Ghost Blog Setup Diary
Preface
This July, by a twist of fate, I bought myself an Alibaba Cloud server. At the time, I was thinking of tinkering with the backend on my own to see whether I could connect the frontend and backend end to end. Then I discovered that the blog I had originally hosted on GitPage was unbearably slow to access. After making up my mind, I migrated the entire blog site originally built with Jekyll to my current Alibaba Cloud host. The old Jekyll blog is still there, still on GitPage. After moving to my own Alibaba Cloud host in China, I used the elegant Ghost to build my new home.
In August this year, the blog went online. Some readers saw that the blog looked pretty good and asked me to write a setup tutorial. Although the blog was online, it had not yet passed the review by the network administration authority, and I still did not know what would happen later. At that time, I was not very familiar with Ghost either, nor did I know how to maintain it over the long term. So I decided to let Ghost run on the server for a month first, and then, after gaining some hands-on experience, write an article documenting the setup process.
Now the blog has been running for more than a month, and I have become comfortable with day-to-day maintenance. That is how this article came about.
Table of Contents
- 1.Introduction to Ghost
- 2.Pre-setup Checklist
- 3.Starting the Setup
- 4.Site-wide Https
- 5.ICP Filing / Public Security Filing
- 6.CDN Optimization for Access Speed
- 7.Later Maintenance
1. Introduction to Ghost

Ghost is an open source blogging platform built on Node.js. It provides an easy-to-use writing interface and experience. Blog content is written in Markdown by default, but native Ghost does not support Markdown tables or LaTeX. If you need them, you must install plugins on the server side.
Ghost aims to replace the bloated Wordpress. It has a clean interface, focuses on writing, and supports online preview and online writing.
Ghost is a dynamic blog system. Its pages are not like those of static blogs such as Hexo and Jekyll, where all pages are generated at compile time. Ghost has both a frontend and a backend. The backend is responsible for writing, publishing posts, system configuration, and so on.
1. Advantages and Disadvantages of Ghost
There is an article that comments on Ghost’s pros and cons as follows:
Advantages Technically, it uses NodeJs, which, for the foreseeable future, undoubtedly has more advantages than PHP. Its concurrency capability far exceeds Wordpress. Although NodeJs has higher long-term maintenance costs, we are only using it to run a blog. In terms of usability, it focuses on writing, comments, great-looking themes, and perfect MarkDown support. It is not as bloated as Wordpress, returning a blog to its most primitive state and conveying the most primitive power of words. In terms of usage, it is convenient and allows editing anytime, anywhere. Compared with static blogs such as Hexo and Jekyll, it is easier to write with, especially when writing on different computers.
Disadvantages It requires a VPS that supports the Node environment. Free options generally rarely support this, so at this point you have to pay. The backend is rudimentary, and many features are not yet complete, but there are no major issues with the writing part.
Regarding the disadvantages, I will add one more point: Ghost does not have as rich a plugin ecosystem as Hexo.
2. Highlights of Ghost:
- Uses Mysql as the database, which is common and easy to get started with. Other databases such as Sqlite can also be used here.
- Uses Nginx as a reverse proxy to configure multiple Ghost blogs, while also increasing the site’s load capacity.
- Provides a very simplified Ubuntu installation method for Node.js, with no need to compile and package manually.
- Installs a system service so Ghost restarts on boot, eliminating future manual operations.
- Uses Font Awesome for social buttons; custom icons can also be used.
- highlight.js as the theme’s code highlighting engine
- Integrates the Disqus comment system to build your own Discuss circle
- Shares excellent free overseas Ghost themes
- Integrates Baidu Analytics and Baidu Share
2. Pre-setup Checklist
- A usable domain name
- A server (I bought Alibaba Cloud ECS, and the server OS is CentOS 7.0 64-bit)
- Node v0.10.40 (the officially recommended version. Note: if you install the Chinese version of Ghost, you can only install this version of Node. Installing a higher version will not be recognized. When installing other versions of Ghost, you must also make sure the version numbers match)
- Nginx 1.80
- Mysql
- Ghost v0.7.4 full (zh) (Chinese localization, supports Qiniu, UpYun, and Alibaba Cloud OSS storage). The latest Ghost version is currently v0.11.1 (3.8mb zip), while the latest Chinese version only goes up to v0.7.4.
Ghost official site https://ghost.org/
Ghost Chinese official site http://www.ghostchina.com/
Ghost Chinese documentation http://docs.ghostchina.com/zh/
3. Starting the Setup

1. Install Node
Ghost is an open source blogging platform built on Node.js, so we first need to set up the Node environment.

$ wget http://nodejs.org/dist/v0.10.40/node-v0.10.40.tar.gz

$ tar zxvf node-v0.10.40.tar.gz

$ cd node-v0.10.40

$ ./configure

$ make && make install
After the command finishes executing, check whether the environment has been configured successfully.
$ node -v

v0.10.40
Displaying the Node version number indicates that the installation was successful.
Be sure to verify that the Node version matches the Ghost version. If they do not match, you will see the following error:
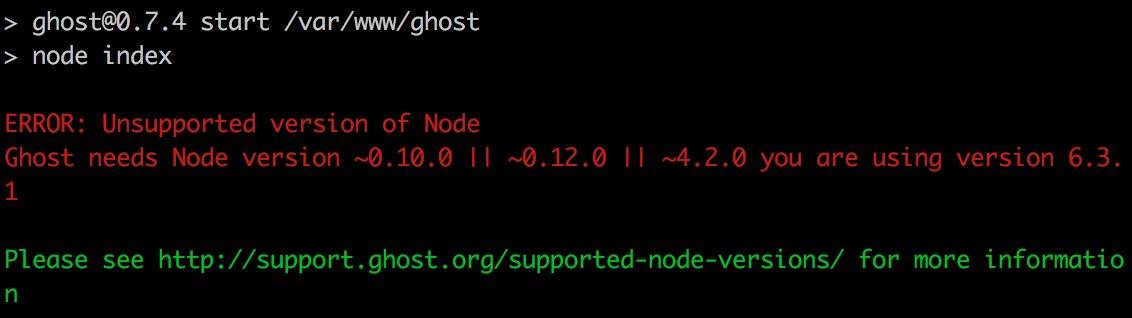
The solution is to change the Node version.
2. Install Nginx
Nginx is a lightweight web server/reverse proxy server and email (IMAP/POP3) proxy server, released under a BSD-like license.
First, create a repository configuration file named nginx.repo in the /etc/yum.repos.d/ directory.
$ vi /etc/yum.repos.d/nginx.repo
Write the following content:
[nginx]
name=nginx repo
baseurl= http://nginx.org/packages/centos/$releasever/$basearch/
gpgcheck=0
enabled=1
Save.
Press i to edit, press Esc to stop editing, use :x to save changes and exit, use :q! to force quit and discard changes, and use :wq to save and exit as well.
After initializing Nginx, continue by running the following command:
$ yum install nginx -y # Install
$ Nginx service nginx start # Start
$ Nginx chkconfig nginx on # Enable Nginx to start on boot
Nginx has now been installed successfully. Enter your server’s IP address in a browser, and you should see the message: “Welcome to Nginx!”
3. Configure Nginx
After installing Nginx, we need to set up a proxy server so that our blog can be accessed using a domain name.
$ cd /etc/nginx/conf.d
Create a configuration file named ghost.conf in this directory.
$ vi /etc/nginx/conf.d/ghost.conf
Paste the following content:
server {
    listen 443;
    server_name halfrost.com www.halfrost.com; # Write your domain name or IP address here

    ssl on;
    ssl_certificate /etc/letsencrypt/live/halfrost.com/fullchain.pem;
    ssl_certificate_key /etc/letsencrypt/live/halfrost.com/privkey.pem;

    location / {
        proxy_set_header   X-Real-IP $remote_addr;
        proxy_set_header   Host      $http_host;
        proxy_pass         http://127.0.0.1:2368;
    }
}
The three SSL lines in the middle are for configuring site-wide HTTPS later. If you don’t need HTTPS, you don’t need to add those three lines.
Save and exit, then restart nginx:
$ service nginx restart
Nginx is now fully configured.
4. Install MySQL

Ghost uses the sqlite3 database by default, which is sufficient for general use. However, if you have a lot of content, it can slow down the entire system and affect page load speed. If you do not want to use MySQL, you can skip this step.
It seems that MySQL is not included by default in the CentOS 7 yum repositories. To solve this, we first need to download the MySQL repo repository.
- Download the MySQL repo repository
$ wget http://repo.mysql.com/mysql-community-release-el7-5.noarch.rpm
- Install the mysql-community-release-el7-5.noarch.rpm package
$ sudo rpm -ivh mysql-community-release-el7-5.noarch.rpm
After installing this package, you will get two MySQL yum repo sources:
/etc/yum.repos.d/mysql-community.repo,
/etc/yum.repos.d/mysql-community-source.repo.
- Install MySQL
$ sudo yum install mysql-server
Just follow the steps to install it. However, after the installation is complete, there is no password, so you need to reset the password.
4.Reset the password
Before resetting the password, you first need to log in.
$ mysql -u root
When logging in, you may encounter an error like this: ERROR 2002 (HY000): Can‘t connect to local MySQL server through socket ‘/var/lib/mysql/mysql.sock‘ (2). The cause is an access-permission issue with /var/lib/mysql. The following command changes the owner of /var/lib/mysql to the current user:
$ sudo chown -R openscanner:openscanner /var/lib/mysql
Then restart the service:
$ service mysqld restart
$ chkconfig mysqld on # Set Mysql to start on boot
5. Configure MySQL
Enter mysql_secure_installation to configure MySQL:
$ Set root password? [Y/n] # Set root password
$ anonymous users? [Y/n] # Remove anonymous users
$ Disallow root login remotely? [Y/n] # Disallow remote root login
$ Remove test database and access to it? [Y/n] # Remove the default test database
$ Reload privilege tables now? [Y/n] # Reload privilege tables for changes to take effect
To prevent Chinese text stored in the database from becoming garbled, we also need to configure the MySQL character encoding:
$ vi /etc/my.cnf
Paste the following content:
[client]
default-character-set=utf8
[mysql]
default-character-set=utf8
[mysqld]
character-set-server=utf8
collation-server=utf8_general_ci
Save and exit, then restart MySQL:
$ service mysqld restart
Finally, we need to create a new database to store the blog data:
$ mysql -u root -p # Enter the configured password
$ create database ghost; # Create the ghost database
$ grant all privileges on ghost.* to 'ghost'@'%' identified by '123456'; # Create a new user ghost with password 123456; set this yourself
$ flush privileges # Reload privilege table data into memory; permissions take effect without restarting mysql
The MySQL database has now been installed and configured.
6. Install Ghost

First, download Ghost:
$ cd /var/www
$ wget http://dl.ghostchina.com/Ghost-0.7.4-zh-full.zip
$ unzip Ghost-0.7.4-zh-full.zip -d ghost
$ cd ghost
Next, modify the default configuration:
$ cp config.example.js config.js
$ vi config.js
Ghost supports multiple operating modes, such as production mode, development mode, and testing mode. Here, we need to find the production mode in the configuration file:
config = {
    // ### Production
    // When running Ghost in the wild, use the production environment.
    // Configure your URL and mail settings here
    production: {
        url: 'http://www.halfrost.com',
        mail: {},
        database: {
            client: 'mysql',
            connection: {
               // filename: path.join(__dirname, '/content/data/ghost.db')
               host:'127.0.0.1',
               user:'ghost',  #database connection user
               password:'iloveghost', #password created earlier for the database
               database:'ghost',  #name of the database created earlier
               charset:'utf8'
            },
            debug: false
        },
 // Configure the MySQL database
        /*database: {
            client: 'mysql',
            connection: {
                host     : 'host',
                user     : 'user',
                password : 'password',
                database : 'database',
                charset  : 'utf8'
            },
            debug: false
        },*/

        server: {
            host: '127.0.0.1',
            port: '2368'
        },

       //Storage.Now,we can support `qiniu`,`upyun`, `aliyun oss`, `aliyun ace-storage` and `local-file-store`
       // storage: {
           // provider: 'local-file-store'
       // }

        // or
        // Reference documentation: http://www.ghostchina.com/qiniu-cdn-for-ghost/
        storage: {
            provider: 'qiniu',
            bucketname: 'Mybucketname',
            ACCESS_KEY: 'TZmRdasfdasfps5NDJEK4d*JsdgYGFFgWOsy5k_k0Zu',
            SECRET_KEY: '7IsGSDDf1ef4HEsafsagLPDfs3gCkr$FERFe6ivfT',
            root: '/Blog/',
            prefix: 'https://odd2zeri30g.qnssl.com/'
        }
The storage item configures cloud storage. It supports Qiniu, UpYun, Alibaba Cloud, and others. For the specific settings, refer to the corresponding documentation. If you only need local storage, change it to the following:
   storage: {
     provider: 'local-file-store'
}
Save and exit; Ghost is now configured.
Run
$ npm start --production
Launch your browser and enter the domain name or IP address you configured earlier. You should now see the Ghost blog you set up. (Press Ctrl+C to stop development mode.)
7. Deploy Ghost
As mentioned earlier, Ghost was started with the npm start –production command. This is a good option for starting and testing in development mode, but launching it from the command line has one drawback: when you close the terminal window or disconnect from SSH, Ghost stops running. To prevent Ghost from stopping, we need to address this issue.
Here are several possible solutions:
PM2(https://github.com/Unitech/pm2)
Forever (https://npmjs.org/package/forever)
Supervisor (http://supervisord.org/)
Here we use PM2 to keep Ghost running:
$ cd /var/www/ghost
$ npm install pm2 -g # Install PM2
$ NODE_ENV=production
$ pm2 start index.js --name "ghost"
$ pm2 startup centos pm2 save
If npm fails to install dependencies, switch the registry to the Taobao mirror and try again.
$ npm install -g cnpm --registry= https://registry.npm.taobao.org
$ cnpm install pm2 -g
$ NODE_ENV=production pm2 start index.js --name "ghost"
$ pm2 startup centos
$ pm2 save
With that, our Ghost blog can keep running. You can use the following commands to manage the Ghost blog:
pm2 start/stop/restart ghost
8. Initialize Ghost
Now that all the preparation is complete, open your browser and enter your domain address/ghost/ in the address bar. Initialize your username and password, and you can begin your enjoyable Ghost journey.
IV. Site-wide HTTPS
Let’s Encrypt is a public, free SSL project based overseas and hosted by the Linux Foundation. It has an impressive background: it was initiated by organizations including Mozilla, Cisco, Akamai, IdenTrust, and the EFF. Its goal is to automatically issue and manage free certificates for websites, helping accelerate the internet’s transition from HTTP to HTTPS. Major companies such as Facebook have also started joining as sponsors.
Let’s Encrypt has already obtained a cross-signature from IdenTrust, which means its certificates can now be trusted by mainstream browsers such as Mozilla, Google, Microsoft, and Apple. You only need to configure the cross-signed certificate in the web server’s certificate chain; the browser client will automatically handle everything else. Let’s Encrypt is easy to install, and there is a very high possibility that it will see large-scale adoption in the future.
Let’s Encrypt official resources:
- Official website: https://letsencrypt.org/
- Project homepage: https://github.com/letsencrypt/letsencrypt
1. Preparations for Installing the Free Let’s Encrypt SSL Certificate
Dependencies required by the Let’s Encrypt installation script: (You can skip this section, because the official Let’s Encrypt script automatically detects and installs them.)
# Debian
$ apt-get install git

# CentOS 6
$ yum install centos-release-SCL && yum update
$ yum install python27
$ scl enable python27 bash
$ yum install python27-python-devel python27-python-setuptools python27-python-tools python27-python-virtualenv
$ yum install augeas-libs dialog gcc libffi-devel openssl-devel python-devel
$ yum install python-argparse

# CentOS 7
$ yum install -y git python27
$ yum install -y augeas-libs dialog gcc libffi-devel openssl-devel python-devel
$ yum install python-argparse
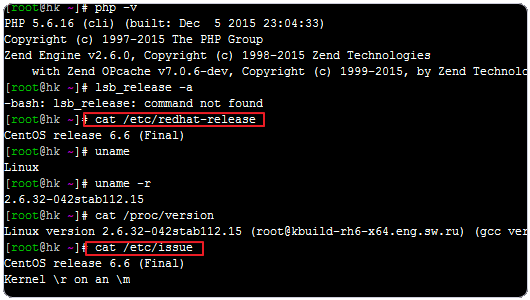
To check which operating system version is installed on your VPS host, you can run: cat /etc/issue or cat /etc/redhat-release.
2. Obtain a Free Let’s Encrypt SSL Certificate
Obtaining a free Let’s Encrypt SSL certificate is very simple. You only need to run the following command, and the SSL certificate and private key will be generated automatically on your VPS.
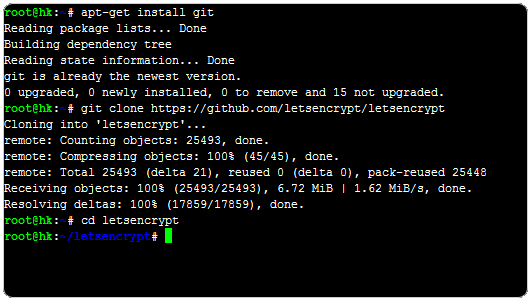
$ git clone https://github.com/letsencrypt/letsencrypt
$ cd letsencrypt
$ ./letsencrypt-auto
After testing, the code above works best on Debian systems: it can automatically detect and install the required software. If you are using another Linux distribution, Red Hat or CentOS 6 may require configuring the EPEL repository, and Python must be version 2.7 or later.
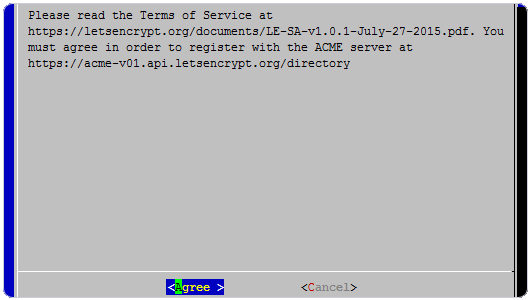
After running the command above, a dialog will pop up asking you to accept the user agreement.
Next, you will be prompted to shut down Nginx or Apache.
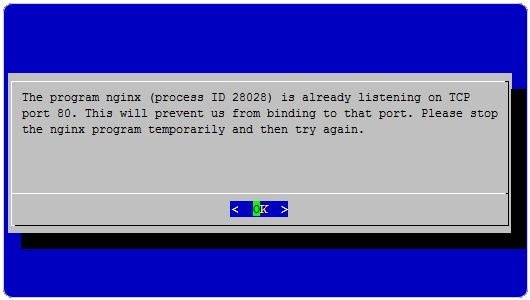
Let’s Encrypt needs to use ports 80 and 443, so you need to stop any applications occupying those two ports.
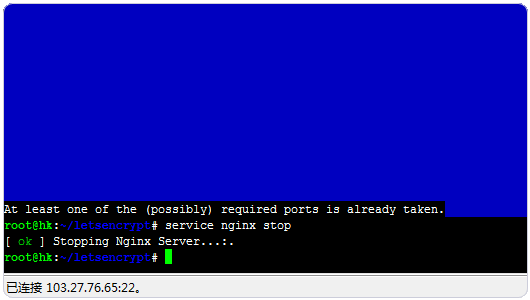
When you see the following content, it means you have successfully obtained your free Let’s Encrypt SSL certificate.
IMPORTANT NOTES:
 - Congratulations! Your certificate and chain have been saved at
   /etc/letsencrypt/live/freehao123.org/fullchain.pem. Your cert will
   expire on 2016-03-09. To obtain a new version of the certificate in
   the future, simply run Let's Encrypt again.
 - If like Let's Encrypt, please consider supporting our work by:

   Donating to ISRG / Let's Encrypt:   https://letsencrypt.org/donate
   Donating to EFF:                    https://eff.org/donate-le
See the figure below:
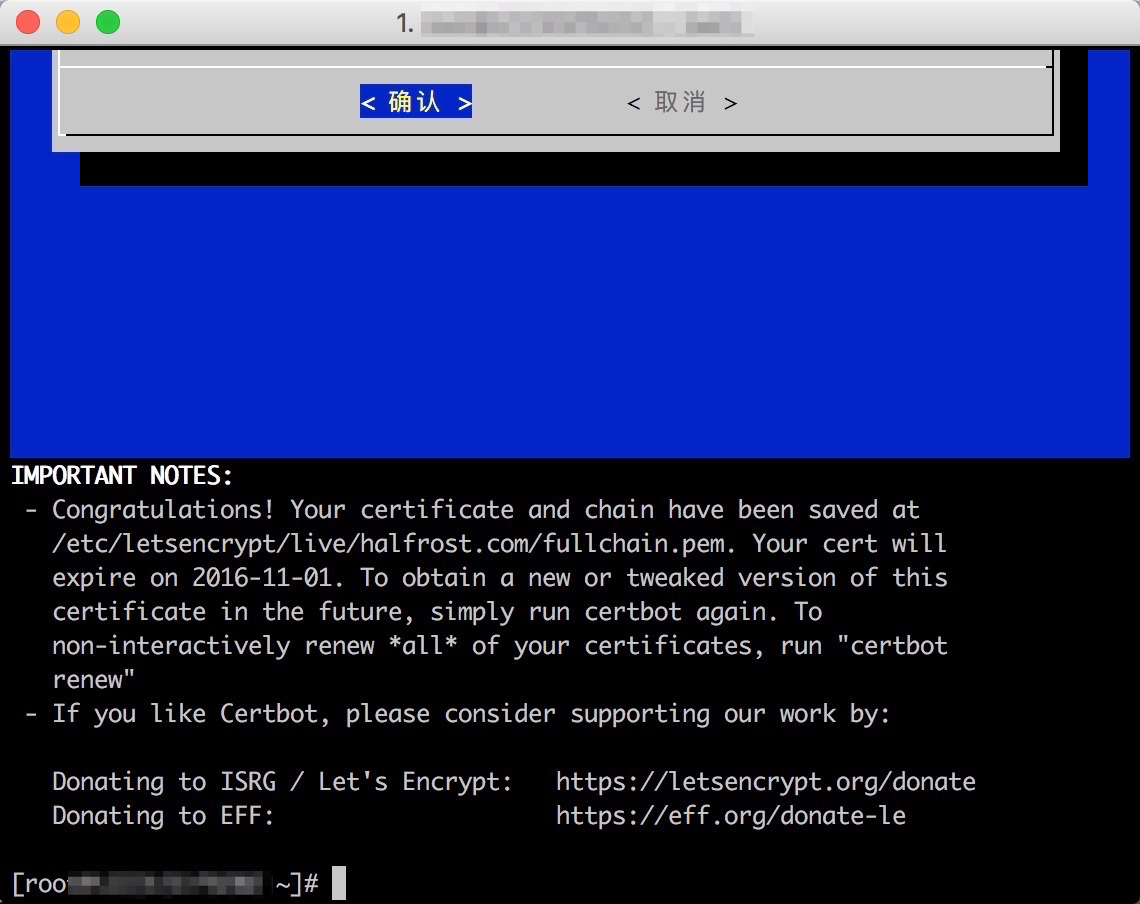
At this point, the certificate application process is complete.
3. Configure the SSL Certificate
Next, configure the local Nginx instance by adding the SSL configuration to the Nginx config file. This configuration was already covered earlier when configuring Nginx.
4. Automatically Obtain SSL Certificates with a Script
Free SSL certificates expire every 3 months. Manually applying for a certificate every time is somewhat cumbersome, and if you forget, the SSL certificate will expire.
Use a script to quickly obtain a Let’s Encrypt SSL certificate. It calls acme_tiny.py to verify, obtain, and renew the certificate, with no additional dependencies required.
Project homepage: https://github.com/xdtianyu/scripts/tree/master/lets-encrypt
Download the project locally
$ wget https://raw.githubusercontent.com/xdtianyu/scripts/master/lets-encrypt/letsencrypt.conf
$ wget https://raw.githubusercontent.com/xdtianyu/scripts/master/lets-encrypt/letsencrypt.sh
$ chmod +x letsencrypt.sh
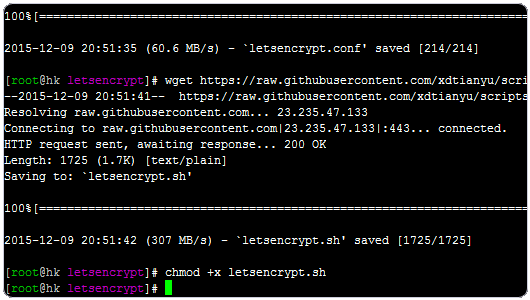
Configuration file. You only need to change DOMAIN_KEY DOMAIN_DIR DOMAINS to your own values.
ACCOUNT_KEY="letsencrypt-account.key"
DOMAIN_KEY="freehao123.com.key"
DOMAIN_DIR="/var/www/freehao123.com"
DOMAINS="DNS:freehao123.com,DNS:www.freehao123.com"
The required key files are generated automatically during execution. Run:
./letsencrypt.sh letsencrypt.conf
Note that the domain must already be bound to the /var/www/www.freehao123.com directory; that is, /var/www/freehao123.com must be accessible via http://freehao123.com and https://www.freehao123.com for domain validation.
Normally, following the steps above should successfully obtain a Let’s Encrypt SSL certificate. However, testing shows that the biggest issue is “DNS query timed out”. Due to DNS resolution issues for the domain, domain validation fails, and the SSL certificate cannot be obtained successfully.
Traceback (most recent call last):
  File "/tmp/acme_tiny.py", line 198, in
    main(sys.argv[1:])
  File "/tmp/acme_tiny.py", line 194, in main
    signed_crt = get_crt(args.account_key, args.csr, args.acme_dir, log=LOGGER, CA=args.ca)
  File "/tmp/acme_tiny.py", line 149, in get_crt
    domain, challenge_status))
ValueError: hkh.freehao123.info challenge did not pass: {u'status': u'invalid', u'validationRecord': [{u'url': u'http://hkh.freehao123.info/.well-known/acme-challenge/sikHlqvbN4MrWkScgr1oZ9RX-lR1l__Z7FWVLhlYR0Q', u'hostname': u'hkh.freehao123.info', u'addressUsed': u'', u'port': u'80', u'addressesResolved': None}],  u'https://acme-v01.api.letsencrypt.org/acme/challenge/5m1su6O5MmJYlGzCJnEUAnvhweAJwECBhEcvsQi5B2Q/1408863', u'token': u'sikHlqvbN4MrWkScgr1oZ9RX-lR1l__Z7FWVLhlYR0Q', u'error': {u'type': u'urn:acme:error:connection', u'detail': u'DNS query timed out'}, u'type': u'http-01'}
If you run into this situation, turn on a VPN and try again.
Once you’ve configured the script to automatically obtain SSL certificates, you no longer need to worry about your SSL certificate expiring.
At this point, accessing port 443 of your blog site will use HTTPS.

V. MIIT ICP Filing / Public Security Filing
By this step, the website is effectively “online” and can be accessed successfully. However, accessing port 80 normally will show the following page.
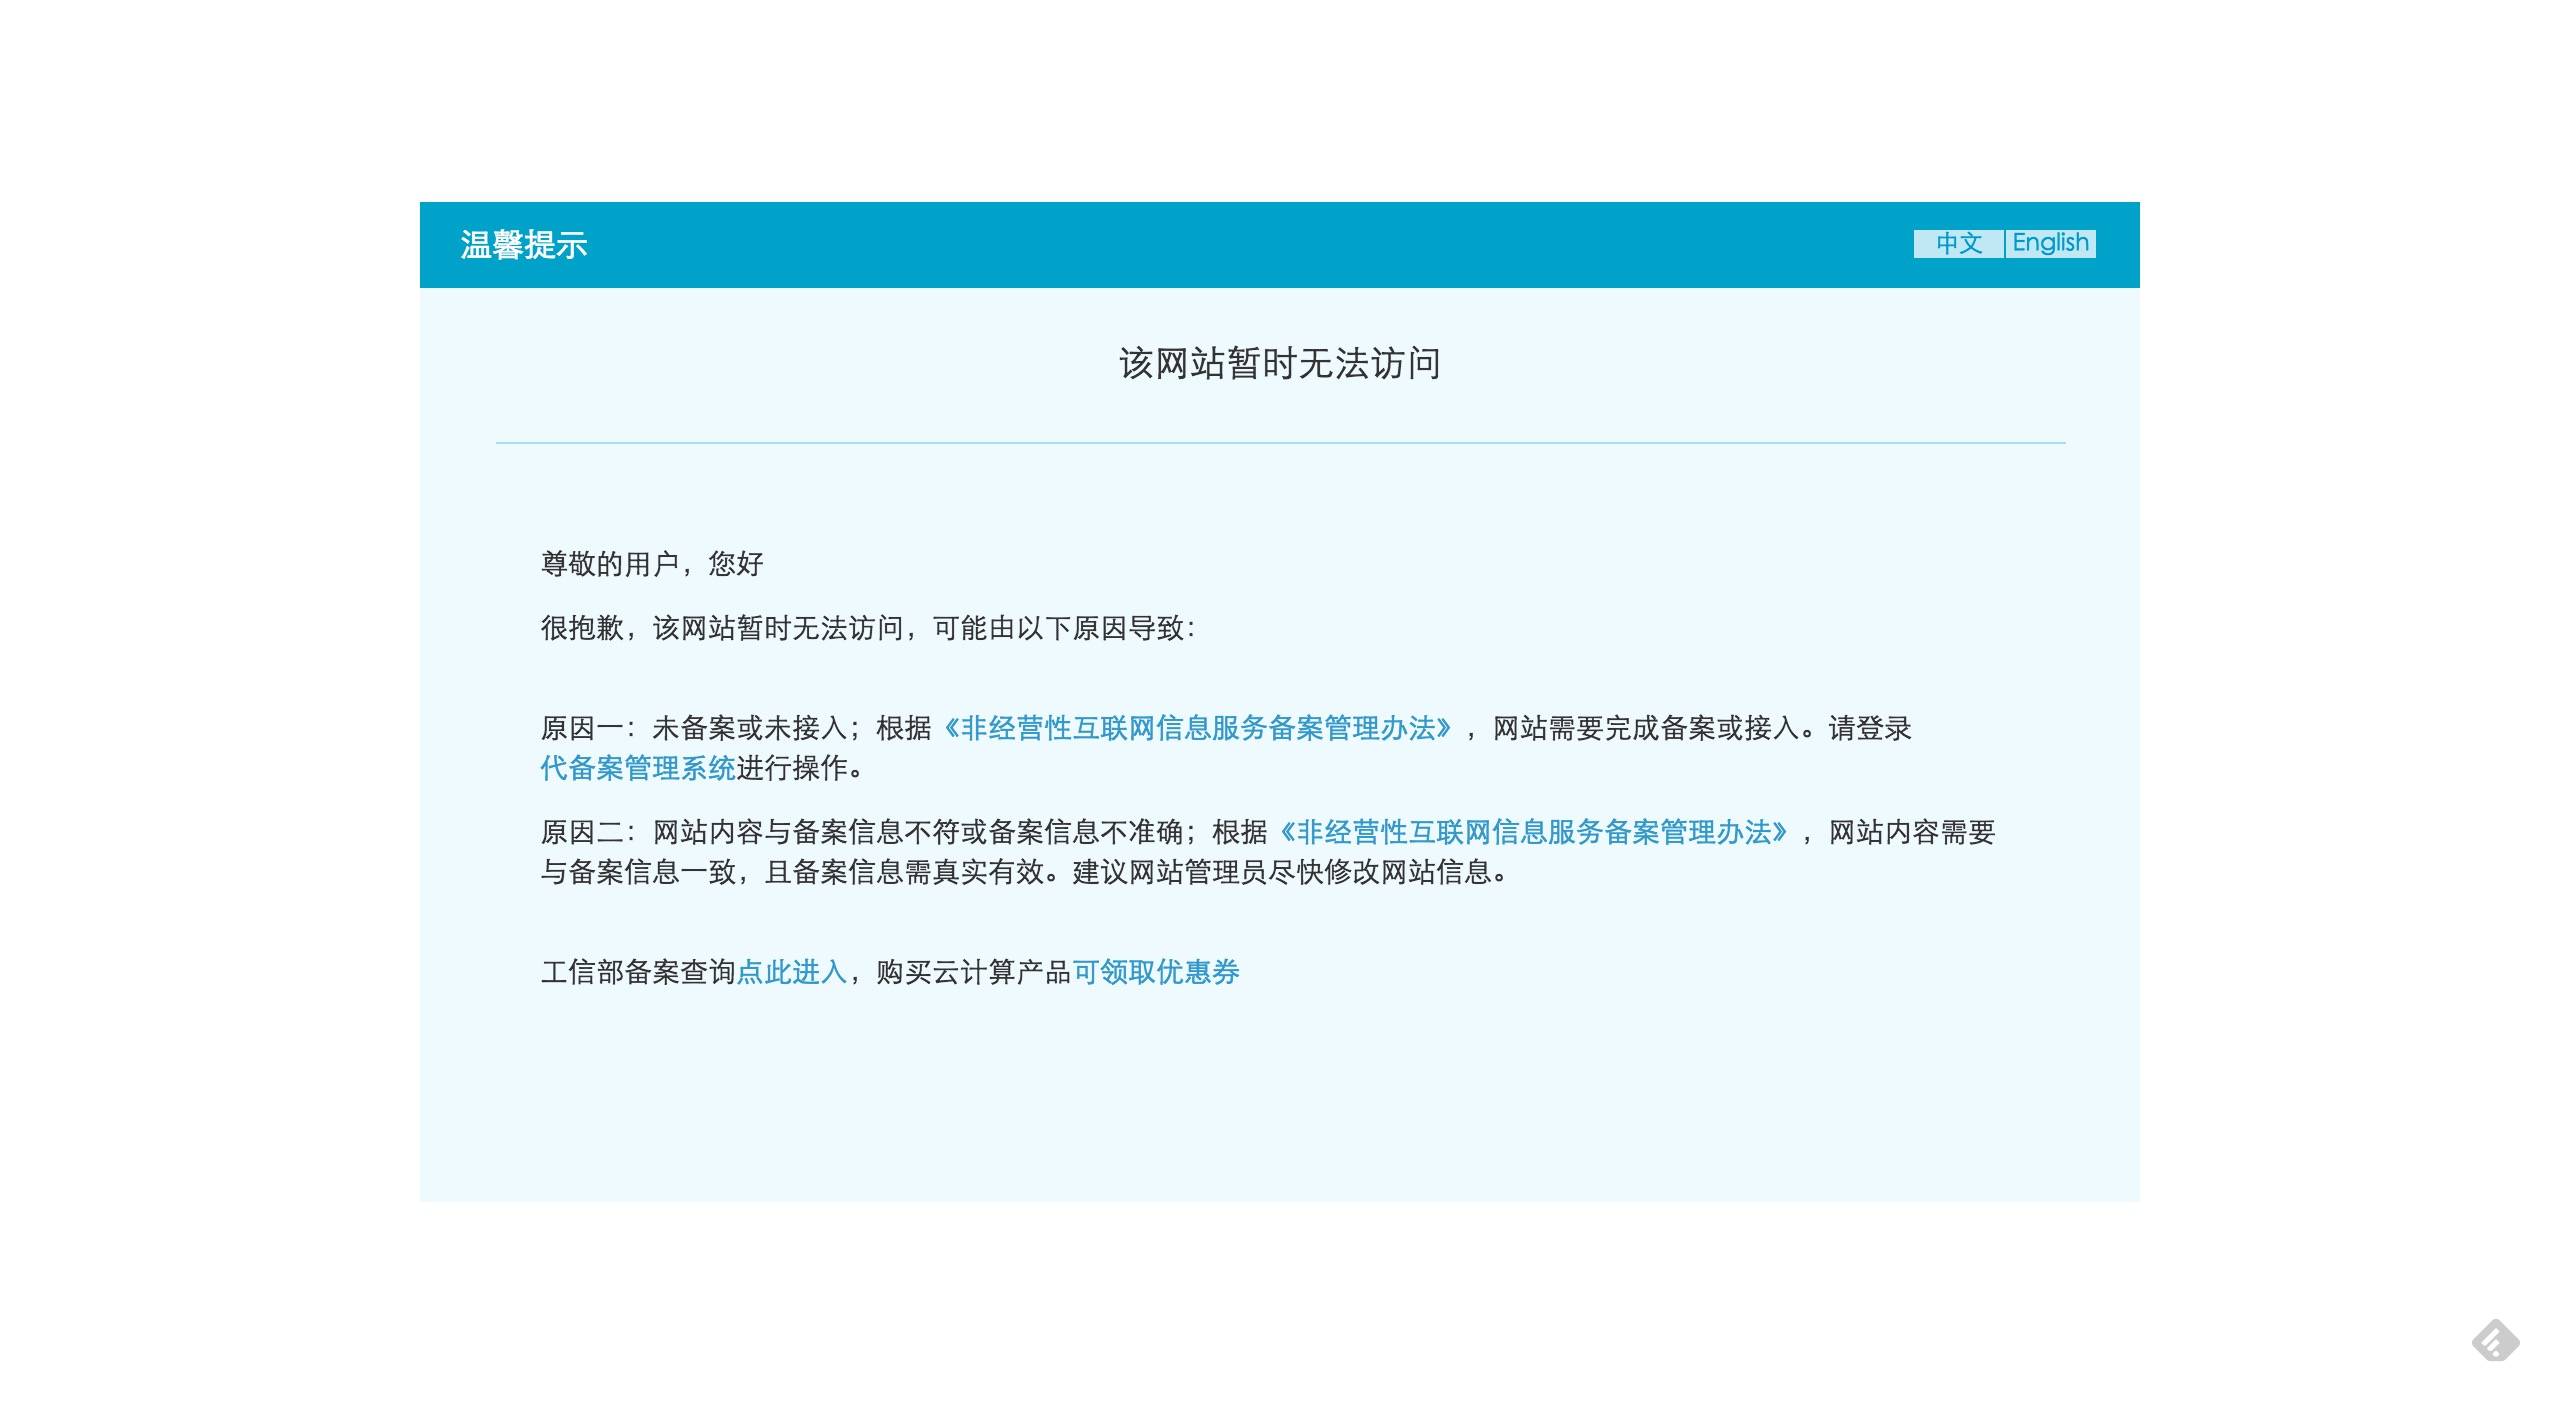
But if HTTPS has been configured, accessing port 443 normally works without any issue.
I suspect you could forward all requests to port 80 over to port 443, which would let you avoid requests to port 80 altogether. However, I haven’t tried doing that.
To make the blog we worked so hard to build accessible in the normal way, we need to apply for an ICP filing with the relevant authority. I bought my server on Alibaba Cloud, and there is a direct link for applying for the filing, which is very convenient.

During the application process, you first need to fill in your personal information, and the application location should be the location on your ID card. Some regions have special rules, such as Shanghai and Beijing: if you have a residence permit, you can use the location of the residence permit. You also need to upload a photo of yourself holding your ID card, as well as scans of several documents that require your handwritten signature.
After submitting these materials, they will mail you a backdrop cloth. You need to take a photo with it and upload it again for the filing.

After that, it’s just waiting. In general, from submission to approval, the ICP filing takes about 10 business days. If it feels slow, you can also call to ask about the review progress.
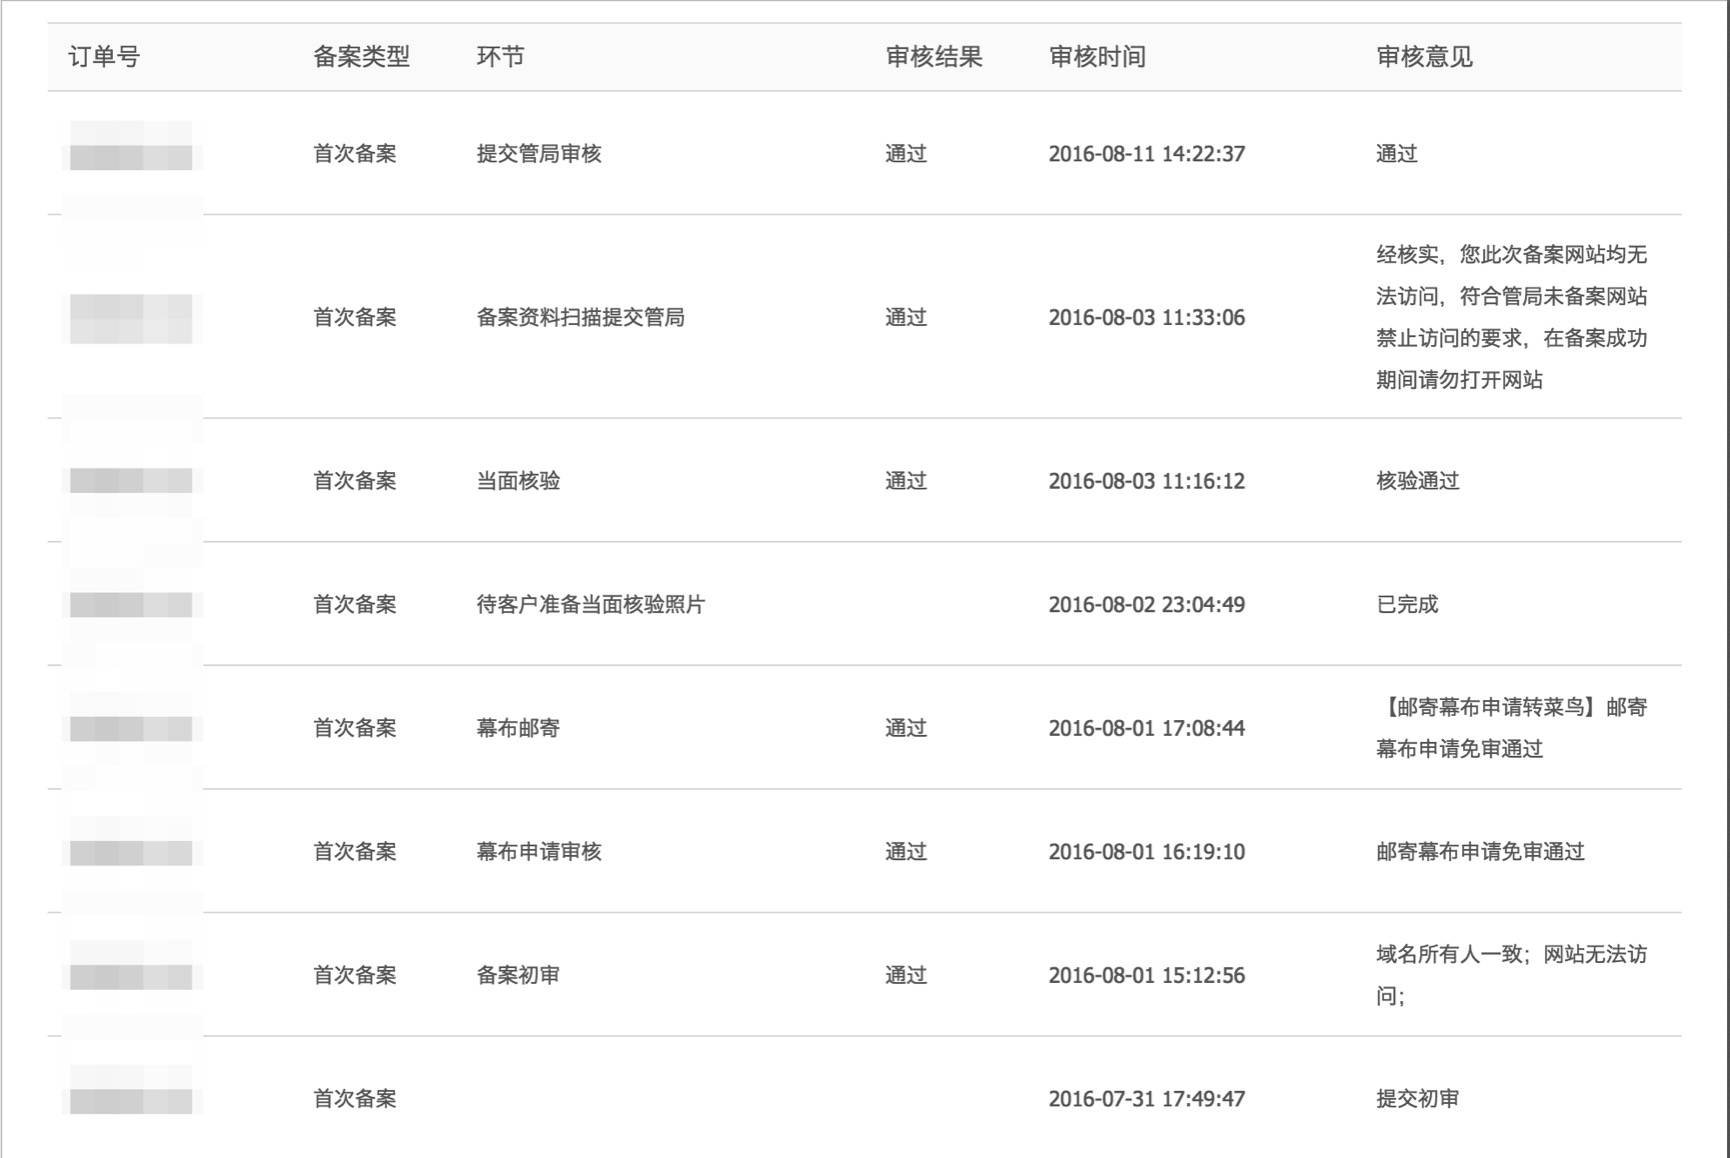
After the ICP filing is approved, you will receive an email, which also mentions a Public Security filing. I noticed that many tutorials don’t mention the Public Security filing. Maybe it’s a newer requirement. Click the link in the email and continue with the Public Security filing.
The Public Security filing also requires you to fill in personal information. Once everything is submitted, that’s it. It is less troublesome than the ICP filing; you just need to wait for approval.

Once both filings are approved, the filing process can be considered complete, and the website can officially go online. Before going online, remember to add the filing number to the website footer. The approval email contains detailed instructions for this. Just follow everything mentioned in the email, and you’ll be all set.
VI. Using a CDN to Improve Access Speed
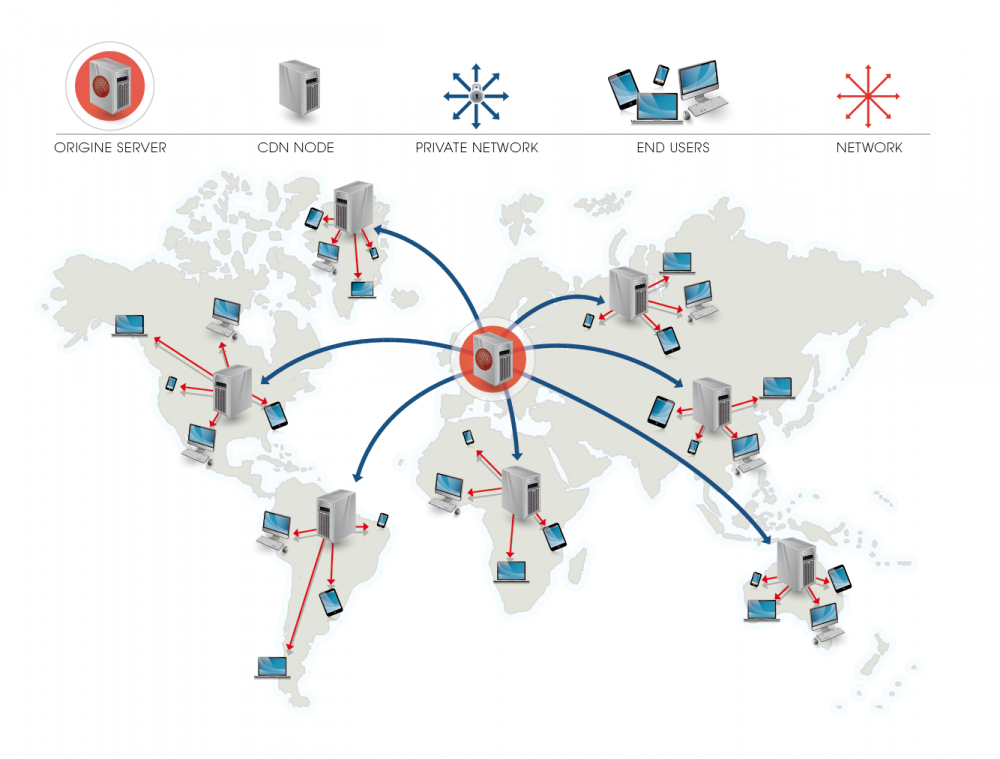
After the website goes online, access speed will be a bit faster than when the server was on an overseas GitPage. However, if the website has many images, or the images in the articles are high quality and numerous, access speed will still decrease accordingly.
At this point, we need to add a CDN for acceleration.
Here I used Qiniu’s CDN cloud service. Apply for one, create your own bucket, and then upload all resources that need to be cached by the CDN. Images, videos, and music can all be placed there. The blog references the external links for these resources on Qiniu.
One thing to note here is that you should remember to configure hotlink protection and traffic alerts in Qiniu. Otherwise, others may quietly steal a lot of traffic from you, and by the end of the month we’ll have wasted a lot of unnecessary money.
Since HTTPS was previously enabled across the entire site, the images on Qiniu also need to use HTTPS. HTTPS traffic has a much smaller free quota than HTTP traffic.
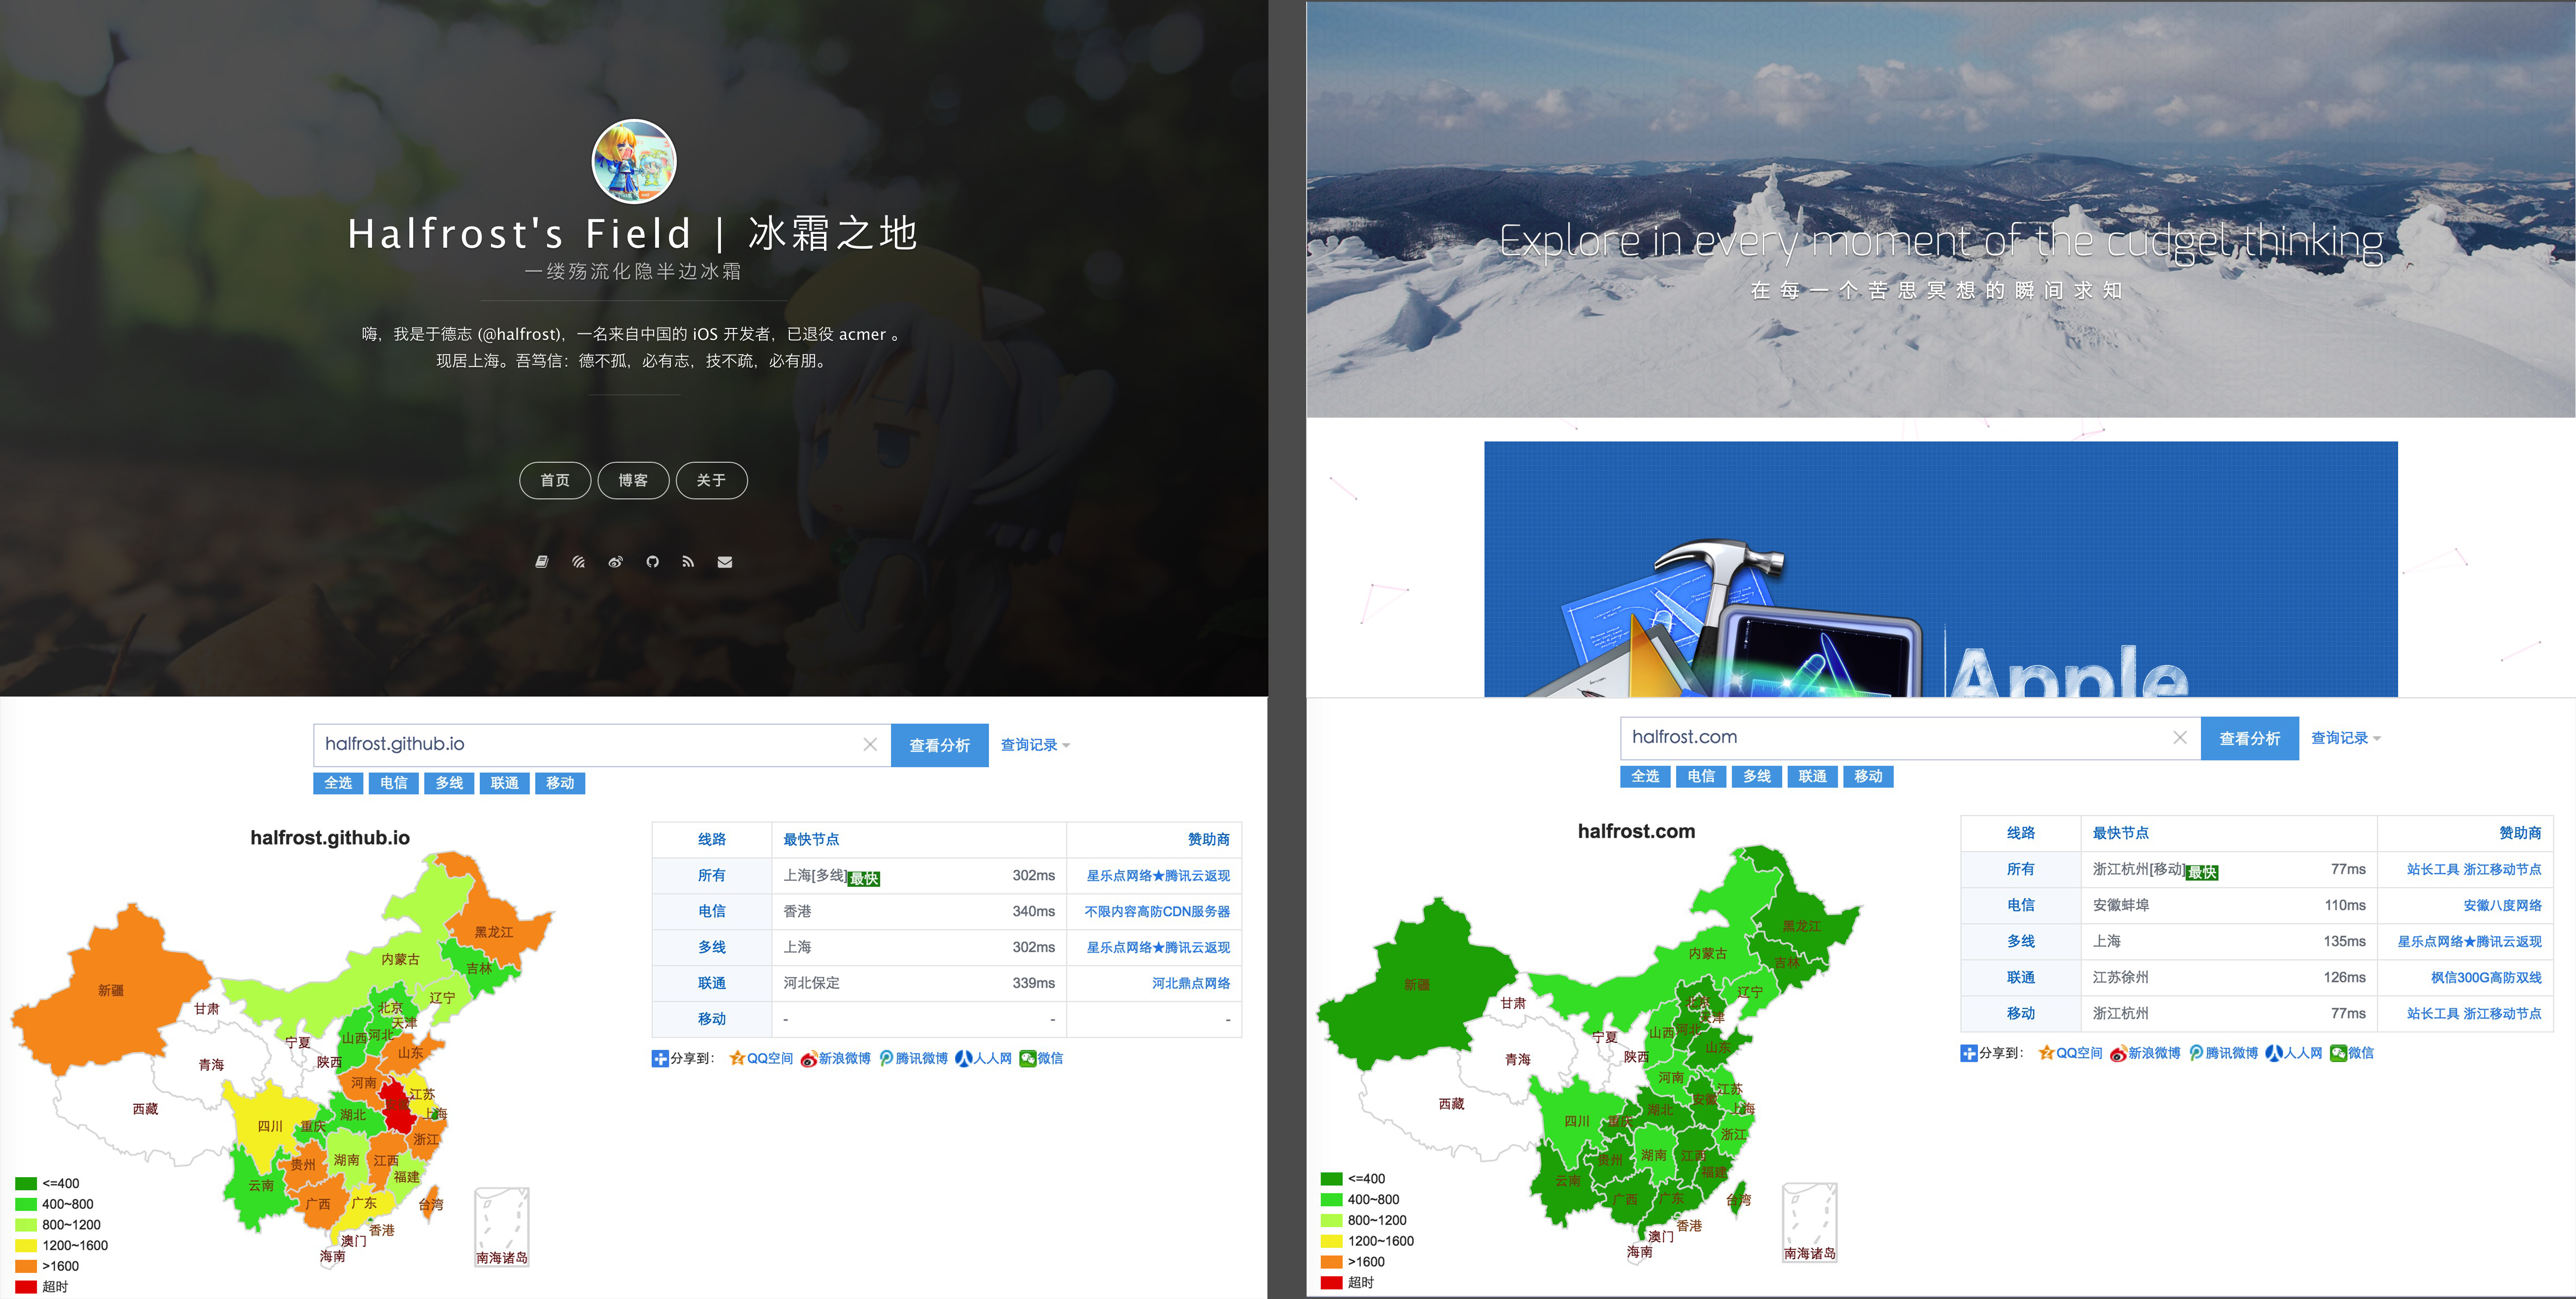
After configuring everything, I ran a benchmark and compared the access speed against the blog previously hosted on GitPage.
VII. Ongoing Maintenance
Maintenance here mainly refers to updating and publishing the blog, as well as changing the Ghost configuration.
Put all Ghost configuration in a repository on your own GitHub, and add your server’s SSH Key to GitHub’s keys.
Run git clone locally. Each time you make changes locally and finish debugging, push a copy to the remote first. Then log in to the server, pull down the latest code, and apply it. After pulling, you only need to run
$ service nginx restart
$ pm2 restart ghost
Just run these two lines.
You may also run into some HTTPS-related issues from time to time; when that happens, Google the error code.
Here is an HTTPS incompatibility issue with Baidu Share.
Here is a modified version of the sharing code on GitHub: https://github.com/hrwhisper/baiduShare
After extracting static, place it under the site root.
Then, in the corresponding Baidu Share code, replace http://bdimg.share.baidu.com/ with /.
.src='http://bdimg.share.baidu.com/static/api/js/share.js?v=89860593.js?cdnversion='+~(-new Date()/36e5)];</script>
Change to
.src='/static/api/js/share.js?v=89860593.js?cdnversion='+~(-new Date()/36e5)];</script>
That’s all it takes. If you want to know exactly how it’s implemented, take a look at the author’s article
Another way to work around Baidu Share not supporting HTTPS is to use Qiniu’s mirror storage.
I looked at the code obtained from Baidu Share, and it mainly loads this: http://bdimg.share.baidu.com/static/api/js/share.js. I tried accessing it and confirmed that it does not support HTTPS. By using Qiniu’s mirror storage, or by setting up an Nginx reverse proxy on your own server, you can make it support HTTPS.
For the specific implementation, see this article
Finally

After painstakingly making our way through all these pitfalls and building this blog ourselves, we will definitely cherish it. This is our programmers’ own home; let’s decorate our new home with one thoughtful blog post after another.
Reference links:
Installing Ghost & Getting Started
Classic Tutorial: “Building a Ghost Blog”
How to Build a Blog on the Ghost Platform
How To Create a Blog with Ghost and Nginx on Ubuntu 14.04
Free SSL Certificate Let’s Encrypt Installation and Usage Tutorial: Configuring SSL for Apache and Nginx
A Step-by-Step Guide to Building Your Own Ghost Blog
GitHub Repo: Halfrost-Field
Follow: halfrost · GitHub
