Gracefully Handling “Callback Hell” in iOS (Part 1) — Using PromiseKit
####Preface I recently read a few articles about encapsulating asynchronous operations in Swift, such as RxSwift, RAC, and so on. Since I’ve written my own share of callback hell, this really resonated with me, so I dug out Promise to study it. I’d like to share some of what I’ve learned; if there are any mistakes, I welcome your feedback.
####Table of Contents
- 1.Introduction to PromiseKit
- 2.Installing and Using PromiseKit
- 3.How to Use PromiseKit’s Main Functions
- 4.Analysis of PromiseKit’s Source Code
- 5.Using PromiseKit to Elegantly Handle Callback Hell
####1.Introduction to PromiseKit PromiseKit is a framework for handling asynchronous programming on iOS/OS X. It was developed by Max Howell, a highly respected developer who created Homebrew on Mac and who, according to legend, did not receive a Google offer because he “couldn’t” invert a binary tree.
In PromiseKit, the most important concept is the concept of a Promise. A Promise is the future value of an asynchronous operation.
A promise represents the future value of an asynchronous task. A promise is an object that wraps an asynchronous task
A Promise is also an object that wraps an asynchronous operation. With PromiseKit, you can write clean, orderly code with simple logic, passing Promises as parameters and modularly moving from one asynchronous task to the next. Code written with PromiseKit looks like this:
[self login].then(^{

     // our login method wrapped an async task in a promise
     return [API fetchData];

}).then(^(NSArray *fetchedData){

     // our API class wraps our API and returns promises
     // fetchedData returned a promise that resolves with an array of data
     self.datasource = fetchedData;
     [self.tableView reloadData];

}).catch(^(NSError *error){

     // any errors in any of the above promises land here
     [[[UIAlertView alloc] init…] show];

});
PromiseKit is used to address asynchronous operations and awkward error-handling callbacks with clean, concise code. It turns asynchronous operations into chained calls with a simple approach to error handling.
PromiseKit currently includes two classes: Promise<T> (Swift) and AnyPromise (Objective-C). The difference between them comes from the characteristics of the two languages: Promise<T> is precisely and strictly typed, while AnyPromise is loosely defined, flexible, and dynamic.
In asynchronous programming, one of the most typical examples is callback hell. If it is not handled elegantly, you end up with something like the image below:
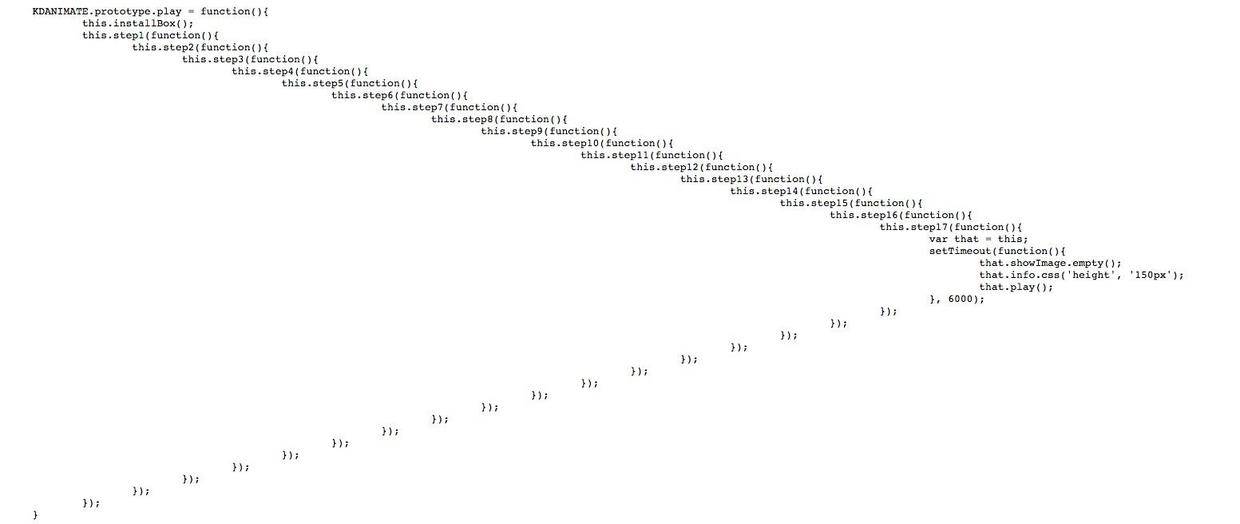
The code shown above actually existed. A friend told me about it; it came from Kuaidi’s code. Of course, they have almost certainly changed it by now. Although this kind of code looks like this:
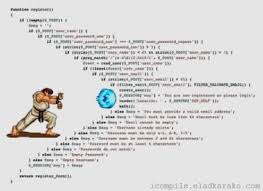
Even though the code does not look elegant, the functionality is correct. But basically everyone has written this kind of code before, and I have written plenty of it myself. Today, let’s get hands-on and use PromiseKit to handle callback hell elegantly.
####II. Installing and Using PromiseKit
- Download and install CocoaPods
Installation steps outside the Great Firewall:
Enter the following in Terminal
sudo gem install cocoapods && pod setup
Most of you behind the Great Firewall should follow these steps:
//Remove the original Ruby default source outside the firewall
$ gem sources --remove https://rubygems.org/
//Add the existing Taobao source inside the firewall
$ gem sources -a https://ruby.taobao.org/
//Verify the new source was replaced successfully
$ gem sources -l
//Download and install cocoapods
// Before OS 10.11
$ sudo gem install cocoapods
//mark:After upgrading OS to OS X EL Capitan, the command should be:
$ sudo gem install -n /usr/local/bin cocoapods
//Set up cocoapods
$ pod setup
- Locate the project path, go into the project directory, and run:
$ touch Podfile && open -e Podfile
TextEdit will open at this point. Then enter the following command:
platform:ios, ‘7.0’

target 'PromisekitDemo' do  //Required by the latest CocoaPods, so this line must be added
    pod 'PromiseKit'
end
Tips: Thanks to qinfensky for the reminder; in fact, you can also use the init command here. A Podfile is a special CocoaPods file in which you can list the open-source libraries you want to use in your project. To create a Podfile, there are two options: 1.Create an empty text file in the project directory and name it Podfile 2.Or run “$ pod init” in the project directory to create the file (enter cd folder path in the terminal, then enter pod init) Both methods can create a Podfile; use whichever one you prefer
3.Install PromiseKit
$ pod install
After installation is complete, exit the terminal and open the newly generated .xcworkspace file.
####III. How to Use PromiseKit’s Main Functions
- then We often write code like this:
- (void)showUndoRedoAlert:(UndoRedoState *)state
{
     UIAlertView *alert = [[UIAlertView alloc] initWithTitle:……];
     alert.delegate = self;
     self.state = state;
     [alert show];
}

- (void)alertView:(UIAlertView *)alertView clickedButtonAtIndex:(NSInteger)buttonIndex
{
    if (buttonIndex == 1) {
        [self.state do];
    }

}
The approach above isn’t wrong; it just stores a property in the calling function, and that property is then used when calling alertView. In fact, there’s no need to store this intermediate property. Next, we’ll use then to eliminate this intermediate variable.
- (void)showUndoRedoAlert:(UndoRedoState *)state
 {
    UIAlertView *alert = [[UIAlertView alloc] initWithTitle:……];
    [alert promise].then(^(NSNumber *dismissedButtonIndex){
        [state do];
    });
}
At this point, someone might ask: why can we call the [alert promise] method? What is the then following the dot syntax? Let me explain. The reason becomes obvious once you open the Promise source code. In the Promise source code
@interface UIAlertView (PromiseKit)

/**
 Displays the alert view.

 @return A promise the fulfills with two parameters:
 1) The index of the button that was tapped to dismiss the alert.
 2) This alert view.
*/
- (PMKPromise *)promise;
The corresponding implementation is as follows:
- (PMKPromise *)promise {
    PMKAlertViewDelegater *d = [PMKAlertViewDelegater new];
    PMKRetain(d);
    self.delegate = d;
    [self show];
    return [PMKPromise new:^(id fulfiller, id rejecter){
        d->fulfiller = fulfiller;
    }];
}
Calling [alert promise] still returns a promise object. A promise’s methods include then, which is why the chained calls above work that way. The fulfiller in the code above will be discussed in the source code analysis section.
In PromiseKit, several class extensions are actually created for you by default, as shown below:
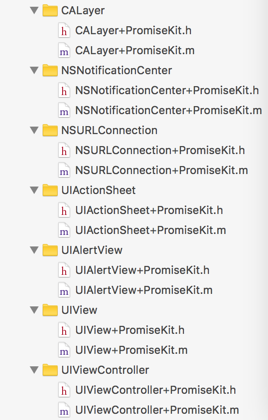
These extension classes encapsulate some commonly used methods for creating promises. By calling these methods, you can happily keep chaining .then all the way through!
2.dispatch_promise In our projects, we often download images asynchronously.
typedefvoid(^onImageReady) (UIImage* image);

+ (void)getImageWithURL:(NSURL *)url onCallback:(onImageReady)callback
{
    dispatch_queue_t queue = dispatch_get_global_queue(DISPATCH_QUEUE_PRIORITY_DEFAULT, 0ul);
    dispatch_async(queue, ^{
        NSData * imageData = [NSData dataWithContentsOfURL:url];
        dispatch_async(dispatch_get_main_queue(), ^{
            UIImage *image = [UIImage imageWithData:imageData];
            callback(image);
        });
    });
}
Using dispatch_promise, we can change it to the following:
    dispatch_promise(^{
        return [NSData dataWithContentsOfURL:url];
    }).then(^(NSData * imageData){
        self.imageView.image = [UIImage imageWithData:imageData];
    }).then(^{
        // add code to happen next here
    });
Let’s look at the source code and see whether the asynchronous call flow is correct.
- (PMKPromise *(^)(id))then {
    return ^(id block){
        return self.thenOn(dispatch_get_main_queue(), block);
    };
}

PMKPromise *dispatch_promise(id block) {
    return dispatch_promise_on(dispatch_get_global_queue(DISPATCH_QUEUE_PRIORITY_DEFAULT, 0), block);
}
Looking at the source code makes it clear that the above is correct.
3.catch In asynchronous operations, error handling is also a real headache. As shown in the code below, every time an asynchronous request returns, you have to handle the error.
void (^errorHandler)(NSError *) = ^(NSError *error) {
    [[UIAlertView …] show];
};
[NSURLConnection sendAsynchronousRequest:rq queue:q completionHandler:^(NSURLResponse *response, NSData *data, NSError *connectionError) {
    if (connectionError) {
        errorHandler(connectionError);
    } else {
        NSError *jsonError = nil;
        NSDictionary *json = [NSJSONSerialization JSONObjectWithData:data options:0 error:&jsonError];
        if (jsonError) {
            errorHandler(jsonError);
        } else {
            id rq = [NSURLRequest requestWithURL:[NSURL URLWithString:json[@"avatar_url"]]];
            [NSURLConnection sendAsynchronousRequest:rq queue:q completionHandler:^(NSURLResponse *response, NSData *data, NSError *connectionError) {
                UIImage *image = [UIImage imageWithData:data];
                if (!image) {
                    errorHandler(nil); // NSError TODO!
                } else {
                    self.imageView.image = image;
                }
            }];
        }
    }
}];
We can use a Promise’s catch to solve the error-handling issue above.
//OC version
[NSURLSession GET:url].then(^(NSDictionary *json){
    return [NSURLConnection GET:json[@"avatar_url"]];
}).then(^(UIImage *image){
    self.imageView.image = image;
}).catch(^(NSError *error){
    [[UIAlertView …] show];
})
//Swift version
firstly {
    NSURLSession.GET(url)
}.then { (json: NSDictionary) in
    NSURLConnection.GET(json["avatar_url"])
}.then { (image: UIImage) in
    self.imageView.image = image
}.error { error in
    UIAlertView(…).show()
}
After using catch, in a chain that passes along a promise, if any intermediate step produces an error, it will be propagated to catch and handled by the Error Handler.
4.when We often have a requirement like this: Before executing task A, there are one or two asynchronous tasks that must run first. Task A needs to be blocked until all asynchronous operations have completed. The code might look like this:
__block int x = 0;
void (^completionHandler)(id, id) = ^(MKLocalSearchResponse *response, NSError *error){
    if (++x == 2) {
        [self finish];
    }
};
[[[MKLocalSearch alloc] initWithRequest:rq1] startWithCompletionHandler:completionHandler];
[[[MKLocalSearch alloc] initWithRequest:rq2] startWithCompletionHandler:completionHandler];
Here, you can use when to handle this situation elegantly:
id search1 = [[[MKLocalSearch alloc] initWithRequest:rq1] promise];
id search2 = [[[MKLocalSearch alloc] initWithRequest:rq2] promise];

PMKWhen(@[search1, search2]).then(^(NSArray *results){
    //…
}).catch(^{
    // called if either search fails
});
Pass an array to when containing two promises. Only after both promises have completed will the subsequent then operation be executed. This satisfies the requirement mentioned earlier.
There are two more points to mention about when: its argument can also be a dictionary.
id coffeeSearch = [[MKLocalSearch alloc] initWithRequest:rq1];
id beerSearch = [[MKLocalSearch alloc] initWithRequest:rq2];
id input = @{@"coffee": coffeeSearch, @"beer": beerSearch};

PMKWhen(input).then(^(NSDictionary *results){
    id coffeeResults = results[@"coffee"];
});
In this example, when is passed an input dictionary. After processing completes, it can still generate a new promise and pass it to the next then. In then, you can access the results dictionary to obtain the result. The mechanism by which a dictionary is passed in will be explained in Chapter 4.
The argument passed to when can also be a variadic attribute:
@property id dataSource;

- (id)dataSource {
    return dataSource ?: [PMKPromise new:…];
}

- (void)viewDidAppear {
    [PMKPromise when:self.dataSource].then(^(id result){
        // cache the result
        self.dataSource = result;
    });
}
If dataSource is empty, create a new promise and pass it into when. After it finishes executing, get result in then and assign result to dataSource; this way, dataSource will contain data. From this, we can see that when is very flexible to use!
5.always & finally
//OC version
[UIApplication sharedApplication].networkActivityIndicatorVisible = YES;
[self myPromise].then(^{
    //…
}).finally(^{
    [UIApplication sharedApplication].networkActivityIndicatorVisible = NO;
})
//Swift version
UIApplication.sharedApplication().networkActivityIndicatorVisible = true
myPromise().then {
    //…
}.always {
    UIApplication.sharedApplication().networkActivityIndicatorVisible = false
}
After we finish executing then and handling the error, if there are still additional operations to perform, we can put them in finally and always.
IV. PromiseKit Source Code Analysis
After learning about the Promise methods above, we can already see that, in asynchronous operations, we can continuously return promises and pass them to subsequent then calls to form a chain. Therefore, the key point is the implementation of then. Before discussing then, let me first talk about the state and propagation mechanism of a promise.
A promise may be in one of three states: pending, fulfilled, or rejected.
A promise’s state can only transition from “pending” to either “fulfilled” or “rejected”; it cannot transition backward, and “fulfilled” and “rejected” cannot transition into each other.
A promise must implement the then method. It can be said that then is the core of a promise. In addition, then must return a promise. The then method of the same promise can be called multiple times, and the execution order of the callbacks must match the order in which they were defined.
The then method accepts two parameters. The first parameter is the callback for success, which is invoked when the promise transitions from “pending” to “fulfilled”. The other is the callback for failure, which is invoked when the promise transitions from “pending” to “rejected”. Meanwhile, then can accept another promise as input, and it can also accept a “then-like” object or method, that is, a thenable object.
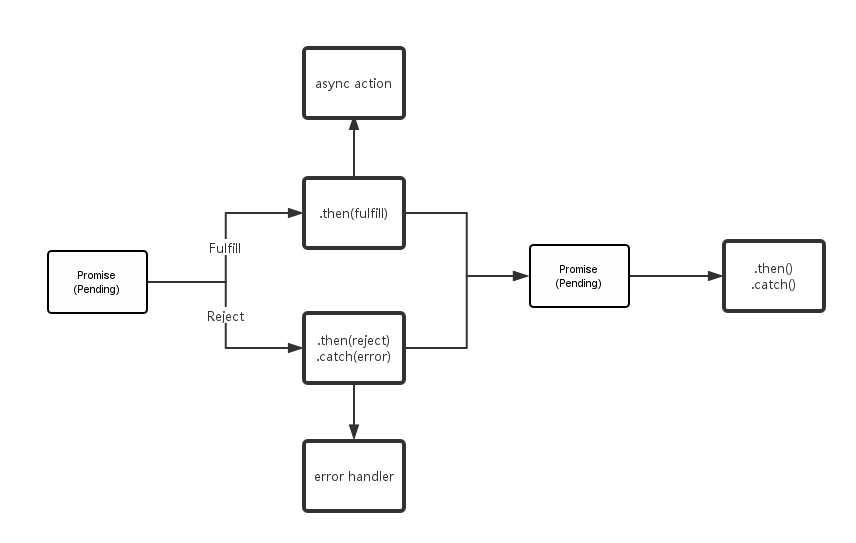
To summarize, as shown in the figure above, a promise object in the pending state can transition either to the fulfilled state with a success value, or to the rejected state with an error message. When the state transition occurs, the methods bound via promise.then will be called. (When binding methods, if the promise object is already in the fulfilled or rejected state, the corresponding method will be called immediately. Therefore, there is no race condition between the completion of the asynchronous operation and the binding of its methods.) After transitioning from pending to fulfilled or rejected, the state of this promise object will never change again. Therefore, then is a function that is called only once, which also shows that then produces a new promise, rather than the original one.
After understanding the flow, we can continue studying the source code. In PromiseKit, the most commonly used methods are then, thenInBackground, catch, and finally.
- (PMKPromise *(^)(id))then {
    return ^(id block){
        return self.thenOn(dispatch_get_main_queue(), block);
    };
}

- (PMKPromise *(^)(id))thenInBackground {
    return ^(id block){
        return self.thenOn(dispatch_get_global_queue(DISPATCH_QUEUE_PRIORITY_DEFAULT, 0), block);
    };
}

- (PMKPromise *(^)(id))catch {
    return ^(id block){
        return self.catchOn(dispatch_get_main_queue(), block);
    };
}

- (PMKPromise *(^)(dispatch_block_t))finally {
    return ^(dispatch_block_t block) {
        return self.finallyOn(dispatch_get_main_queue(), block);
    };
}
Under the hood, these four methods call their respective thenon, catchon, and finallyon methods. The implementations of these on methods are basically the same, so I’ll analyze the most important one, thenon.
- (PMKResolveOnQueueBlock)thenOn {
    return [self resolved:^(id result) {
        if (IsPromise(result))
            return ((PMKPromise *)result).thenOn;

        if (IsError(result)) return ^(dispatch_queue_t q, id block) {
            return [PMKPromise promiseWithValue:result];
        };

        return ^(dispatch_queue_t q, id block) {
            block = [block copy];
            return dispatch_promise_on(q, ^{
                return pmk_safely_call_block(block, result);
            });
        };
    }
    pending:^(id result, PMKPromise *next, dispatch_queue_t q, id block, void (^resolve)(id)) {
        if (IsError(result))
            PMKResolve(next, result);
        else dispatch_async(q, ^{
            resolve(pmk_safely_call_block(block, result));
        });
    }];
}
This thenon returns a method, so continue reading below.
- (id)resolved:(PMKResolveOnQueueBlock(^)(id result))mkresolvedCallback
       pending:(void(^)(id result, PMKPromise *next, dispatch_queue_t q, id block, void (^resolver)(id)))mkpendingCallback
{
    __block PMKResolveOnQueueBlock callBlock;
    __block id result;

    dispatch_sync(_promiseQueue, ^{
        if ((result = _result))
            return;

        callBlock = ^(dispatch_queue_t q, id block) {

            block = [block copy];

            __block PMKPromise *next = nil;

            dispatch_barrier_sync(_promiseQueue, ^{
                if ((result = _result))
                    return;

                __block PMKPromiseFulfiller resolver;
                next = [PMKPromise new:^(PMKPromiseFulfiller fulfill, PMKPromiseRejecter reject) {
                    resolver = ^(id o){
                        if (IsError(o)) reject(o); else fulfill(o);
                    };
                }];
                [_handlers addObject:^(id value){
                    mkpendingCallback(value, next, q, block, resolver);
                }];
            });

            return next ?: mkresolvedCallback(result)(q, block);
        };
    });

    // We could just always return the above block, but then every caller would
    // trigger a barrier_sync on the promise queue. Instead, if we know that the
    // promise is resolved (since that makes it immutable), we can return a simpler
    // block that doesn't use a barrier in those cases.

    return callBlock ?: mkresolvedCallback(result);
}
This method looks quite complex, but if you look closely, the function’s parameters are actually just two blocks: one resolved block and one pending block. After a promise has been resolved, it may be fulfilled or rejected. A new next promise is then created and passed into the next then, and its state becomes pending. In the code above, the first return means that if next is nil, the promise has not been created yet. In that case, mkresolvedCallback is called again with result as the argument, producing a PMKResolveOnQueueBlock, which is then passed into (q, block) again, until the next promise is created and the pendingCallback is stored in the handler. This handler stores all blocks waiting to be executed. If all the blocks in this array are executed, that is equivalent to completing all the asynchronous operations above in sequence. The second return occurs when callblock is nil; mkresolvedCallback(result) is called again to ensure that the next promise is always created.
The dispatch_barrier_sync call in this function is what enables chained then calls after a promise. Because of this GCD method, the subsequent then calls behave as if they are executed sequentially, one line at a time.
Some people may ask: we don’t see the individual blocks being executed; they are only added to the handler array. The answer to this question is the core of promises. The operation that executes the blocks is placed inside resolve. Let’s look at the source code first.
static void PMKResolve(PMKPromise *this, id result) {
    void (^set)(id) = ^(id r){
        NSArray *handlers = PMKSetResult(this, r);
        for (void (^handler)(id) in handlers)
            handler(r);
    };

    if (IsPromise(result)) {
        PMKPromise *next = result;
        dispatch_barrier_sync(next->_promiseQueue, ^{
            id nextResult = next->_result;

            if (nextResult == nil) {  // ie. pending
                [next->_handlers addObject:^(id o){
                    PMKResolve(this, o);
                }];
            } else
                set(nextResult);
        });
    } else
        set(result);
}
This is a recursive function. The condition that enables recursion is the line PMKResolve(this, o);. When nextResult = nil, it means this promise is still in the pending state and has not been executed yet. At this point, it recursively calls itself until nextResult is no longer nil. Once it is no longer nil, the set method is called. The set method is an anonymous function whose for loop iterates in order and executes each block in the handler array. The if statement inside first checks whether result is a promise. If it is not a promise, it executes the set method and invokes each block in sequence.
At this point, the execution mechanism of a single then is complete. Next, let’s look at how when works.
    return newPromise = [PMKPromise new:^(PMKPromiseFulfiller fulfiller, PMKPromiseRejecter rejecter){
        NSPointerArray *results = nil;
      #if TARGET_OS_IPHONE
        results = [NSPointerArray strongObjectsPointerArray];
      #else
        if ([[NSPointerArray class] respondsToSelector:@selector(strongObjectsPointerArray)]) {
            results = [NSPointerArray strongObjectsPointerArray];
        } else {
          #pragma clang diagnostic push
          #pragma clang diagnostic ignored "-Wdeprecated-declarations"
            results = [NSPointerArray pointerArrayWithStrongObjects];
          #pragma clang diagnostic pop
        }
      #endif
        results.count = count;

        NSUInteger ii = 0;

        for (__strong PMKPromise *promise in promises) {
            if (![promise isKindOfClass:[PMKPromise class]])
                promise = [PMKPromise promiseWithValue:promise];
            promise.catch(rejecter(@(ii)));
            promise.then(^(id o){
                [results replacePointerAtIndex:ii withPointer:(__bridge void *)(o ?: [NSNull null])];
                if (--count == 0)
                    fulfiller(results.allObjects);
            });
            ii++;
        }
    }];
Here we only excerpt the return part. Once you understand then, when is easy to understand. when executes each promise in the array of promises passed to it in sequence, then passes the final results to a newly created promise, which is returned as the return value.
One extra point worth mentioning is how when handles it if you pass in a dictionary.
    if ([promises isKindOfClass:[NSDictionary class]])
        return newPromise = [PMKPromise new:^(PMKPromiseFulfiller fulfiller, PMKPromiseRejecter rejecter){
            NSMutableDictionary *results = [NSMutableDictionary new];
            for (id key in promises) {
                PMKPromise *promise = promises[key];
                if (![promise isKindOfClass:[PMKPromise class]])
                    promise = [PMKPromise promiseWithValue:promise];
                promise.catch(rejecter(key));
                promise.then(^(id o){
                    if (o)
                        results[key] = o;
                    if (--count == 0)
                        fulfiller(results);
                });
            }
        }];
The approach is basically the same as when’s array-based approach, except for one additional step: first retrieve promise[key] from the dictionary, and then continue operating on that promise. Therefore, when can accept a dictionary whose values are promises.
V. Use PromiseKit to Handle Callback Hell Elegantly
Here I’ll give an example so everyone can get a feel for how concise using promises can be. First, let’s describe the scenario. Suppose there is a submit button. When you click it, it submits a task. First, you need to determine whether the user has permission to submit. If not, show an error. After confirming the user has permission, you also need to make a request to check whether the current task already exists. If it does, show an error. If it does not, you can safely submit the task.
void (^errorHandler)(NSError *) = ^(NSError *error) {
    [[UIAlertView …] show];
};
[NSURLConnection sendAsynchronousRequest:rq queue:q completionHandler:^(NSURLResponse *response, NSData *data, NSError *connectionError) {
    if (connectionError) {
        errorHandler(connectionError);
    } else {
        NSError *jsonError = nil;
        NSDictionary *json = [NSJSONSerialization JSONObjectWithData:data options:0 error:&jsonError];
        if (jsonError) {
            errorHandler(jsonError);
        } else {
            id rq = [NSURLRequest requestWithURL:[NSURL URLWithString:json[@"have_authority"]]];
            [NSURLConnection sendAsynchronousRequest:rq queue:q completionHandler:^(NSURLResponse *response, NSData *data, NSError *connectionError) {

                NSError *jsonError = nil;
                NSDictionary *json = [NSJSONSerialization JSONObjectWithData:data options:0 error:&jsonError];

                if (jsonError) {
                    errorHandler(jsonError);
                } else {
                    id rq = [NSURLRequest requestWithURL:[NSURL URLWithString:json[@"exist"]]];
                    [NSURLConnection sendAsynchronousRequest:rq queue:q completionHandler:^(NSURLResponse *response, NSData *data, NSError *connectionError) {

                        NSError *jsonError = nil;
                        NSDictionary *json = [NSJSONSerialization JSONObjectWithData:data options:0 error:&jsonError];

                        if (jsonError) {
                            errorHandler(jsonError);
                        } else {
                            if ([json[@"status"] isEqualToString:@"OK"]) {
                                [self submitTask];
                            } else {
                                errorHandler(json[@"status"]);
                            }
                        }
                    }];
                }
            }];
        }
    }
}];
The code above has three levels of callbacks, which already looks pretty dizzying. Next, let’s use promises to clean it up.
[NSURLSession GET:url].then(^(NSDictionary *json){
    return [NSURLConnection GET:json[@"have_authority"]];
}).then(^(NSDictionary *json){
    return [NSURLConnection GET:json[@"exist"]];
}).then(^(NSDictionary *json){
    if ([json[@"status"] isEqualToString:@"OK"]) {
        return [NSURLConnection GET:submitJson];
    } else
        @throw [NSError errorWithDomain:… code:… userInfo:json[@"status"]];
}).catch(^(NSError *error){
    [[UIAlertView …] show];
})
What used to be nearly 40 lines of code suddenly becomes around 15 lines. It looks much cleaner than before and is more readable.
####Finally
After reading the usage examples of PromiseKit above, my personal understanding of PromiseKit is that it is essentially a Monad. This has been a very popular concept recently; at SwiftCon 2016 in Shanghai at the end of April, Tang Qiao’s talk was about Monad. If you are not very familiar with this concept yet, you can check out his blog or find some videos to learn more. A Promise is like a box that encapsulates a set of operations, and then corresponds to a group of flatMap or map operations. That said, there are still some drawbacks. If you use AFNetWorking for networking, a network request may very likely invoke its callback multiple times. In that case, when using PromiseKit, you need to wrap your own promise. PromiseKit natively uses the OMGHTTPURLRQ networking framework. The network request wrappers built into PromiseKit are also still based on NSURLConnection. So for those using AFNetWorking, if you want to elegantly eliminate the callback hell caused by network requests, you still need to first wrap your own Promise, and then chain it elegantly with then. Many people may get to this point and think: I introduced a framework to solve a problem, but now I still need to wrap things again before it can solve the problem, so it does not feel quite worth it.
My own view is that PromiseKit is an excellent open-source library for solving asynchronous programming problems, especially nested callbacks and callback hell, where its effect is very obvious. Although you need to wrap AFNetWorking promises yourself, the underlying idea is very much worth learning from! This is also what I want to share with everyone in the next article: using the idea of promises to elegantly handle callback hell ourselves. That is all for this article on PromiseKit.
If there are any mistakes, please feel free to correct me.
