A Step-by-Step Guide to Configuring Multiple Environment Variables for an iOS App
Preface
When it comes to multiple environments, I believe most companies now have at least 2–3 app environments, such as a Test environment, a UAT (User Acceptance Test) environment, a Release environment, and so on. When developers need to produce multiple builds, the common approach is usually to modify the environment variables directly in the code, then run Archive to package the app. Of course, this approach works, but it is not very elegant or efficient. If Jenkins has already been set up (setup tutorial), we can use it to package the app more elegantly. If we use Jenkins for packaging, we need to configure multiple environment variables for the app. After that, Jenkins can automatically integrate the app under different environments. Next, let’s discuss two common approaches.
####Table of Contents
- Configure multiple environments using Build Configuration
- Configure multiple environments using xcconfig files
- Configure multiple environments using Targets
I. Configure multiple environments using Build Configuration
In the preface, we first discussed the requirement: because we need to configure multiple environments, and all of these environments need to be installable on a phone, we can configure Build Configuration to accomplish this task. If you are not yet familiar with Build Configuration, you can first review the official documentation. The new documentation link is here: Build settings reference.
1. Create a new Build Configuration
First, click Project and find Configuration, then choose to add one. Here we add a new Configuration. By default, the system provides two: Debug and Release. Here we need to choose whether to duplicate Debug or Release. The difference between Release and Debug is that Release cannot be used to debug the program, because by default some debugging-related parameters are disabled. You can see the specific differences in Build Settings. In addition, Release performs compiler optimizations during compilation, so the packaged output will be slightly smaller than one built with Debug.
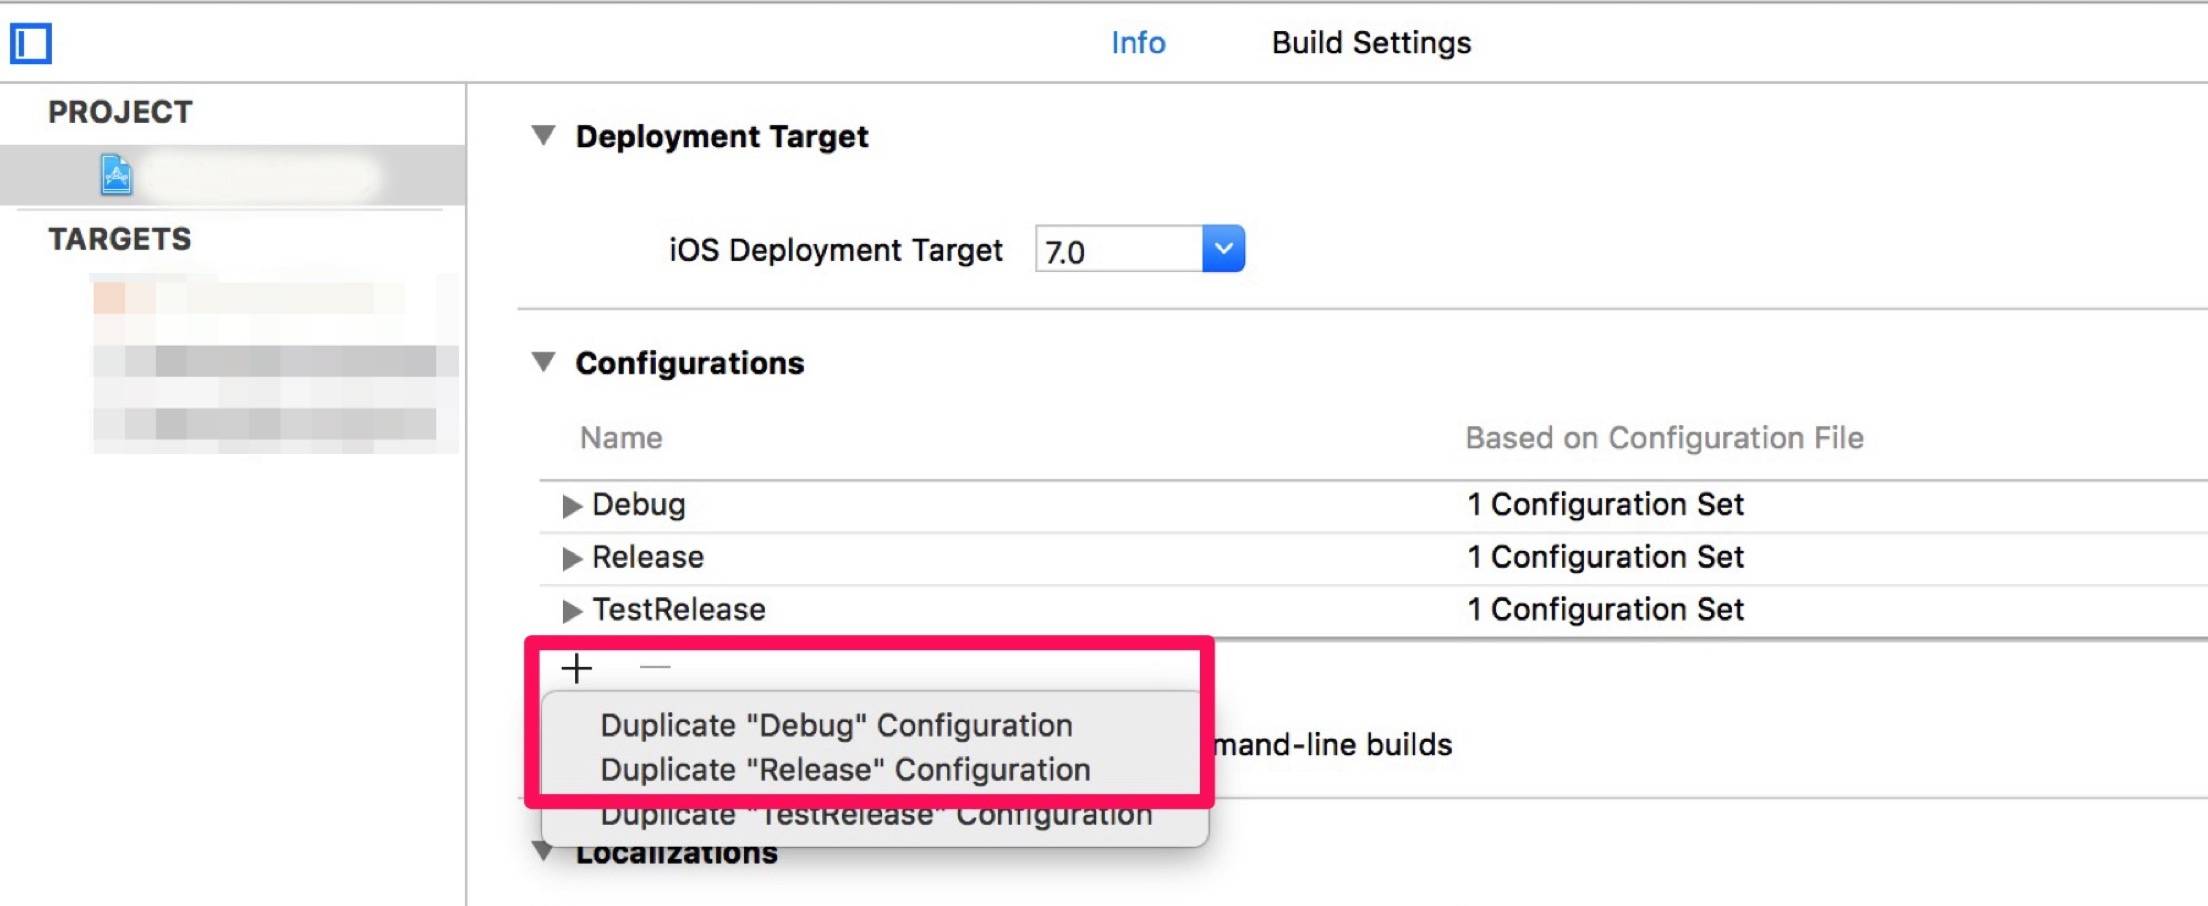
Here we choose Duplicate “Debug” Configuration, because our new environment needs debugging. After adding it, there will be one more set of Configurations. This set is essentially a collection of configuration options containing some compiler parameters. If the project currently uses CocoaPods, opening Configuration Set will show something like this:
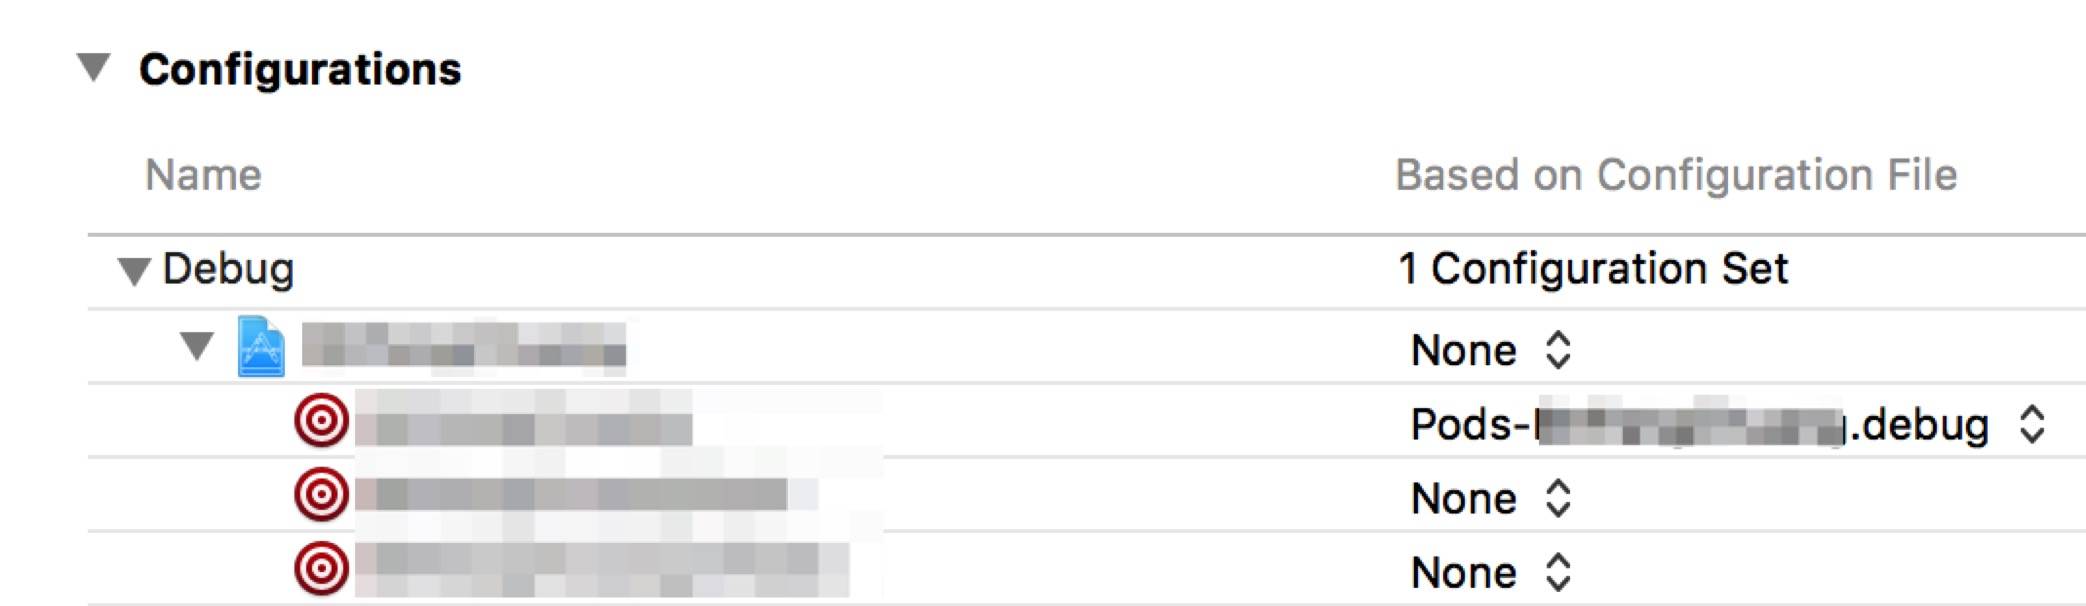
In our own project, we use Pod. When we open the configuration, we will see the following information
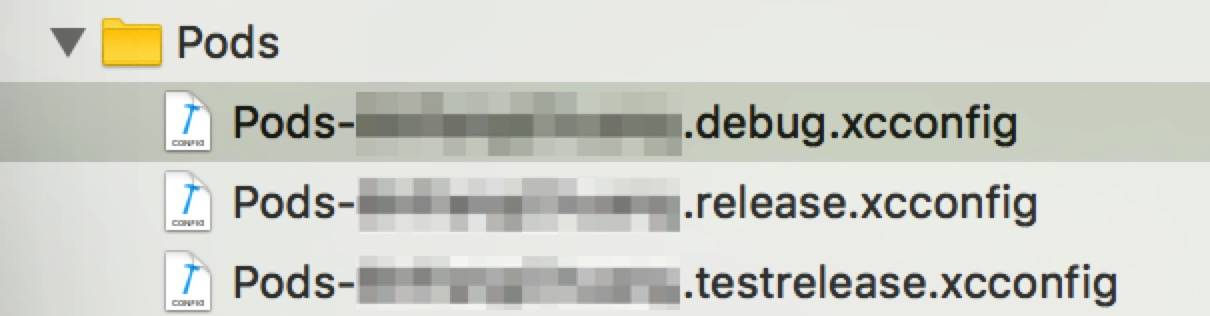
Note: After creating the new Build Configuration, if you have pods, immediately run the following
pod install
After the pod installation is complete, an xcconfig file will be generated automatically. If you manually create this xcconfig file and then copy the contents of the original pod xcconfig files corresponding to Debug and Release into it, that will not work. The xcconfig file must be generated by pod itself in order to be recognized.
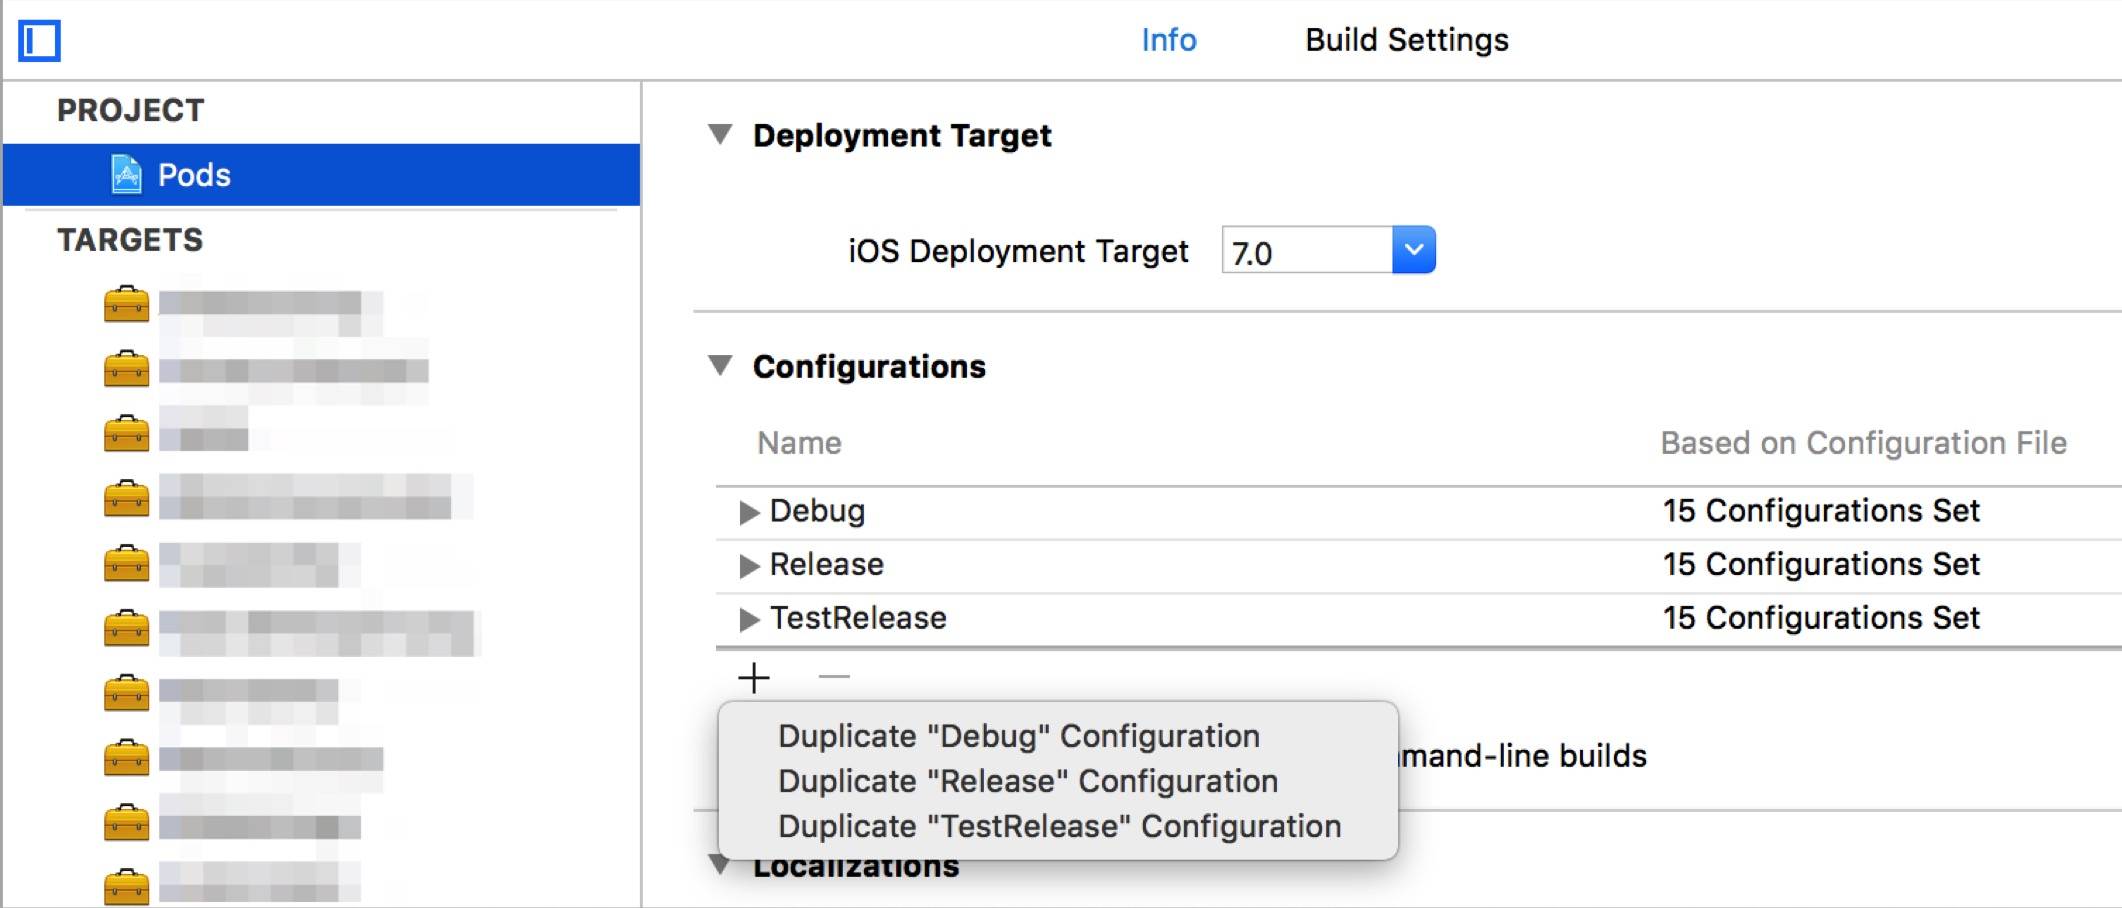
After creating the new Build Configuration, you also need to create the corresponding Build Configuration in pod; otherwise, the build will fail later. If you are not using pod, you can ignore this section.
Create a new Build Configuration corresponding to the one previously created in the Project, as shown below.
2. Create a New Scheme
Next, we need to create a new build Scheme for the new Configuration.
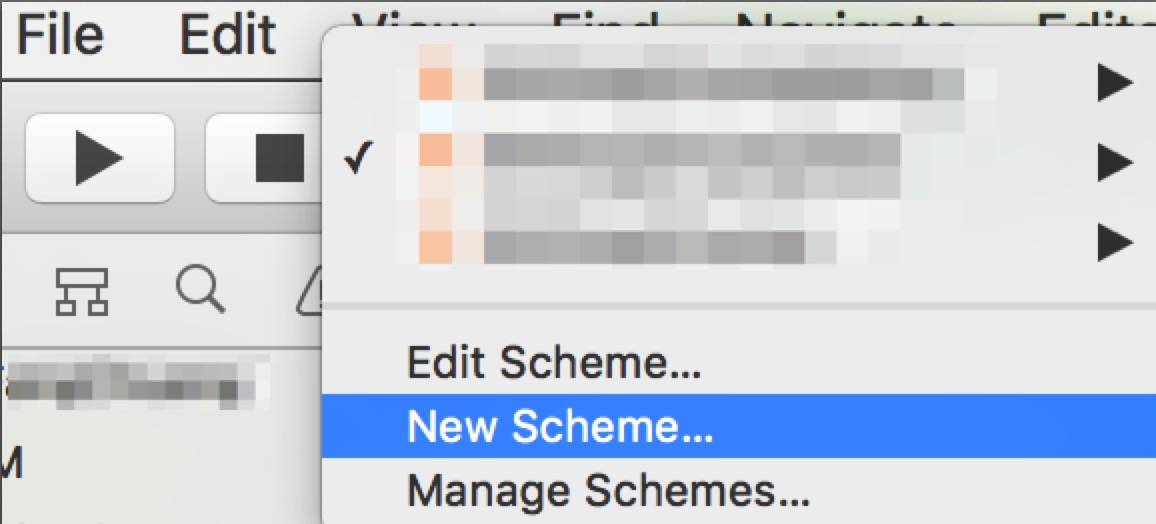
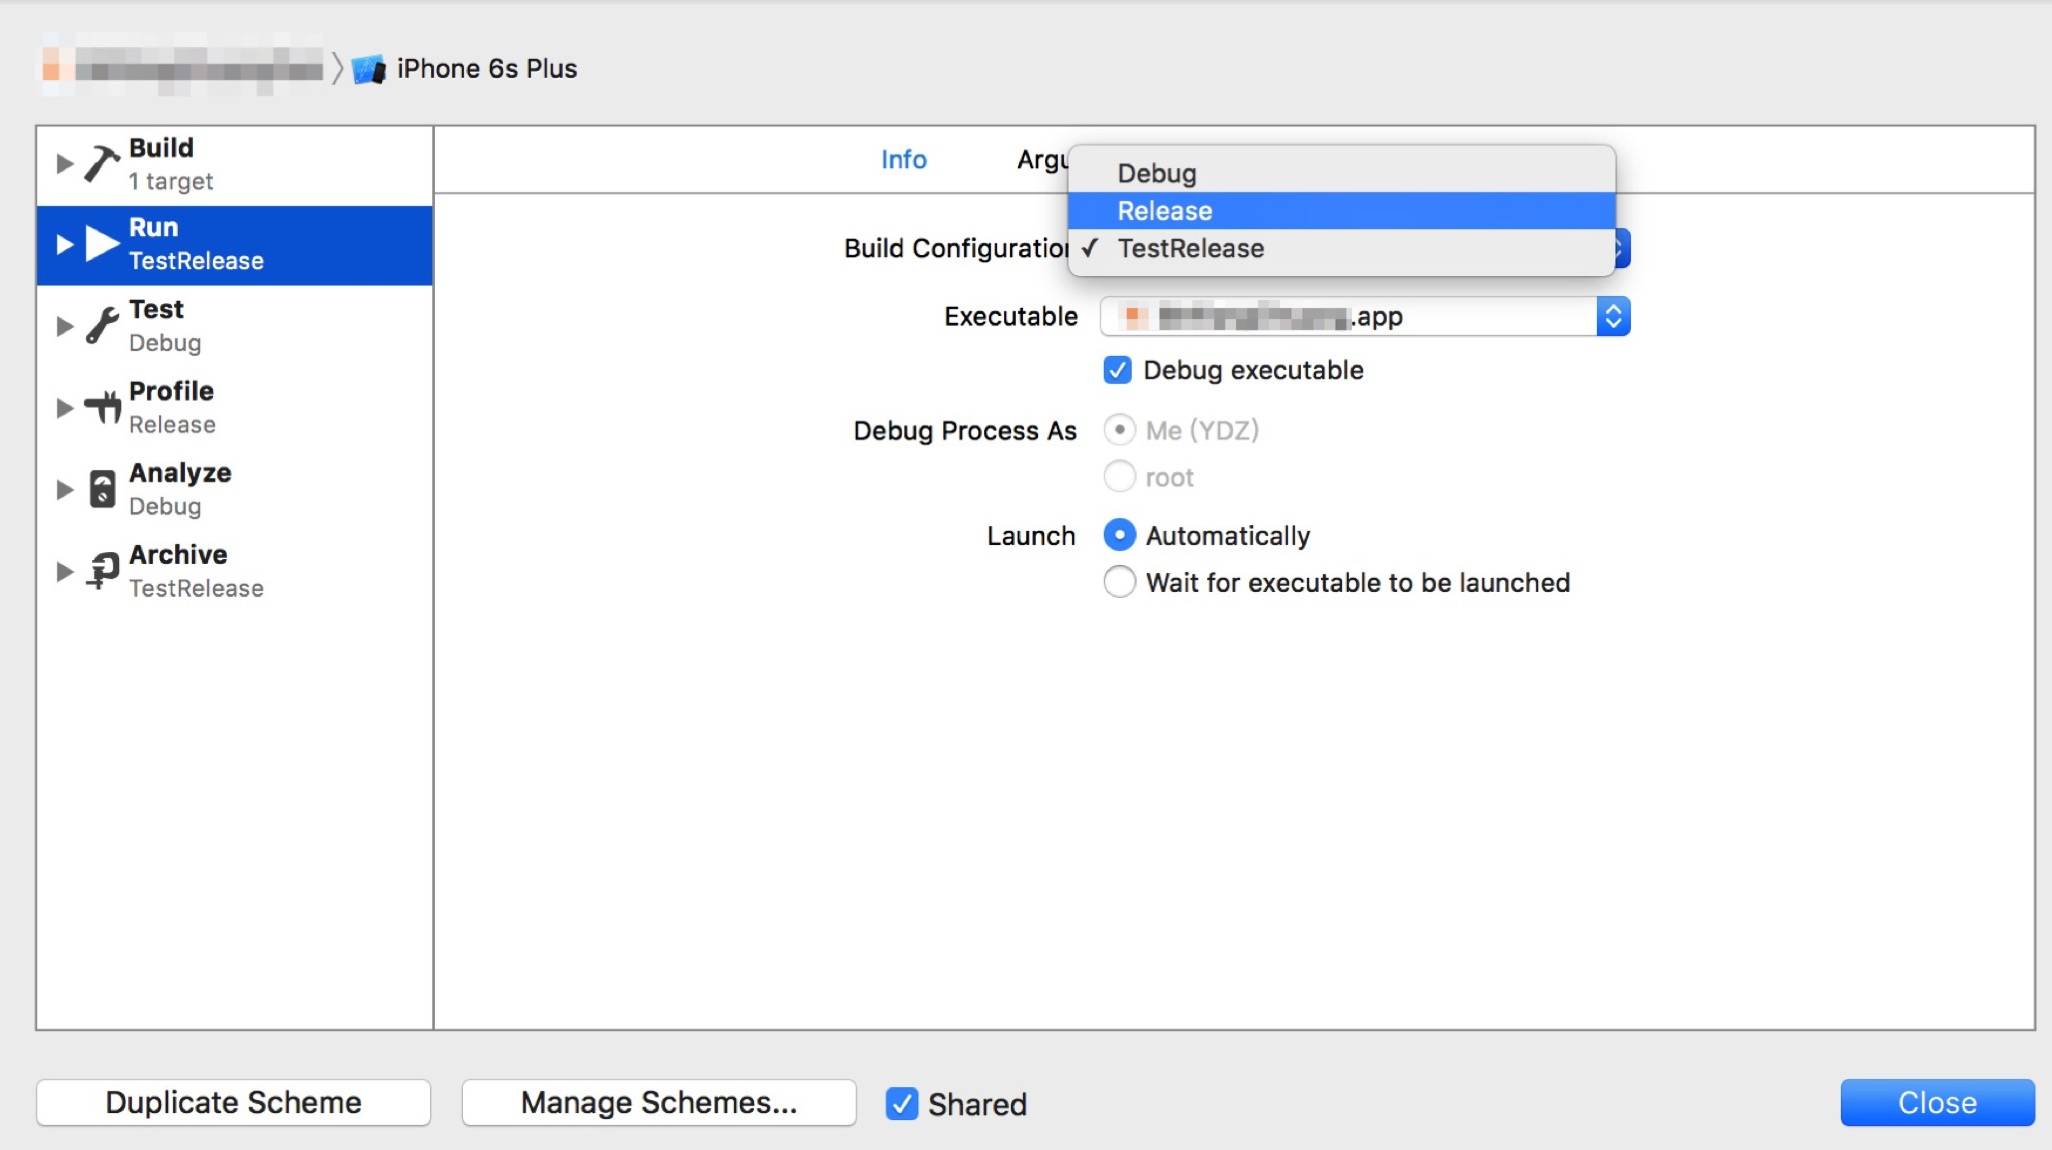
After it is created, we can edit the Scheme we just created. Here, you can change both the Run mode and Archive to the new Scheme. As shown below:
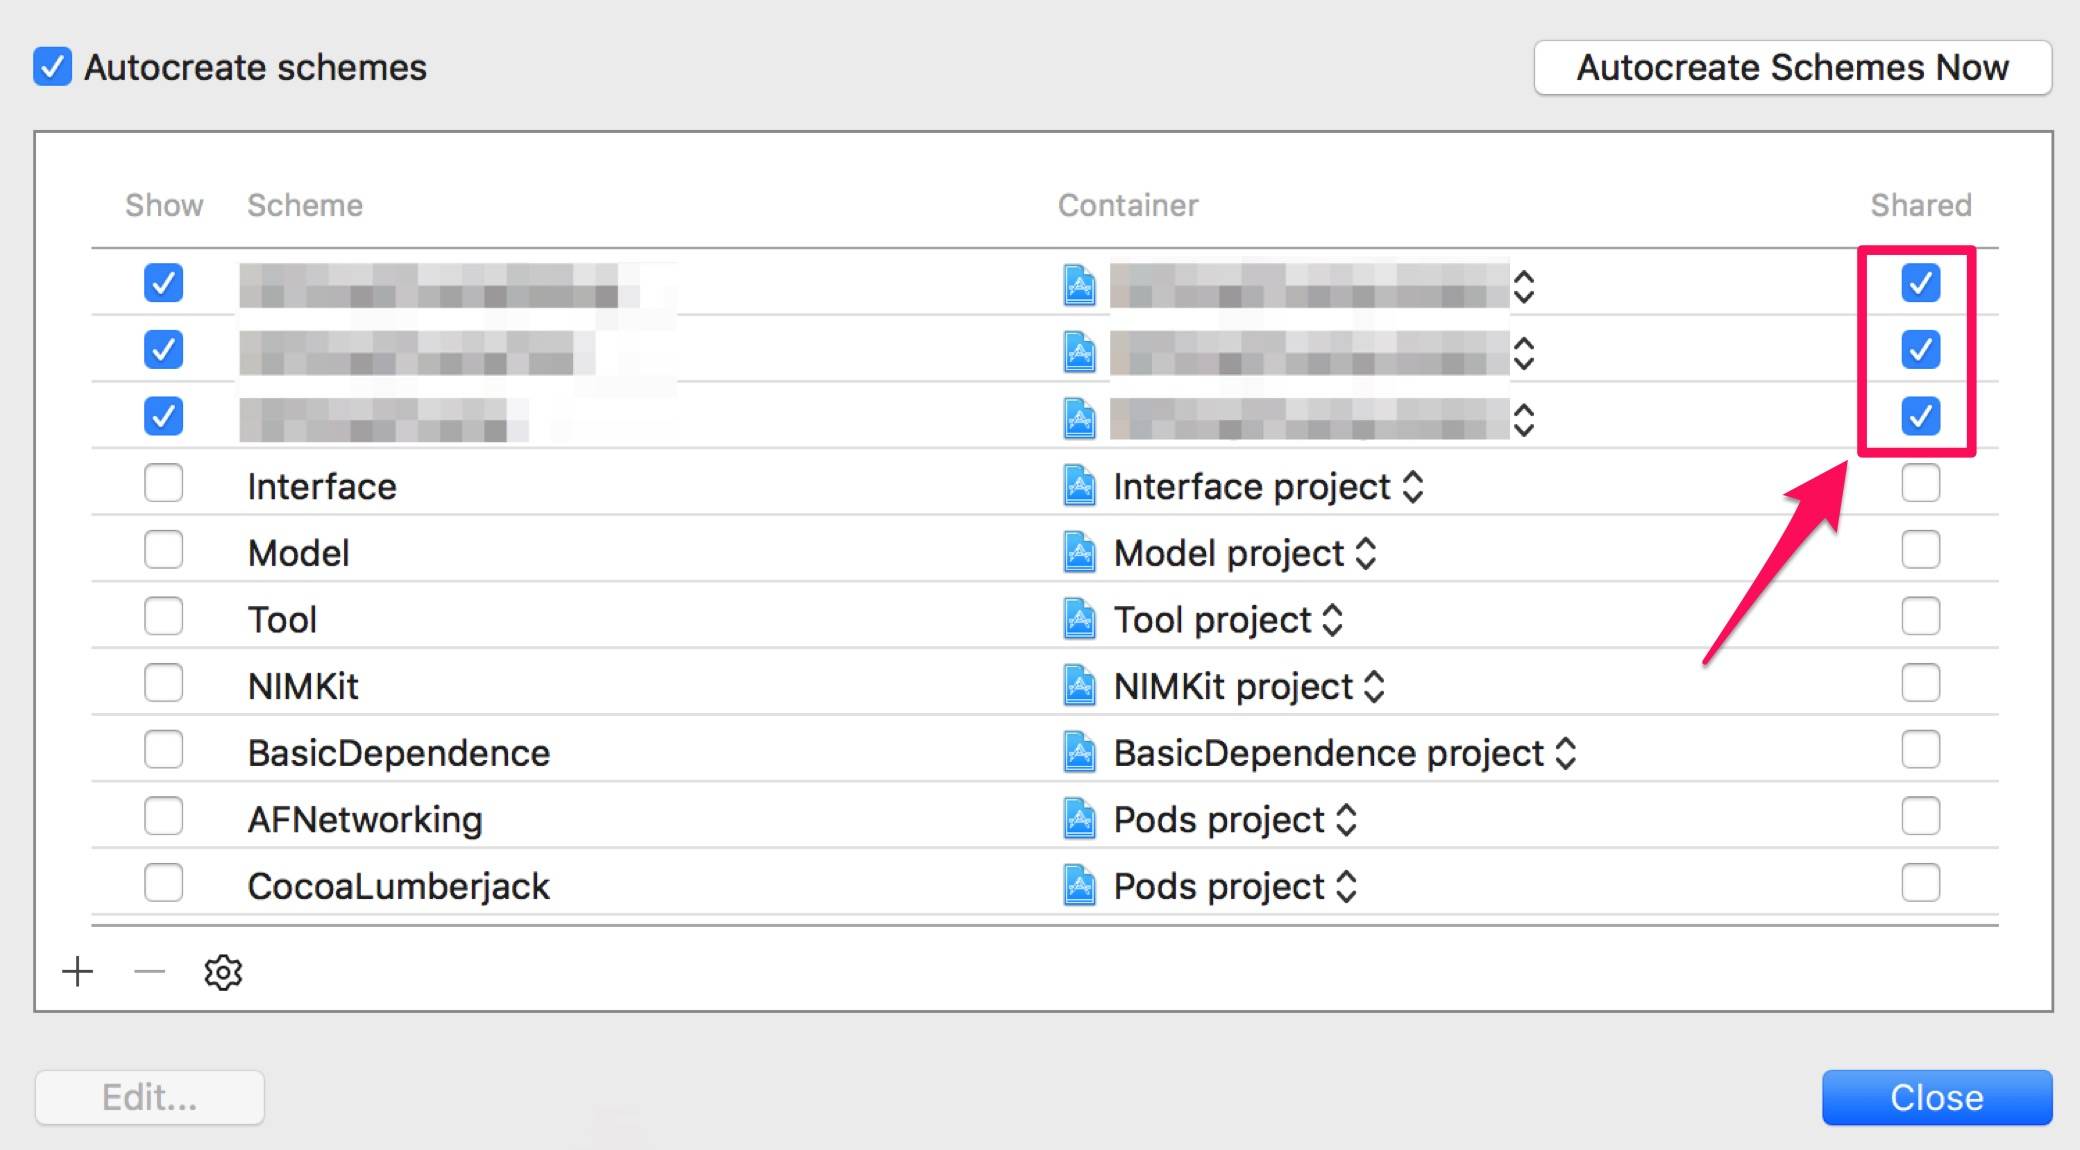
Note: If you are using collaboration tools such as Git, you also need to share the newly created Scheme here; otherwise, other people will not be able to see it. Select “Manage Schemes”.
3. Create User-defined Build Settings
Go back to the Project’s Build Settings and select Add User-Defined Setting.
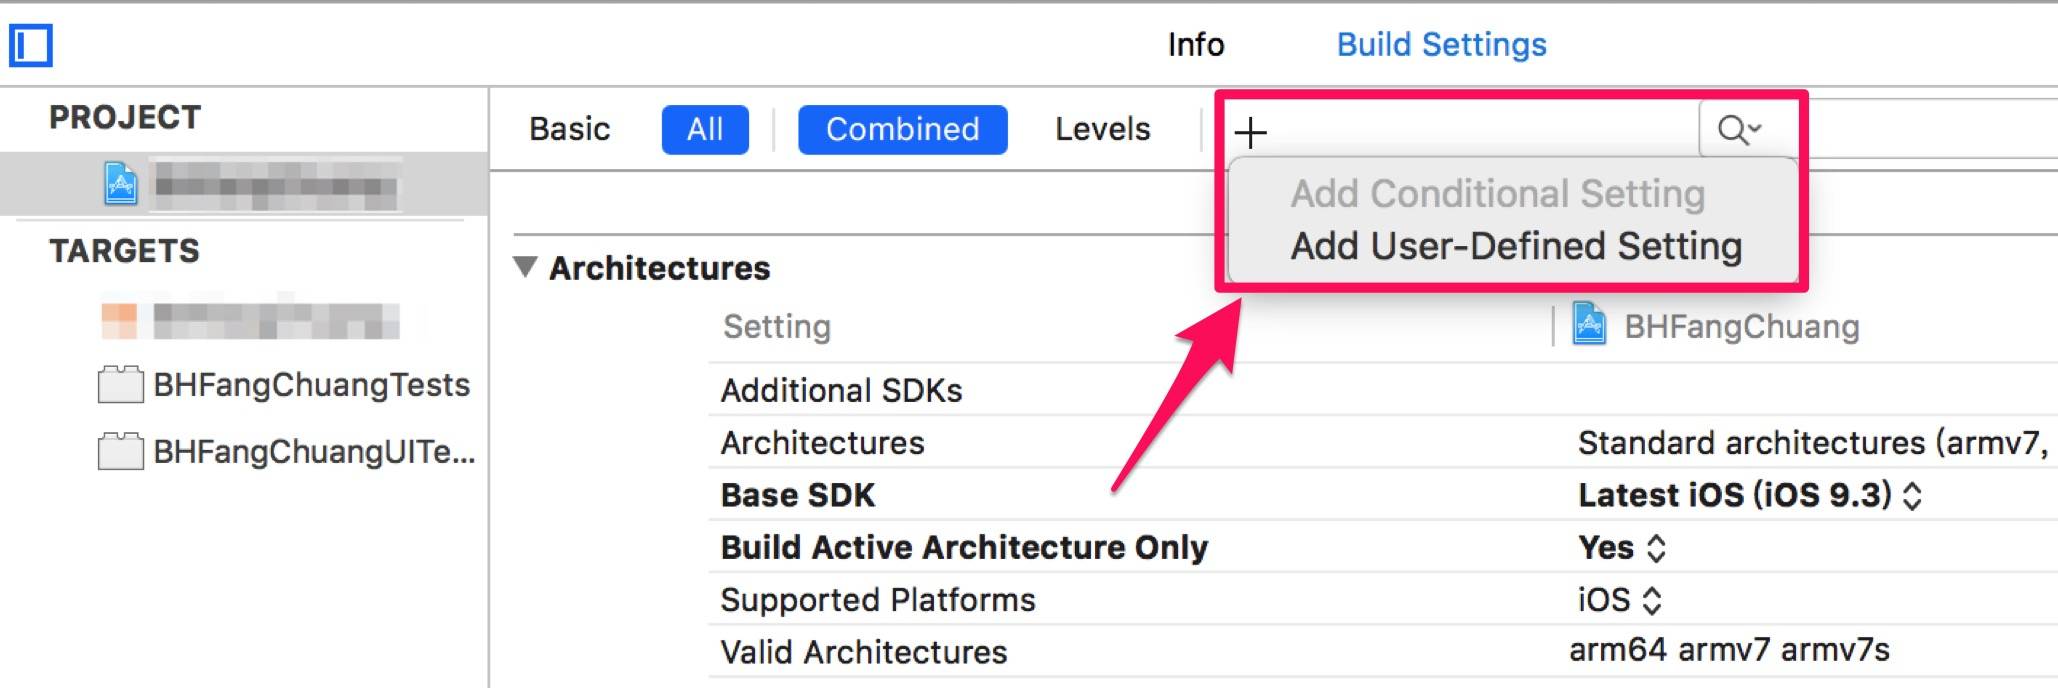
Here we add two new parameters. CustomAppBundleld is used so that, when packaging later, we can generate multiple separate packages. Here we need three different Ids. It is recommended to simply append the Scheme name to the original Bundleld.
CustomProductName is the name displayed on the phone after the app is installed. You can describe it according to the corresponding environment, such as test server, UAT, and so on. As shown below.
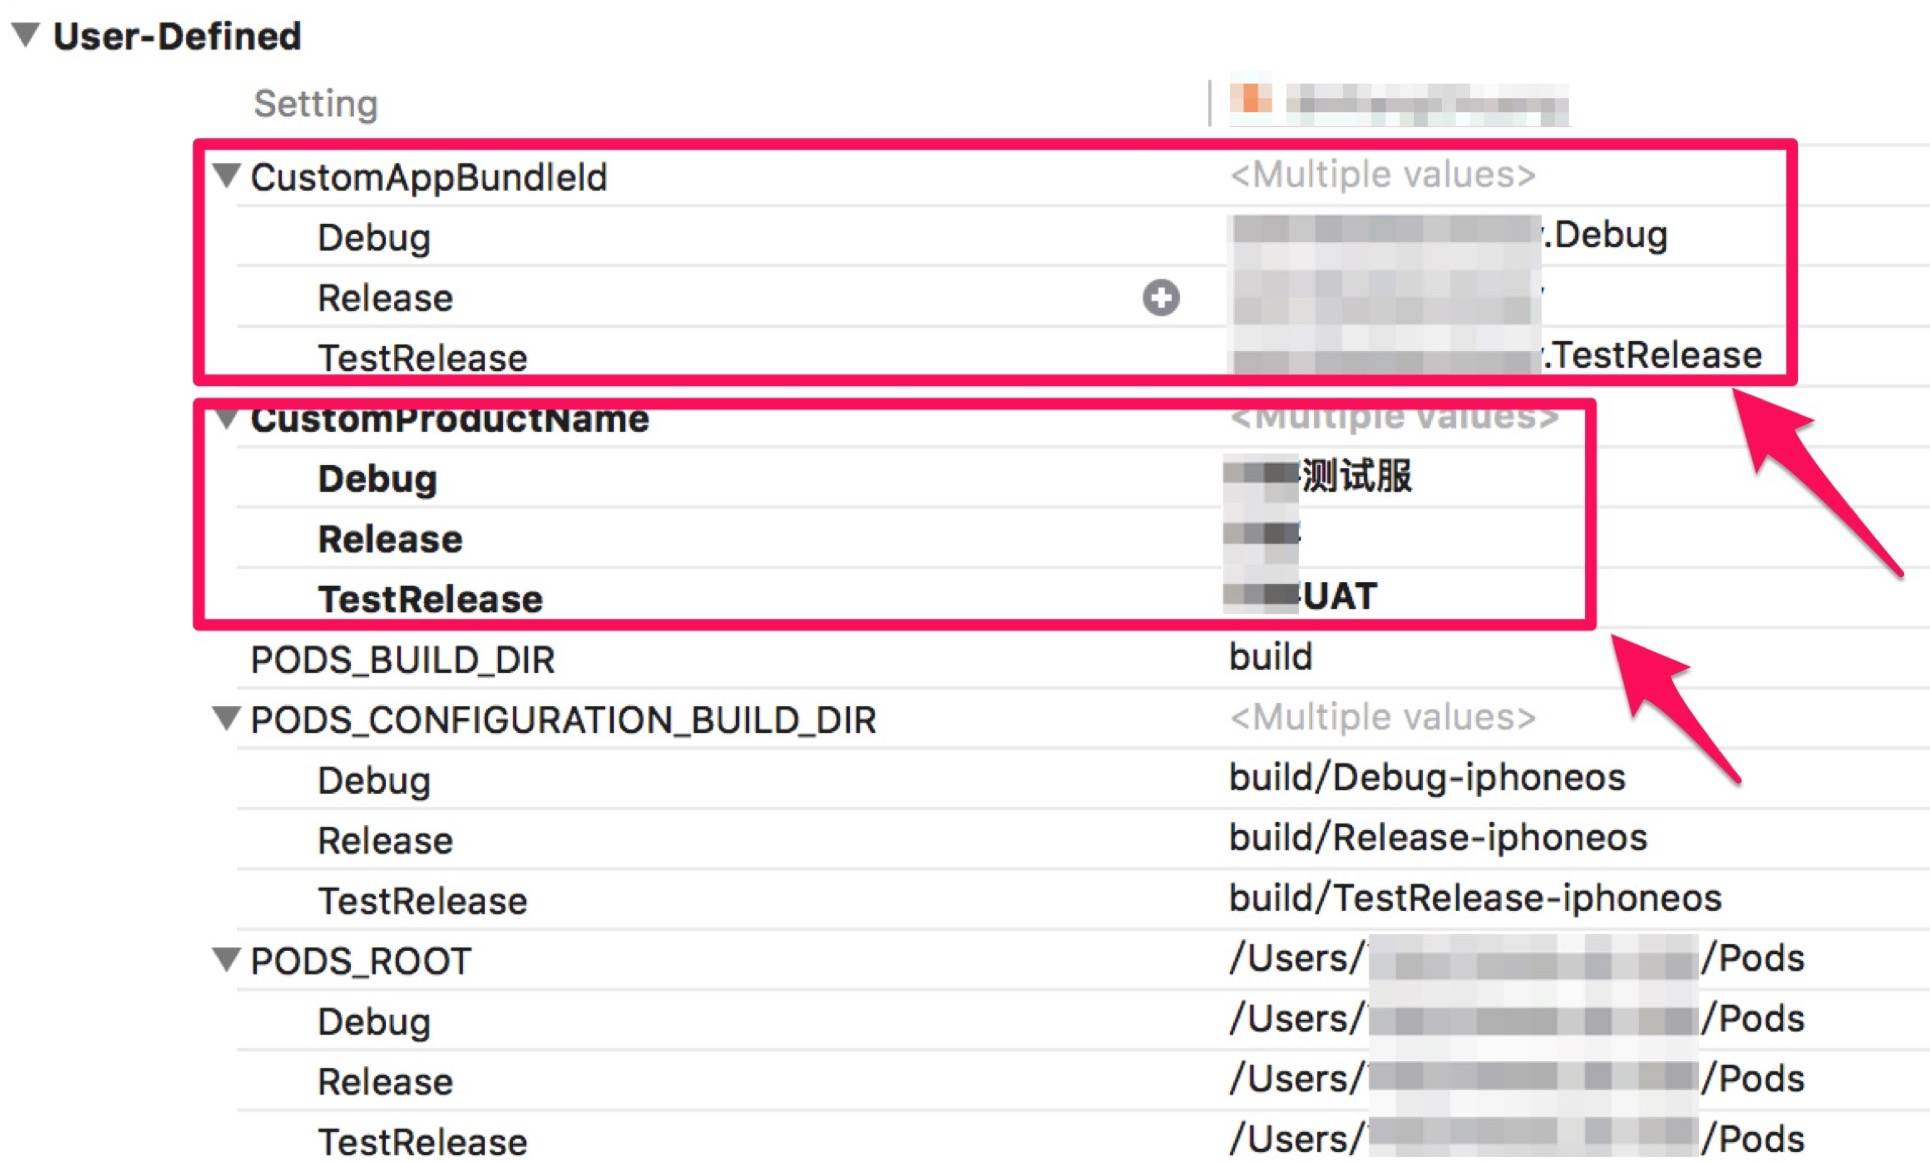
One point worth mentioning here is that the Build_DIR directories under Pods are actually generated by Pods itself. After you have previously run Pod install, these are all configured by default, and no further changes are needed.
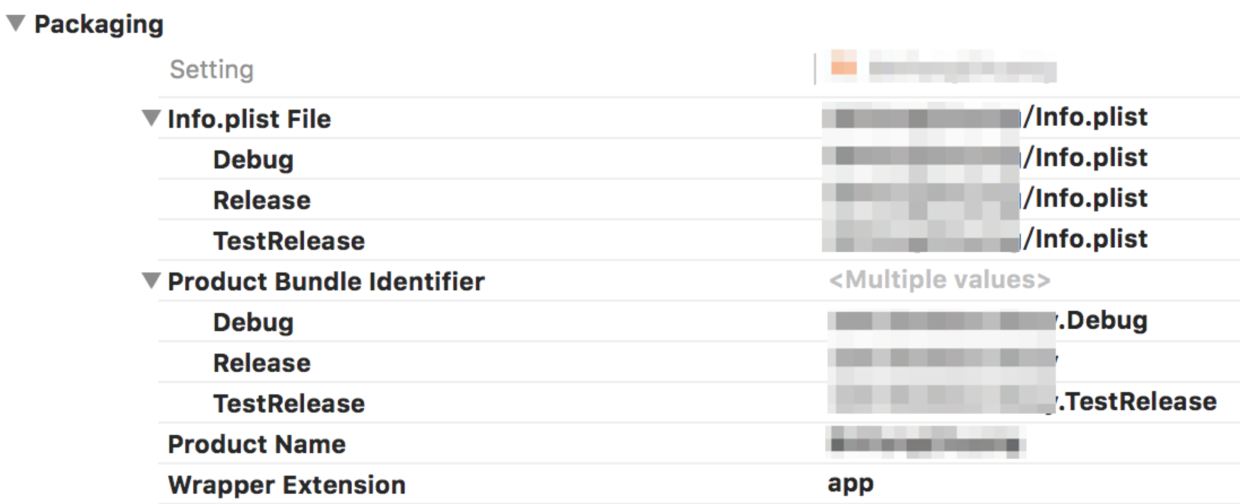
4. Modify the info.plist File and Images.xcassets
First, modify the info.plist file.
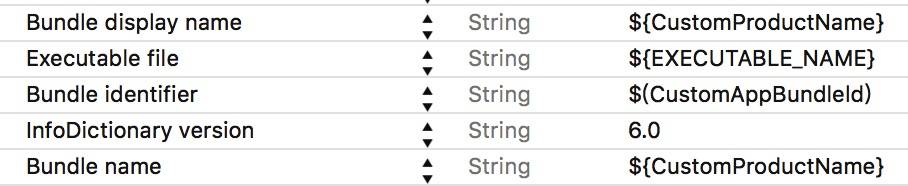
Since we added two new values, CustomAppBundleld and CustomProductName, we need to change the Bundle display name in info.plist to this custom dictionary. During compilation, the compiler will use the Scheme we configured to automatically select the ProductName corresponding to Debug, Release, and TestRelease.
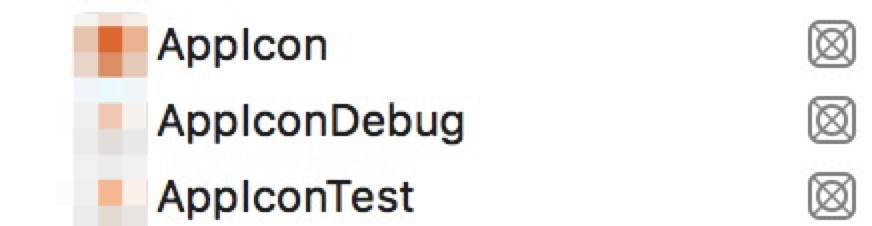
We also need to add two new New iOS App Icon entries in Images.xcassets. It is best to use the same names as the schemes so they are easy to distinguish.
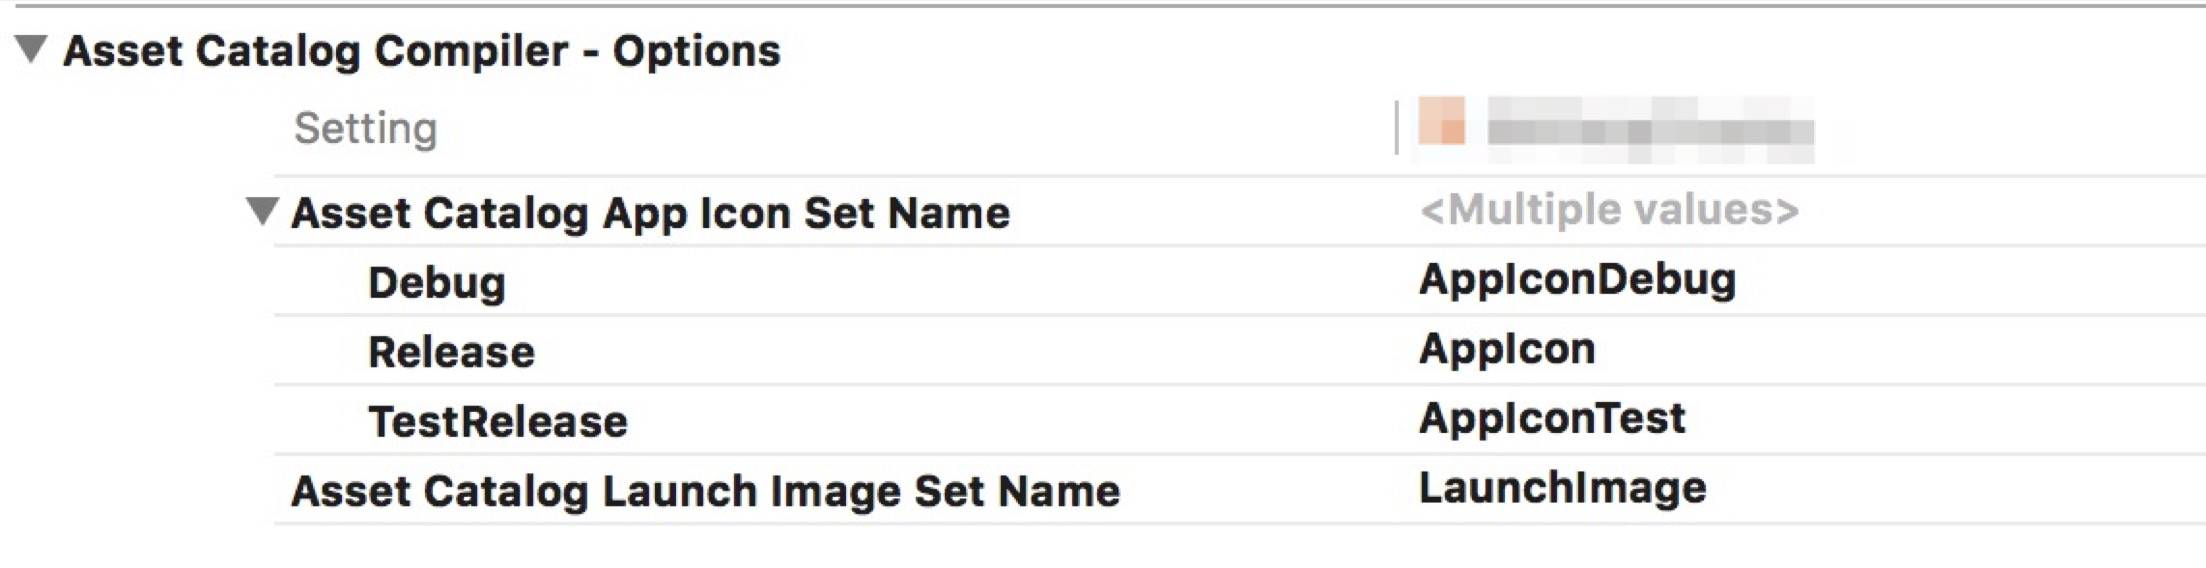
After creating the AppIcons, go back to Build Setting, find Asset Catalog Compiler, and set the App Icon set Name for each of these modes to the corresponding icon. As shown above.
Now that we have created these schemes, how do we package all of them into apps? Here is an official document, Troubleshooting Application Archiving in Xcode, which records in detail how packaging works when we normally click Archive.
Here I’ll share some lessons learned from splitting these environments. Always remember: every environment must have both Debug and Release configured! Never assume that the production version only needs Release configured. If one day you need to debug the production version, you will have nowhere to start if Debug has not been configured. Also never assume that the test environment only needs Debug configured. If one day you need to release a Release package for the test environment, you will again have nowhere to start. My recommendation is to configure both Debug and Release for every environment. Even if you do not use them later, configure them in advance just in case. A reasonable configuration should look like the following.
| -------------------------- |------------------|
|           Scheme           |   Configurations |
| -------------------------- |------------------|
|      XXXXProjectTest       |      Debug       |
|                            |------------------|
|                            |      Release     |
| -------------------------- |------------------|
|      XXXXProjectAppStore   |      Debug       |
|                            |------------------|
|                            |      Release     |
| -------------------------- |------------------|
|      XXXXProjectUAT        |      Debug       |
|                            |------------------|
|                            |      Release     |
| -------------------------- |------------------|
Be careful here to distinguish between the Scheme name and the build configuration. Selecting a Scheme is only equivalent to selecting an environment; it does not indicate whether it is Debug or Release.
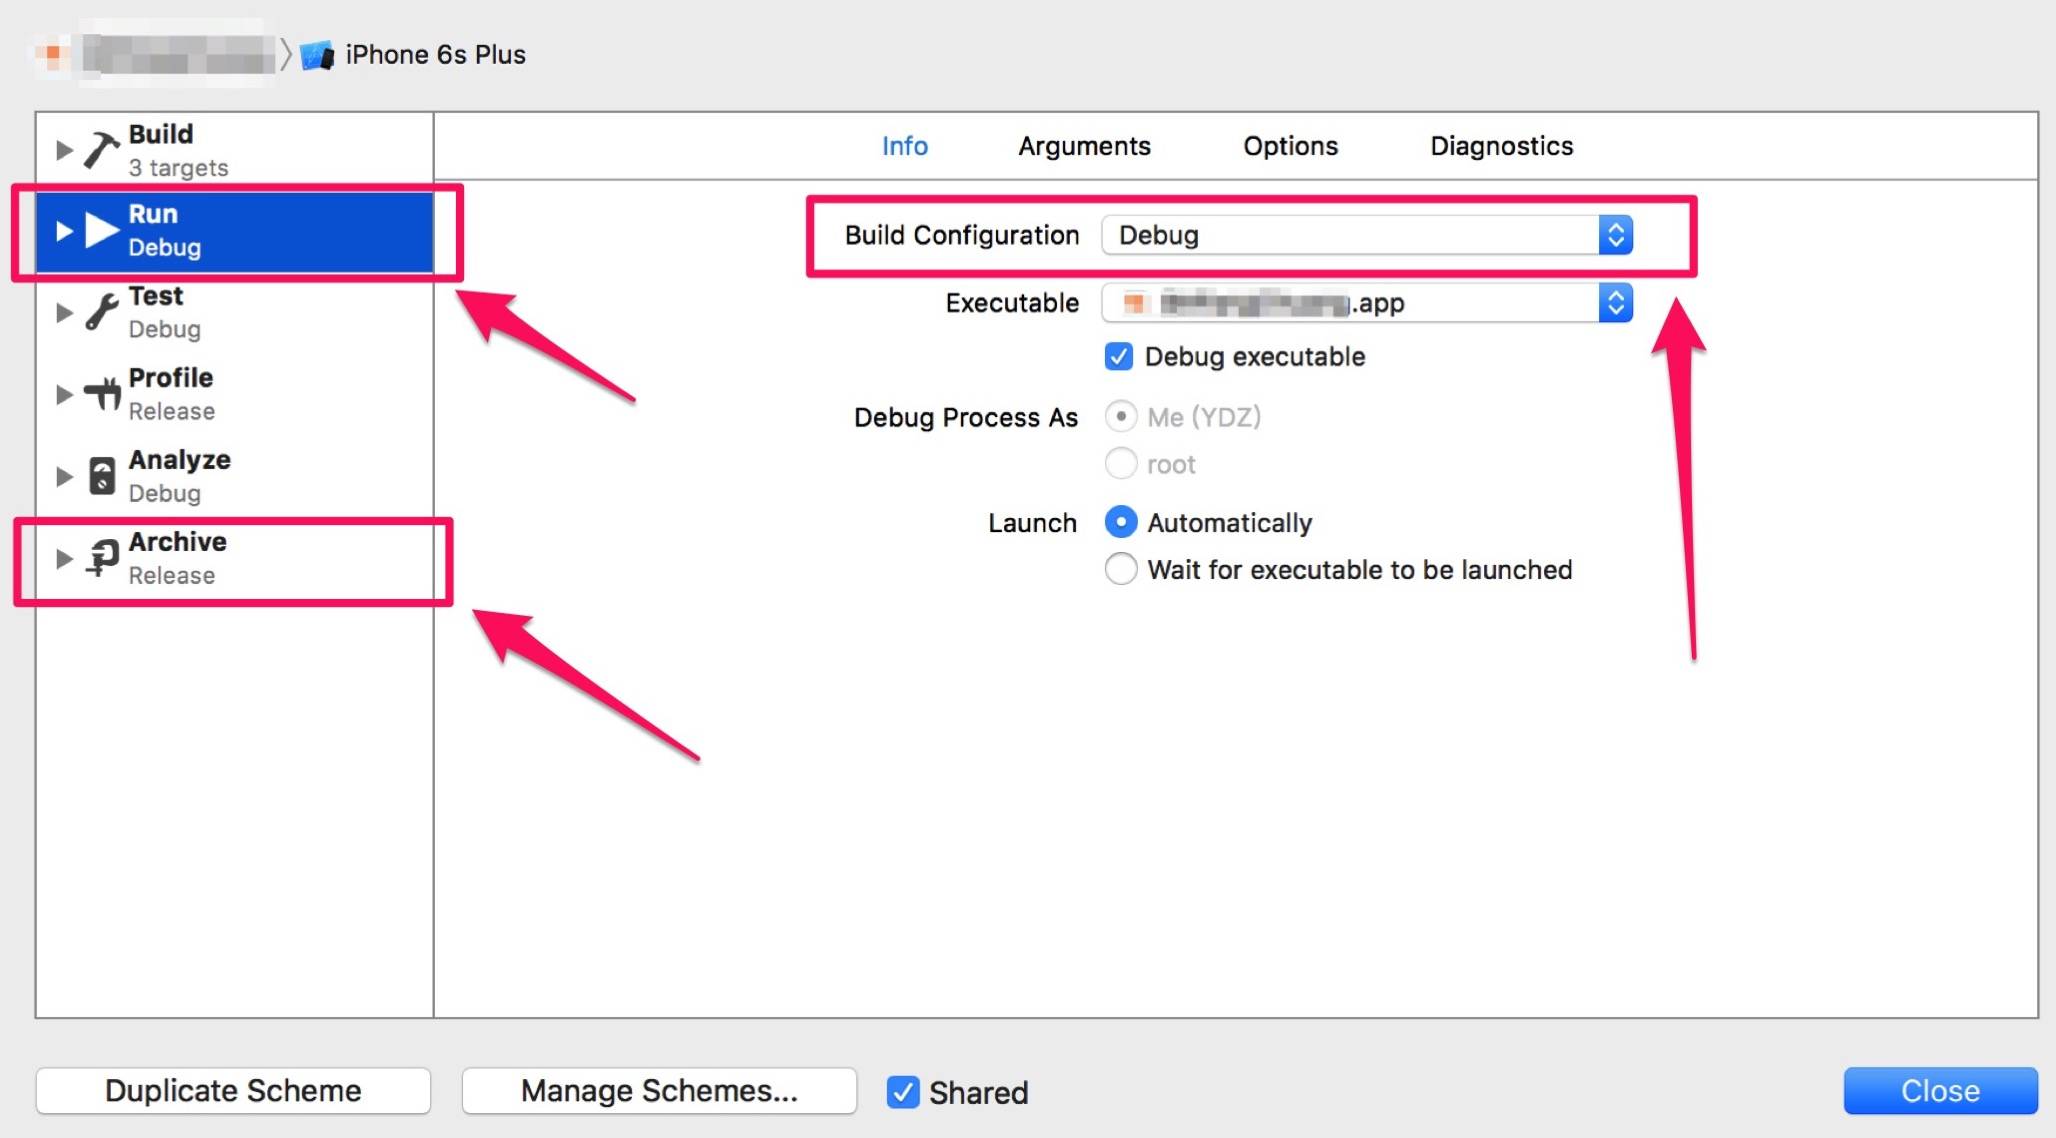
I recommend using Scheme only to configure the environment, while using the Run and Archive actions to configure Debug and Release. I recommend setting up each Scheme as shown above: Run maps to Debug, and Archive maps to Release.
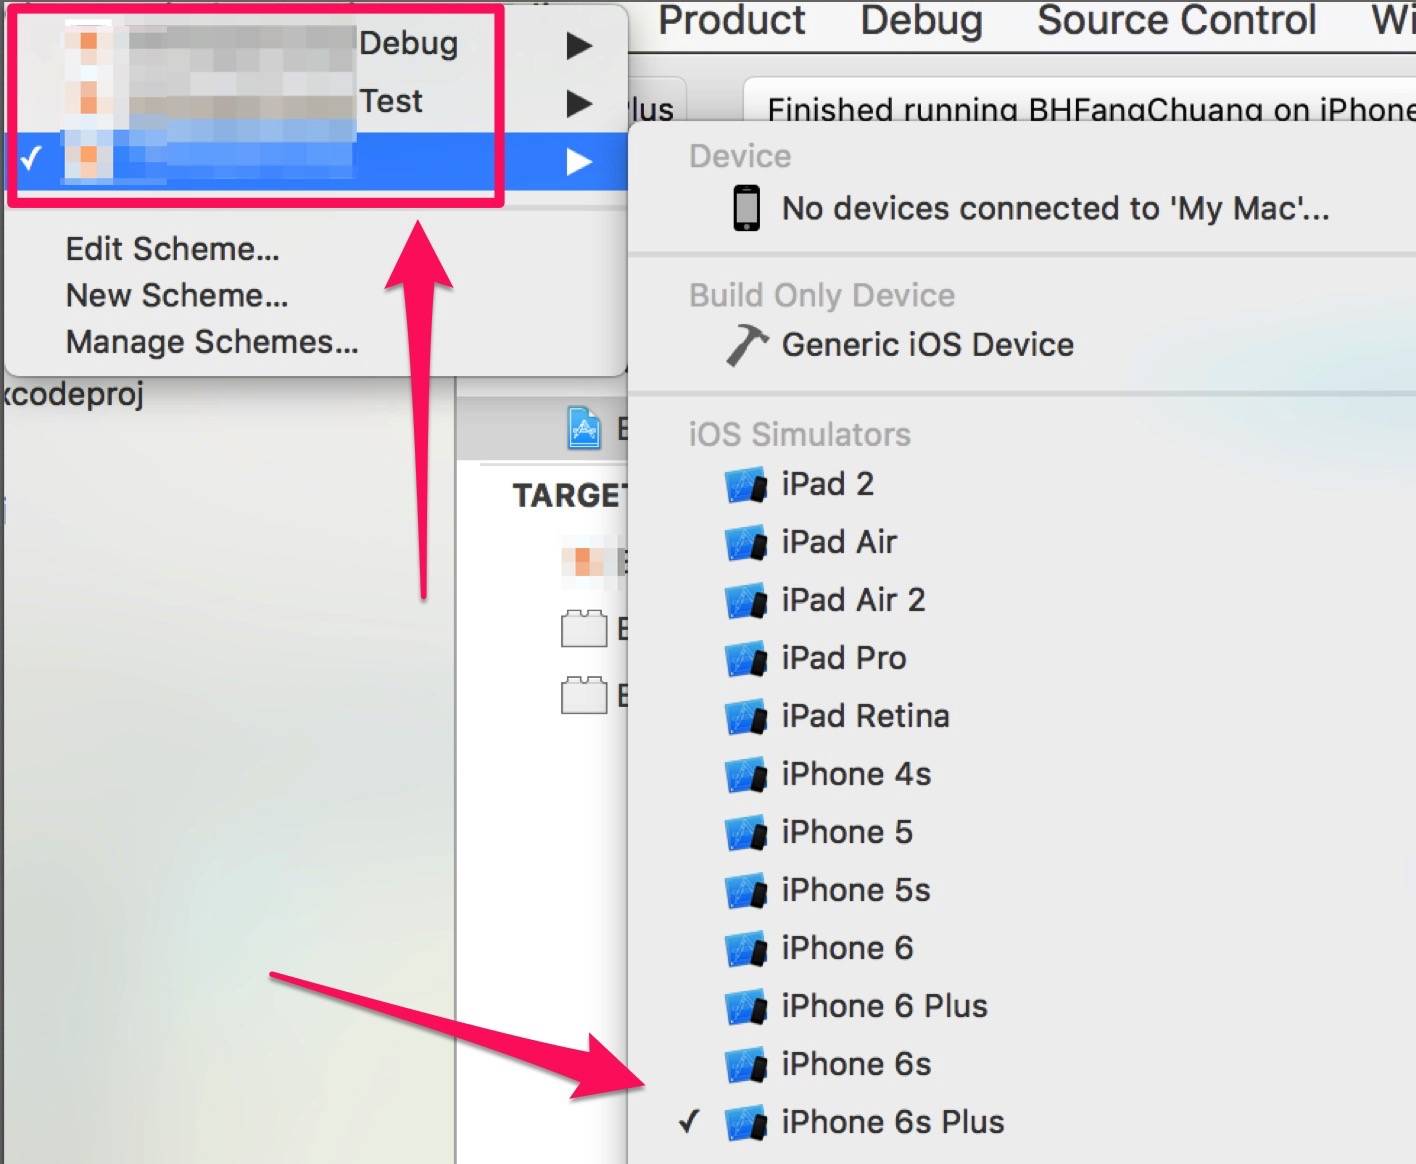
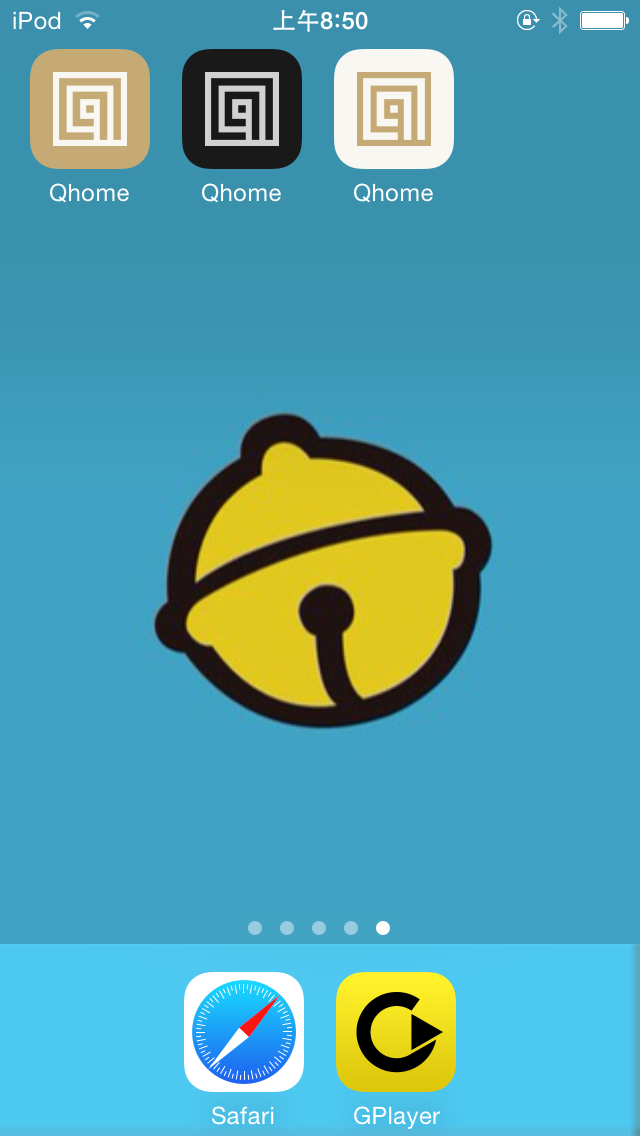
After completing the configuration above, you can choose different environments to run the app. You can generate apps for different environments on the device, and they can be installed at the same time, as shown below.
5. Configuring and Reading Environment Variables
Next, let’s look at several ways to dynamically configure environment variables.
1. Using the GCC Precompiled Header Parameter GCC_PREPROCESSOR_DEFINITIONS
Go to Build Settings and find Apple LLVM Preprocessing. Here you can find Preprocessor Macros, where you can add macro definitions for environment variables as identifiers. Preprocessor Macros can define different macros in advance for different environments.

As shown above, the circled area is actually an identifier.
Once we have these predefined identifiers, we can write code like the following.
#ifdef DEVELOP

#define searchURL @"http://www.baidu.com"

#define sociaURL  @"weibo.com"

#elif UAT

#define searchURL @"http://www.bing.com"

#define sociaURL  @"twitter.com"

#else

#define searchURL @"http://www.google.com"

#define sociaURL  @"facebook.com"

#endif
2. Dynamically Configure Environment Variables Using plist Files
First, create three plist files with the same name as the configuration files for the three environments.
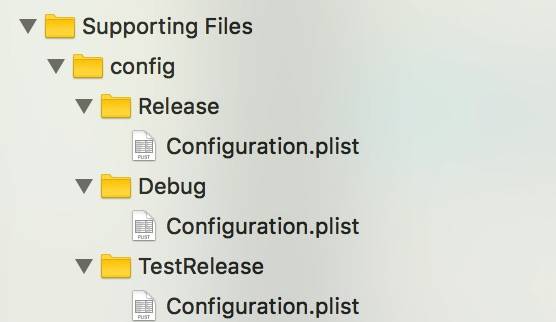
The benefit of using the same name here is that it makes the code simpler: you only need to read Configuration.plist. If the names were different, you would have to construct the plist filename for the corresponding environment before reading it.
As we all know, if you create two files with the same name in a folder, macOS will warn you that the names are identical and will not allow you to create them. So how do we create three files with the same name? It is actually very simple: put them in three different folders. As shown below:
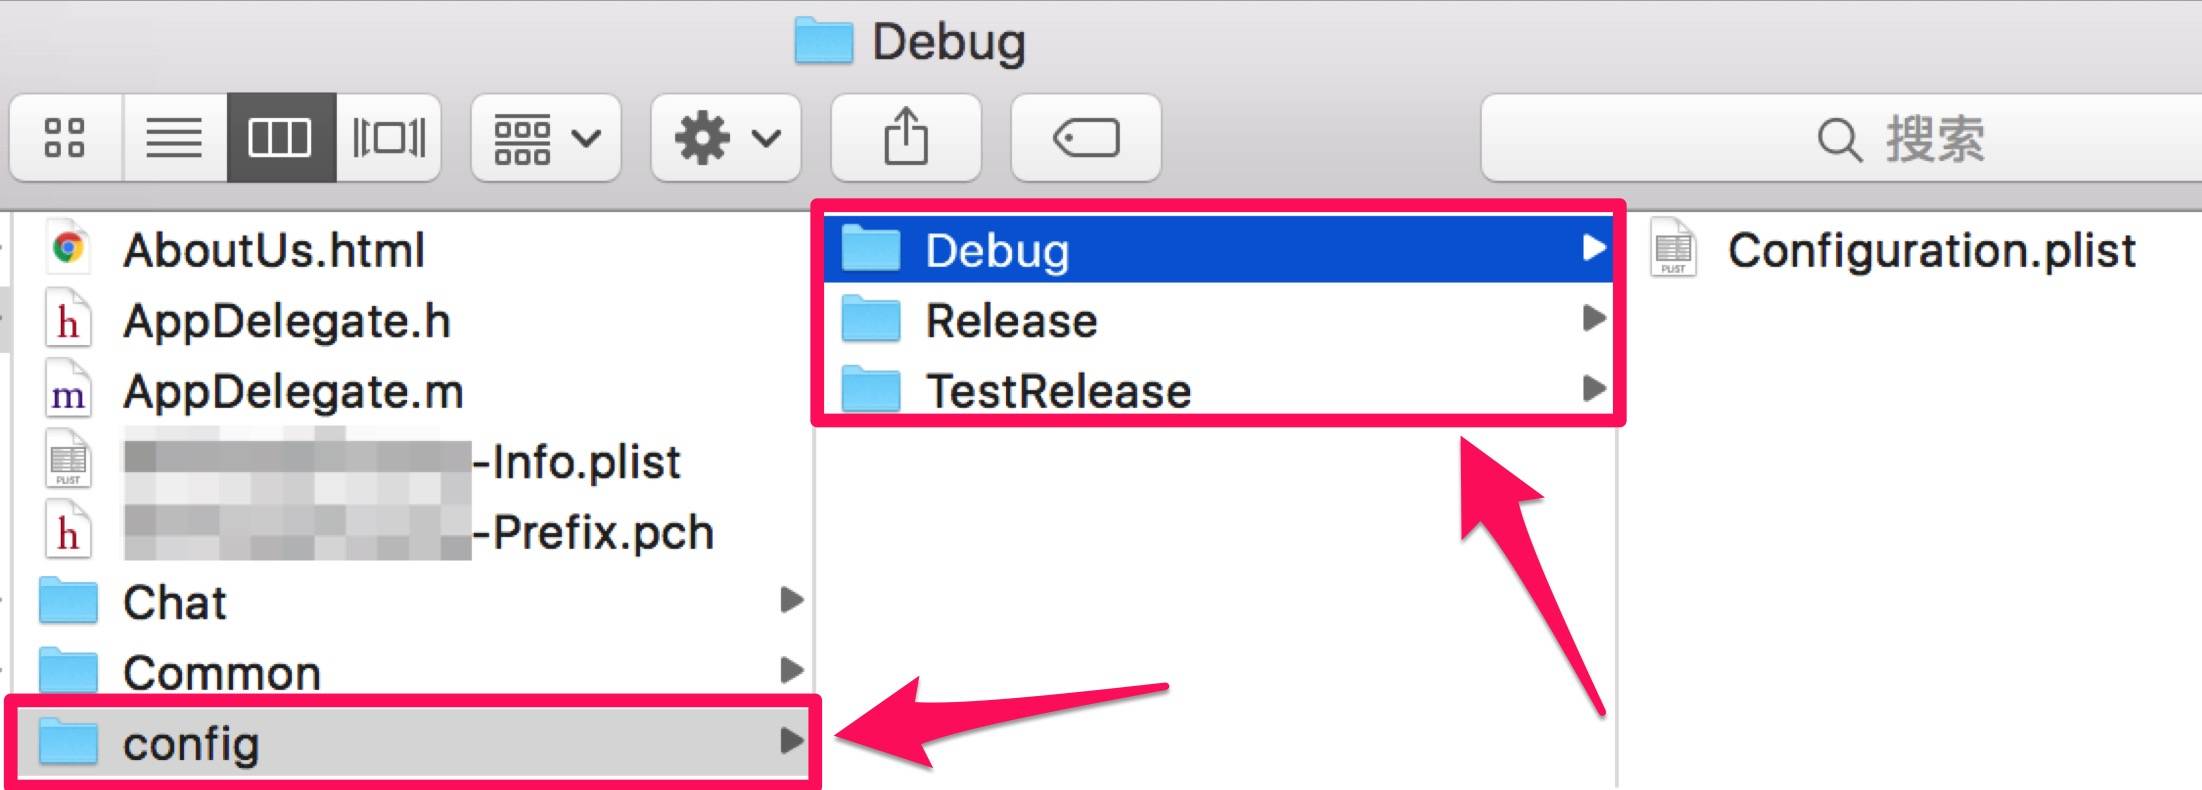
This is how I placed them; you can organize the files according to your own preferences.
Next, before running the app during compilation, we need to dynamically copy Configuration.plist into the app. This requires setting up a copy script.
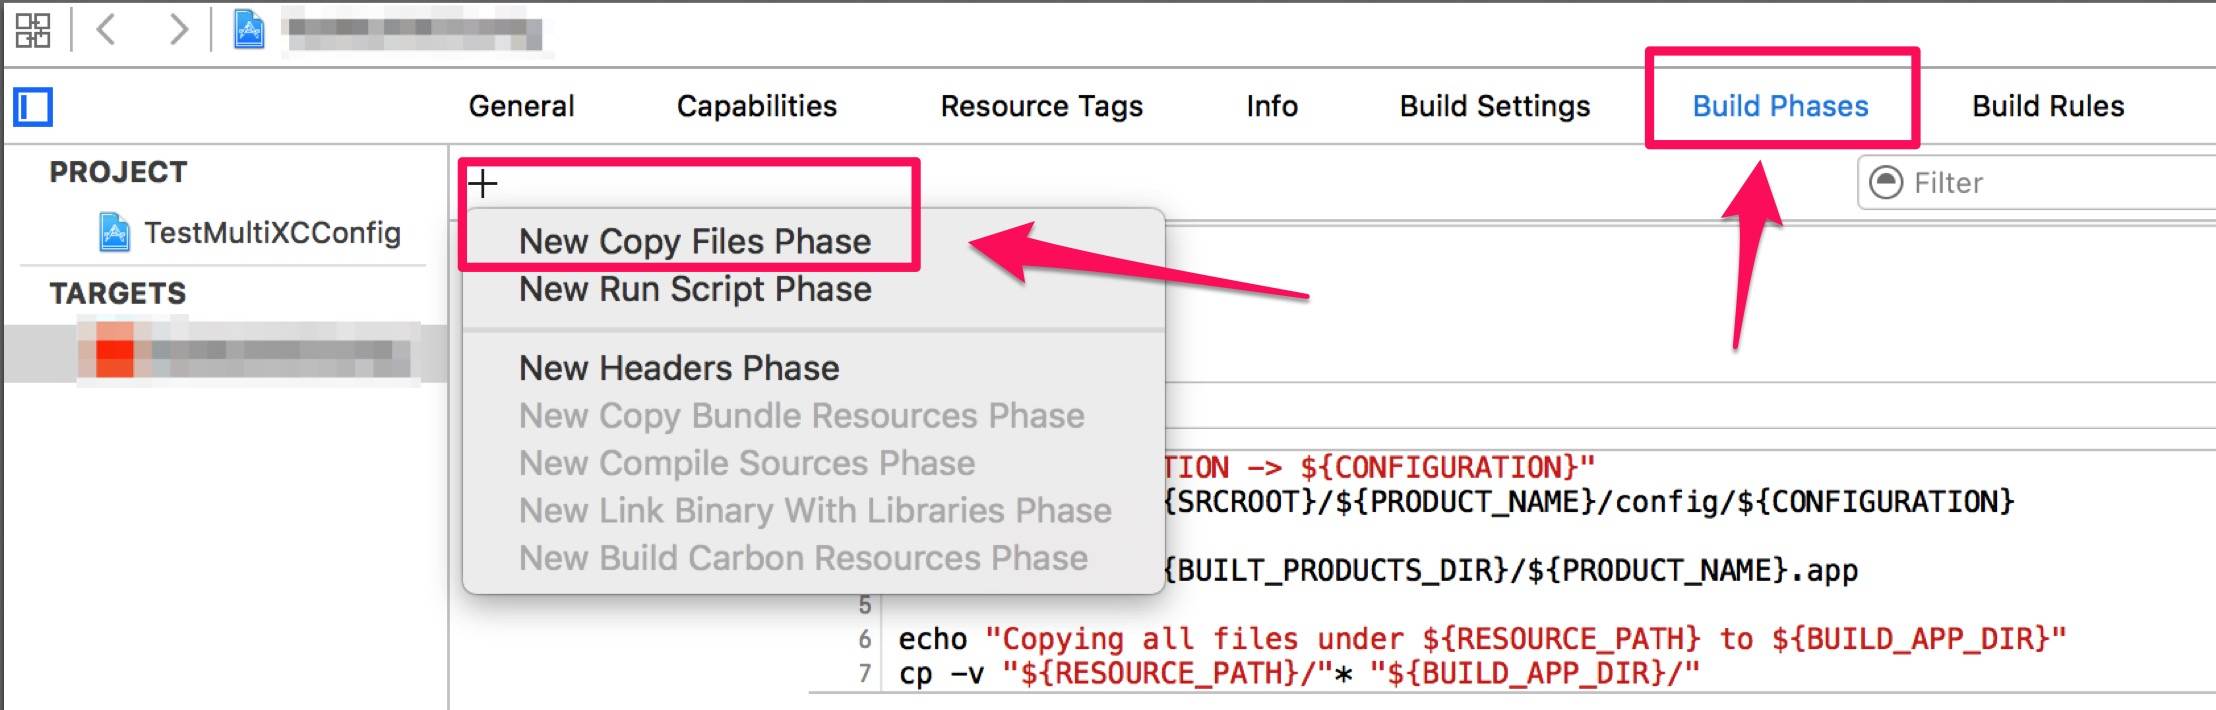
Go into our Target, find Build Phases, create a New Copy Files Phase, and rename it to Copy Configuration Files.
echo "CONFIGURATION -> ${CONFIGURATION}"
RESOURCE_PATH=${SRCROOT}/${PRODUCT_NAME}/config/${CONFIGURATION}

BUILD_APP_DIR=${BUILT_PRODUCTS_DIR}/${PRODUCT_NAME}.app

echo "Copying all files under ${RESOURCE_PATH} to ${BUILD_APP_DIR}"
cp -v "${RESOURCE_PATH}/"* "${BUILD_APP_DIR}/"
This script ensures that, at build time, one of our Configuration.plist files is selected and packaged into the app.
Then, by writing code to read the information from this plist each time, we can make the behavior dynamic.
- (NSString *) readValueFromConfigurationFile {
    NSBundle *bundle = [NSBundle mainBundle];
    NSString *path = [bundle pathForResource:@"Configuration" ofType:@"plist"];
    NSDictionary *config = [NSDictionary dictionaryWithContentsOfFile:path];
    return config[@"serverURL"];
}
Here I assume the plist file has a preconfigured string named serverURL; using this approach, you can read it out. Of course, you can also configure arrays and dictionaries in the plist; just adjust the return value and the key accordingly.
3. Use a singleton to handle environment switching
Of course, you can also use a singleton to implement environment switching. Create a singleton, then add a list to the settings menu that enumerates all environments. After the user makes a selection, the singleton initializes the environment chosen by the user. Unlike the approaches above, this method switches between multiple environments within a single app. Choose whichever approach fits your needs.
II. Use files to configure multiple environments
Speaking of xcconfig, Apple’s official documentation does not go into much detail. After searching online, I found another detailed unofficial document: The Unofficial Guide to xcconfig files
Before discussing xcconfig, let’s first clarify a few concepts.
1. Distinguish several concepts
Let’s first distinguish the relationship among Xcode Workspace, Xcode Scheme, Xcode Project, Xcode Target, and Build Settings. These relationships are actually already explained very clearly in Apple’s official documentation. For details, see Xcode Concepts.
Here is my brief interpretation of the documentation.
Xcode Workspace
A workspace is an Xcode document that groups projects and other documents so you can work on them together. A workspace can contain any number of Xcode projects, plus any other files you want to include. In addition to organizing all the files in each Xcode project, a workspace provides implicit and explicit relationships among the included projects and their targets.
Everyone should already be familiar with the concept of a workspace. It can contain multiple projects and other document files.
Xcode Project
An Xcode project is a repository for all the files, resources, and information required to build one or more software products. A project contains all the elements used to build your products and maintains the relationships between those elements. It contains one or more targets, which specify how to build products. A project defines default build settings for all the targets in the project (each target can also specify its own build settings, which override the project build settings).
A project is a repository. It contains all files and resources belonging to the project, as well as the information needed to generate one or more software products. Each project contains one or more targets, and each target tells us how to produce products. A project defines the default build settings for all targets. Each target can also define its own build settings, and a target’s build settings override the project’s build settings.
This last sentence is important; we will use this point later when configuring xcconfig.
An Xcode Project file contains the following information: references to resource files (source .h and .m files, frameworks, resource files such as plist, bundle files, image files such as image.xcassets, as well as Interface Builder (nib) and storyboard files), groups used to organize source files in the file navigator, project-level build configurations (Debug\\Release), targets, and the executable environment used for debugging or testing the program.
Xcode Target
A target specifies a product to build and contains the instructions for building the product from a set of files in a project or workspace. A target defines a single product; it organizes the inputs into the build system—the source files and instructions for processing those source files—required to build that product. Projects can contain one or more targets, each of which produces one product.
A target produces one and only one product. It integrates the files required to build that product and the instruction set needed to process those files into the build system. Projects can contain one or more targets, and each target produces one product.
It is worth noting that the build setting parameters in each target are inherited from the project’s build settings. Once you modify any setting in the target to override the project settings, the effective setting will be the one configured in the target. A project can contain multiple targets, but at any given time, only one target is active. You can use an Xcode scheme to specify which target is active.
Build Settings
A build setting is a variable that contains information about how a particular aspect of a product’s build process should be performed. For example, the information in a build setting can specify which options Xcode passes to the compiler.
Build settings contain the parameter information required during the product build process. A project’s build settings apply to all targets in the entire project, while a target’s build settings override the project’s build settings; the overridden configuration is determined by the target.
A build configuration specifies a set of build settings used to generate the product of a particular target. For example, Debug and Release are build configurations.
Xcode Scheme
An Xcode scheme defines a collection of targets to build, a configuration to use when building, and a collection of tests to execute.
A scheme contains a set of targets (there may be dependencies between these targets), a configuration, and a set of tests to execute.
To illustrate the relationship among these five concepts with a possibly imperfect analogy:
An Xcode Workspace is like a factory, and an Xcode Project is like a workshop. Each workshop can produce products independently of the factory (a project can exist independently of a workspace), but when multiple workshops are combined, they need a factory to organize them (if you use CocoaPods, you need to use a workspace). An Xcode Target is like an assembly line, and each assembly line produces only one type of product. Build Settings are the recipe for producing the product; if you are making soda, Build Settings are the formulas for each ingredient. An Xcode Scheme is the production plan: it includes the assembly-line production, the recipe, and also the quality inspection (test) after production is complete.
2. Create an xcconfig file
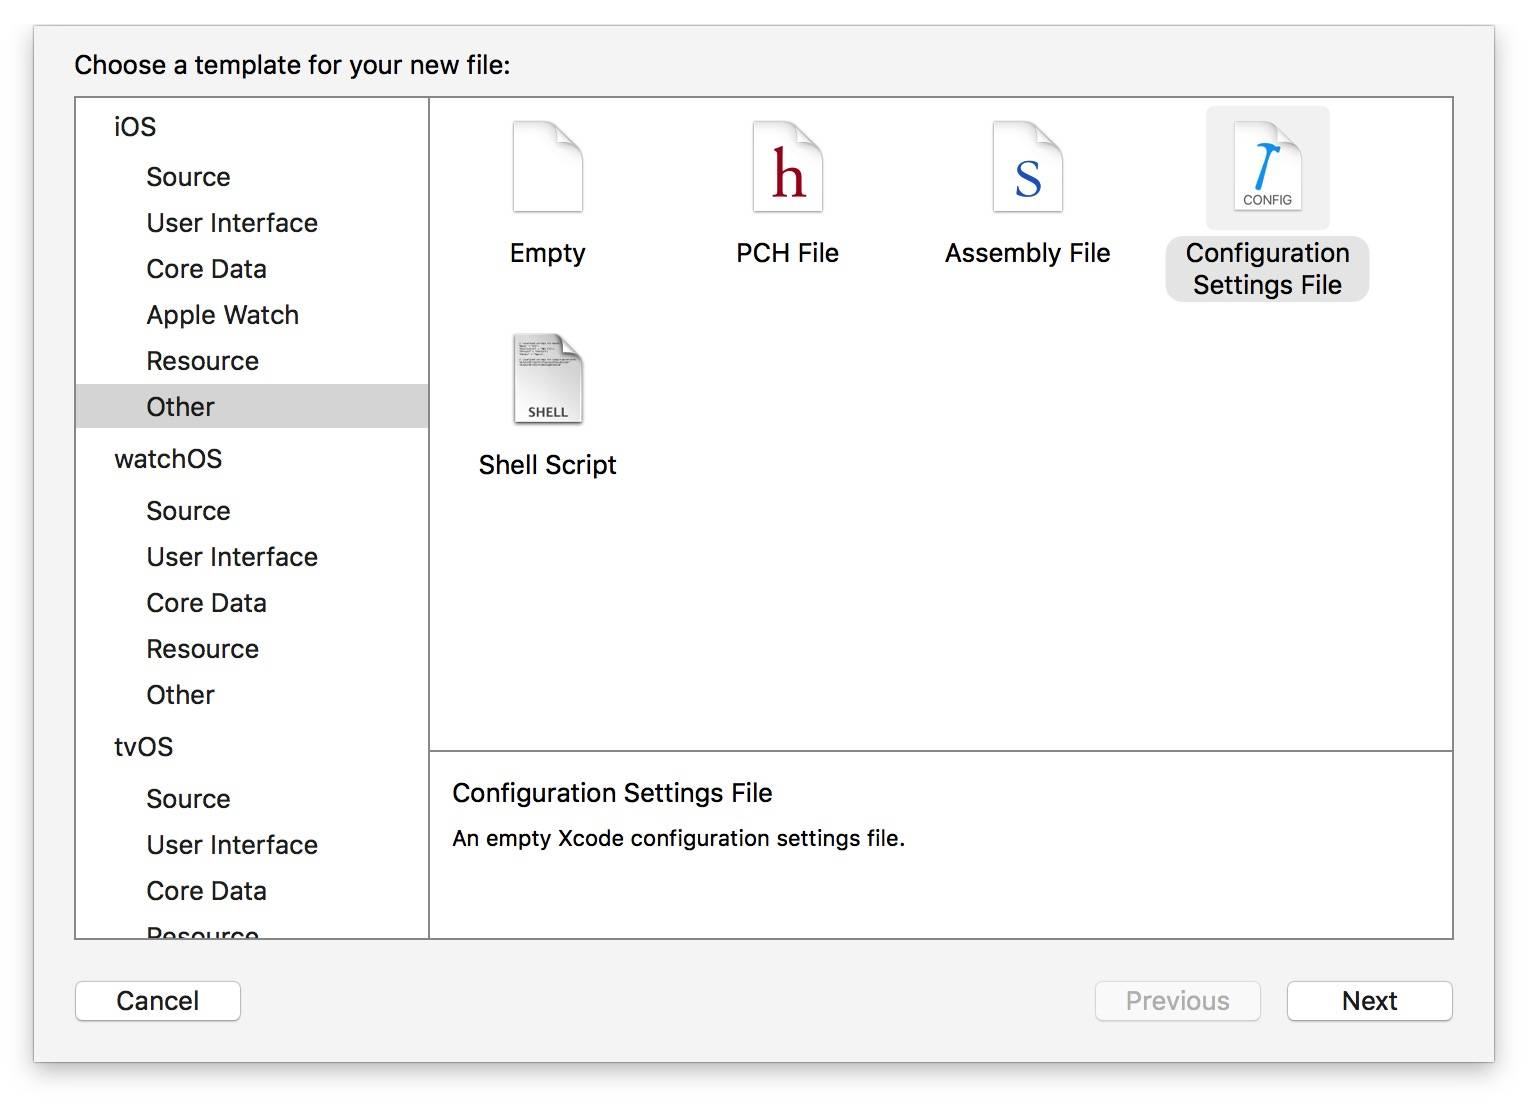
After creating this file, configure it in the project.
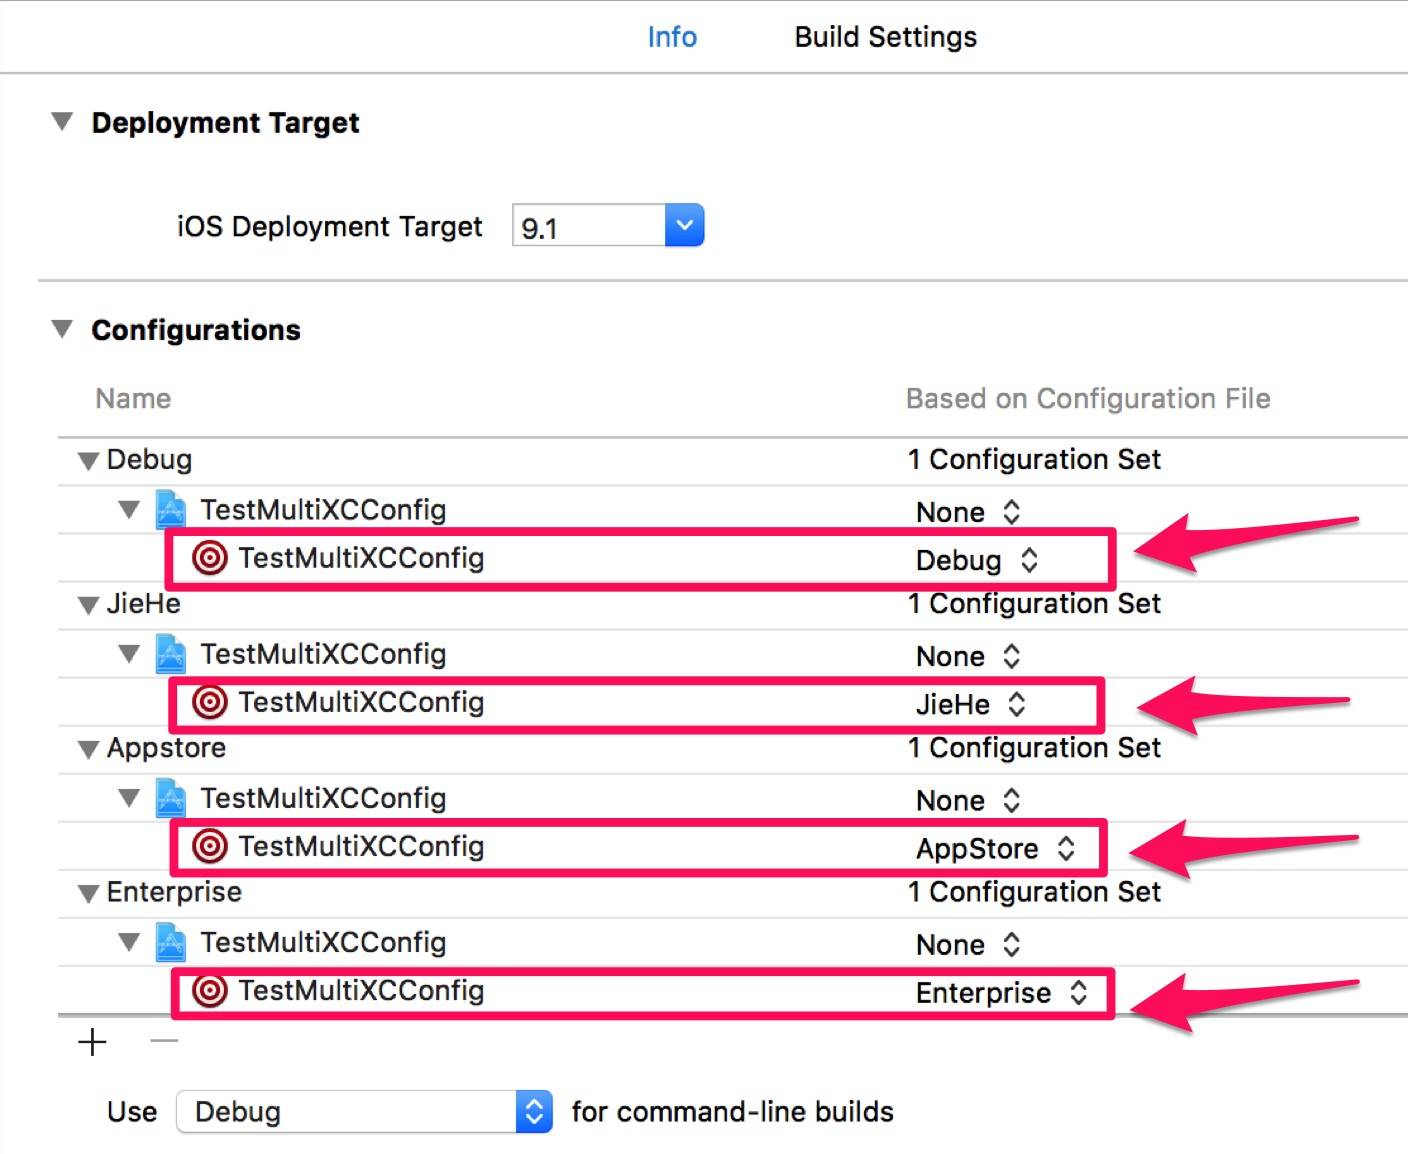
In these places, replace the configuration file with the file we just created.
Next, we need to write our xcconfig file. You can put quite a lot in this file. Careful readers will notice that CocoaPods, which we have been using all along, actually uses this file to configure compilation parameters. If we look at any simple CocoaPods xcconfig file, it looks like the following image:
GCC_PREPROCESSOR_DEFINITIONS = $(inherited) COCOAPODS=1
HEADER_SEARCH_PATHS = $(inherited) "${PODS_ROOT}/Headers/Public" "${PODS_ROOT}/Headers/Public/Forms"
OTHER_CFLAGS = $(inherited) -isystem "${PODS_ROOT}/Headers/Public" -isystem "${PODS_ROOT}/Headers/Public/Forms"
OTHER_LDFLAGS = $(inherited) -ObjC -l"Forms"
PODS_ROOT = ${SRCROOT}/Pods
Since we need to configure the network environment, we can write it like this.
//Network request baseurl
REQUESTBASE_URL = @"http:\\/\\/10.20.100.1"
Of course, it can also be written in the style of CocoaPods.
GCC_PREPROCESSOR_DEFINITIONS = $(inherited) WEBSERVICE_URL='$(REQUESTBASE_URL)' MESSAGE_SYSTEM_URL='$(MESSAGE_SYSTEM_URL)'
This uses a GCC_PREPROCESSOR_DEFINITIONS build setting.
Space-separated list of option specifications. Specifies preprocessor macros in the form foo (for a simple #define) or foo=1 (for a value definition). This list is passed to the compiler through the gcc -D option when compiling precompiled headers and implementation files.
GCC_PREPROCESSOR_DEFINITIONS is a GCC precompiled-header setting. In general, we can assign default values to preprocessor macro definitions under Build Settings in the Project file.
It is located in Build Settings under Apple LLVM 7.X - Preprocessing - Preprocessor Macros.
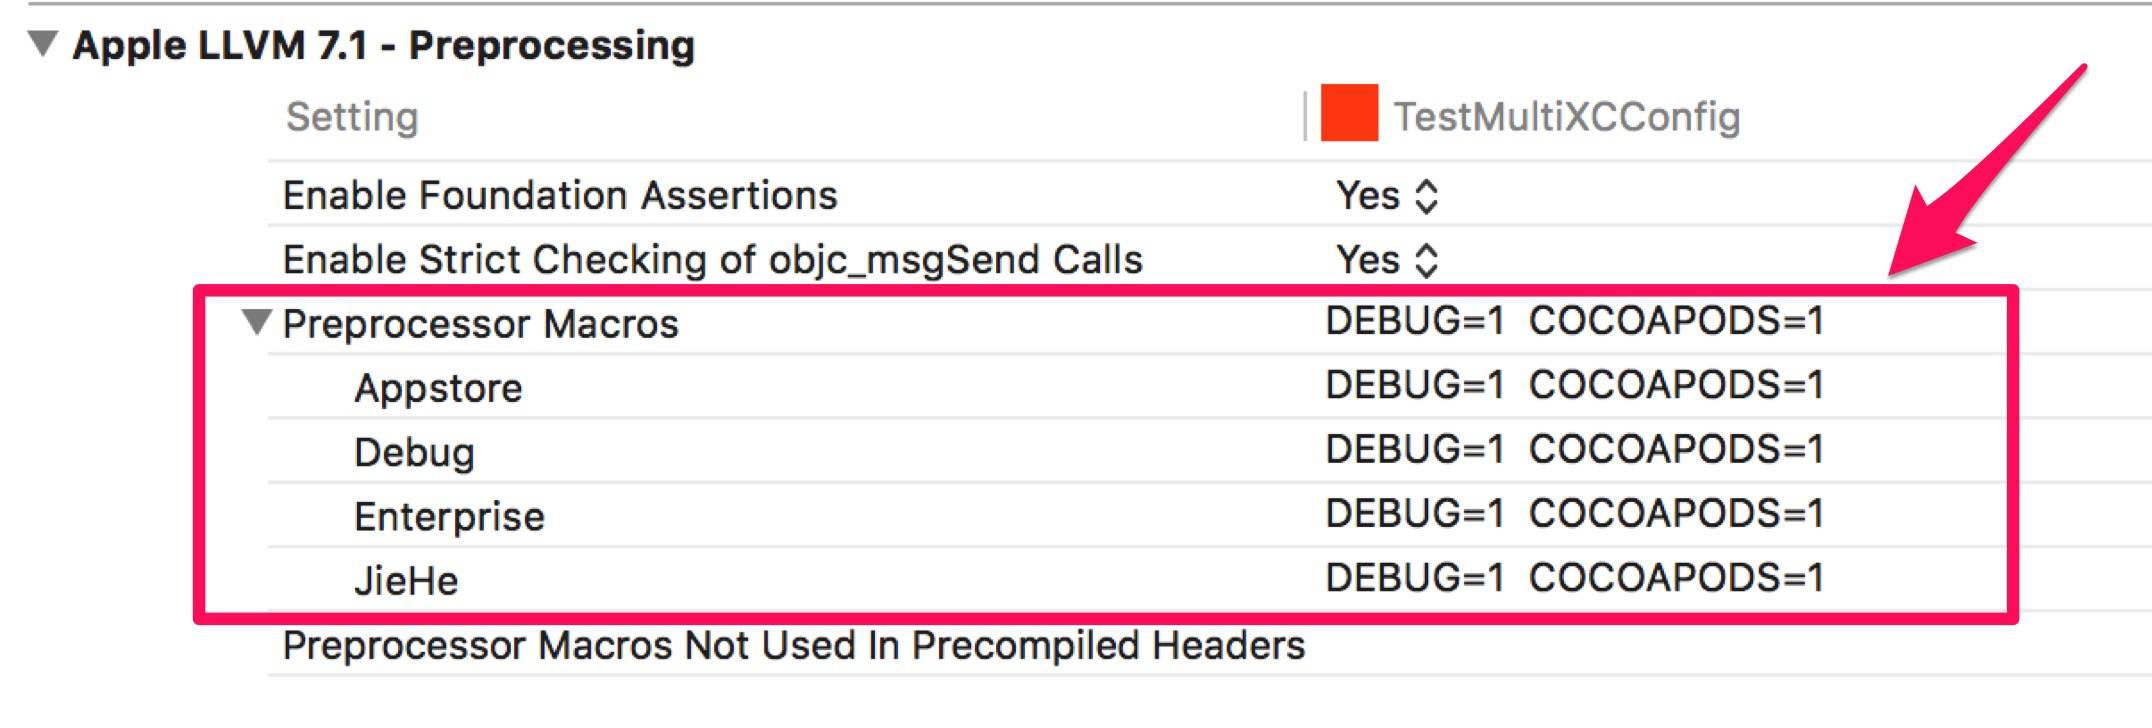
Preprocessor Macros are actually configured by default according to the Configuration option. You can predefine different macros for different environments, or define different values for the same variable in different environments.
With xcconfig, we can write different Configuration options into different files. Each xcconfig can configure property values in Build Settings. In essence, this modifies the value of GCC_PREPROCESSOR_DEFINITIONS through xcconfig, allowing us to meet the requirement of dynamically configuring environments.
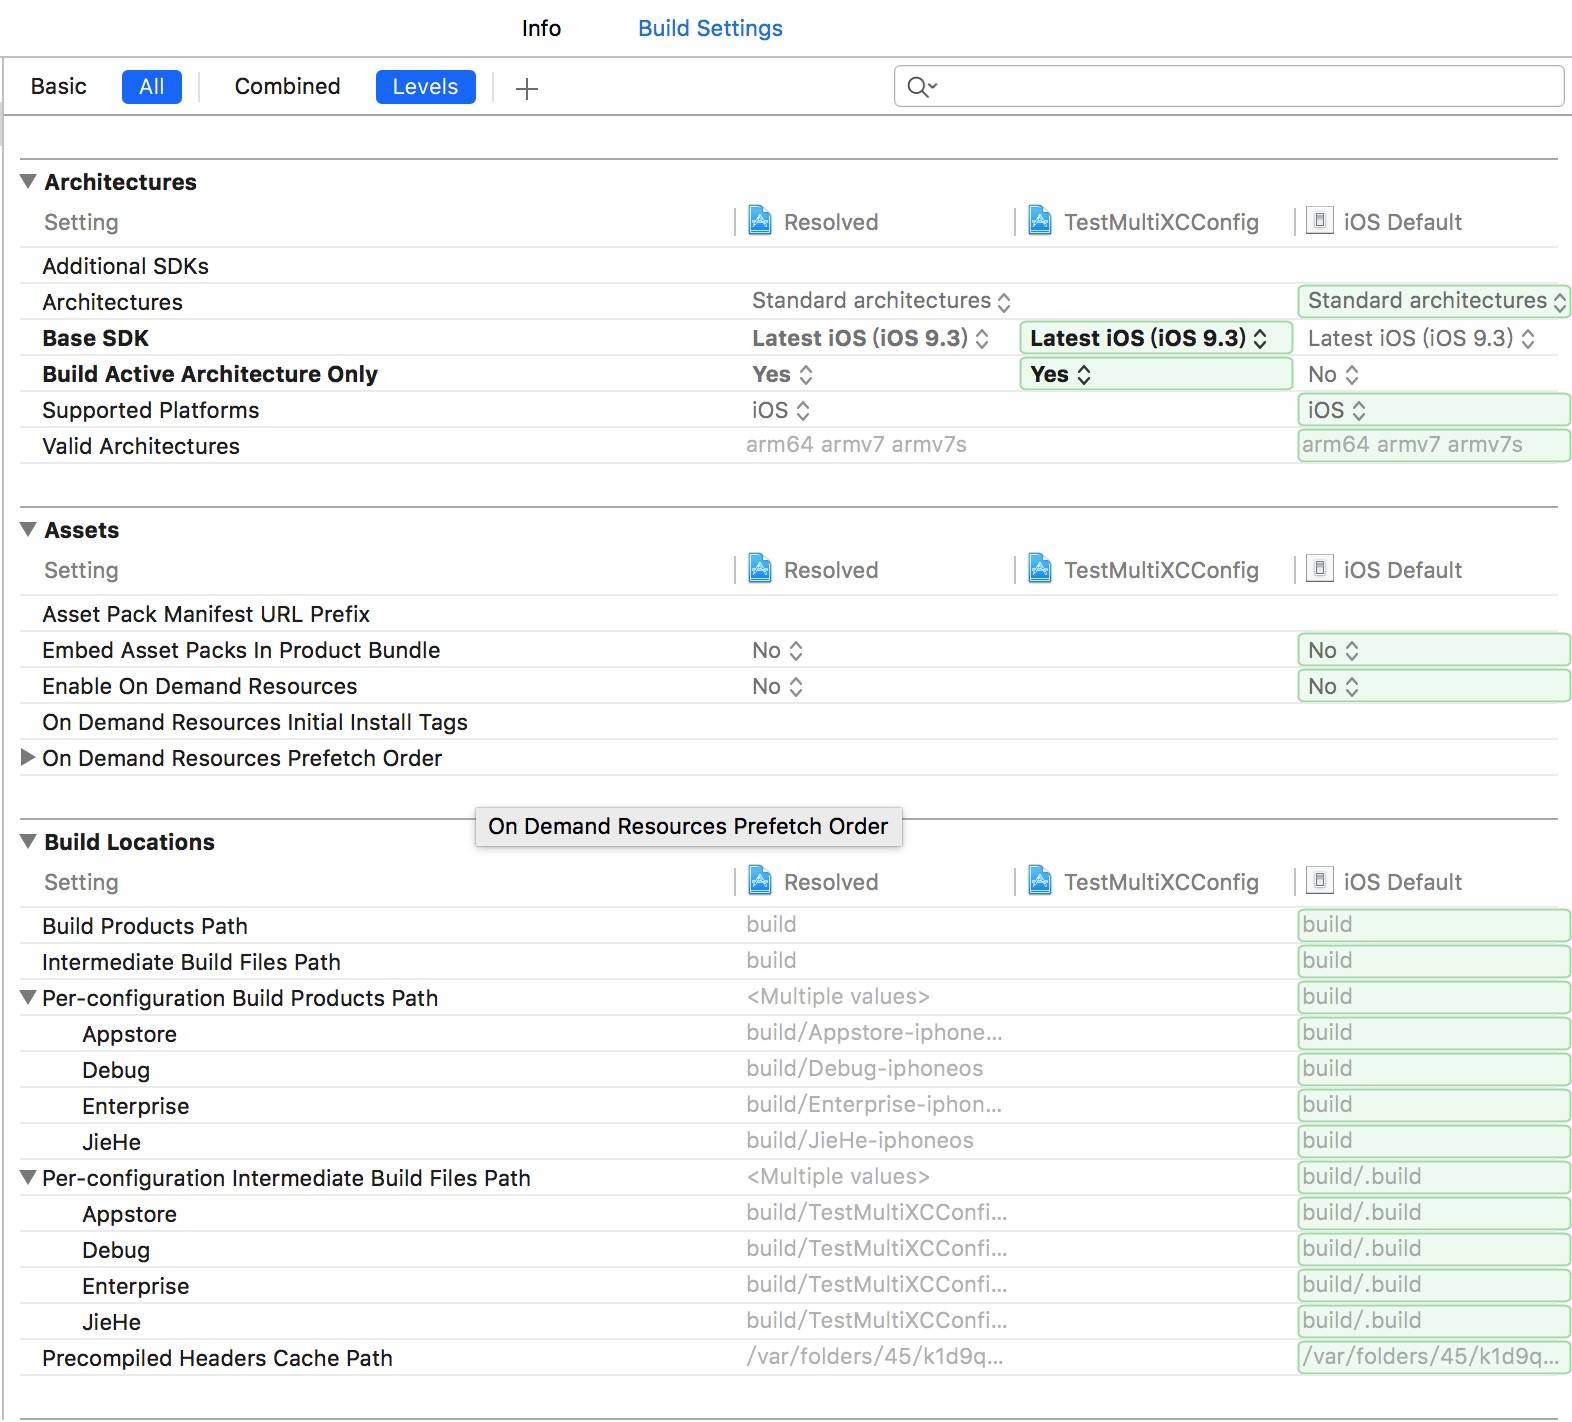
One final point to mention is the level of this configuration file. With so many local configurations, which one ultimately takes effect? Open the Levels view in Build Settings, and let’s look at an example.

We can currently see five configurations, and they have priorities. The priority decreases from left to right. Resolved = target-level > project-level > custom configuration file > iOS default configuration. The first column on the left always shows the final configuration result currently in effect.
Once we understand this priority order, we can configure our app more flexibly.
That is basically all for the common usage of xcconfig configuration. But there is more to it than that.
You can also use xcconfig to dynamically configure many parameters in Build Settings. This is actually similar to how CocoaPods works. There is, however, a very elegant approach from an expert that is worth learning from if you are interested. The open-source library xcconfigs by iOS expert Justin Spahr-Summers provides an authoritative-style template. It is a great library for learning how to use xcconfig, and I highly recommend it.
Finally, here is a demo that configures CocoaPods, xcconfig files, and Build Configuration. Feel free to take a look and give feedback: Demo.
3. Using Targets to Configure Multiple Environments
To configure multiple environments, a Scheme and xcconfig are actually more than enough. So why include this third approach? Although using multiple Targets just to configure “something as small as” multiple environments is a bit of overkill, it can indeed satisfy the requirement.
As for the technique of building with Targets, I practiced it at the company I worked for two years ago. The requirement at the time was to build an OEM product. Our company had its main product and also built OEM products for other companies. Once OEM is mentioned, you can probably see the clever use of Targets here. With Targets, you can instantly generate a large number of apps in batches.
In 2013, Tang Qiao also published an article about Targets: Technical Details of the Yuantiku iOS Client (Part 1): Using Multiple Targets to Build Many Similar Apps. My former company implemented this kind of functionality in 2014 as well.
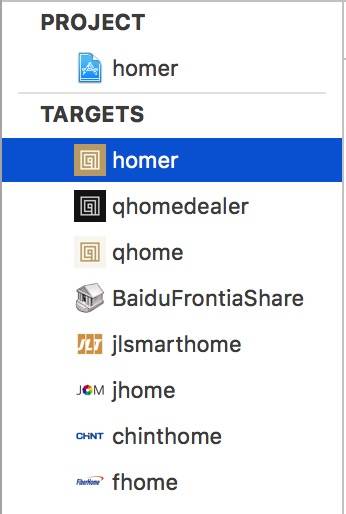
With just one codebase, you can produce seven apps. The seven apps have different certificates and different configurations, but only one codebase needs to be maintained to achieve the goal of maintaining all seven apps.
Next, let’s look at how to create Targets. There are two ways.
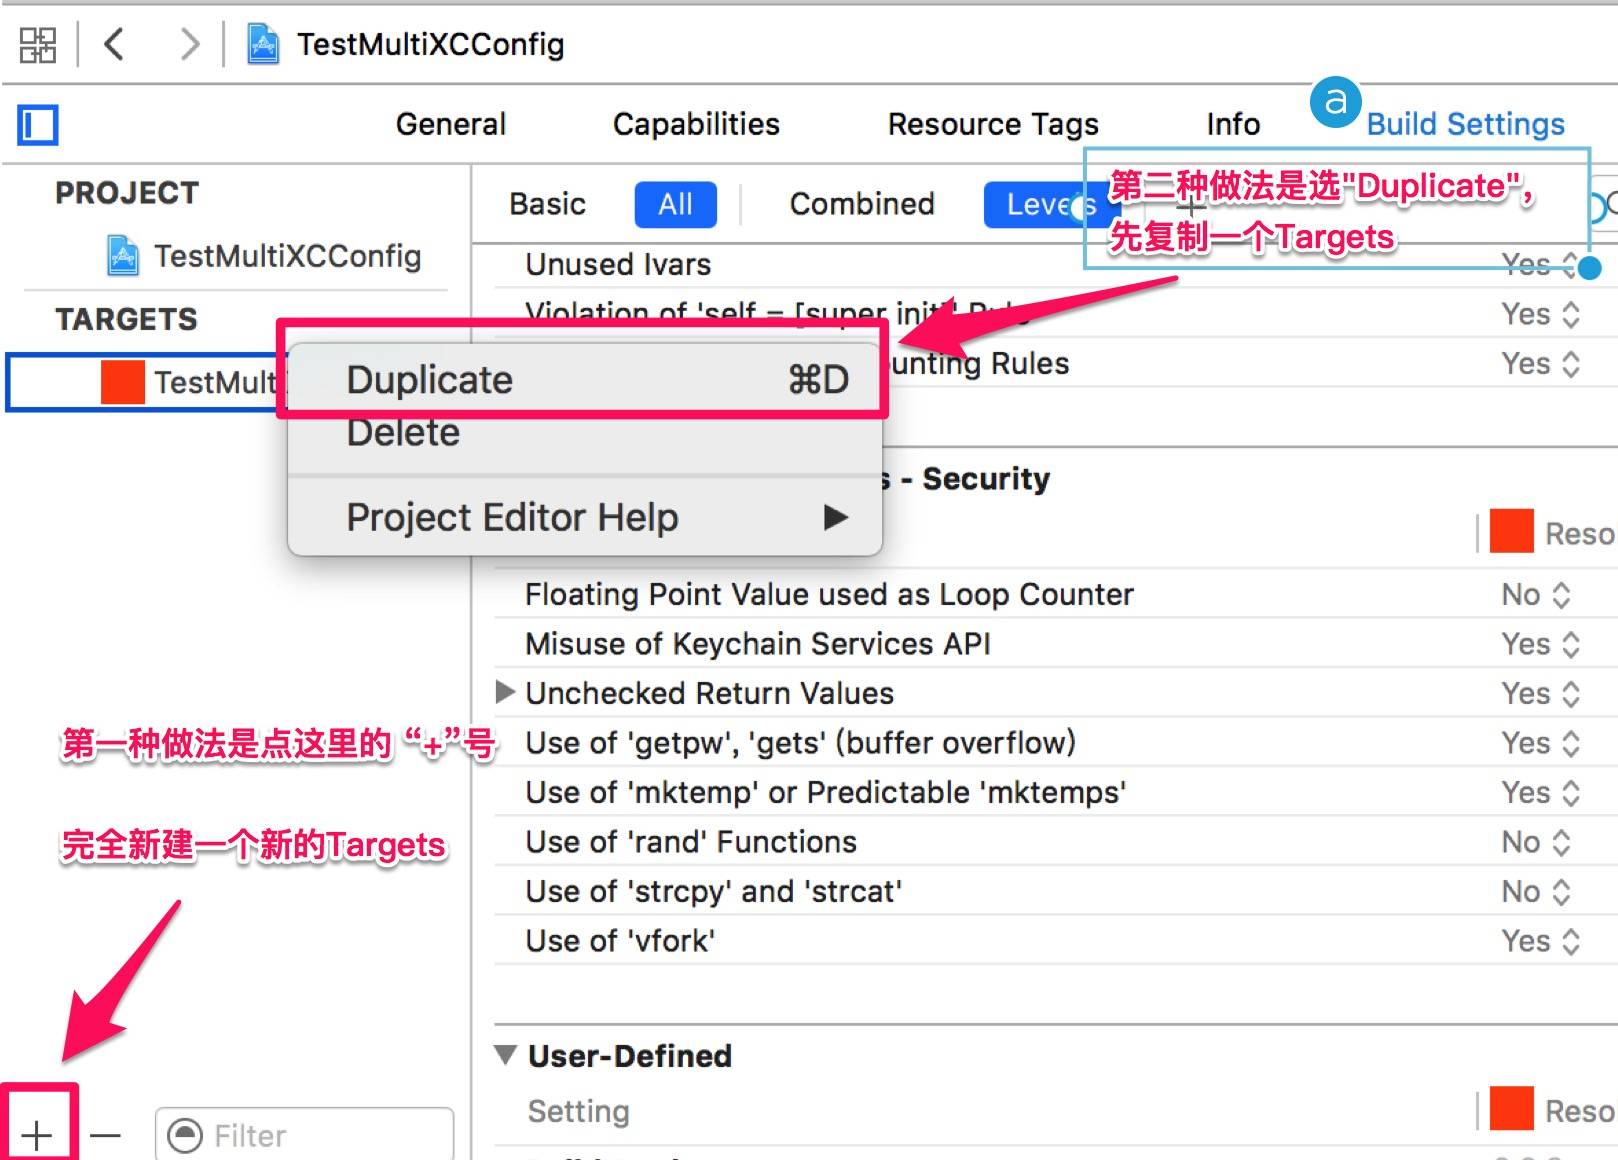
One method is to create a completely new Target, and the other is to duplicate an existing Target.
If you use the first method to create a Target, what you do afterward depends on your requirements. If you also want to do something like OEM, you can delete the newly created project and still maintain a single local codebase. Then, in the newly created Target’s Build Phases, add the existing local code and configure the parameters however you like. This also lets you maintain multiple apps with one codebase.
The second method is to duplicate an existing Target. With this approach, you only need to modify the parameters yourself.
Now let’s talk about Target parameters.
Because we have created a new Target, it is equivalent to creating a new app. Therefore, all files inside it can be changed, including info.plist, source references, Build Settings… every parameter can be modified. This is not limited to modifying Scheme and xcconfig. That is why I said earlier that using Targets just to configure multiple environments is a bit of overkill, but it can certainly accomplish the goal. As mentioned in Chapter 2, a Target is like an assembly line and is second only to the Project in importance. You can imagine that with Targets, there is almost nothing we cannot modify.
P.S. One last thing about Targets: if you have multiple apps, and more than 80% of the code among these apps is exactly the same—or only a few screens differ while the logic is entirely the same—I recommend using Targets. That way, you only need to maintain one codebase. Maintaining multiple copies of identical code is extremely inefficient. A single bug would require repeated changes across multiple codebases, which is time-consuming and labor-intensive.
At this point, someone might ask: if we maintain only one codebase, what happens if these apps have different requirements in the future? For example, what if they need to enter different screens, navigate to different screens, or display pages differently? This is actually very simple. In Compile Sources inside Targets, you can add different compiled source files for different Targets. You only need to add the code for different screens to each Target for compilation. Then, on the screen that performs the navigation, add macros to control each app so it navigates to the corresponding screen. In this way, you still maintain a single local codebase; each Target simply compiles a subset of that codebase. This remains convenient to maintain, while also supporting different screens and different requirements for different apps.
Conclusion
The requirement behind this article actually came from the previous article on Jenkins automated continuous integration: there was a need to build packages for different environments. Before using Jenkins, we could simply change the URL and run the app once. Although that approach was not very elegant, it was not troublesome either. Now that we want continuous integration, we have to separate the environments and configure the parameters correctly, so Jenkins can build packages for multiple environments at once—truly achieving multi-environment continuous integration.
Finally, we can build packages for different environments. Feedback is welcome.
