iOS Modularization — An Analysis of Routing Design
Preface
As user demands continue to grow, expectations for an app’s user experience are also becoming increasingly high. To better address various requirements, developers have evolved app architectures from the originally simple MVC to more complex architectures such as MVVM and VIPER, from a software engineering perspective. Choosing an architecture that fits the business is intended to make the project easier to maintain later on.
But users are still not satisfied. They continue to place more and higher demands on developers: not only do they want a high-quality user experience, they also require rapid iteration—ideally a new feature every day—and they even expect to experience new features without updating the app. To meet these user needs, developers started refactoring existing projects with technologies such as H5, ReactNative, and Weex. The project architecture has also become more complex: vertically, it is layered into a networking layer, UI layer, and data persistence layer. Horizontally, each layer is also componentized according to business needs. Although this makes development more efficient and maintenance easier, how do we decouple the layers, decouple individual screens and components, and reduce coupling between components? How can we ensure the entire system maintains the characteristics of “high cohesion and low coupling” no matter how complex it becomes? This series of problems is now in front of developers and urgently needs to be solved. Today, let’s talk about some ideas for solving this problem.
Table of Contents
- 1.Introduction
- 2.What Problems Can App Routing Solve
- 3.Implementing Navigation Between Apps
- 4.Routing Design Between Components Inside an App
- 5.Pros and Cons of Different Solutions
- 6.The Best Solution
1. Introduction
The broader front-end ecosystem has been evolving for many years, and I believe it has certainly encountered similar problems. Over the past two years, SPA development has grown extremely rapidly, and React and Vue have consistently been at the center of attention. So let’s take a look at how they handle this problem.

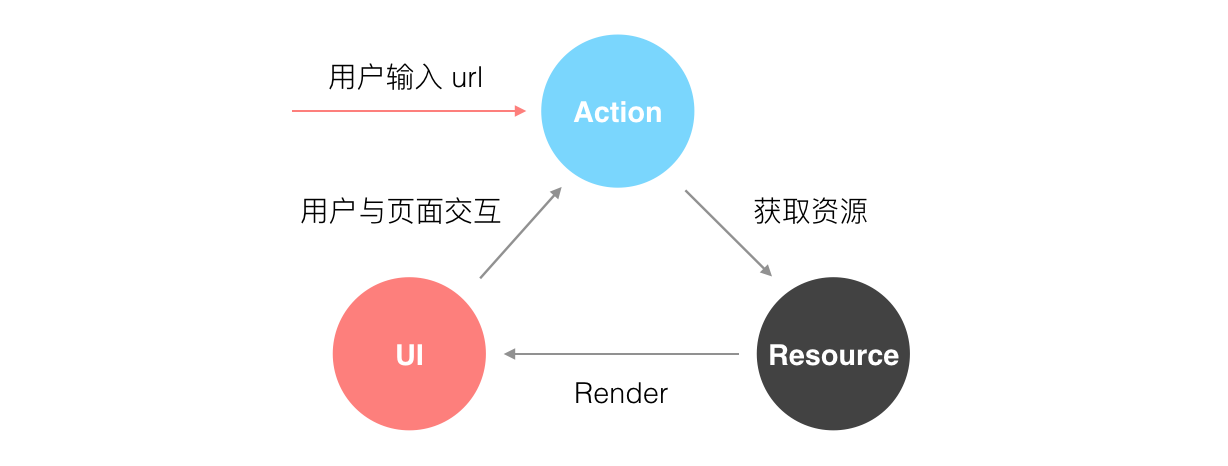
In SPA single-page applications, routing plays a critical role. The main purpose of routing is to keep the view and the URL in sync. From a front-end perspective, a view is considered a representation of a resource. When users interact with a page, the application switches among several interaction states, and routing can record certain important states, such as whether the user is logged in while browsing a website and which page of the website they are visiting. These changes are also recorded in the browser history, allowing users to switch states through the browser’s Forward and Back buttons. In general, users can change the URL either by manually entering it or by interacting with the page, then send a request to the server synchronously or asynchronously to obtain resources, and redraw the UI after success. The principle is shown in the following diagram:
The process by which react-router takes an incoming location and eventually renders a new UI is as follows:
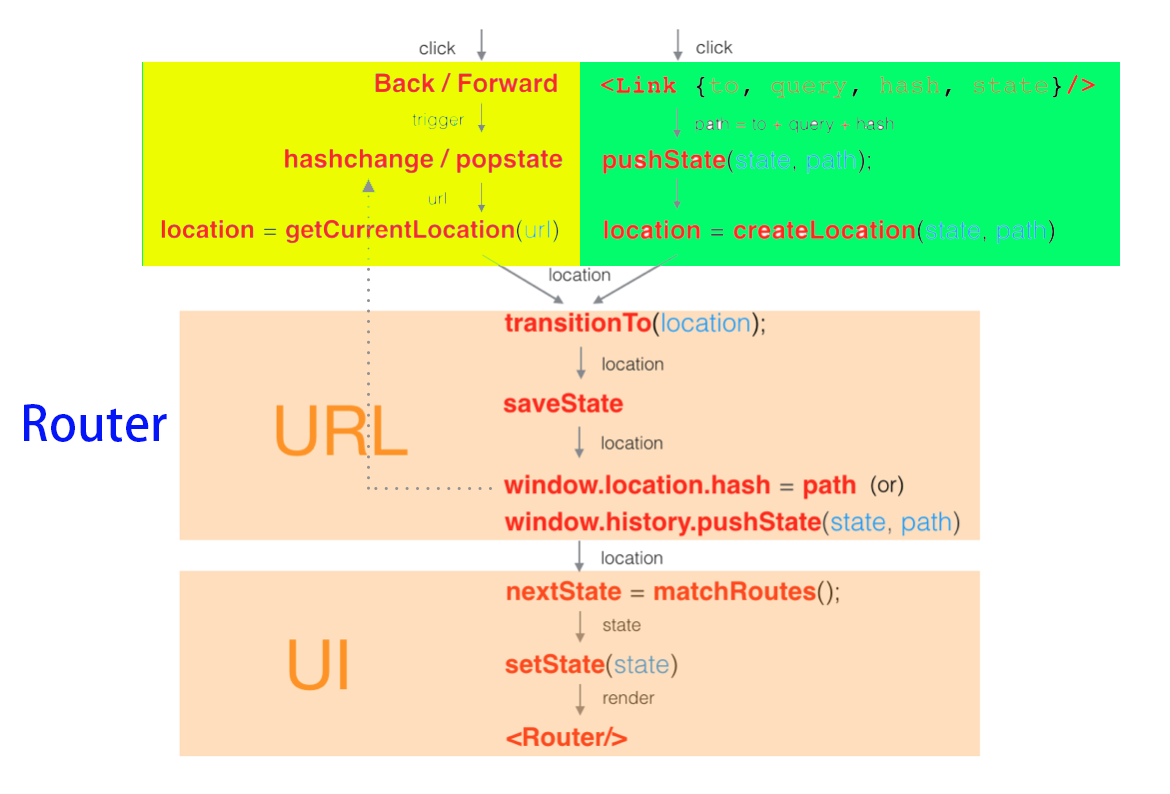
There are two sources for location: one is the browser’s Back and Forward actions, and the other is directly clicking a link. After a new location object is created, the internal matchRoutes method of the router matches a subset of the Route component tree against the current location object and obtains nextState. When this.setState(nextState) is called, the Router component can be re-rendered.
This is roughly how the broader front-end handles it, and we can borrow these ideas for iOS. In the diagram above, Back / Forward can often be managed by UINavgation on iOS. So the iOS Router mainly handles the green part.
2. What Problems Can App Routing Solve

Since the front end can solve the synchronization problem between URL and UI in SPAs, what problems can this idea solve in apps?
Consider the following questions: how do we usually solve them elegantly during development?
- For 3D Touch functionality or tapping a push notification, the requirement is to navigate from outside the app to a deeply nested screen inside the app.
For example, WeChat’s 3D Touch can jump directly to “My QR Code”. The “My QR Code” screen is a third-level screen under Me. Or, to take a more extreme case, the product requirement is even more unreasonable and asks to jump to a tenth-level screen inside the app. How should this be handled?
- How should a series of apps from the same company navigate to each other?
If you have several apps and want them to navigate to one another, how should this be handled?
- How can we decouple app components from each other and app pages from each other?
As the project becomes increasingly complex, the navigation logic and relationships among components and pages increase. How can we elegantly decouple components and pages from one another?
- How can we unify page navigation logic across iOS and Android? Or even unify the way all three ends request resources?
Some modules in the project may mix ReactNative, Weex, and H5 screens, and these screens may also call Native screens and Native components. So how can we unify the way the Web side and the Native side request resources?
If dynamically delivered configuration files are used to configure the app’s navigation logic, how can we make iOS and Android share a single configuration file?
If a bug appears in the app, how can we implement simple hotfix functionality without using JSPatch?
For example, if an urgent bug suddenly appears after the app goes online, can we dynamically downgrade the page to H5, ReactNative, or Weex? Or directly replace it with a local error screen?
How can we perform tracking and analytics whenever components call each other and pages navigate? Should we manually write tracking code at every navigation point? Use Runtime AOP?
How can we add logic checks, token mechanisms, and risk-control logic coordinated with grayscale release during every inter-component call?
How can we call the same screen or the same component from any screen in the app? Can this only be achieved by registering a singleton in AppDelegate?
For example, if a problem occurs in the app, the user could be on any screen. How can we force the user to log out anytime, anywhere? Or force navigation to the same local error screen? Or navigate to the corresponding H5, ReactNative, or Weex screen? How can we display a View to the user anytime, anywhere, from any screen?
All of the above problems can actually be solved by designing a router on the app side. So how should we design a router?
3. Implementing Navigation Between Apps
Before discussing routing inside an app, let’s first talk about how navigation between different apps is implemented on iOS.
1. URL Scheme Approach
The iOS system supports URL Scheme by default. For details, see the official documentation.
For example, entering the following commands in Safari on an iPhone will automatically open certain apps:
// Open mailbox
mailto://

// Call 110
tel://110
Before iOS 9, you only needed to add URL types - URL Schemes to the app’s info.plist, as shown below:
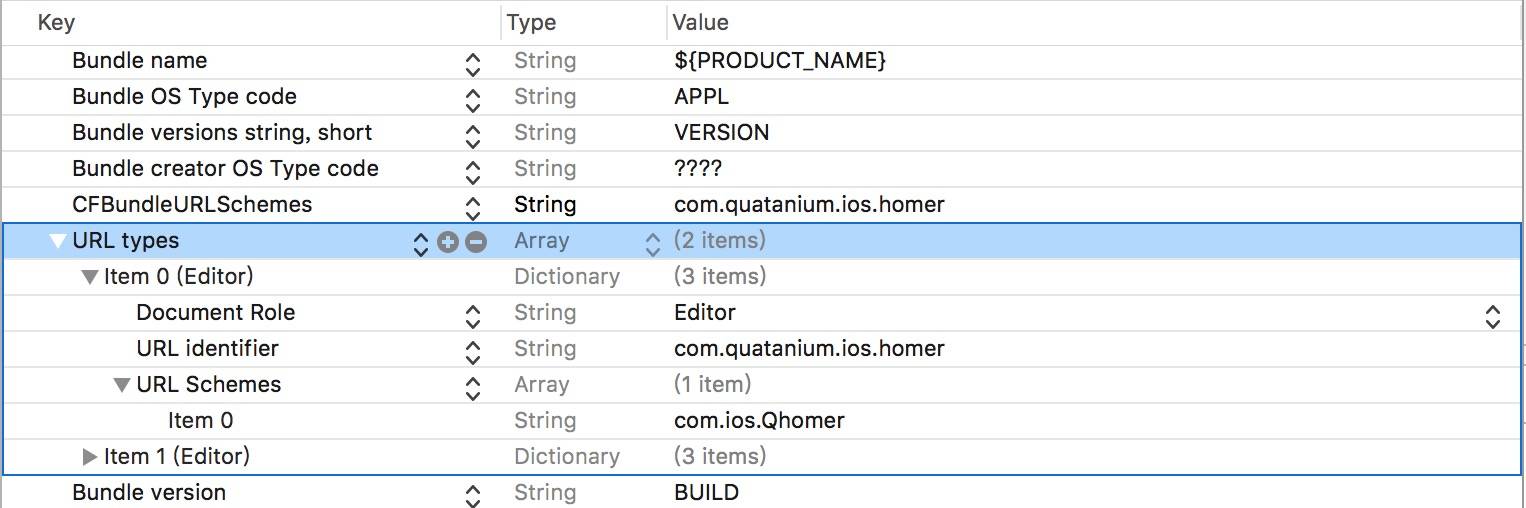
Here, a Scheme named com.ios.Qhomer has been added. Then you can enter the following in Safari on the iPhone:
com.ios.Qhomer://
Then you can open this App directly.
For some other common Apps, you can download their ipa files from iTunes, unzip them, and use Show Package Contents to find the info.plist file. Open it, and you can find the corresponding URL Scheme inside.
// Mobile QQ
mqq://

// WeChat
weixin://

// Sina Weibo
sinaweibo://

// Ele.me
eleme://
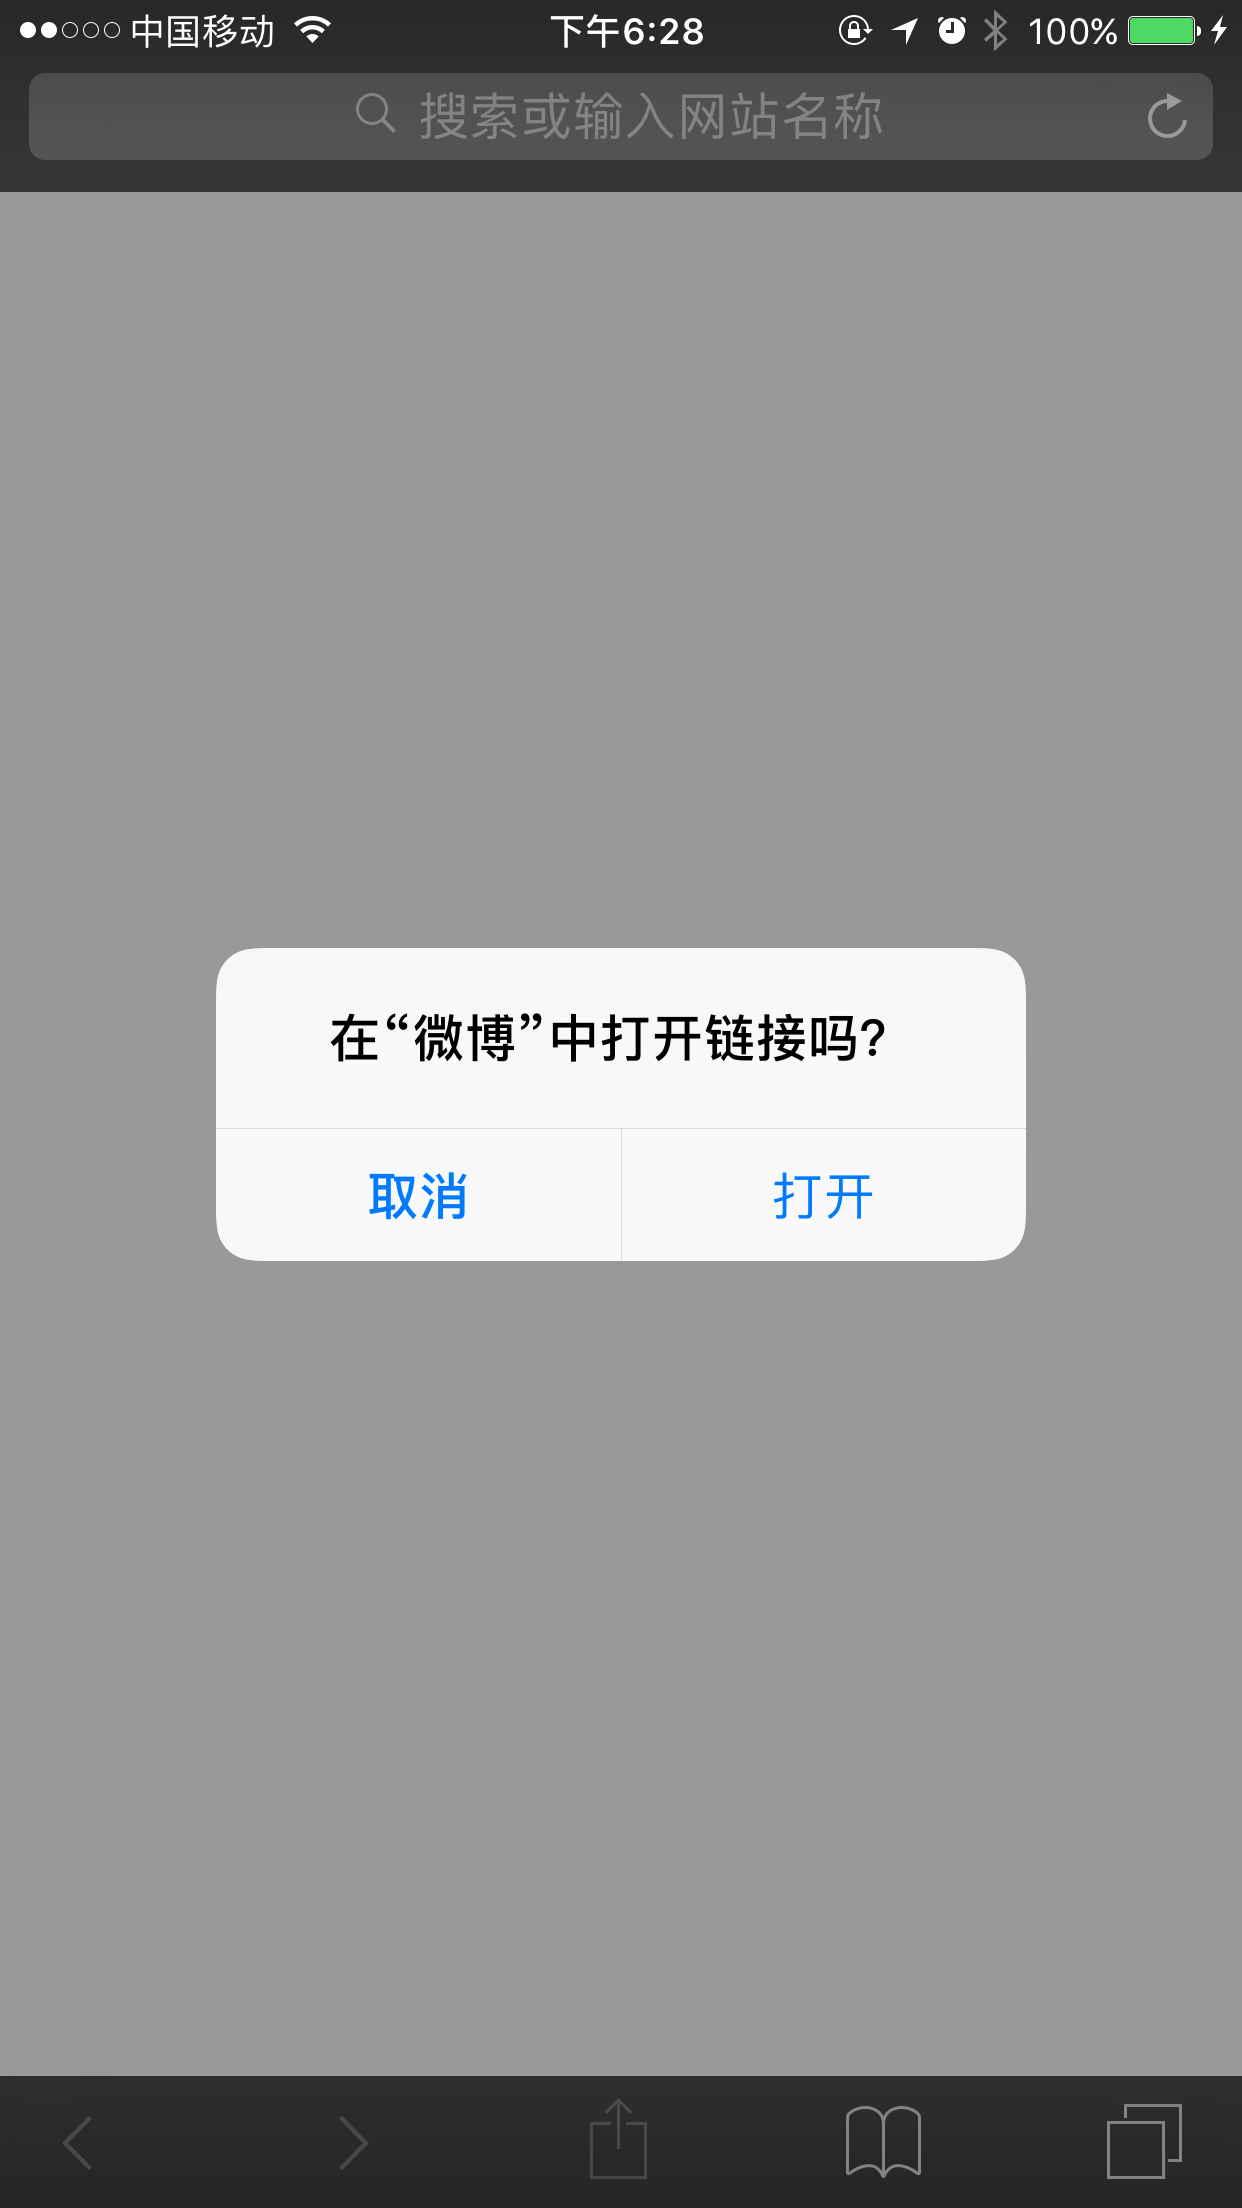
Of course, some apps are fairly sensitive about URL Scheme invocations; they don’t want other apps to invoke them arbitrarily.
- (BOOL)application:(UIApplication *)application
            openURL:(NSURL *)url
  sourceApplication:(NSString *)sourceApplication
         annotation:(id)annotation
{
    NSLog(@"sourceApplication: %@", sourceApplication);
    NSLog(@"URL scheme:%@", [url scheme]);
    NSLog(@"URL query: %@", [url query]);

    if ([sourceApplication isEqualToString:@"com.tencent.weixin"]){
        // Allow opening
        return YES;
    }else{
        return NO;
    }
}
If the App to be invoked is already running, its lifecycle is as follows:
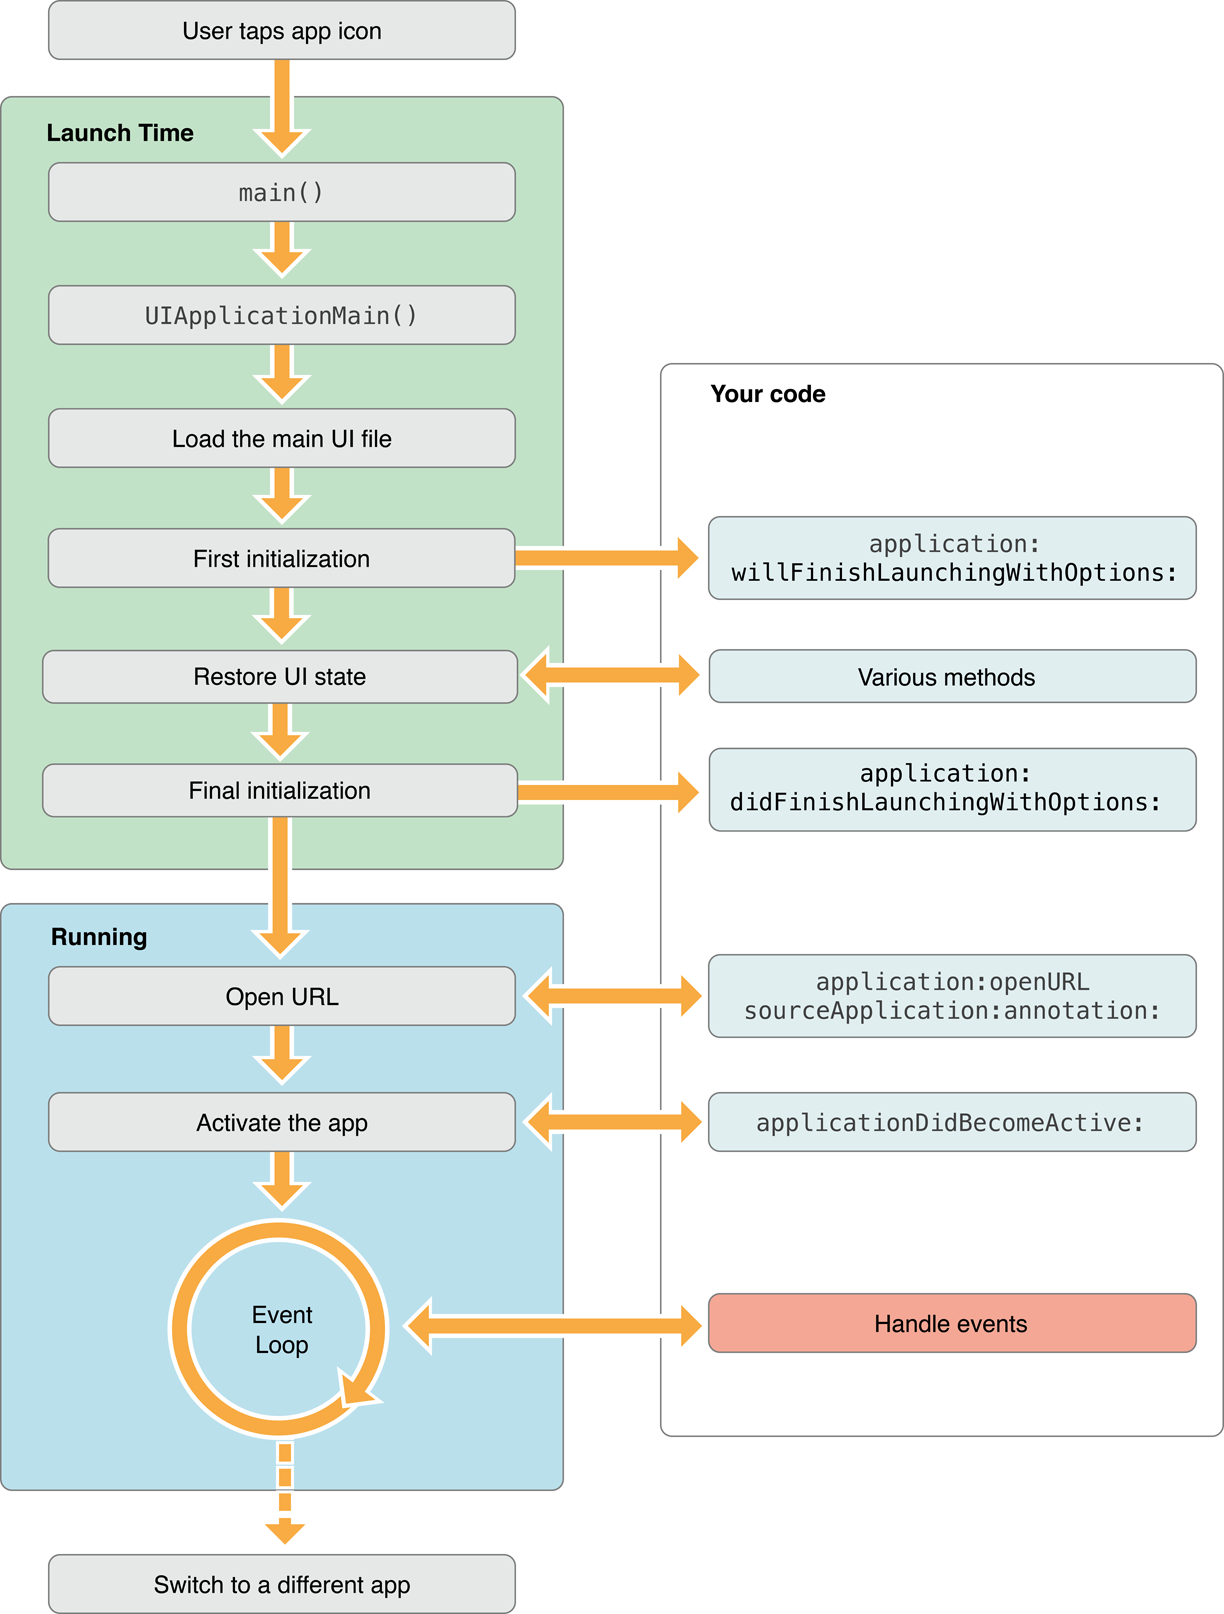
If the App to be invoked is in the background, its lifecycle is as follows:
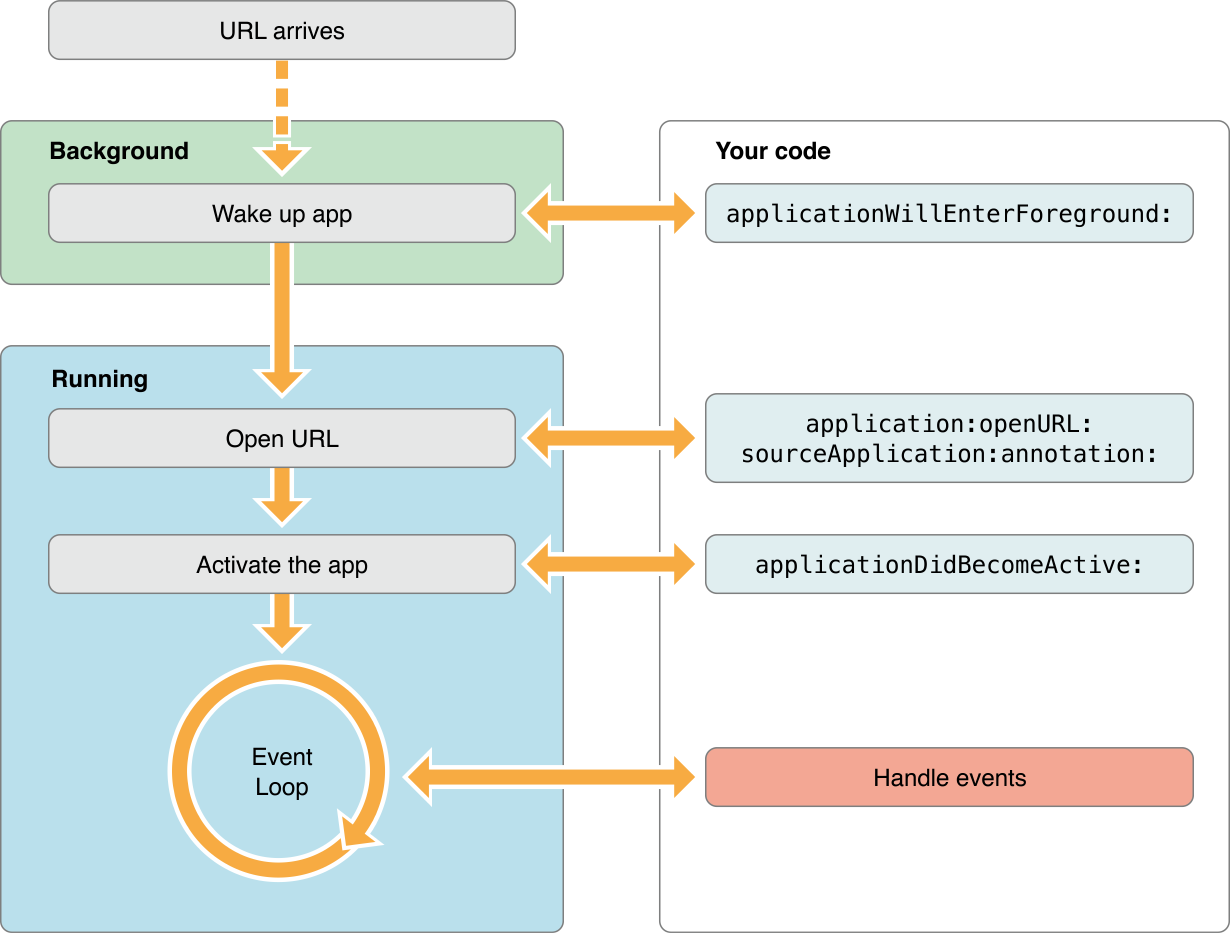
Once we understand the lifecycle above, we can prevent arbitrary invocation by some Apps by calling application:openURL:sourceApplication:annotation:.
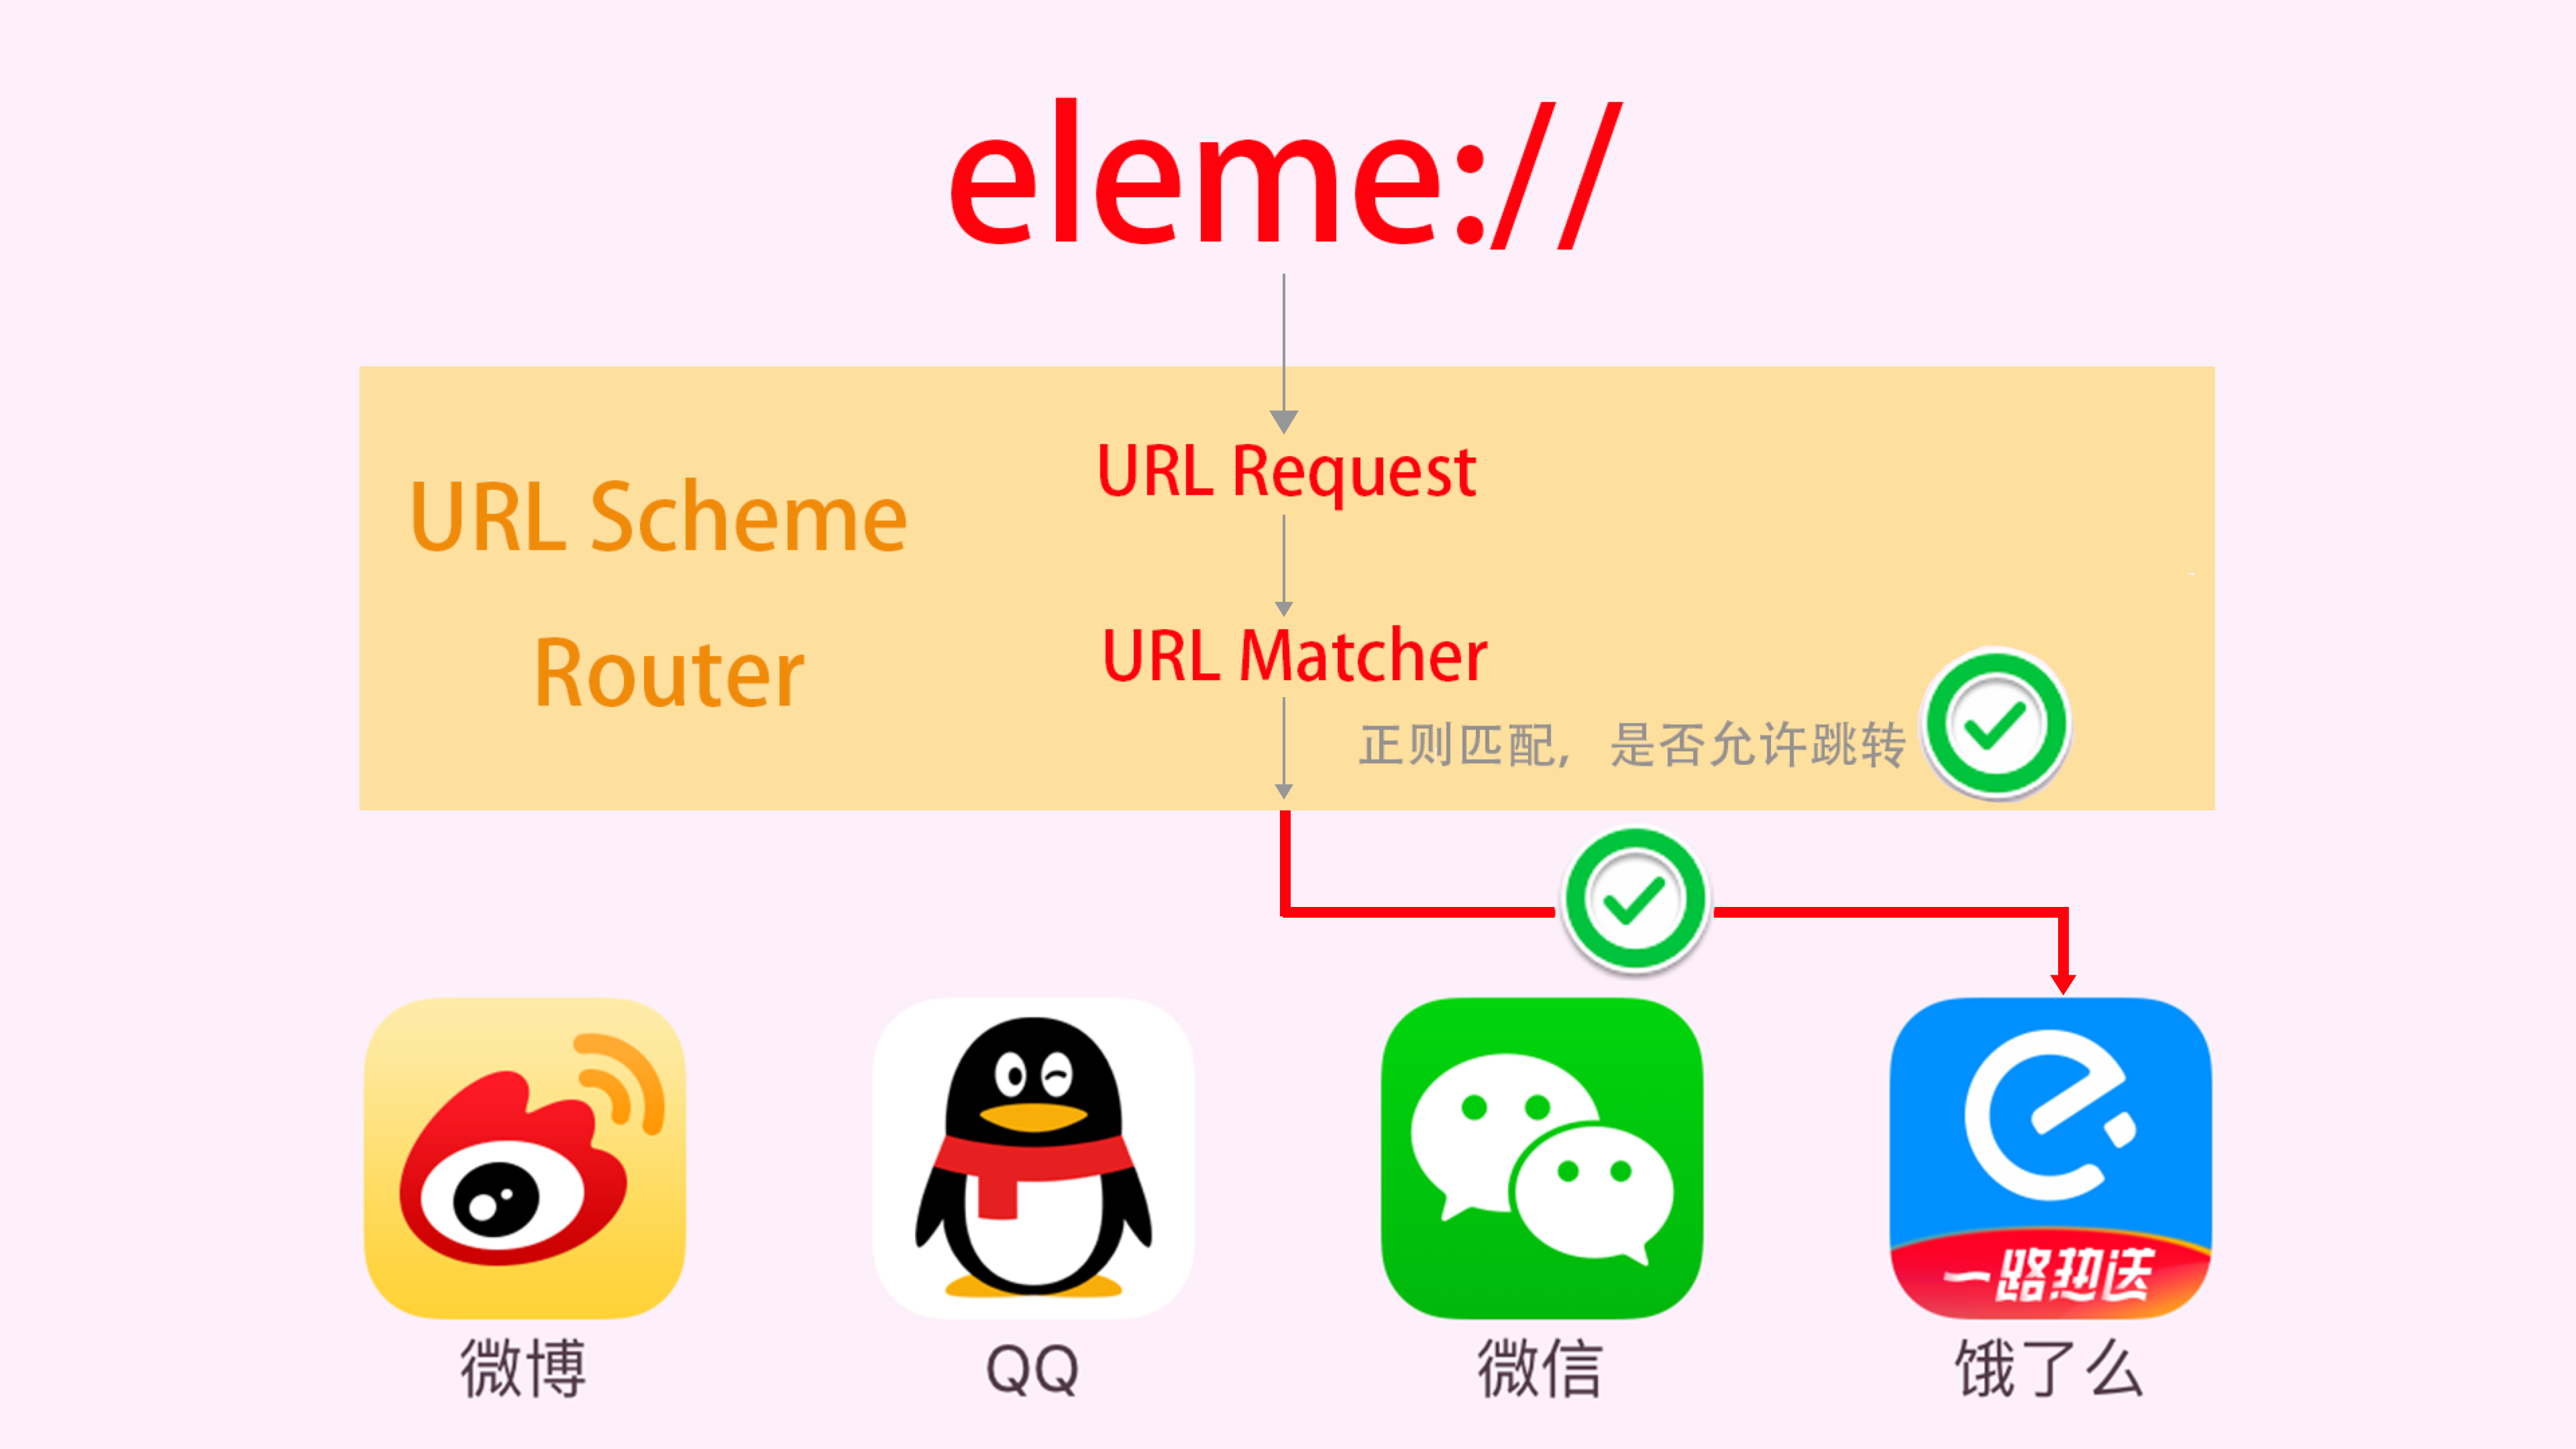
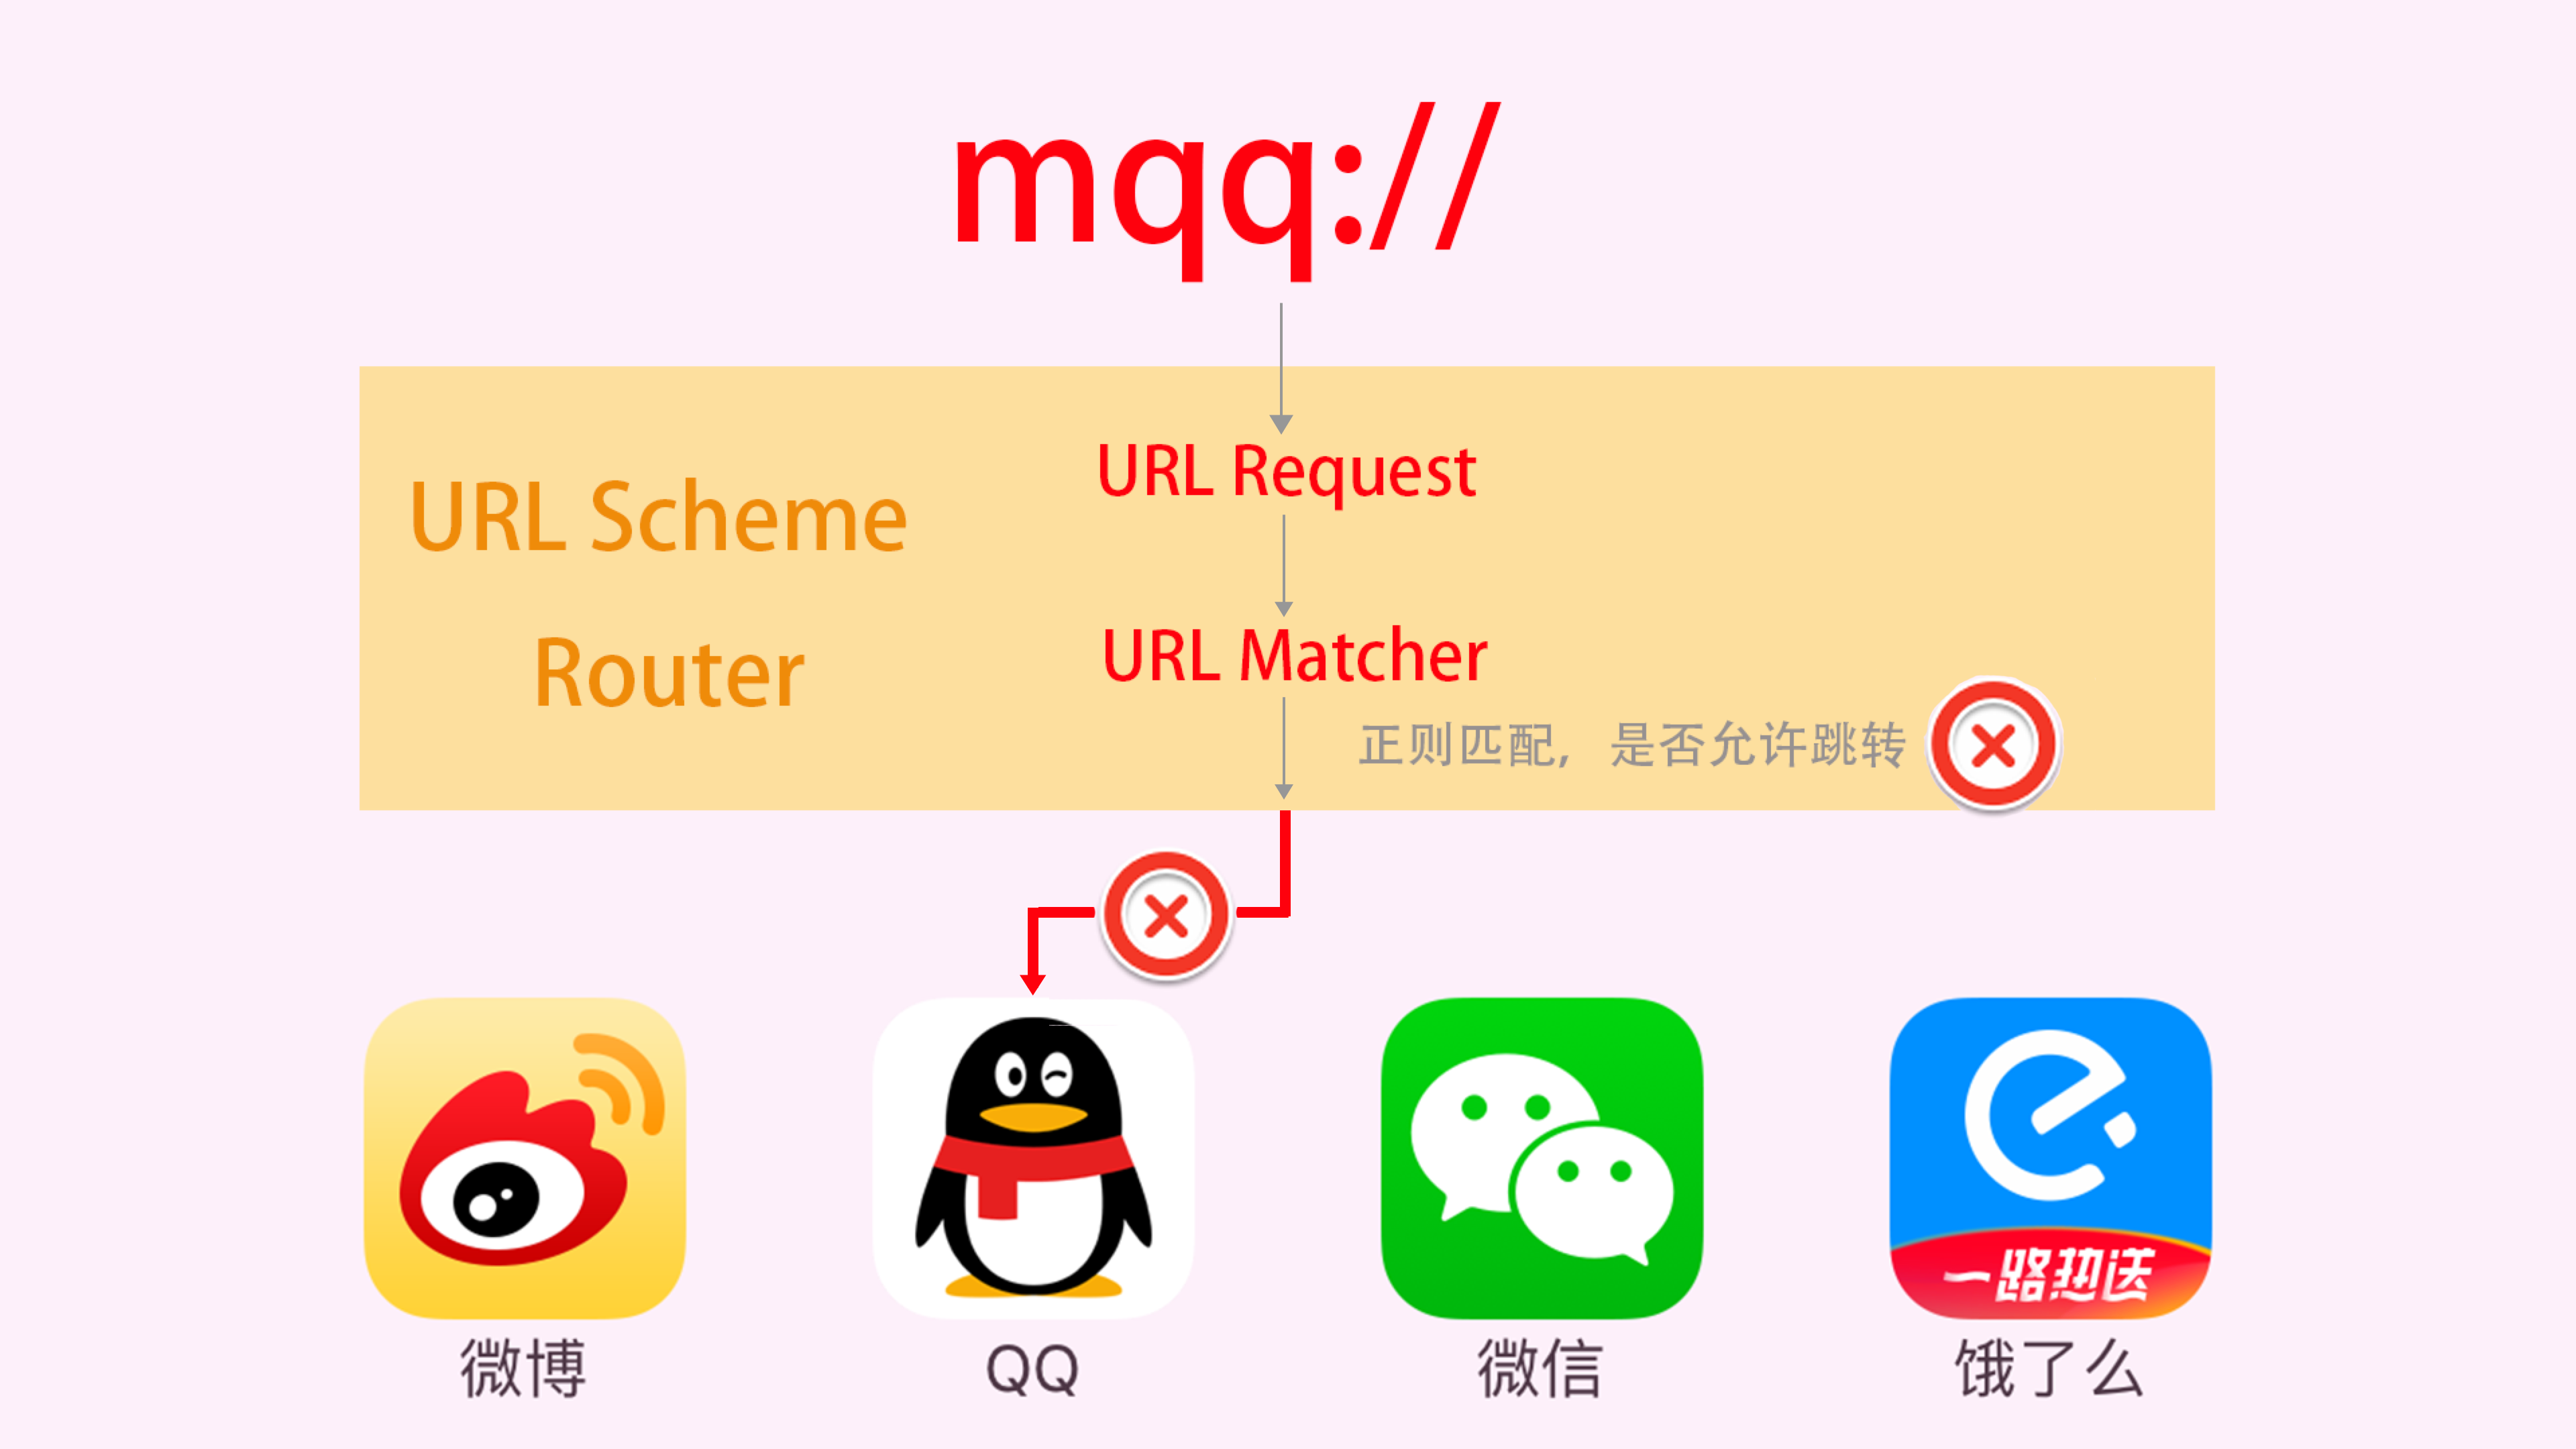
As shown above, the Ele.me App allows invocation via URL Scheme, so we can invoke the Ele.me App from Safari. Mobile QQ does not allow invocation, so we cannot jump to it from Safari.
For more about inter-App navigation, see the official documentation Inter-App Communication.
Apps can also jump directly to system settings. For example, some requirements involve checking whether the user has enabled certain system permissions. If not, an alert is shown; tapping a button in the alert jumps directly to the corresponding settings screen in System Settings.
iOS 10 Supports Jumping to System Settings via URL Scheme
The Correct Way to Jump to System Settings in iOS 10
Summary List of URLs for iOS System Features
2. Universal Links Approach
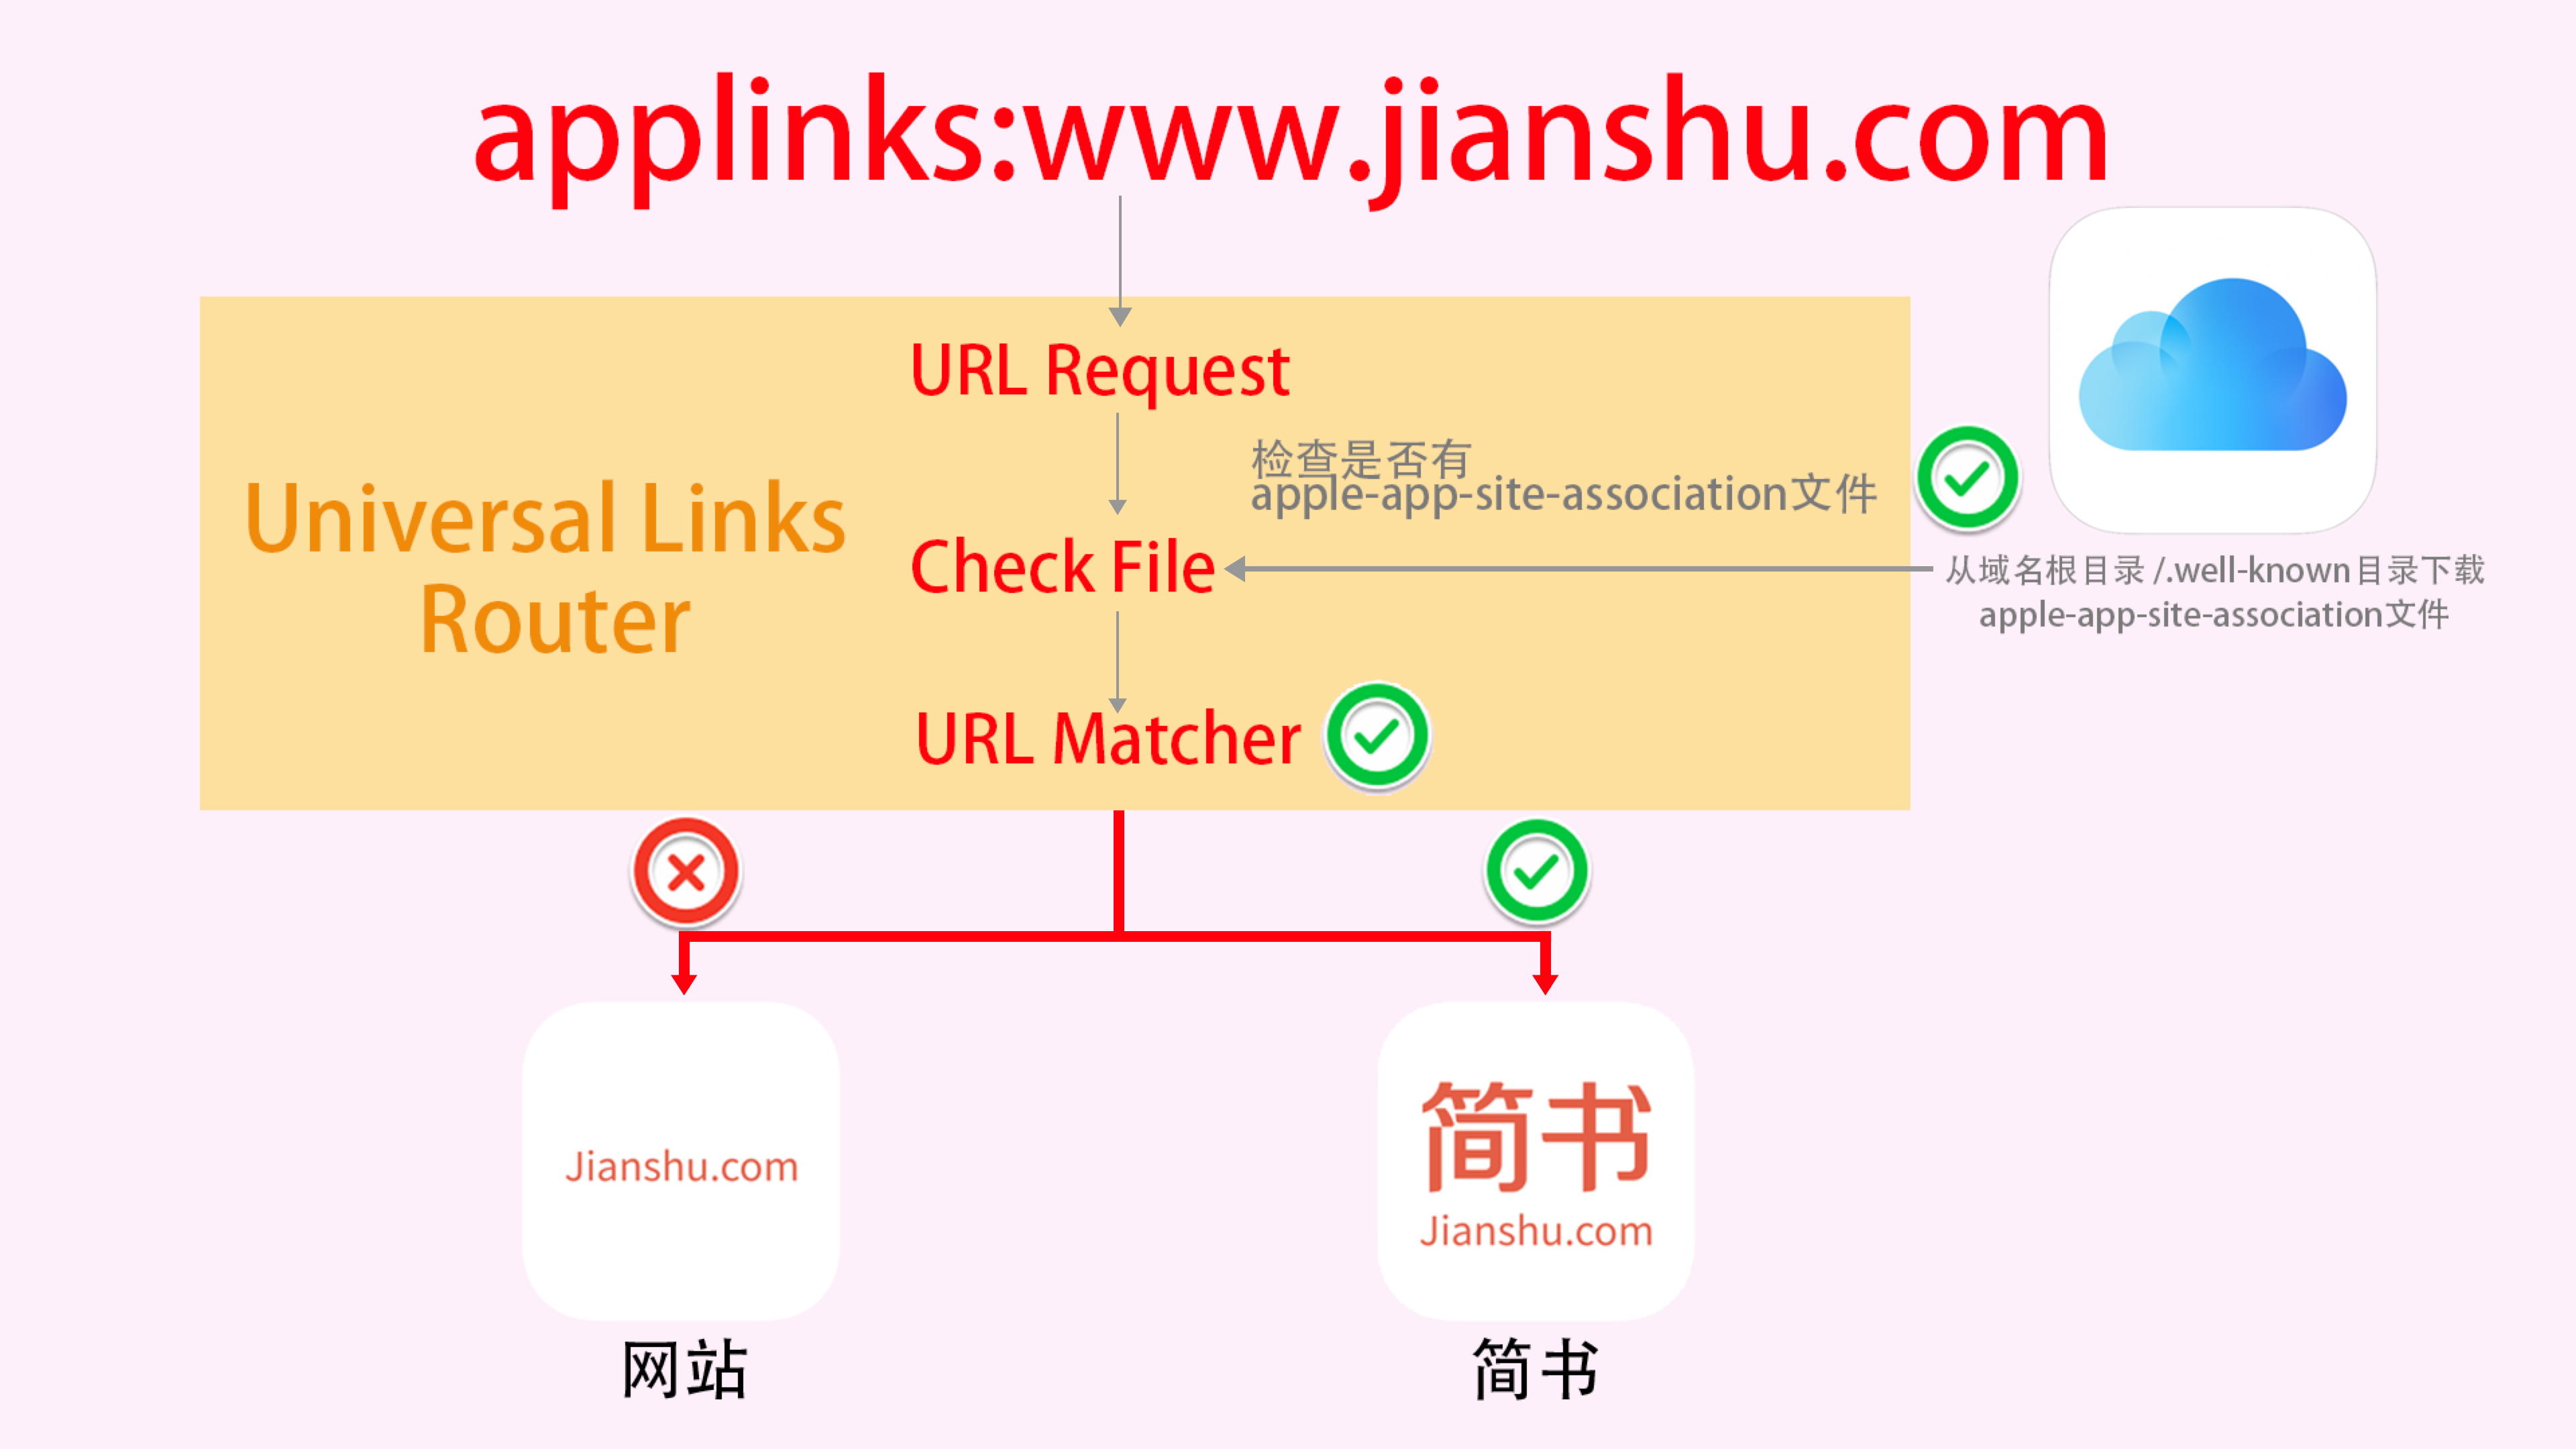
Although opening a web page inside WeChat disables all Schemes, iOS 9.0 introduced a new feature called Universal Links. With this feature, our App can be launched via an HTTP link.
- If the App is installed, the App can be opened whether the HTTP link is in WeChat, Safari, or another third-party browser.
- If the App is not installed, the web page will be opened.
The setup requires three steps:
- The App needs to enable the Associated Domains service and configure Domains. Note that they must start with applinks:.
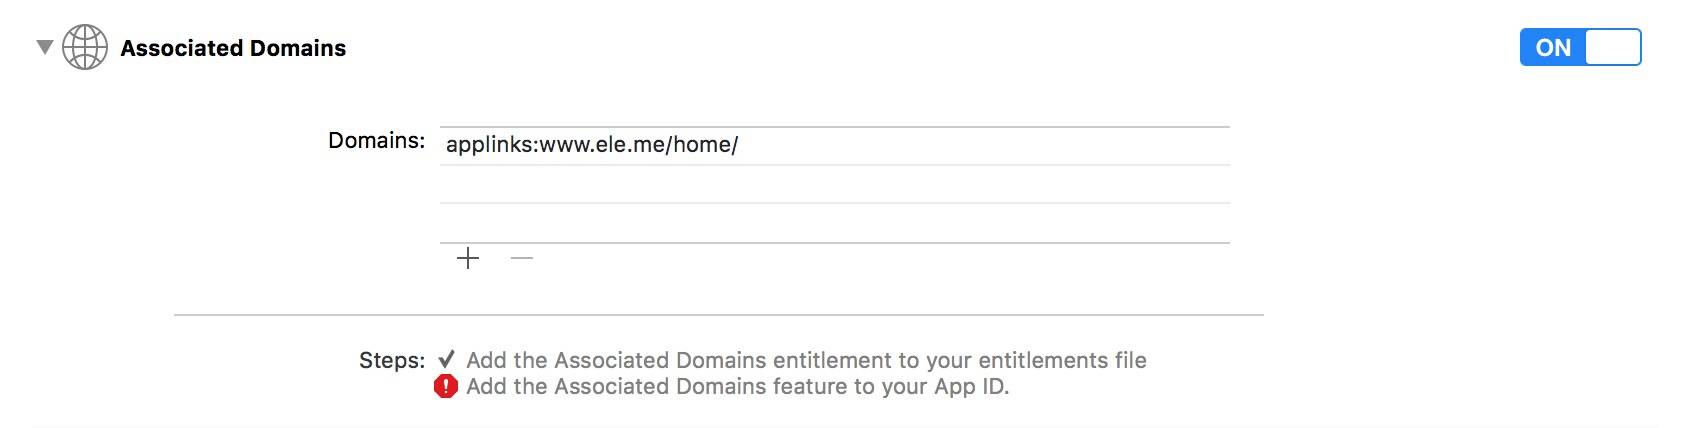
The domain name must support HTTPS.
Upload a file in JSON format named apple-app-site-association to the root directory of your domain, or to the .well-known directory. iOS will automatically read this file. For the specific file content, see the official documentation.
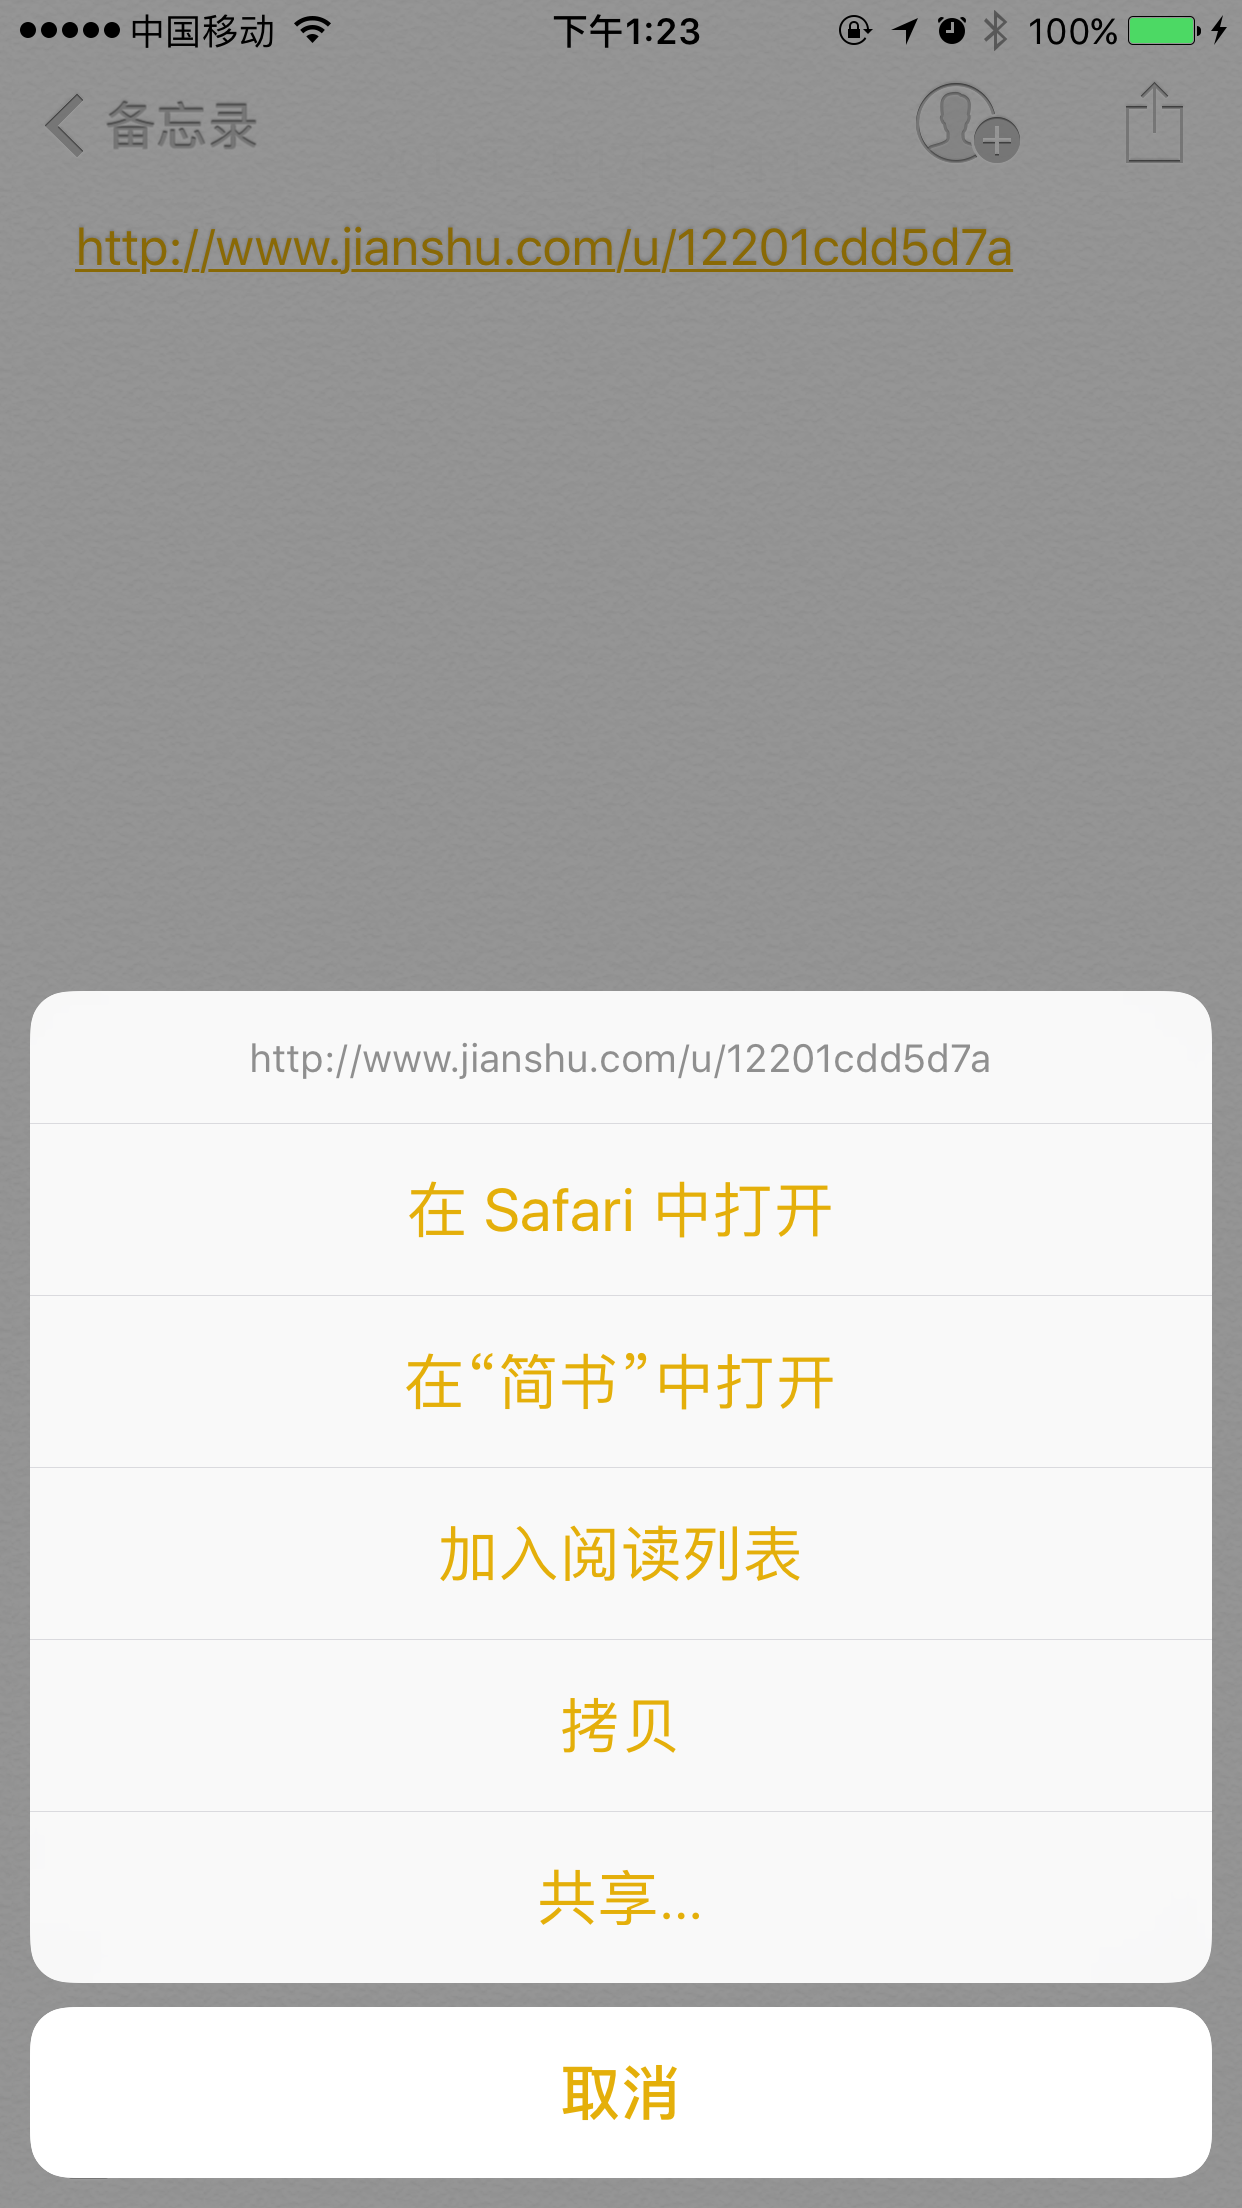
If the App supports Universal Links, other Apps can jump directly into our own App. As shown below, when tapping the link, because the link matches the links we configured, the menu will show an option to open it with our App.
The effect is the same in a browser. If Universal Links are supported, visiting the corresponding URL will produce different behavior, as shown below:

The above are the two ways to navigate between Apps in iOS.
From the URL Scheme mechanism supported in iOS, we can see that Apple also accesses a resource using a URI-based approach.
Uniform Resource Identifier (URI) is a string used to identify the name of an Internet resource. This kind of identifier allows users to interact with resources on a network (usually the World Wide Web) through a specific protocol. The most common form of URI is the Uniform Resource Locator (URL).
For example:

This is a URI, and each segment represents a corresponding meaning. When the other party receives such a string, it can parse it according to the rules and obtain all the useful information.
Can this give us some ideas for designing routing between App components? If we want to define a unified way to access resources across three platforms (iOS, Android, and H5), can we implement it using this URI-based approach?
IV. Routing Design Between In-App Components
In the previous section, we introduced how the iOS system helps us handle inter-App navigation logic. In this section, we focus on how routing between the various components inside an App should be designed. Routing design inside an App mainly needs to solve two problems:
- Navigation between pages and components.
- Mutual invocation between components.
Let’s analyze these two problems first.
1. About Page Navigation
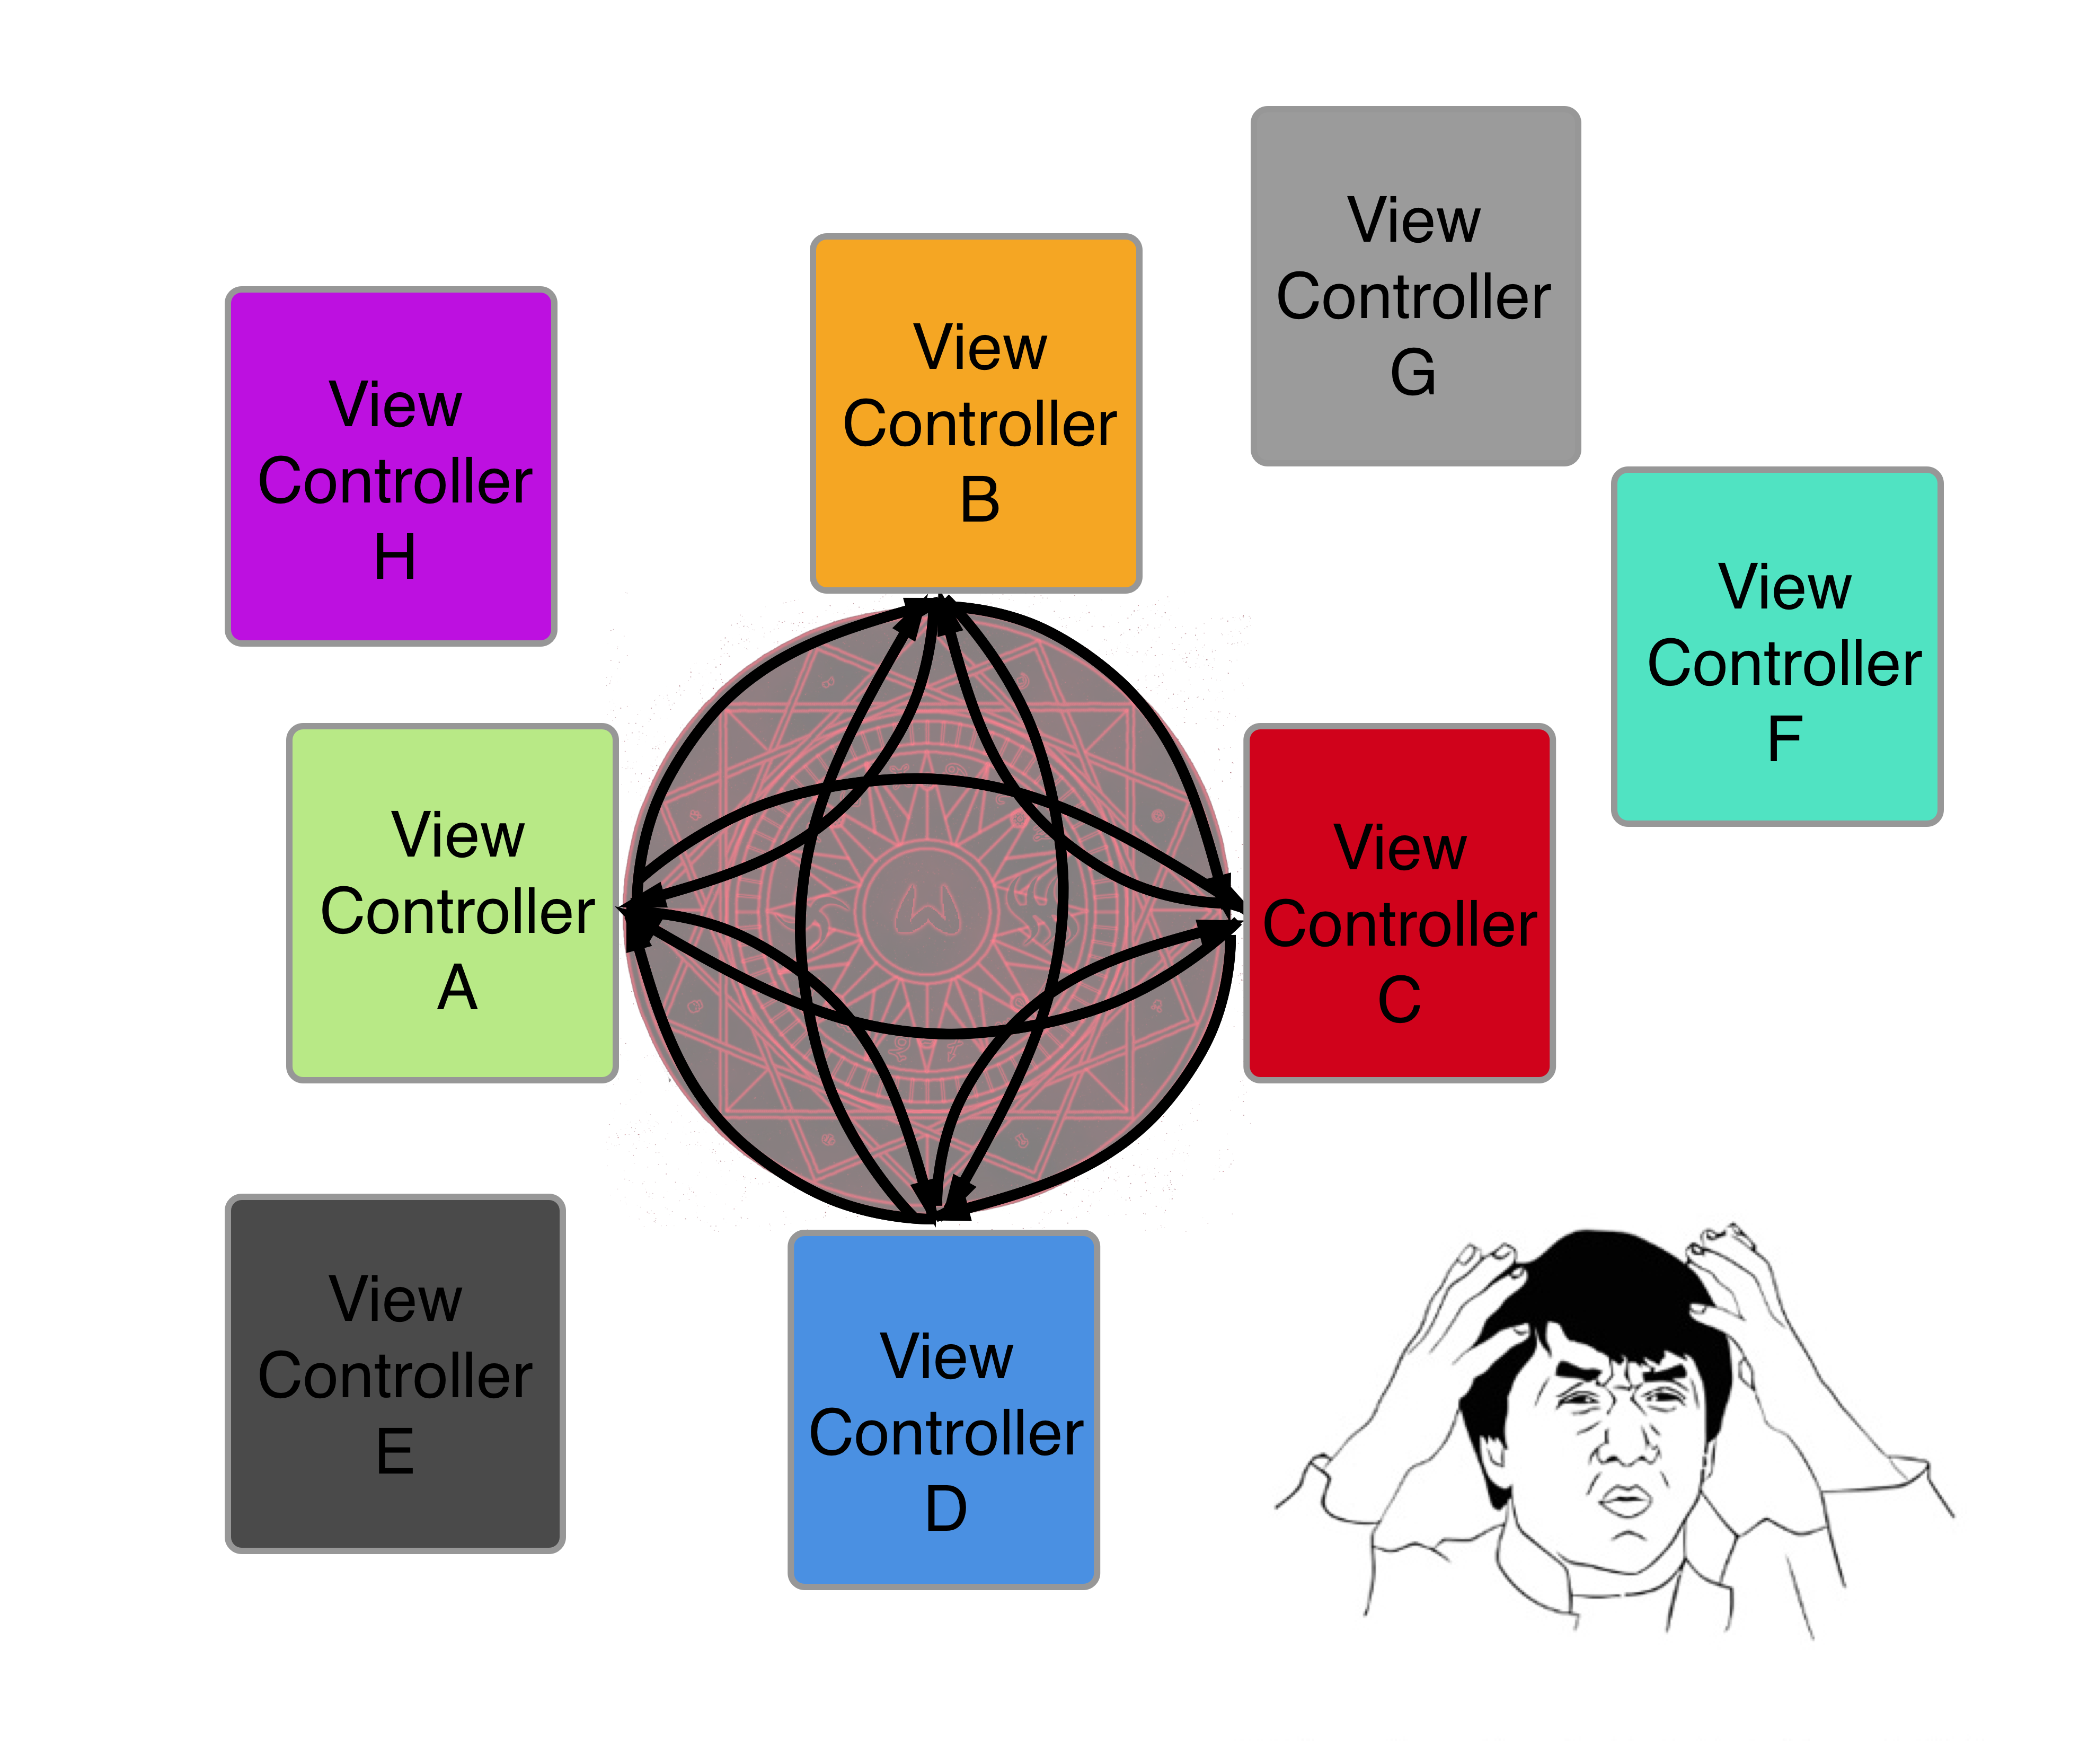
During iOS development, we often encounter scenarios such as tapping a button to Push to another screen, or tapping a cell to Present a new ViewController. In the MVC pattern, this usually means creating a new VC and then Push / Present to the next VC. But in MVVM, this can be inappropriate in some cases.
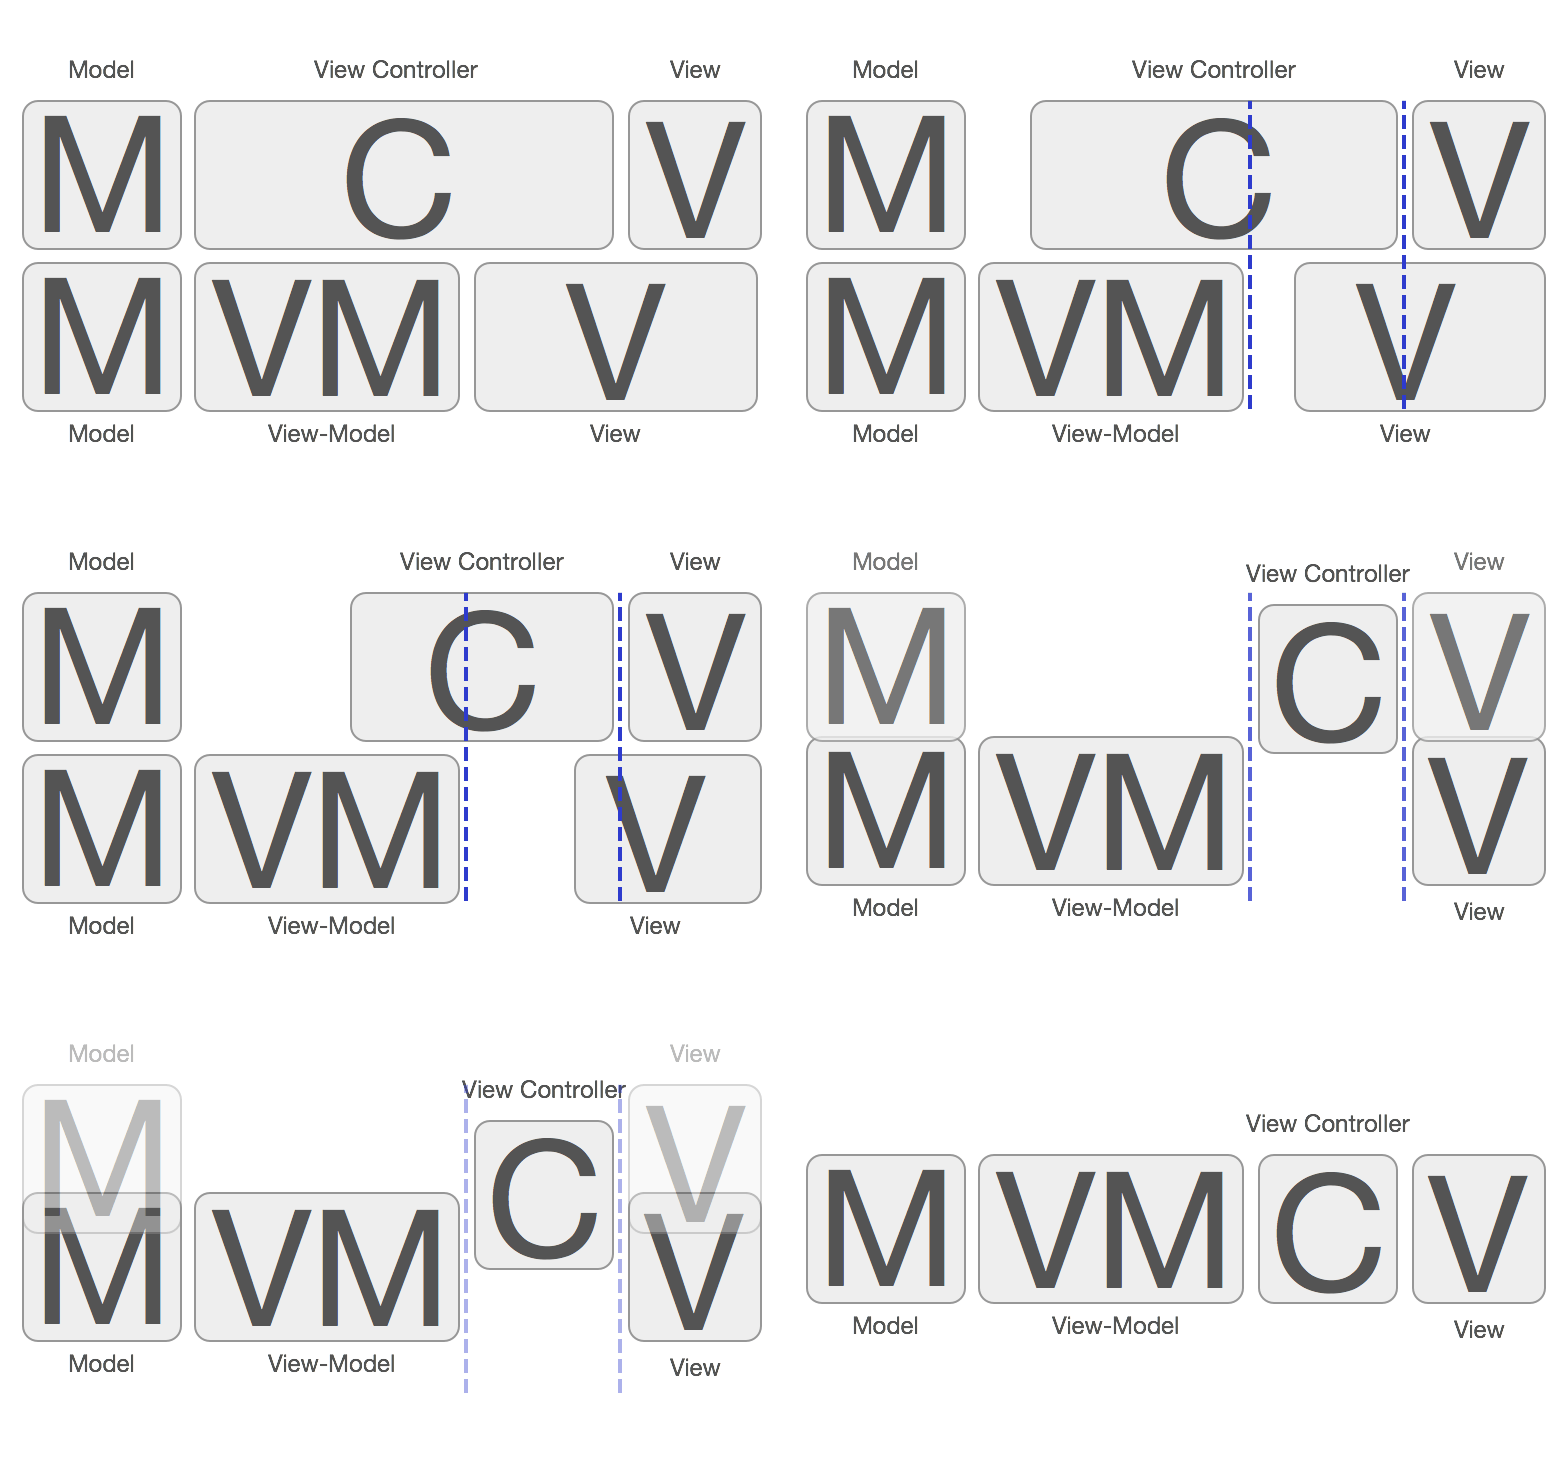
As we all know, MVVM splits MVC into the structure shown above. The data-related code that originally belonged to the View is moved into the ViewModel, and the corresponding C becomes slimmer, evolving into an M-VM-C-V structure. The code in this C can be reduced to only page-navigation-related logic. In code, it would look like this:
Assume the execution logic of a button has been encapsulated into a command.
    @weakify(self);
    [[[_viewModel.someCommand executionSignals] flatten] subscribeNext:^(id x) {
        @strongify(self);
        // Navigation logic
        [self.navigationController pushViewController:targetViewController animated:YES];
  }];
The code above is fine in itself, but it may weaken one important role of the MVVM framework.
In addition to decoupling, an MVVM framework has two other very important goals:
- High code reuse
- Easier unit testing
If we need to verify whether a piece of business logic is correct, we only need to unit test the ViewModel. The prerequisite is that we assume the UI binding process implemented with ReactiveCocoa is correct. At present, the binding is correct. Therefore, we only need to unit test up to the ViewModel layer to complete testing of the business logic.
Page navigation is also part of the business logic, so it should be placed in the ViewModel and unit-tested together, ensuring coverage of the business logic tests.
There are two ways to put page navigation in the ViewModel. The first is to implement it with routing. The second has nothing to do with routing, so I will not elaborate on it here. If you are interested, you can look at the concrete implementation of page navigation in the lpd-mvvm-kit library.
The coupling between page navigations also becomes apparent:
- Because
pushViewControllerorpresentViewControllermust be followed by the ViewController to operate on, that class has to be introduced, and importing its header file introduces coupling. - Because the navigation operation is hard-coded here, if a bug occurs in production, this part is outside our control.
- For push notifications or 3D Touch requirements, if we need to jump directly to the 10th-level internal screen, we have to write an entry point that navigates to the specified screen.
2. About Inter-Component Calls
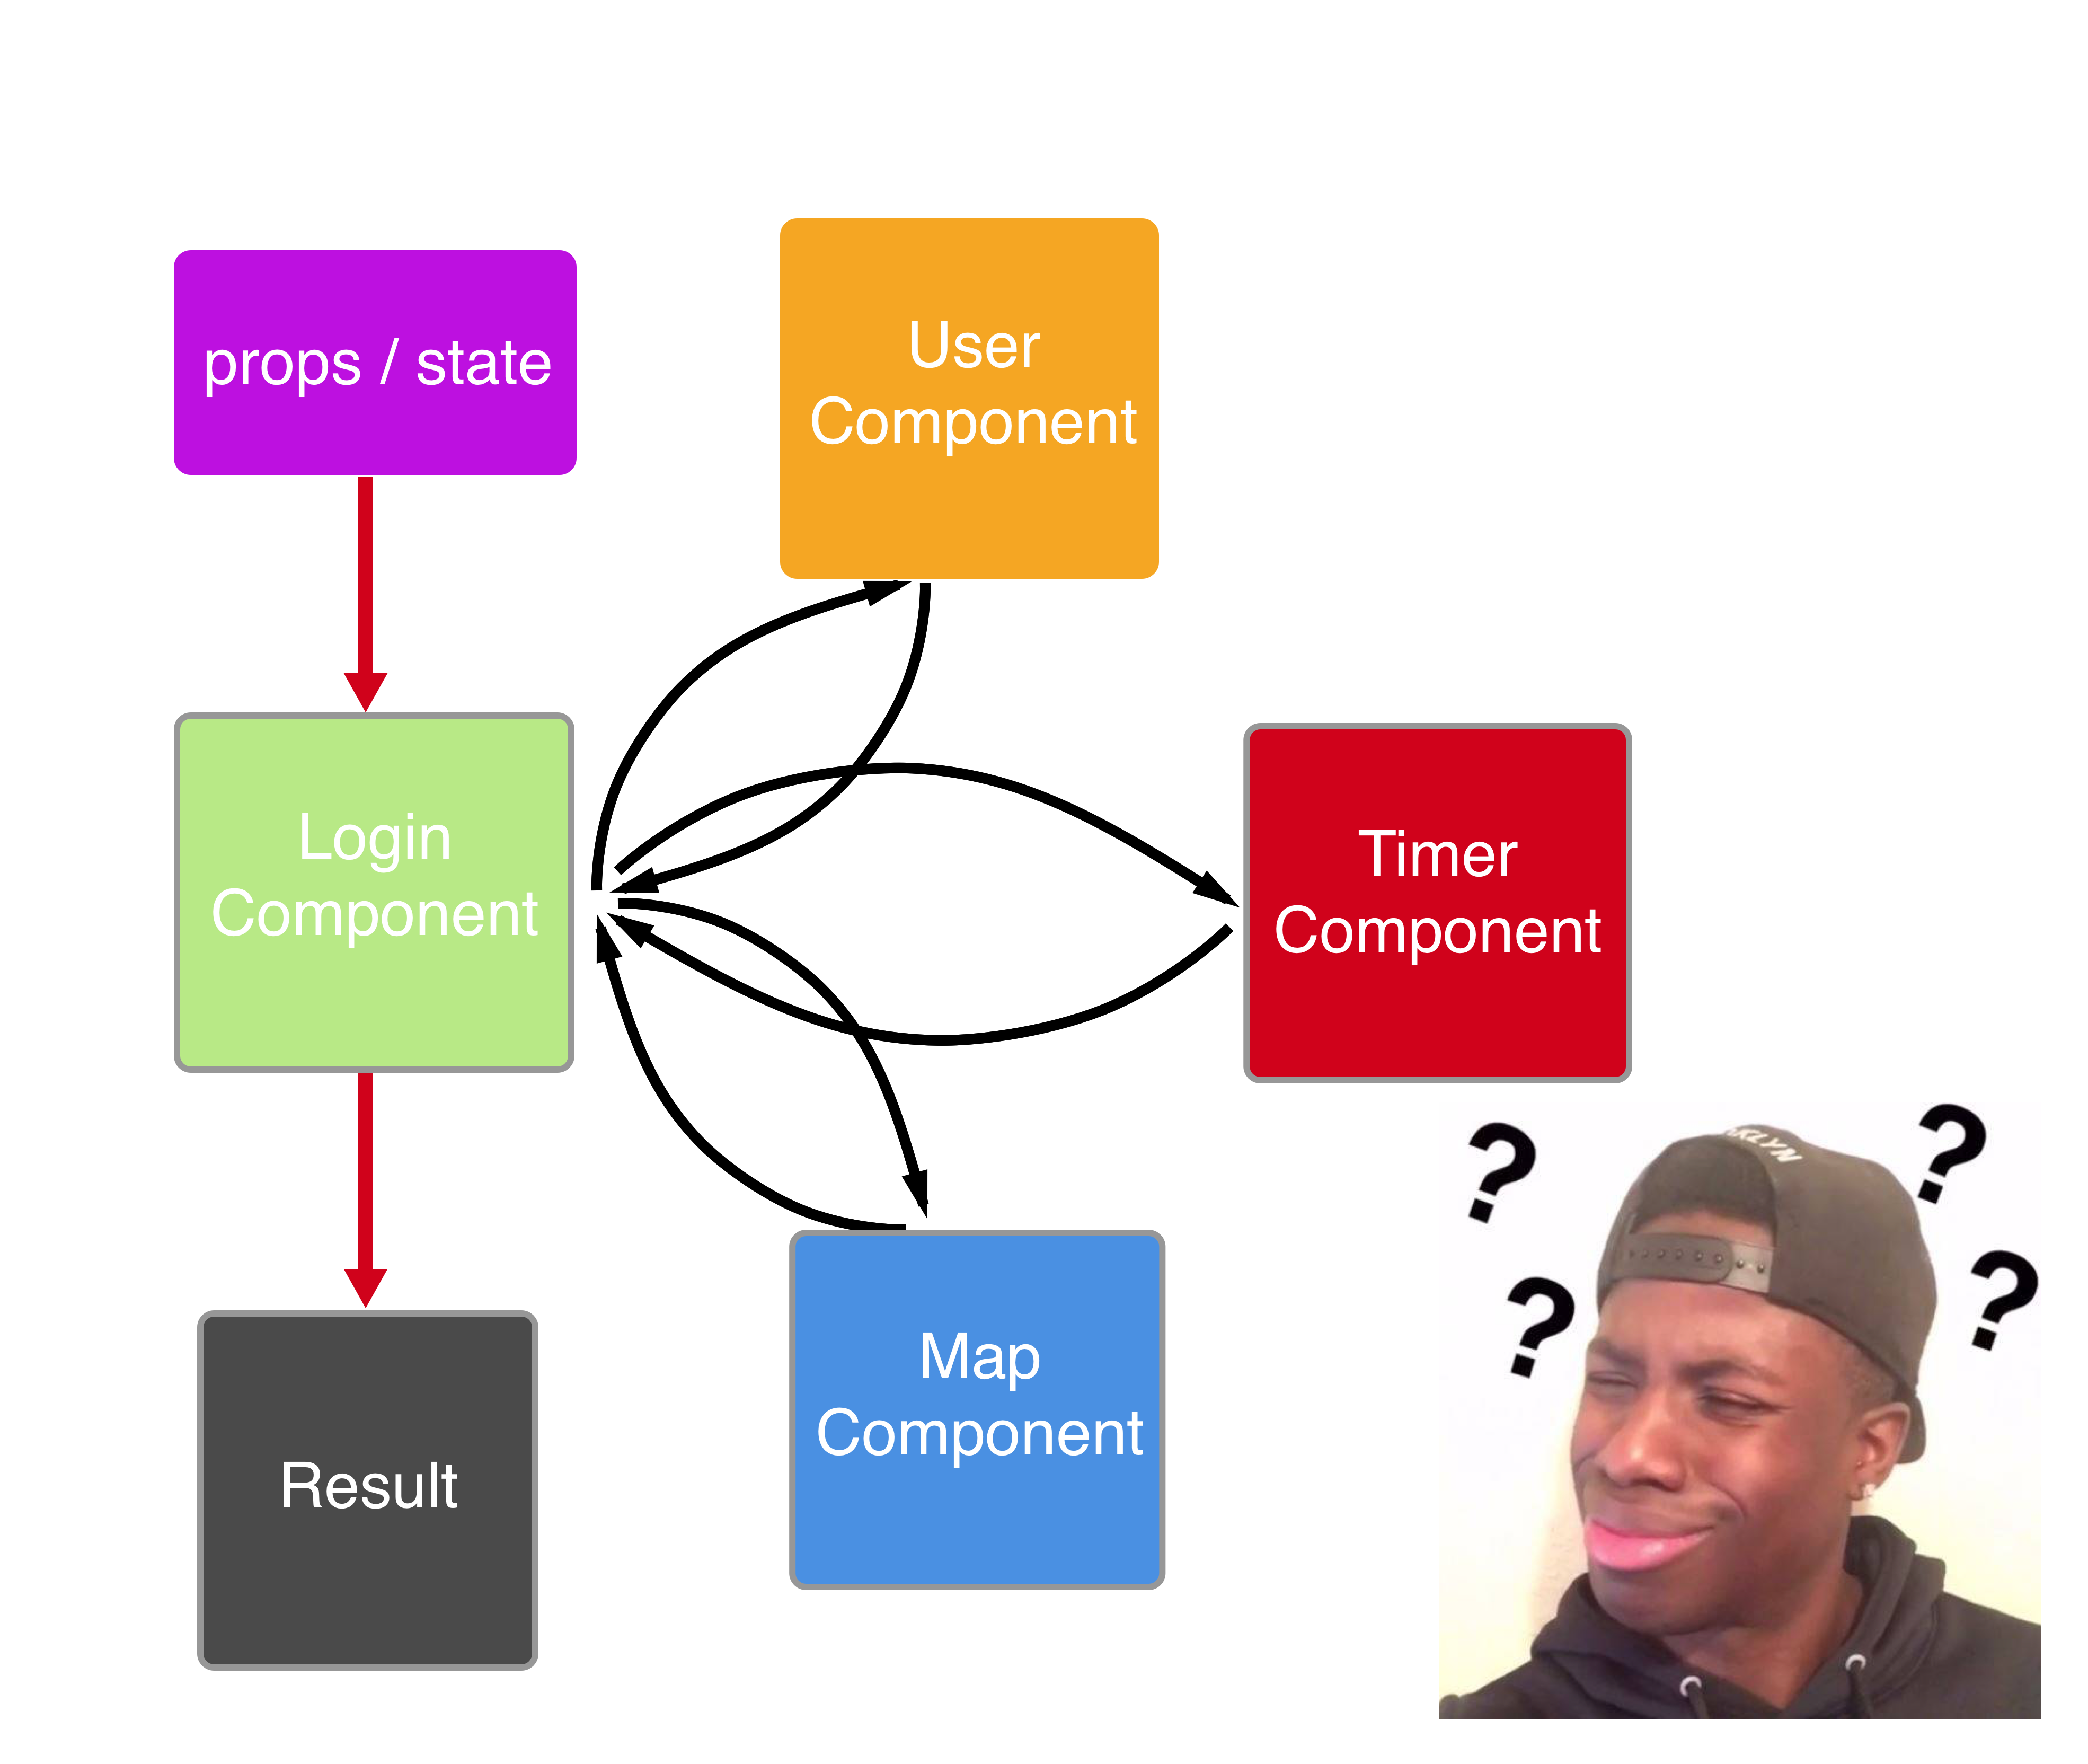
Inter-component calls also need to be decoupled. As the business becomes increasingly complex, we encapsulate more and more components. If the encapsulation granularity is not well controlled, a large number of highly coupled components will emerge. The granularity of components can be continuously adjusted along with business changes, and component responsibilities can be redefined accordingly. However, calls between components remain unavoidable: components call the interfaces exposed by other components. Reducing the coupling between components is exactly the responsibility of a well-designed routing system.
3. How to Design a Router
How can we design a router that perfectly solves the two problems above? Let’s first look at the design ideas of some excellent open-source libraries on GitHub. The following are several routing solutions I found on GitHub, sorted by Star count from high to low. Let’s analyze their respective design ideas one by one.
(1) JLRoutes Star 3189
JLRoutes has the most Stars on all of GitHub, so let’s start by analyzing its specific design approach.
First, JLRoutes is influenced by the idea of URL Scheme. It treats every request for a resource as a URI.
First, let’s get familiar with the fields of NSURLComponent:

Note The URLs employed by the NSURL class are described in RFC 1808, RFC 1738, and RFC 2732.
JLRoutes takes each incoming string and splits it according to the structure shown above. It then extracts the various NSURLComponent parts according to the definitions in the RFC standards.

JLRoutes globally maintains a Map. This Map uses scheme as the Key and JLRoutes as the Value. Therefore, each scheme in routeControllerMap is unique.
As for why there are so many routes, in my opinion, if routes are divided by business line, each business line may have different logic. Even if components in different business lines have the same names, different business lines may require different routing rules.
For example: if DiDi were to componentize its ride-hailing business by city, then each city would correspond to one scheme here. The ride-hailing business in every city includes calling a car, payment, and so on. However, because local regulations differ from city to city, even if these components have the same names, their internal functionality may vary greatly. Therefore, multiple routes are divided here, which can also be understood as different namespaces.
Each JLRoutes stores an array. This array stores each routing rule. Each JLRRouteDefinition stores the externally passed-in block closure, pattern, and the split pattern.
In the array of each JLRoutes, routes are ordered by priority, with higher-priority routes placed earlier.
- (void)_registerRoute:(NSString *)routePattern priority:(NSUInteger)priority handler:(BOOL (^)(NSDictionary *parameters))handlerBlock
{
    JLRRouteDefinition *route = [[JLRRouteDefinition alloc] initWithScheme:self.scheme pattern:routePattern priority:priority handlerBlock:handlerBlock];

    if (priority == 0 || self.routes.count == 0) {
        [self.routes addObject:route];
    } else {
        NSUInteger index = 0;
        BOOL addedRoute = NO;

        // Find an existing route with a lower priority than the route to insert
        for (JLRRouteDefinition *existingRoute in [self.routes copy]) {
            if (existingRoute.priority < priority) {
                // If found, insert it into the array
                [self.routes insertObject:route atIndex:index];
                addedRoute = YES;
                break;
            }
            index++;
        }

        // If no route with a lower priority than the route to insert is found, or the last route has the same priority as the current route, it can only be inserted at the end.
        if (!addedRoute) {
            [self.routes addObject:route];
        }
    }
}
Because the routes in this array form a monotonic queue, you only need to traverse from high to low when looking up priority.
The specific route lookup process is as follows:
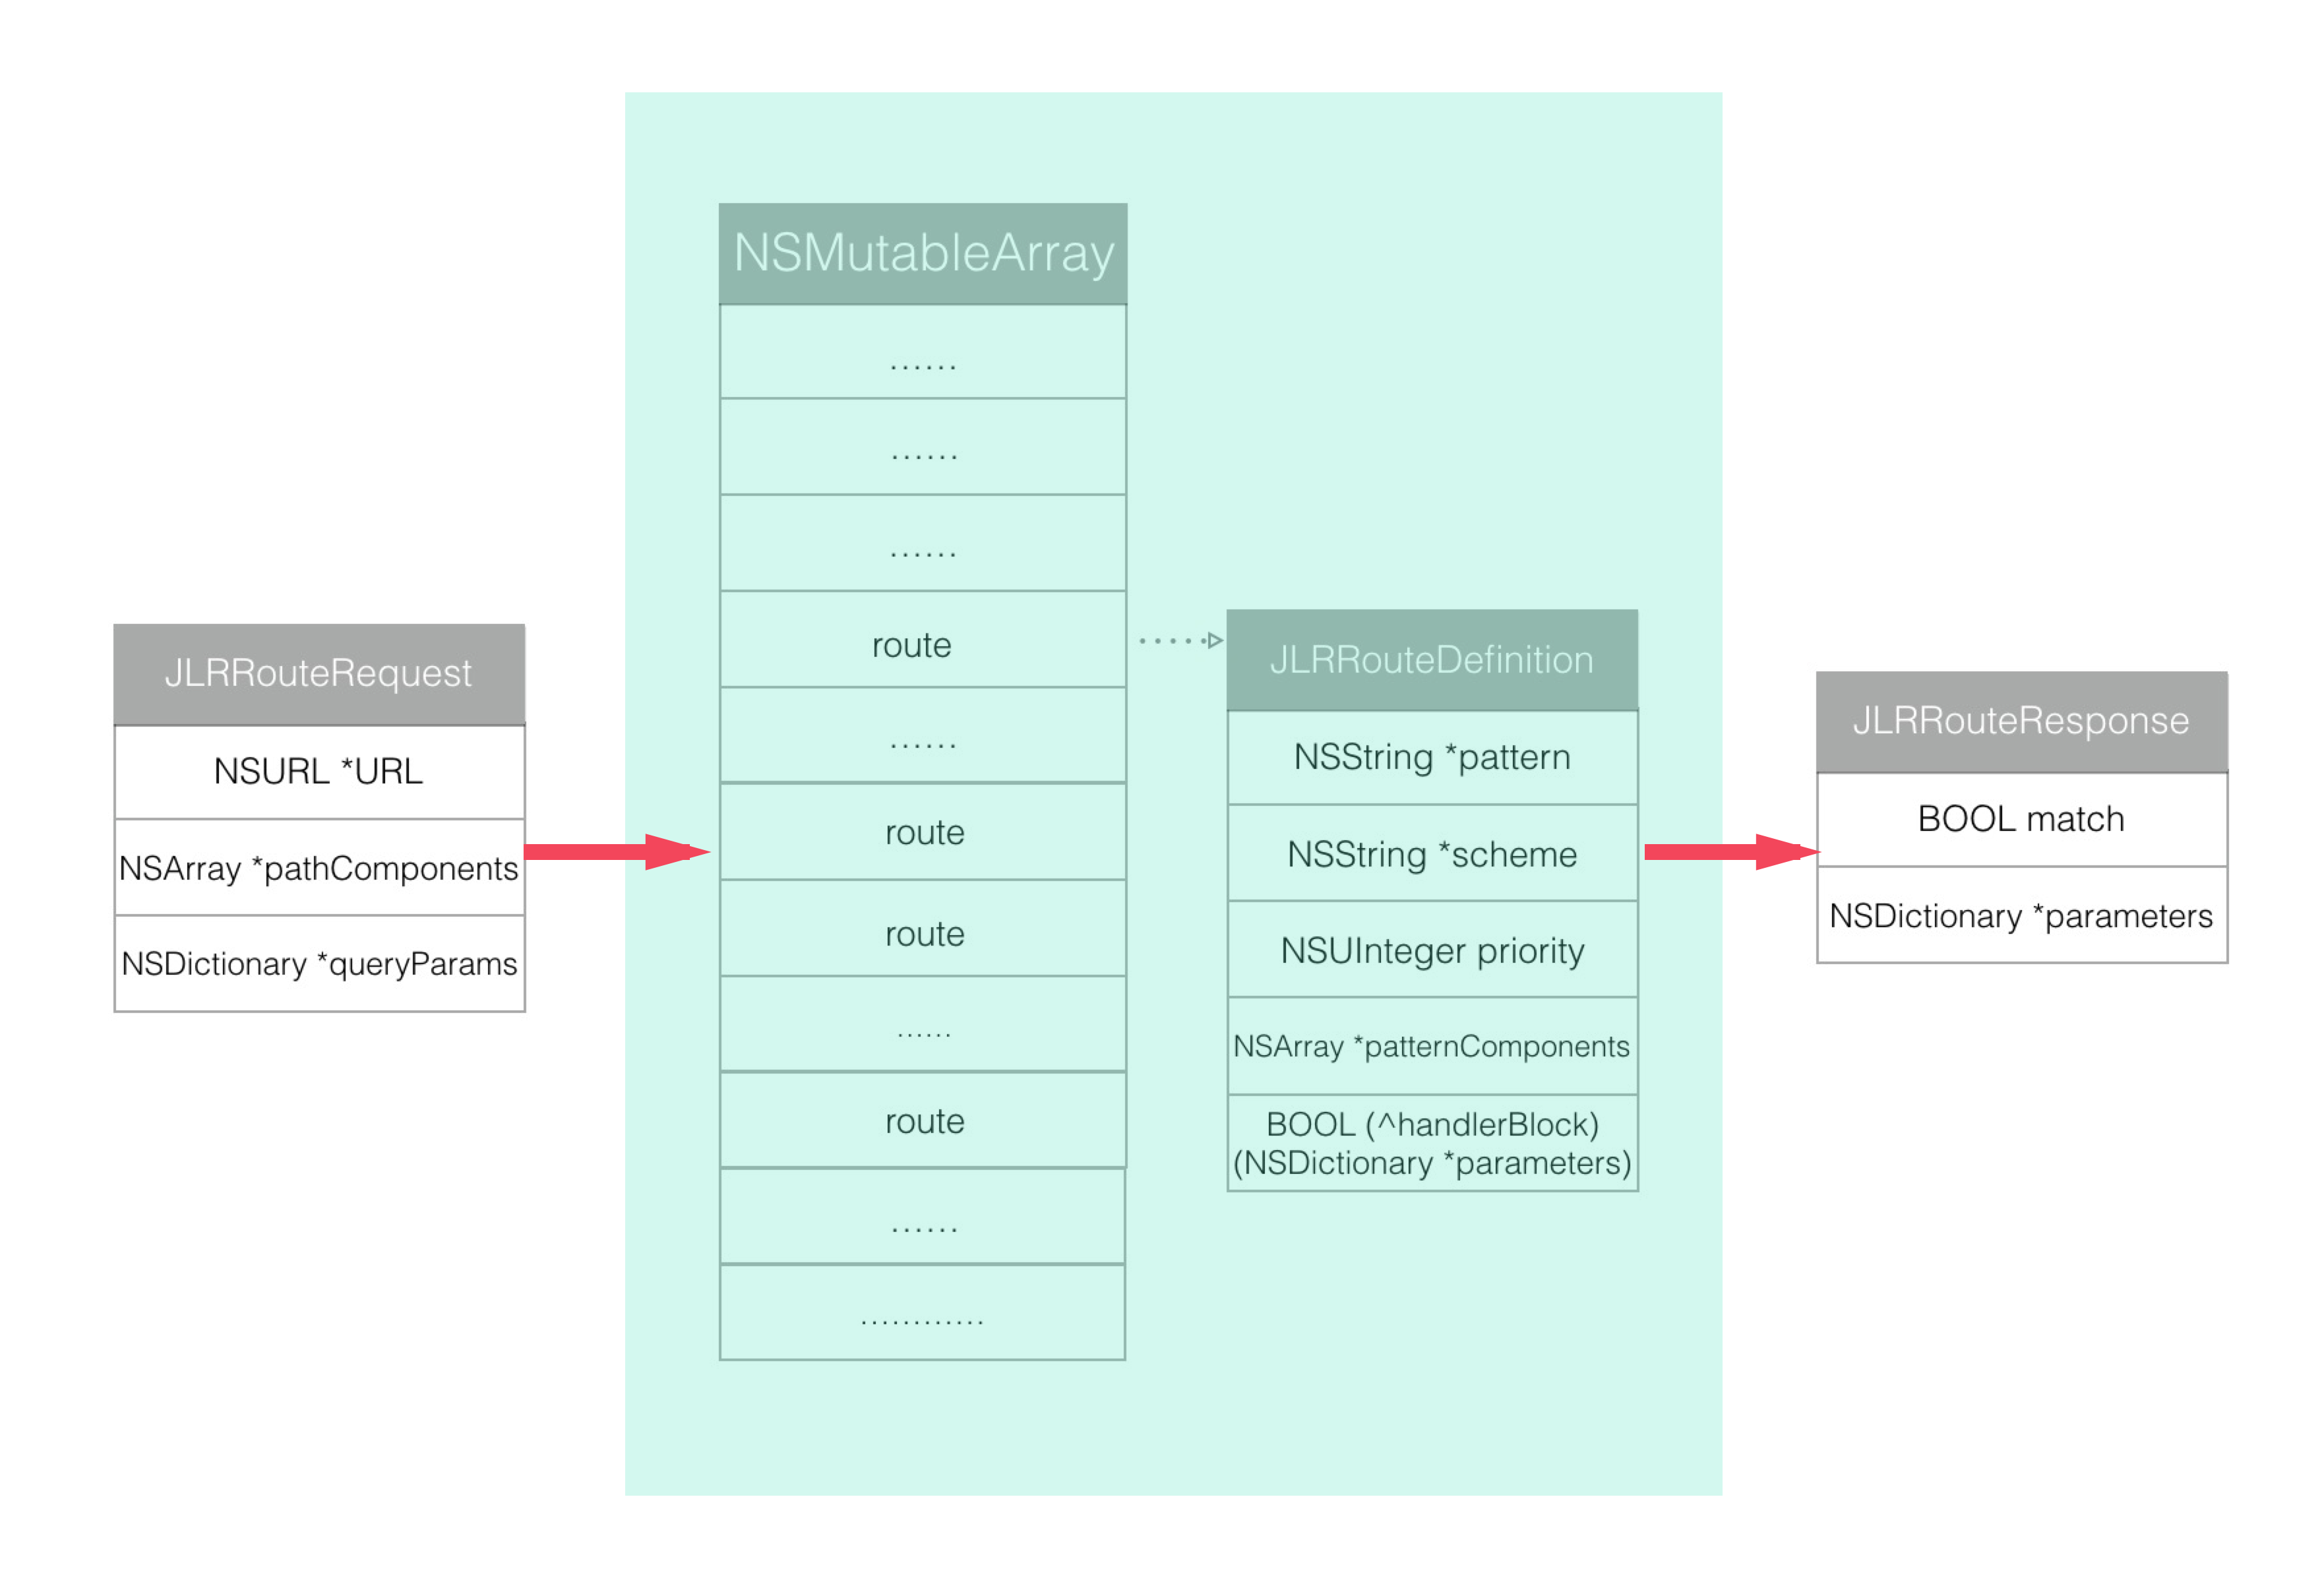
First, initialize a JLRRouteRequest from the externally provided URL, then use this JLRRouteRequest to request each route in the current route array in order. Each rule generates a response, but only responses that satisfy the conditions will match. Finally, take the matching JLRRouteResponse and extract the corresponding parameters from its parameters dictionary. The important code in the lookup and matching process is as follows:
- (BOOL)_routeURL:(NSURL *)URL withParameters:(NSDictionary *)parameters executeRouteBlock:(BOOL)executeRouteBlock
{
    if (!URL) {
        return NO;
    }

    [self _verboseLog:@"Trying to route URL %@", URL];

    BOOL didRoute = NO;
    JLRRouteRequest *request = [[JLRRouteRequest alloc] initWithURL:URL];

    for (JLRRouteDefinition *route in [self.routes copy]) {
        // Check each route and generate the corresponding response
        JLRRouteResponse *response = [route routeResponseForRequest:request decodePlusSymbols:shouldDecodePlusSymbols];
        if (!response.isMatch) {
            continue;
        }

        [self _verboseLog:@"Successfully matched %@", route];

        if (!executeRouteBlock) {
            // If execution is not allowed but a matching route response was found.
            return YES;
        }

        // Assemble the final parameters
        NSMutableDictionary *finalParameters = [NSMutableDictionary dictionary];
        [finalParameters addEntriesFromDictionary:response.parameters];
        [finalParameters addEntriesFromDictionary:parameters];
        [self _verboseLog:@"Final parameters are %@", finalParameters];

        didRoute = [route callHandlerBlockWithParameters:finalParameters];

        if (didRoute) {
            // Handler called successfully
            break;
        }
    }

    if (!didRoute) {
        [self _verboseLog:@"Could not find a matching route"];
    }

    // If no matching route is found in the current route rules, the current route is not global, and fallback to global lookup is allowed, continue searching the global route rules.
    if (!didRoute && self.shouldFallbackToGlobalRoutes && ![self _isGlobalRoutesController]) {
        [self _verboseLog:@"Falling back to global routes..."];
        didRoute = [[JLRoutes globalRoutes] _routeURL:URL withParameters:parameters executeRouteBlock:executeRouteBlock];
    }

    // Finally, if nothing matched and there is an unmatched URL handler, call this block for final handling.

if, after everything, we did not route anything and we have an unmatched URL handler, then call it
    if (!didRoute && executeRouteBlock && self.unmatchedURLHandler) {
        [self _verboseLog:@"Falling back to the unmatched URL handler"];
        self.unmatchedURLHandler(self, URL, parameters);
    }

    return didRoute;
}
For example:
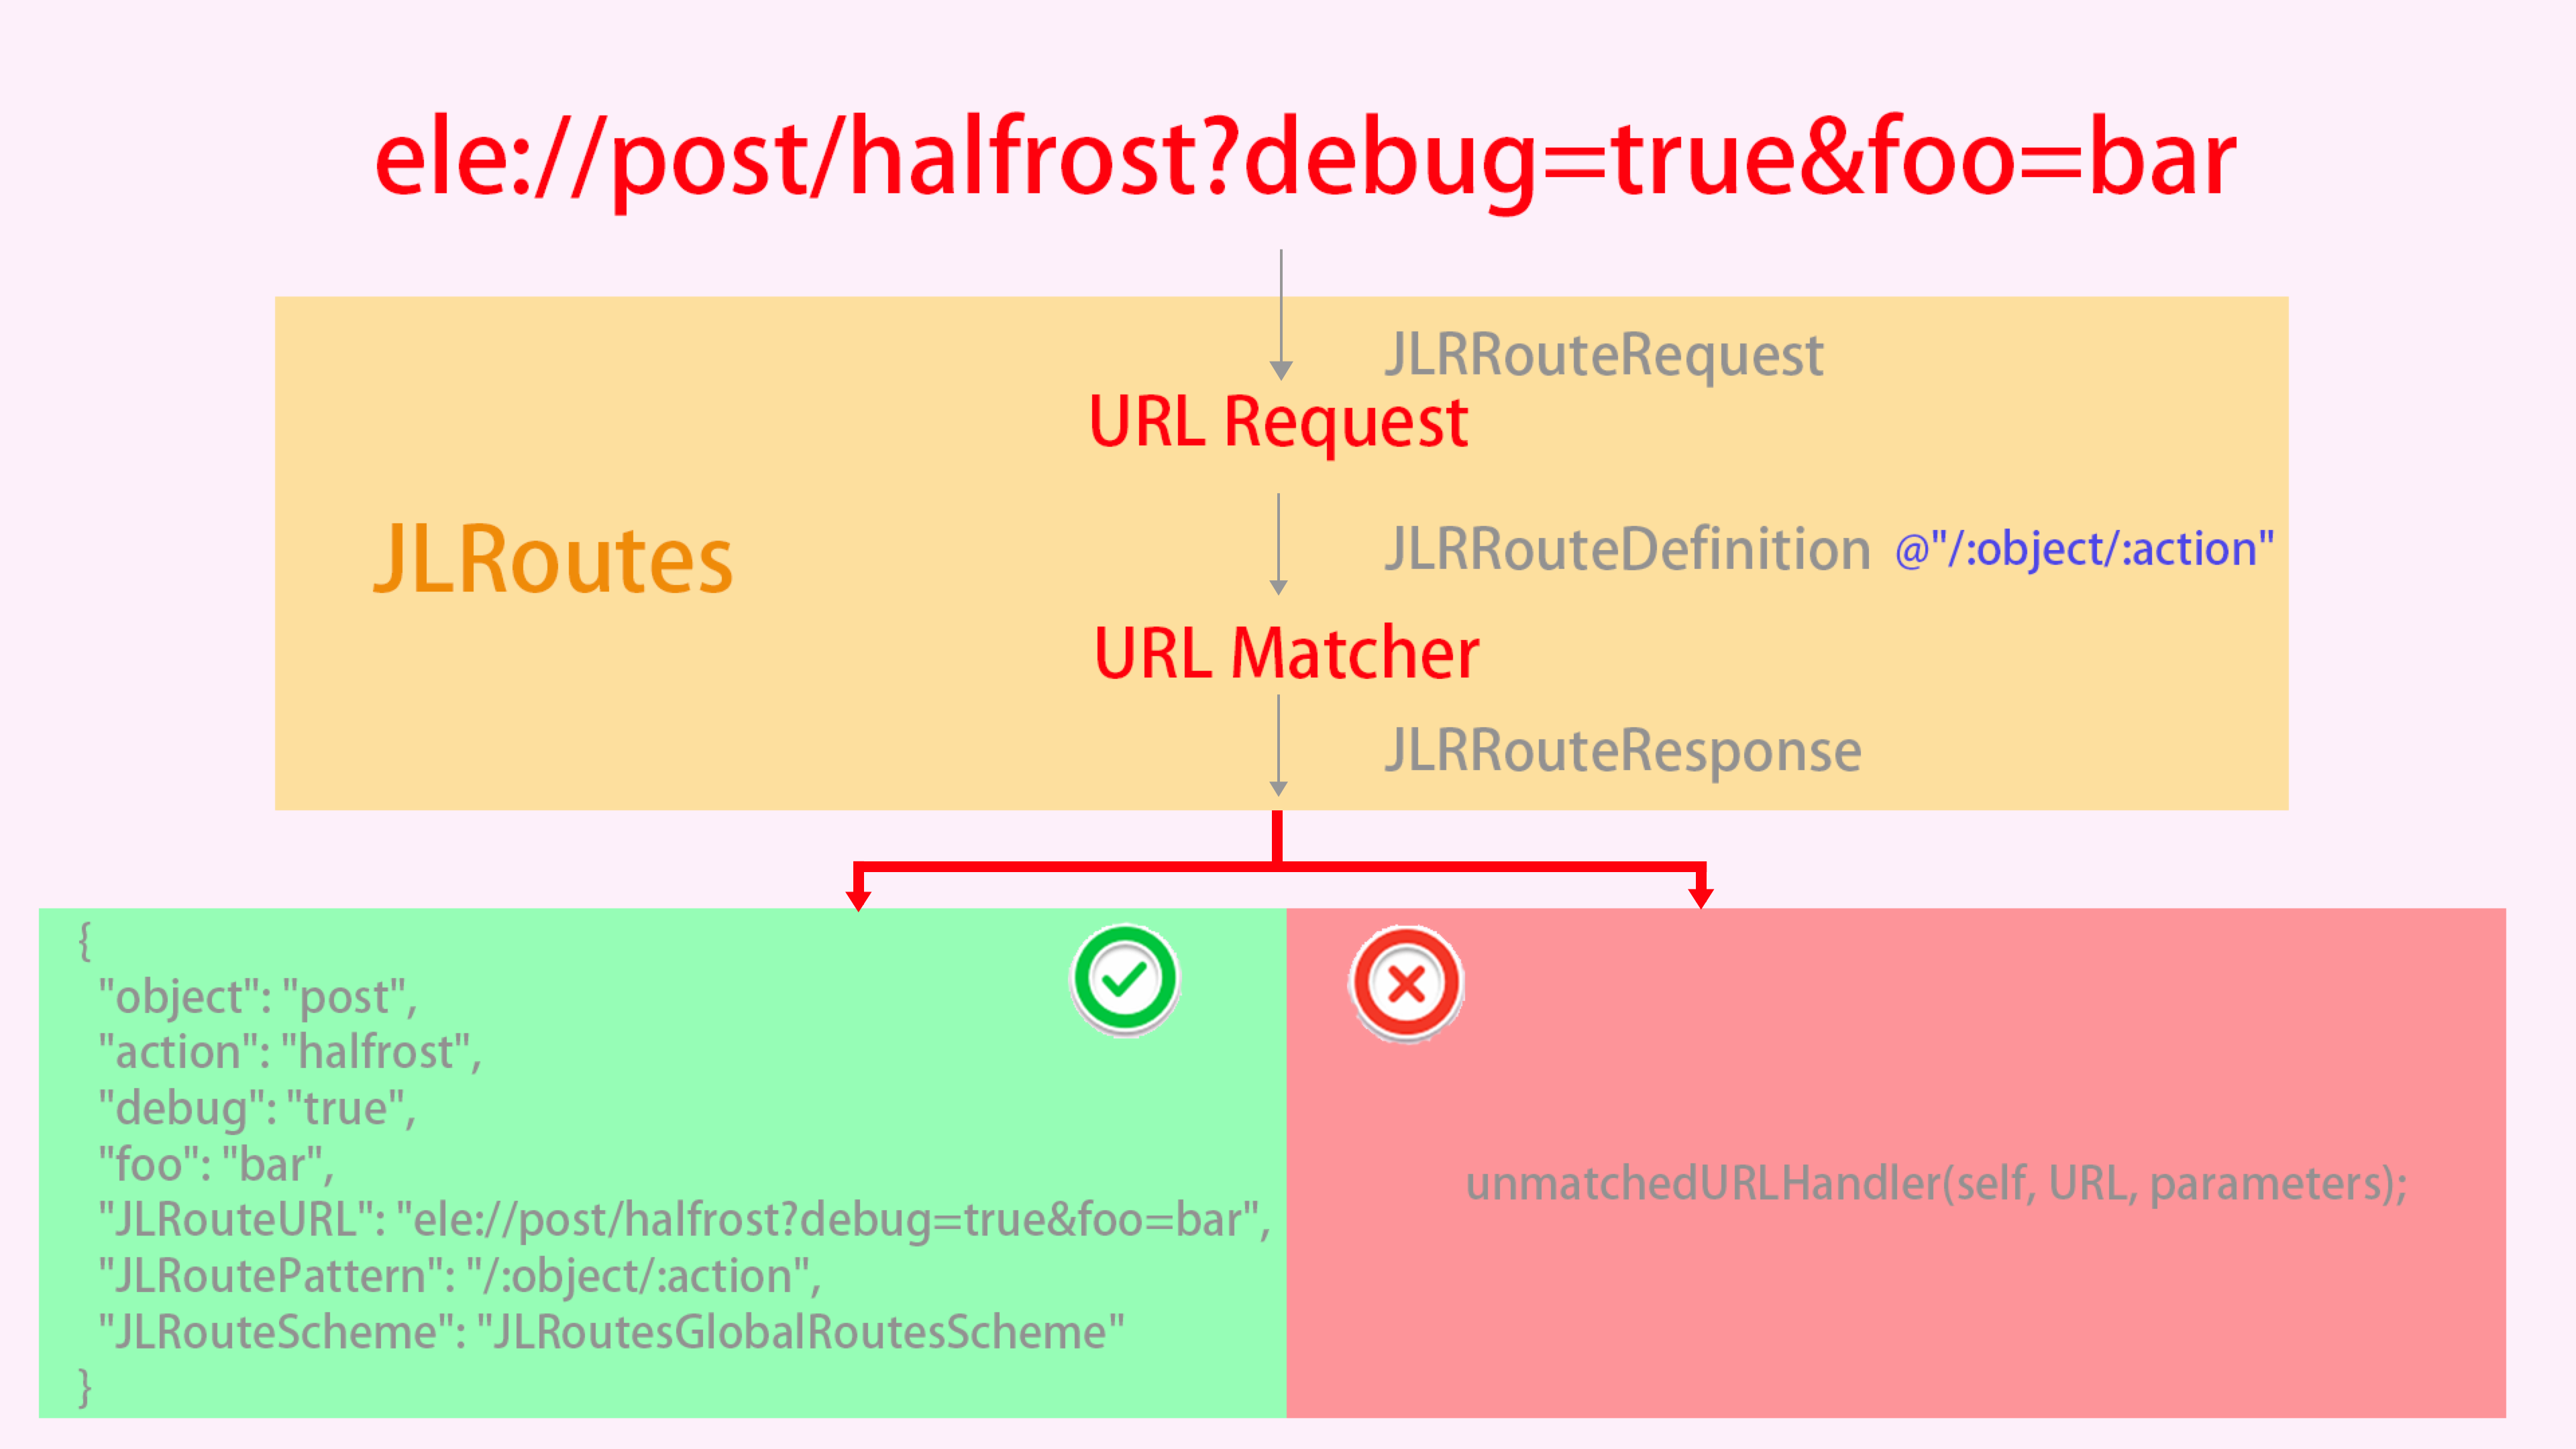
First, we register a Router with the following rules:
[[JLRoutes globalRoutes] addRoute:@"/:object/:action" handler:^BOOL(NSDictionary *parameters) {
  NSString *object = parameters[@"object"];
  NSString *action = parameters[@"action"];
  // stuff
  return YES;
}];
We pass in a URL and let the Router handle it.
NSURL *editPost = [NSURL URLWithString:@"ele://post/halfrost?debug=true&foo=bar"];
[[UIApplication sharedApplication] openURL:editPost];
After a successful match, we will get a dictionary like this:
{
  "object": "post",
  "action": "halfrost",
  "debug": "true",
  "foo": "bar",
  "JLRouteURL": "ele://post/halfrost?debug=true&foo=bar",
  "JLRoutePattern": "/:object/:action",
  "JLRouteScheme": "JLRoutesGlobalRoutesScheme"
}
The above process is illustrated in the following diagram:
JLRoutes also supports optional routing rules. Suppose you define a routing rule:
/the(/foo/:a)(/bar/:b)
JLRoutes registers the following four route rules for us by default:
/the/foo/:a/bar/:b
/the/foo/:a
/the/bar/:b
/the
(2) routable-ios Star 1415
Routable is a URL router used on the in-app native side. It can be used on iOS as well as on Android.
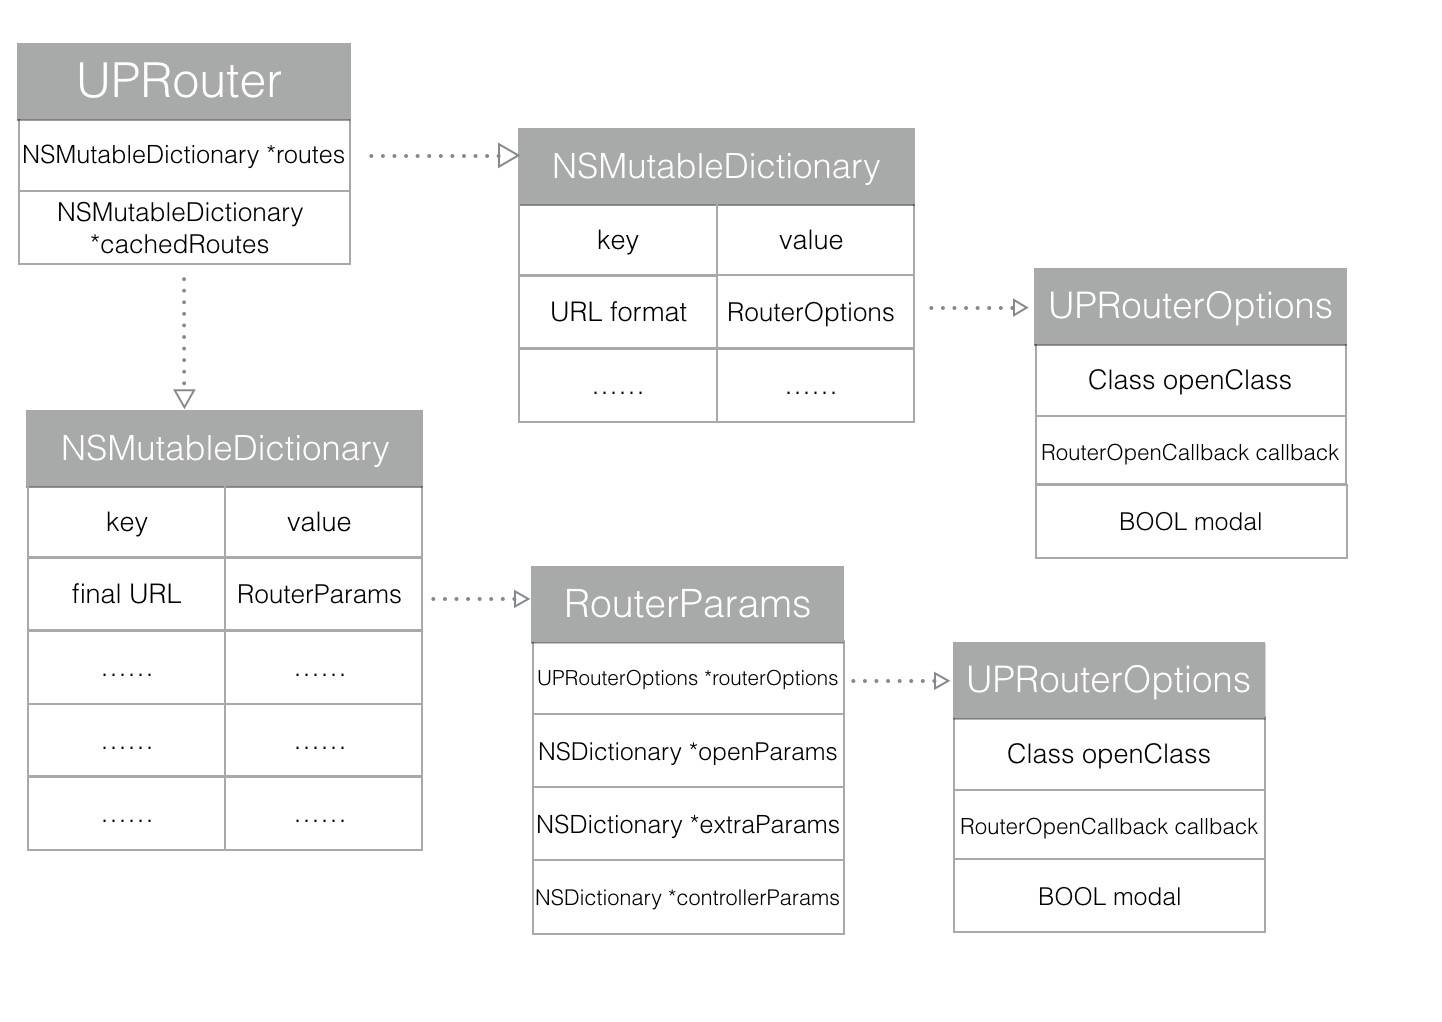
UPRouter stores two dictionaries. In the routes dictionary, the keys are routing rules, and the values are UPRouterOptions. In cachedRoutes, the keys are the final URLs, including parameters, and the values are RouterParams. RouterParams contains the UPRouterOptions matched from routes, as well as additional open parameters openParams and some extra parameters extraParams.
- (RouterParams *)routerParamsForUrl:(NSString *)url extraParams: (NSDictionary *)extraParams {
    if (!url) {
        //if we wait, caching this as key would throw an exception
        if (_ignoresExceptions) {
            return nil;
        }
        @throw [NSException exceptionWithName:@"RouteNotFoundException"
                                       reason:[NSString stringWithFormat:ROUTE_NOT_FOUND_FORMAT, url]
                                     userInfo:nil];
    }

    if ([self.cachedRoutes objectForKey:url] && !extraParams) {
        return [self.cachedRoutes objectForKey:url];
    }

   // Compare whether the number of params after splitting the URL by / matches the number of pathComponents
    NSArray *givenParts = url.pathComponents;
    NSArray *legacyParts = [url componentsSeparatedByString:@"/"];
    if ([legacyParts count] != [givenParts count]) {
        NSLog(@"Routable Warning - your URL %@ has empty path components - this will throw an error in an upcoming release", url);
        givenParts = legacyParts;
    }

    __block RouterParams *openParams = nil;
    [self.routes enumerateKeysAndObjectsUsingBlock:
     ^(NSString *routerUrl, UPRouterOptions *routerOptions, BOOL *stop) {

         NSArray *routerParts = [routerUrl pathComponents];
         if ([routerParts count] == [givenParts count]) {

             NSDictionary *givenParams = [self paramsForUrlComponents:givenParts routerUrlComponents:routerParts];
             if (givenParams) {
                 openParams = [[RouterParams alloc] initWithRouterOptions:routerOptions openParams:givenParams extraParams: extraParams];
                 *stop = YES;
             }
         }
     }];

    if (!openParams) {
        if (_ignoresExceptions) {
            return nil;
        }
        @throw [NSException exceptionWithName:@"RouteNotFoundException"
                                       reason:[NSString stringWithFormat:ROUTE_NOT_FOUND_FORMAT, url]
                                     userInfo:nil];
    }
    [self.cachedRoutes setObject:openParams forKey:url];
    return openParams;
}
The key thing this code does is iterate over the routes dictionary, find the string whose parameters match, wrap it in RouterParams, and return it.
- (NSDictionary *)paramsForUrlComponents:(NSArray *)givenUrlComponents routerUrlComponents:(NSArray *)routerUrlComponents {

    __block NSMutableDictionary *params = [NSMutableDictionary dictionary];
    [routerUrlComponents enumerateObjectsUsingBlock:
     ^(NSString *routerComponent, NSUInteger idx, BOOL *stop) {

         NSString *givenComponent = givenUrlComponents[idx];
         if ([routerComponent hasPrefix:@":"]) {
             NSString *key = [routerComponent substringFromIndex:1];
             [params setObject:givenComponent forKey:key];
         }
         else if (![routerComponent isEqualToString:givenComponent]) {
             params = nil;
             *stop = YES;
         }
     }];
    return params;
}
In the function above, the first parameter is the split array of the URL passed in from the outside, containing all input parameters. The second parameter is the split array of the routing rule. Since routerComponent is defined such that only the part after : is a parameter, position 1 of routerComponent is the corresponding parameter name. In the params dictionary, the parameter name is used as the key and the parameter value as the value.
 NSDictionary *givenParams = [self paramsForUrlComponents:givenParts routerUrlComponents:routerParts];
if (givenParams) {
       openParams = [[RouterParams alloc] initWithRouterOptions:routerOptions openParams:givenParams extraParams: extraParams];
       *stop = YES;
}
Finally, via the RouterParams initialization method, a RouterParams is created using three initialization arguments: the UPRouterOptions corresponding to the routing rule, the parameter dictionary givenParams encapsulated in the previous step, and the second input parameter of the routerParamsForUrl: extraParams: method.
[self.cachedRoutes setObject:openParams forKey:url];
In the final step, in the self.cachedRoutes dictionary, the key is the parameterized URL, and the value is RouterParams.
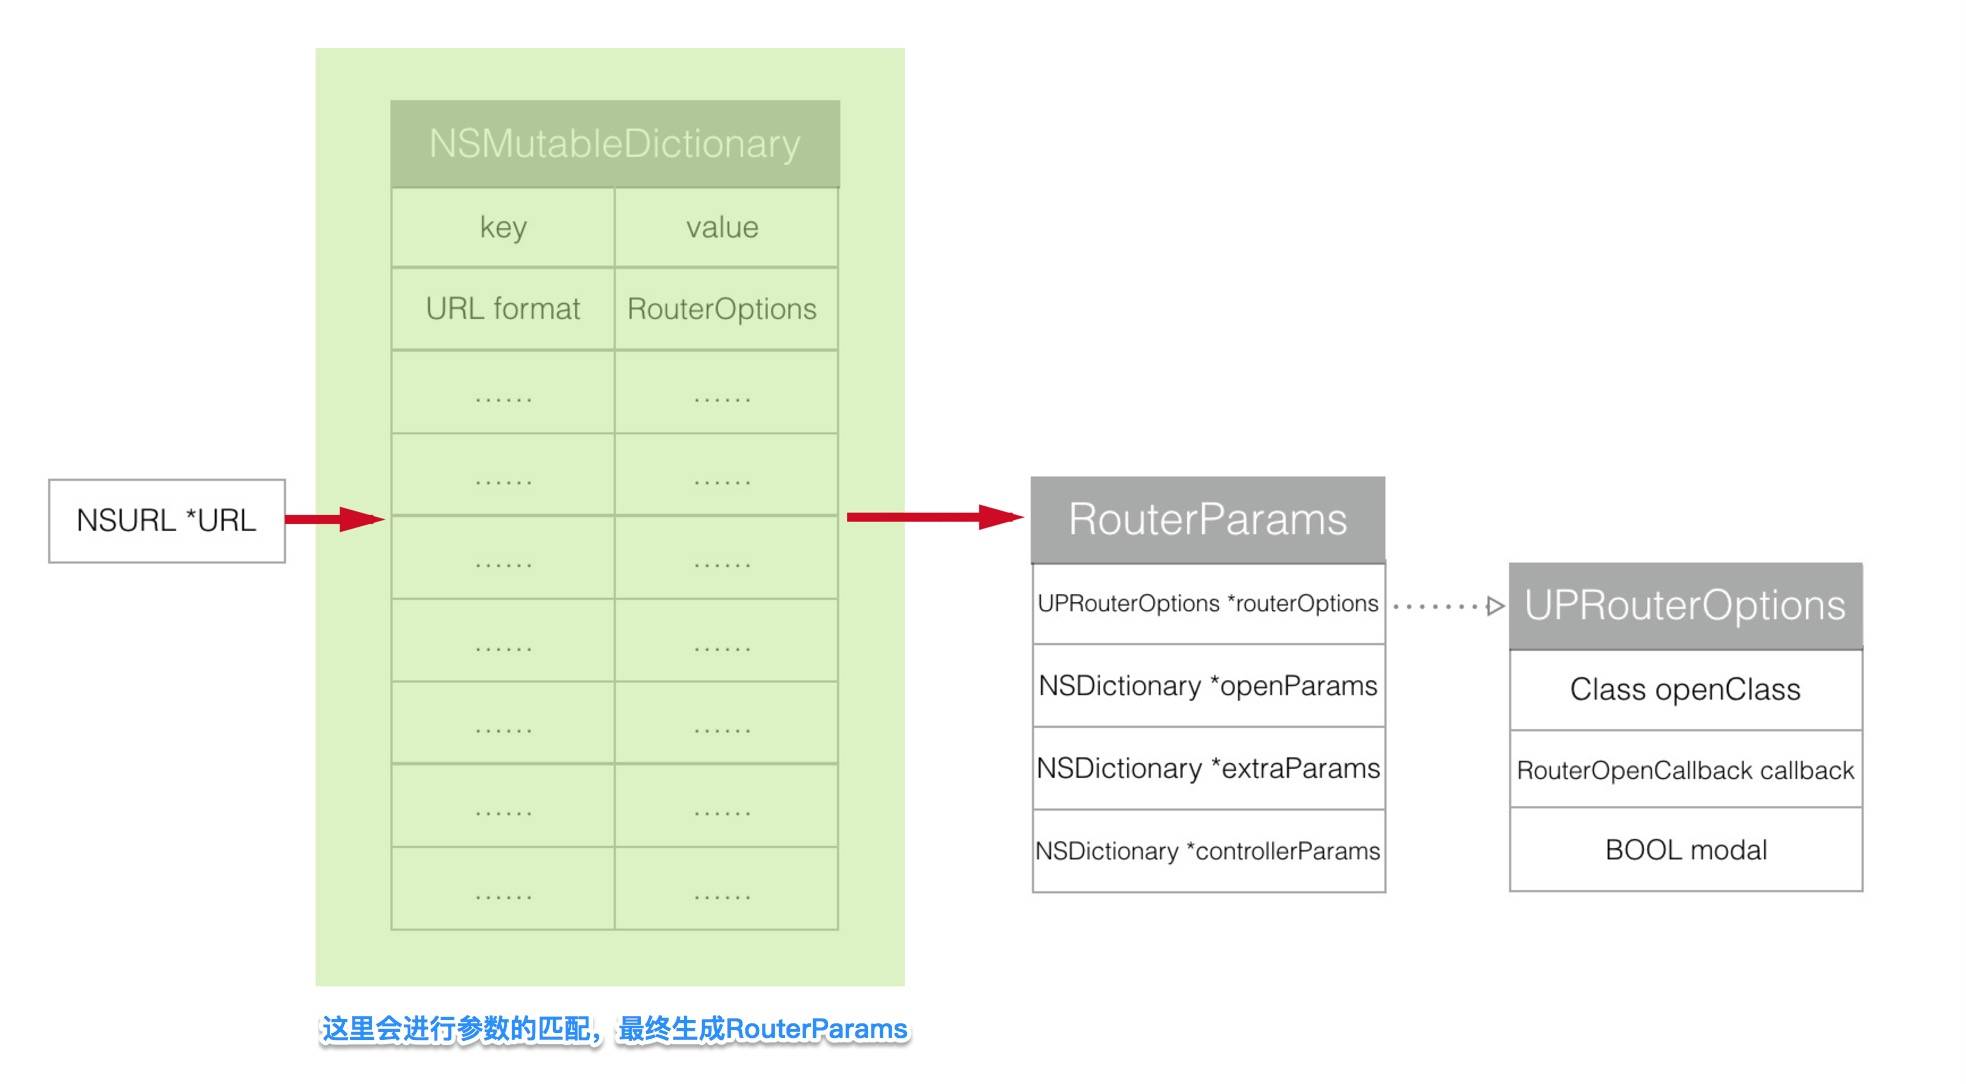
Finally, convert the matched and encapsulated RouterParams into the corresponding Controller.
- (UIViewController *)controllerForRouterParams:(RouterParams *)params {
    SEL CONTROLLER_CLASS_SELECTOR = sel_registerName("allocWithRouterParams:");
    SEL CONTROLLER_SELECTOR = sel_registerName("initWithRouterParams:");
    UIViewController *controller = nil;
    Class controllerClass = params.routerOptions.openClass;

#pragma clang diagnostic push

#pragma clang diagnostic ignored "-Warc-performSelector-leaks"
    if ([controllerClass respondsToSelector:CONTROLLER_CLASS_SELECTOR]) {
        controller = [controllerClass performSelector:CONTROLLER_CLASS_SELECTOR withObject:[params controllerParams]];
    }
    else if ([params.routerOptions.openClass instancesRespondToSelector:CONTROLLER_SELECTOR]) {
        controller = [[params.routerOptions.openClass alloc] performSelector:CONTROLLER_SELECTOR withObject:[params controllerParams]];
    }

#pragma clang diagnostic pop
    if (!controller) {
        if (_ignoresExceptions) {
            return controller;
        }
        @throw [NSException exceptionWithName:@"RoutableInitializerNotFound"
                                       reason:[NSString stringWithFormat:INVALID_CONTROLLER_FORMAT, NSStringFromClass(controllerClass), NSStringFromSelector(CONTROLLER_CLASS_SELECTOR),  NSStringFromSelector(CONTROLLER_SELECTOR)]
                                     userInfo:nil];
    }

    controller.modalTransitionStyle = params.routerOptions.transitionStyle;
    controller.modalPresentationStyle = params.routerOptions.presentationStyle;
    return controller;
}
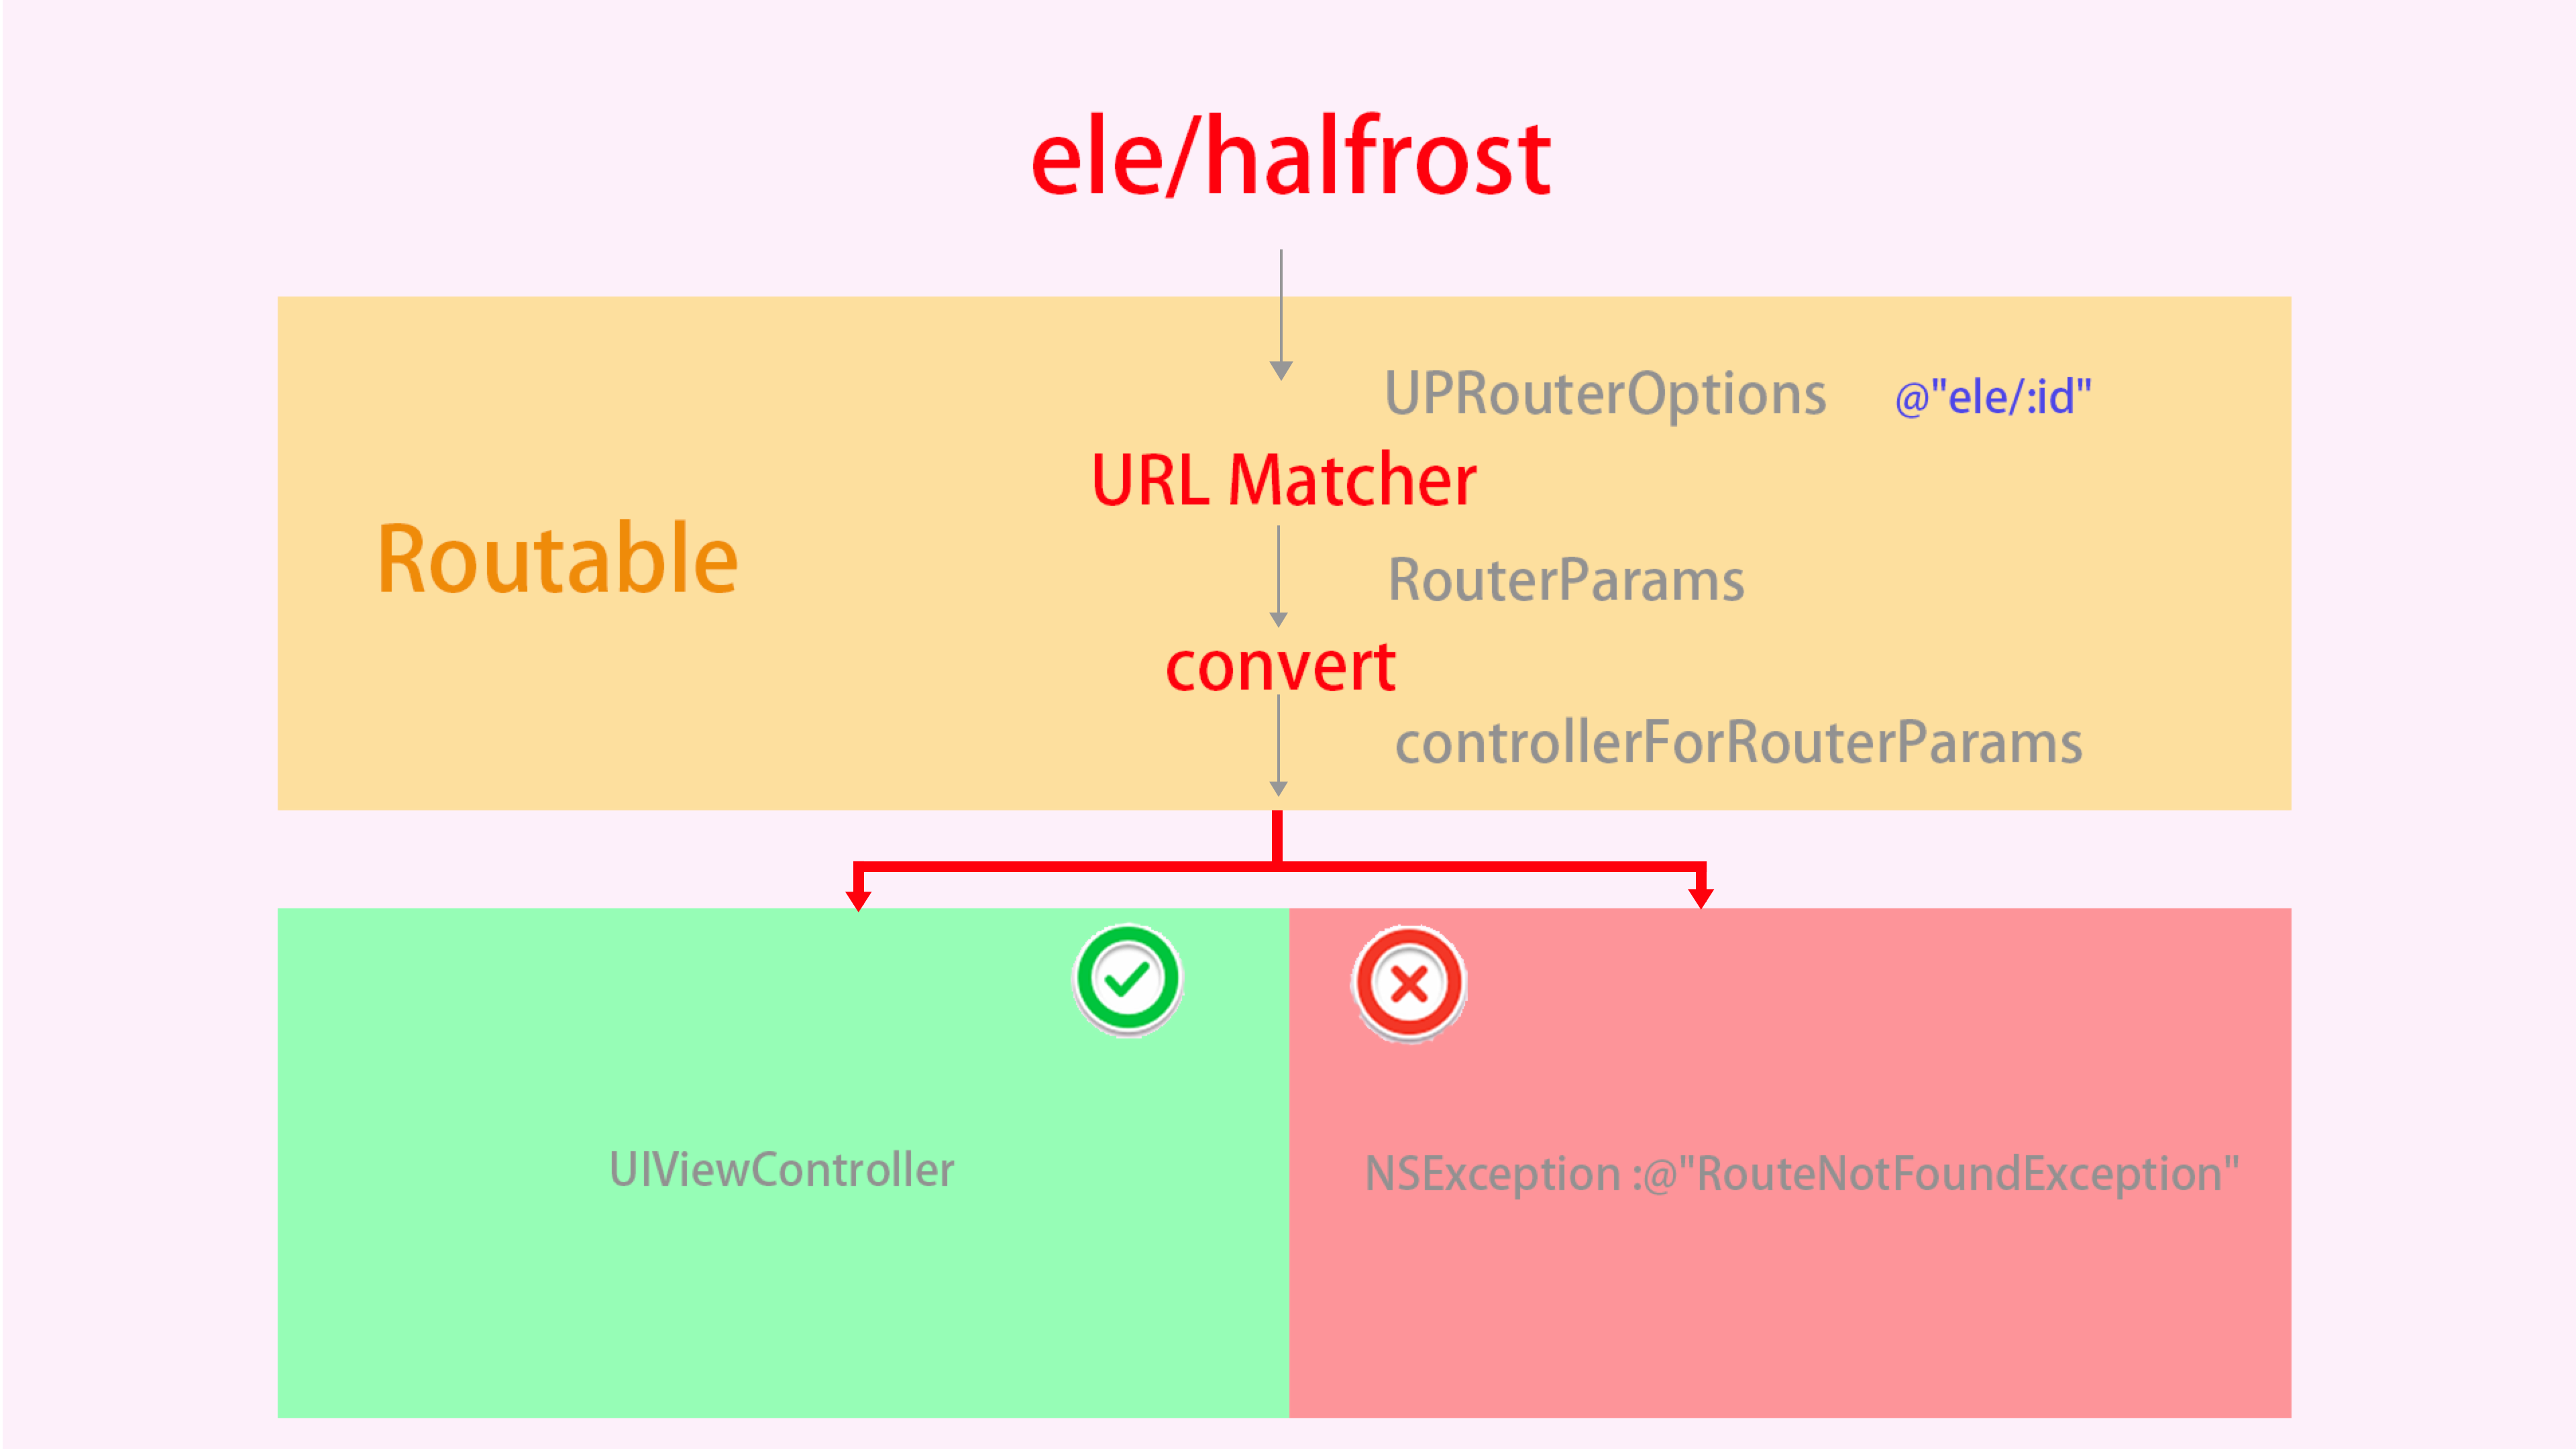
If the Controller is a class, call allocWithRouterParams: to initialize it. If the Controller is already an instance, call initWithRouterParams: to initialize it.
The general flow of Routable is illustrated below:
(3)HHRouter Star 1277
This is a Router from Pudding Animation, inspired by ABRouter and Routable iOS.
Let’s first look at the HHRouter API. The methods it provides are very clear.
ViewController provides two methods. map is used to define routing rules, while matchController is used to match routing rules. After a successful match, it returns the corresponding UIViewController.
- (void)map:(NSString *)route toControllerClass:(Class)controllerClass;
- (UIViewController *)matchController:(NSString *)route;
The block closure provides three methods. map also sets routing rules. matchBlock is used to match a route and find the specified block, but it does not invoke that block. callBlock finds the specified block and invokes it immediately once found.
- (void)map:(NSString *)route toBlock:(HHRouterBlock)block;

- (HHRouterBlock)matchBlock:(NSString *)route;
- (id)callBlock:(NSString *)route;
The difference between matchBlock: and callBlock: is that the former does not automatically invoke the block. Therefore, after the matchBlock: method finds the corresponding block, you need to invoke it manually if you want to execute it.
In addition to the methods above, HHRouter also provides us with a special method.
- (HHRouteType)canRoute:(NSString *)route;
This method is used to find the RouteType corresponding to the routing rule being executed. There are only three RouteTypes in total:
typedef NS_ENUM (NSInteger, HHRouteType) {
    HHRouteTypeNone = 0,
    HHRouteTypeViewController = 1,
    HHRouteTypeBlock = 2
};
Next, let’s look at how HHRouter manages routing rules. The entire HHRouter is backed by an NSMutableDictionary *routes.
@interface HHRouter ()
@property (strong, nonatomic) NSMutableDictionary *routes;
@end
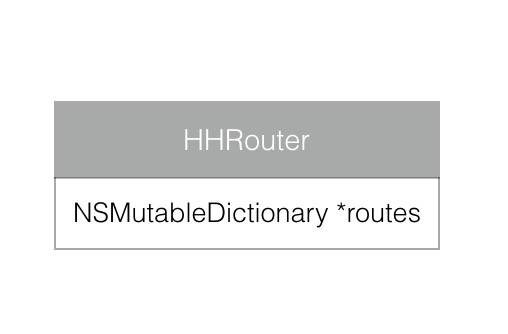
Although it uses just this one seemingly “simple” dictionary data structure, HHRouter’s routing design is actually quite ingenious.
- (void)map:(NSString *)route toBlock:(HHRouterBlock)block
{
    NSMutableDictionary *subRoutes = [self subRoutesToRoute:route];
    subRoutes[@"_"] = [block copy];
}

- (void)map:(NSString *)route toControllerClass:(Class)controllerClass
{
    NSMutableDictionary *subRoutes = [self subRoutesToRoute:route];
    subRoutes[@"_"] = controllerClass;
}
The two methods above are the method implementations invoked by the block closure and the ViewController when setting routing rules, respectively. Whether it is a ViewController or a block closure, subRoutesToRoute: is called when setting the rules.
- (NSMutableDictionary *)subRoutesToRoute:(NSString *)route
{
    NSArray *pathComponents = [self pathComponentsFromRoute:route];

    NSInteger index = 0;
    NSMutableDictionary *subRoutes = self.routes;

    while (index < pathComponents.count) {
        NSString *pathComponent = pathComponents[index];
        if (![subRoutes objectForKey:pathComponent]) {
            subRoutes[pathComponent] = [[NSMutableDictionary alloc] init];
        }
        subRoutes = subRoutes[pathComponent];
        index++;
    }

    return subRoutes;
}
The function above is used to construct a dictionary of route matching rules.
For example:
[[HHRouter shared] map:@"/user/:userId/"
         toControllerClass:[UserViewController class]];
[[HHRouter shared] map:@"/story/:storyId/"
         toControllerClass:[StoryViewController class]];
[[HHRouter shared] map:@"/user/:userId/story/?a=0"
         toControllerClass:[StoryListViewController class]];
After configuring three rules, if we construct the route-matching rule dictionary using the method described above, the route rule dictionary will look like this:
{
    story =     {
        ":storyId" =         {
            "_" = StoryViewController;
        };
    };
    user =     {
        ":userId" =         {
            "_" = UserViewController;
            story =             {
                "_" = StoryListViewController;
            };
        };
    };
}
After the routing rule dictionary is generated, it will be traversed when matching is performed.
Assume a route comes in at this point:
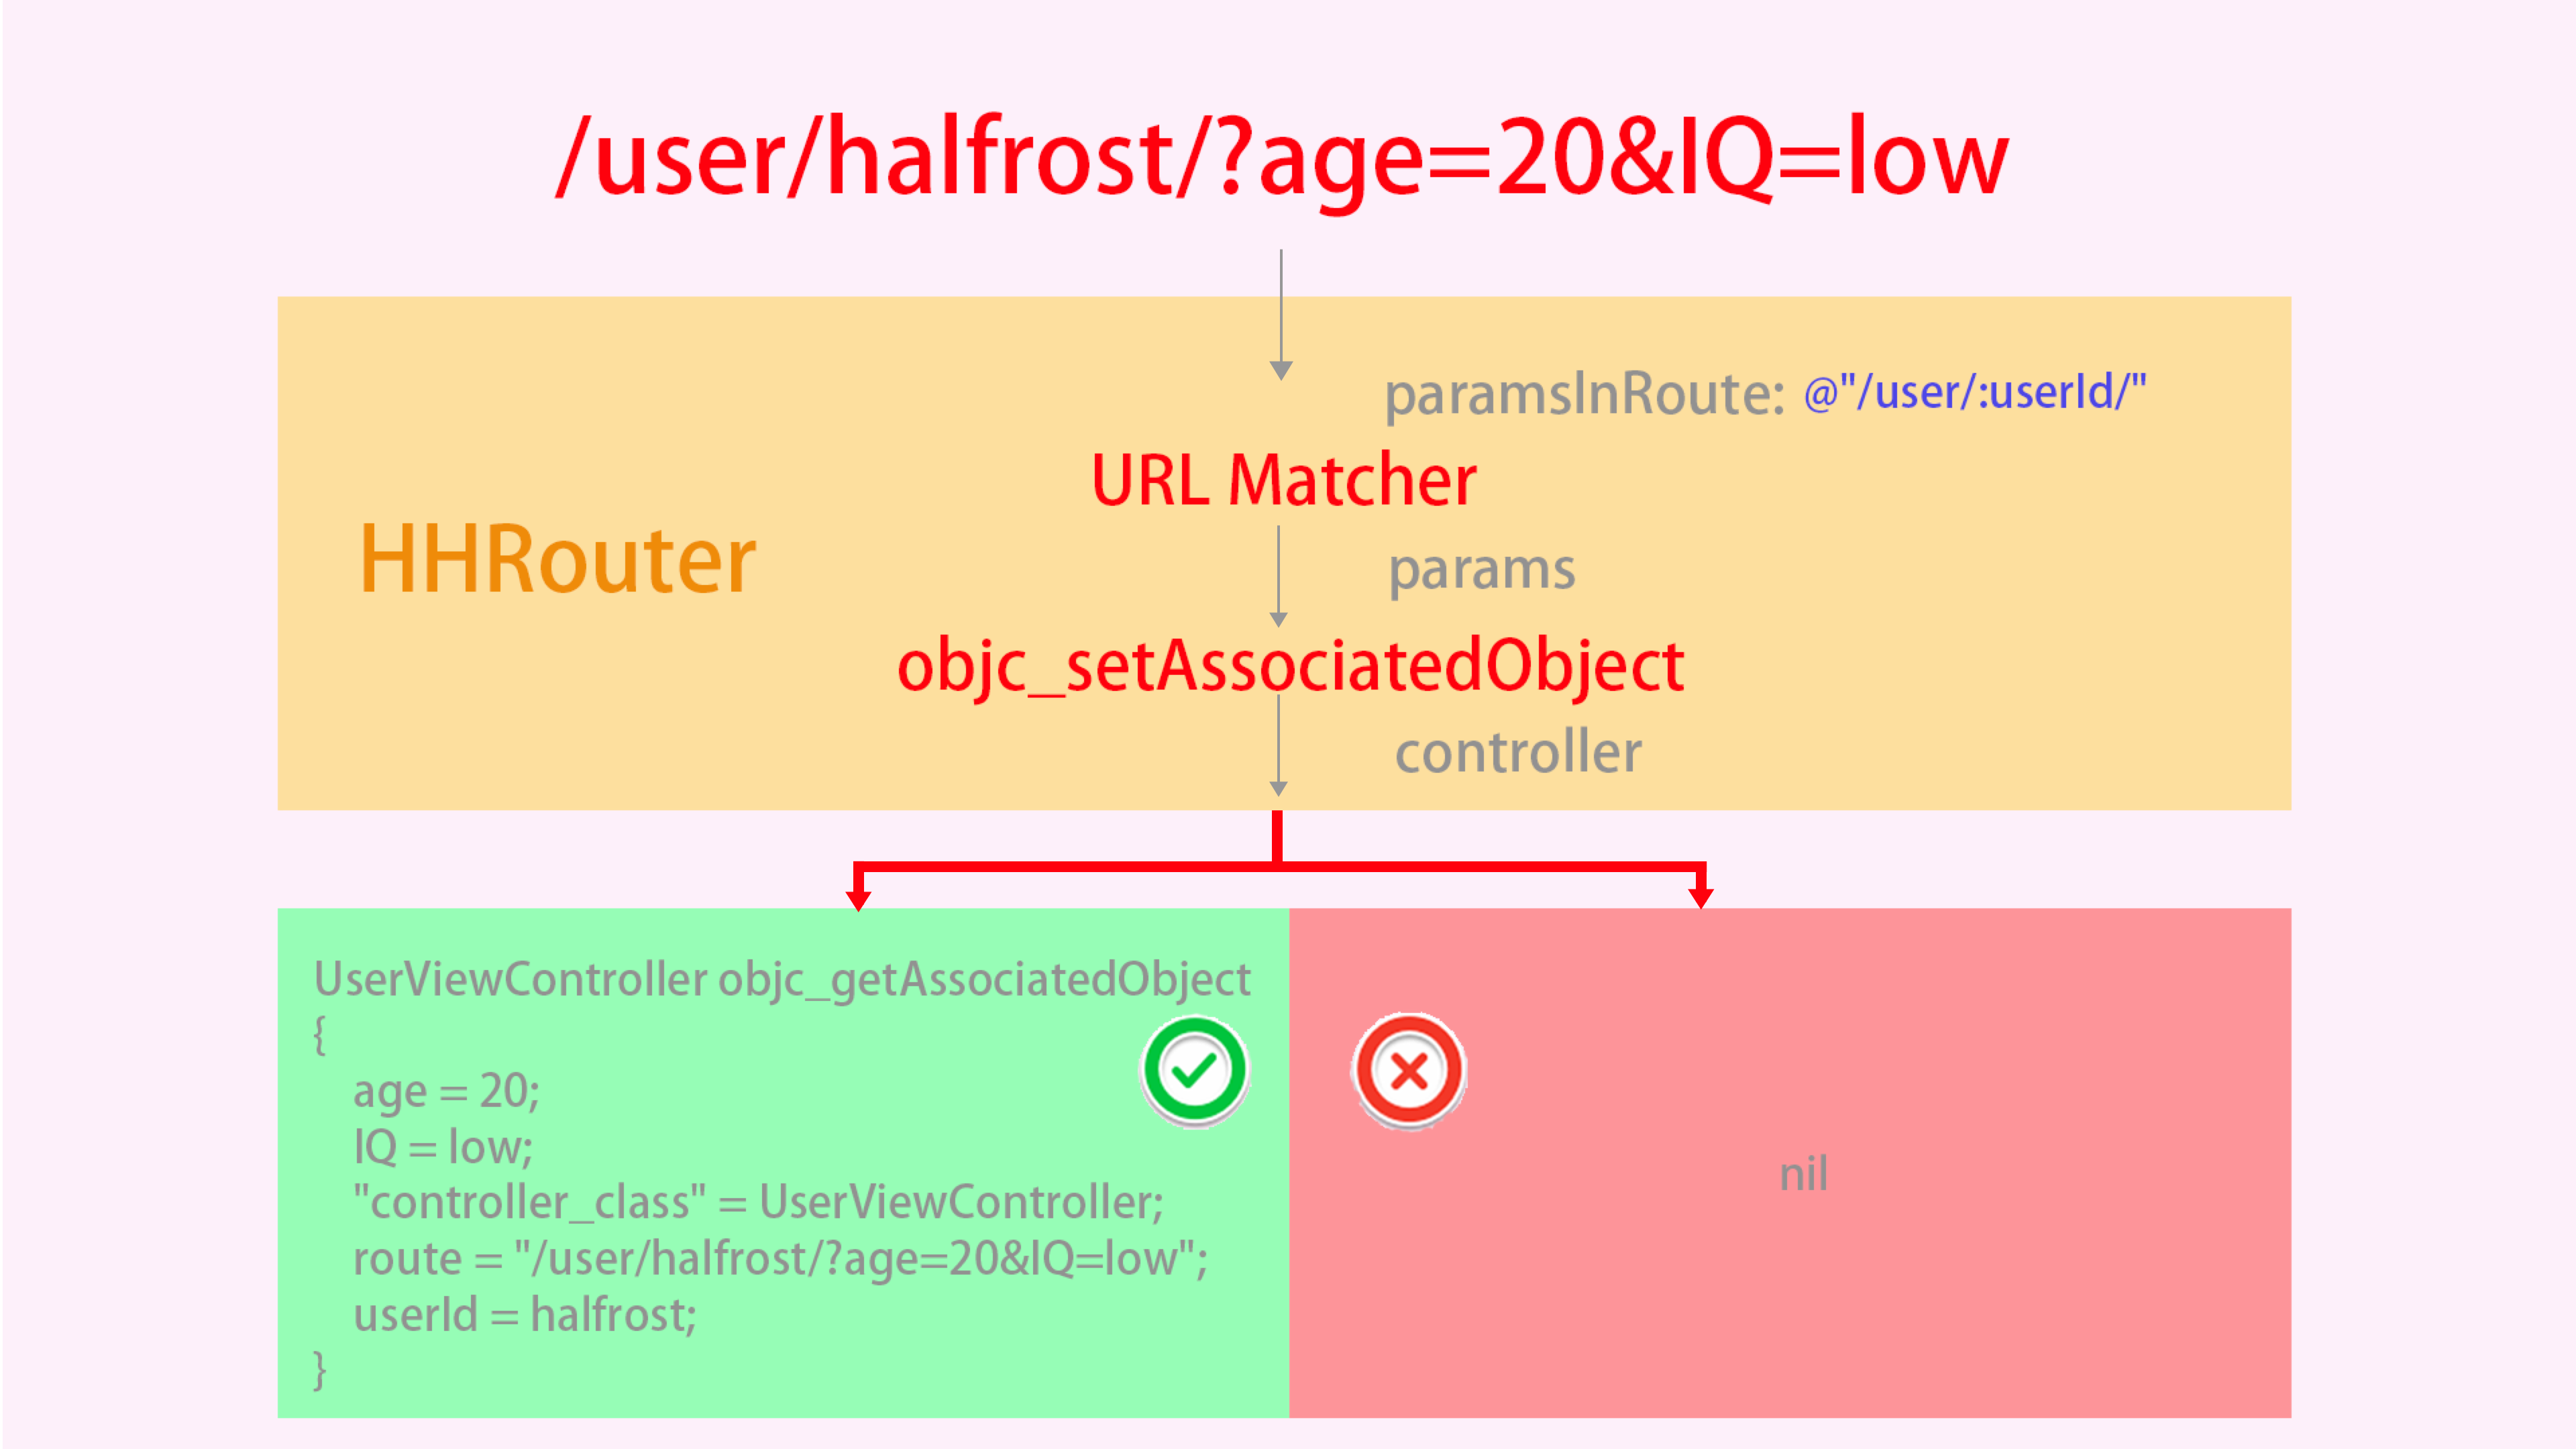
[[[HHRouter shared] matchController:@"hhrouter20://user/1/"] class],
HHRouter handles this route by first matching the preceding scheme. If even the scheme is incorrect, the subsequent match will fail directly.
It then performs route matching, and the final generated parameter dictionary is as follows:
{
    "controller_class" = UserViewController;
    route = "/user/1/";
    userId = 1;
}
The specific function for matching route parameters is in
- (NSDictionary *)paramsInRoute:(NSString *)route
This is implemented in this method. The method parses all parameters from the incoming URL one by one according to the route matching rules; any parameters after the ? are also parsed into a dictionary. This method is straightforward, so I won’t go into further detail here.
The ViewController dictionary also includes two entries by default:
"controller_class" =
route =
The route stores the full URL that was passed in.
What if the incoming route has a query string appended? Let’s take another look:
[[HHRouter shared] matchController:@"/user/1/?a=b&c=d"]
The parsed parameter dictionary would look like this:
{
    a = b;
    c = d;
    "controller_class" = UserViewController;
    route = "/user/1/?a=b&c=d";
    userId = 1;
}
Similarly, what if it is a block closure?
Again, first add a routing rule for the block closure:
[[HHRouter shared] map:@"/user/add/"
                   toBlock:^id(NSDictionary* params) {
                   }];
A routing-rule dictionary will be generated for this rule.
{
    story =     {
        ":storyId" =         {
            "_" = StoryViewController;
        };
    };
    user =     {
        ":userId" =         {
            "_" = UserViewController;
            story =             {
                "_" = StoryListViewController;
            };
        };
        add =         {
            "_" = "<__NSMallocBlock__: 0x600000240480>";
        };
    };
}
Note that “_” is followed by a block.
There are two ways to match a block closure.
// 1. After the first method matches the corresponding block, you still need to manually call the closure once.
    HHRouterBlock block = [[HHRouter shared] matchBlock:@"/user/add/?a=1&b=2"];
    block(nil);


// 2. After the second method matches the block, it automatically calls the closure.
    [[HHRouter shared] callBlock:@"/user/add/?a=1&b=2"];
The matched parameter dictionary is as follows:
{
    a = 1;
    b = 2;
    block = "<__NSMallocBlock__: 0x600000056b90>";
    route = "/user/add/?a=1&b=2";
}
The block dictionary will include the following two entries by default:
block =
route =
The full URL passed in is stored in the route.
The generated parameter dictionary is eventually attached to the ViewController as an Associated Object.
- (void)setParams:(NSDictionary *)paramsDictionary
{
    objc_setAssociatedObject(self, &kAssociatedParamsObjectKey, paramsDictionary, OBJC_ASSOCIATION_RETAIN_NONATOMIC);
}

- (NSDictionary *)params
{
    return objc_getAssociatedObject(self, &kAssociatedParamsObjectKey);
}
This binding process takes place when the match is complete.
- (UIViewController *)matchController:(NSString *)route
{
    NSDictionary *params = [self paramsInRoute:route];
    Class controllerClass = params[@"controller_class"];

    UIViewController *viewController = [[controllerClass alloc] init];

    if ([viewController respondsToSelector:@selector(setParams:)]) {
        [viewController performSelector:@selector(setParams:)
                             withObject:[params copy]];
    }
    return viewController;
}
The resulting ViewController is also the one we want. The corresponding parameters are all in the dictionary of the params property bound to it.
The process above can be illustrated as follows:
(4)MGJRouter Star 633
This is a routing approach from Mogujie.
The origin of this library:
The main issue with JLRoutes is that its URL lookup implementation is not efficient enough: it traverses rather than matches. It also has too many features.
HHRouter performs URL lookup based on matching, so it is more efficient. MGJRouter also adopts this approach, but HHRouter is too tightly coupled to ViewController, which reduces flexibility to some extent.
That led to MGJRouter.
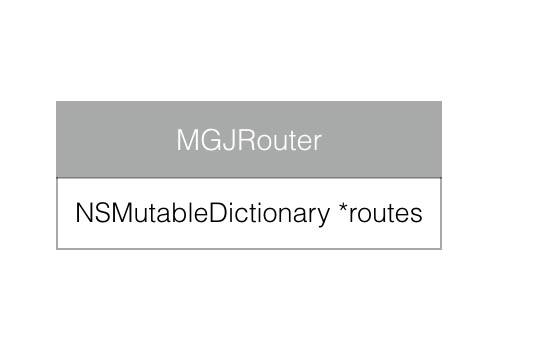
From a data-structure perspective, MGJRouter is still exactly the same as HHRouter.
@interface MGJRouter ()
@property (nonatomic) NSMutableDictionary *routes;
@end
So let’s take a look at what optimizations and improvements it makes to HHRouter.
1. MGJRouter supports passing some userinfo when calling openURL
[MGJRouter openURL:@"mgj://category/travel" withUserInfo:@{@"user_id": @1900} completion:nil];
Compared with HHRouter, this is merely syntactic sugar in terms of syntax. Although HHRouter does not support dictionary parameters, this can be compensated for by appending URL Query Parameters to the URL.
    if (parameters) {
        MGJRouterHandler handler = parameters[@"block"];
        if (completion) {
            parameters[MGJRouterParameterCompletion] = completion;
        }
        if (userInfo) {
            parameters[MGJRouterParameterUserInfo] = userInfo;
        }
        if (handler) {
            [parameters removeObjectForKey:@"block"];
            handler(parameters);
        }
    }
MGJRouter handles userInfo by directly wrapping it in the value corresponding to Key = MGJRouterParameterUserInfo.
2. Support URLs containing Chinese characters.
    [parameters enumerateKeysAndObjectsUsingBlock:^(id key, NSString *obj, BOOL *stop) {
        if ([obj isKindOfClass:[NSString class]]) {
            parameters[key] = [obj stringByReplacingPercentEscapesUsingEncoding:NSUTF8StringEncoding];
        }
    }];
Here, you just need to pay attention to encoding.
3. Define a global URL Pattern as the Fallback.
This mimics the idea in JLRoutes where, if no match is found, it automatically falls back to global.
    if (parameters) {
        MGJRouterHandler handler = parameters[@"block"];
        if (handler) {
            [parameters removeObjectForKey:@"block"];
            handler(parameters);
        }
    }
The parameters dictionary first stores the next routing rule, which exists inside a block closure. During matching, this handler is retrieved, and the matching is degraded into this closure for the final handling.
4. When OpenURL finishes, a Completion Block can be executed.
In MGJRouter, the author refactored the structure of the routing rules originally stored in HHRouter’s dictionary.
NSString *const MGJRouterParameterURL = @"MGJRouterParameterURL";
NSString *const MGJRouterParameterCompletion = @"MGJRouterParameterCompletion";
NSString *const MGJRouterParameterUserInfo = @"MGJRouterParameterUserInfo";
These three keys store the following information:
MGJRouterParameterURL stores the full incoming URL information.
MGJRouterParameterCompletion stores the completion closure.
MGJRouterParameterUserInfo stores the UserInfo dictionary.
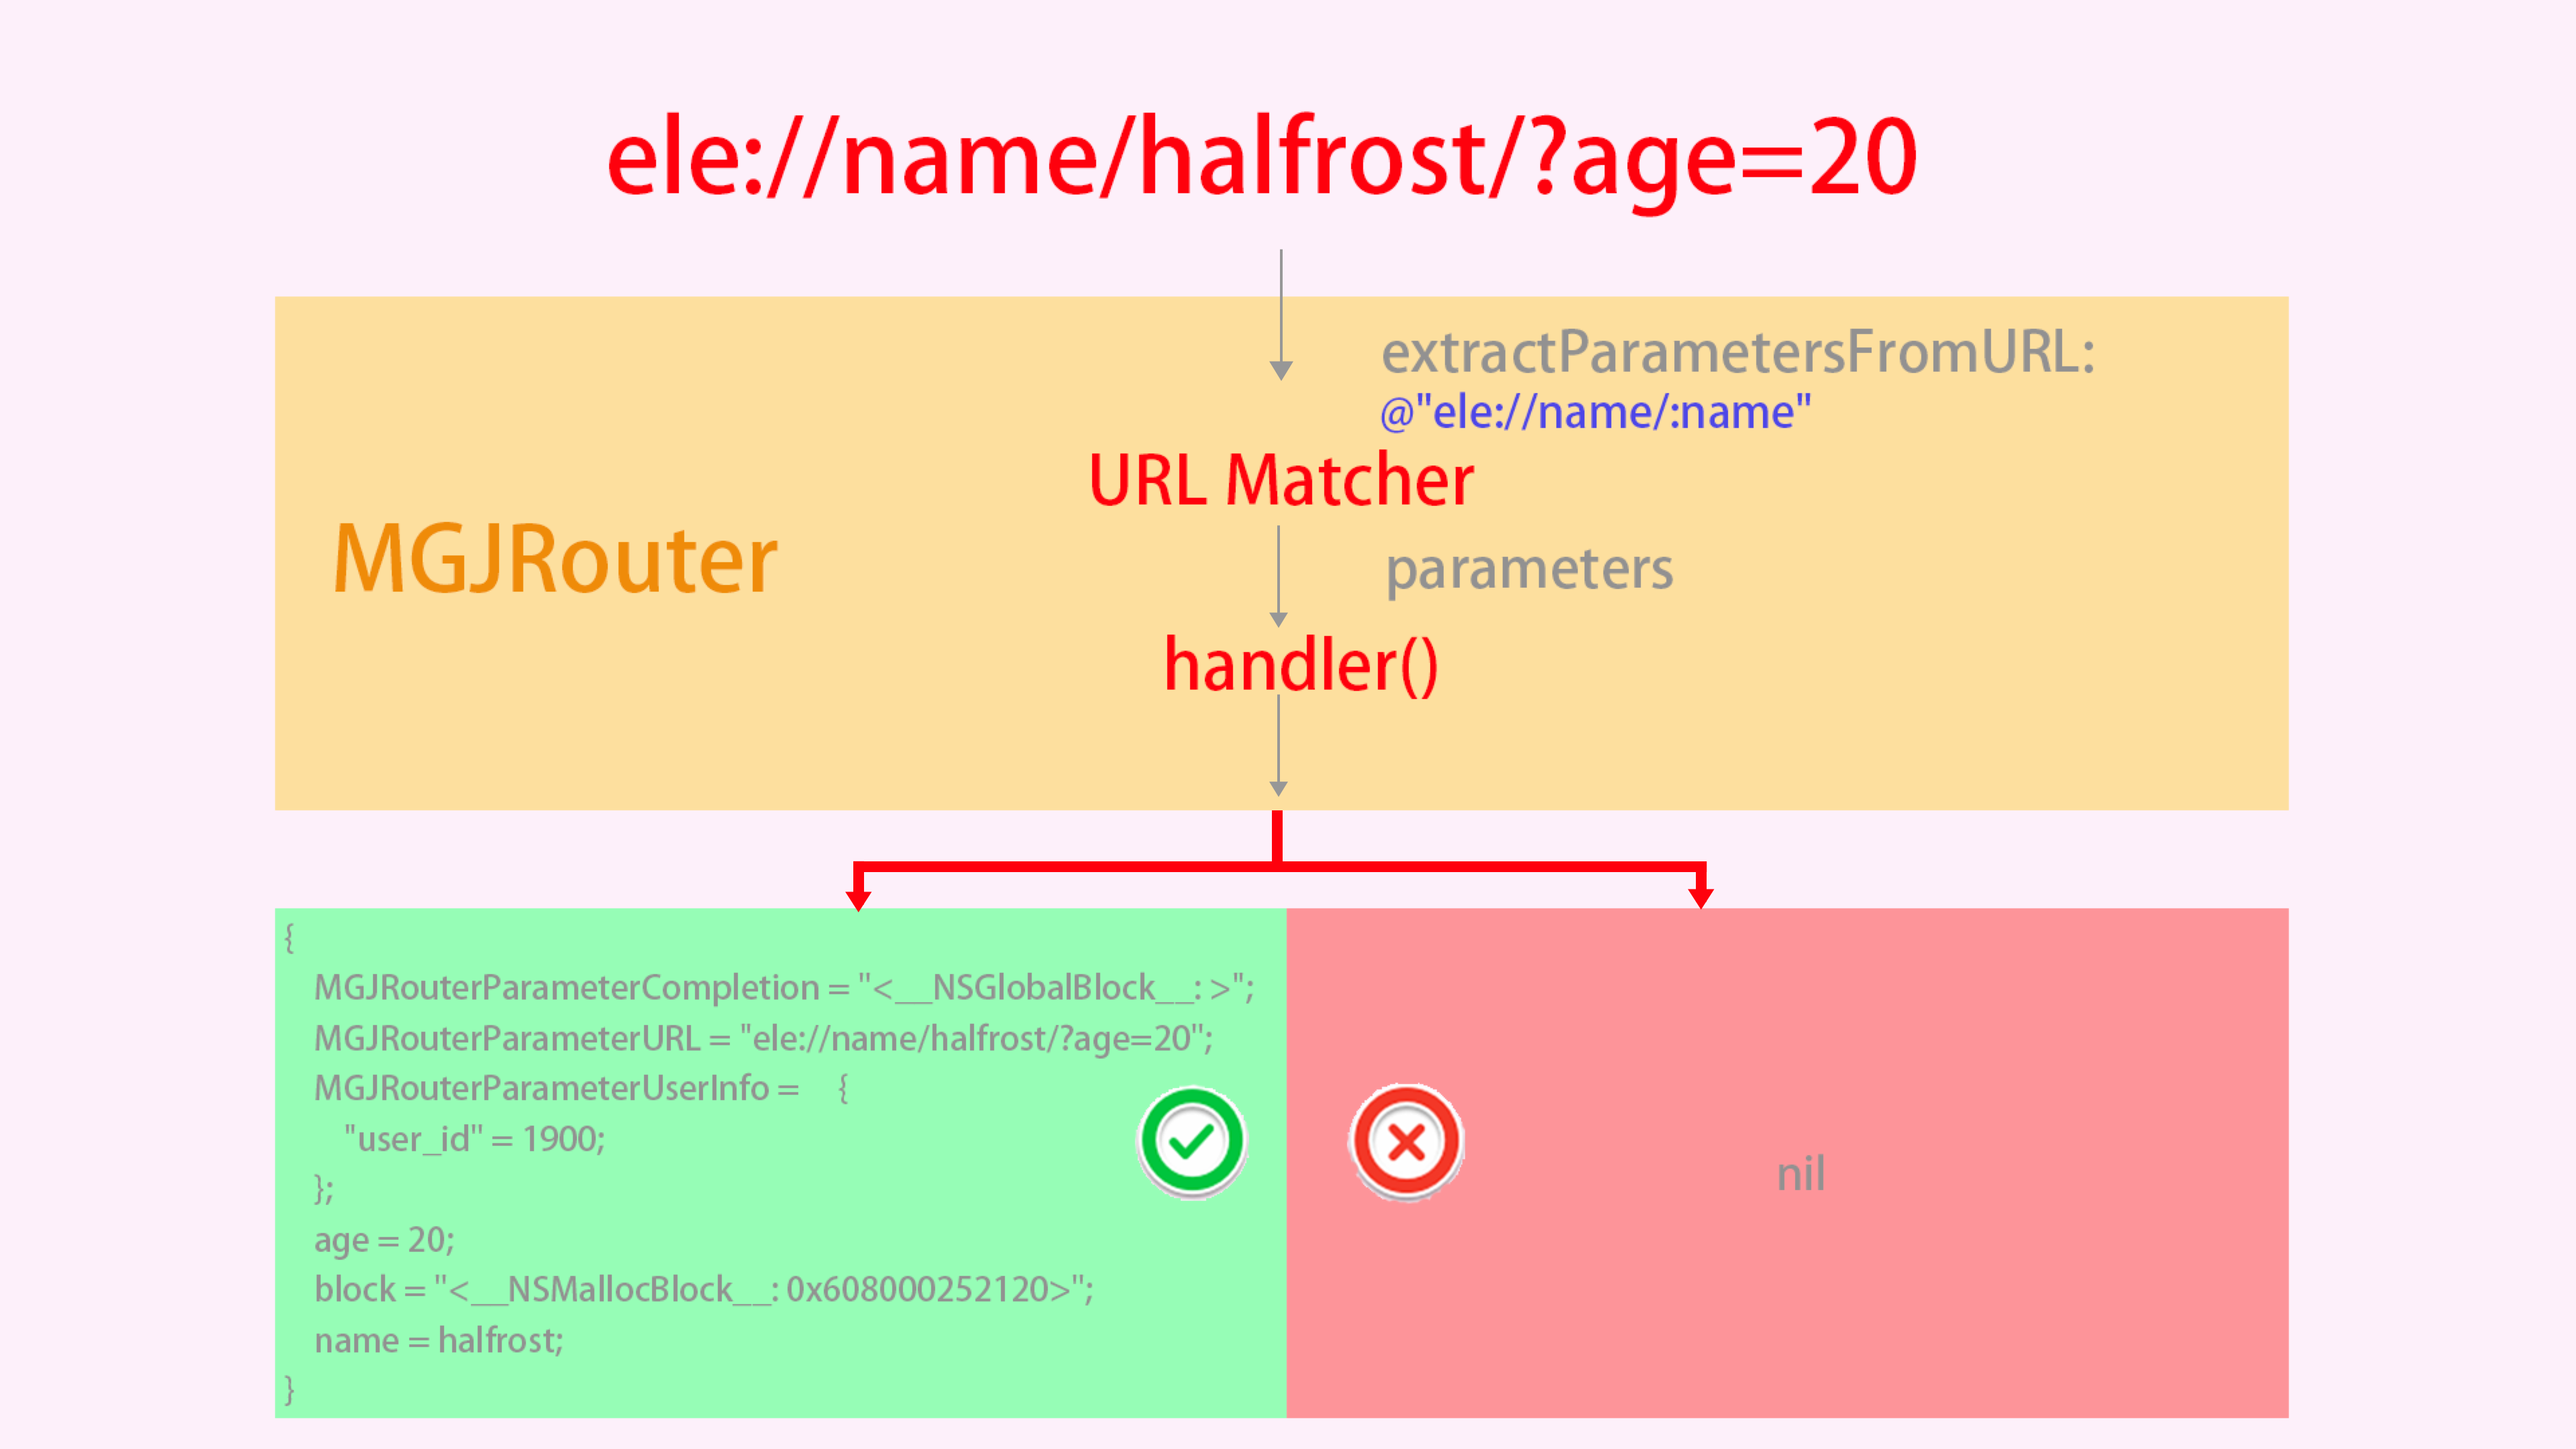
For example:
    [MGJRouter registerURLPattern:@"ele://name/:name" toHandler:^(NSDictionary *routerParameters) {
        void (^completion)(NSString *) = routerParameters[MGJRouterParameterCompletion];
        if (completion) {
            completion(@"Done");
        }
    }];

    [MGJRouter openURL:@"ele://name/halfrost/?age=20" withUserInfo:@{@"user_id": @1900} completion:^(id result) {
        NSLog(@"result = %@",result);
    }];
The URL above will match successfully, and the generated parameter dictionary structure is as follows:
{
    MGJRouterParameterCompletion = "<__NSGlobalBlock__: 0x107ffe680>";
    MGJRouterParameterURL = "ele://name/halfrost/?age=20";
    MGJRouterParameterUserInfo =     {
        "user_id" = 1900;
    };
    age = 20;
    block = "<__NSMallocBlock__: 0x608000252120>";
    name = halfrost;
}
5. URLs can be managed centrally
This feature is very useful.
If you are not careful when handling URLs, they can easily end up scattered across various parts of the project, making them hard to manage. For example, the pattern used during registration is mgj://beauty/:id, and when opening it becomes mgj://beauty/123. If the URL needs to change later, handling that becomes cumbersome and difficult to manage centrally.
So MGJRouter provides a class method to address this issue.
#define TEMPLATE_URL @"qq://name/:name"

[MGJRouter registerURLPattern:TEMPLATE_URL  toHandler:^(NSDictionary *routerParameters) {
    NSLog(@"routerParameters[name]:%@", routerParameters[@"name"]); // halfrost
}];

[MGJRouter openURL:[MGJRouter generateURLWithPattern:TEMPLATE_URL parameters:@[@"halfrost"]]];
}
generateURLWithPattern: This function replaces all : characters in the macros we define with the strings in the subsequent string array, assigning them in order.
The process above is illustrated as follows:
To distinguish page-to-page calls from component-to-component calls, Mogujie came up with a new approach: using protocols for component-to-component invocation.
Each component has an Entry. This Entry mainly does three things:
- Registers the URLs this component cares about
- Registers the methods/properties that this component exposes for invocation
- Responds differently at different stages of the App lifecycle
A page-to-page openURL call looks like this:
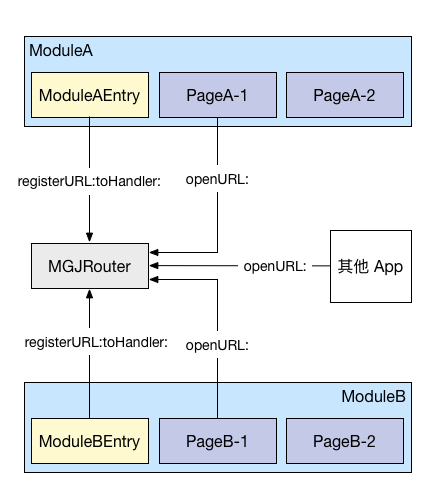
Each component registers with MGJRouter; components can call each other, and other apps can also open a page or invoke a component through the openURL: method.
For component-to-component invocation, Mogujie uses a protocol-based approach.
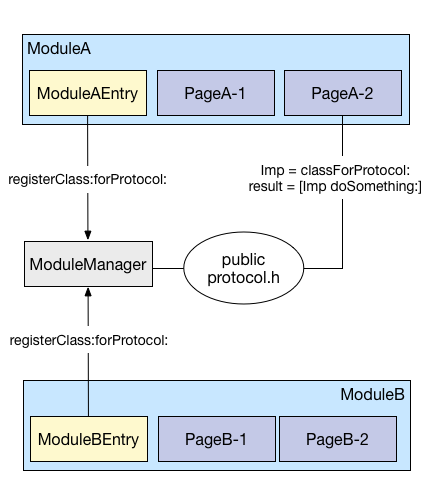
The result of [ModuleManager registerClass:ClassA forProtocol:ProtocolA] is that a new mapping is added to the dict maintained internally by MM.
The return value of [ModuleManager classForProtocol:ProtocolA] is the class corresponding to the protocol in MM’s internal dict. The caller does not need to care what this class actually is; as long as it implements the ProtocolA protocol, it can just be used.
There needs to be a common place to hold these public protocols, which is the PublicProtocl.h shown in the diagram.
My guess is that the implementation might look roughly like this:
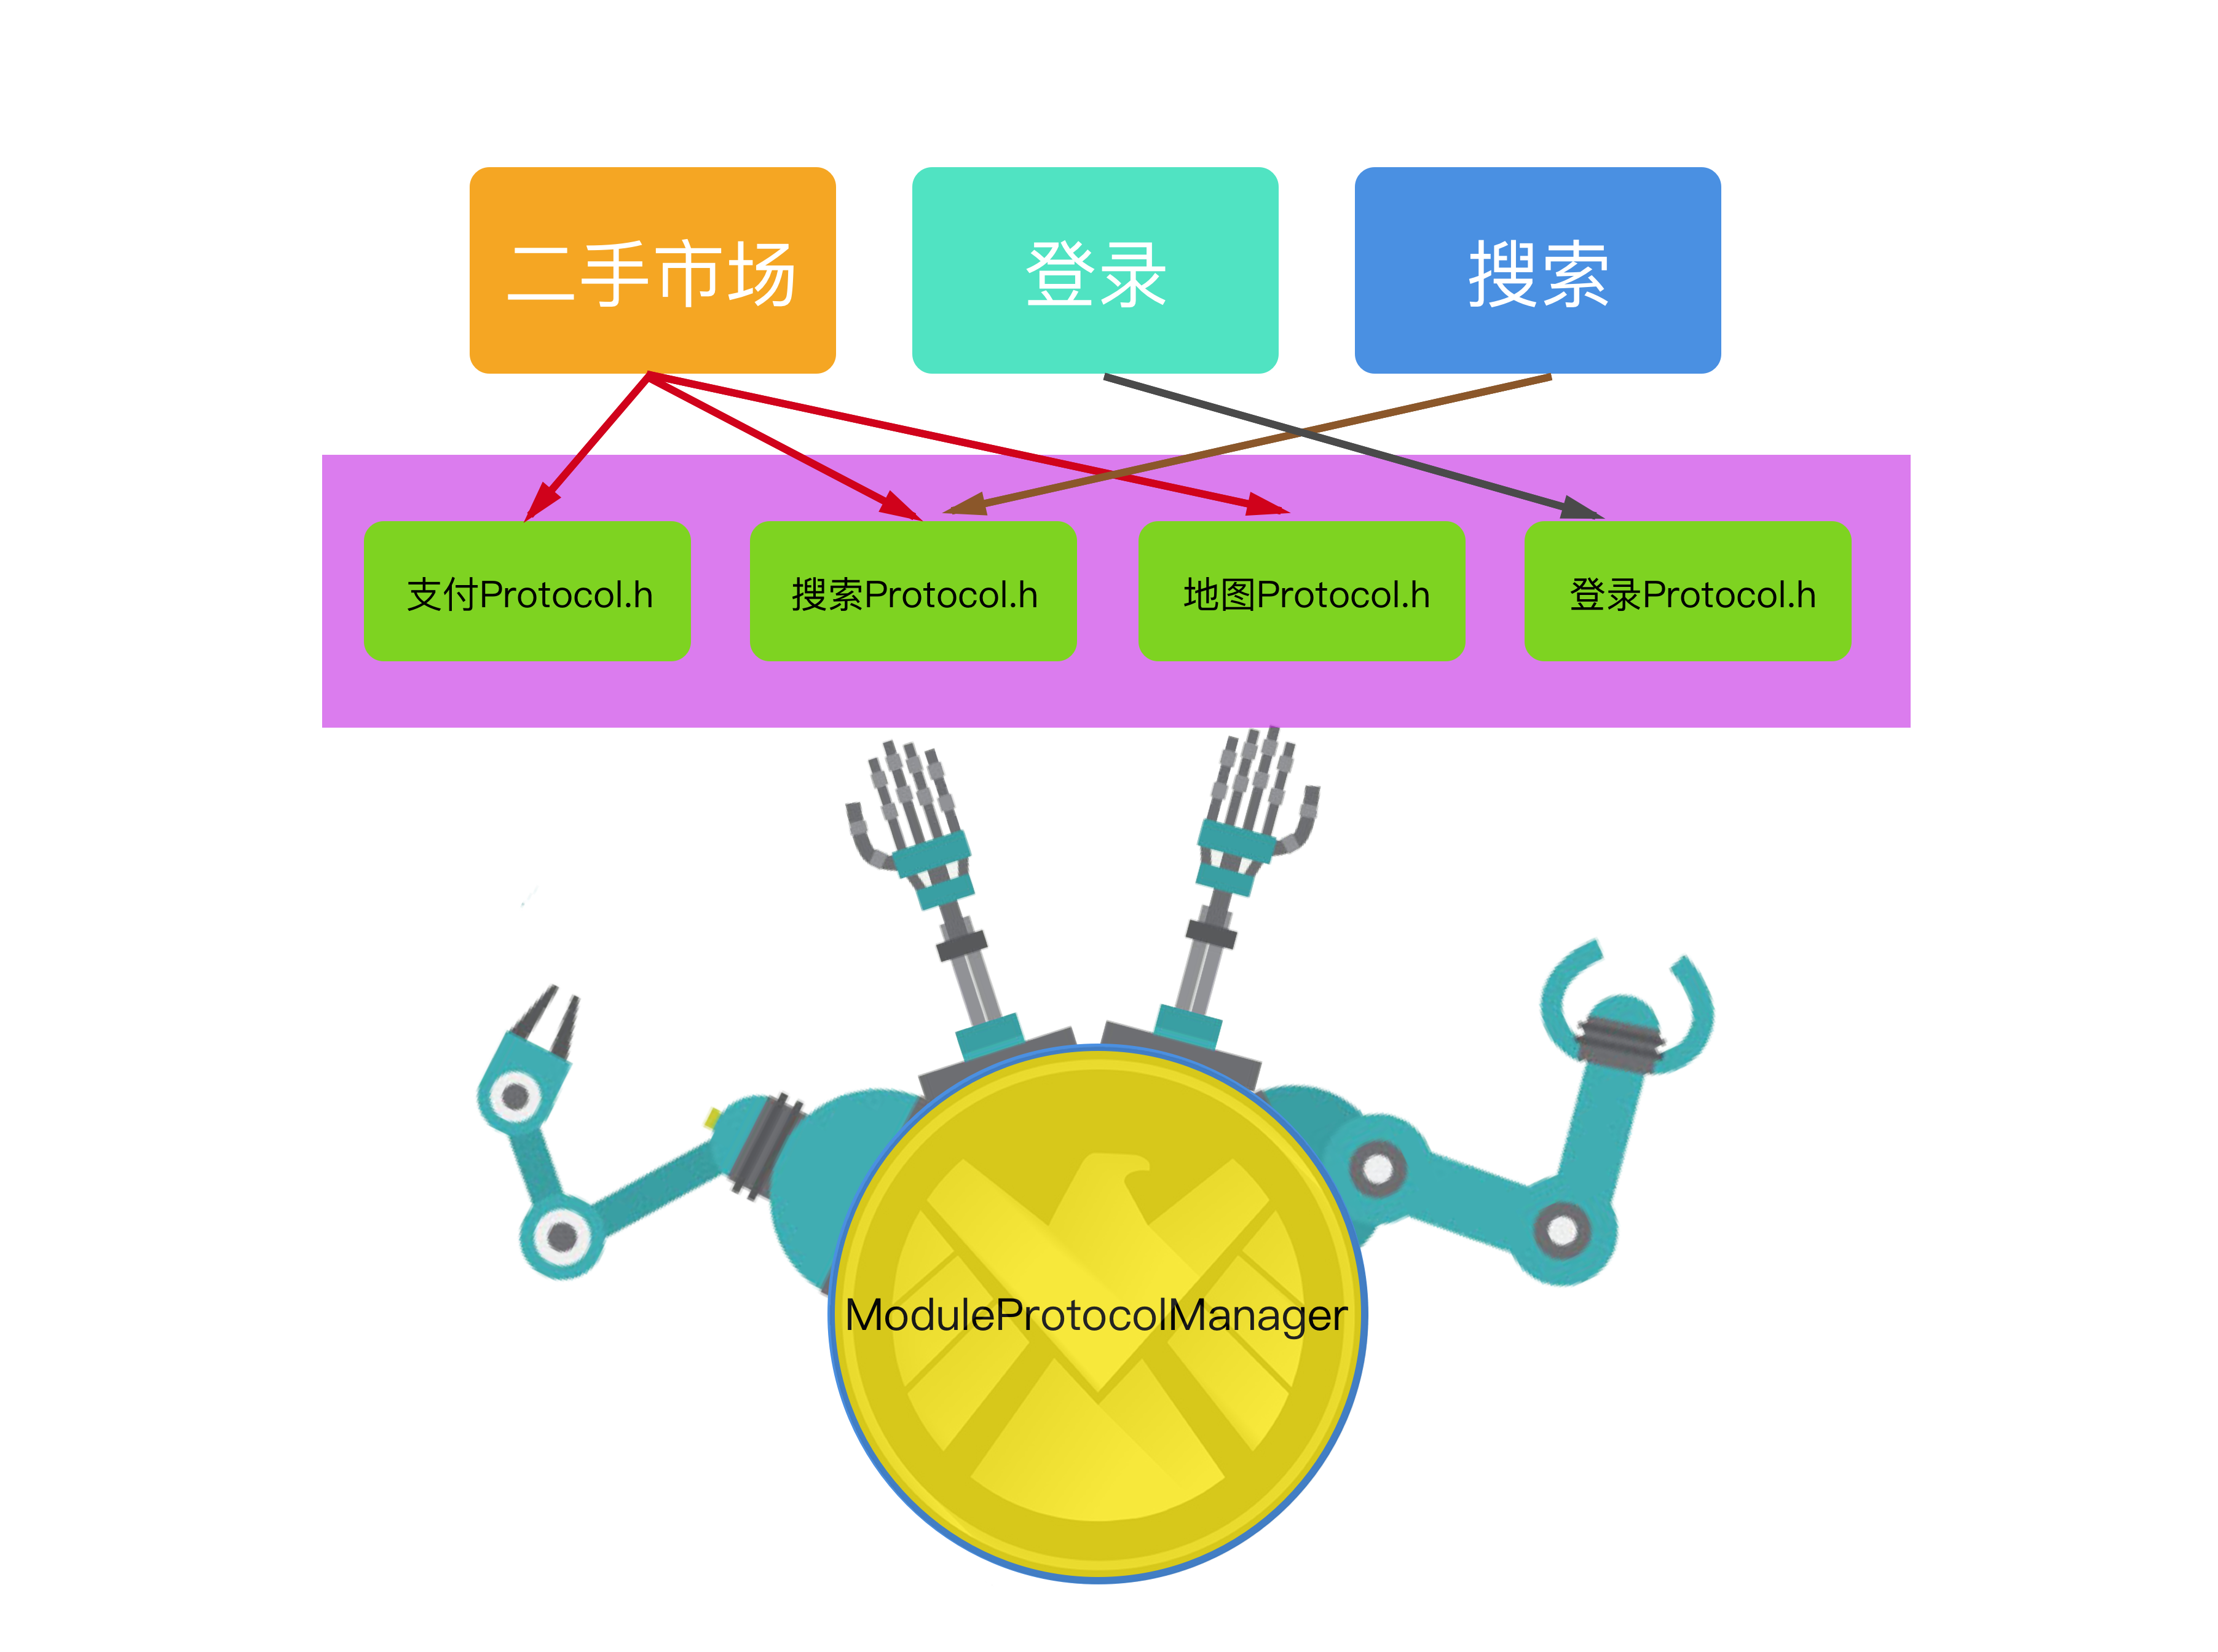
@interface ModuleProtocolManager : NSObject

+ (void)registServiceProvide:(id)provide forProtocol:(Protocol*)protocol;
+ (id)serviceProvideForProtocol:(Protocol *)protocol;

@end
Then this is a singleton, where the various protocols are registered:
@interface ModuleProtocolManager ()

@property (nonatomic, strong) NSMutableDictionary *serviceProvideSource;
@end

@implementation ModuleProtocolManager

+ (ModuleProtocolManager *)sharedInstance
{
    static ModuleProtocolManager * instance;
    static dispatch_once_t onceToken;
    dispatch_once(&onceToken, ^{
        instance = [[self alloc] init];
    });
    return instance;
}

- (instancetype)init
{
    self = [super init];
    if (self) {
        _serviceProvideSource = [[NSMutableDictionary alloc] init];
    }
    return self;
}

+ (void)registServiceProvide:(id)provide forProtocol:(Protocol*)protocol
{
    if (provide == nil || protocol == nil)
        return;
    [[self sharedInstance].serviceProvideSource setObject:provide forKey:NSStringFromProtocol(protocol)];
}

+ (id)serviceProvideForProtocol:(Protocol *)protocol
{
    return [[self sharedInstance].serviceProvideSource objectForKey:NSStringFromProtocol(protocol)];
}
In ModuleProtocolManager, a dictionary is used to store each registered protocol. Now let’s take another guess at the implementation of ModuleEntry.
#import <Foundation/Foundation.h>

#import <UIKit/UIKit.h>

@protocol DetailModuleEntryProtocol <NSObject>

@required;
- (UIViewController *)detailViewControllerWithId:(NSString*)Id Name:(NSString *)name;
@end
Each module then has a “connector” that hooks into the externally exposed protocol.
#import <Foundation/Foundation.h>

@interface DetailModuleEntry : NSObject
@end
In its implementation, you need to import three external files: ModuleProtocolManager, DetailModuleEntryProtocol, and the component or page in the current module that needs to be navigated to or invoked.
#import "DetailModuleEntry.h"

#import <DetailModuleEntryProtocol/DetailModuleEntryProtocol.h>

#import <ModuleProtocolManager/ModuleProtocolManager.h>

#import "DetailViewController.h"

@interface DetailModuleEntry()<DetailModuleEntryProtocol>

@end

@implementation DetailModuleEntry

+ (void)load
{
    [ModuleProtocolManager registServiceProvide:[[self alloc] init] forProtocol:@protocol(DetailModuleEntryProtocol)];
}

- (UIViewController *)detailViewControllerWithId:(NSString*)Id Name:(NSString *)name
{
    DetailViewController *detailVC = [[DetailViewController alloc] initWithId:id Name:name];
    return detailVC;
}

@end
At this point, the Protocol-based solution is complete. If you need to invoke a component or navigate to a page, you only need to first look up the corresponding DetailModuleEntry in ModuleProtocolManager’s dictionary based on the relevant ModuleEntryProtocol. Once you find the DetailModuleEntry, you have found the “entry point” of the component or page. Then simply pass the parameters in.
- (void)didClickDetailButton:(UIButton *)button
{
    id< DetailModuleEntryProtocol > DetailModuleEntry = [ModuleProtocolManager serviceProvideForProtocol:@protocol(DetailModuleEntryProtocol)];
    UIViewController *detailVC = [DetailModuleEntry detailViewControllerWithId:@“Detail Screen” Name:@“My Cart”];
    [self.navigationController pushViewController:detailVC animated:YES];

}
This lets you invoke the component or screen.
If components share identical interfaces, you can further extract these interfaces. The extracted interfaces become “meta-interfaces”, which are sufficient to support an entire component layer.
(5) CTMediator Star 803
Next, let’s talk about @casatwy’s approach, which is based on the Mediator pattern.
The traditional Mediator pattern looks like this:
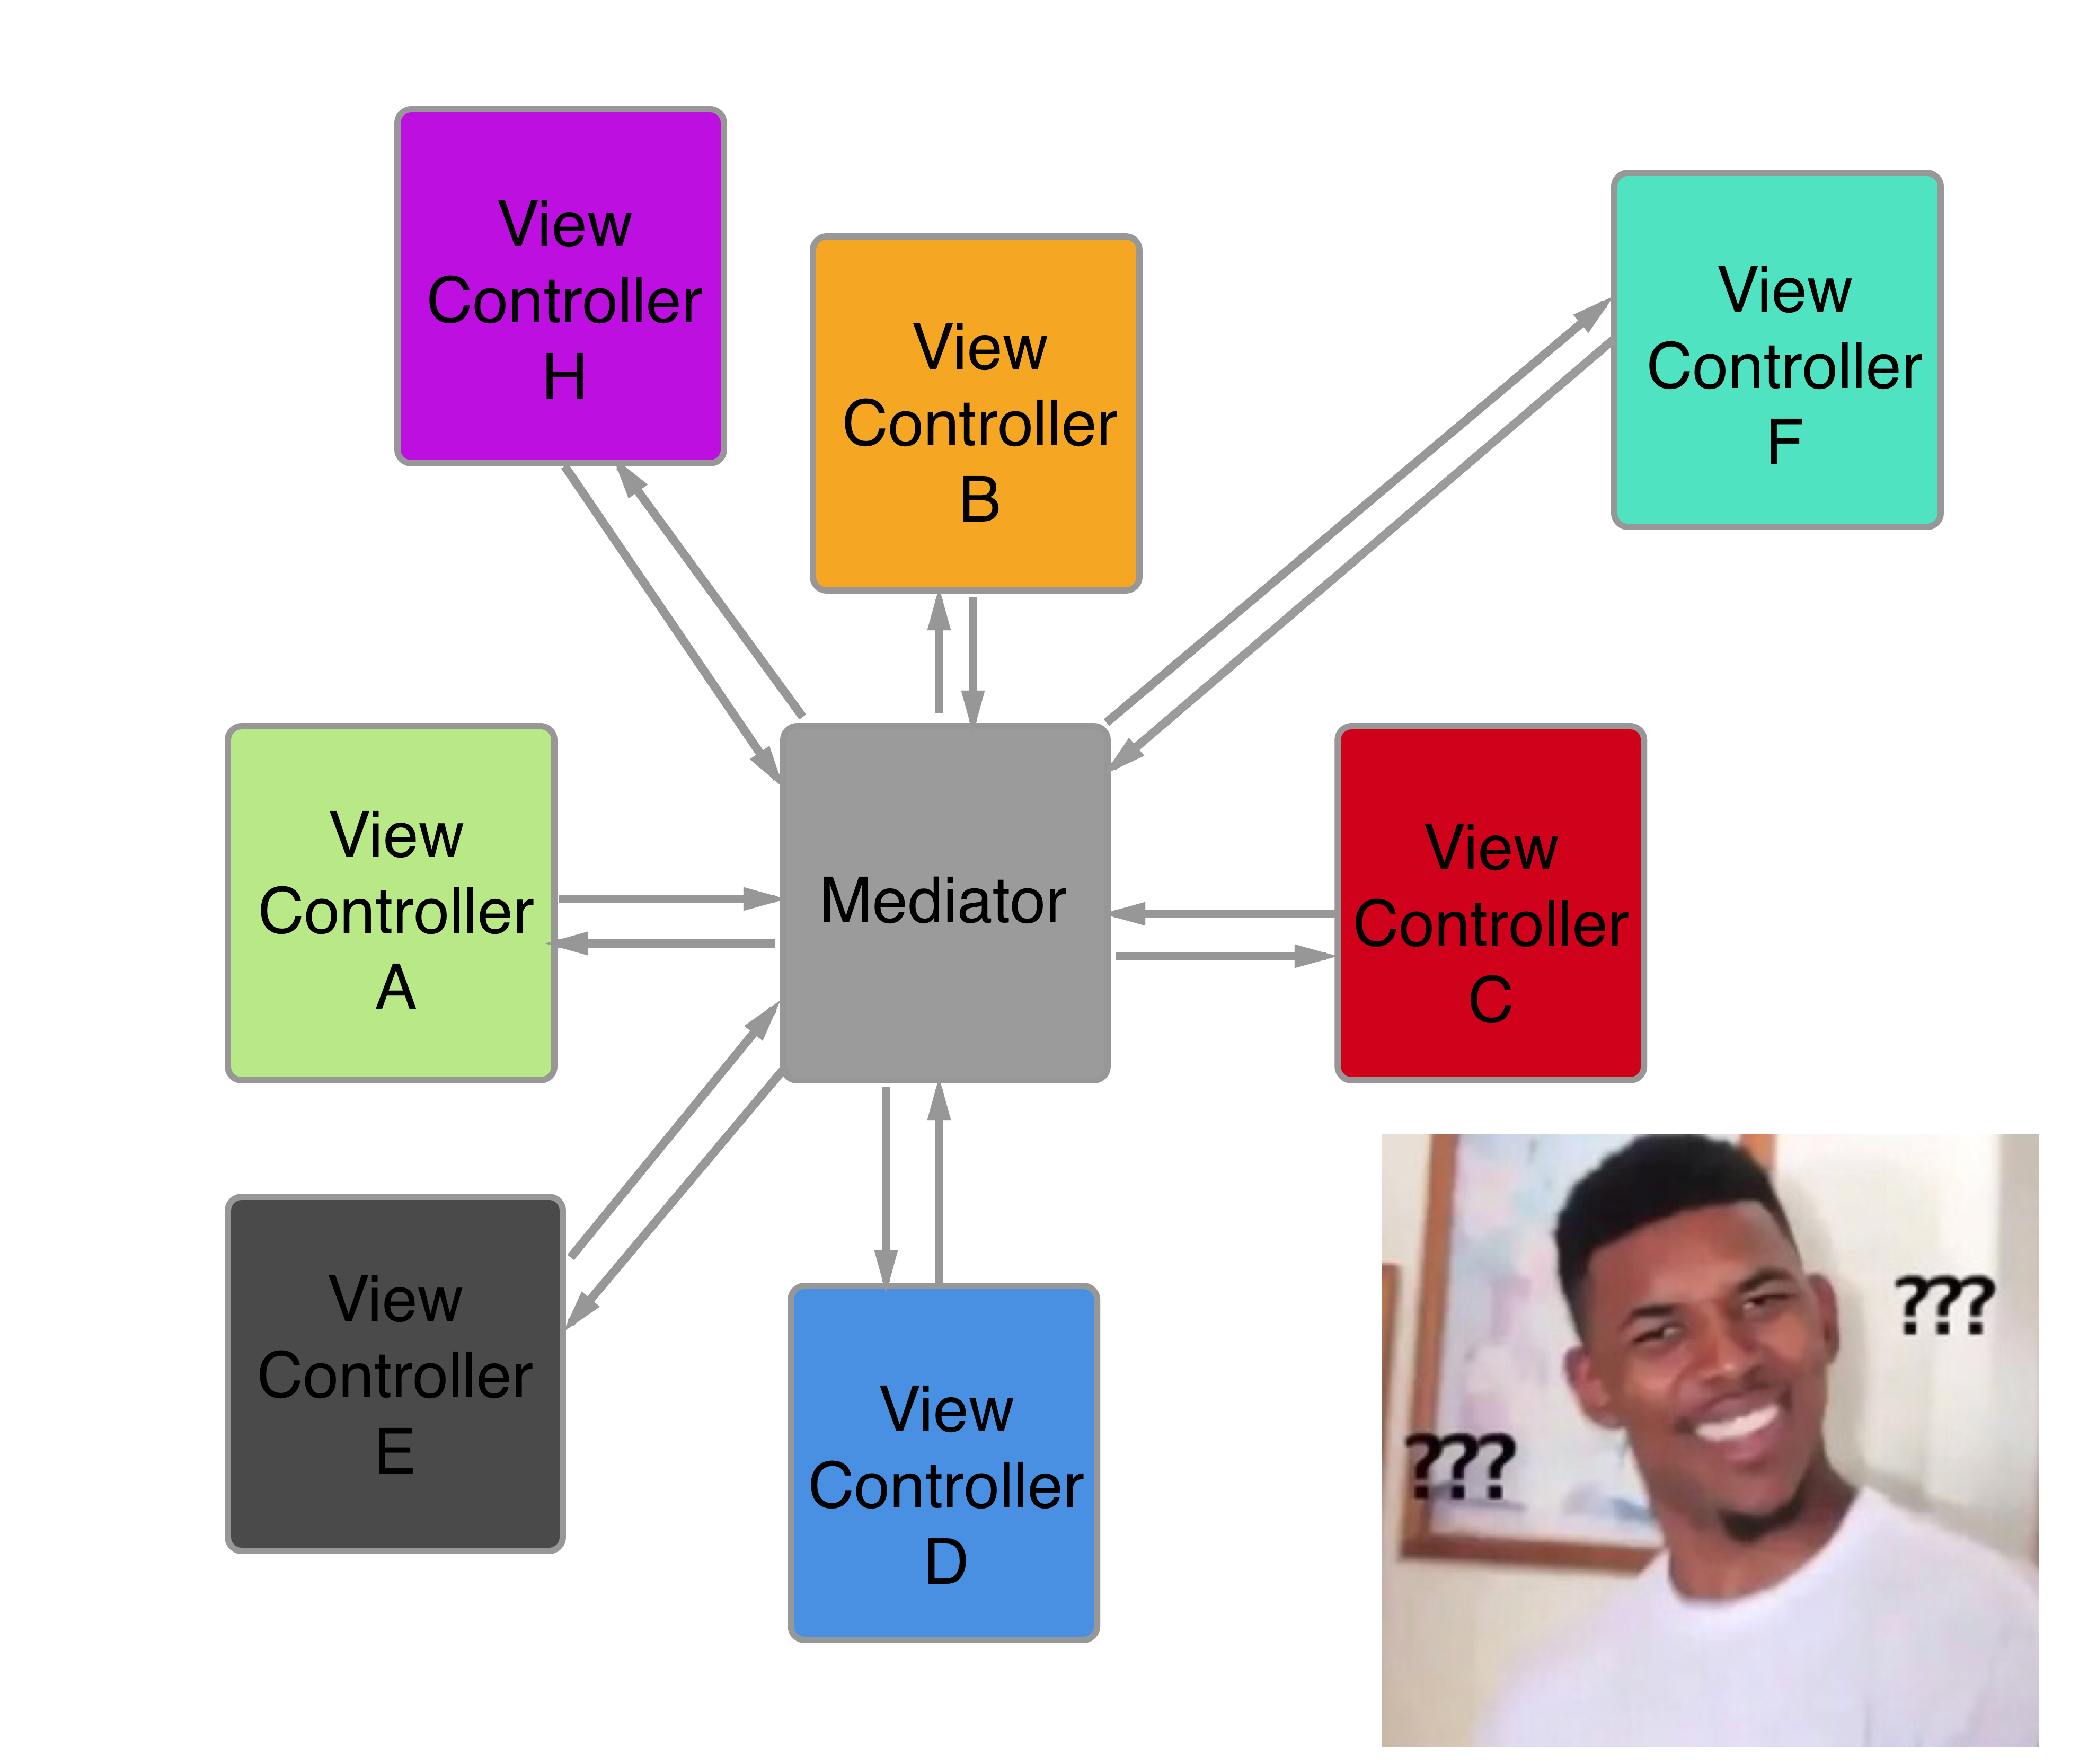
In this pattern, every page or component depends on the mediator. Components no longer depend on each other; calls between components depend only on the Mediator. The Mediator, however, still depends on other components. So is this the final solution?
Let’s look at how @casatwy further optimizes it.
The main idea is to use the simple and straightforward Target-Action concept, and leverage Runtime to solve the decoupling problem.
- (id)performTarget:(NSString *)targetName action:(NSString *)actionName params:(NSDictionary *)params shouldCacheTarget:(BOOL)shouldCacheTarget
{

    NSString *targetClassString = [NSString stringWithFormat:@"Target_%@", targetName];
    NSString *actionString = [NSString stringWithFormat:@"Action_%@:", actionName];
    Class targetClass;

    NSObject *target = self.cachedTarget[targetClassString];
    if (target == nil) {
        targetClass = NSClassFromString(targetClassString);
        target = [[targetClass alloc] init];
    }

    SEL action = NSSelectorFromString(actionString);

    if (target == nil) {
        // This is one place to handle unresponsive requests. This demo keeps it simple: if there is no target that can respond, just return. In actual development, you can provide a fixed target in advance to step in here and handle such requests.
        return nil;
    }

    if (shouldCacheTarget) {
        self.cachedTarget[targetClassString] = target;
    }

    if ([target respondsToSelector:action]) {

#pragma clang diagnostic push

#pragma clang diagnostic ignored "-Warc-performSelector-leaks"
        return [target performSelector:action withObject:params];

#pragma clang diagnostic pop
    } else {
        // The target may be a Swift object.
        actionString = [NSString stringWithFormat:@"Action_%@WithParams:", actionName];
        action = NSSelectorFromString(actionString);
        if ([target respondsToSelector:action]) {

#pragma clang diagnostic push

#pragma clang diagnostic ignored "-Warc-performSelector-leaks"
            return [target performSelector:action withObject:params];

#pragma clang diagnostic pop
        } else {
            // This is where unresponsive requests are handled. If there is no response, try calling the corresponding target's notFound method for centralized handling.
            SEL action = NSSelectorFromString(@"notFound:");
            if ([target respondsToSelector:action]) {

#pragma clang diagnostic push

#pragma clang diagnostic ignored "-Warc-performSelector-leaks"
                return [target performSelector:action withObject:params];

#pragma clang diagnostic pop
            } else {
                // This is also where unresponsive requests are handled. If even notFound is unavailable, this demo simply returns. In actual development, you can use the fixed target mentioned earlier to step in.
                [self.cachedTarget removeObjectForKey:targetClassString];
                return nil;
            }
        }
    }
}
targetName is the Object for invoking the interface, actionName is the SEL of the method being invoked, params contains the parameters, and shouldCacheTarget indicates whether caching is needed. If caching is required, the target is stored, with targetClassString as the key and the target as the value.
With this approach, the externally called methods are very consistent: they all call performTarget: action: params: shouldCacheTarget:. The third parameter is a dictionary, which can carry many parameters as long as the key-value pairs are set correctly. Error handling is also centralized in one place. If the target does not exist, or if the target cannot respond to the corresponding method, the Mediator can handle the error uniformly.
However, in actual development, whether for UI calls or inter-component calls, many methods need to be defined in the Mediator. Therefore, the author also suggests using Categories to split up all the methods in the Mediator, so that the Mediator class does not become overly large.
- (UIViewController *)CTMediator_viewControllerForDetail
{
    UIViewController *viewController = [self performTarget:kCTMediatorTargetA
                                                    action:kCTMediatorActionNativFetchDetailViewController
                                                    params:@{@"key":@"value"}
                                         shouldCacheTarget:NO
                                        ];
    if ([viewController isKindOfClass:[UIViewController class]]) {
        // After the view controller is handed off, the caller can choose to push or present it
        return viewController;
    } else {
        // Handle the exceptional case here; the specific handling depends on the product
        return [[UIViewController alloc] init];
    }
}


- (void)CTMediator_presentImage:(UIImage *)image
{
    if (image) {
        [self performTarget:kCTMediatorTargetA
                     action:kCTMediatorActionNativePresentImage
                     params:@{@"image":image}
          shouldCacheTarget:NO];
    } else {
        // Handle the case where image is nil; the handling depends on the product
        [self performTarget:kCTMediatorTargetA
                     action:kCTMediatorActionNativeNoImage
                     params:@{@"image":[UIImage imageNamed:@"noImage"]}
          shouldCacheTarget:NO];
    }
}
Just put each of these concrete methods into the Category. The invocation pattern is very consistent: they all call the performTarget: action: params: shouldCacheTarget: method.
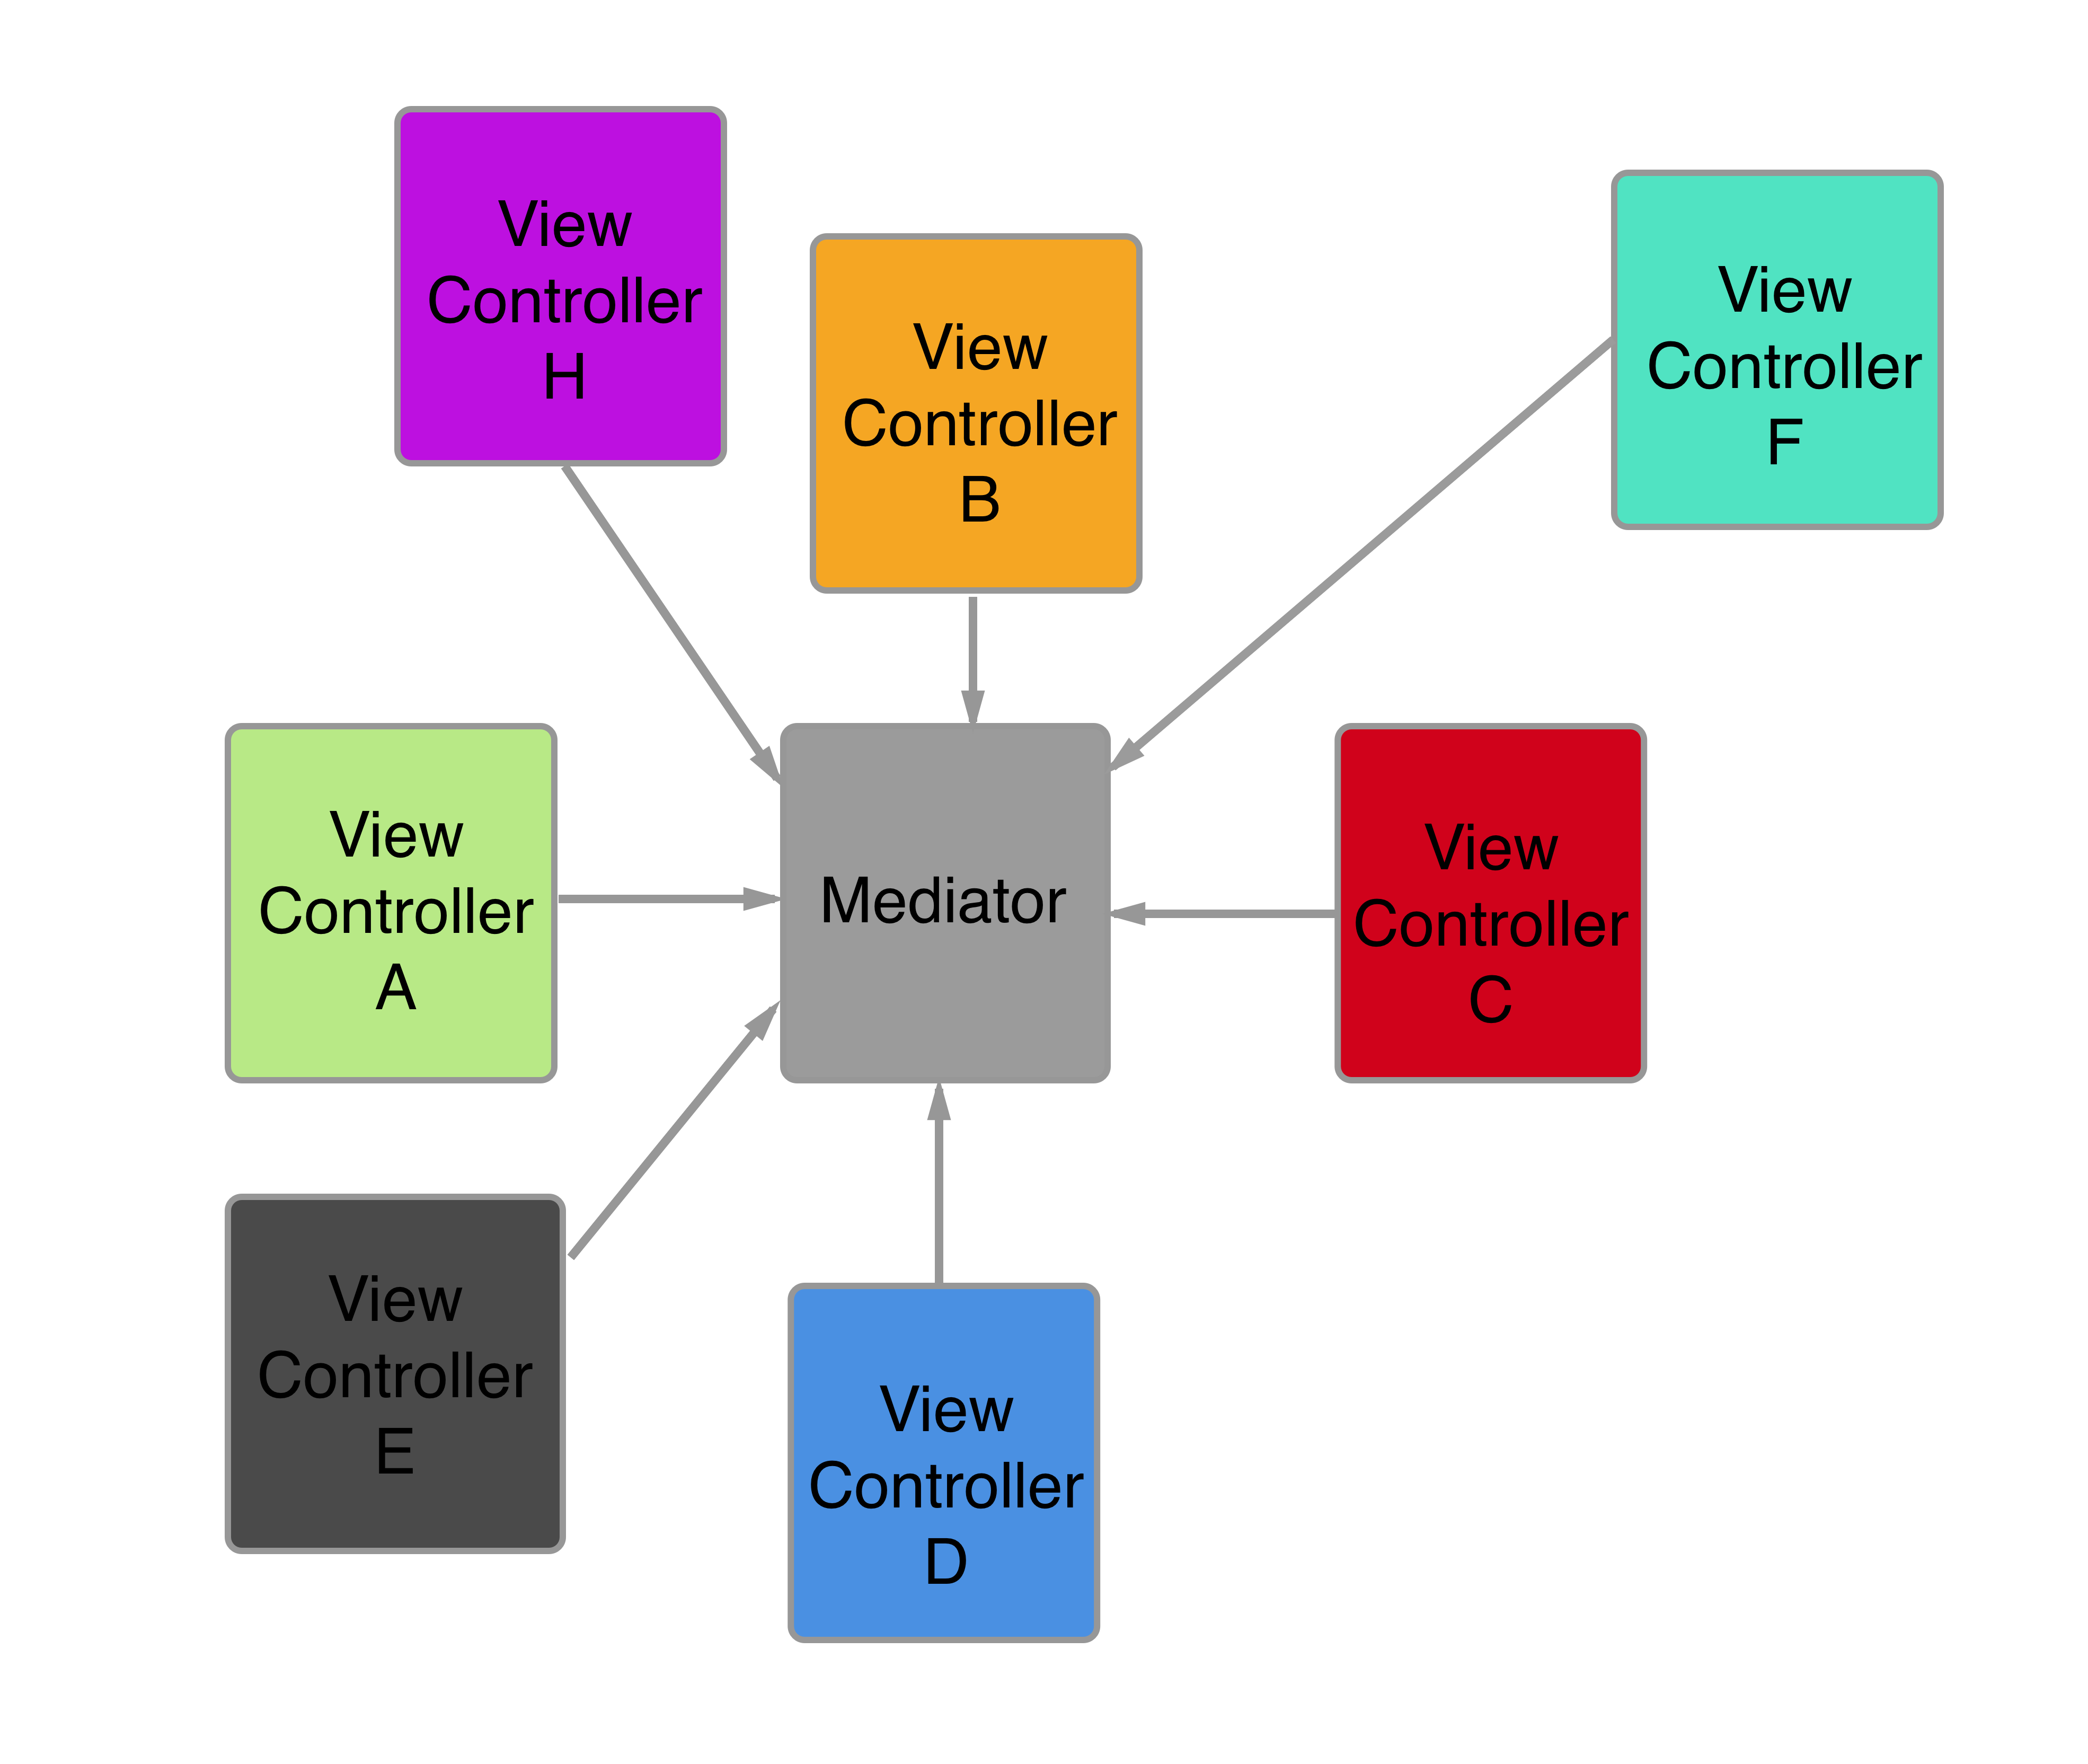
In the end, the Mediator’s dependency on components is removed. Components no longer depend on each other; inter-component calls depend only on the Mediator, and the Mediator does not depend on any other component.
(6) Some solutions that have not been open sourced
In addition to the open-source routing solutions above, there are also some well-designed solutions that have not been open sourced. Let’s analyze and discuss them together.

This solution is from Uber’s rider app.
After Uber identified some drawbacks of MVC—for example, view controllers easily growing to tens of thousands of lines and becoming extremely bloated, and being difficult to unit test—it considered switching the architecture to VIPER. But VIPER also has its own drawbacks. Because of its iOS-specific structure, iOS has to make certain trade-offs for Android. View-driven application logic means that application state is driven by views, and the entire application is locked into the view tree. Any change to business logic associated with manipulating application state must go through the Presenter. As a result, business logic is exposed. Ultimately, this tightly couples the view tree and the business tree. This makes it very difficult to implement a Node that contains only business logic, or a Node that contains only view logic.
By improving the VIPER architecture, adopting its strengths, and addressing its weaknesses, Uber’s rider app arrived at a brand-new architecture: Riblets.
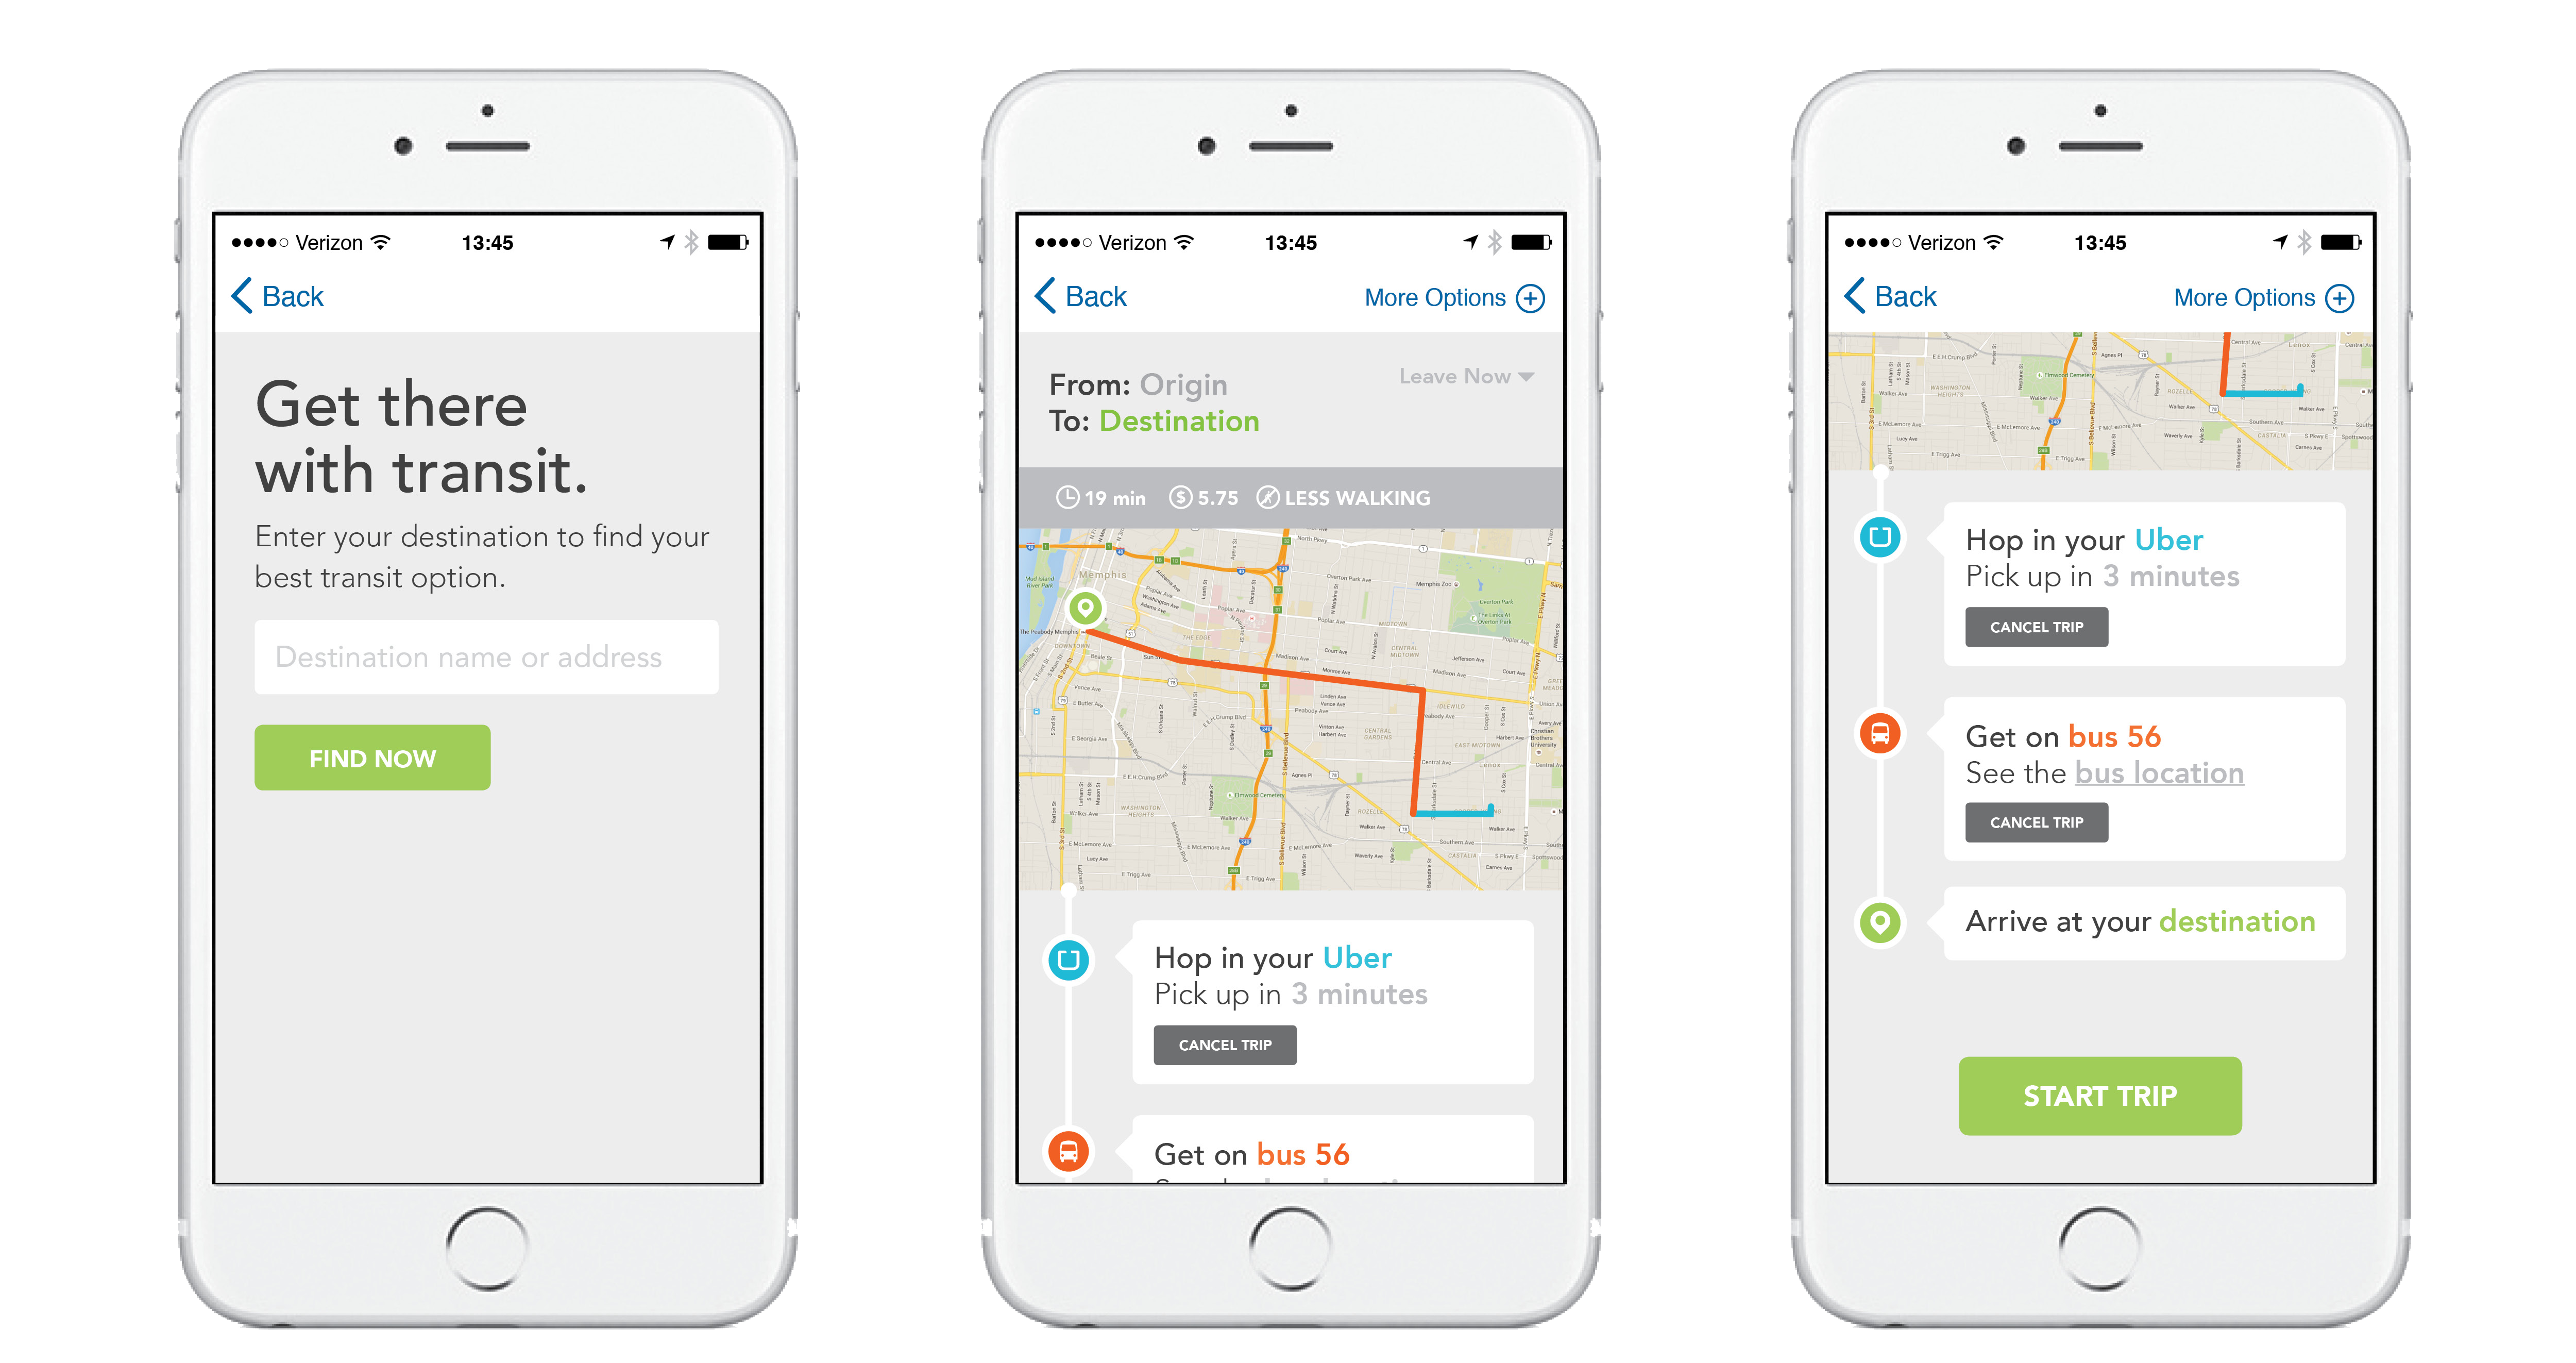
In this new architecture, even similar logic is broken down into very small, independent, individually testable components. Each component has a very clear purpose. By using these small Riblets, the entire app is ultimately assembled into a Riblets tree.
Through abstraction, a Riblet is defined as the following six smaller components, each with its own responsibility. A Riblet further abstracts business logic and view logic.
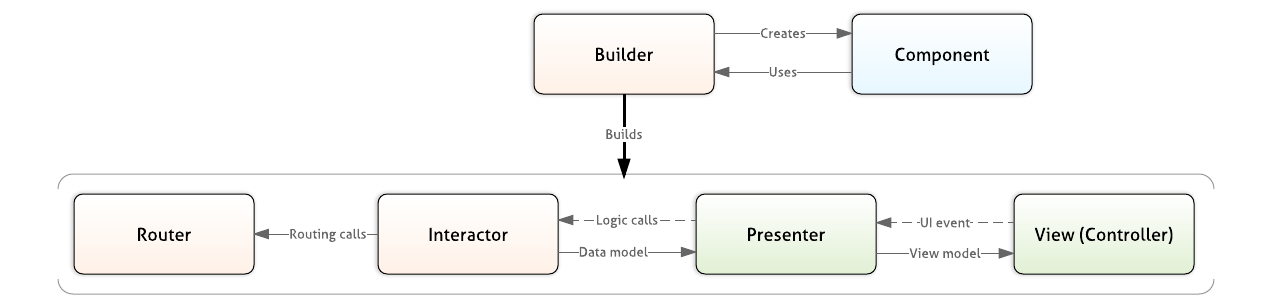
If a Riblet is designed this way, how is it different from the previous VIPER and MVC architectures? The biggest difference is routing.
The Router inside a Riblet is no longer driven by view logic; it is now driven by business logic. This major change means that the entire app is no longer driven by presentation, but by data flow.
Each Riblet consists of a Router, an Interactor, a Builder, and their related components. This is where the name comes from: Router - Interactor - Builder, or Rib. Of course, it can also have optional Presenters and Views. The Router and Interactor handle business logic, while the Presenter and View handle view logic.
Let’s focus on the responsibilities of routing inside a Riblet.
1. Responsibilities of routing
In the overall app structure tree, the responsibility of routing is to attach and detach other child Riblets. The decision itself is passed in from the Interactor. During state transitions, when attaching and detaching child Riblets, routing also affects the lifecycle of the Interactor. Routing contains only two pieces of business logic:
- Provide methods for attaching and detaching other routers.
- Decide the final state transition logic among multiple children.
2. Assembly
Each Riblet has only one pair of Router and Interactor. However, it can have multiple pairs of views. Riblets only handle business logic and do not handle view-related parts. A Riblet can have a single view, with one Presenter and one View; it can have multiple views, with one Presenter and multiple Views, or multiple Presenters and multiple Views; it can even have no view at all, with neither a Presenter nor a View. This design helps build the business logic tree and also enables a clean separation from the view tree.
For example, the rider Riblet is a Riblet without a view. It is used to check whether the current user has an active route. If the rider has confirmed a route, this Riblet attaches to the route Riblet. The route Riblet displays the route on the map. If no route has been confirmed, the rider Riblet is attached to the request Riblet. The request Riblet displays a waiting-to-be-called state on the screen. A Riblet like the rider Riblet, which has no view logic at all, separates business logic and plays an important role in driving the app and supporting a modular architecture.
3. How Riblets work
Data flow inside a Riblet
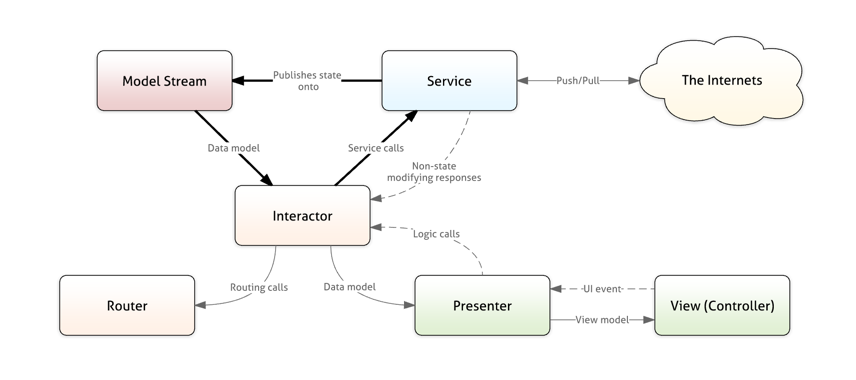
In this new architecture, data flow is unidirectional. Data flows from services to the Model Stream, which generates a stream of models. The model stream then flows from the Model Stream to the Interactor. The Interactor, scheduler, and remote push notifications can all trigger changes in Services, causing changes to the Model Stream. The Model Stream generates immutable models. This enforced requirement means that Interactors can only change app state through the Service layer.
Two examples:
Data from the backend to the View
A state change causes the server backend to trigger a push notification to the app. The data is pushed to the app and then generates an immutable data stream. After the Interactor receives the model, it passes it to the Presenter. The Presenter converts the model into a view model and passes it to the View.Data from the View to the backend server
When the user taps a button, such as the login button, the View triggers a UI event and passes it to the Presenter. The Presenter calls the Interactor’s login method. The Interactor then calls the actual login method in the Service call. After the network request, the data is pulled to the backend server.
Data flow between Riblets
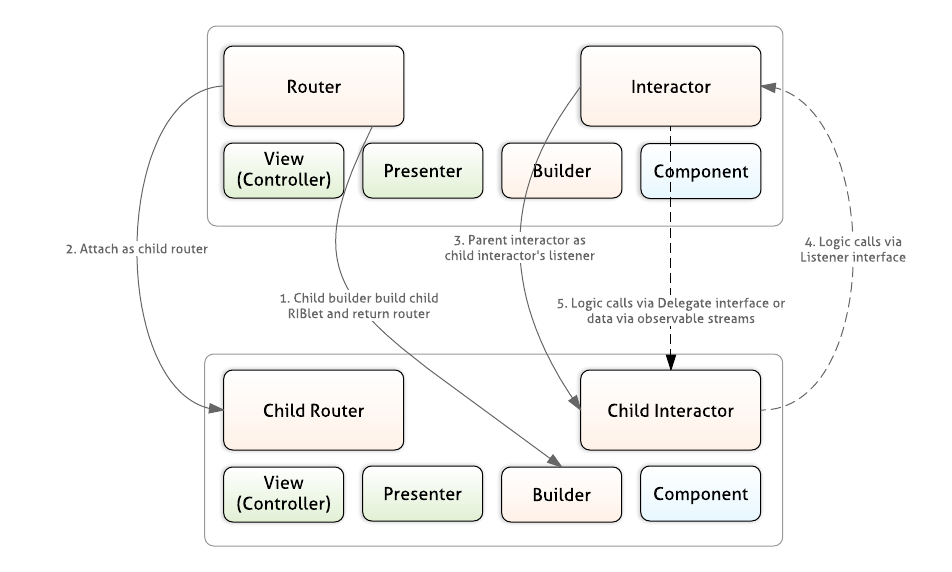
When an Interactor needs to call events from another Riblet while processing business logic, it needs to attach to the child Interactor. See the five steps in the diagram above.
If the call goes from a child to its parent, the parent Interactor’s interface is usually defined as a listener. If the call goes from the parent to the child, the child’s interface is usually a delegate that implements certain Protocols from the parent.
In the Riblet solution, the Router is used only to maintain a tree relationship, while the Interactor is the one responsible for deciding and triggering logical transitions between components.
5. Pros and cons of each solution
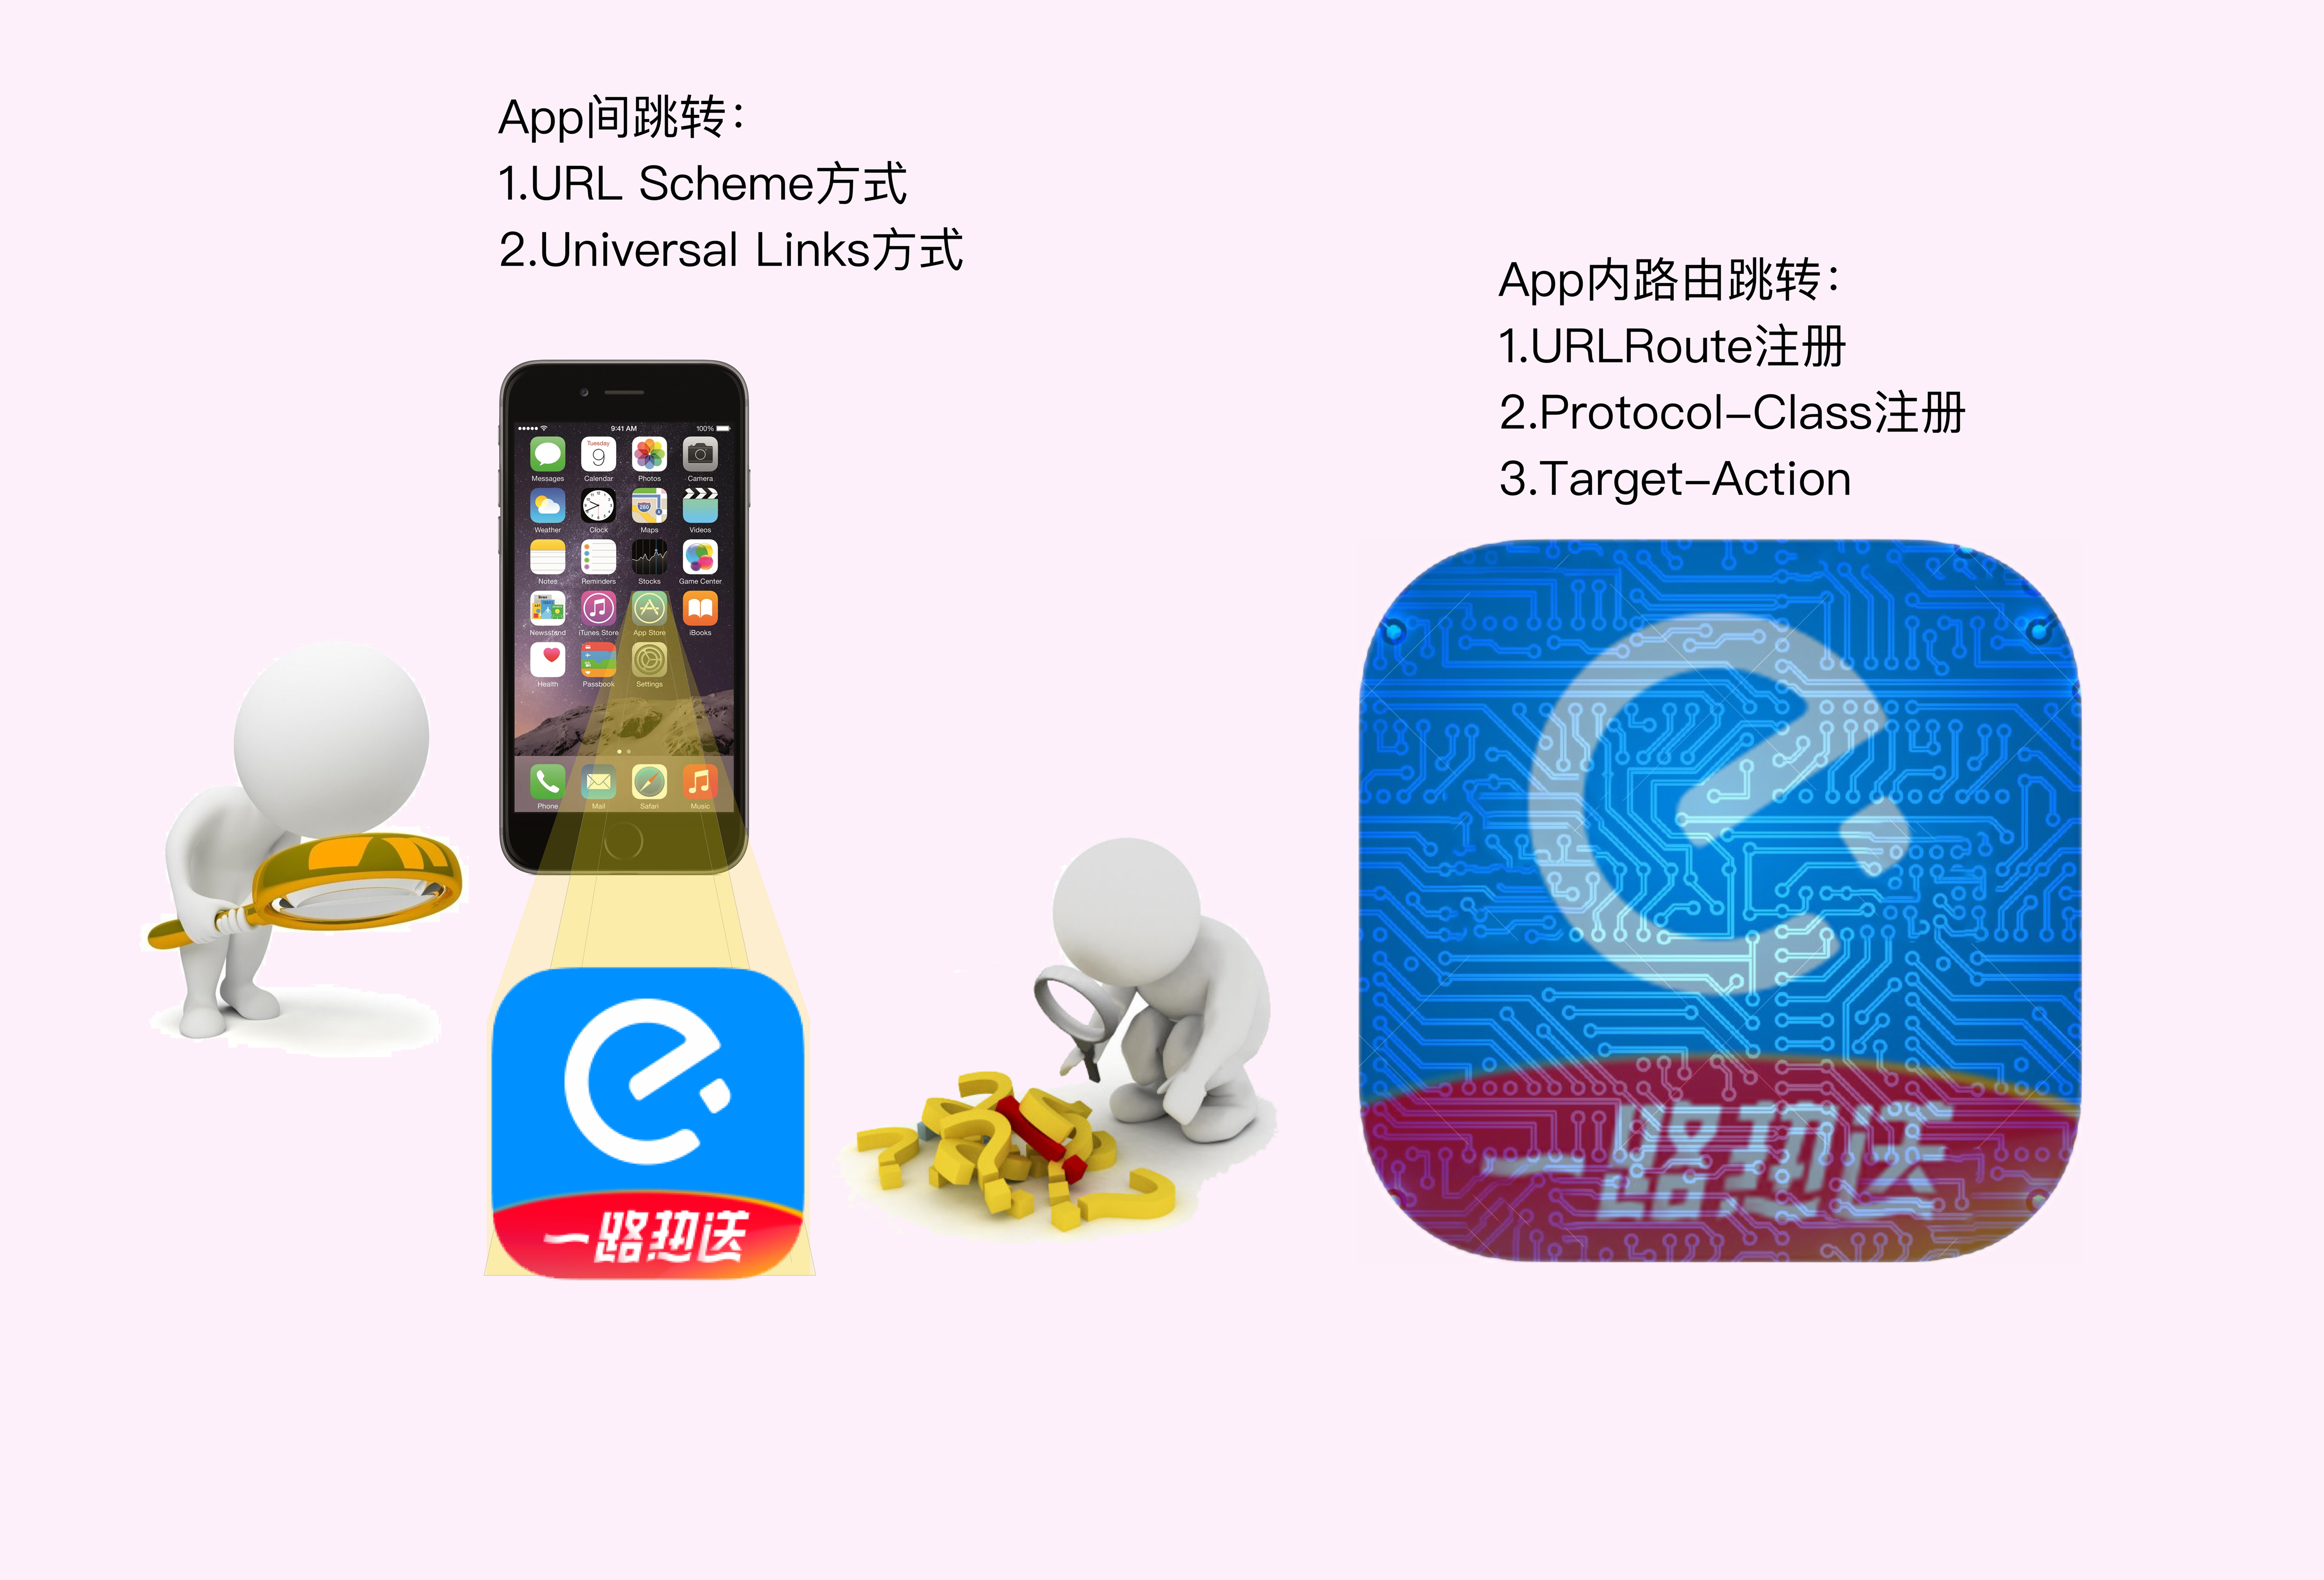
Based on the analysis above, we can see that routing design evolves from URLRoute to Protocol-class to Target-Action. This is also a process of gradually getting closer to the essence of the problem.
1. Pros and cons of the URLRoute registration solution
First, URLRoute may have been inspired by frontend routers and system-level in-app navigation. It requests resources through URLs. Whether the resource is an H5 page, RN, Weex, an iOS screen, or a component, the request method is unified. The URL can also carry parameters, so it can invoke any screen or component. This approach is therefore the easiest and the first one people tend to think of.
URLRoute has many advantages. Its biggest advantage is that the server can dynamically control page navigation, error handling after page failures can be handled uniformly, and request methods across the three ends—iOS, Android, and H5 / RN / Weex—can be unified.
However, whether this approach is appropriate depends on the needs of different companies. If a company has already completed server-side dynamic delivery scaffolding tools, and the frontend has also implemented the ability to replace a Native screen with an equivalent business screen at any time when something goes wrong, then URLRoute is more likely to be chosen.
But if the company’s H5 side has not built replacement screens for failures, and H5 developers feel that this only adds to their burden; and if the company has not built a system for dynamically delivering routing rules from the server, then the company may not adopt URLRoute. This is because the small amount of dynamism provided by URLRoute can be achieved with JSPatch. If a bug appears online, it can be fixed immediately with JSPatch, without using URLRoute.
So choosing URLRoute also depends on the company’s stage of development, staffing, and technology selection.
The URLRoute solution also has some drawbacks. First, URL mapping rules need to be registered, and they are usually written in the load method. Writing them in the load method affects app startup speed.
Second, there is a large amount of hard coding. The component names and page names in URL links are hard-coded, and the parameters are hard-coded as well. Moreover, every URL parameter field must be maintained in documentation, which is also a burden for business developers. URL short links are scattered throughout the app, making maintenance quite troublesome. Although Mogujie thought of using macros to centrally manage these links, that still does not solve the hard-coding problem.
A truly good routing system should serve the entire app invisibly. It should be an imperceptible process. From this perspective, URLRoute is somewhat lacking.
The final drawback is that URLs are not very friendly for passing NSObject parameters. At most, they can pass a dictionary.
2. Pros and cons of the Protocol-Class registration solution
The advantage of the Protocol-Class solution is that it has no hard coding.
The Protocol-Class solution also has some drawbacks. Every Protocol must be registered with the ModuleManager.
In this solution, ModuleEntry needs to depend on both ModuleManager and the pages or components inside the component. Of course, ModuleEntry also depends on ModuleEntryProtocol, but this dependency can be removed. For example, by using the Runtime method NSProtocolFromString together with hard coding, the dependency on the Protocol can be removed. However, considering that hard coding is unfriendly to debugging and later maintenance, the dependency on the Protocol should not be removed.
The final drawback is that component method calls are scattered everywhere. There is no unified entry point, so it is not possible to handle missing components or errors uniformly.
3. Pros and cons of the Target-Action solution
The advantage of the Target-Action solution is that it makes full use of Runtime features and requires no registration step. In the Target-Action solution, the only dependency relationship is that components depend on the Mediator layer. Categories for the Mediator are maintained in the Mediator. Each category corresponds to a Target, and methods in the Category correspond to Action scenarios. The Target-Action solution also unifies the entry point for all inter-component calls.
The Target-Action solution can also provide a certain degree of safety, because it verifies the Native prefix in the URL.
The drawback of the Target-Action solution is that Target_Action packages regular parameters into a dictionary in the Category, and then unpacks the dictionary back into regular parameters at the Target. This introduces some hard coding.
4. How should components be split?
This question should actually be considered before deciding to implement componentization. So why mention it here? Because every company has its own approach to splitting components. Should they be split by business line? By the smallest business-function modules? Or by complete features? This involves the granularity of the split. The granularity of component splitting directly affects how much decoupling the routing layer will need in the future. Suppose you encapsulate the entire login flow into a component. Since login involves multiple pages, all of those pages would be packaged inside that one component. When other modules need to query the login state, they would need to use an externally exposed interface from the login component that can return the login state. In this case, you could consider defining these interfaces in a Protocol and exposing them for external use. Alternatively, you could use a Target-Action approach. If an entire feature is split out as the login component, the granularity is relatively coarse.
If you only split out the small login-state functionality as a meta component, then external modules that want to get the login state can simply call this component directly. This kind of split has very fine granularity, which can lead to a huge number of components.
Therefore, when splitting components, perhaps the business was not very complex at the time, and after being split into components, the mutual coupling was not significant. But as the business keeps changing, the coupling between previously defined components may become increasingly high, so you may consider further splitting the old components. Or perhaps some business lines get cut, and some previously small components may be combined again. In short, before the business is fully stabilized, component splitting may remain an ongoing process.
VI. The Best Solution

Regarding architecture, I think it is meaningless to talk about architecture in isolation from the business. Architecture exists to serve the business; discussing architecture in the abstract is merely an idealized state. So there is no best solution—only the most suitable one.
The solution that best fits your company’s business is the best solution. Divide and conquer: choosing different solutions for different businesses is the optimal approach. If you insist on adopting one generic solution across the board, forcing different businesses to use the same approach, then too many compromises and sacrifices will be required, which is not ideal.
I hope this article can serve as a starting point and help everyone choose the routing solution that best fits their own business. Of course, there will certainly be even better solutions, and I welcome your guidance and feedback.
References:
Implementing a CTMediator-Based Componentization Solution in an Existing Project
Thoughts on iOS Application Architecture: Componentization Solutions
Mogujie App’s Journey to Componentization
Mogujie App’s Journey to Componentization · Continued
ENGINEERING THE ARCHITECTURE BEHIND UBER’S NEW RIDER APP
GitHub Repo: Halfrost-Field
Follow: halfrost · GitHub
Source: https://halfrost.com/ios_router/
