How to Quickly Build Yourself a Cozy 'Home'—Building a Static Blog with Jekyll
Foreword
I believe every programmer has a wish: to have a “home” of their own—a blog of their own, a dedicated website. In this “home,” you can share and discuss any technology with like-minded peers, or just chat about anything. More importantly, it can serve as a record of your technical growth and help you improve your skills. Next, I’ll walk through the process of building my blog.
Table of Contents:
- Set up Jekyll locally
- Develop or choose a Jekyll theme
- Use the GitHub Pages service
- Apply for a personal domain name
- Add visitor commenting functionality to the blog
- Apply for the “little green lock” HTTPS
- Ongoing maintenance
1. Set up Jekyll locally
What is Jekyll? It is a simple static blog generation tool, as opposed to a dynamic blog.
- Simple. Because it does not require a database. You write static files in Markdown and generate HTML pages. Its advantages are faster page response times and allowing the blogger to focus solely on writing articles without worrying about layout.
- Static. Markdown (or Textile), Liquid, and HTML & CSS are used to build a publishable static website.
- Blog support. It supports custom URLs, blog categories, pages, posts, and custom layout design.
//Install Jekyll with gem
gem install jekyll


//Create your blog site with Jekyll
jekyll new blog  #Create your site


//Start the Jekyll service
//Enter the blog directory; be sure to enter the created directory, otherwise the service cannot start
cd blog
jekyll serve 	 #Start your http service
After the local service starts, the default port for the Jekyll service is 4000, so you can open a browser and enter: http://localhost:4000 to access it.
At this point, a simple blog page will be displayed.
The usage of some other Jekyll commands is as follows:
$ jekyll build

# => The contents of the current folder will be generated into the ./_site folder.

$ jekyll build --destination <destination>

# => The contents of the current folder will be generated into the target folder <destination>.

$ jekyll build --source <source> --destination <destination>

# => The contents of the specified source folder <source> will be generated into the target folder <destination>.

$ jekyll build --watch

# => The contents of the current folder will be generated into the ./_site folder,

#    watch for changes, and automatically regenerate.

$ jekyll serve

# => A development server will run at http://localhost:4000/

# Auto-regeneration (automatically regenerate files): enabled. Use `--no-watch` to disable.

$ jekyll serve --detach

# => Same as the `jekyll serve` command, but detaches from the terminal and runs in the background.

#    To shut down the server, use the `kill -9 1234` command; "1234" is the process ID (PID).

#    If you can't find the process ID, use the `ps aux | grep jekyll` command to check, then shut down the server. [More](http://unixhelp.ed.ac.uk/shell/jobz5.html).
At its core, Jekyll is essentially a text transformation engine. The idea is simple: you write posts in your favorite markup language—Markdown, Textile, or even plain HTML—and Jekyll helps you apply one or more layouts to them. Throughout the process, you can configure URL paths, how your text is displayed within the layout, and so on. All of this can be done by editing plain text, and the static pages generated at the end are the final result.
Next, let’s talk about Jekyll’s directory structure:
├── _config.yml  			(configuration file)
├── _drafts  				(drafts are unpublished posts)
|   ├── begin-with-the-crazy-ideas.textile
|   └── on-simplicity-in-technology.markdown
├── _includes 			(load these include partials into your layouts)
|   ├── footer.html
|   └── header.html
├── _layouts 			    (templates wrapped around posts)
|   ├── default.html
|   └── post.html
├── _posts 				  (posts are stored here)
|   ├── 2007-10-29-why-every-programmer-should-play-nethack.textile
|   └── 2009-04-26-barcamp-boston-4-roundup.textile
├── _site 				(generated pages are placed in this directory)
├── .jekyll-metadata	  (This file helps Jekyll track which files have not been modified since the site was last built and which files need to be regenerated on the next site build. This file is not included in the generated site.)
└── index.html 		   (site index)
II. Develop or Choose a Jekyll Theme
Next, let’s talk about the blog’s appearance. This is probably something many people care a lot about—reading articles on a polished, high-quality blog is a pleasure in itself. This is where a custom theme comes in. You can either develop one yourself or choose an existing theme and then modify the CSS layout to make it your own. Jekyll themes are available here, where you can pick a theme you like. Download it, tweak the CSS, or borrow parts of it, and you’ll have a beautiful blog ready to go.
III. Use the GitHub Pages Service
1. Create Our Own Repository
The following uses usename as a placeholder for your own username.
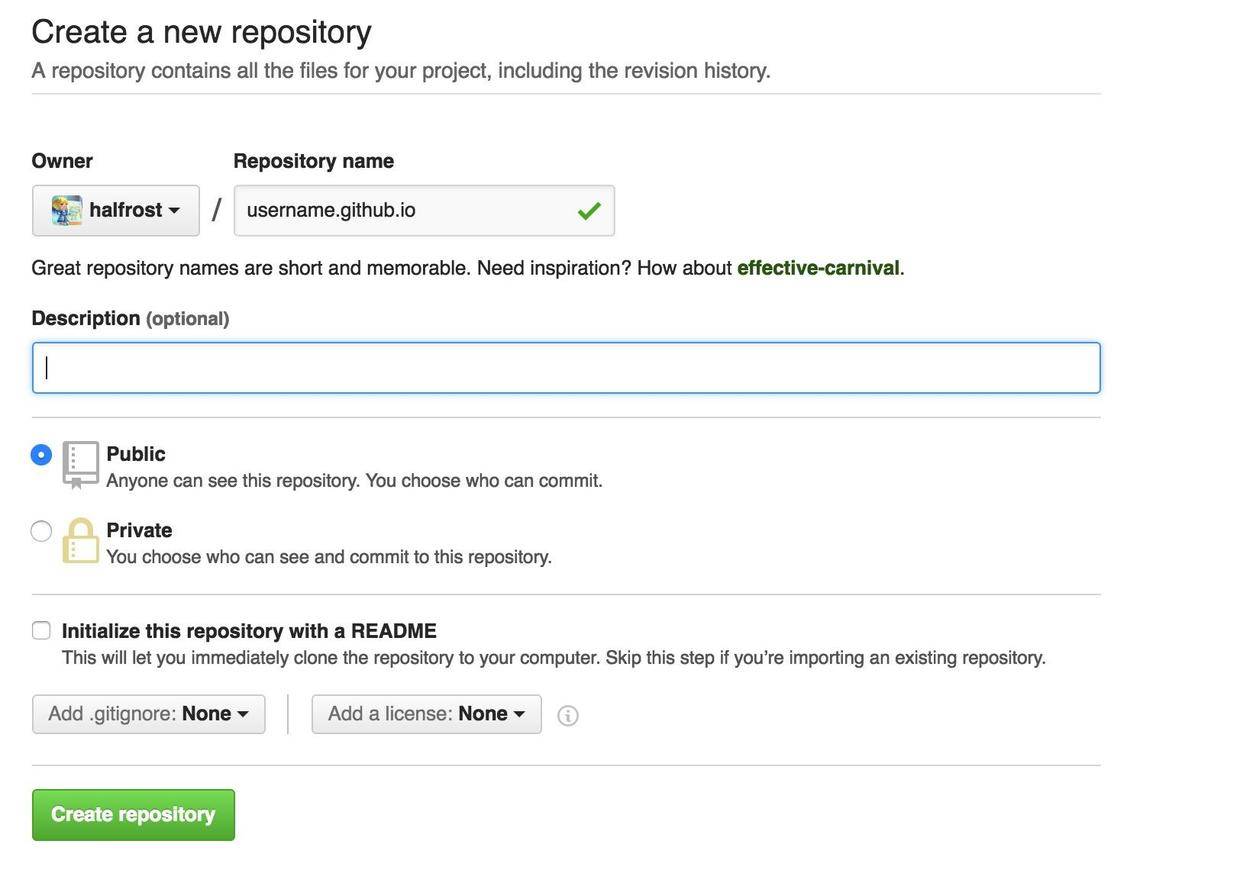
2. Configure Our Repository
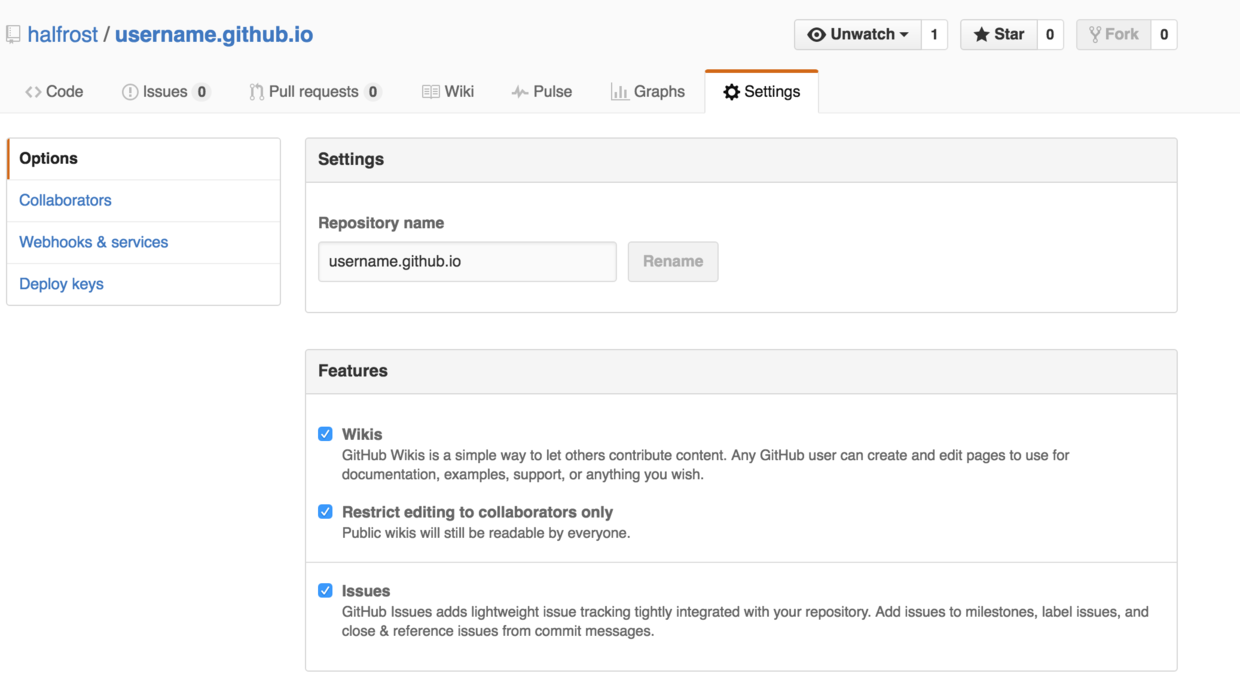
Find GitHub Pages in Settings.
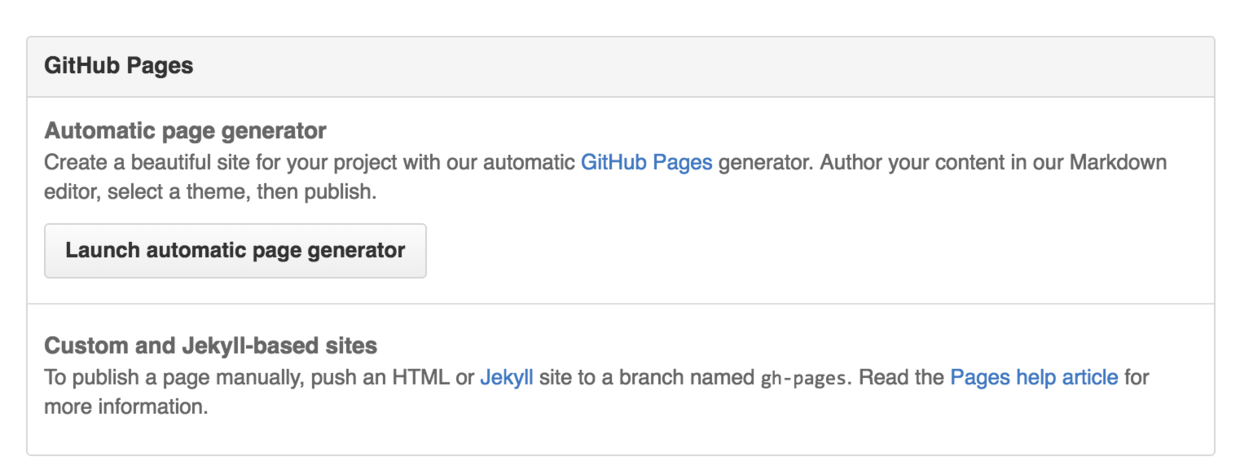
Select Launch automatic page generator.
On the next screen, simply select Continue to layouts.
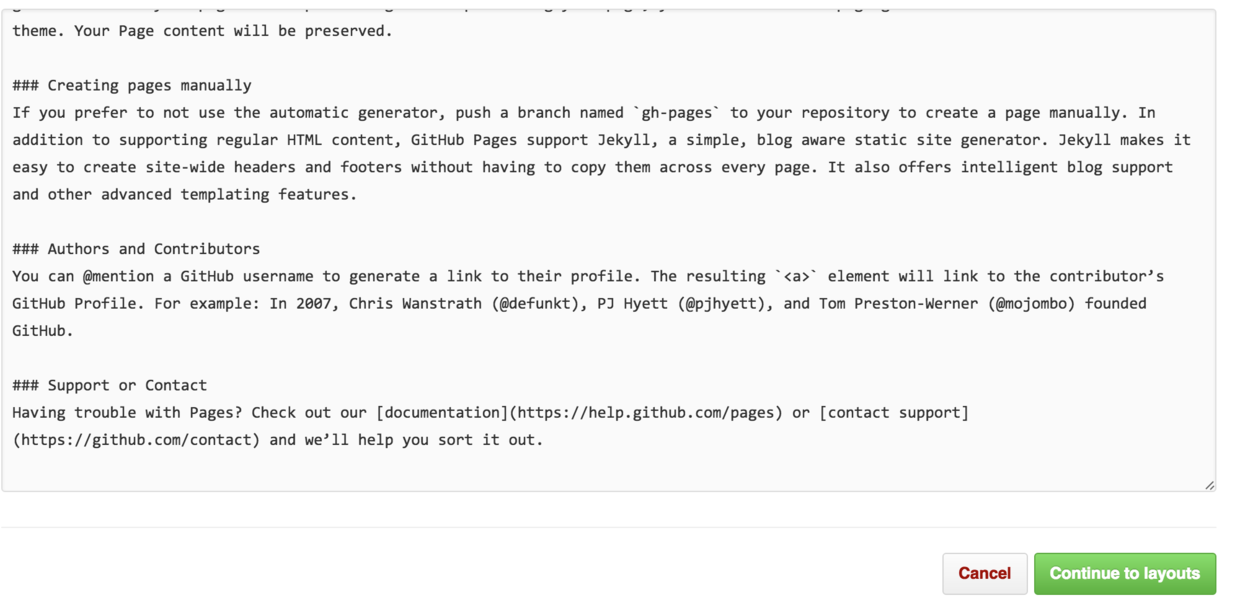
Once you reach this screen, choose any template and click Publish Page.
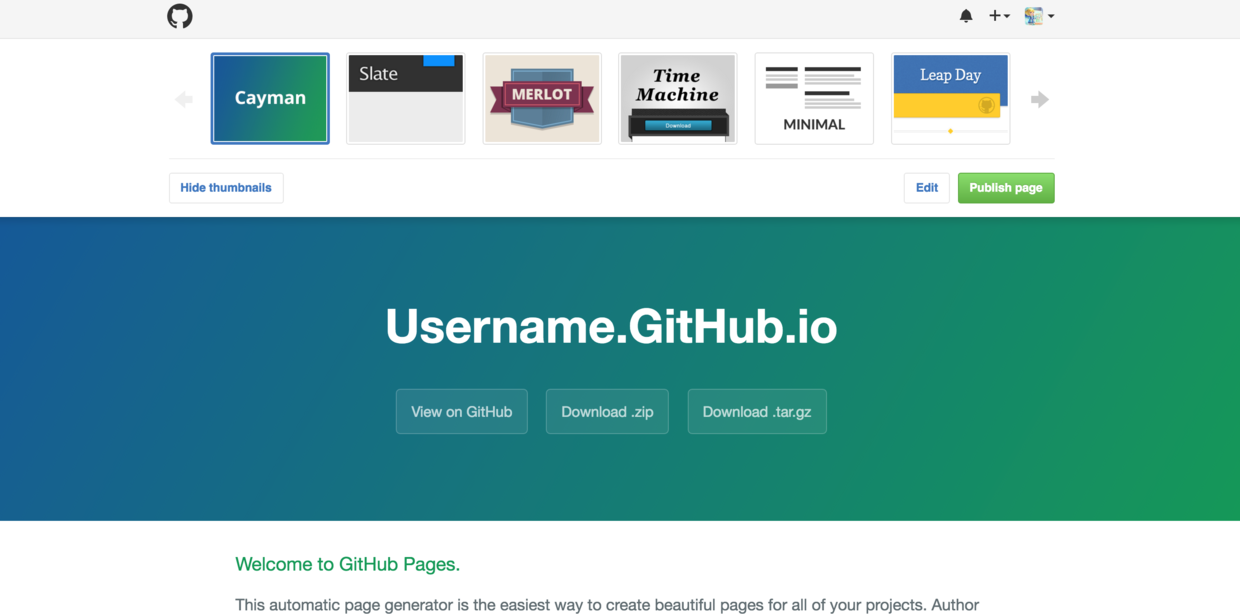
At this point, a static web page has been generated. Visit the address you just configured, https://halfrost.com/username.github.io/, and you’ll be able to access it.
Next, all we need to do is deploy the blog generated by Jekyll to GitHub Pages.
3. Deploy the Blog
First, git clone the newly created repository locally, then cd into the repository directory and run jekyll serve -B.
cd username.github.com
jekyll serve -B
Note: Before starting, make sure there are no Jekyll services running in other directories. You can use ps aux|grep jekyll to view the processes. If any exist, use kill -9 process_id to terminate the other processes.
Now open http://localhost:4000, and you should be able to see the homepage we created on GitHub. In theory, it should be exactly the same as what you see when accessing https://username.com/username.github.io/.
Next, copy the entire blog directory you created into this repository folder. Of course, you can delete the files that were previously in this repository, leaving only the README. Then push the entire project to GitHub.
git add --all                          #Add to staging area
git commit -m "Commit default Jekyll page"       #Commit to local repository
git push origin master                 #The live site is deployed on master
Note: before submitting, make sure the _config.yml file is configured as shown below. This is required by GitHub Pages; if you choose any other mode, you will immediately receive an email notification with a build warning.
highlighter: rouge
markdown: kramdown
After waiting about 1–2 minutes, refresh username.github.io again, and you should see our blog.
IV. Apply for a Personal Domain
Many platforms now support custom domains. For example, Sina Weibo lets you apply for a custom domain, so in the future you can visit weibo.com/your-name to go directly to your homepage. Similarly, we also want a name that takes us directly to our blog homepage, so we first need to buy a domain. In China, the most commonly used provider is probably Wanwang; internationally, it is Go Daddy. Choose a username you like. If no one has already bought that domain, congratulations—you can go ahead and purchase it.
After buying the domain, the next step is configuration.
- To bind it, we need to add a CNAME file under the username.github.com directory. Add your domain name to it—suppose it is example.com—and then push the CNAME file to the remote repository:
git add CNAME
git push origin master
- Add your CNAME records at your domain registrar. Add two records with host records
@andwww, both of type CNAME. CNAME stands for canonical name record, and it can map multiple names to the same computer. For the record value, enter username.github.io.. Note that there is also a dot afterio; don’t forget it.

Note that when adding the @ record, you may very likely be told there is a conflict—specifically with the MX record. Here I simply deleted the @ rule for the MX record. If you want to understand why, you can read this link: http://cn.v2ex.com/t/204489 . The conclusion is still that you should delete the @ entry for MX yourself.
If it is a domestic domain name, DNS resolution will be very fast; generally it completes within 10 minutes. Then we can directly access our blog through the custom domain we purchased.
V. Add visitor comments to the blog
Static blogs generally integrate visitor comments using disqus. It is usually placed at the end of a blog post, though the layout is of course up to your own design. Here I’ll just paste the code I used to integrate disqus. Yours should probably be similar.
<section class="post-comments">
  {% if site.comment.disqus %}
    <div id="disqus_thread"></div>
    <script>

    var disqus_config = function () {
        this.page.url = "{{ page.url | prepend: site.baseurl | prepend: site.url }}";
        this.page.identifier = "{{ page.url }}";
    };

    var disqus_shortname = '{{ site.comment.disqus }}';

    (function() { // DON'T EDIT BELOW THIS LINE
        var d = document, s = d.createElement('script');
        s.src = '//' + disqus_shortname + '.disqus.com/embed.js';
        s.setAttribute('data-timestamp', +new Date());
            (d.head || d.body).appendChild(s);
        })();
    </script>
    <noscript>To view<a href="http://disqus.com/?ref_noscript"> Disqus </a>comments, please enable JavaScript</noscript>

  {% elsif site.comment.duoshuo %}
    <div class="ds-thread" data-thread-key="{{ page.url }}" data-title="{{ page.title }}" data-url="{{ page.url | prepend: site.baseurl | prepend: site.url }}"></div>
    <script type="text/javascript">
        var duoshuoQuery = {short_name:"{{ site.comment.duoshuo }}"};
        (function() {
            var ds = document.createElement('script');
            ds.type = 'text/javascript';ds.async = true;
            ds.src = (document.location.protocol == 'https:' ? 'https:' : 'http:') + '//static.duoshuo.com/embed.js';
            ds.charset = 'UTF-8';
            (document.getElementsByTagName('head')[0] || document.getElementsByTagName('body')[0]).appendChild(ds);
        })();
    </script>
  {% endif %}


</section>
6. Apply for the “Little Green Lock” HTTPS

To use an HTTPS URL, there are currently two approaches: one is to apply for an HTTPS certificate—for a free option, use the free SSL certificates provided by Let’s Encrypt; the other is to use the service provided by Kloudsec. I won’t go into the process of applying for an SSL certificate here. Instead, I’ll talk about the second approach: using Kloudsec’s service.
How it works
According to the HOW DOES IT WORK? section in the Kloudsec documentation, the service sits between our web server and our website visitors. Its principle is that it caches pages from our server, so the HTTPS connection that users actually establish is between the user’s browser and Kloudsec.
First, register for a Kloudsec account by entering your email address and password. Next, it will ask you to enter the repository address and domain name, and it will check whether the repository exists. Finally, activate the Kloudsec account and log in.
Then comes the most critical step: configuring the domain name DNS records.
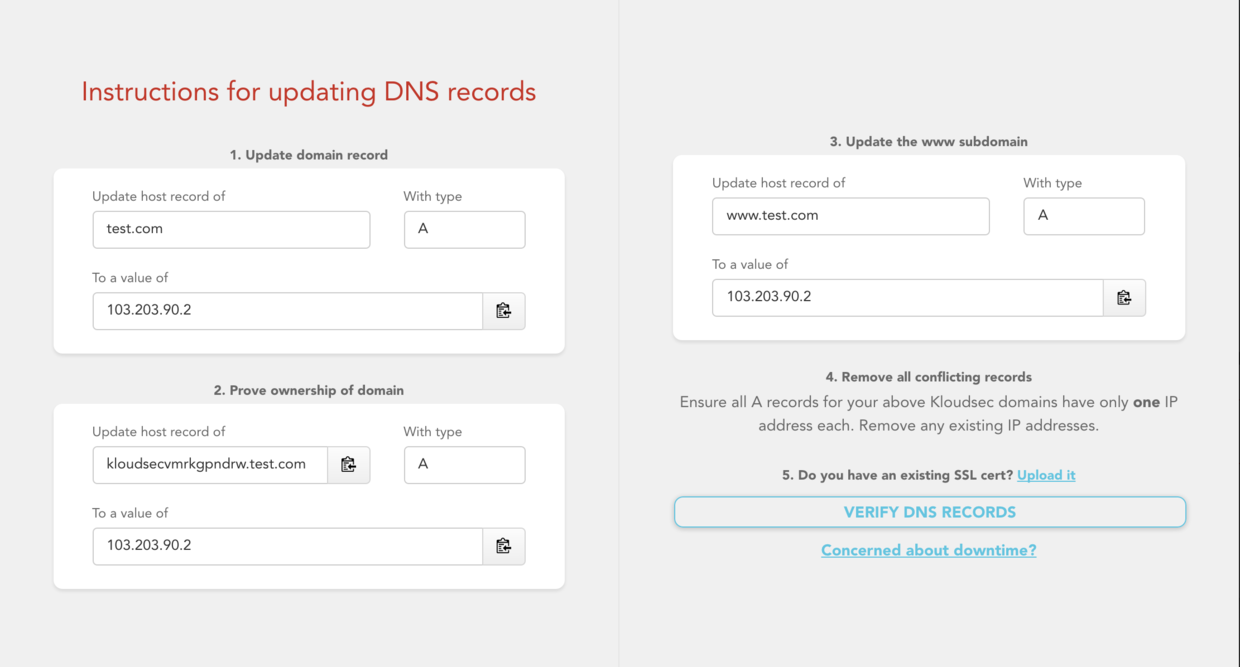
As shown above, you need to configure three A records. After completing the setup, click Verify DNS records. If verification succeeds, you can proceed with the remaining configuration.
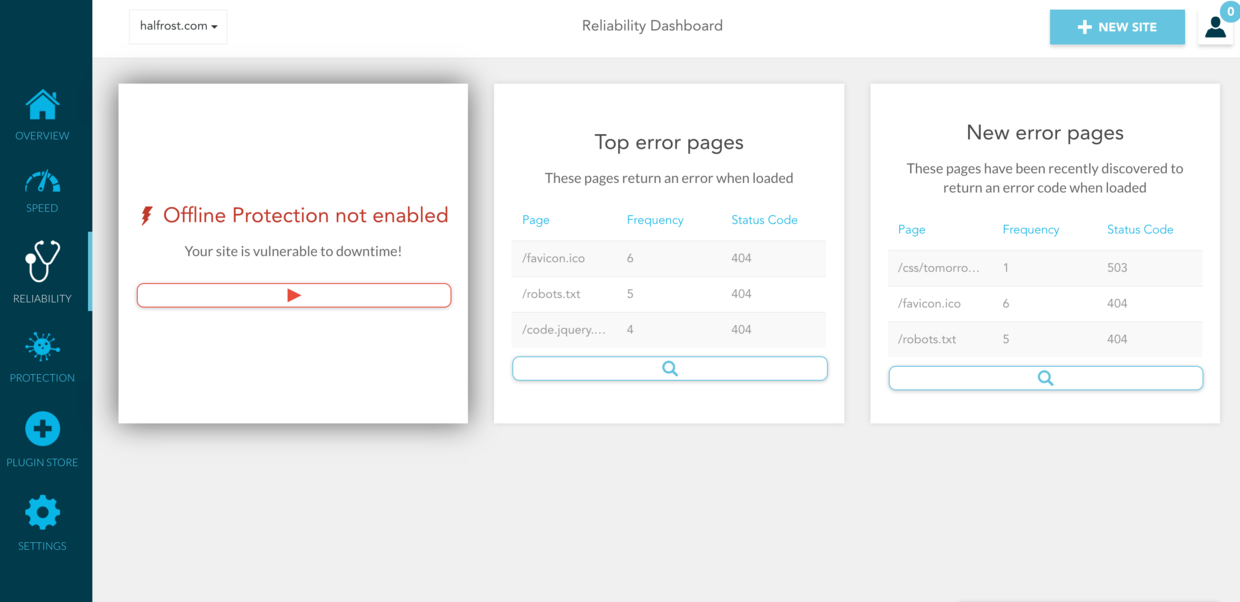
There are some free and paid services here; choose based on your needs.
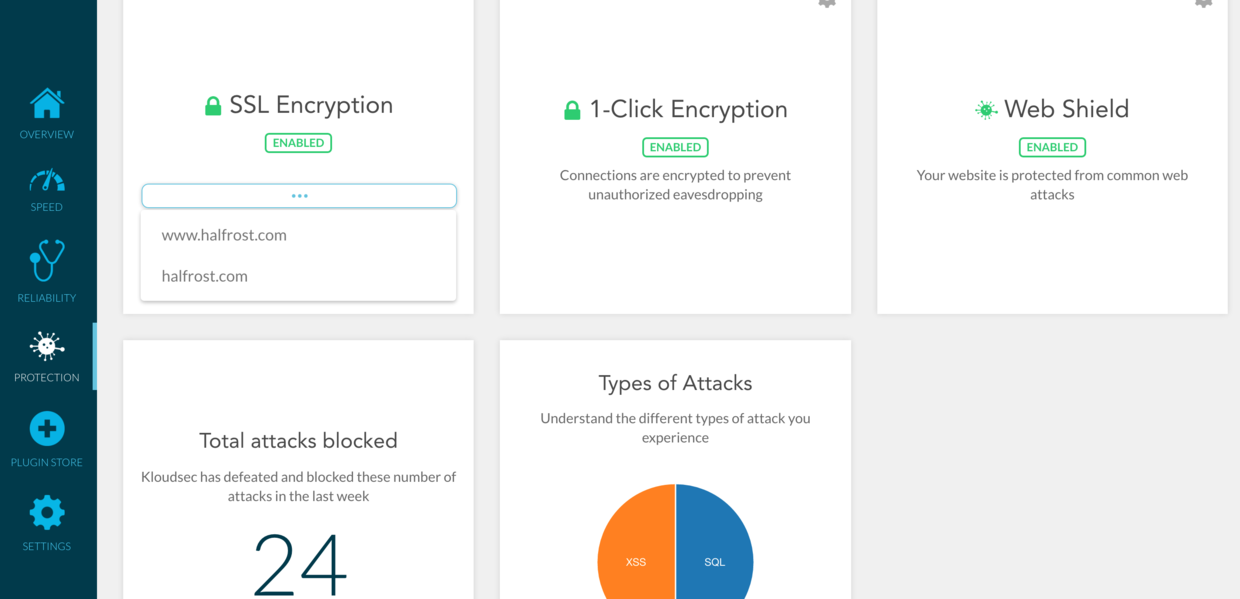
Here, SSL Encryption needs to be selected. After enabling it, you will see the following settings.
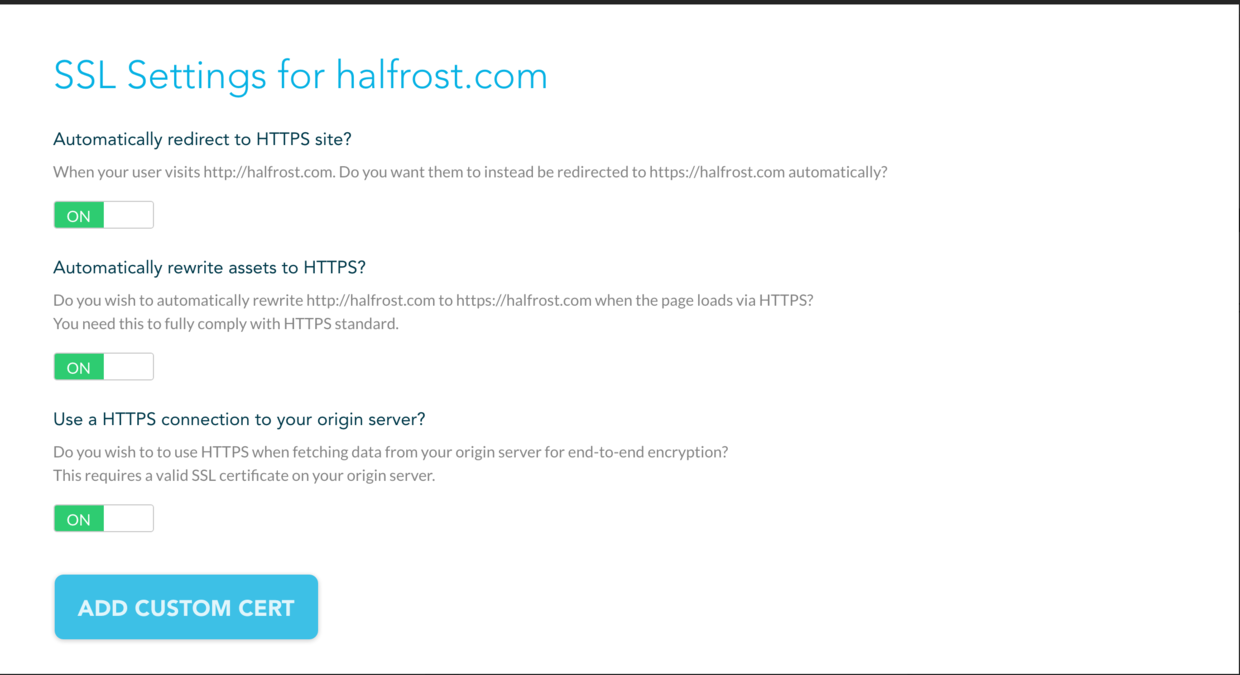
If you do not upload your own SSL certificate here, it will generate a free SSL certificate for you. If you want to use your own, click the ADD CUSTOM CERT button to upload your SSL certificate.
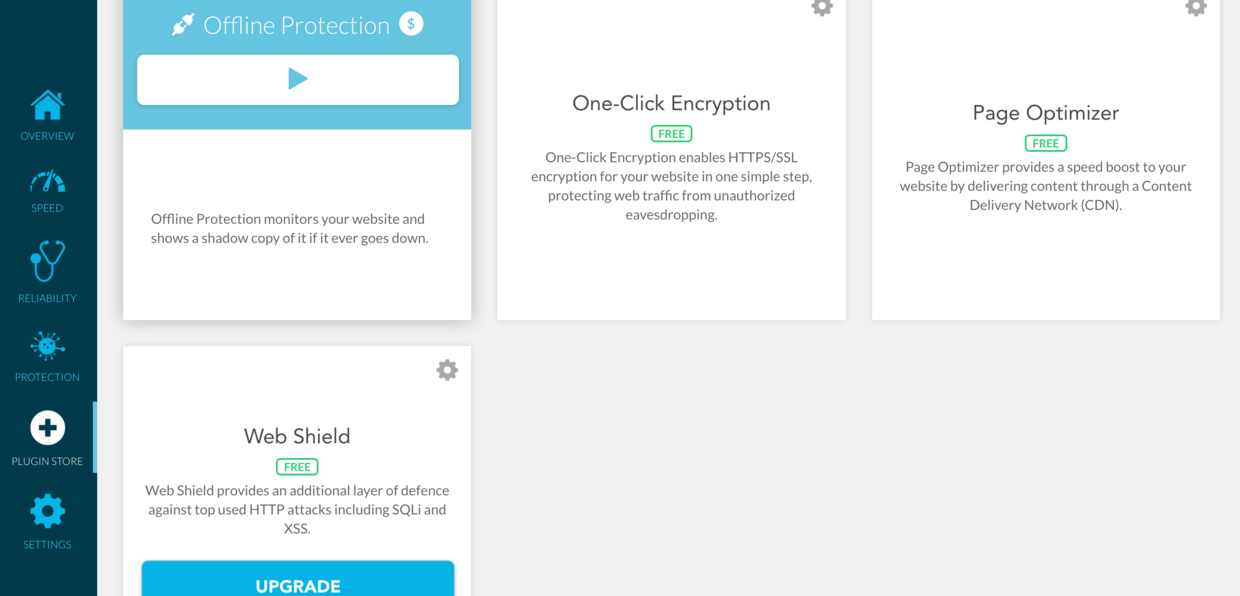
These are some plugins. Choose them depending on whether you need them.
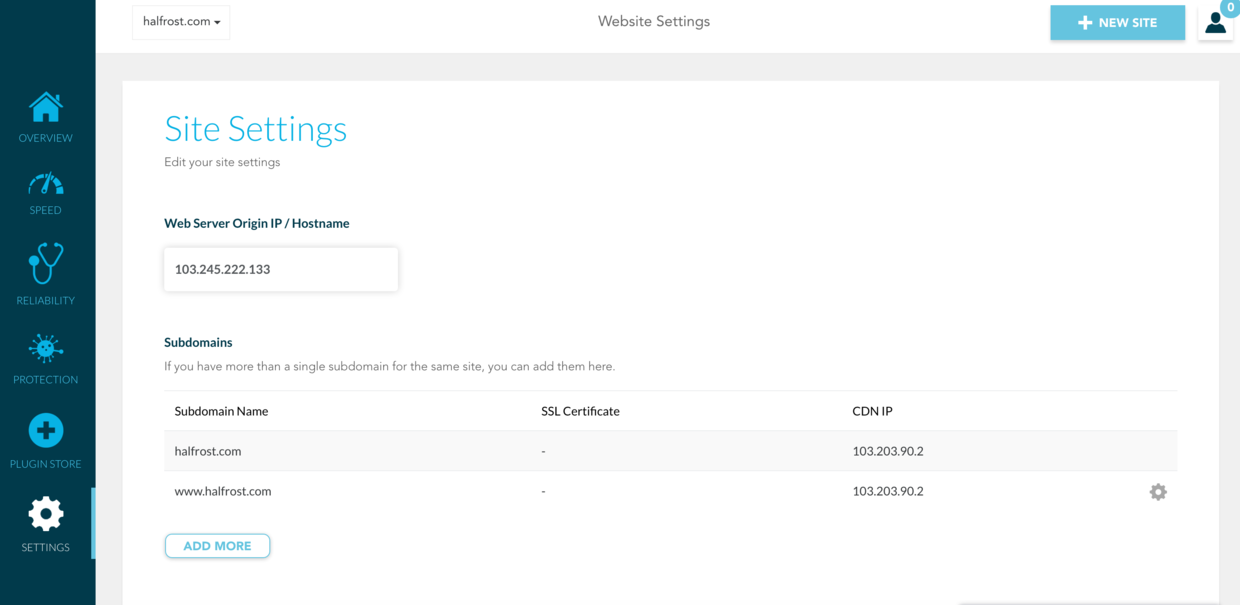
Finally, add this IP address under SETTING. This IP is an available IP address for GitHub Pages.
Benefits of using Kloudsec
- It eliminates the unfriendly warning about the certificate being untrusted and potentially insecure.
- Configuration is convenient and done once and for all.
- Access speed is not affected.
- The little green lock is reassuring to see.
Later, I discovered a third way to access the blog over HTTPS: Use the Pages service provided by GitLab. It directly supports adding SSL certificates for custom domains and can be used together with a freely applied-for SSL certificate. For details, see A Simple Way to Build a Secure Blog at Zero Cost.
7. Future Maintenance
At this point, the personal blog has been successfully bound to the domain name and is online. There actually isn’t much maintenance work going forward.
1. Edit posts locally:
Use a Markdown tool to write the blog post first. Note that the header of every blog post must include the following format.
---
layout: post
title: How to Quickly Build Yourself a Cozy "Home"——Generating a Static Blog with Jekyll
author: A Wisp of Sorrow Flowing into Hidden Half-Frost
date: 2016.06.21 01:57:32 +0800
categories: Blog
tag: Blog
---
After finishing the post, run jekyll build to generate the pages, then use jekyll serve -B and visit localhost:4000 locally to preview the post.
2. Publishing the Blog Online
Once you’ve confirmed locally that the post looks correct, you can push it to the Github Pages server using git commands such as git add, git commit, and git push. After a minute or two, visit your own domain and you’ll see the new blog post!
Conclusion
That’s it for setting up a static blog. If anything is still unclear, feel free to leave me a comment. Another excellent static blog framework is hexo; if you’re interested and enjoy tinkering, you can give it a try as well. Tang Qiao uses it to build his blog. Of course, there are also dynamic blogs built with ghost. To set up a dynamic blog, you’ll need to buy your own server, install a node.js environment, and handle all future maintenance yourself. If you’re interested, you can try that too!
