This site now supports QUIC
1. What Is QUIC?
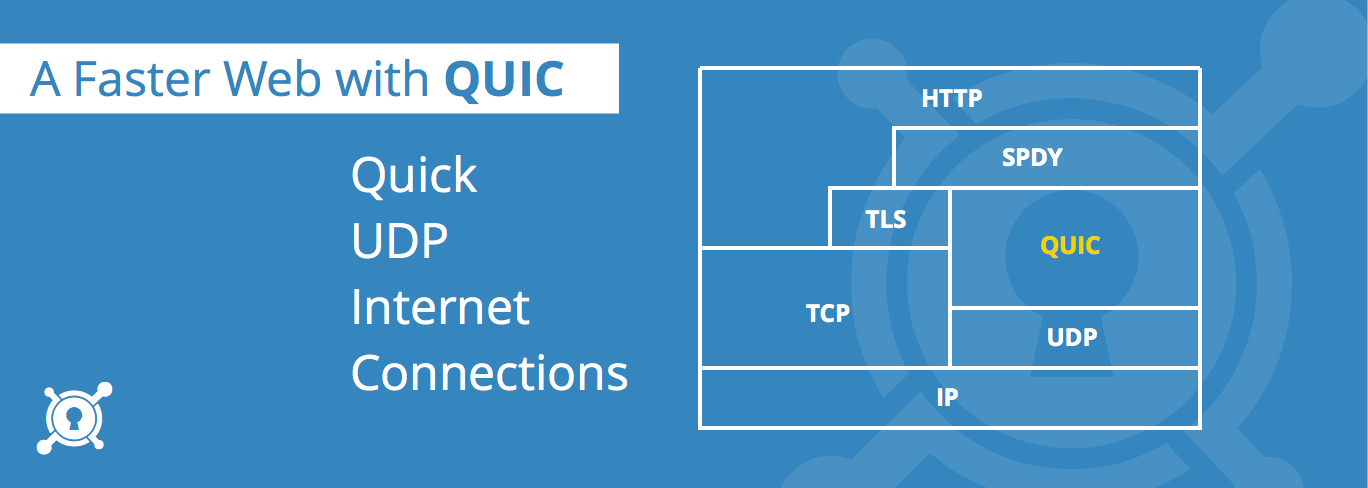
QUIC stands for Quick UDP Internet Connections, a new transport protocol invented by Google. Compared with TCP, QUIC can reduce latency. On the surface, QUIC is very similar to TCP + TLS + HTTP/2 implemented on top of UDP. Because TCP is implemented in the operating-system kernel and in middleware firmware, making major changes to TCP is almost impossible. QUIC, however, is built on top of UDP, so it does not have this limitation. QUIC can provide reliable transport, and compared with TCP, its flow-control functionality lives in user space rather than kernel space. That means users are not limited to CUBIC or BBR; they can freely choose, or even tune and optimize it for their application scenarios.
Compared with the existing TCP + TLS + HTTP/2 approach, QUIC has the following key characteristics:
- Uses caching to significantly reduce connection establishment time
- Improves congestion control, moving it from kernel space to user space
- Multiplexing without head-of-line blocking
- Forward error correction to reduce retransmissions
- Smooth connection migration, so changes in network state do not cause the connection to drop.
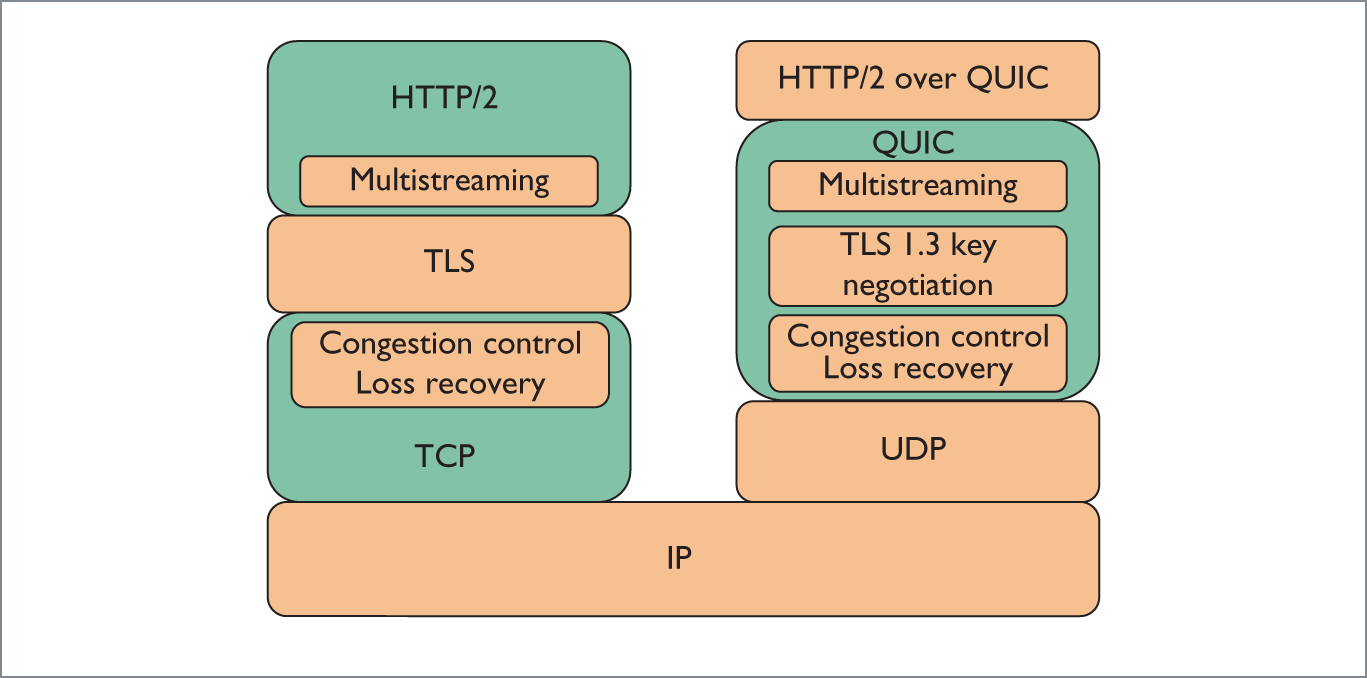
QUIC sits on top of UDP. If you want to compare it with the TCP/IP stack, it looks like the diagram above. QUIC can be compared to the TLS layer in TCP/IP. But its functionality is not exactly TLS; it also includes part of HTTP/2, as well as some TCP functionality underneath, such as congestion control, packet-loss recovery, and flow control.
2. Why Deploy QUIC?
This site has already deployed TLS 1.3, so repeat handshakes can achieve 0-RTT, and the speed is already quite fast. So why deploy QUIC as well?
- The initial handshake for HTTP + TLS still requires multiple RTTs, so there is still room for optimization
- On mobile phones in poor network conditions, TCP head-of-line blocking and TLS record HOF make network degradation worse
- A single HTTPS solution is too monolithic; deploying multiple paths improves overall system availability
In fact, the most important point is still speed. Users who frequently use Google services will notice that Google has already deployed QUIC for its main services and supports four major versions: quic-44, quic-43, quic-39, and quic-35 (supporting multiple versions at the same time is mainly to remain compatible with multiple versions of the Chrome browser. The latest Chrome browsers, 68–70, only have quic-44, while older versions, 62–66, only have quic-39. To serve users on all versions, they have no choice but to support this many versions).
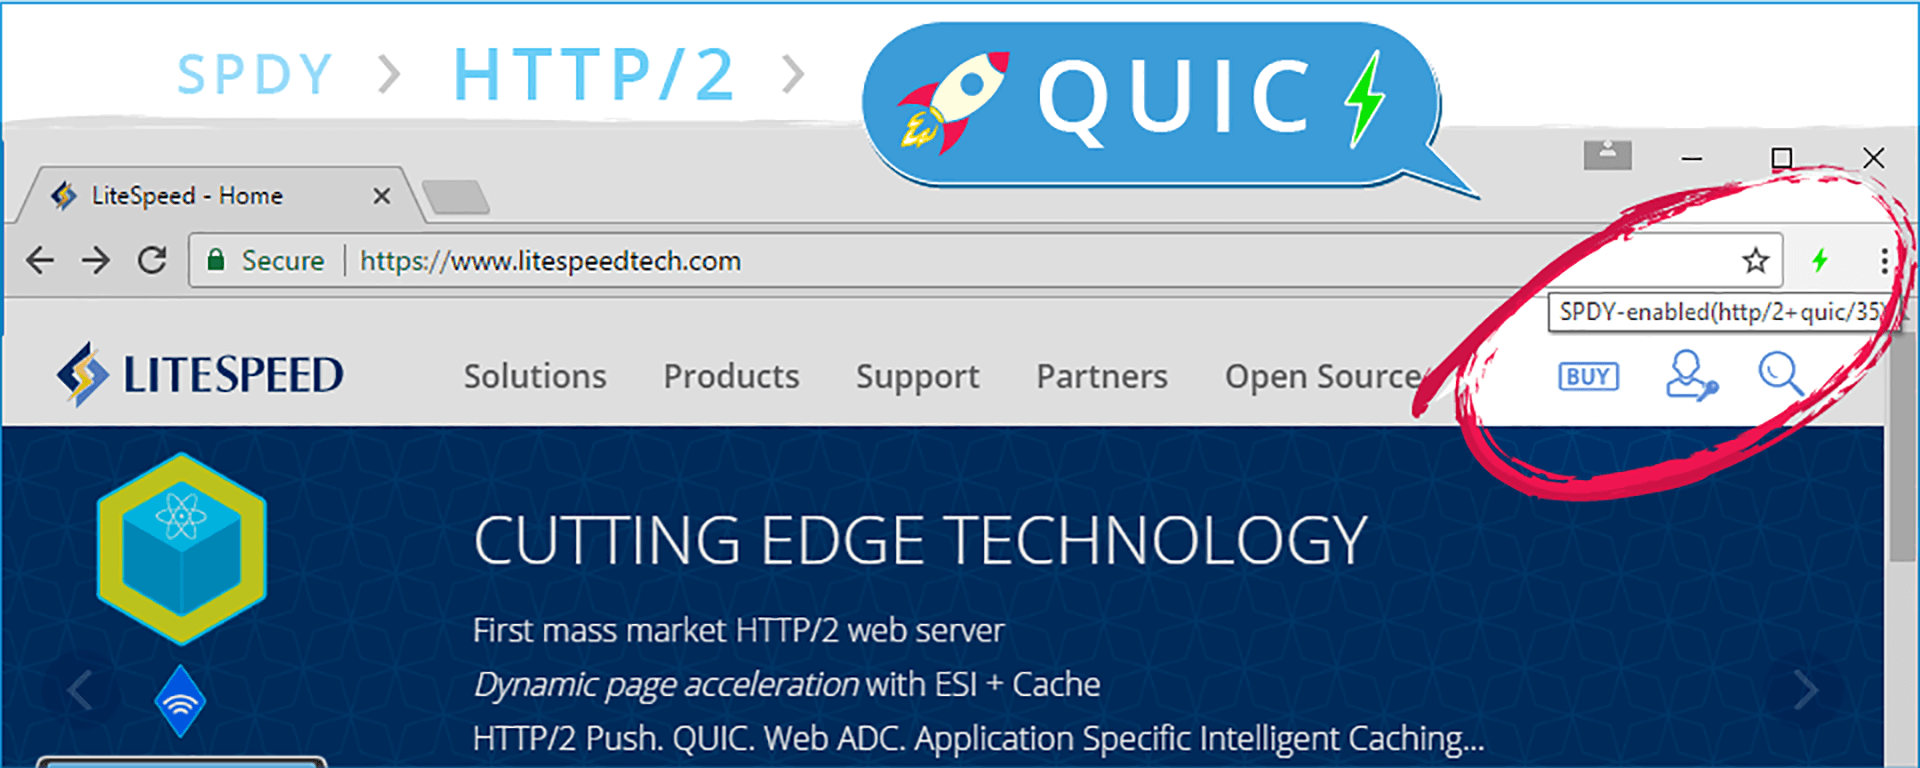
There is one more point: if you are an HTTP/2 developer, you must know the official Google plugin HTTP/2 and SPDY indicator. If it is only ordinary HTTP/2 + TLS, this plugin displays blue and shows “ HTTP/2-enabled(h2) ”; but if QUIC is enabled, it turns a cool green and shows “SPDY-enabled(http/2+quic/39)”. Green indicates that the network channel is more open.
All right, enough reasons. Next, let’s look at how to deploy it.
3. Prerequisites for Implementing QUIC
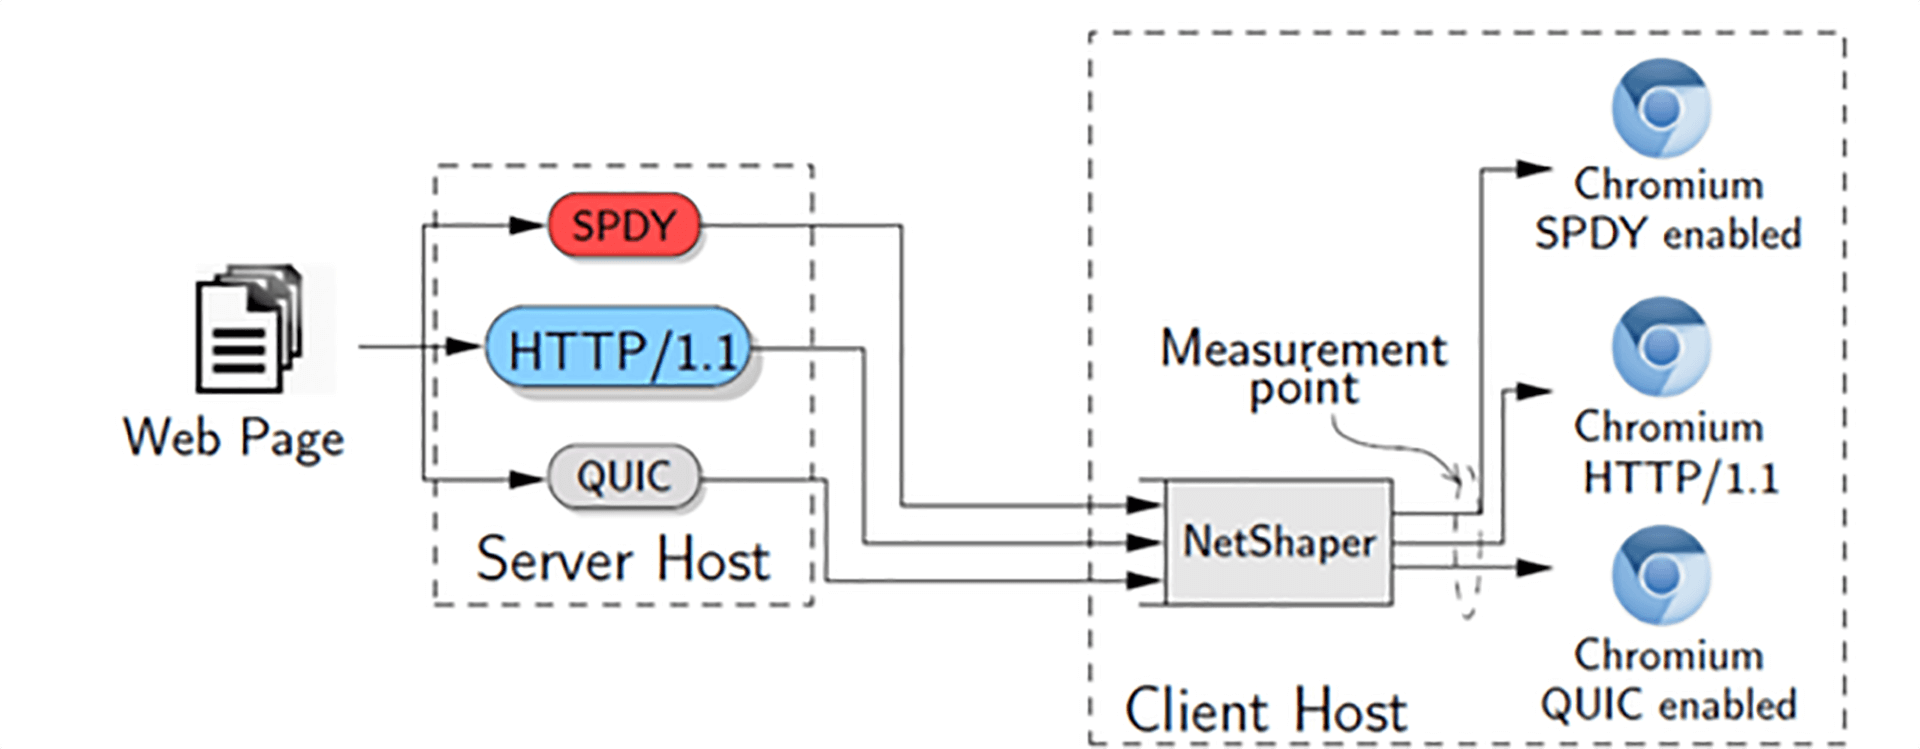
To implement QUIC in the browser, there are some prerequisites. Since it seems that only the Chrome browser currently supports the QUIC protocol, the following conditions are for Chrome.
1. First Connection
When Chrome sends a request to a server it has never requested before, it does not know whether the other side supports QUIC, so it first sends the initial request over TCP. After the server responds to this request, it must send the Alt-Svc HTTP response header to tell Chrome that it supports QUIC. (For example, the response header “alt-svc: quic=”:443”; ma=2592000; v="44,43,39,35” tells Chrome that the server supports QUIC on port 443, supports versions 44, 43, 39, and 35, and has a max-age of 2592000 seconds.) Now Chrome knows that the server supports QUIC, so it tries to use QUIC for the next request. After issuing the request, Chrome will race QUIC against TCP to establish a connection with the server. (It establishes these connections, but does not send requests.) If the first request is sent over TCP, TCP wins the race, and the second request will be sent over TCP. At some later point, if the QUIC connection succeeds, all future requests will be sent over the QUIC connection.
Therefore, QUIC protocol discovery is implemented by identifying special fields in the response header.
2. Subsequent Connections
Chrome always has native QUIC support, and servers that enable QUIC always support 0-RTT handshakes. When Chrome sends a request to a server it has previously used QUIC with, it will also race it against TCP. Because Chrome can perform a 0-RTT handshake, QUIC will immediately win, and requests will continue to be issued over the QUIC connection.
3. Connection Failure
If the QUIC handshake fails (for example, if UDP is blocked, or if the server is incompatible with Chrome’s QUIC version), Chrome marks QUIC as broken for that host. Any in-flight requests will be resent over TCP. Because QUIC is marked as broken for the host, QUIC connections will not be attempted immediately. After 5 minutes, the broken connection’s QUIC marker expires into “recently broken”. When the next request is made to the server, Chrome will again continue to race TCP and QUIC. Because QUIC was “recently broken”, the 0-RTT handshake will be disabled. If the handshake fails again, QUIC will once again mark the connection as broken for 10 minutes, which is twice the previous period for marking QUIC as broken, and this will keep doubling thereafter. If the handshake succeeds, the request will be sent over QUIC, and QUIC will no longer be marked as “recently broken”.
Another point to note is that QUIC must be deployed on TCP / UDP port 443 at the same time. There is no special reason; this is effectively a rule. For details, see this post: Why MUST a server use the same port for HTTP/QUIC?
Once you understand these points, the deployment plan for QUIC becomes clear.
4. QUIC Deployment Plan
Because the nginx ecosystem is relatively mature, completely abandoning nginx just to deploy QUIC would be putting the cart before the horse. But nginx does not currently support QUIC, so how can we try QUIC in advance? Deploy it in two steps.
(1). Configure the Response Header in nginx
add_header alt-svc 'quic=":443"; ma=2592000; v="39"';
This step is relatively simple; its purpose is to tell the Chrome browser that the current server supports QUIC.
(II). Implement the QUIC Protocol
The full QUIC protocol is fairly complex, and implementing an entire stack from scratch is still quite difficult for me. So let’s first look at the available open-source implementations:
1. Chromium
This is the officially supported implementation. Naturally, it has many advantages: it is maintained by Google, is basically free of pitfalls, and can always track Chrome updates to the latest version. However, building Chromium is relatively troublesome because it has its own separate build toolchain. I won’t consider this option for now.
2. proto-quic
This is the QUIC protocol component extracted from Chromium, but its GitHub homepage has announced that it is no longer supported and is only for experimental use. I won’t consider this option.
3. goquic
goquic provides Go bindings for libquic, and libquic was also extracted from Chromium. It has not been maintained for several years and only supports up to quic-36. goquic provides a reverse proxy, but testing shows that because the QUIC version is too old, the latest Chrome browser can no longer support it. I won’t consider this option.
4. quic-go
quic-go is a QUIC protocol stack written entirely in Go. It is actively developed, already used in Caddy, licensed under MIT, and currently looks like the better option.
So the choice is the last one: use Caddy to deploy and implement QUIC.
The deployment plan is as follows:
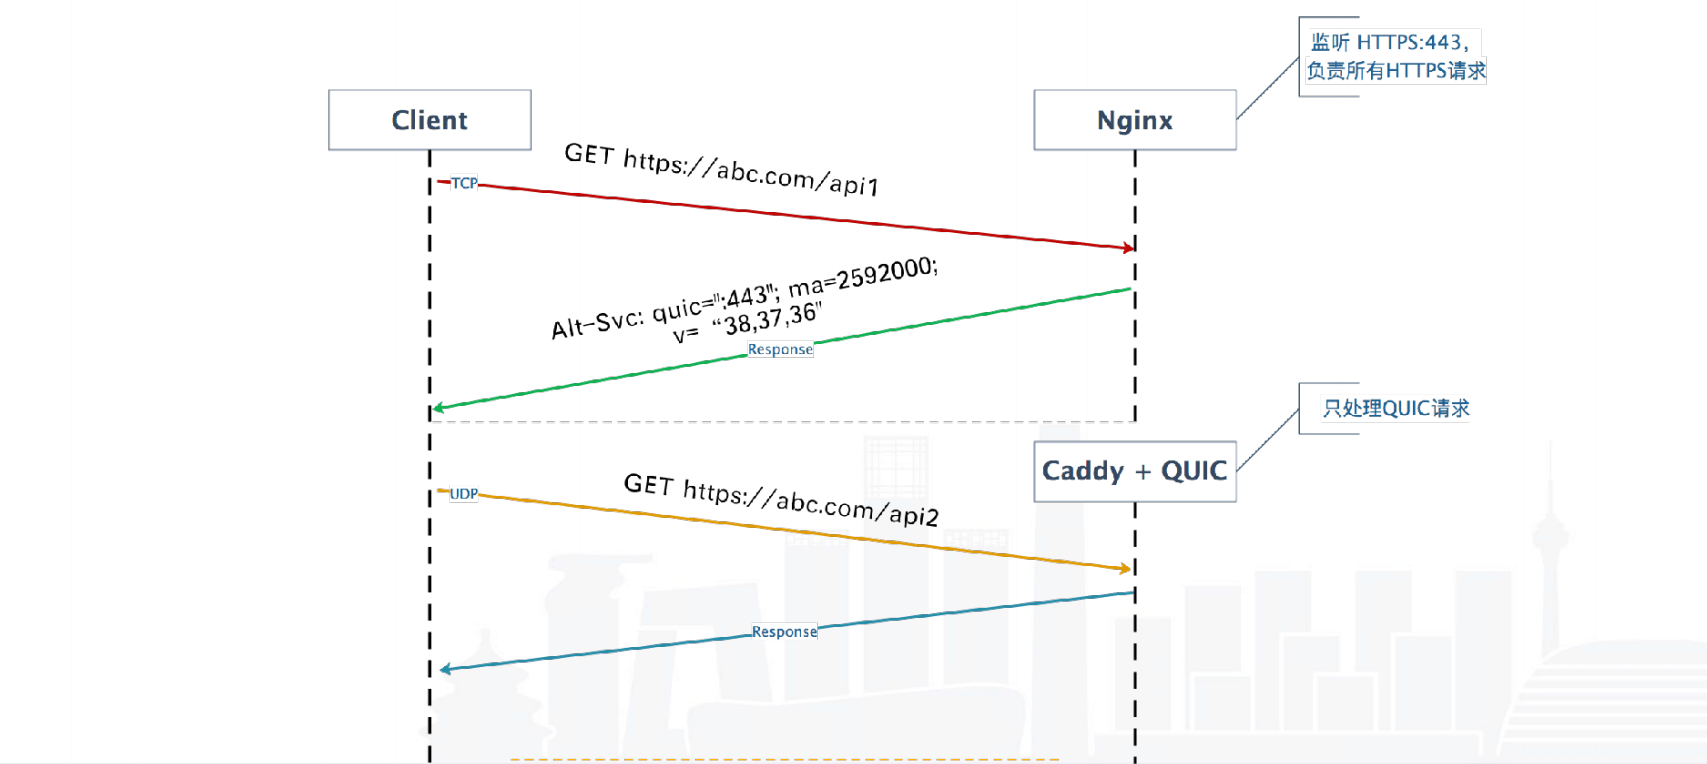
nginx will continue to be used, but nginx will only respond on TCP/443, while UDP/443 will be handled by Caddy. nginx returns a response header telling the Chrome browser that QUIC is supported, and then Caddy acts as a reverse proxy to forward requests.
V. Deployment
The Caddy project was not originally intended specifically for implementing QUIC. It is meant to provide an HTTPS web server with automatic certificate management. Caddy automatically renews certificates. QUIC is just one of its ancillary features (though it seems more people use it to implement QUIC 🤣).
If you run Caddy directly on the server, it will report an error:
Activating privacy features... done.
2018/07/22 14:03:15 listen tcp :443: bind: address already in use
It turns out that Caddy also listens on TCP/443, so we need to resolve that first. We only need Caddy to listen on UDP/443 and “mask out” Caddy’s TCP/443 functionality. A better way to do this is with Docker, because Docker container networks are isolated from the host network by default.
So let’s create a new Docker container.
FROM ubuntu:latest
LABEL maintainer="ydz@627@gmail.com"

RUN apt-get update

RUN set -x  \
	&& apt-get install curl -y \
	&& curl https://getcaddy.com | bash -s personal && which caddy
If you do not want to build it yourself, you can simply pull this image from my Docker pub: REPOSITORY: halfrost/blog, TAG: caddy-0.0.1.
Then create a new Caddy configuration file.
https://halfrost.com
gzip
tls /conf/chained.pem /conf/domain.key

proxy / http://127.0.0.1:2368 {
  header_upstream Host {host}
  header_upstream X-Real-IP {remote}
  header_upstream X-Forwarded-For {remote}
  header_upstream X-Forwarded-Proto {scheme}
}

log /caddy-conf/caddy_blog.log
errors /caddy-conf/caddy_errors.log
Configure the specific HTTPS certificate paths, as well as the log and error paths in the file above, according to your preferences.
Next, you can start Docker.
$ docker container run -d -p 443:443/udp --name halfrost-blog -v /www/ssl:/conf -v /www/caddy:/caddy-conf halfrost/blog:caddy-0.0.1 caddy -quic -conf /caddy-conf/caddy.conf
Explanation of the command above:
-p maps ports: it maps the host’s 443/udp to port 443 in Docker.
-name assigns a name to this Docker container. If it is not set, a random name will be generated.
CONTAINER ID        IMAGE                             COMMAND                  CREATED             STATUS              PORTS                    NAMES
366d4b392ed0        halfrost/blog:caddy-0.0.1         "caddy -quic -conf..."   10 hours ago        Up 10 hours         0.0.0.0:443->443/udp     halfrost-blog
-v mounts directories. The path before the colon is the host directory, and the path after the colon is the directory inside Docker.
The final -conf loads the conf file from the host.
If Docker fails to start, check the Docker logs to see why startup failed:
$ docker logs -f -t --tail 10 366d4b392ed0
At this point, all server-side operations are complete.
VI. Verify QUIC
1. Verify the Port
First, verify whether Caddy is listening on UDP/443:
netstat -anp | grep "443"

tcp        0      0 0.0.0.0:443             0.0.0.0:*               LISTEN      9748/nginx: master
tcp        0      0 172.16.9.240:443        101.86.117.100:54518    TIME_WAIT   -
tcp        0      0 172.16.9.240:443        124.90.178.236:33162    FIN_WAIT2   -
tcp        0      0 172.16.9.240:64854      140.205.230.3:443       TIME_WAIT   -
udp6       0      0 :::443                  :::*                                5629/./caddy
You can see that it is indeed listening on UDP/443.
2. Enable the QUIC feature in Chrome
Next, enable Chrome’s QUIC feature.
In chrome://flags/, find Experimental QUIC protocol and set it to Enabled. Restart the browser for it to take effect.
3. Install the HTTP/2 and SPDY indicator extension
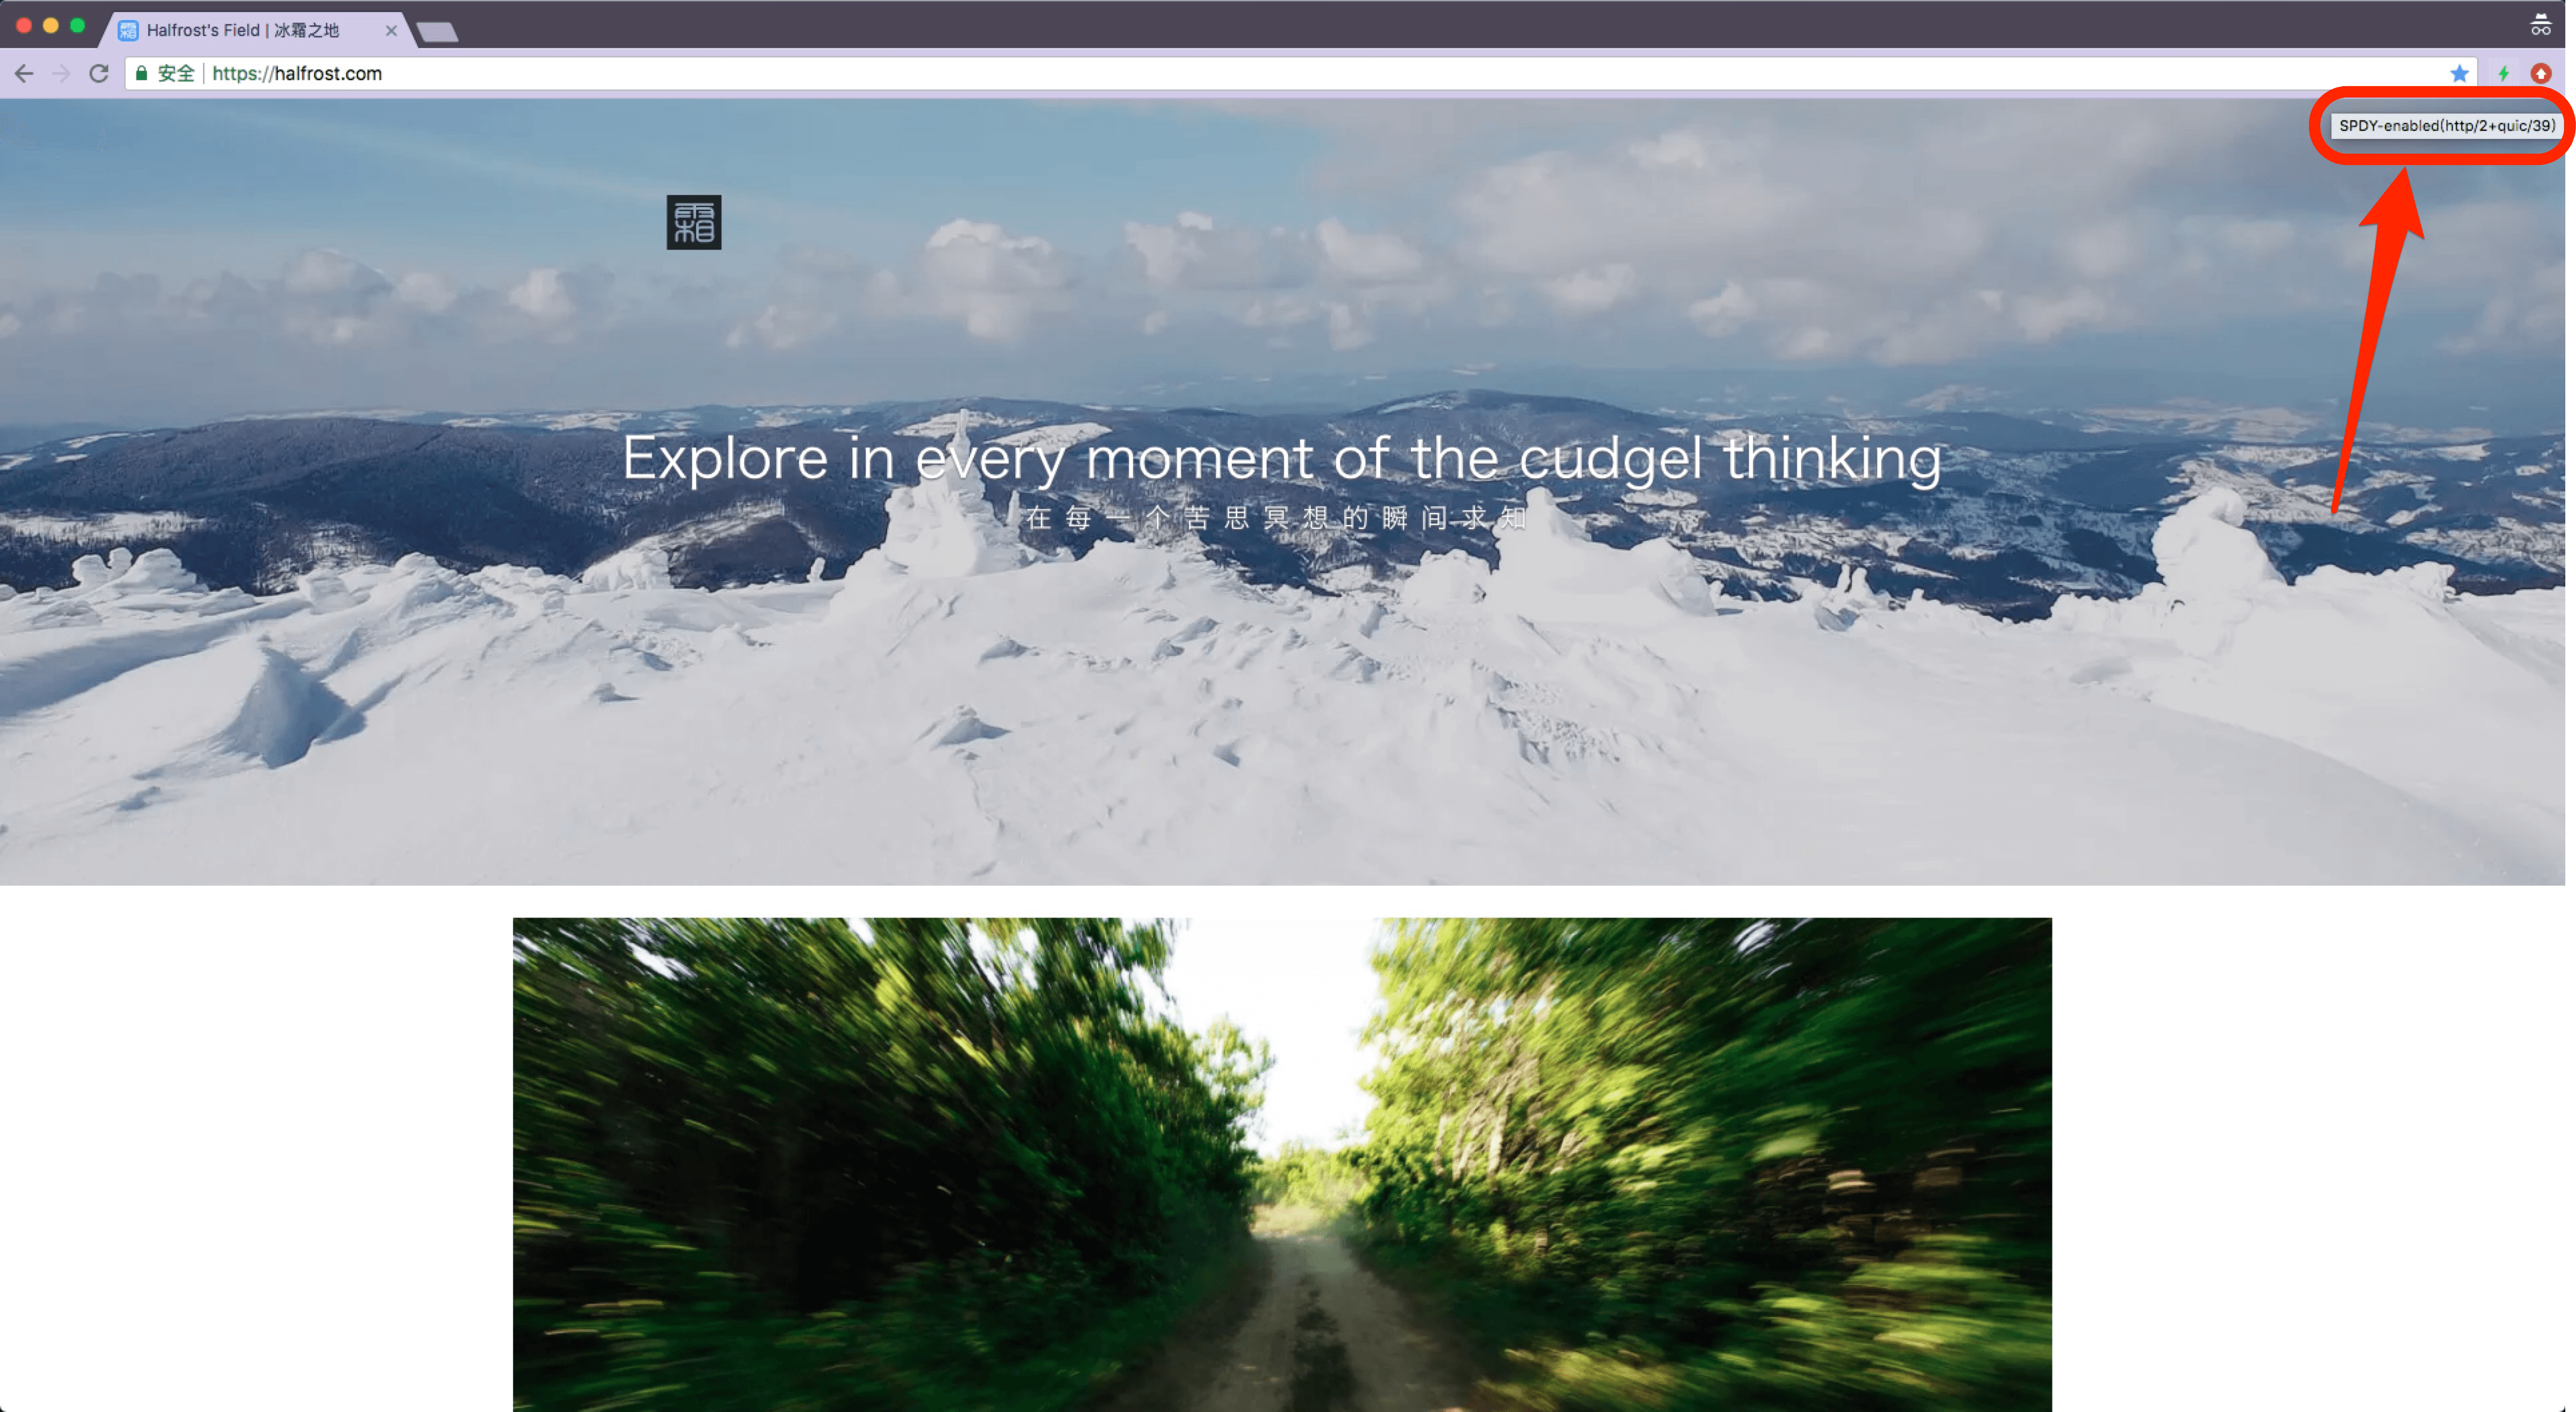
Install the HTTP/2 and SPDY indicator extension from the Chrome Store. This extension was mentioned earlier. If QUIC is enabled, the extension will clearly show green. As shown in the upper-right corner of the image above, the green lightning bolt ⚡️ indicates that QUIC has been enabled.
4. Chrome Developer Tools
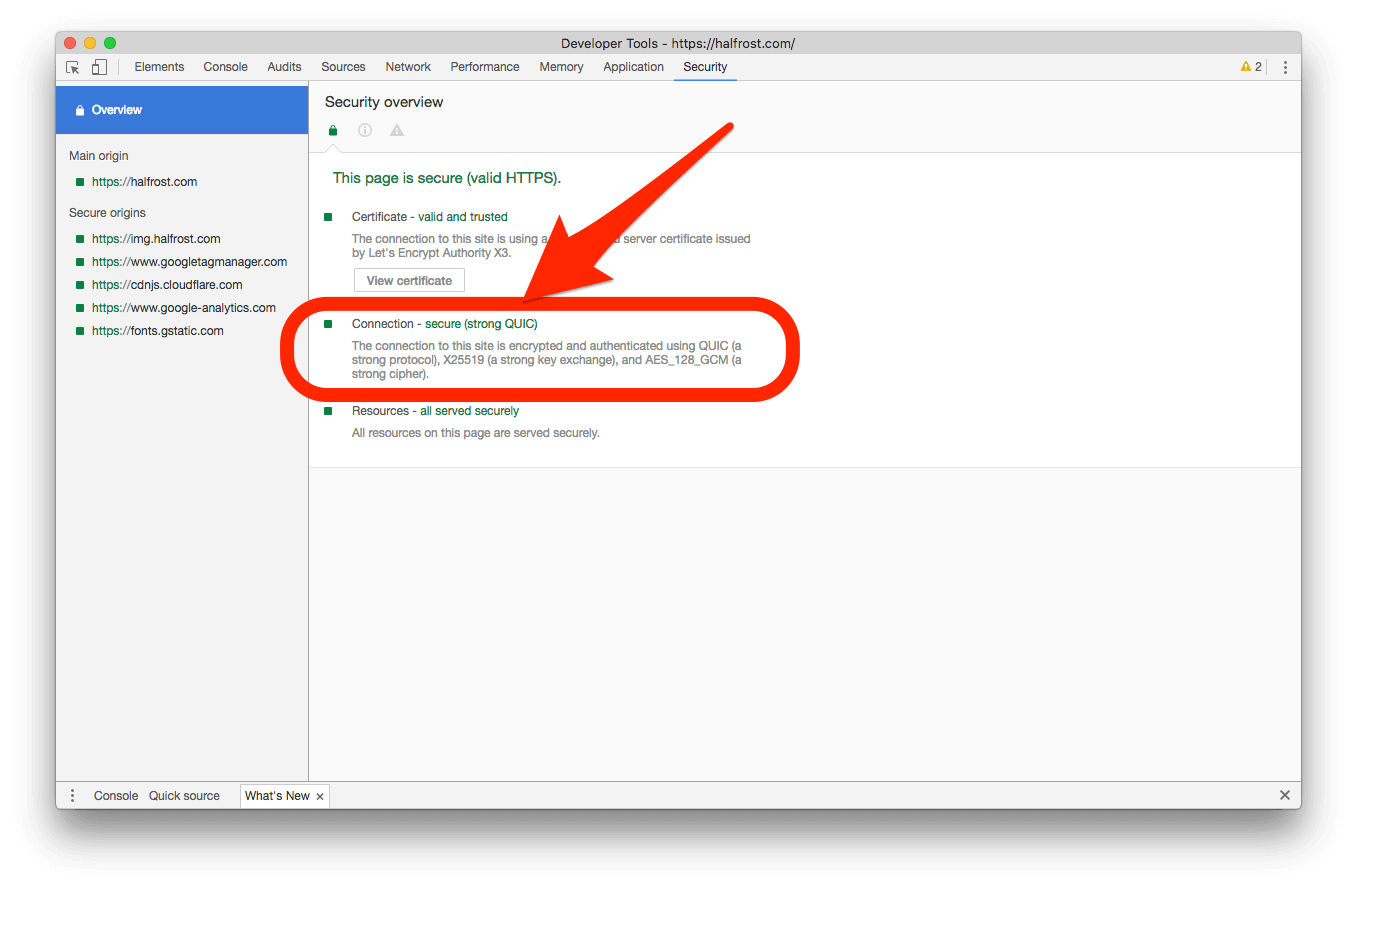
In Chrome Developer Tools, open the Security tab. Under Connection, you will see QUIC. If it shows QUIC, it means QUIC is enabled.
5. chrome net-internals
Open chrome://net-internals/#quic.
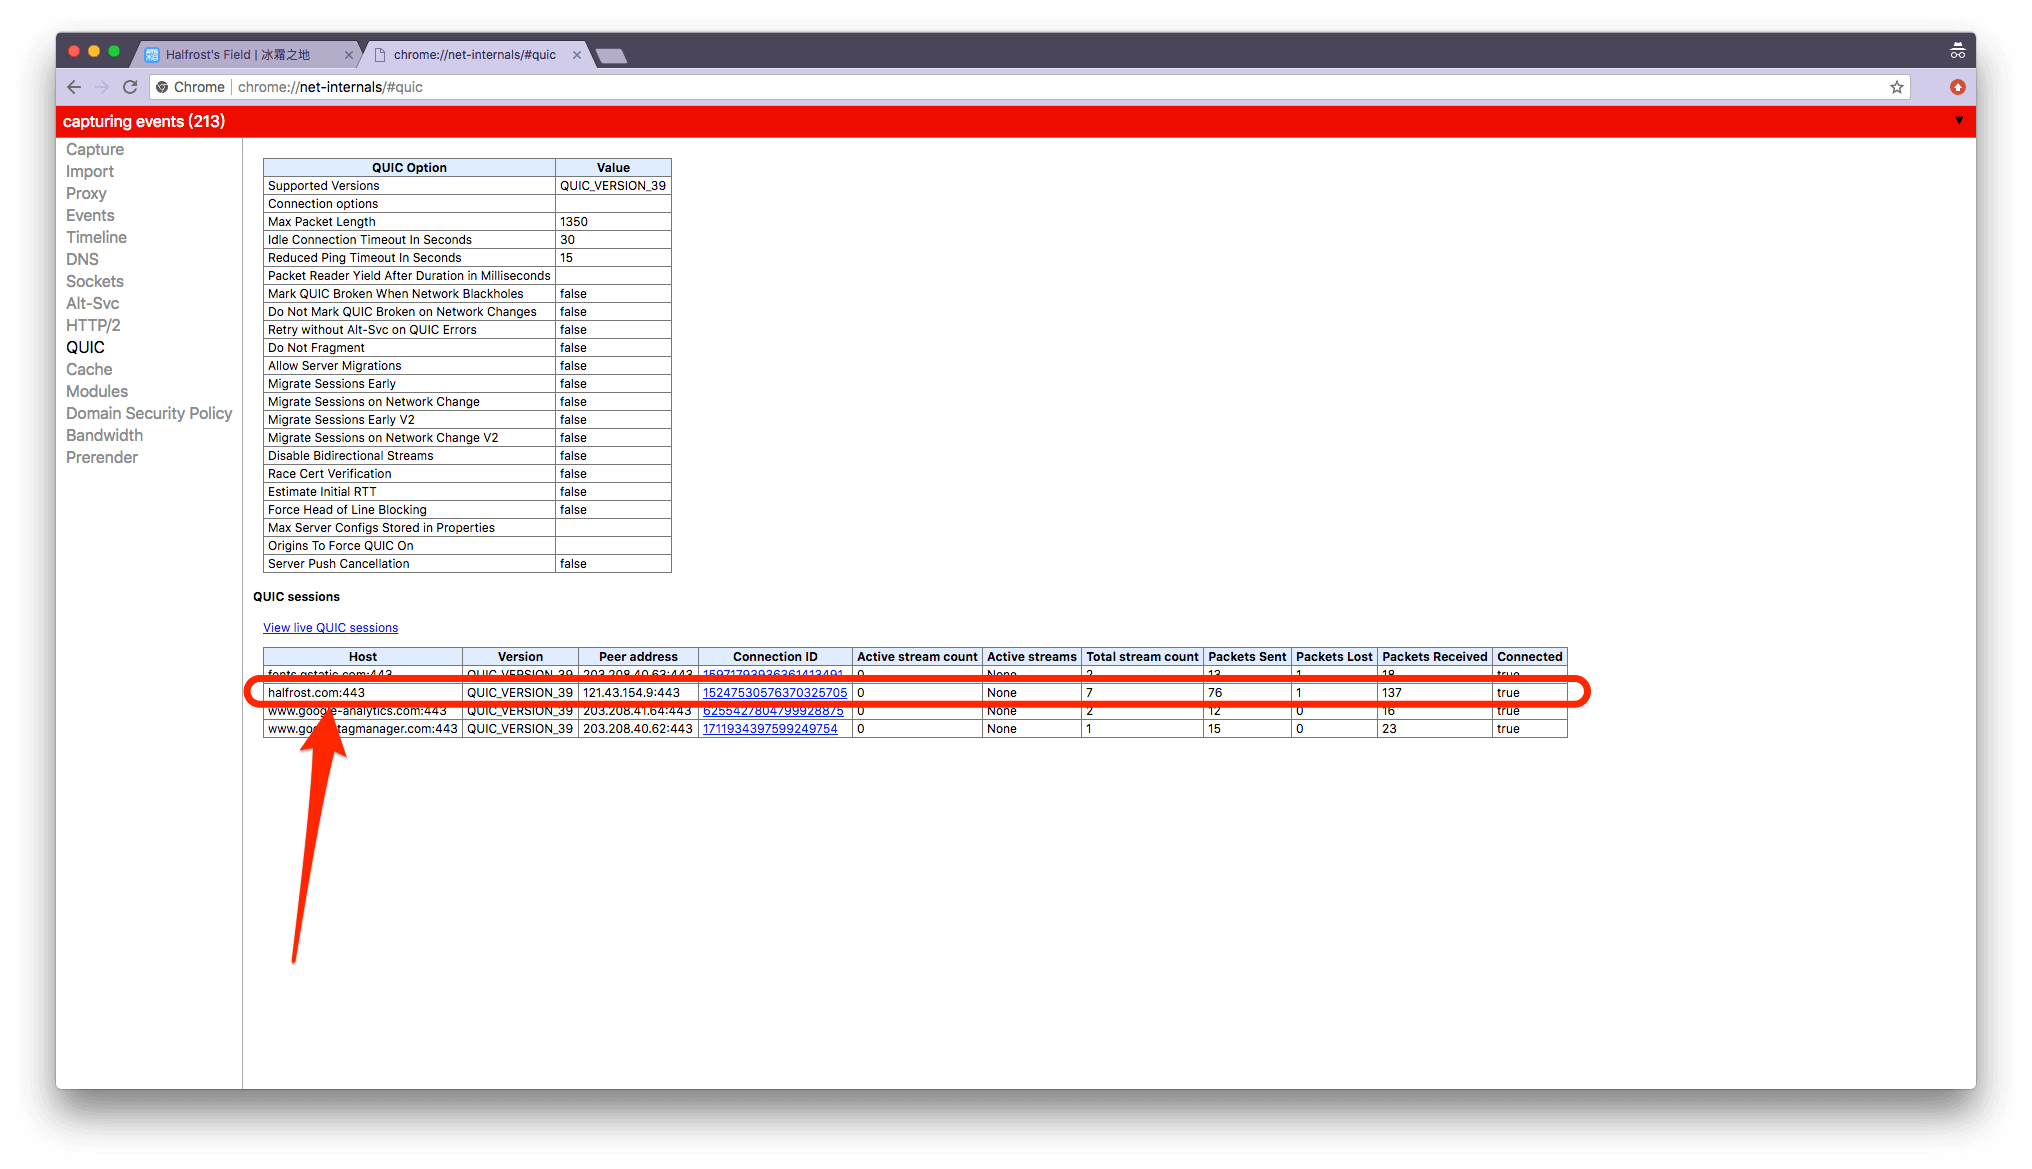
If you see QUIC sessions, it has been enabled successfully.
The Alt-svc section on the left records all response headers that support QUIC.
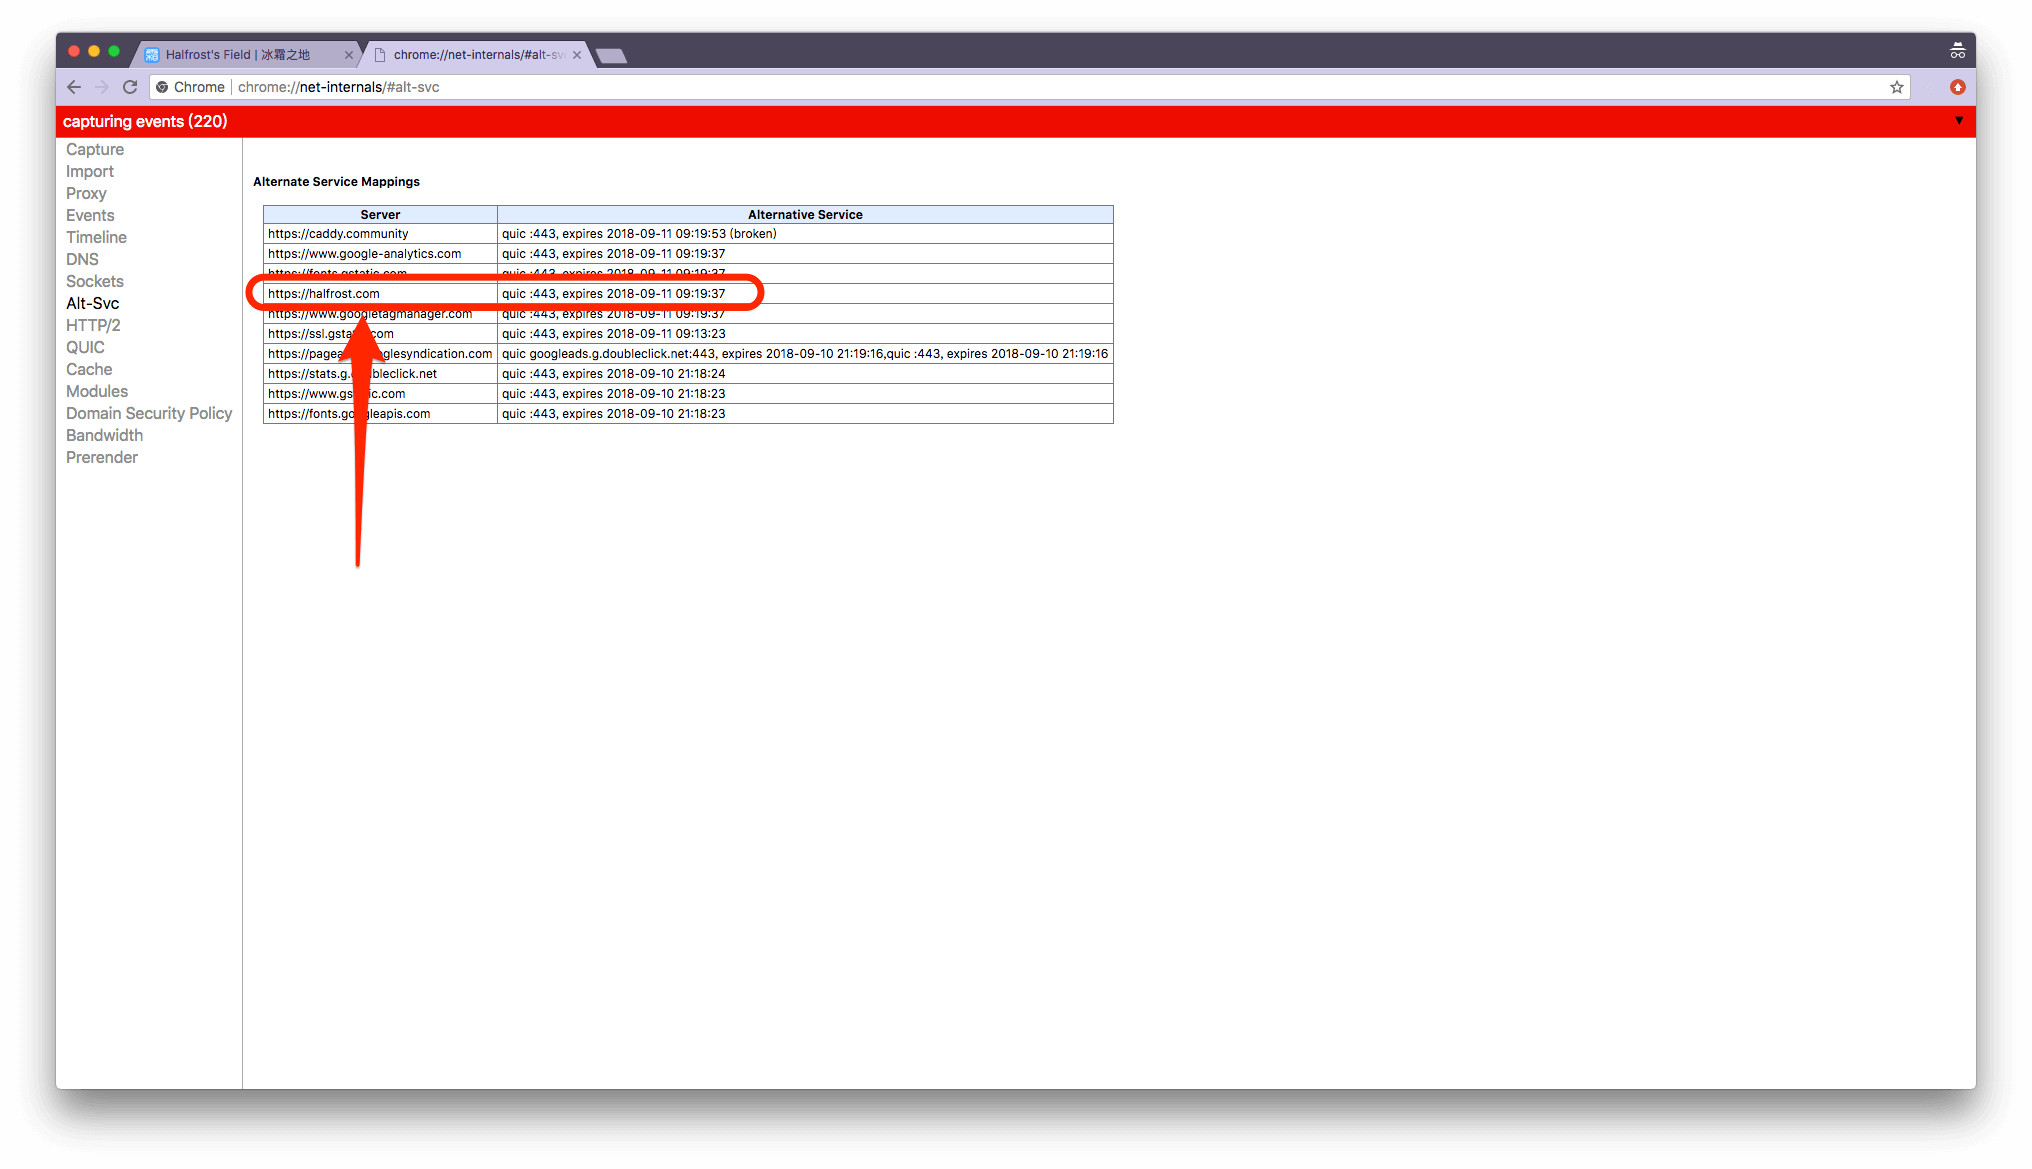
The dictionary above also records the next retry time. If it previously showed broken, you can clear all records on this page. To clear them, click the small triangle in the upper-right corner of this page. There is an item called “Clear cache”. After clearing it, Chrome will immediately try QUIC again on the next request.
Update:
In newer Chrome versions 68 and later, net-internals no longer has the pages shown in the screenshots above. These tools have all been moved to chrome://net-export/. When I wrote this article, Chrome was still at version 67.
On chrome://net-export/, you first need to record the requests and save them as a JSON file.
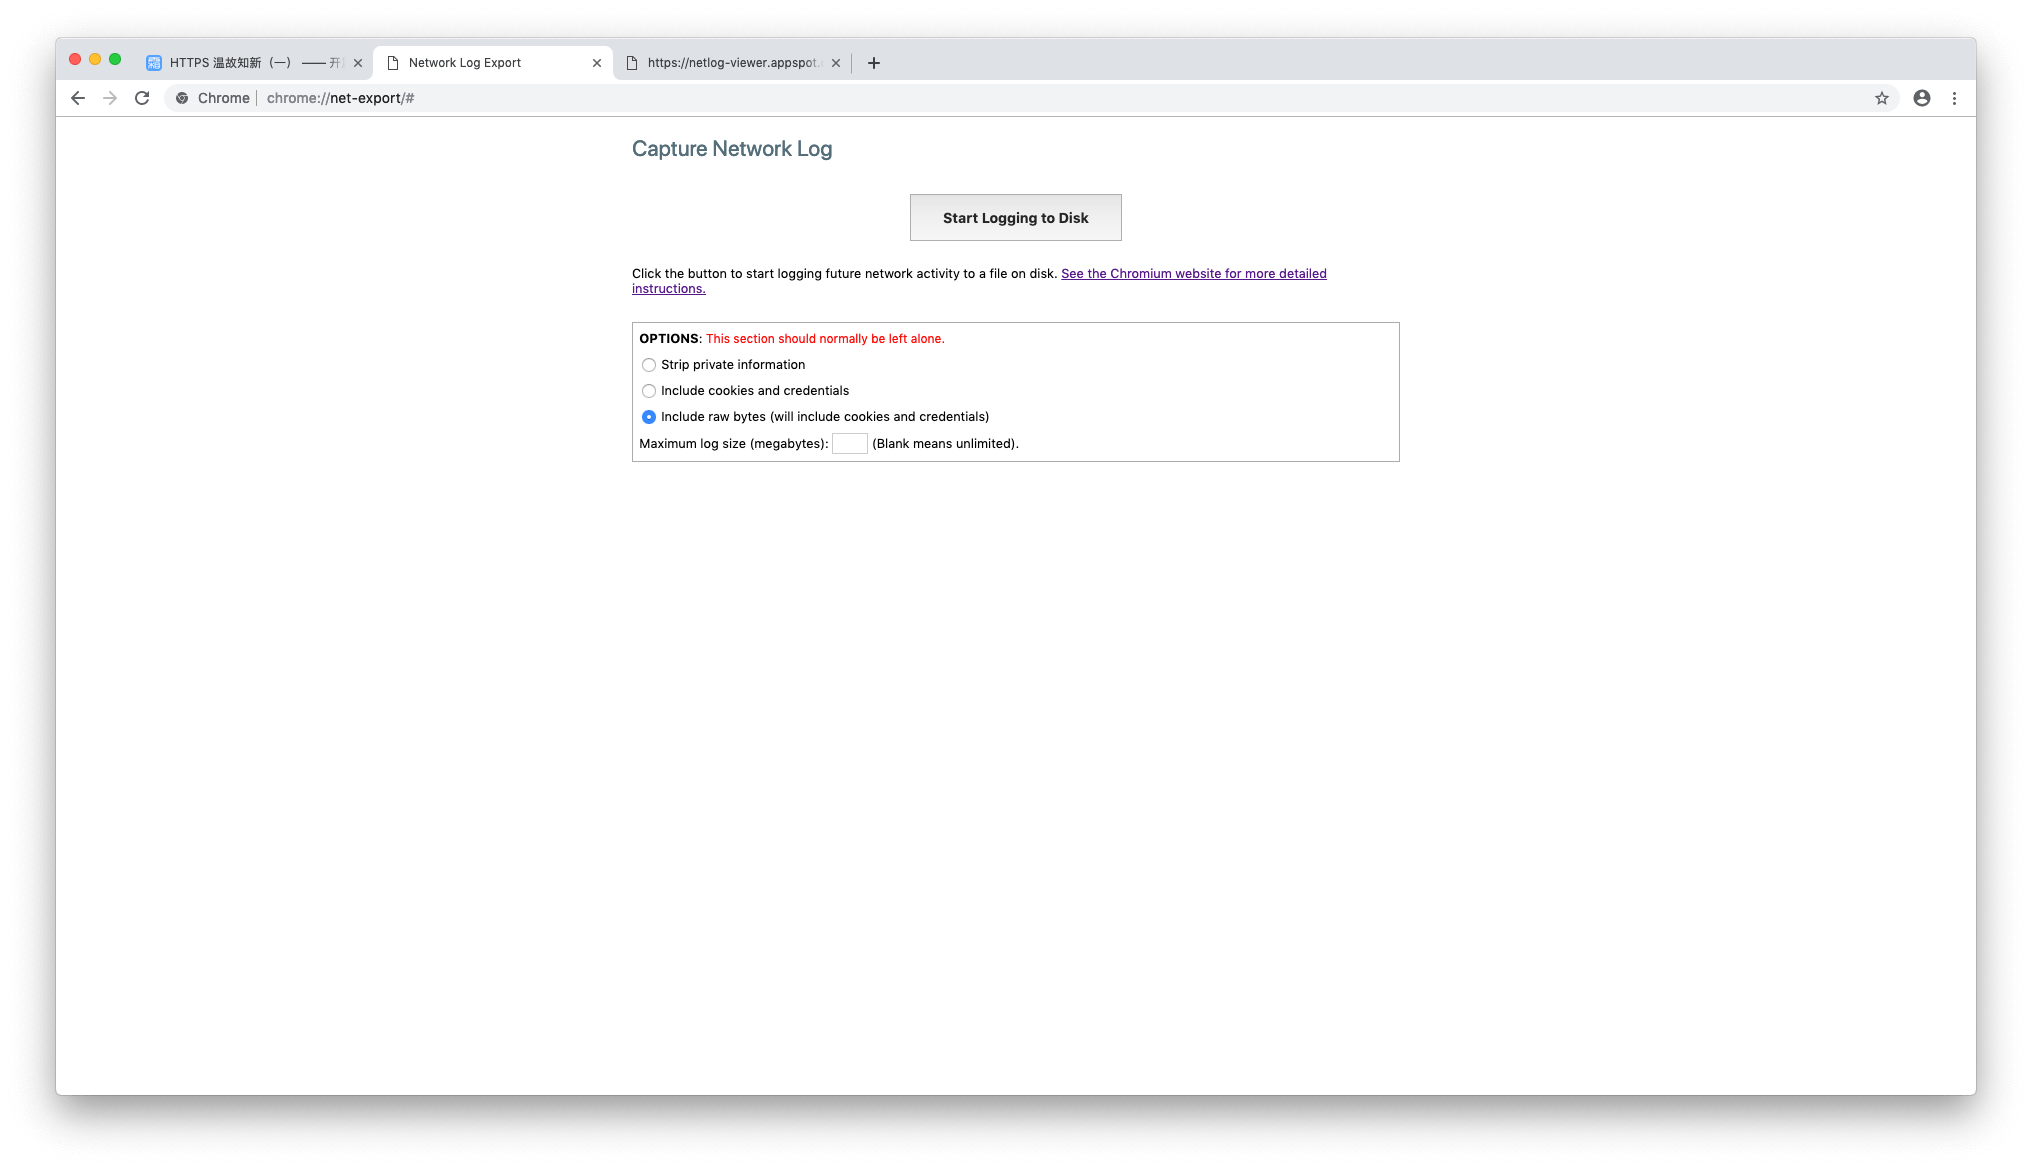
After recording is complete, the following page will appear:
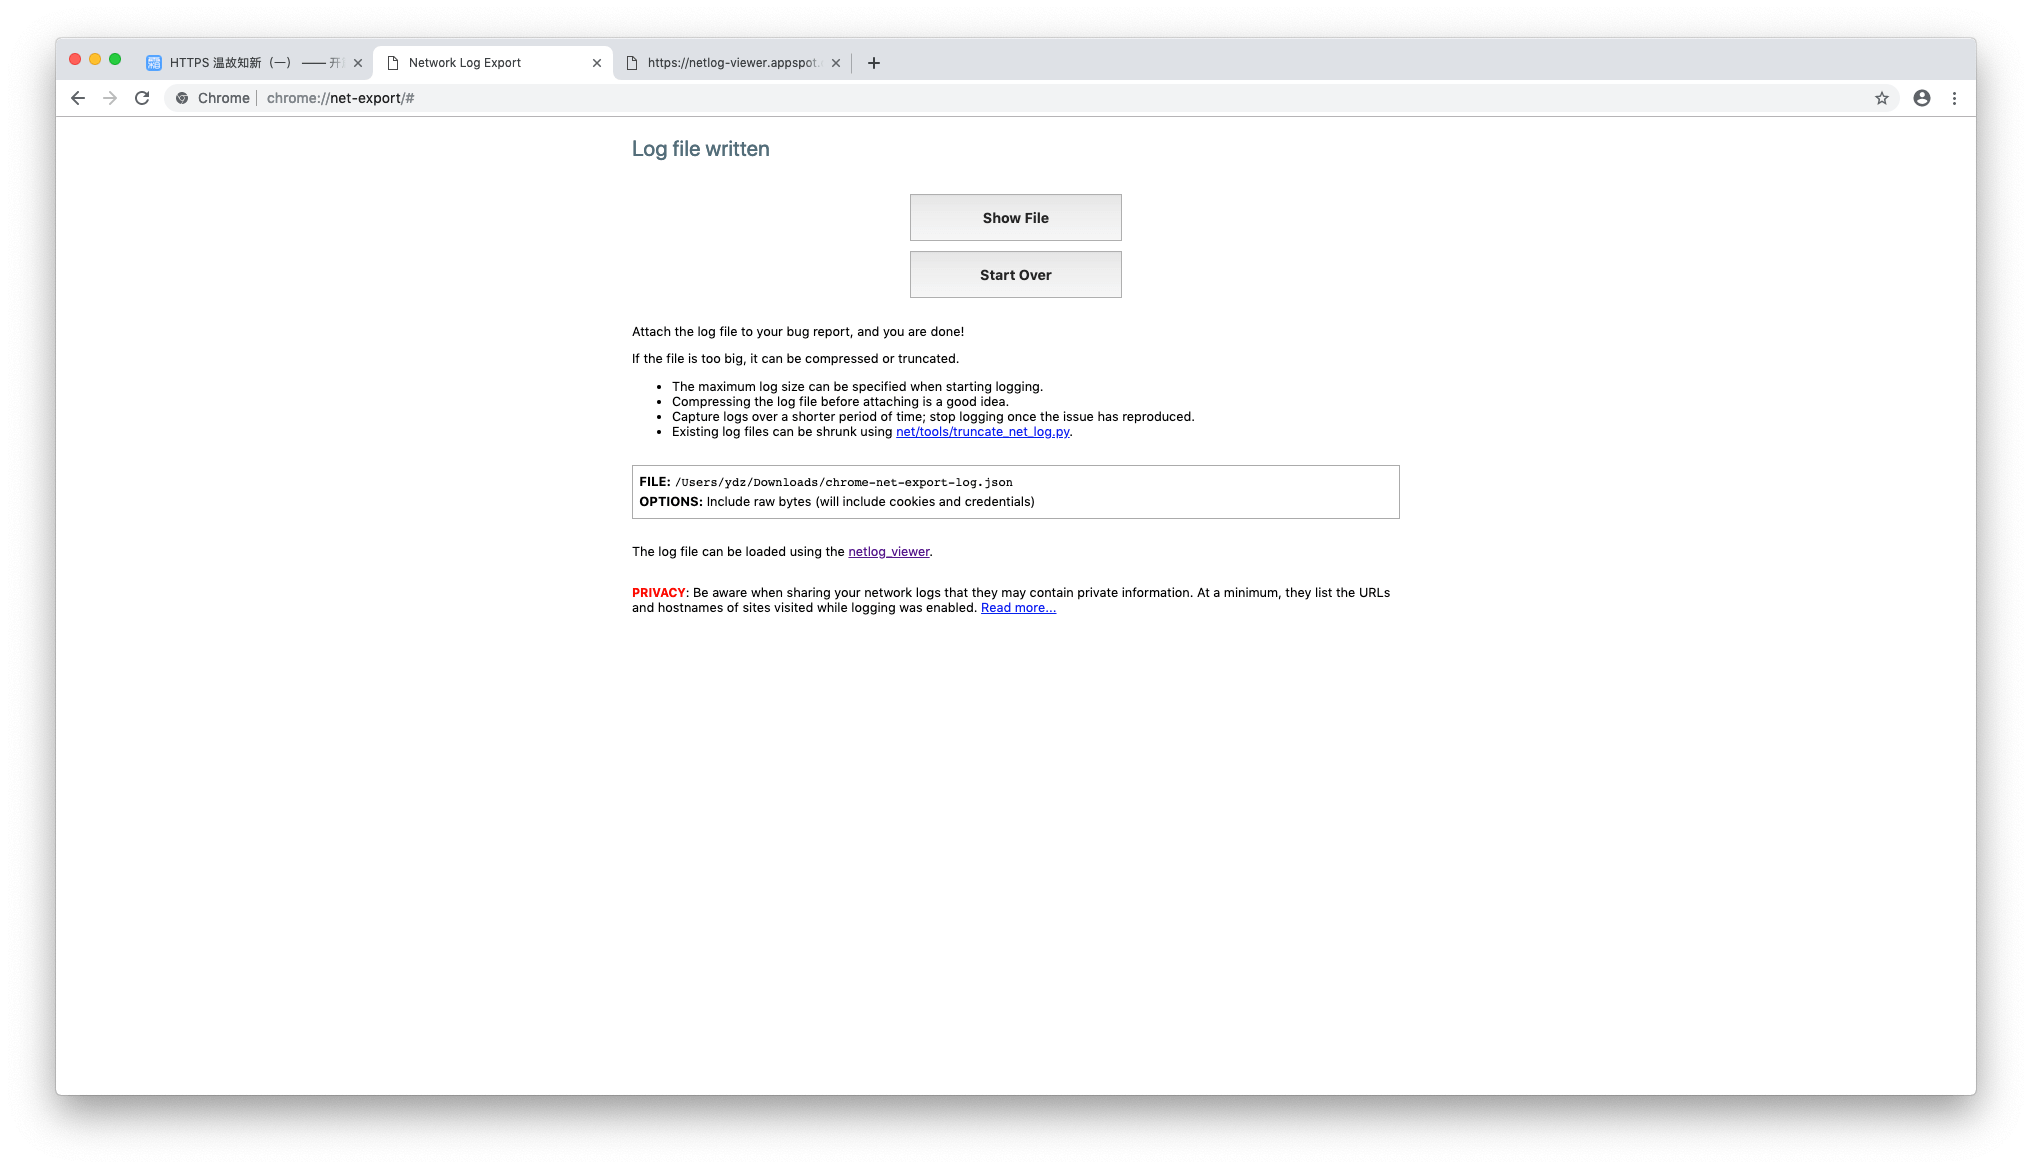
Then parse the JSON file at https://netlog-viewer.appspot.com/. After parsing, you will be able to see those tools on the left.
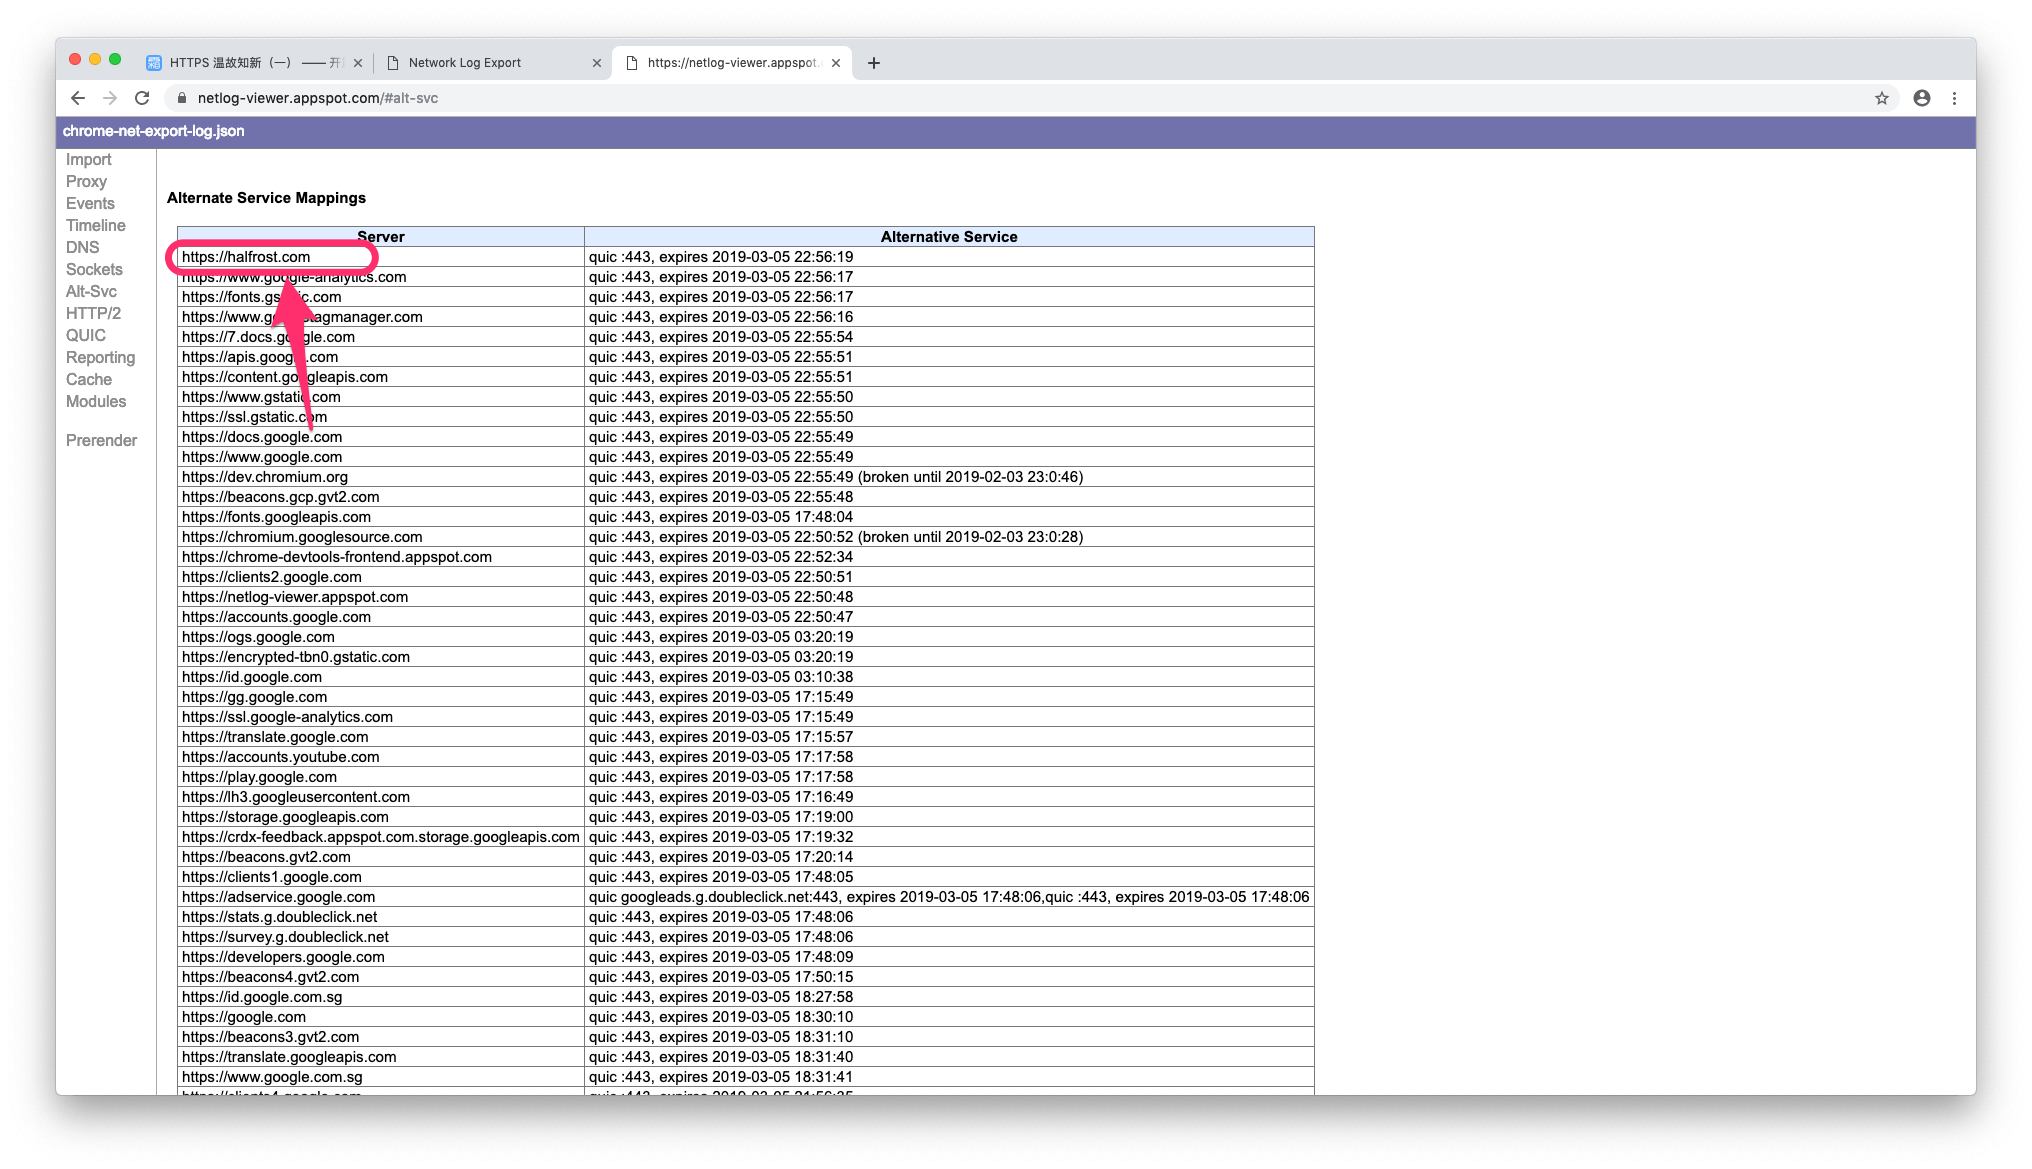
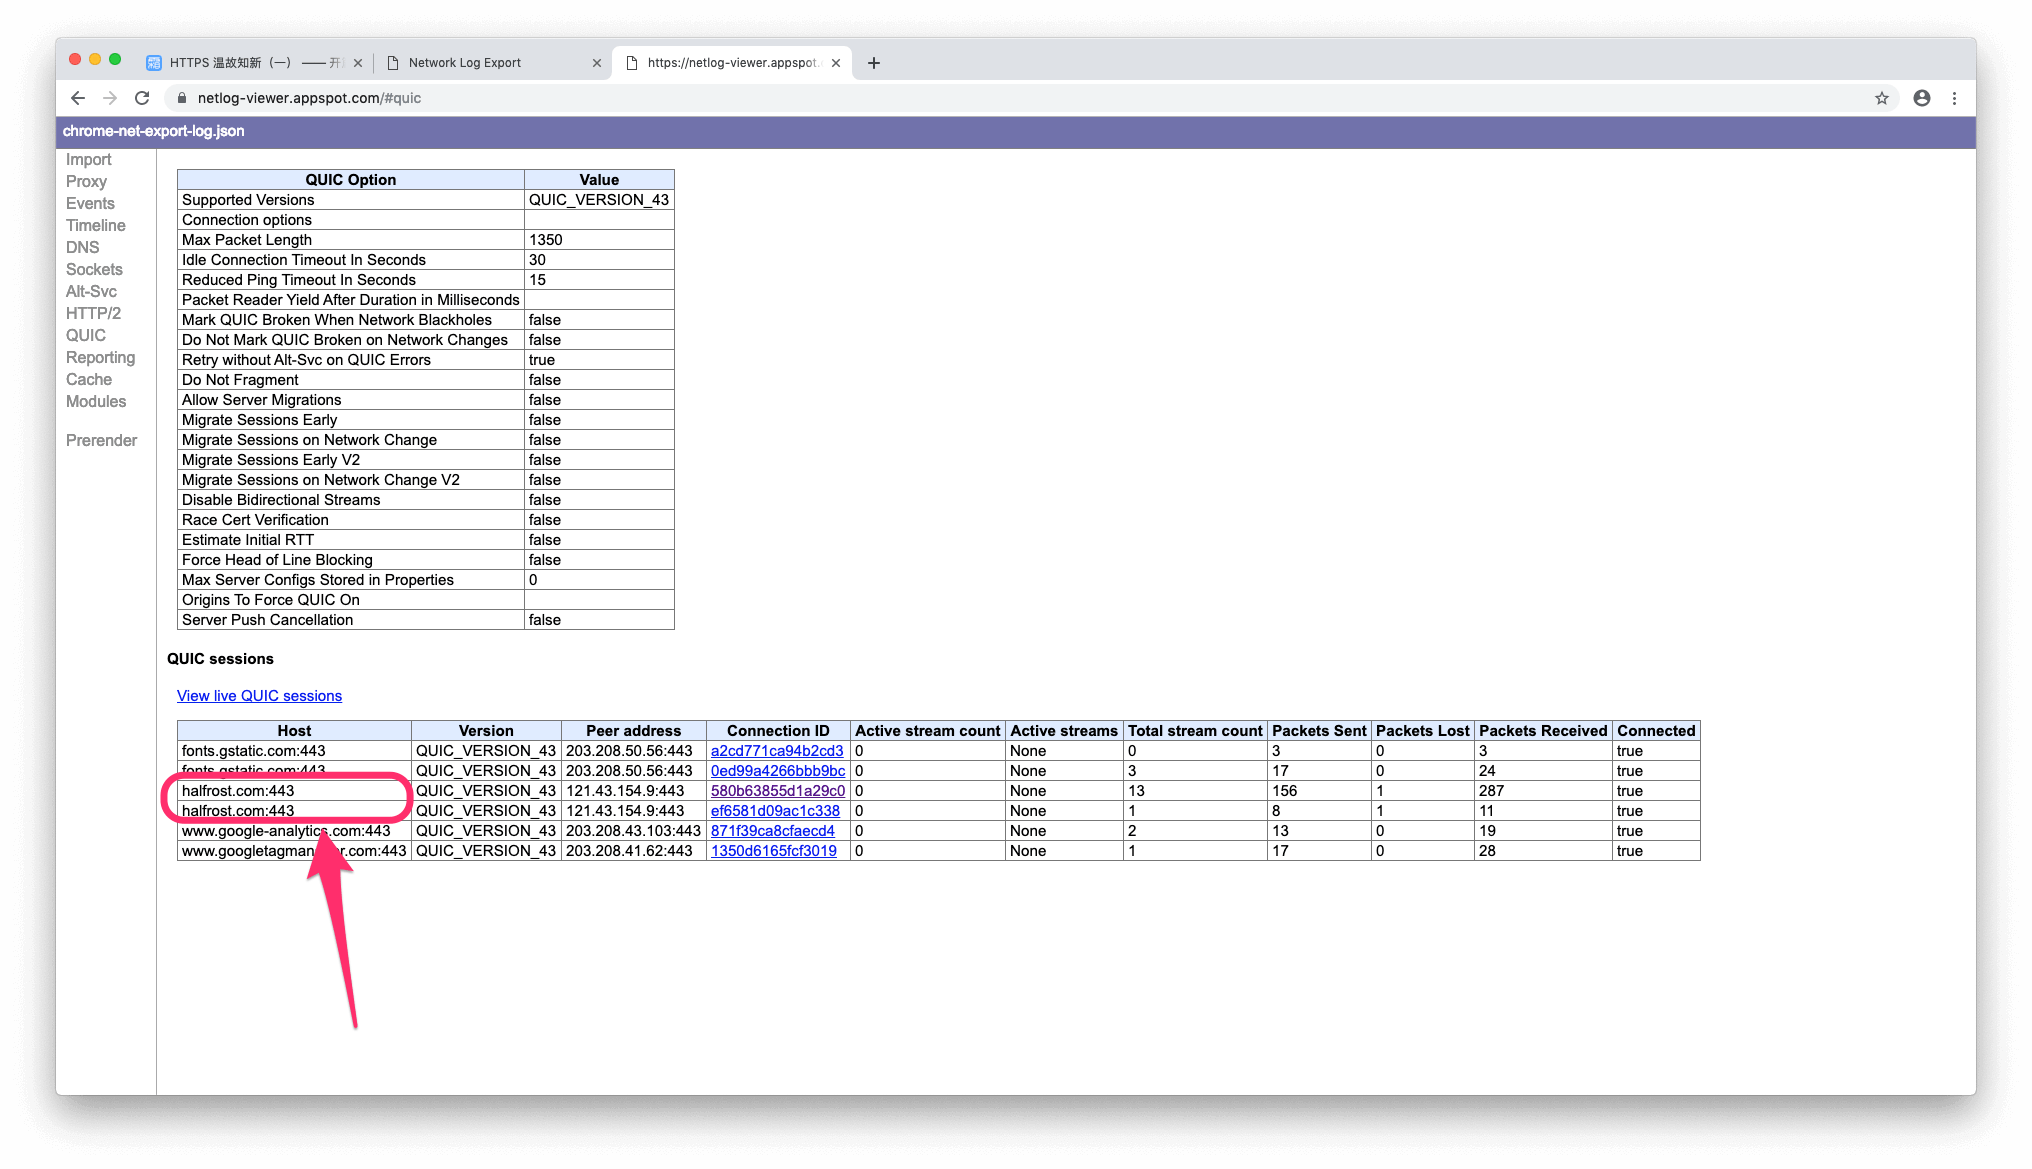
As for how to clear the Alt-svc cache, I have not yet found a way to clear it in real time. Currently I click Disable cache under Network and Clear storage under Application in DevTools. It is possible that clearing the Alt-svc cache has not been implemented yet. If I find a method later, I will come back and update this paragraph. If any readers know how to clear Alternate Service Mappings in Alt-svc, please leave a comment and share it. That said, not clearing the cache in Alt-svc does not have much impact on enabling QUIC. It just means that after it becomes broken, you need to wait an additional 5-minute expiration period. If the cache could be cleared immediately, you would not need to wait those 5 minutes.
6. Capture packets with Wireshark
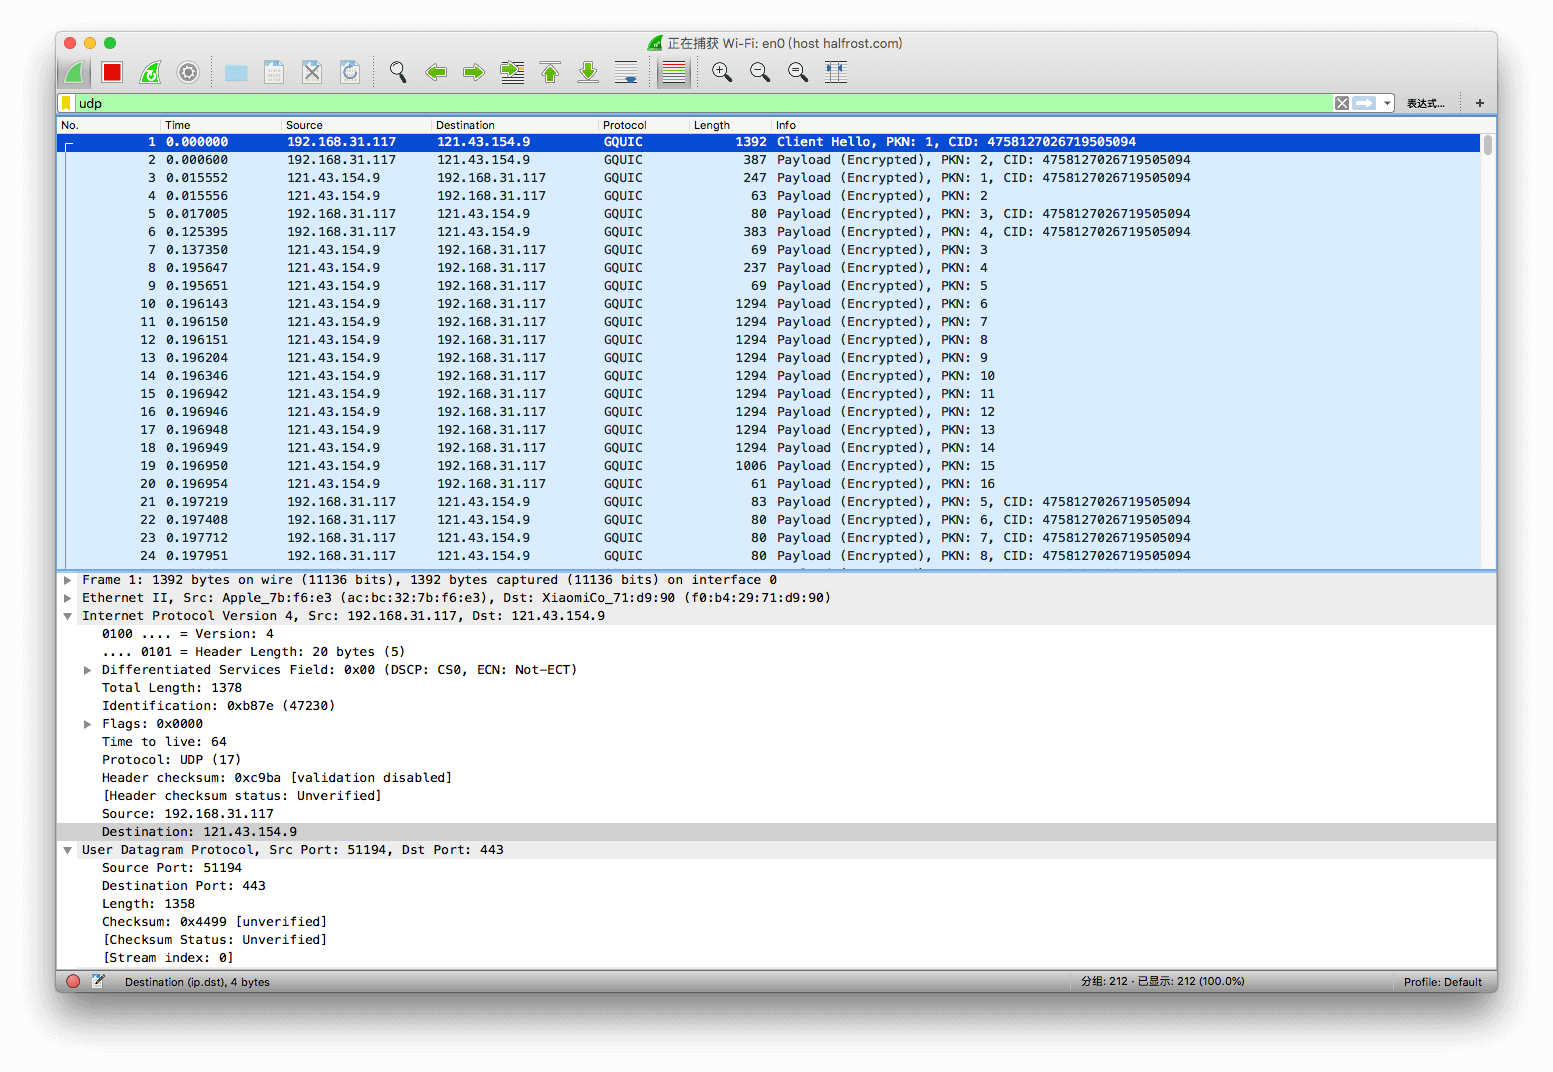
The final method is to use Wireshark to capture packets and check whether all the packets being sent are GQUIC packets. If they are, QUIC has been enabled successfully.
VII. Some Practical “Pitfalls”
At this point, readers may think this article is over. Indeed, by now QUIC has been enabled successfully and verified. So why is there still this section? My final solution was actually not the one described above, because some annoying situations occurred along the way, and in the end I did not choose the Docker-based approach. Of course, my situation is fairly special. I am sharing it here simply to record the troubleshooting process.
My browser version was the latest 68, and I had also installed Canary, version 70. After deploying QUIC, I refreshed like crazy but still could not get the little green lightning bolt ⚡️ to appear. In the end, I had no choice but to capture packets to investigate the issue. The packet capture showed that Chrome 68 ships with the quic-43 implementation by default, and the handshake fails. As a result, QUIC is not enabled.
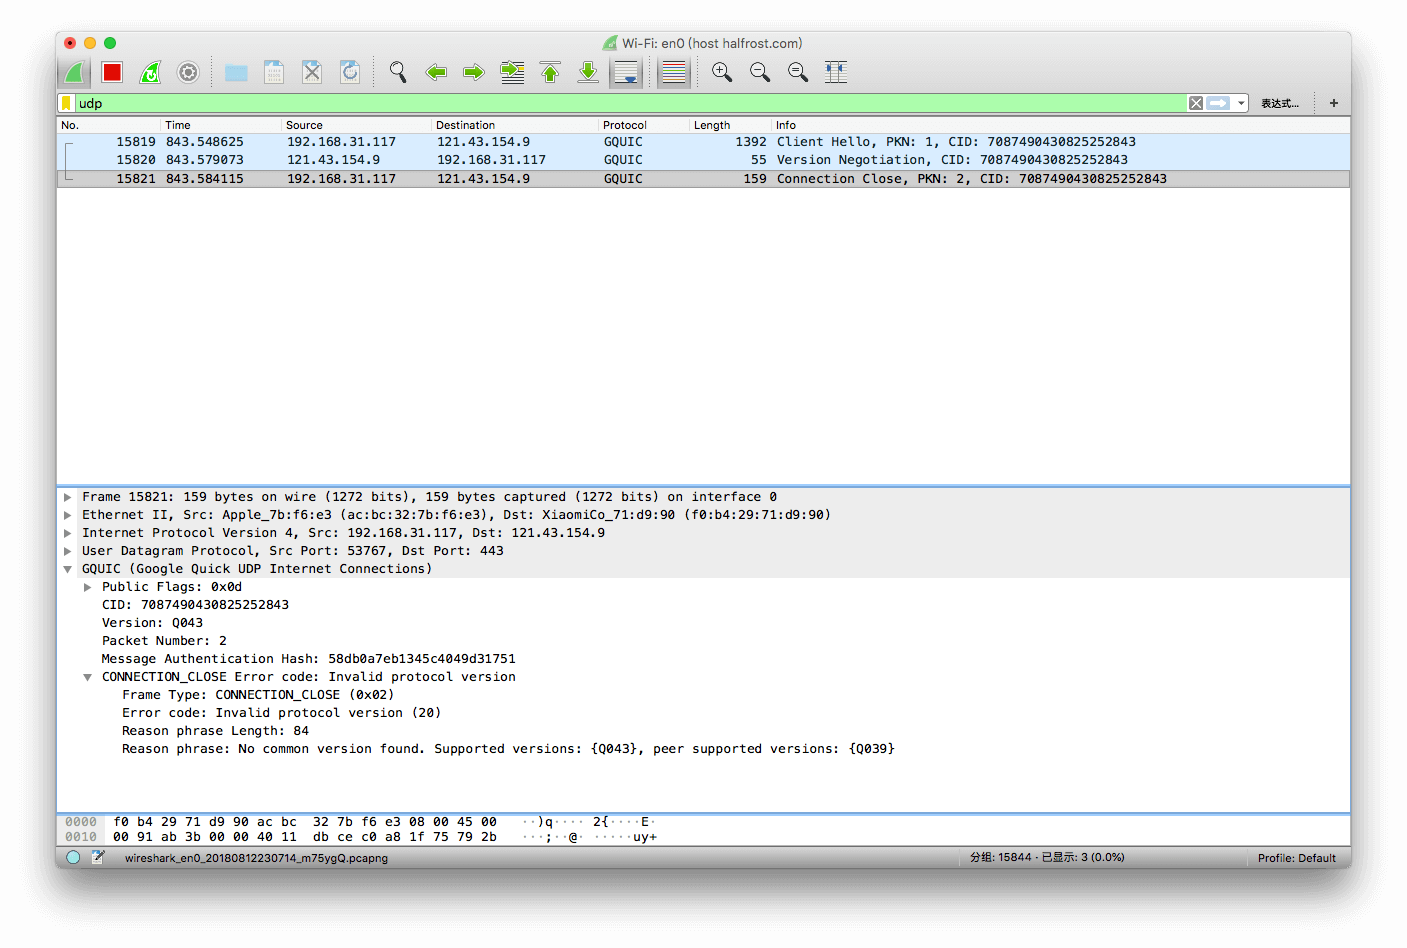
The image above shows that the handshake failed.
So, to verify that QUIC could be enabled successfully, I downloaded an older version, 65. But then another problem appeared: opening the page returned “502 Bad Gateway”. In addition, I saw broken on the chrome://net-internals/#alt-svc page.
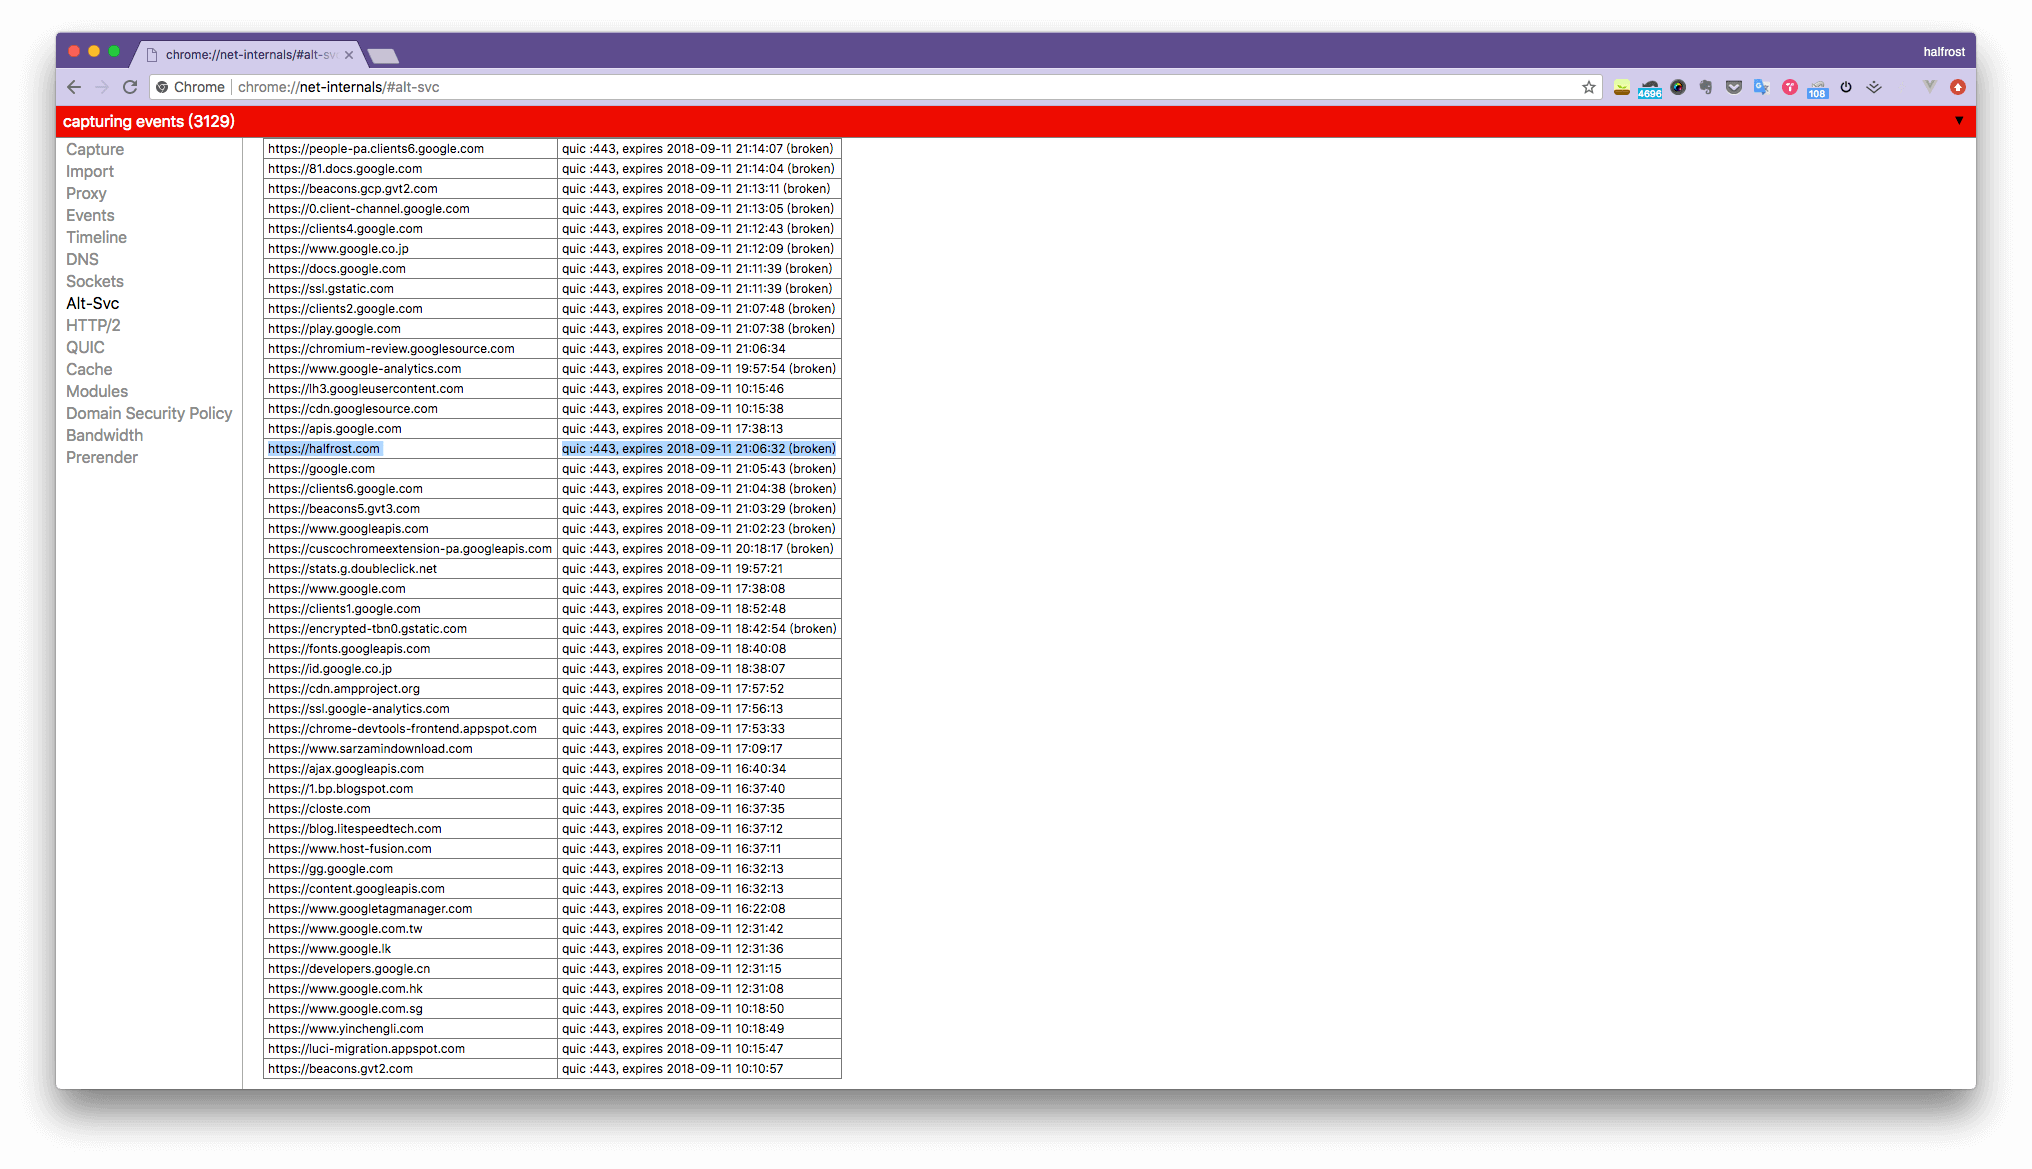
Seeing broken means that the UDP channel is not working.
There are several possible reasons why the UDP channel is not working: Alibaba Cloud or the ISP may be blocking UDP packets at some point; the server-side QUIC service may be down; or the blog port may be down.
First, verify whether the server-side Caddy has crashed. I printed the Docker logs and did not find any Caddy crash. I also checked Ghost and did not find any crash there either.
Next, check whether the UDP packets are not being sent over.
My server runs CentOS, so I used netcat to test the UDP channel.
$ yum install nc
$ nc --udp --listen 6111
Connect to the server locally:
$ nc -u <server ip> 6111
Send a string locally. If the server also displays the same string, it means there is no firewall in between. After verification, the entire UDP path is reachable.
Note here: if the other side does not receive the packet, it does not necessarily mean the UDP path is unreachable. If the peer has a firewall enabled and the firewall DROPs the packet, no ICMP “port unreachable” message will be received. In that case, using the
nccommand may make an actually unreachable port appear reachable. Think carefully about how UDP works and this becomes clear: unlike TCP, UDP does not require an ACK. So if no “port unreachable” message is received after some time, UDP considers the port reachable, but in reality the UDP data may have been DROPPED by the firewall.
At this point, I was a bit confused. After calming down, I took another careful look at the caddy logs:
11/Aug/2018:13:12:24 +0000 [ERROR 502 /] dial tcp 127.0.0.1:2368: connect: connection refused
11/Aug/2018:13:12:24 +0000 [ERROR 502 /] dial tcp 127.0.0.1:2368: connect: connection refused
11/Aug/2018:13:12:24 +0000 [ERROR 502 /] dial tcp 127.0.0.1:2368: connect: connection refused
11/Aug/2018:13:12:24 +0000 [ERROR 502 /] dial tcp 127.0.0.1:2368: connect: connection refused
11/Aug/2018:13:12:24 +0000 [ERROR 502 /] dial tcp 127.0.0.1:2368: connect: connection refused
11/Aug/2018:13:12:25 +0000 [ERROR 502 /] dial tcp 127.0.0.1:2368: connect: connection refused
11/Aug/2018:13:12:26 +0000 [ERROR 502 /serviceworker-v1.js] dial tcp 127.0.0.1:2368: connect: connection refused
11/Aug/2018:13:12:26 +0000 [ERROR 502 /] dial tcp 127.0.0.1:2368: connect: connection refused
11/Aug/2018:13:12:27 +0000 [ERROR 502 /serviceworker-v1.js] dial tcp 127.0.0.1:2368: connect: connection refused
11/Aug/2018:13:14:12 +0000 [ERROR 502 /serviceworker-v1.js.map] dial tcp 127.0.0.1:2368: connect: connection refused
11/Aug/2018:13:14:12 +0000 [ERROR 502 /assets/dist/sw-toolbox.js.map] dial tcp 127.0.0.1:2368: connect: connection refused
11/Aug/2018:13:14:14 +0000 [ERROR 502 /] dial tcp 127.0.0.1:2368: connect: connection refused
11/Aug/2018:13:14:16 +0000 [ERROR 502 /] dial tcp 127.0.0.1:2368: connect: connection refused
11/Aug/2018:13:14:17 +0000 [ERROR 502 /] dial tcp 127.0.0.1:2368: connect: connection refused
11/Aug/2018:13:14:27 +0000 [ERROR 502 /] dial tcp 127.0.0.1:2368: connect: connection refused
11/Aug/2018:13:14:29 +0000 [ERROR 502 /rss/] dial tcp 127.0.0.1:2368: connect: connection refused
11/Aug/2018:13:14:30 +0000 [ERROR 502 /] dial tcp 127.0.0.1:2368: connect: connection refused
11/Aug/2018:13:14:31 +0000 [ERROR 502 /] dial tcp 127.0.0.1:2368: connect: connection refused
The logs don’t show the specific error either. It keeps reporting 502, connection refused.
Log in to the server and simulate the request:
$ curl -X GET 127.0.0.1:2368
It returned the blog homepage index.html, which means Ghost’s Node service hadn’t gone down either—everything was normal. So what exactly was causing the 502 error?
We forward the host’s UDP/443 port to port 443 inside Docker, and then reverse-proxy requests to 127.0.0.1:2368. The remaining thing to verify is whether proxying succeeds from inside Docker.
$ sudo docker exec -it 775c7c9ee1e1 /bin/bash

Entered the Docker container.

/# curl -X GET http://127.0.0.1:2368

curl: (7) Failed to connect to 127.0.0.1 port 2368: Connection refused
An error occurs here. From this point, we can identify the root cause. The reason Caddy reports a 502 error is that, from inside Docker, Caddy cannot access the host machine’s 127.0.0.1:2368 port.
Verify it again from inside Docker: the contents of the /etc/hosts/ file.
127.0.0.1	localhost
::1	localhost ip6-localhost ip6-loopback
fe00::0	ip6-localnet
ff00::0	ip6-mcastprefix
ff02::1	ip6-allnodes
ff02::2	ip6-allrouters
192.168.0.4	366d4b392ed0
You can see that there is also a 127.0.0.1 inside Docker, so the 127.0.0.1 configured for the proxy earlier was not forwarded to the host machine; instead, it was intercepted locally by the hosts file here. So how can we access the host machine from inside Docker? What is the host machine’s IP?
Continue executing inside Docker:
/# apt-get install iproute2
/# apt-get install net-tools
/# netstat -nr | grep '^0\.0\.0\.0' | awk '{print $2}'

192.168.0.1
Outputting 192.168.0.1 means that the gateway for the Docker network segment is 192.168.0.1. So can we use this IP to access services on the host machine? The answer is yes.
Does that mean we have to enter Docker and run such a command every time to check the host machine’s IP? Of course not. There are two ways to solve this IP issue.
1. The –add-host Command
$ HOST_IP=`ip -4 addr show scope global dev docker0 | grep inet | awk '{print \$2}' | cut -d / -f 1`

$ docker run --add-host outside:$HOST_IP --name busybox -it busybox /bin/sh

/ # cat /etc/hosts
127.0.0.1    localhost
::1    localhost ip6-localhost ip6-loopback
fe00::0    ip6-localnet
ff00::0    ip6-mcastprefix
ff02::1    ip6-allnodes
ff02::2    ip6-allrouters
172.17.0.1    outside <---- THIS ONE!
172.17.0.3    a8300156a695
2. Modify the dockerfile
Add a line at the end of the dockerfile:
RUN ip -4 route list match 0/0 | awk '{print $3 "host.docker.internal"}' >> /etc/hosts
Docker generally creates three types of networks:
$ docker network ls

NETWORK ID          NAME                DRIVER              SCOPE
a6211ef82668        bridge              bridge              local
bb6cb9901ca2        host                host                local
c25d8f9f4ae3        none                null                local
It uses bridge mode by default, so the host can be reached via the gateway of Docker’s subnet.
$ docker network inspect bridge

[
    {
        "Name": "bridge",
        "Id": "a6211ef82668f63c117d63fdc666a79dea8f3868bdc80434b9f00a05c9ae9d9b",
        "Created": "2018-07-26T22:24:42.881531018+08:00",
        "Scope": "local",
        "Driver": "bridge",
        "EnableIPv6": false,
        "IPAM": {
            "Driver": "default",
            "Options": null,
            "Config": [
                {
                    "Subnet": "192.168.0.0/20",
                    "Gateway": "192.168.0.1"
                }
            ]
        },
        "Internal": false,
        "Attachable": false,
        "Ingress": false,
        "Containers": {
            "0592382ce0319a58be1eaa07a612ee75092b192337871632b9b2af9baa8f2233": {
                "Name": "serene_brahmagupta",
                "EndpointID": "97349fed924efb4d49173943e0daff0459f0d8df373c639710c81f9efa0f7965",
                "MacAddress": "02:42:c0:a8:00:02",
                "IPv4Address": "192.168.0.2/20",
                "IPv6Address": ""
            },
            "366d4b392ed071186c6442228442a929b20656242b75021beab6eaa7afbc352b": {
                "Name": "halfrost-blog",
                "EndpointID": "13c186ae9c460a87280593c3083f644bdbcd718e993b4ba3ee5a8efc66ae82c8",
                "MacAddress": "02:42:c0:a8:00:04",
                "IPv4Address": "192.168.0.4/20",
                "IPv6Address": ""
            },
            "66b36b776c6f390dfb81f055e38e276cbab9e97fe1aa7736e50b08c04e4d9635": {
                "Name": "infallible_saha",
                "EndpointID": "18ea99dc8e5add8867d6933717b682701f01452439e699274a8b71a053c673df",
                "MacAddress": "02:42:c0:a8:00:03",
                "IPv4Address": "192.168.0.3/20",
                "IPv6Address": ""
            }
        },
        "Options": {
            "com.docker.network.bridge.default_bridge": "true",
            "com.docker.network.bridge.enable_icc": "true",
            "com.docker.network.bridge.enable_ip_masquerade": "true",
            "com.docker.network.bridge.host_binding_ipv4": "0.0.0.0",
            "com.docker.network.bridge.name": "docker0",
            "com.docker.network.driver.mtu": "1500"
        },
        "Labels": {}
    }
]
I changed the proxy to 192.168.0.1:2368, but the connection was still refused. That meant the access method was still incorrect. After checking the Ghost documentation, I found that port 2368 is not exposed externally and, by default, can only be accessed from the host machine. Therefore, the Node service on port 2368 cannot be accessed across different network segments.
At this point in the investigation, there were two options. Option one was to change Ghost’s service port to 0.0.0.0:2368, but doing so would require changing many settings inside Ghost. Option two was to put the Caddy Docker container and the host machine on the same network segment.
I chose the second approach.
You can put Docker and the host machine on the same network segment by specifying --network=host at startup. This puts Docker and the host on the same network segment. However, this introduces a new problem: the previous port mapping no longer applies. In this mode, Caddy also listens on the host machine’s TCP/443 port, which defeats the purpose of using Docker to avoid having multiple processes listen on the same port.
At this point, I ultimately decided to abandon the Docker-based approach. The only remaining option was to modify Caddy’s source code.
Download the Caddy source code. In the Listen function in caddy/caddyhttp/httpserver/server.go, comment out one of the lines and replace it with:
// ln, err := net.Listen("tcp", s.Server.Addr)
ln, err := net.Listen("tcp", "127.0.0.1:61234")
// Just use any large unused port
Just replace the original 443 address with an unused address, then recompile.
$ cd $GOPATH/src/github.com/mholt/caddy/caddy
$ go run build.go --goos=linux --goarch=amd64
After the build completes successfully, you can start Caddy normally even while nginx is already running. To have Caddy run in the background as a daemon process, you can use the nohup command:
$ nohup sudo ./caddy -quic -conf ./conf >/dev/null 2>&1 &
At this point, the author’s QUIC deployment was set up “perfectly”.
VIII. Q & A
Q: I refreshed several times. Why do I still not see the green little lightning bolt ⚡️ on your blog? A: First, check whether your Chrome version is between 62 and 65. If it is higher or lower than this range, the QUIC handshake will fail, and QUIC communication will not work. Versions 62–65 support quic-39, while the latest caddy currently supports only up to quic-39.
Second, check whether you have a global proxy/VPN tool such as Surge enabled locally. If such software is enabled, it usually configures itself as the system proxy for all requests on your machine, which means all requests appear to come from 127.0.0.1:XXXX. In that case, UDP requests will not be triggered either. So you need to disable Surge’s “Set as System Proxy” option.
Finally, you can check whether there are any broken entries on the chrome://net-internals/#alt-svc page. If there are, clear them and refresh immediately to try again.
Q: Why does caddy not support the latest QUIC protocol? A: You can look at its issue for this. From January to April this year, the author released a new version every month and continuously followed QUIC protocol updates. After May, however, no new versions were released. The author said that the way two imported libraries are integrated needed to be refactored first; otherwise, future development would become increasingly messy. Now QUIC has reached quic-44, but caddy still has not caught up. We can only keep waiting.
Q: How do you debug QUIC? A: Good question. The author also considered inspecting the contents of QUIC’s encrypted packets. However, there is currently no way to do so. With TLS, encrypted content can be inspected by saving the negotiated keys, but this does not seem possible with QUIC yet (at least the author has not found any relevant information online).
With Wireshark packet capture, you can currently only see the plaintext from the early handshake phase. Packets after the handshake are encrypted. So debugging QUIC issues still requires further research.
IX. Closing
Currently, the latest caddy only supports up to quic-39, and it also cannot support multiple versions at the same time. The latest Chrome already supports the latest quic-44, so we can only wait quietly for caddy to update.
After an update, the author’s blog now supports the three mainstream versions quic-44, quic-43, and quic-39. Everyone is welcome to try it out.
In addition, in the mobile Internet era, if clients also want to benefit from QUIC, relying solely on the Chrome browser is not enough. Google provides the cronet library, which is a wrapper around the Chromium network stack. It can be used on Android and iOS platforms and can be conveniently integrated into mobile apps. With this library, apps can communicate with servers over QUIC.
Finally, I recommend reading Sina Weibo’s talk from Qcon 2018, Some Practical Experience with QUIC.
The author will provide a more detailed analysis of the QUIC protocol in upcoming articles.
Reference:
Official QUIC Introduction
Quickly Enable the QUIC Protocol on a Web Server
reading-and-annotate-quic
How to Upgrade a Website to QUIC and Analysis of QUIC Features
How This Site Enabled and Configured QUIC Support
GitHub Repo: Halfrost-Field
Follow: halfrost · GitHub
Source: https://halfrost.com/quic_start/
