Talking About the Big Front-End Era (1) —— Componentization in Vue and iOS
Preface
The concept of the “full-spectrum front end” has been brought up again and again this year. So what exactly is the full-spectrum front-end era? The term originally came from within Alibaba, where many front-end developers wrote both front-end code and Java Velocity templates. Today, however, its scope has expanded significantly: front end + mobile, front end, CDN, Nginx, Node, Hybrid, Weex, React Native, and Native App. I am an ordinary full-time iOS developer. After getting into front-end development, I found that there are aspects of the front end that mobile development can learn from, which led to this series on the full-spectrum front-end era. I hope the two sides can learn from each other’s excellent ideas. When talking about the full-spectrum front end, commonly mentioned topics include componentization, routing and decoupling, engineering practices (bundlers, scaffolding, package managers), MVC and MVVM architectures, instrumentation, and performance monitoring. I’ll start with componentization. There are already many articles online comparing front-end frameworks (React, Vue, Angular), but there seem to be fewer cross-platform comparisons. I plan to focus on comparing the front end with mobile development (primarily iOS), look at the different approaches on both sides, and discuss whether there are ideas worth borrowing from each other.
The front-end parts of this article may seem fairly basic to front-end experts. If there are any mistakes, I sincerely welcome corrections from everyone.
Vue Part

1. The Need for Componentization
To improve code reuse and reduce repetitive development, we split related code by template, style, and script, and encapsulate it into individual components. Components can extend HTML elements and encapsulate reusable HTML code. We can think of components as custom HTML elements. In Vue, each encapsulated component can be regarded as a ViewModel.
2. How to Encapsulate Components
When discussing how to encapsulate components, we first need to talk about how to organize them.
In a simple SPA project, you can define a global component directly with Vue.component. But once the project becomes complex, this approach starts to show drawbacks:
- Global definitions force every component name to be unique
- String templates lack syntax highlighting, and when HTML spans multiple lines, you need to use the ugly \
- No CSS support means that when HTML and JavaScript are componentized, CSS is clearly left out
- No build step limits you to HTML and ES5 JavaScript, preventing the use of preprocessors such as Pug (formerly Jade) and Babel
Moreover, most company-level projects today introduce engineering-style management and use package managers such as npm or yarn. Therefore, in complex Vue projects, defining components with Vue.component is no longer suitable. This is where single-file components come in, along with build tools such as Webpack or Browserify. For example, in the Hello.vue component below, the entire file is one component.
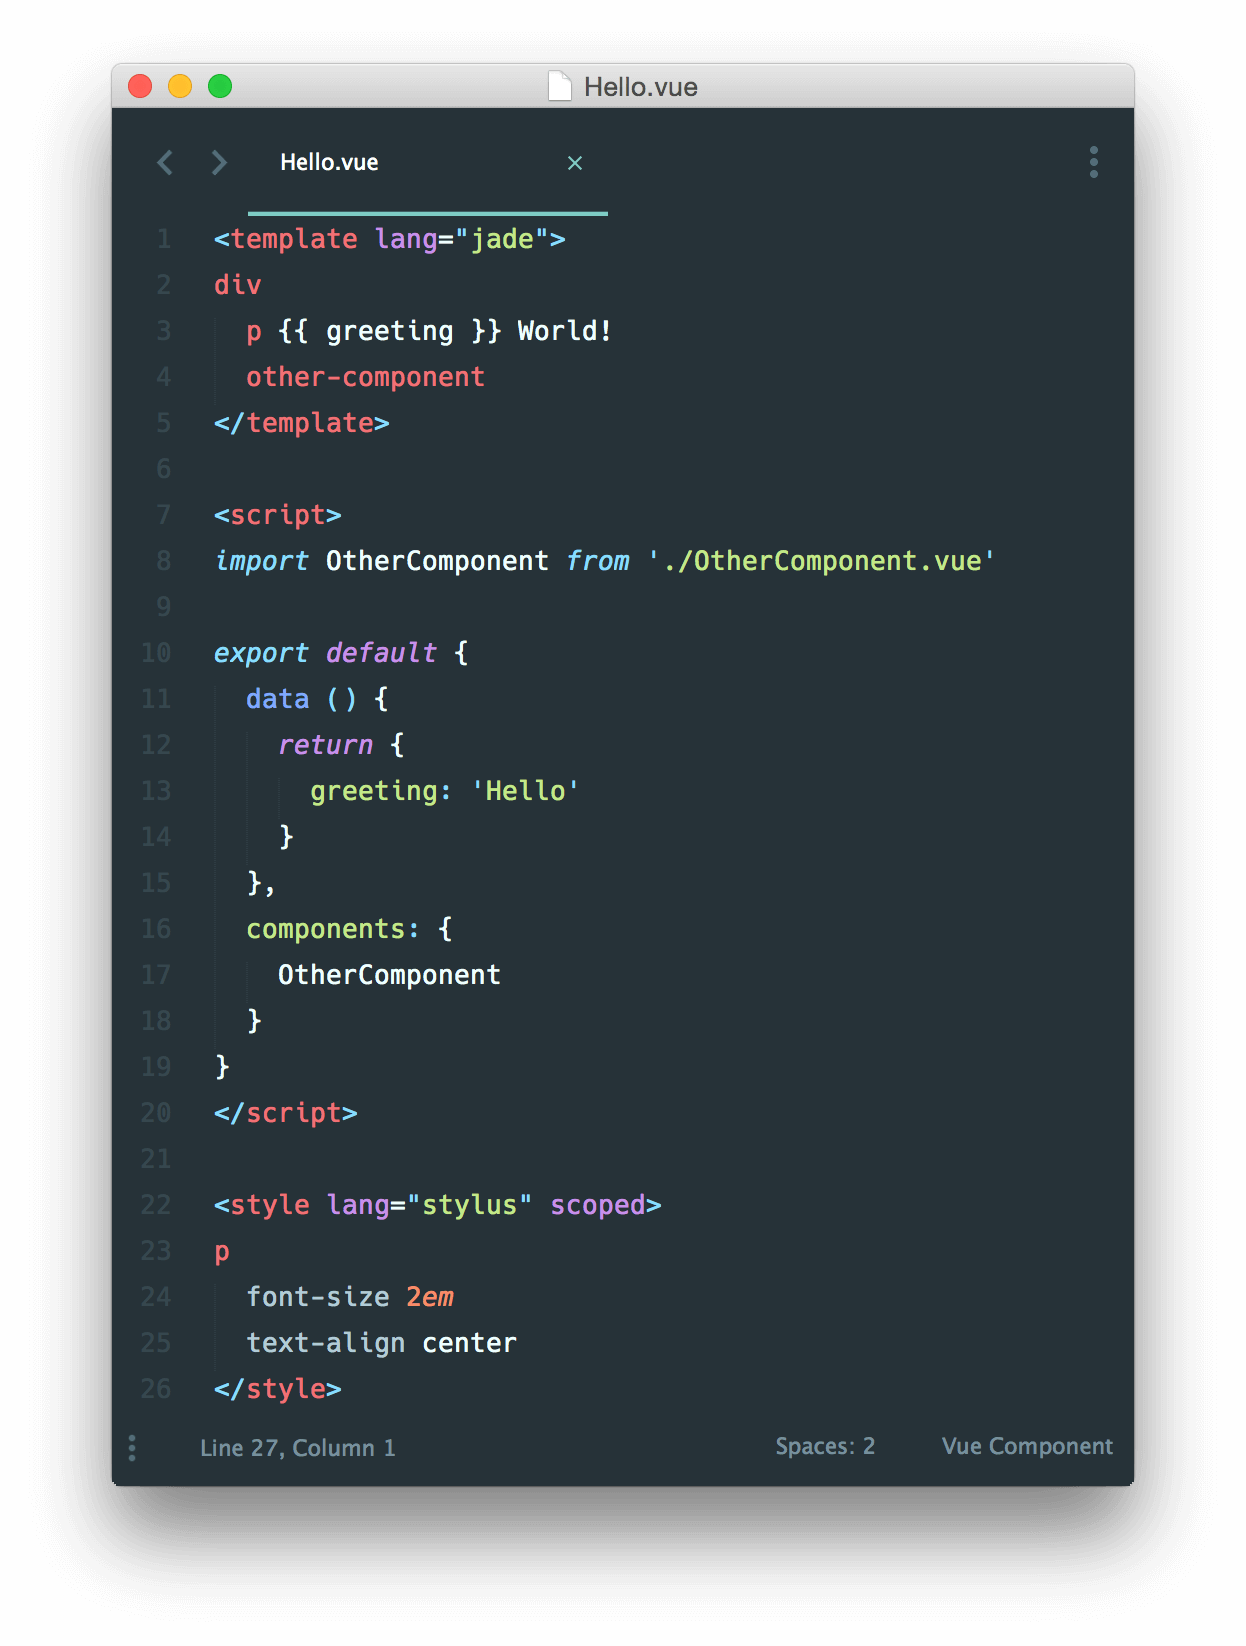
In a single-file component, the entire file is a CommonJS module, containing the component’s corresponding HTML, its internal JavaScript logic, and its CSS styles.
Inside the component’s script tag, you need to encapsulate the behavior of that component’s ViewModel.
data The component’s initial data and private properties.
props The component’s properties. These properties are specifically used to receive data passed between parent and child components. (This can be compared to @property in iOS.)
methods The component’s internal logic functions.
watch Properties that require additional observation. (This can be compared to KVO in iOS.)
computed The component’s computed properties
components The child components used by this component
lifecycle hooks Lifecycle hook functions. A component also has a lifecycle, including the following: beforeCreate, created, beforeMount, mounted, beforeUpdate, updated, activated, deactivated, beforeDestroy, destroyed, and other lifecycle hooks. In these hook functions, we can add the predefined logic we need. (This can be compared to the lifecycle of a ViewController in iOS.)

Seen this way, encapsulating a single-file component in Vue follows exactly the same thinking as encapsulating a ViewModel in iOS. Unless otherwise stated, the following discussion refers to single-file components.
3. How to Divide Components
In general, components can be divided according to the following criteria:
- Page regions: header, footer, sidebar……
- Functional modules: select, pagination……
Here is an example to illustrate how the front end divides components.
1. Page Regions
Again, take the homepage of objc China as an example.
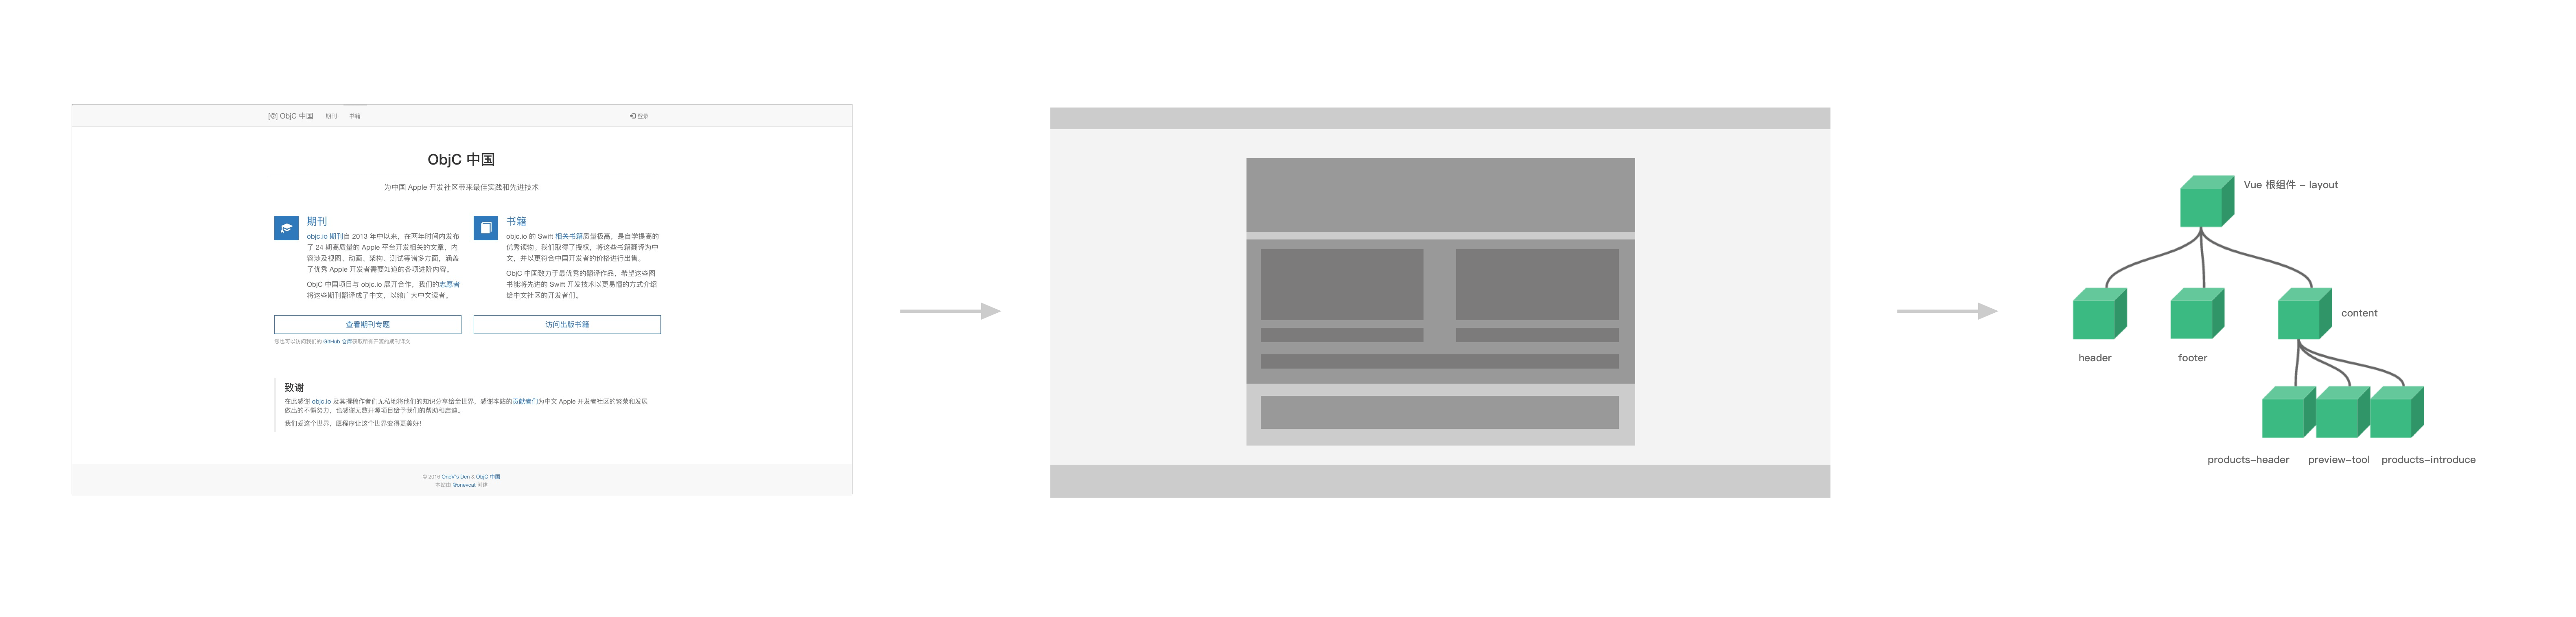
We can first abstract the layout of the page above into the form shown in the middle of the image, then divide components according to page regions, and finally obtain the component tree on the far right.
In the root component of the Vue instance, load layout.
import Vue from 'vue';
import store from './store';
import router from './router';
import Layout from './components/layout';

new Vue({
  el: '#app',
  router,
  store,
  template: '<Layout/>',
  components: {
    Layout
  }
});
Based on the abstracted component tree, we can further break down each smaller component.
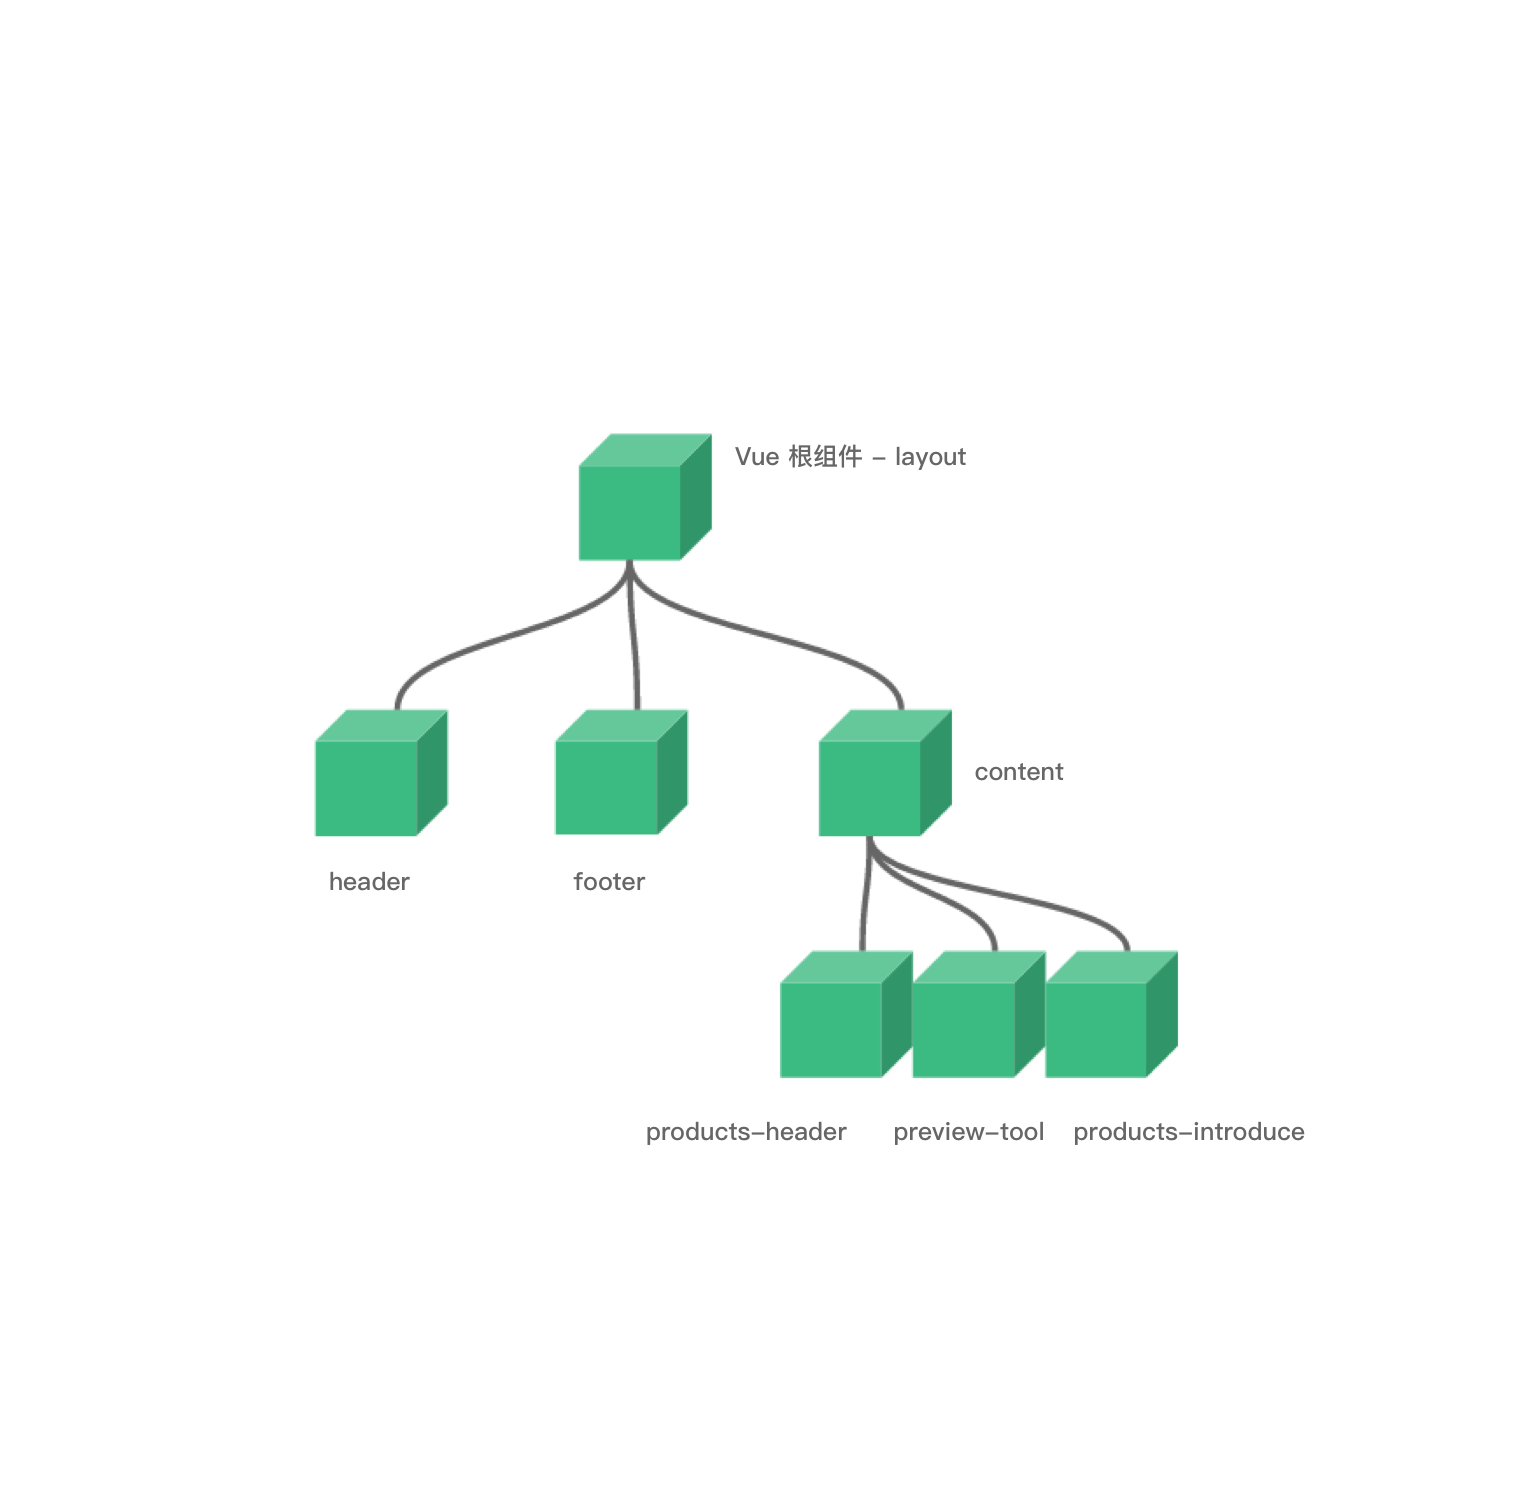
The components one level below layout are header, footer, and content; these three parts make up the entire layout.vue single-file component.
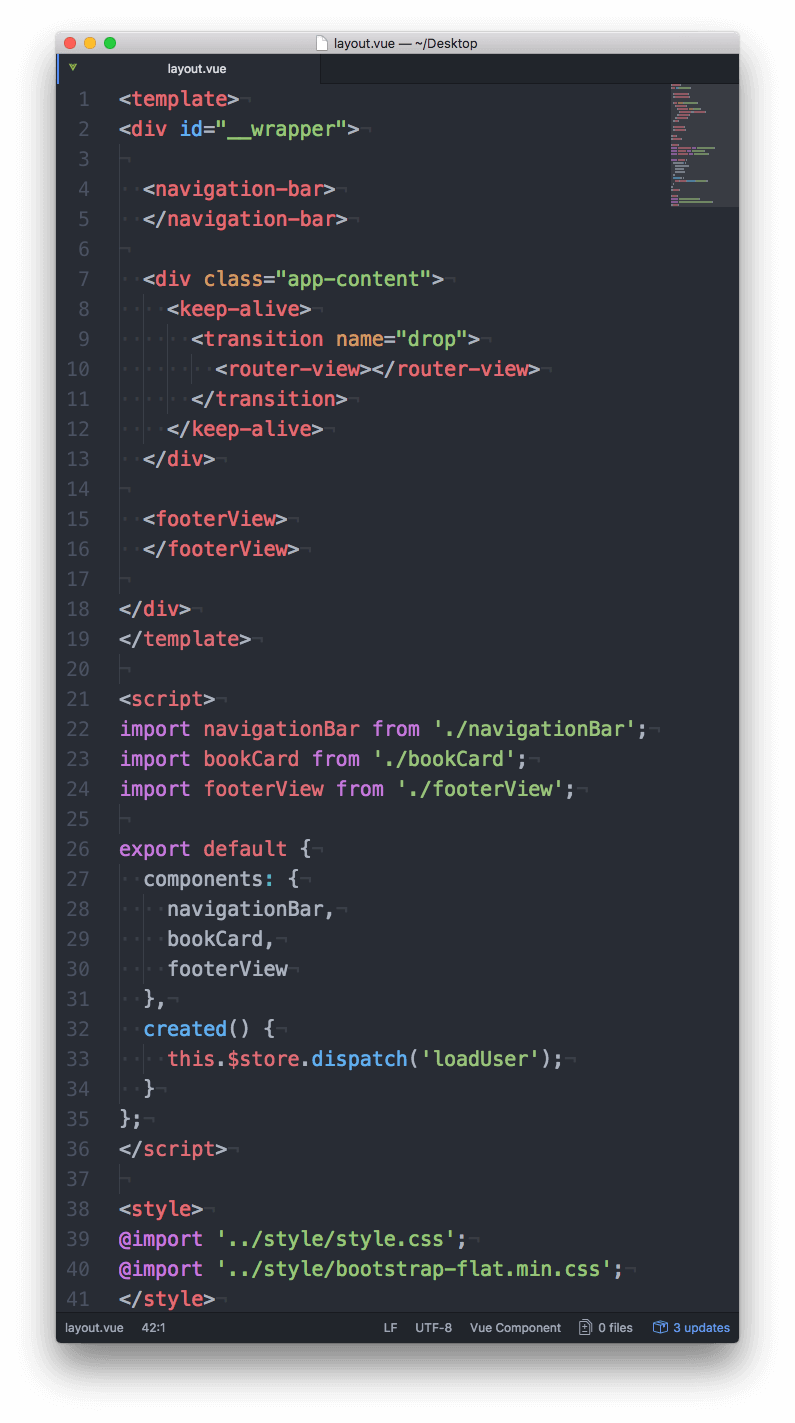
The figure above shows the complete implementation of our layout.vue. This single-file component references three child components: navigationBar, footerView, and content. Since content consists of the various routed pages, it is declared here as router-view.
As for the concrete implementation of each child component, I won’t go into further detail here. You can find the code here: navigationBar.vue, footerView, and layout.vue.
2. Functional Modules
In most projects, detail pages usually contain the most content, so let’s use the detail page from objc China as an example.
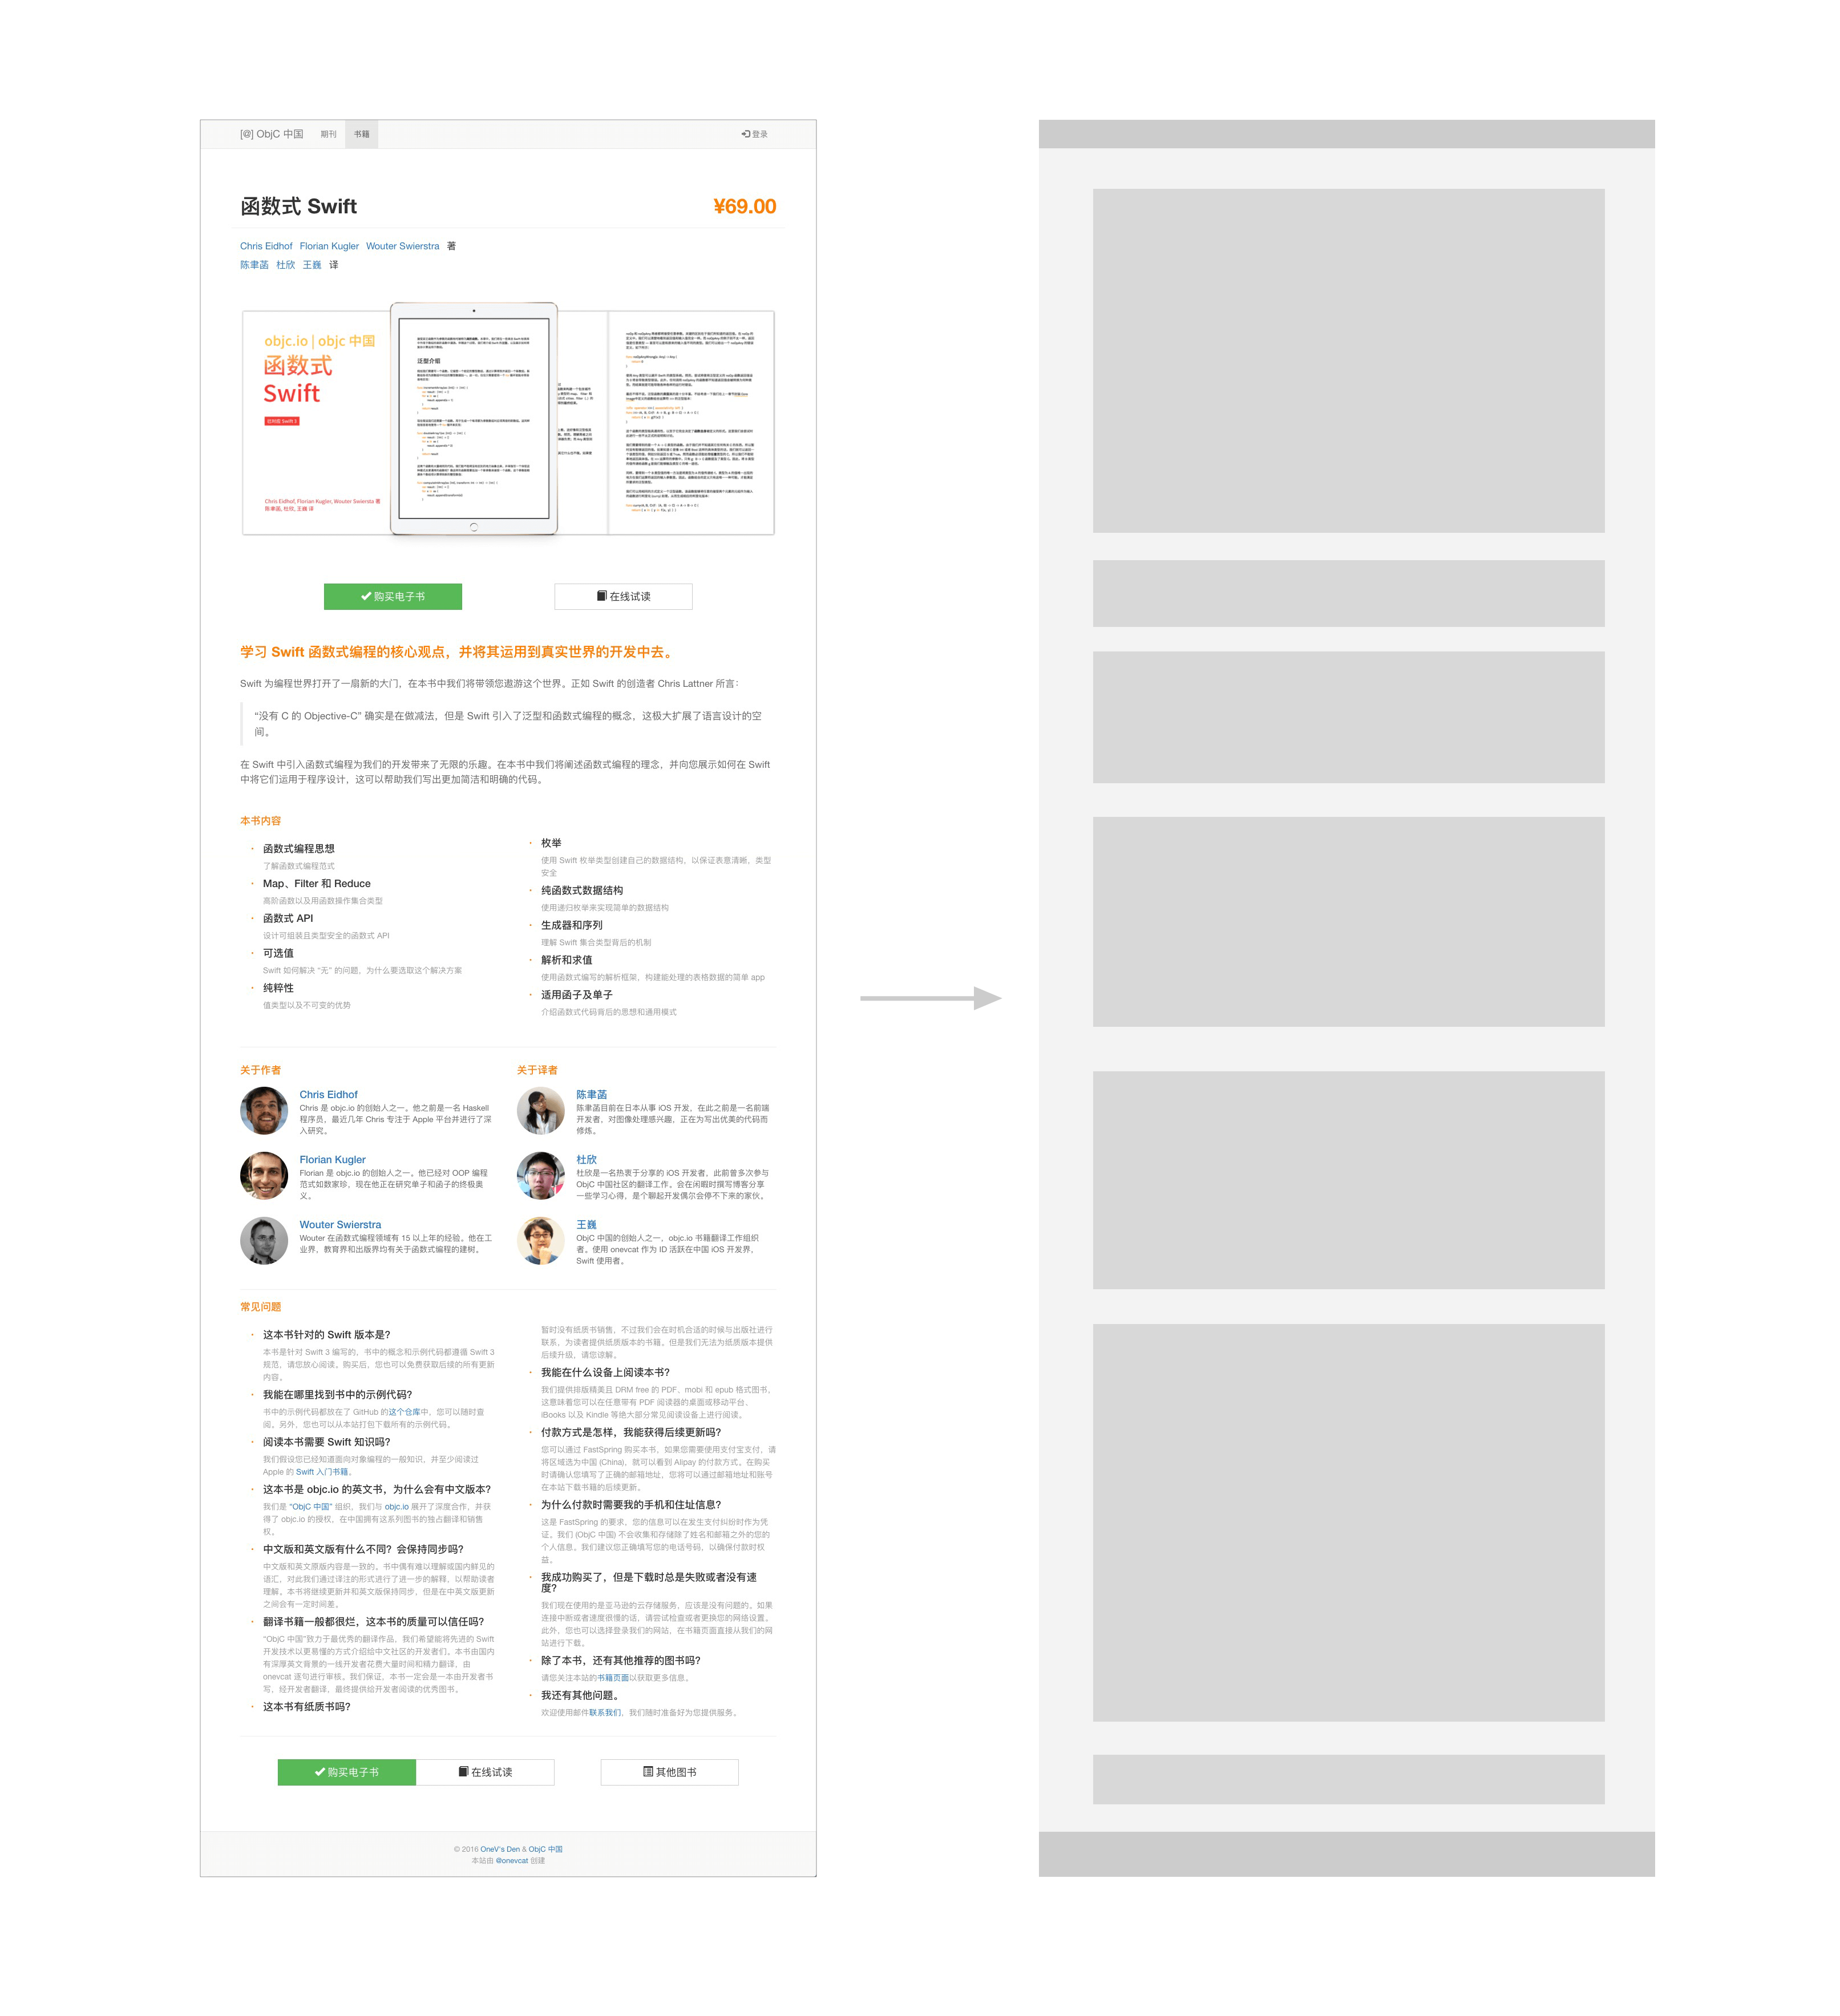
The left side of the figure above is the detail page, while the right side shows the page divided by functionality. We split the entire page into six child components.
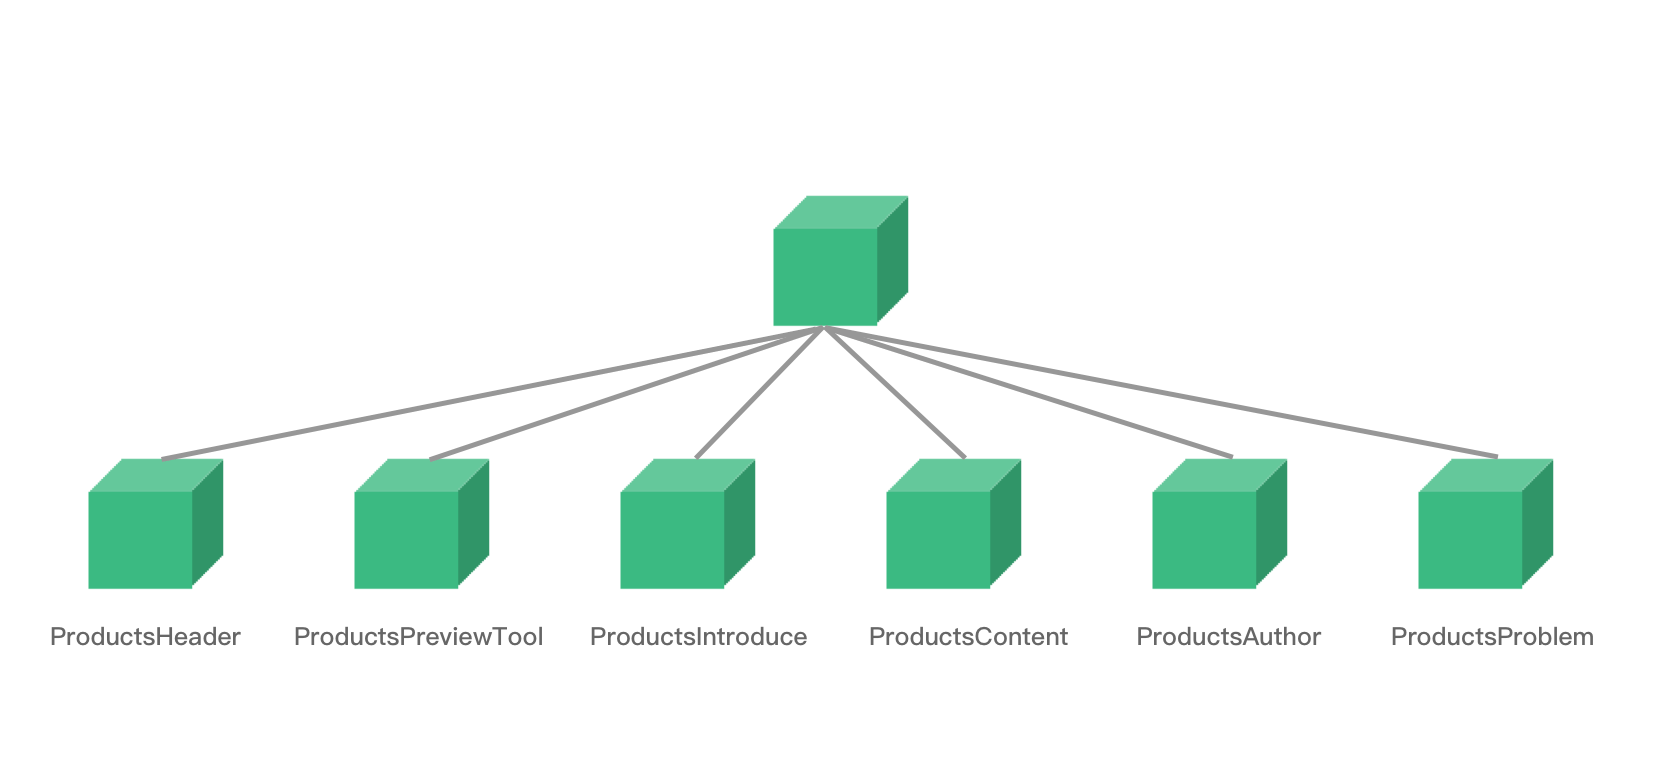
Expanding them from top to bottom gives the structure shown above.
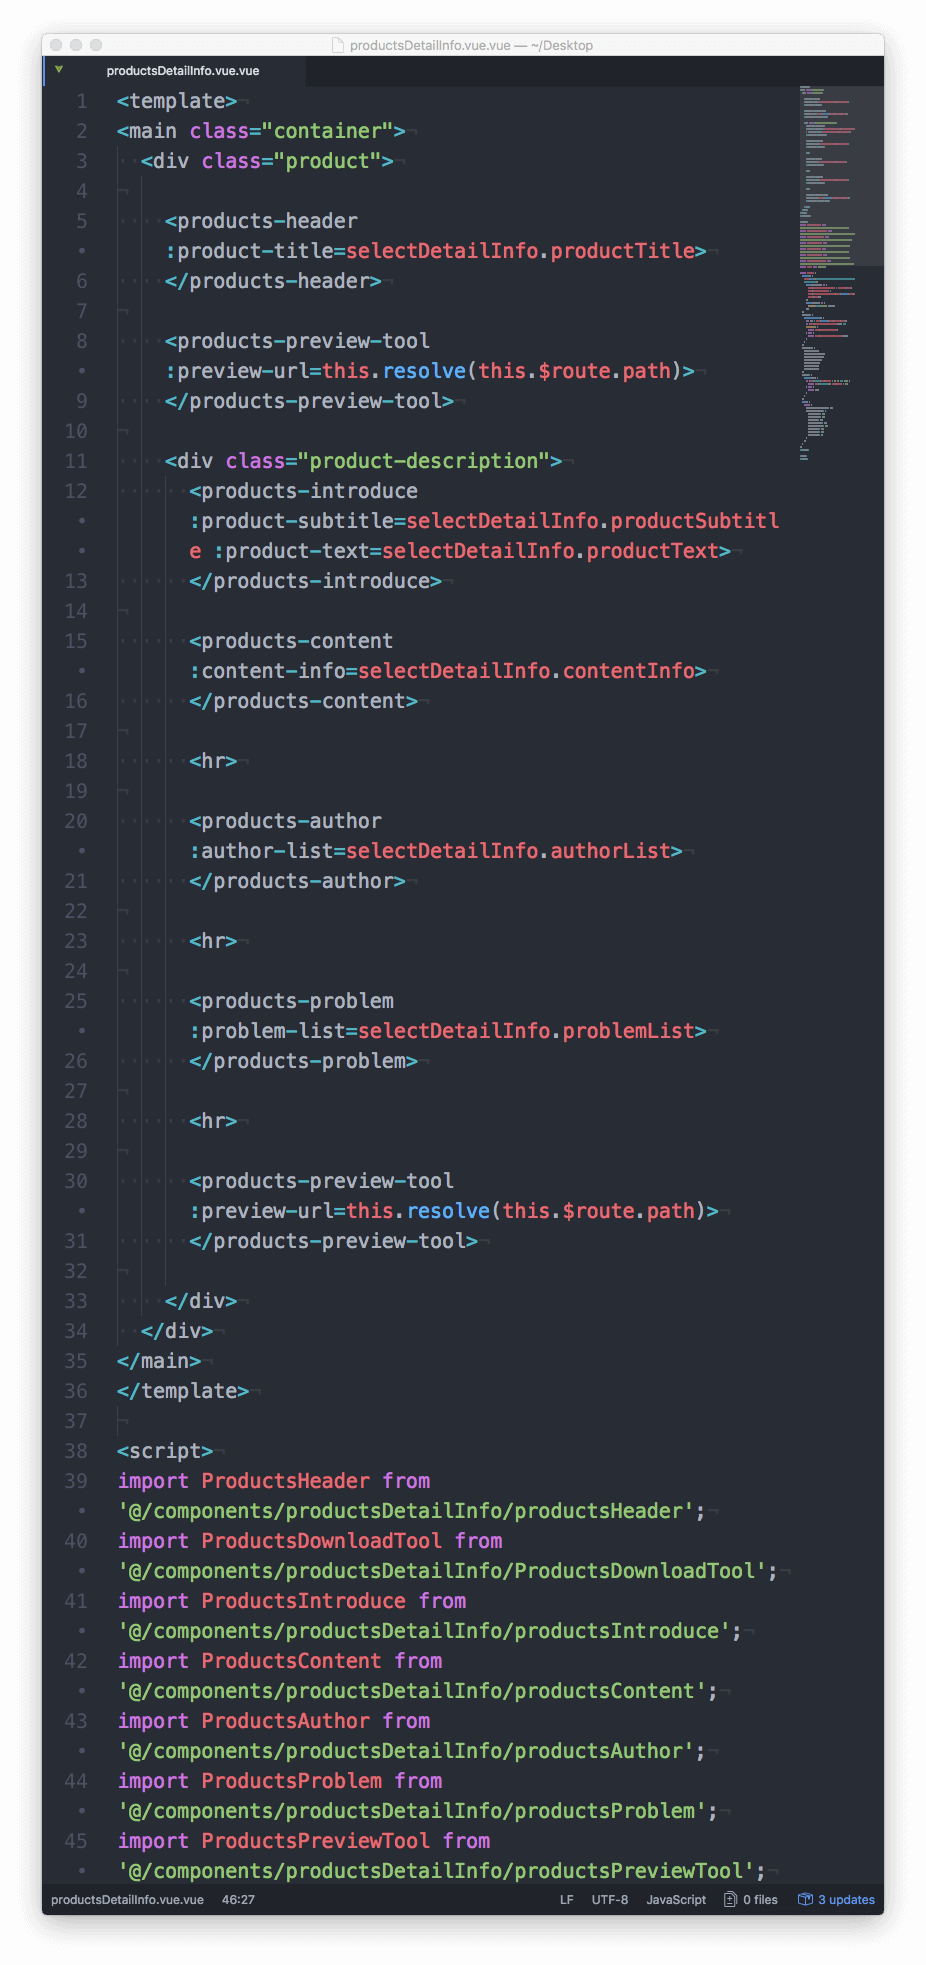
After dividing the page by functionality, the code for the entire detail page becomes exceptionally clean. The whole page is just six single-file child components. Each child component encapsulates its own logic, and the detail page simply assembles them together. The code is highly readable, and future maintenance is also very convenient.
The concrete code for the detail page is here: https://github.com/halfrost/vue-objccn/blob/master/src/pages/productsDetailInfo.vue
The code for the six child components is here: https://github.com/halfrost/vue-objccn/tree/master/src/components/productsDetailInfo. See the links for the implementation details; I won’t repeat them here.
In summary, an abstracted frontend SPA page is essentially one large component tree.
IV. Principles of Componentization
For example:
<!DOCTYPE html>
<html>
    <body>
        <div id="app">
            <parent-component>
            </parent-component>
        </div>
    </body>
    <script src="js/vue.js"></script>
    <script>

        var Child = Vue.extend({
            template: '<p>This is a child component !</p>'
        })

        var Parent = Vue.extend({
            // Use the <child-component> tag inside the Parent component
            template :'<p>This is a Parent component !</p><child-component></child-component>',
            components: {
                // Locally register the Child component; it can only be used inside the Parent component
                'child-component': Child
            }
        })

        // Globally register the Parent component
        Vue.component('parent-component', Parent)

        new Vue({
            el: '#app'
        })

    </script>
</html>
In the example above, a <child-component> is declared inside the <parent-component> parent component, and the final rendered result is:
This is a Parent component !
This is a child component !

The execution order of the above code is as follows:
- The child component is first registered in the parent component’s
components. - The parent component is registered globally using
Vue.component. - When the parent component is rendered, rendering reaches
<child-component>, and the child component is rendered as well.
One point worth noting is that when Vue parses templates, it follows the following common HTML restrictions:
acannot contain other interactive elements (such as buttons or links)ulandolcan only directly containliselectcan only containoptionandoptgrouptablecan only directly containthead,tbody,tfoot,tr,caption,col, andcolgrouptrcan only directly containthandtd
5. Component Categories
Components can be divided into the following four types:
- Ordinary components
- Dynamic components
- Async components
- Recursive components
1. Ordinary Components
The components discussed earlier are all ordinary components, so they will not be repeated here.
2. Dynamic Components
Dynamic components use the is feature, which allows multiple components to use the same mount point and be switched dynamically.
var vm = new Vue({
  el: '#example',
  data: {
    currentView: 'home'
  },
  components: {
    home: { /* ... */ },
    posts: { /* ... */ },
    archive: { /* ... */ }
  }
})


<component v-bind:is="currentView">
  <!-- The component changes when vm.currentview changes! -->
</component>
Now that the concrete type of the <component> component is represented by currentView, we can dynamically load different components by changing the value of currentView. In the example above, you can repeatedly change currentView in data to dynamically load the three different components: home, posts, and archive.
3. Async Components
Vue allows you to define a component as a factory function. When the component needs to be rendered, the factory function is triggered to dynamically resolve the component, and the result is cached:
Vue.component("async-component", function(resolve, reject){
    // async operation
    setTimeout(function() {
        resolve({
            template: '<div>something async</div>'
        });
    },1000);
});
Dynamic components can work with webpack to implement code splitting. webpack can split code into chunks and download a chunk via ajax only when it is needed:
Vue.component('async-webpack-example', function(resolve) {
  // This special require syntax tells webpack
  // to automatically split the compiled code into different chunks,
  // which will be automatically downloaded via ajax requests.
  require(['./my-async-component'], resolve)
});
4. Recursive Components
If a component has the name attribute set, it can become a recursive component.
A recursive component can use the name in its template to repeatedly call itself recursively.
name: 'recursion-component',
template: '<div><recursion-component></recursion-component></div>'
The code above is incorrect. Writing the template this way will cause infinite recursive loops and eventually throw the error “max stack size exceeded”. The fix is to break the infinite loop, for example by having v-if return false.
6. Message Passing and State Management Between Components
In Vue, component message passing is mainly divided into three approaches:
- Message passing between parent and child components
- Event Bus
- Vuex unidirectional data flow
1. Message Passing Between Parent and Child Components
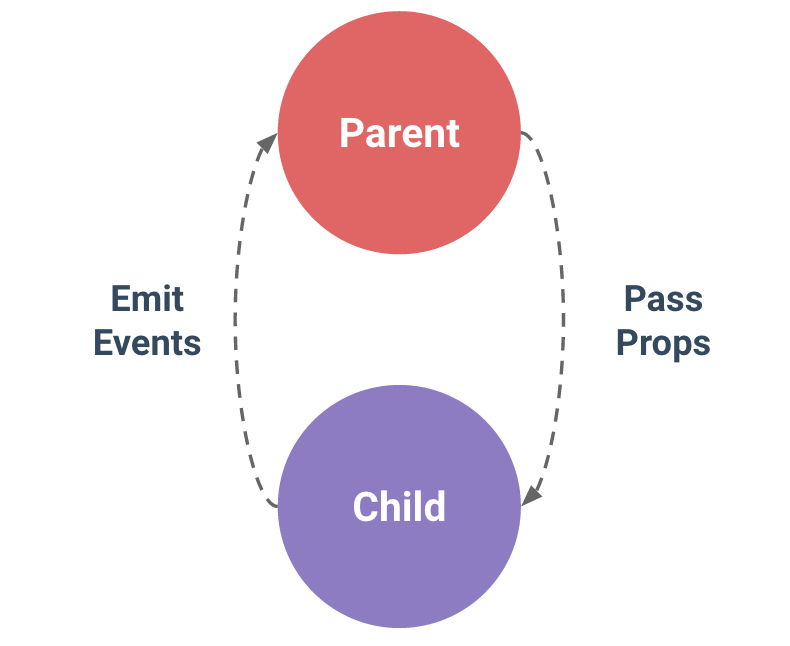
The parent-child component communication model is relatively straightforward. Since Vue 2.0, the relationship between parent and child components can be summarized as ** props down, events up **. The parent component passes data down to the child component via props, while the child component sends messages to the parent component via events.
Passing Data from Parent to Child
For example:
Vue.component('child', {
  // Declare props
  props: ['msg'],
  // prop can be used in the template
  // Can be set with `this.msg`
  template: '<span>{{ msg }}</span>'
})

<child msg="hello!"></child>
A msg prop is declared in the child component’s props, and the parent component uses this prop to pass a value to the child component.
One thing to note here is that in non-string templates, camelCased prop names need to be converted to their corresponding kebab-case names.
The example above uses static binding. Vue also supports dynamic binding; here you can also use the v-bind directive to bind props dynamically.
Passing data from parent to child is a one-way data flow. A prop is one-way bound: when a parent component’s property changes, the change is propagated to the child component, but not the other way around. This is to prevent child components from accidentally mutating the parent component’s state, which would make the application’s data flow difficult to understand.
In addition, every time the parent component updates, all props in the child component are refreshed to their latest values. This means you should not mutate props inside a child component. Vue recommends that child component props be immutable.
This leads to two types of problems:
Because of one-way data flow, the child component’s data or state may become inconsistent with the parent component’s. To synchronize them, the child component may try to modify the parent component’s data or state against the direction of the data flow.
After a child component receives a prop value, it may want to change it for two reasons. The first is that after the prop is passed in as an initial value, the child component wants to use it as local data. The second is that after the prop is passed in as an initial value, the child component wants to transform it into other data for output.
Developers can forcefully implement both of these kinds of changes, but doing so leads to undesirable “consequences”. For the first problem, manually mutating the parent component’s data or state results in a chaotic data flow. Looking only at the parent component, it becomes difficult to understand its state, because it may be mutated by any child component! Ideally, only a component itself should be able to mutate its own state. For the second problem, after forcefully mutating a child component’s props, Vue will issue a warning in the console.
So how can these two problems be solved elegantly? Let’s go through them one by one:
(1) For the first problem, switching to two-way binding solves it.
In Vue 2.3.0 and later, there are two ways to implement two-way binding.
First approach:
Use the .sync modifier, which exists as compile-time syntax sugar in Vue 2.3.0 and later. It is expanded into a v-on listener that automatically updates the parent component’s property.
// Declare a two-way binding
<comp :foo.sync="bar"></comp>


// The line above will be expanded to the following line:
<comp :foo="bar" @update:foo="val => bar = val"></comp>

// When the child component needs to update the value of foo, it explicitly triggers an update event:
this.$emit('update:foo', newValue)
The second approach:
Custom events can be used to create custom form input components, with v-model for two-way data binding.
<input :value="value" @input="updateValue($event.target.value)" >
Two-way binding implemented in this way must satisfy two conditions:
- Accept a value prop
- Trigger an input event when there is a new value
The two officially recommended approaches to two-way binding are the two methods described above. However, there are also some implicit forms of two-way binding that may inadvertently introduce bugs.
props are a one-way data flow: the parent component passes data to the child component. One thing to pay particular attention to is that if the data being passed is a reference type (such as an array or an object), then by default it effectively becomes two-way data binding, and changes made by the child component will affect the parent component. In this case, if developers are unaware of it, some inexplicable bugs may occur, so you need to be careful when passing reference-type data.
(2) For the second issue, there are two approaches:
- The first approach is: define a local variable and initialize it with the prop value:
props: ['initialCounter'],
data: function () {
  return { counter: this.initialCounter }
}
- The second approach is to define a computed property that processes the prop’s value and returns it.
props: ['size'],
computed: {
  normalizedSize: function () {
    return this.size.trim().toLowerCase()
  }
}
When passing data from parent to child, you can also pass templates, using slot to distribute content.
slot is a built-in custom element directive in Vue. In the bind callback, slot obtains the element that will replace the slot based on name. If the current context contains the content needed for replacement, it calls the parent element’s replaceChild method to replace the slot element with the replacement element; otherwise, it directly removes the element to be replaced. If the element replacing the slot has a single top-level element, the first child node of that top-level element is a DOM element, that node has a v-if directive, and the slot element contains content, then the replacement template will add a v-else template containing the content placed in the slot. If the v-if directive evaluates to false, the content of the else template is rendered.
Passing from Child to Parent
There is only one straightforward way for a child component to pass data back to its parent component: custom events!
The parent component uses $on(eventName) to listen for events.
The child component uses $emit(eventName) to trigger events.
A simple example:
// There is a button inside the child component
<button @click="emitMyEvent">emit</button>

emitMyEvent() {
  this.$emit('my-event', this.hello);
}


// Listen for the child component's custom event in the parent component
<child @my-event="getMyEvent"></child>

getMyEvent() {
    console.log(' i got child event ');
}
Data can also be passed through the parent-child relationship here (by directly modifying the data), but this approach is not recommended. For example, this.$parent or this.$children can be used to directly call methods on the parent or child component. This is analogous to the ViewControllers approach in iOS: from this array, you can directly obtain all VCs and then call the methods they expose in their .h files. However, this approach creates excessive direct coupling between components.
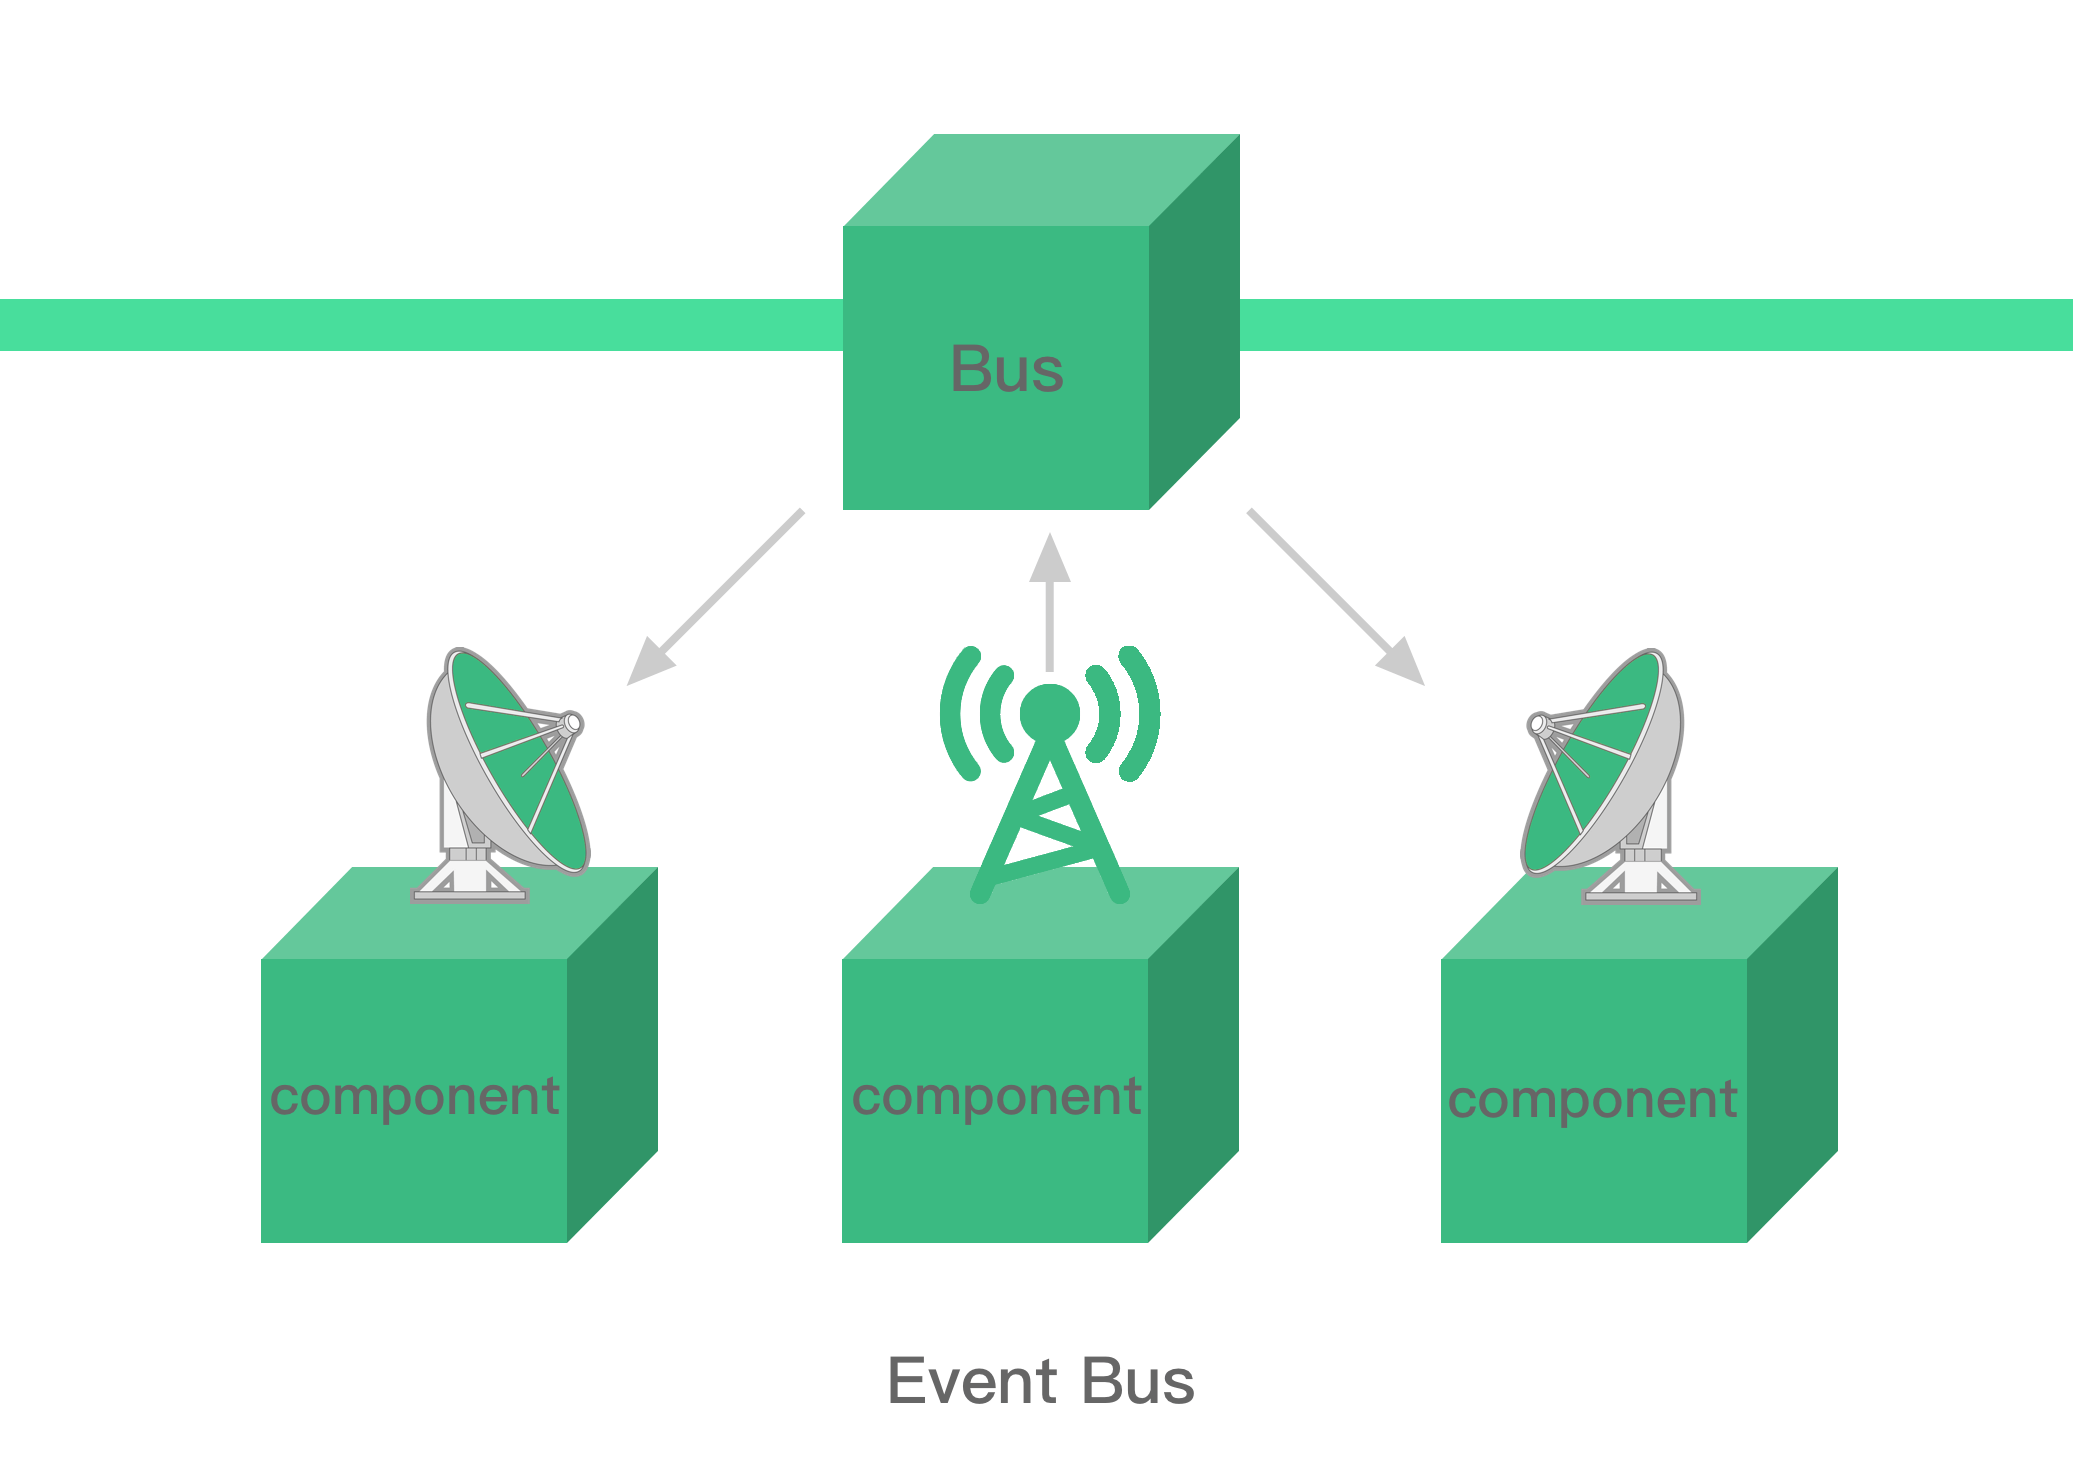
2. Event Bus
The concept of an Event Bus should also be familiar to mobile developers, since it exists in Android development as well. In iOS development, it can be compared to a message bus. A concrete implementation could be Notification, or signal propagation in ReactiveCocoa.
The implementation of an Event Bus still relies on a Vue instance. Create a new Vue instance dedicated to serving as the message bus.
var eventBus = new Vue()

// Import eventBus in component A
eventBus.$emit('myEvent', 1)

// Listen in the component that needs to listen
eventBus.$on('id-selected', () => {
  // ...
})
3. Vuex One-Way Data Flow
Since this article focuses on componentization, Vuex is only introduced here in terms of usage. As for its underlying principles, they will be analyzed separately in a future article.
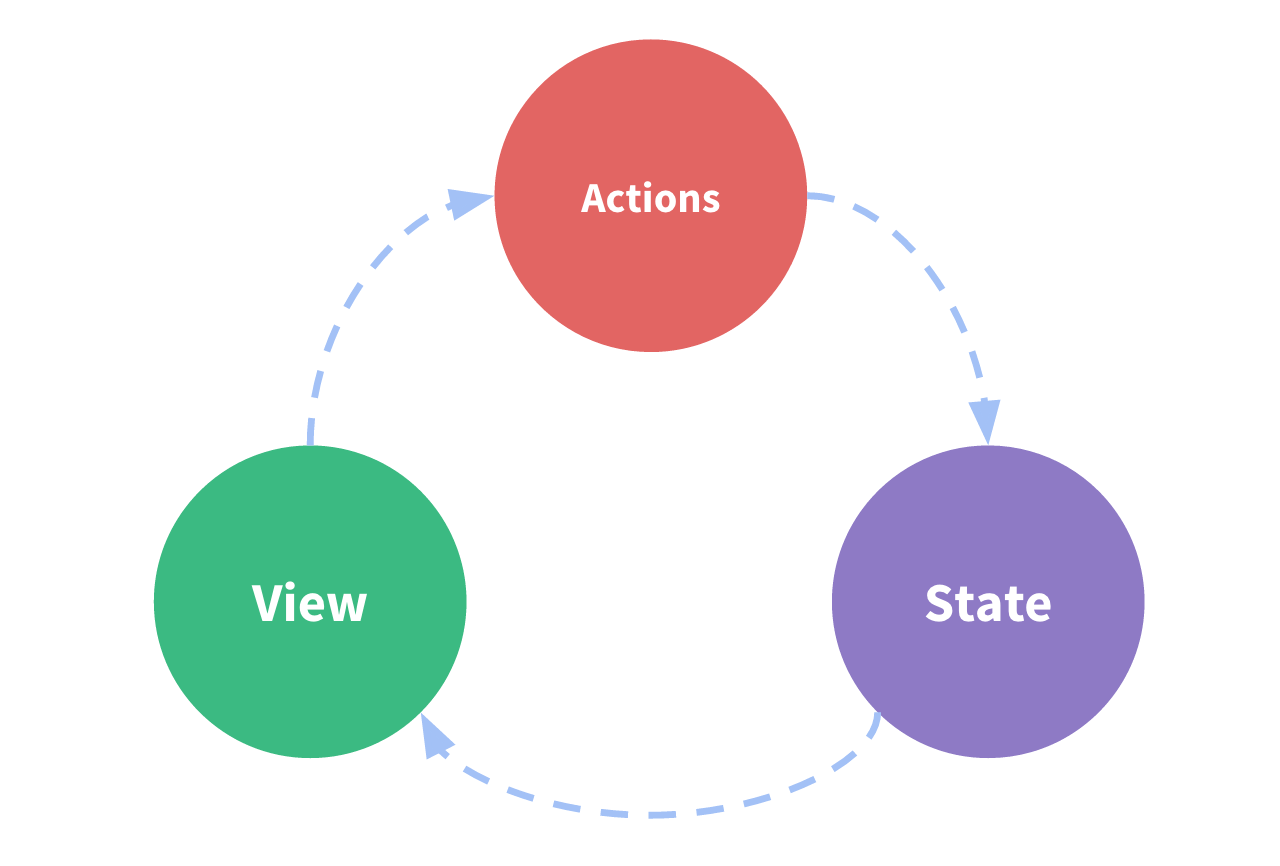
This diagram describes what Vuex is. Vuex is a state management pattern developed specifically for Vue.js applications. It uses a centralized store to manage the state of all components in an application, and enforces corresponding rules to ensure that state changes in a predictable way.
The direction of the arrows in the diagram above describes the flow of data. The data flow is one-way: it flows from Actions to State, and changes to the data in State then affect how the View displays data.
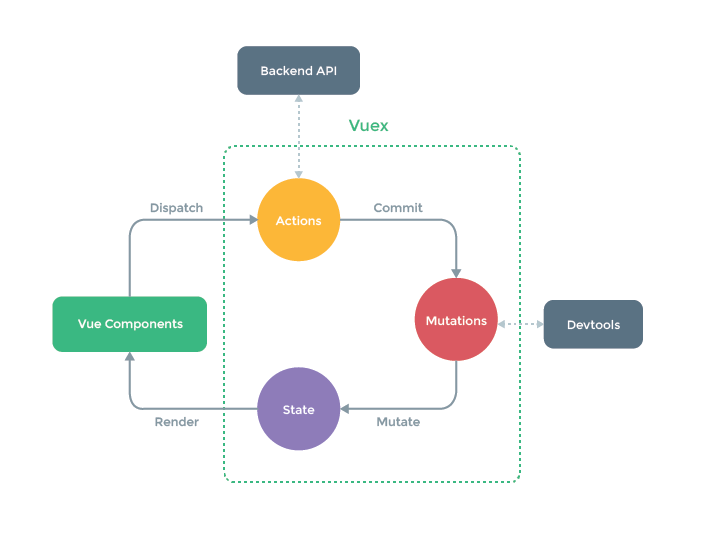
Starting from the three simple roles of Actions, State, and View, a Mutation has now been added. Mutations have now become the only way to change state in a Vuex store: by committing a mutation. Mutations in Vuex are very similar to events: each mutation has a string event type (type) and a callback function (handler).
In general, components call Mutation methods via commit.
this.$store.commit('increment', payload);
The differences between Actions and Mutations are:
- Actions commit mutations rather than directly changing state.
- Actions can contain arbitrary asynchronous operations, whereas Mutations must be synchronous functions.
In general, Actions methods are called via dispatch in components.
this.$store.dispatch('increment');
For Vuex best practices, the Vuex team provides a project template structure and recommends that we organize our projects according to this pattern.
├── index.html
├── main.js
├── api
│   └── ... # Extract API requests
├── components
│   ├── App.vue
│   └── ...
└── store
    ├── index.js          # Where we assemble modules and export the store
    ├── actions.js        # Root-level actions
    ├── mutations.js      # Root-level mutations
    └── modules
        ├── cart.js       # Cart module
        └── products.js   # Products module
The detailed code for this example is available here
VII. Component Registration Methods
There are mainly two ways to register components: global registration and local registration
1. Global Registration
Use the Vue.component directive for global registration
Vue.component('my-component', {
  // Options
})
Once registered, the component can be used in the parent instance as a custom element: <my-component></my-component>.
// Register
Vue.component('my-component', {
  template: '<div>A custom component!</div>'
})
// Create root instance
new Vue({
  el: '#example'
})

<div id="example">
  <my-component></my-component>
</div>
2. Local Registration
Globally registering components can slow down the loading speed of some pages. Some components only need to be loaded when they are actually used, so there is no need to register every component globally. This is where local registration comes in.
var Child = {
  template: '<div>A custom component!</div>'
}
new Vue({
  // ...
  components: {
    // <my-component> will only be available in the parent template
    'my-component': Child
  }
})
iOS
1. The Need for Componentization
In the early stages of developing an iOS Native app, if there are not many developers involved, most of the code is usually written in a single project. At that point, the business is not growing too quickly either, so development efficiency can often be maintained.
However, once the project becomes large, the number of developers gradually increases, and the business grows rapidly, the drawbacks of a single-project development model start to emerge.
- Code files within the project become heavily coupled.
- Conflicts become more frequent. In large companies, many people work on the same project at the same time. Every time you pull the latest code, there may be many conflicts. Sometimes merging code can take around half an hour, which hurts development efficiency.
- Development efficiency for business teams is not high enough. Once there are many developers, each person only wants to focus on their own component, but they still have to compile the entire project and work alongside unrelated code. Debugging is also inconvenient: even for a very small feature, the entire project has to be compiled, resulting in low debugging efficiency.
To solve these problems, the concept of componentization emerged in iOS projects. Therefore, iOS componentization is intended to address the issues above, which are different from the pain points solved by frontend componentization.
After iOS componentization, the following benefits can be achieved:
- Faster compilation speed (there is no need to compile the large chunk of code in the main project; each component is a static library)
- Freedom to choose a development style (MVC / MVVM / FRP)
- Easier for QA to perform targeted testing
- Improved business development efficiency
Encapsulation is only a small part of iOS componentization. The bigger focus is how to split components and how to decouple them. Frontend componentization may place more emphasis on component encapsulation and high reusability.
2. How to Encapsulate Components
The approach to iOS componentization is very straightforward: use Cocoapods to encapsulate code into pod libraries, and let the main project reference these pods. More and more third-party libraries are also publishing their latest versions on Cocoapods, and large companies maintain private Cocoapods repositories internally. A well-encapsulated Pod component is very convenient for the main project to use.
As for how to use Cocoapods to package a static library .a or a framework, there are many tutorials online. Here is a link; the detailed steps will not be repeated here.
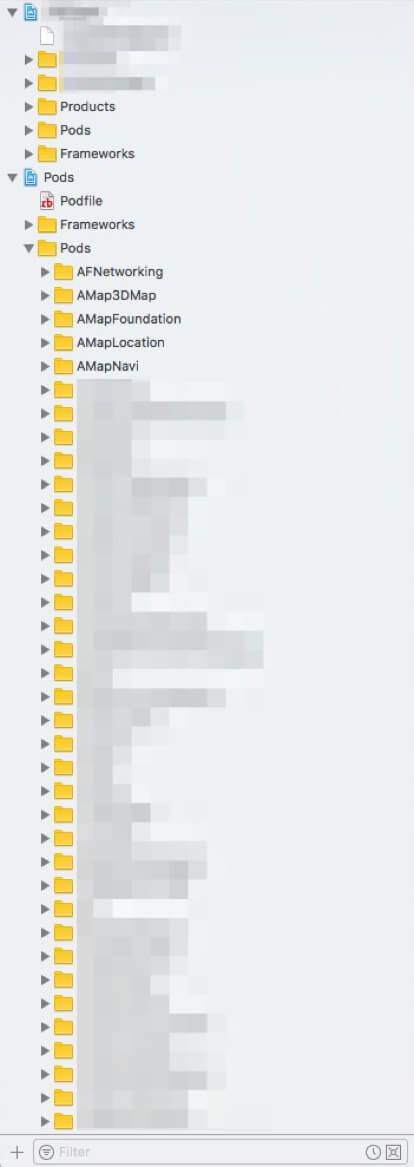
The ideal end state is that the main project becomes only a shell project. All other code lives inside component Pods. The main project’s job is just to initialize and load these components, with no other code.
3. How to Divide Components
Although there is no very explicit standard for dividing iOS components—because every project is different, and the granularity of component division also varies—there is still a general principle.
Utilities, categories, the networking layer, local storage, and similar pieces that can be reused across apps are extracted into Pod libraries. Some business-related parts that are reused across multiple apps are also extracted this way.
The principle is: code that should be shared across apps should be extracted into Pod libraries and treated as components. Business lines that are not shared across apps should also be extracted into Pods to decouple them from other files in the project.
A common approach is to start from the lower layers: networking libraries, routing, MVVM frameworks, database storage, encryption and decryption, utility classes, maps, foundational SDKs, APM, risk control, analytics tracking, and so on. Moving upward, the upper layers are components owned by different business teams. Typical examples include shopping cart, my wallet, login, and registration.
4. Principles of Componentization
iOS componentization is implemented with the help of Cocoapods. For the specific working principles of Cocoapods, you can read this article: What Does CocoaPods Do?.
Here is a brief analysis of how libraries brought in by pod are loaded into the main project.
Based on the dependency libraries specified in the Podfile, pod downloads the source code of these libraries and creates the Pods workspace. When the program is compiled, two scripts configured by pod are executed in advance.
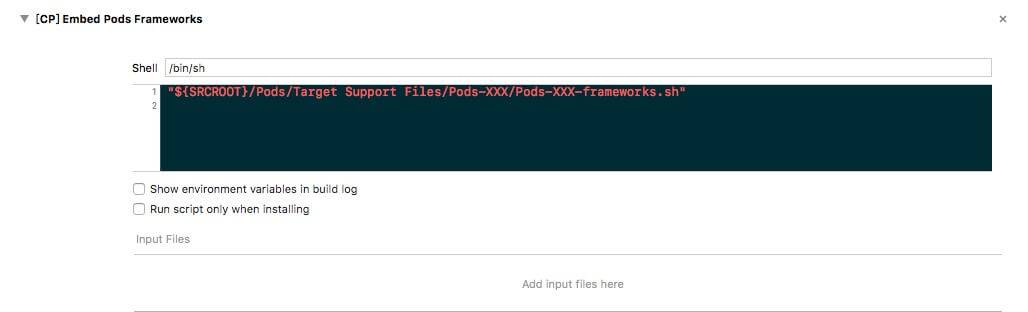
In the script above, the packaged static libraries inside Pods are merged into the static library libPods-XXX.a, which is the library that the main project depends on.
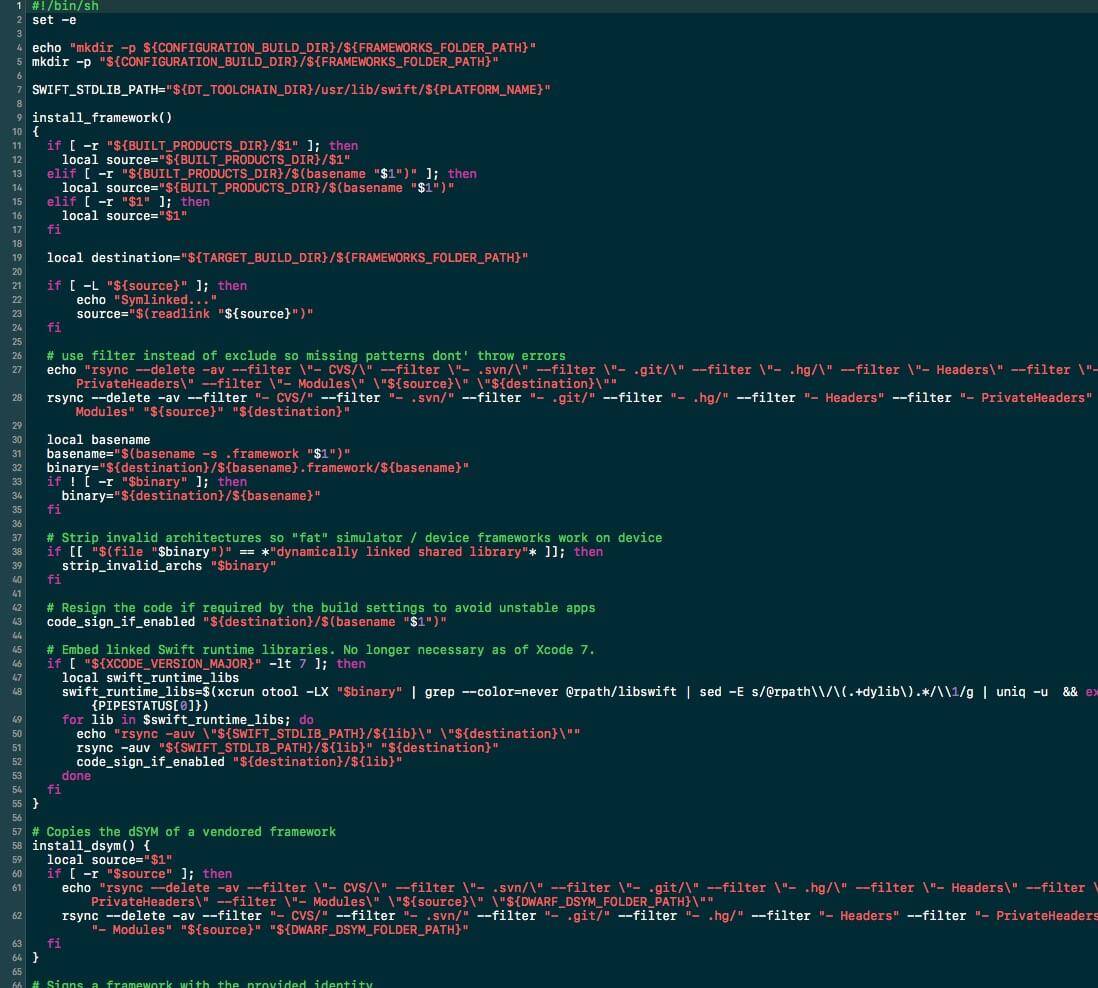
The image above shows the script that loads Pods libraries into the main project.
Another script in Pods is used to load resources, as shown below.
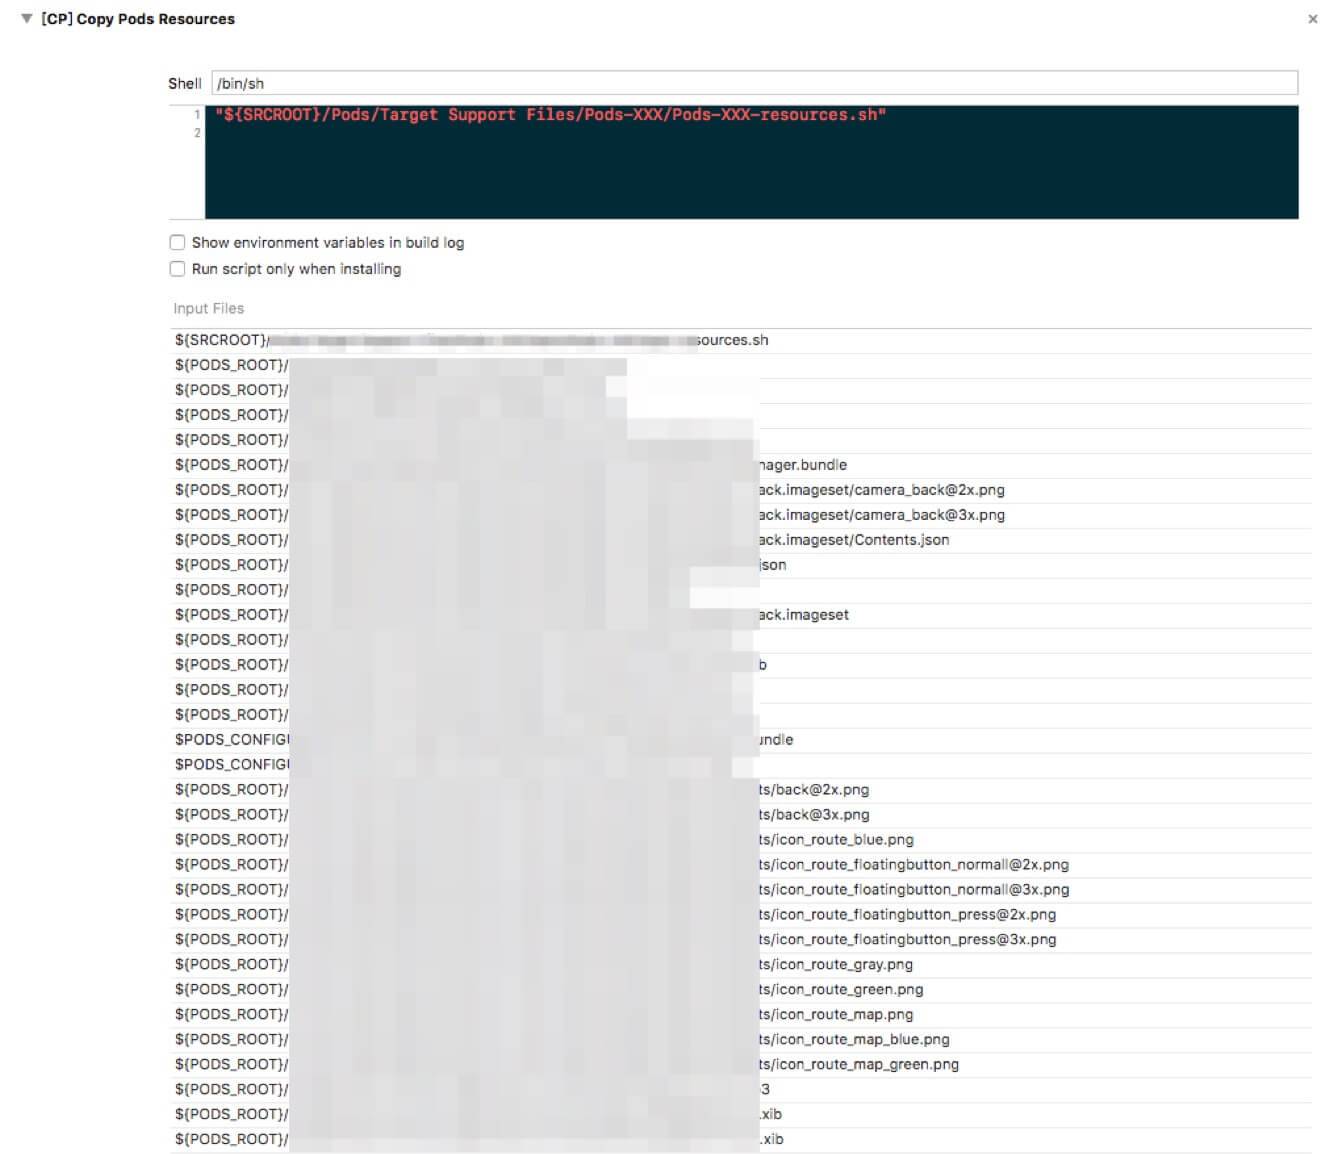
The resources loaded here include image resources in the Pods libraries, or xib, storyboard, music resources, and so on inside Bundles. These resources are also packaged together into the static library libPods-XXX.a.
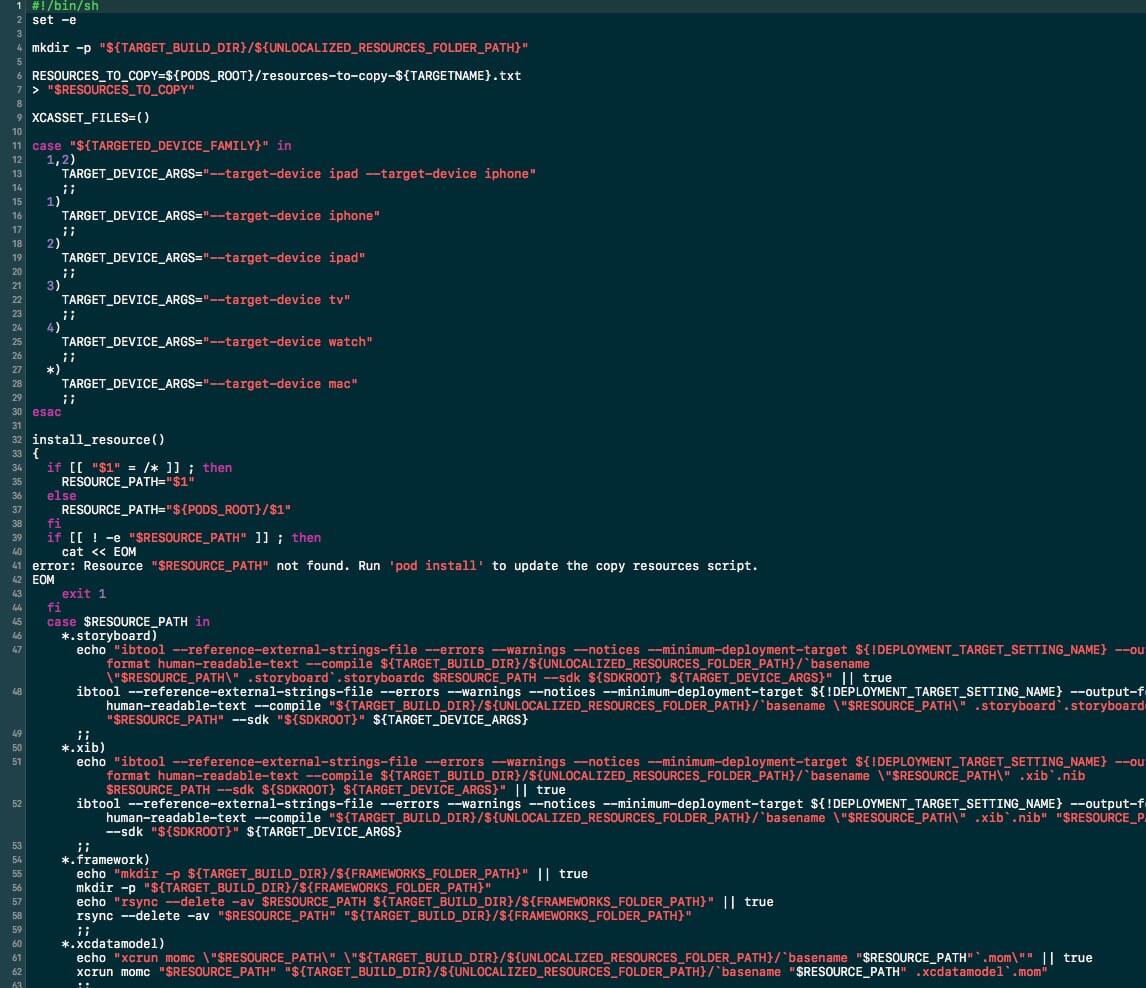
The image above shows the script that loads resources.
5. Component Types
iOS components mainly come in two forms:
- Static libraries
- Dynamic libraries
Static libraries are generally files ending in .a or .framework, while dynamic libraries are generally files ending in .dylib or .framework.
As you can see, for a file ending in .framework, it is not possible to determine whether it is a static library or a dynamic library from the file type alone.
The differences between static libraries and dynamic libraries are:
A
.afile is definitely a static library, a.dylibfile is definitely a dynamic library, and a.frameworkmay be either a static library or a dynamic library;When a static library is linked with other libraries, it is fully copied into the executable file. If multiple apps use the same static library, each app will copy one copy, and the downside is wasted memory. This is similar to defining a basic variable: when using that basic variable, a new copy of the data is made rather than using the originally defined one. The advantage of a static library is also obvious: after compilation is complete, the library file effectively no longer plays a role. The target program has no external dependencies and can run directly. Of course, its disadvantage is also obvious: it increases the size of the target program.
A dynamic library is not copied. There is only one copy, which is dynamically loaded into memory when the program runs. The system loads it only once, and multiple programs share the same copy, saving memory. In addition, by using a dynamic library, you can update the dynamic library file to update the application without recompiling and relinking the executable program.
6. Message Passing and State Management Between Components
As discussed earlier, iOS componentization places great emphasis on decoupling, which is an important goal of componentization. Message passing between iOS components is implemented through routing. Regarding routing, the author once wrote a fairly detailed article. If you are interested, you can read iOS Componentization — Analysis of Routing Design Ideas.
7. Component Registration Methods
There are mainly three ways to register iOS components:
- Registration via the load method
- Registration by reading a plist file
- Registration via annotations
The first two methods are relatively simple and easy to understand.
The first method uses Runtime inside the load method to save the mapping between component names and component instances into a global dictionary, making it convenient for the program to call them at any time after startup.
The second method writes the mapping between component names and component instances into a plist file in advance. When the program needs it, it reads this plist file directly. The plist file can be fetched from the server, giving the App a certain degree of dynamism.
The third method is relatively hacky. It uses the Mach-O data structure. When the program is linked into an executable file, the relevant registration information is written directly into the Data segment of the final executable file. After the program starts, it can simply read the desired data from that segment.
For detailed implementations of these three approaches, you can read an earlier article by the author: BeeHive — An Elegant Decoupling Framework That Is Still Being Improved. This article analyzes the specific implementation of the three registration processes above in detail.
Summary
From the analysis above, we can see that Vue componentization and iOS componentization are quite different.
The Development Models on the Two Platforms Differ
This is mainly reflected in the difference between single-page applications and multi-page-like applications.
One type of application that is currently popular on the frontend is the single page web application (SPA). As the name suggests, it is an application with only one Web page: a Web application that loads a single HTML page and dynamically updates that page as the user interacts with the application.
The browser loads the initial page from the server, along with the scripts required by the entire application (frameworks, libraries, application code) and stylesheets. When the user navigates to other pages, no page refresh is triggered. The page URL is updated through the HTML5 History API. The browser retrieves the new data needed for the new page—usually in JSON format—through AJAX requests. Then, the SPA dynamically updates the new page through JavaScript using the resources already downloaded during the initial page load. This model is similar to how native mobile applications work.
However, iOS development is more like an MPA (Multi-Page Application).
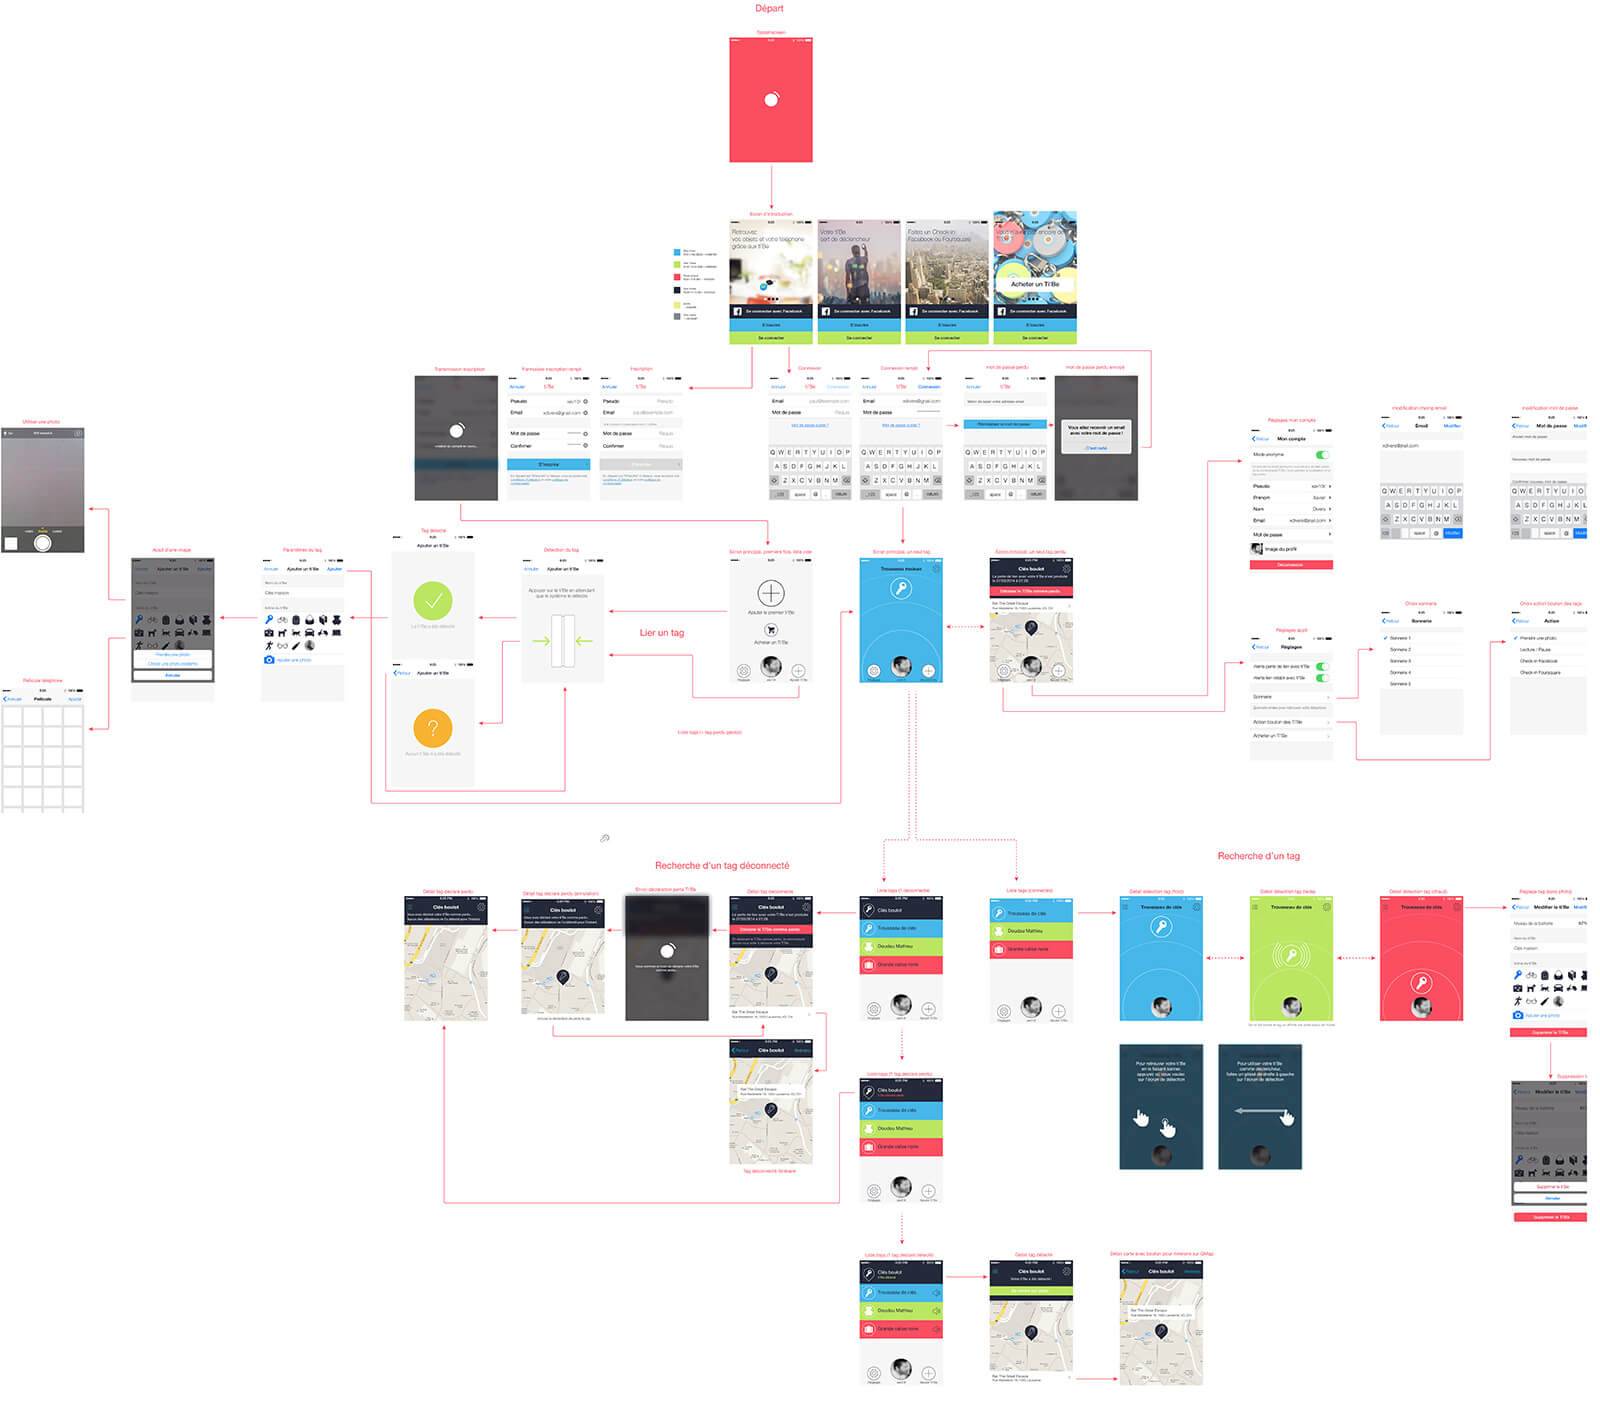
A native App page structure is often roughly like the image above. Of course, some people may say that it is still possible to write all these pages as a single page and control all Views inside one VC, similar to how the frontend uses the DOM. Although this idea is theoretically feasible, the author has never seen anyone do this. Once there are many pages—more than 100 pages and thousands of Views—all controlled by one VC, development becomes rather painful.
The Requirements They Solve Also Differ
iOS componentization partly solves the problem of code reuse, but it more importantly addresses high coupling and low collaboration efficiency in development. Vue componentization is more focused on solving code reuse.
The Direction of Componentization Also Differs Between the Two
On the iOS platform, because Apple has already encapsulated frameworks such as UIKit, the basic controls have already been encapsulated and do not need to be manually encapsulated by us. Therefore, iOS components focus on larger functional units, such as networking libraries, shopping cart, my wallet, and entire business modules. Frontend page layout is performed on the DOM, with only the most basic CSS tags available, so controls need to be written by developers themselves. The reusable single-file components encapsulated by Vue componentization are actually more similar to ViewModels on the iOS side.
Therefore, from the perspective of encapsulation, there is not much the two can borrow from each other. What iOS can borrow from the frontend is mainly state management and the idea of unidirectional data flow. Although this idea is good, how to apply it well in a company’s own app is still a matter of differing opinions; not all businesses are suitable for unidirectional data flow.
Reference:
Vue.js Official Documentation
GitHub Repo:Halfrost-Field
Follow: halfrost · GitHub
