Weex Layout Engine Powered by the FlexBox Algorithm
Preface
In the previous article, we discussed the basic flow of how Weex works in the iOS client. This article will analyze in detail how Weex lays out native interfaces with high performance, and then compare it with existing layout approaches to see how Weex’s layout performance actually stacks up.
Table of Contents
- 1.Weex Layout Algorithm
- 2.Performance Analysis of the Weex Layout Algorithm
- 3.How Weex Lays Out Native Interfaces
1. Weex Layout Algorithm
Open the Layout folder in the Weex source code, and you will see two C files. These two files are the Weex layout engine we are going to discuss today.
Layout.h and Layout.c originally came from React Native. In other words, Weex and React Native used the same layout engine code.
These two files no longer exist in the current React Native codebase; they have been replaced by Yoga.

Yoga was originally a cross-platform CSS-based layout engine introduced by Facebook in React Native. It implements the Flexbox specification and fully complies with the W3C standard. As the system continued to mature, Facebook re-released it, and it became what is now Yoga (Yoga official website).
So what is Flexbox?
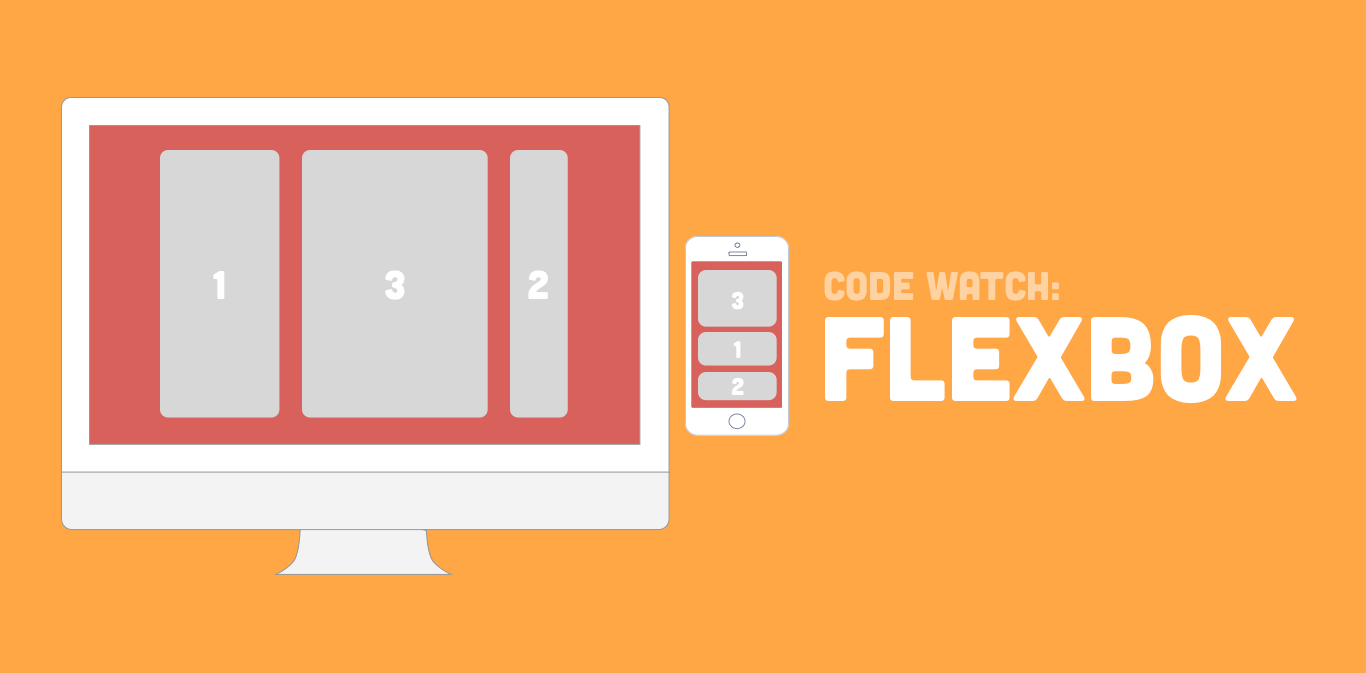
Those familiar with frontend development should be very familiar with this concept. In 2009, the W3C proposed a new solution—Flex layout—which can implement a wide variety of page layouts in a simple, complete, and responsive way. Today, it is supported by almost all browsers. Modern frontend development is mainly implemented with HTML / CSS / JS, where CSS is used for frontend layout. Any HTML container can be designated as a Flex layout through CSS. Once a container is designated as a Flex layout, its child elements can be laid out according to Flexbox syntax.
For the basic definitions of Flexbox and more detailed documentation, interested readers can refer to the W3C official documentation, which provides very detailed explanations. Official documentation link
The Layout files in Weex are the predecessor of Yoga, from before Yoga was officially released. The underlying code is written in C, so performance is not an issue. Next, let’s take a close look at how the Layout files implement Flexbox.
Therefore, all source code analysis below is based on version v0.10.0.
(1) Basic Data Structures in Flexbox
The original goal of Flexbox layout (Flexible Box) was to allocate the layout of child views more efficiently, including dynamically changing width, height, and ordering. Flexbox makes it easier to accommodate screens of different sizes, such as by stretching and shrinking child views.
In the world of Flexbox, there are the concepts of the main axis and the cross axis.
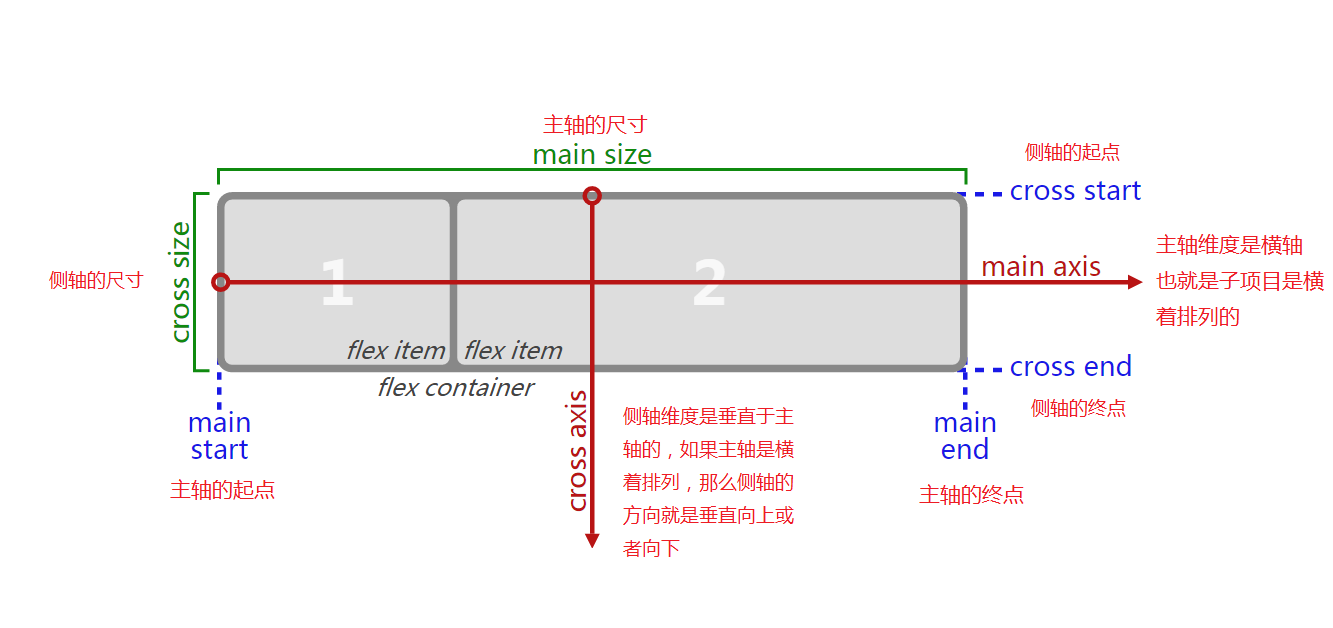
In most cases, child views are arranged along the main axis, from main-start to main-end. However, one thing to note here is that although the main axis and cross axis are always perpendicular to each other, which one is horizontal and which one is vertical is not fixed. The following situation may occur:
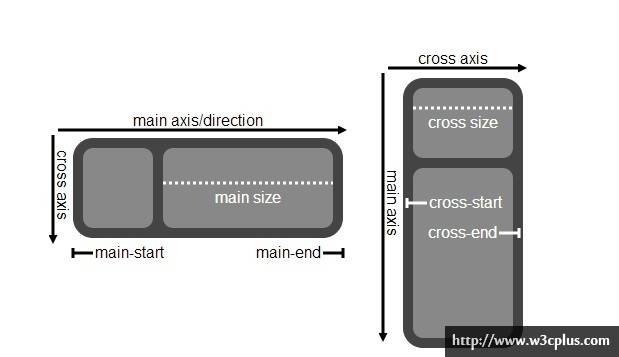
In the case shown above, where the horizontal direction is the cross axis, child views are arranged along the cross axis, from cross-start to cross-end.
Main axis: The main axis of the parent view. Child views are primarily arranged and laid out along this axis.
Main-start and main-end: The layout direction of child views inside the parent view is from main-start toward main-end.
Main size: The width or height of a child view in the main-axis direction is the size along the main axis. The primary size property of a child view is either its width or its height, depending on which one corresponds to the main-axis direction.
Cross axis: The axis perpendicular to the main axis is called the cross axis. Its direction mainly depends on the direction of the main axis.
Cross-start and cross-end: The placement of child view lines starts from the cross-start side of the container and ends toward the cross-end side.
Cross size: The width or height of a child view in the cross-axis direction is the item’s cross-axis length. The cross-axis length property of a flex item is either the width or height property, depending on which one corresponds to the cross-axis direction.
Next, let’s see how Layout defines the elements in Flexbox.
typedef enum {
  CSS_DIRECTION_INHERIT = 0,
  CSS_DIRECTION_LTR,
  CSS_DIRECTION_RTL
} css_direction_t;
This direction defines the overall layout direction of the context. INHERIT means inheritance, LTR means Left To Right, laying out from left to right, and RTL means Right To Left, laying out from right to left. In the analysis below, unless otherwise specified, the layout is LTR, from left to right. If it is RTL, it is the reverse of LTR.
typedef enum {
  CSS_FLEX_DIRECTION_COLUMN = 0,
  CSS_FLEX_DIRECTION_COLUMN_REVERSE,
  CSS_FLEX_DIRECTION_ROW,
  CSS_FLEX_DIRECTION_ROW_REVERSE
} css_flex_direction_t;
This defines the direction of the Flex layout.
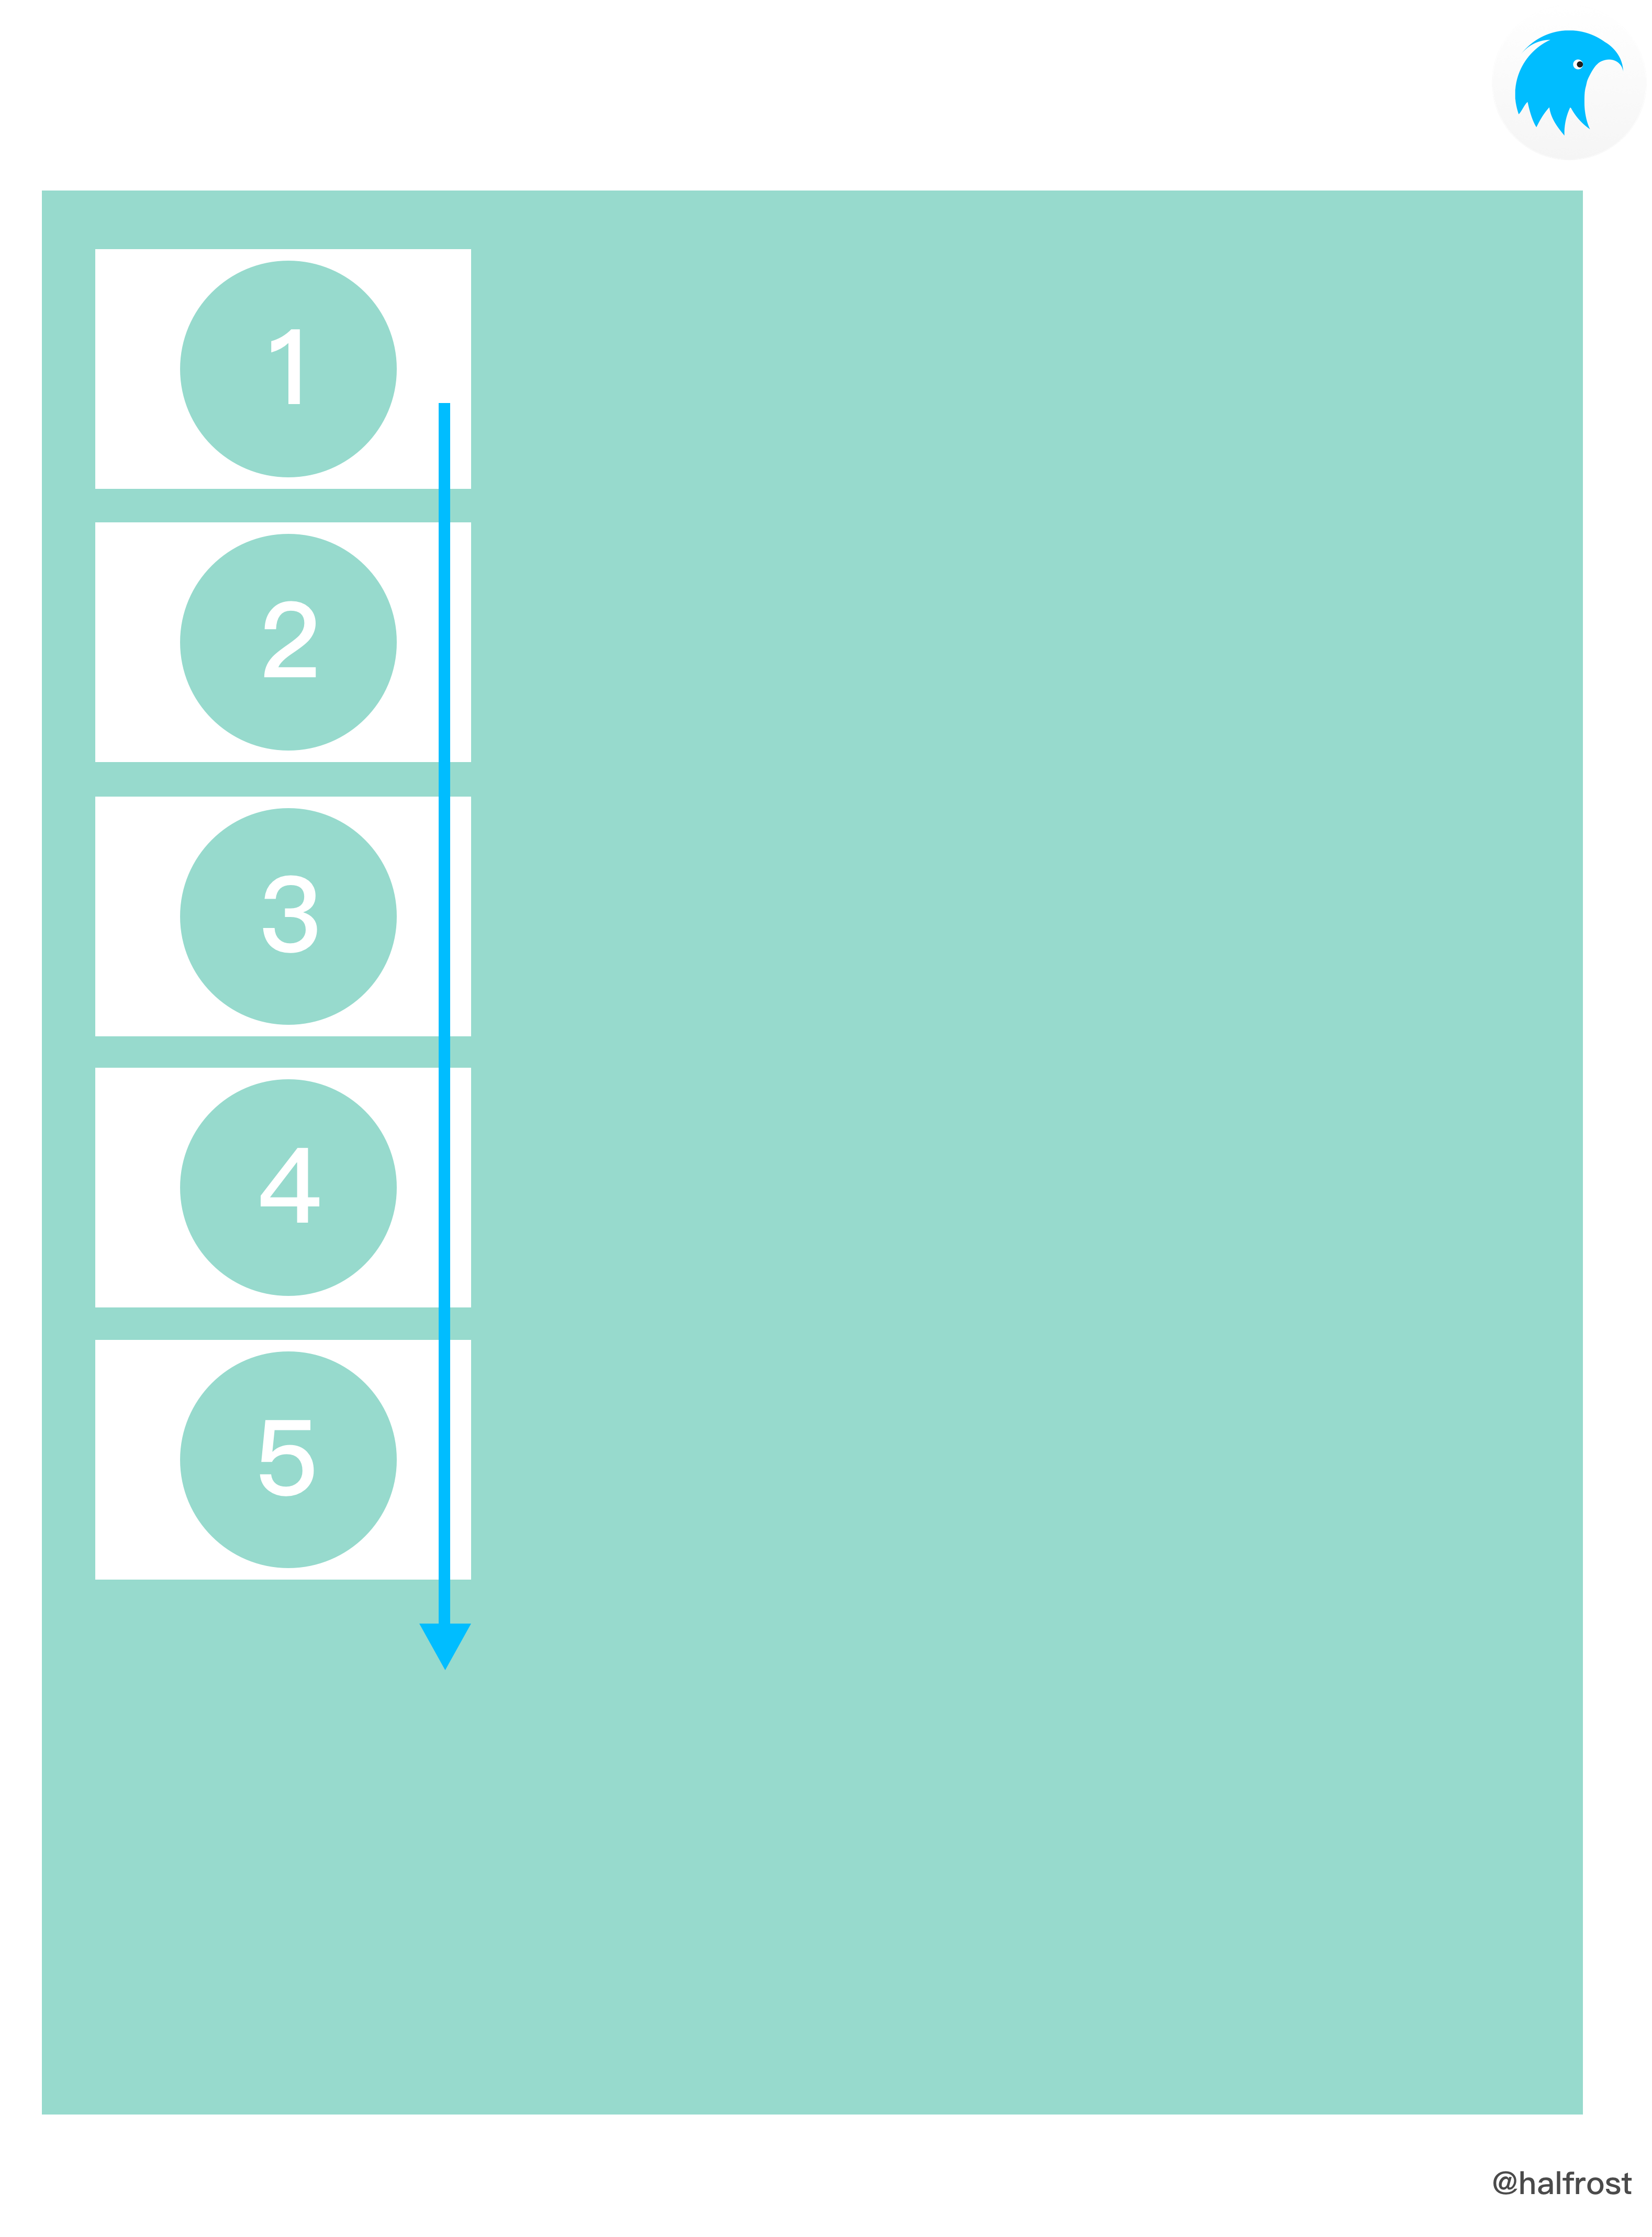
The image above shows COLUMN. The layout direction is from top to bottom.
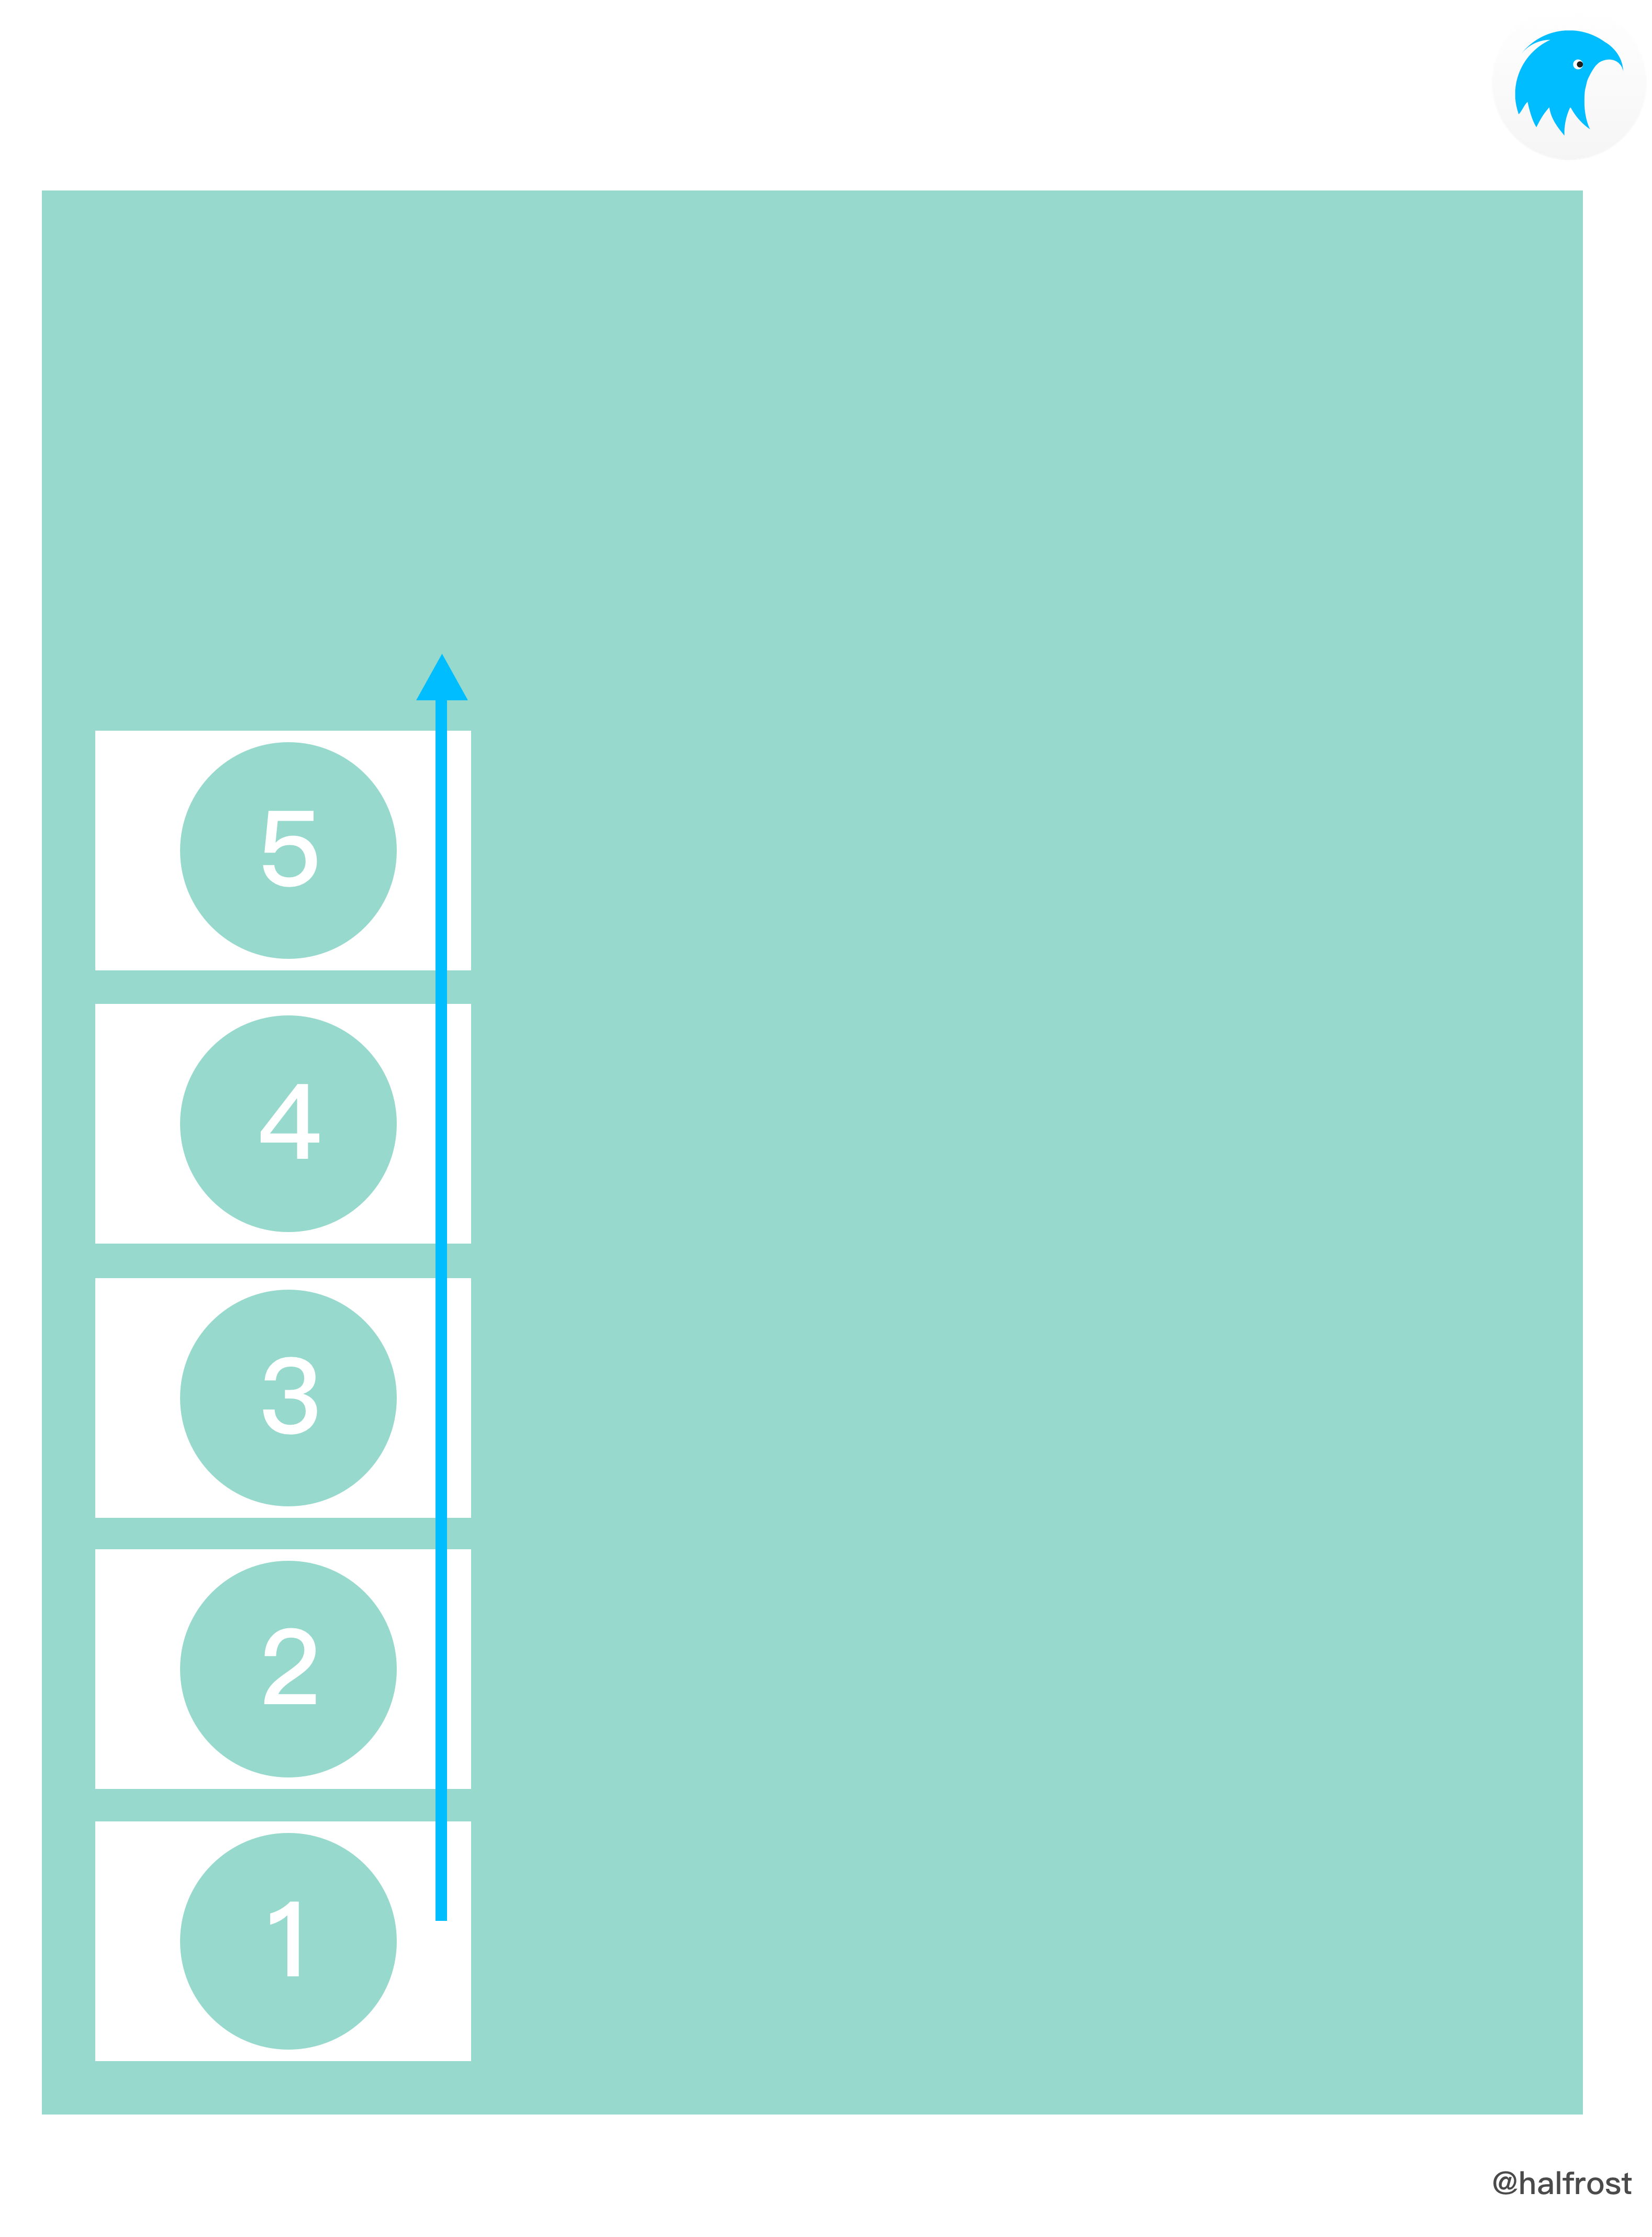
The image above shows COLUMN_REVERSE. The layout direction is from bottom to top.
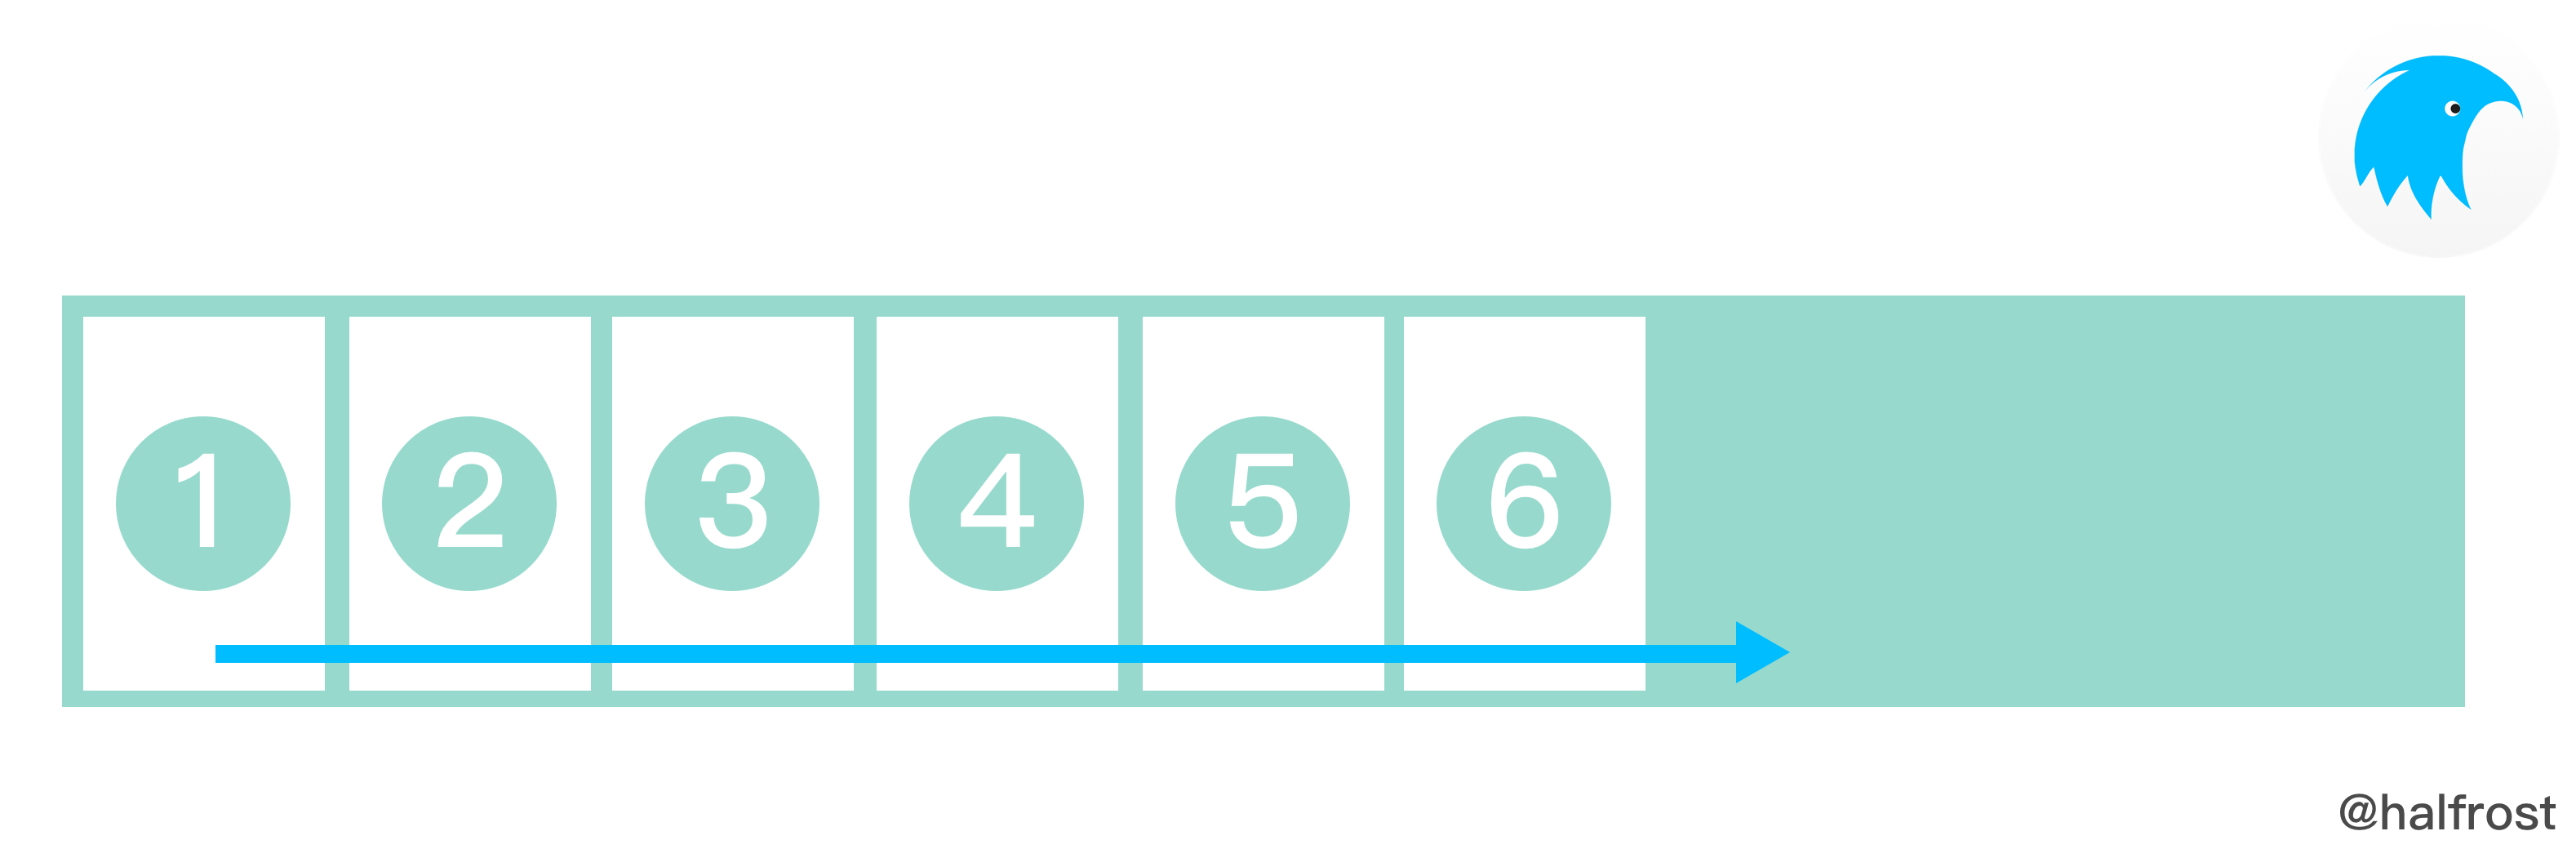
The image above shows ROW. The layout direction is from left to right.
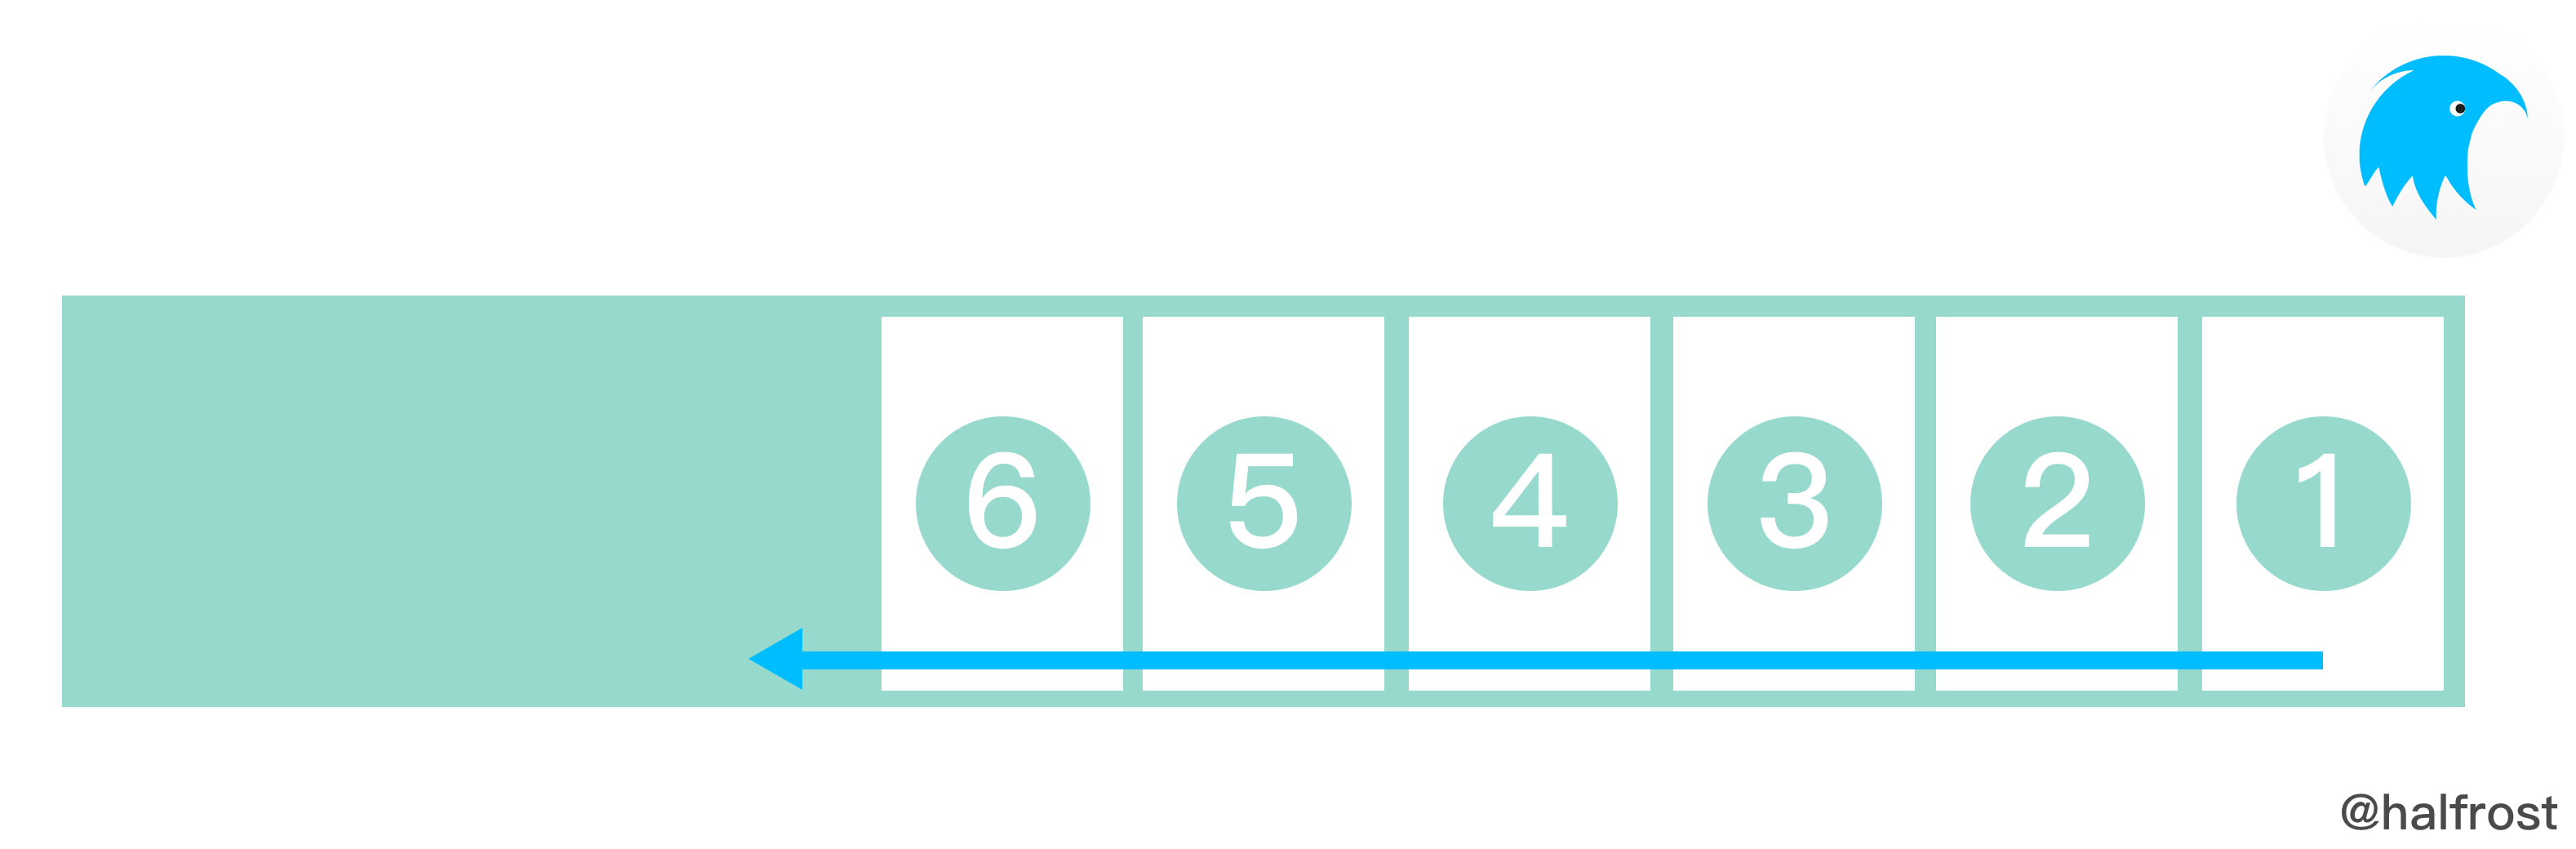
The image above shows ROW_REVERSE. The layout direction is from right to left.
As you can see here, in an LTR context, ROW_REVERSE is equivalent to ROW in an RTL context.
typedef enum {
  CSS_JUSTIFY_FLEX_START = 0,
  CSS_JUSTIFY_CENTER,
  CSS_JUSTIFY_FLEX_END,
  CSS_JUSTIFY_SPACE_BETWEEN,
  CSS_JUSTIFY_SPACE_AROUND
} css_justify_t;
This defines how child views are arranged along the main axis.
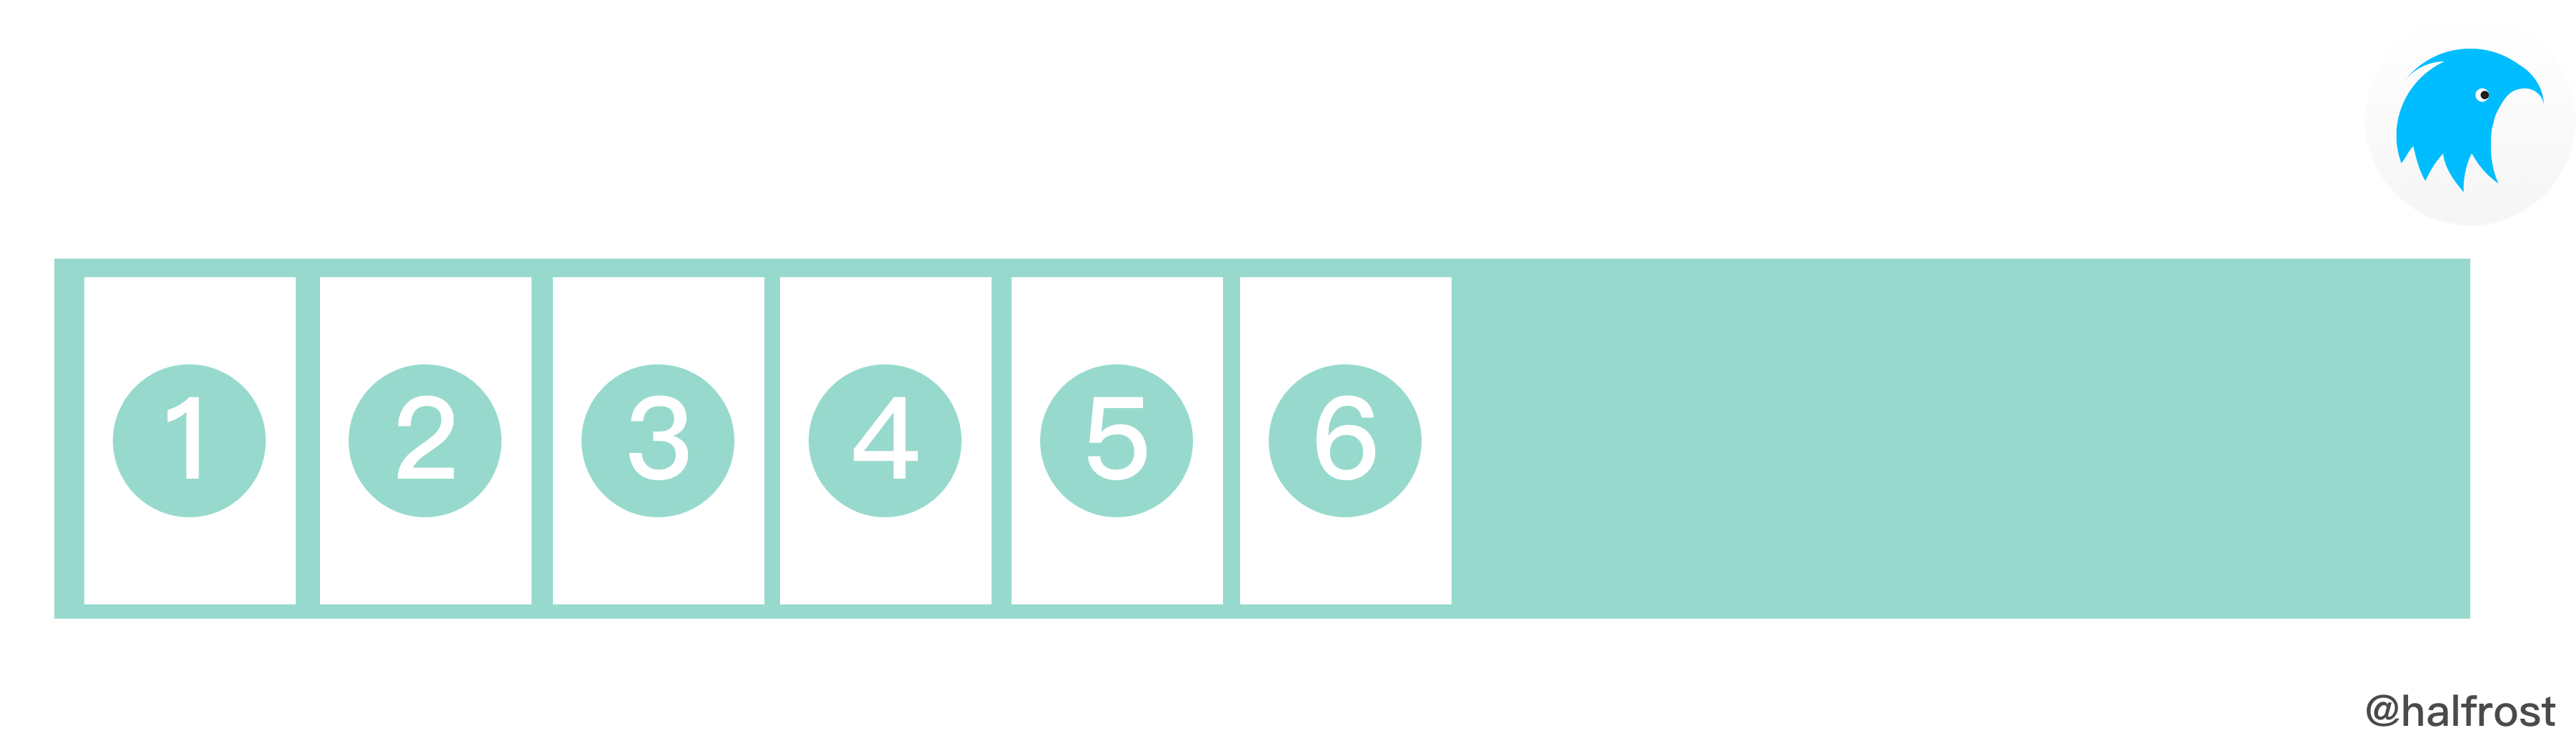
The image above shows JUSTIFY_FLEX_START
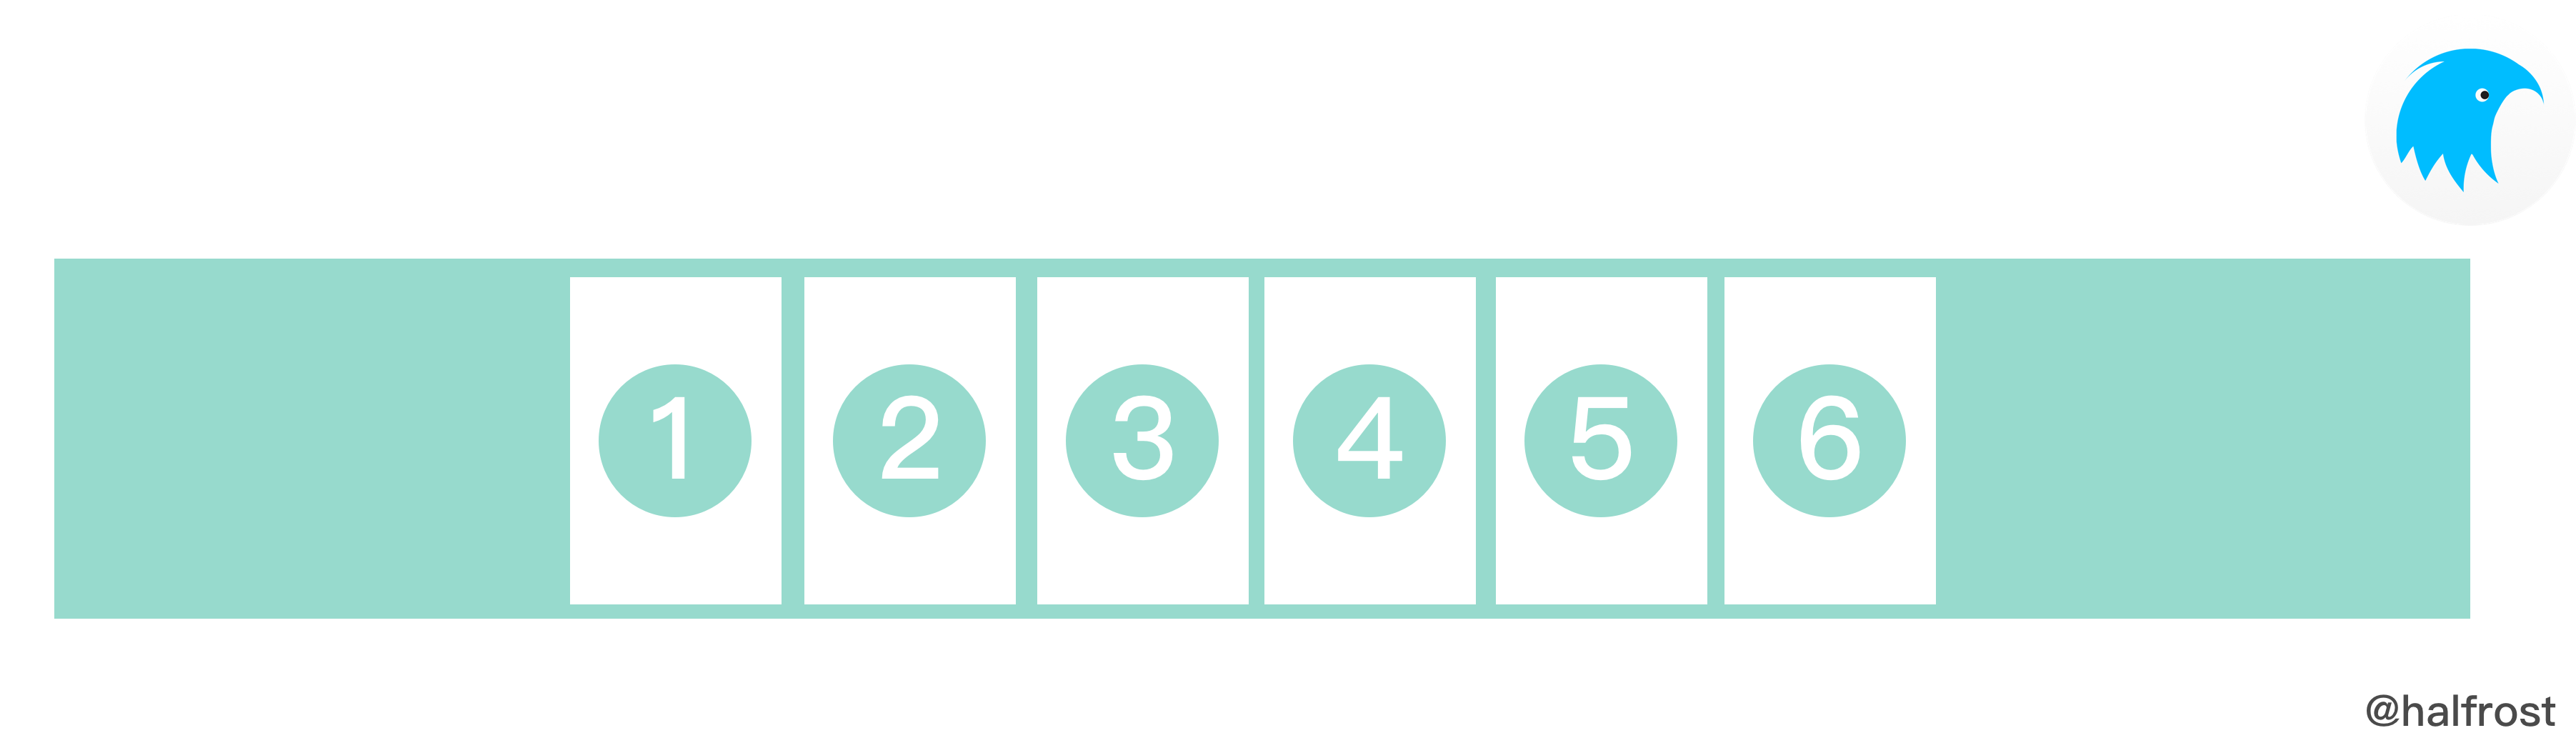
The image above shows JUSTIFY_CENTER
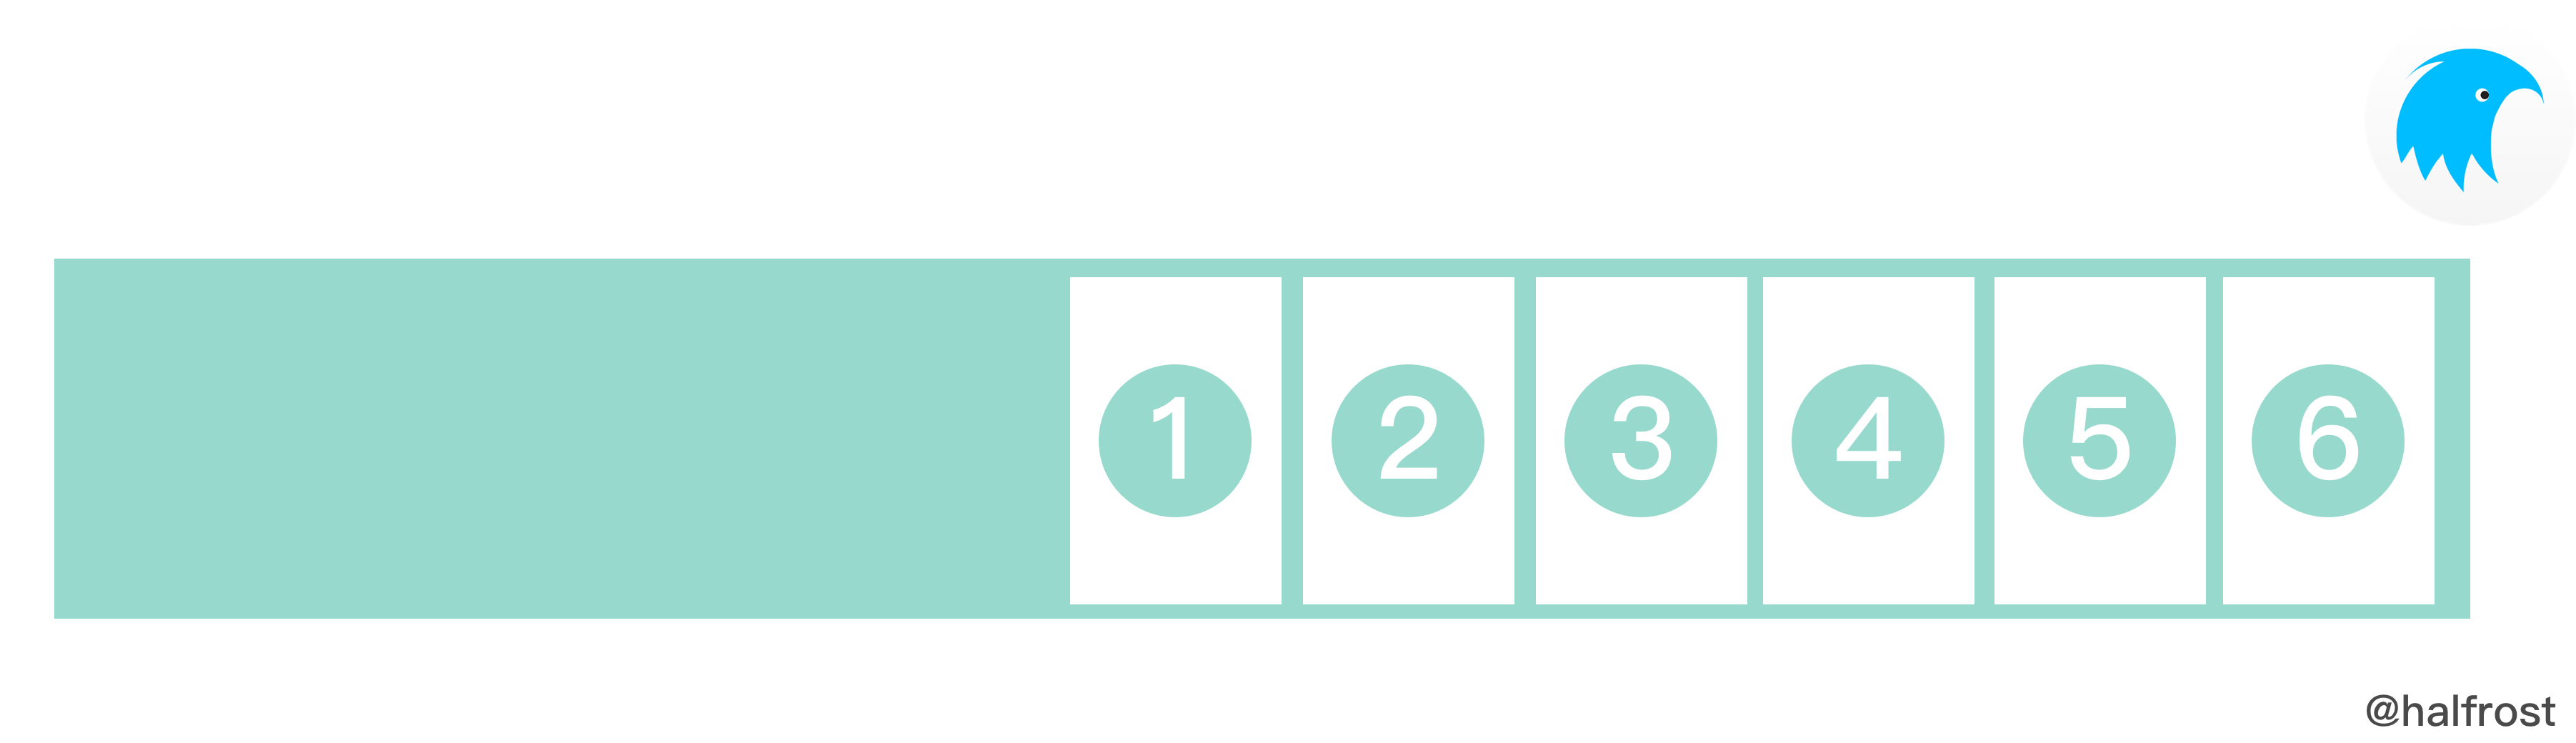
The image above shows JUSTIFY_FLEX_END
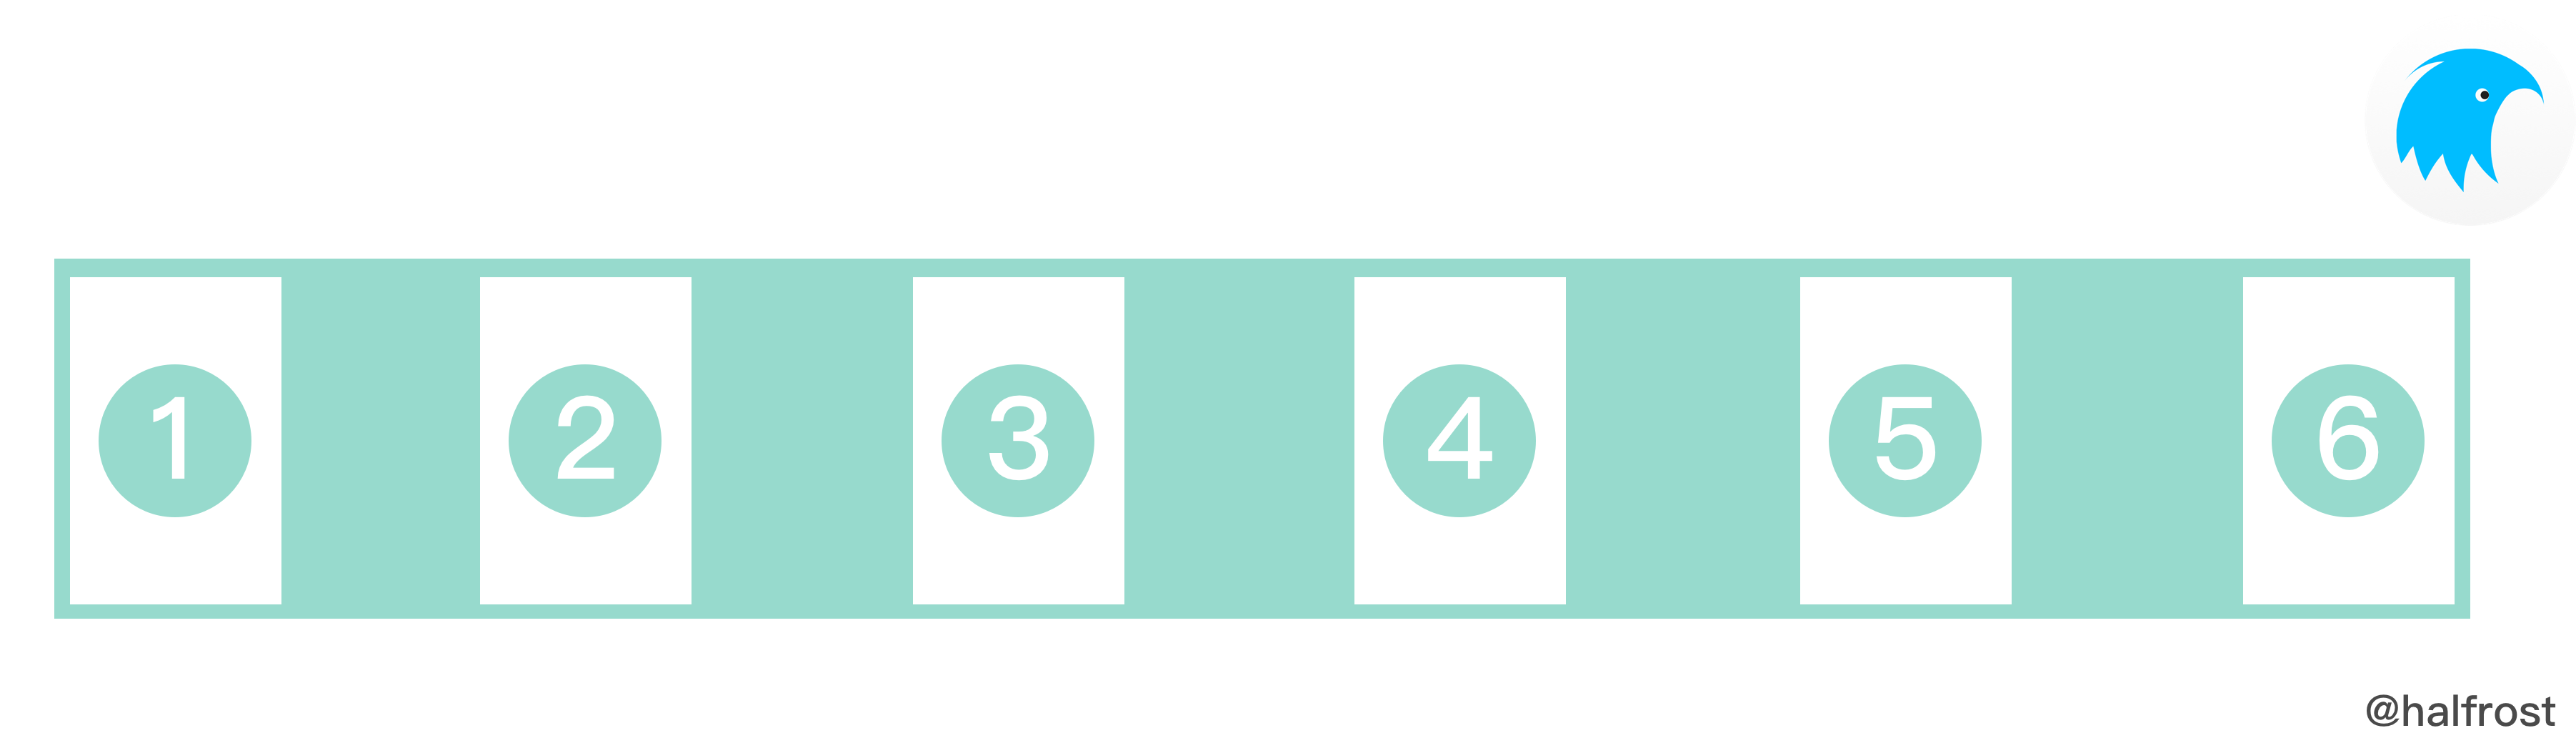
The image above shows JUSTIFY_SPACE_BETWEEN
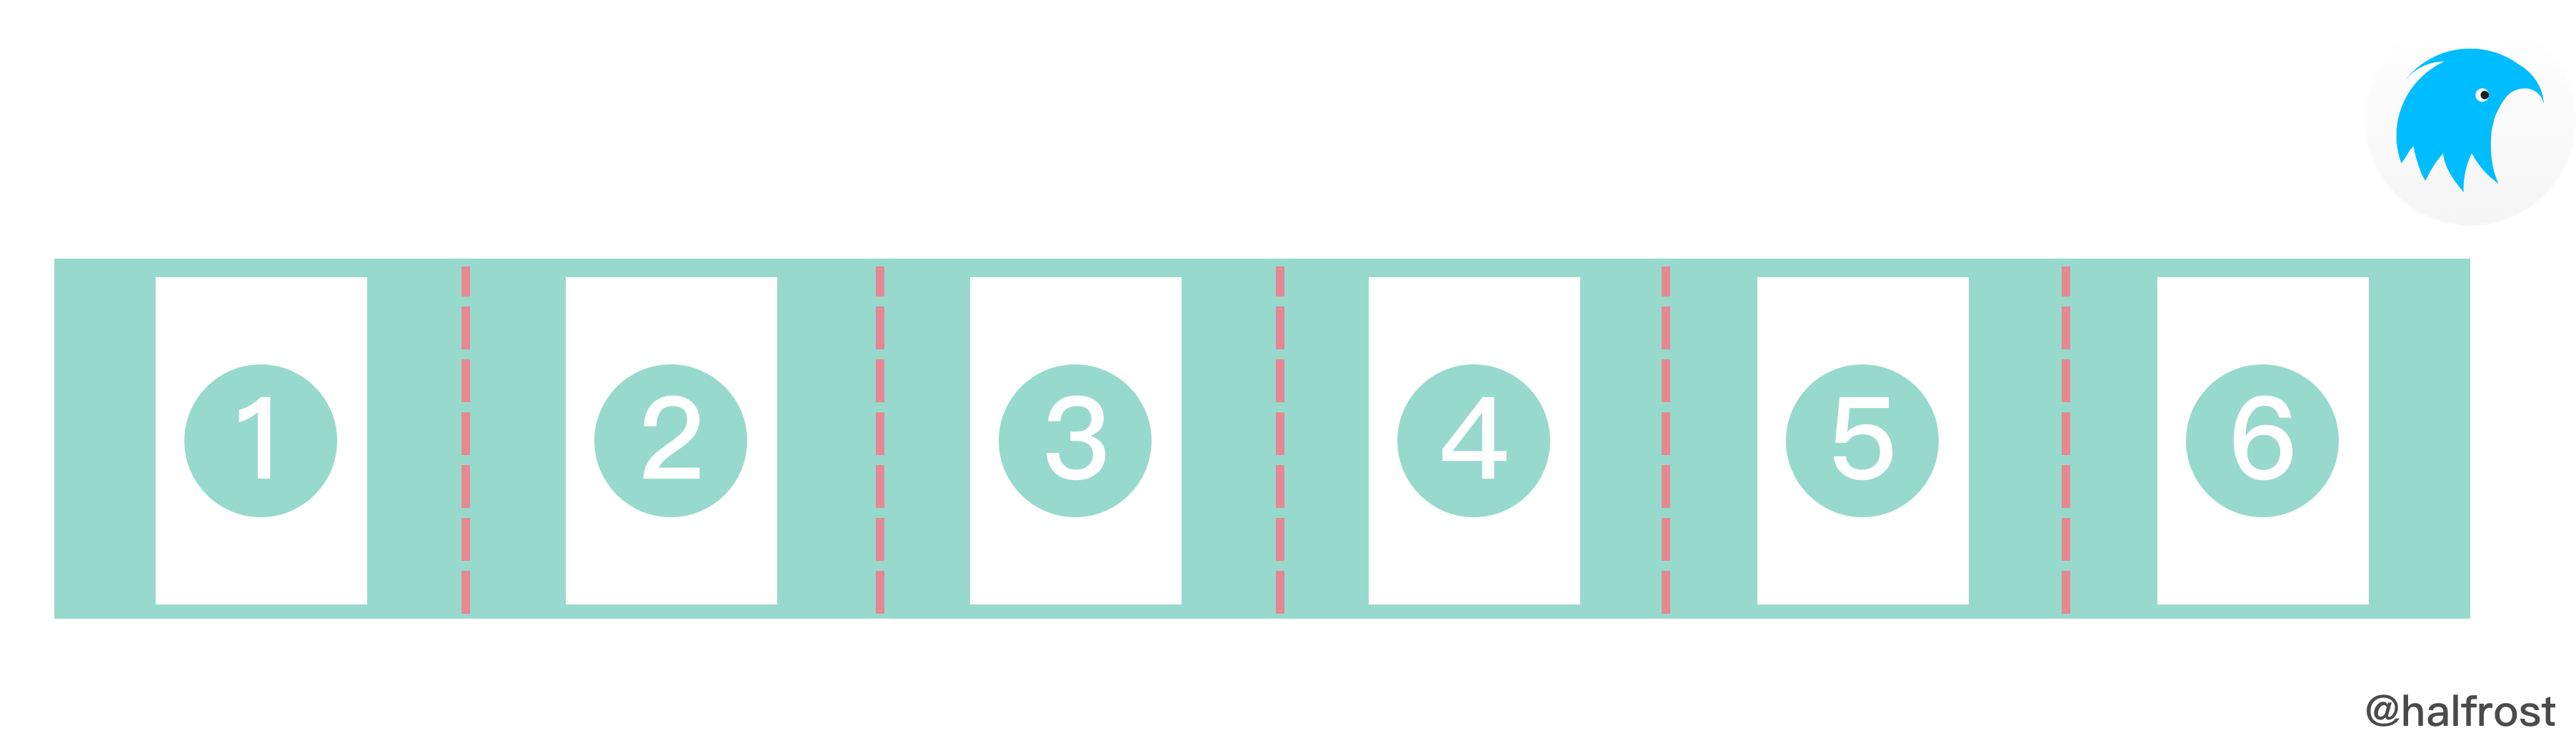
The image above shows JUSTIFY_SPACE_AROUND. With this mode, a certain amount of width is maintained on both the left and right sides of each view.
typedef enum {
  CSS_ALIGN_AUTO = 0,
  CSS_ALIGN_FLEX_START,
  CSS_ALIGN_CENTER,
  CSS_ALIGN_FLEX_END,
  CSS_ALIGN_STRETCH
} css_align_t;
This defines how child views are aligned on the cross axis.
In Weex, three alignment modes are defined as part of the css_align_t type: align_content, align_items, and align_self. These three types of alignment differ slightly.
ALIGN_AUTO is only a default value for align_self. For align_content and align_items, it is not a valid value for aligning child views.
1.align_items
align_items defines how child views are arranged on the cross axis within a single line.
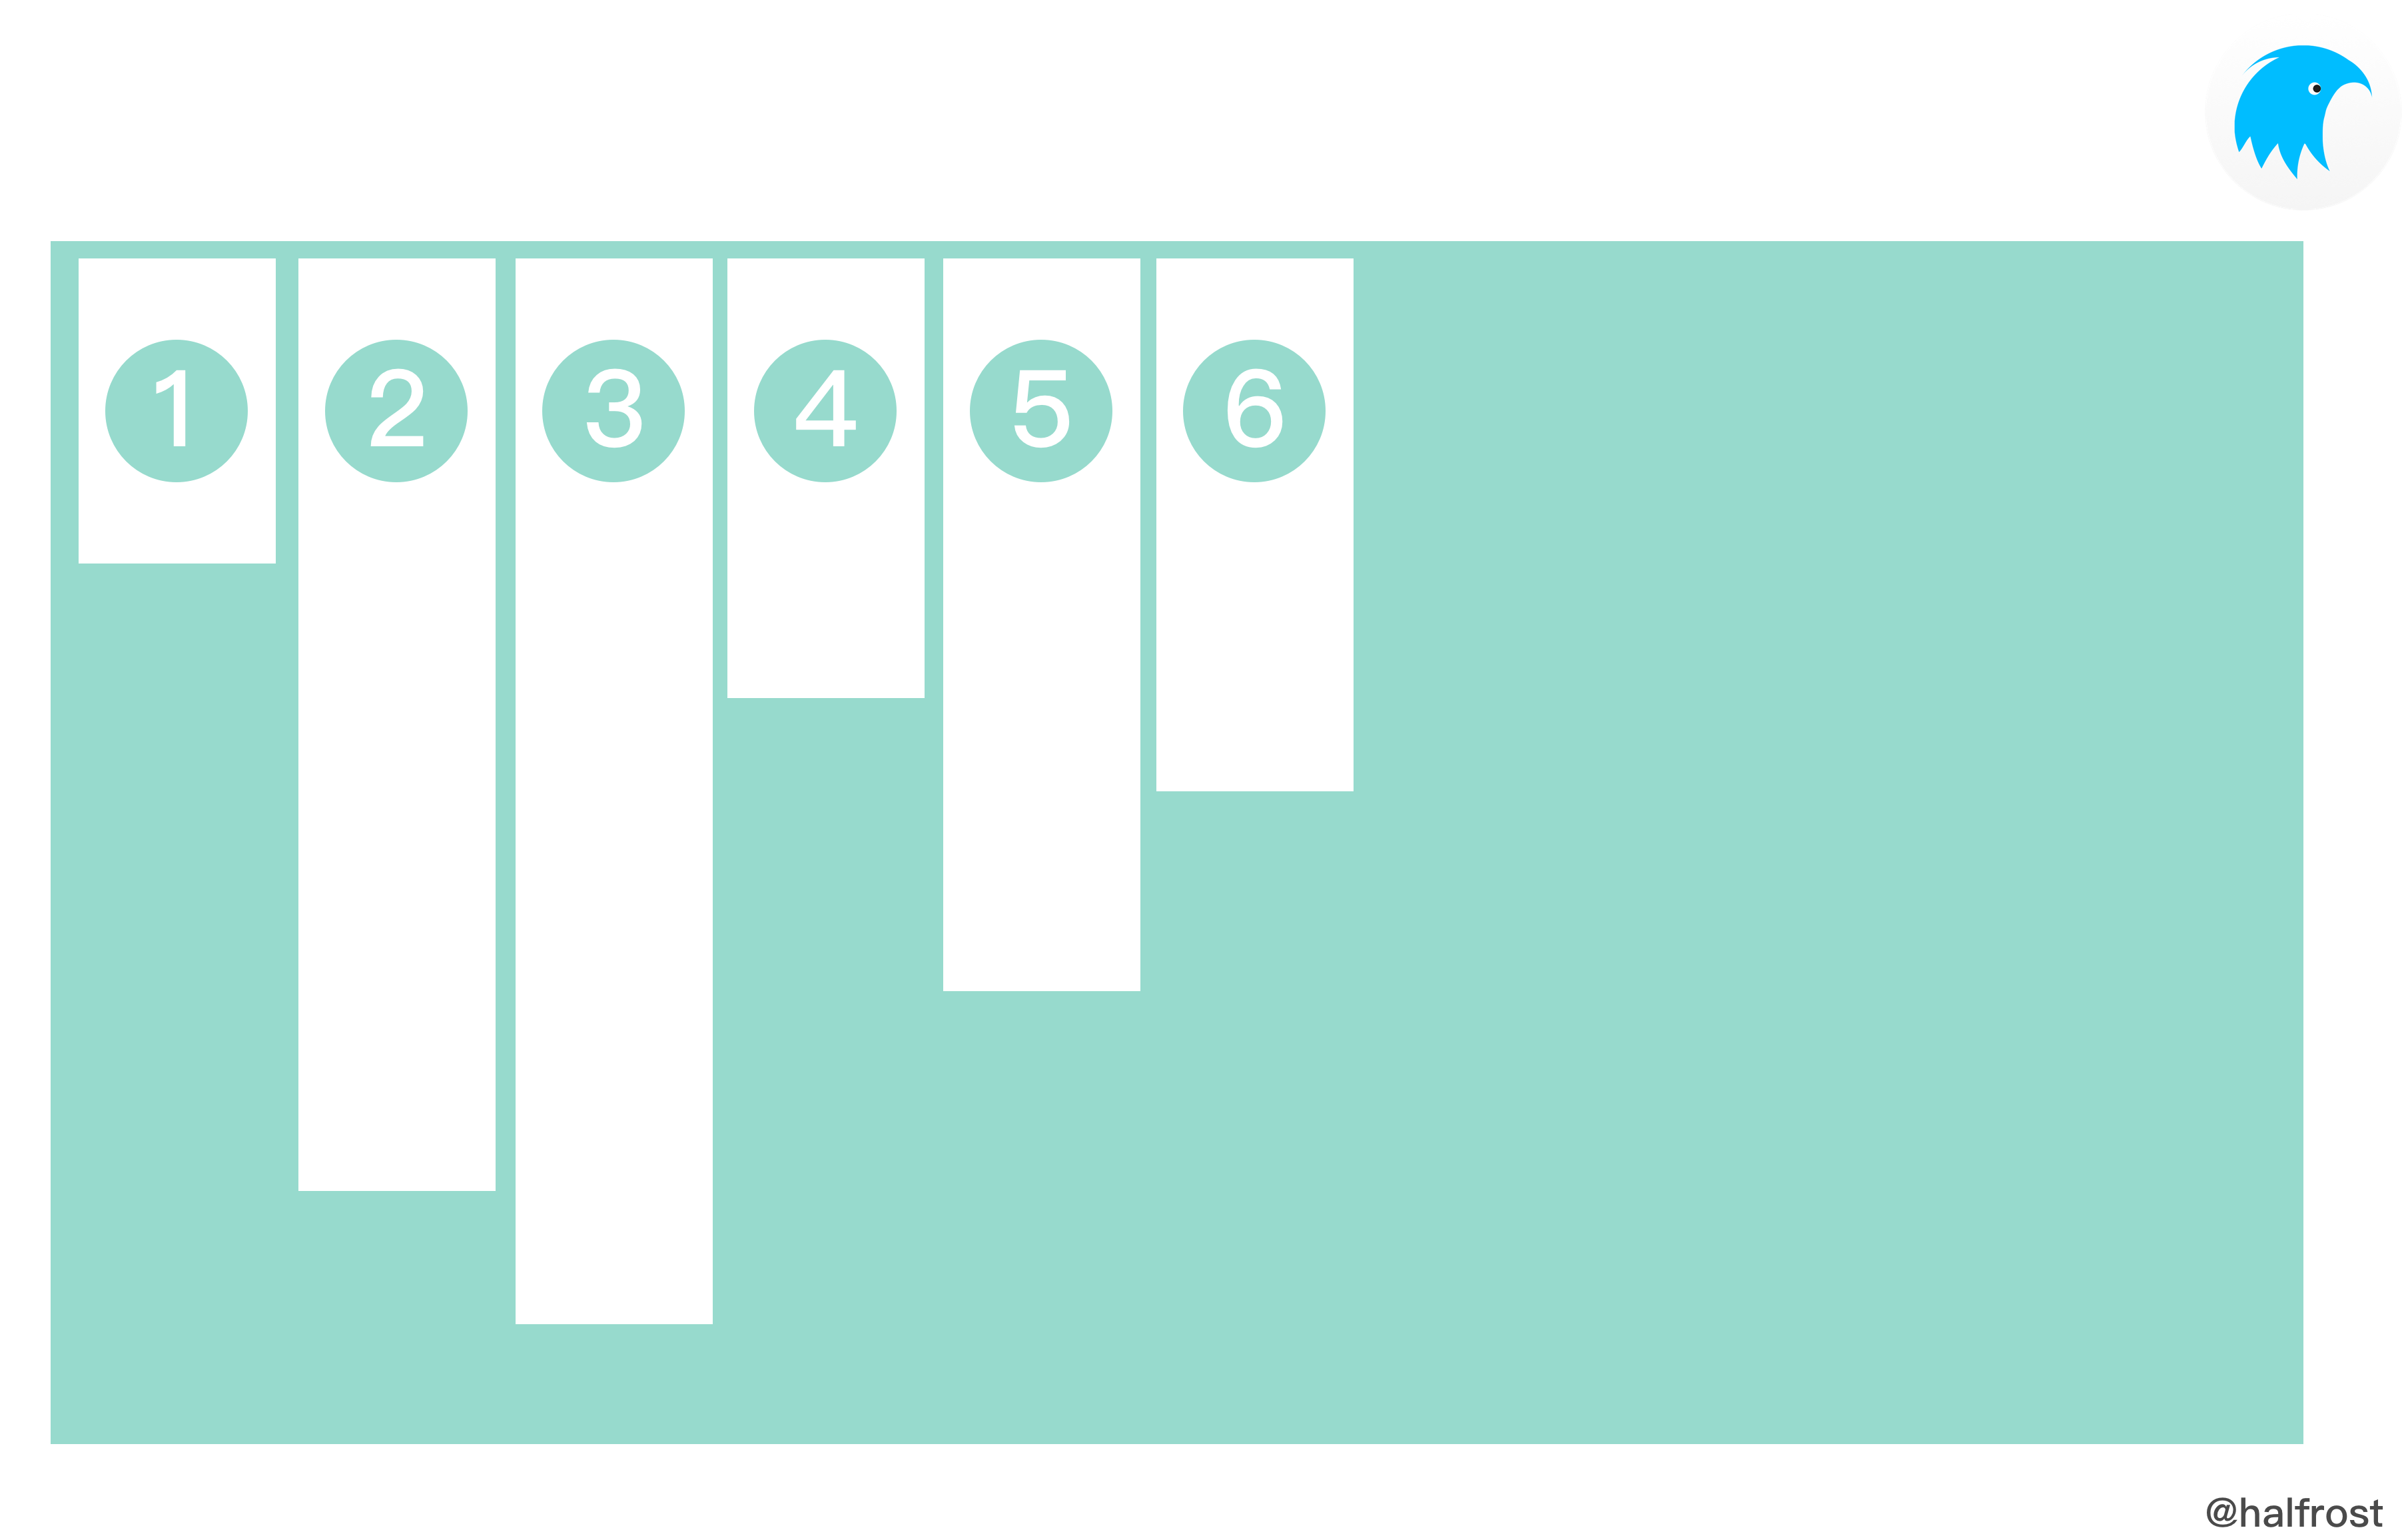
The image above shows ALIGN_FLEX_START
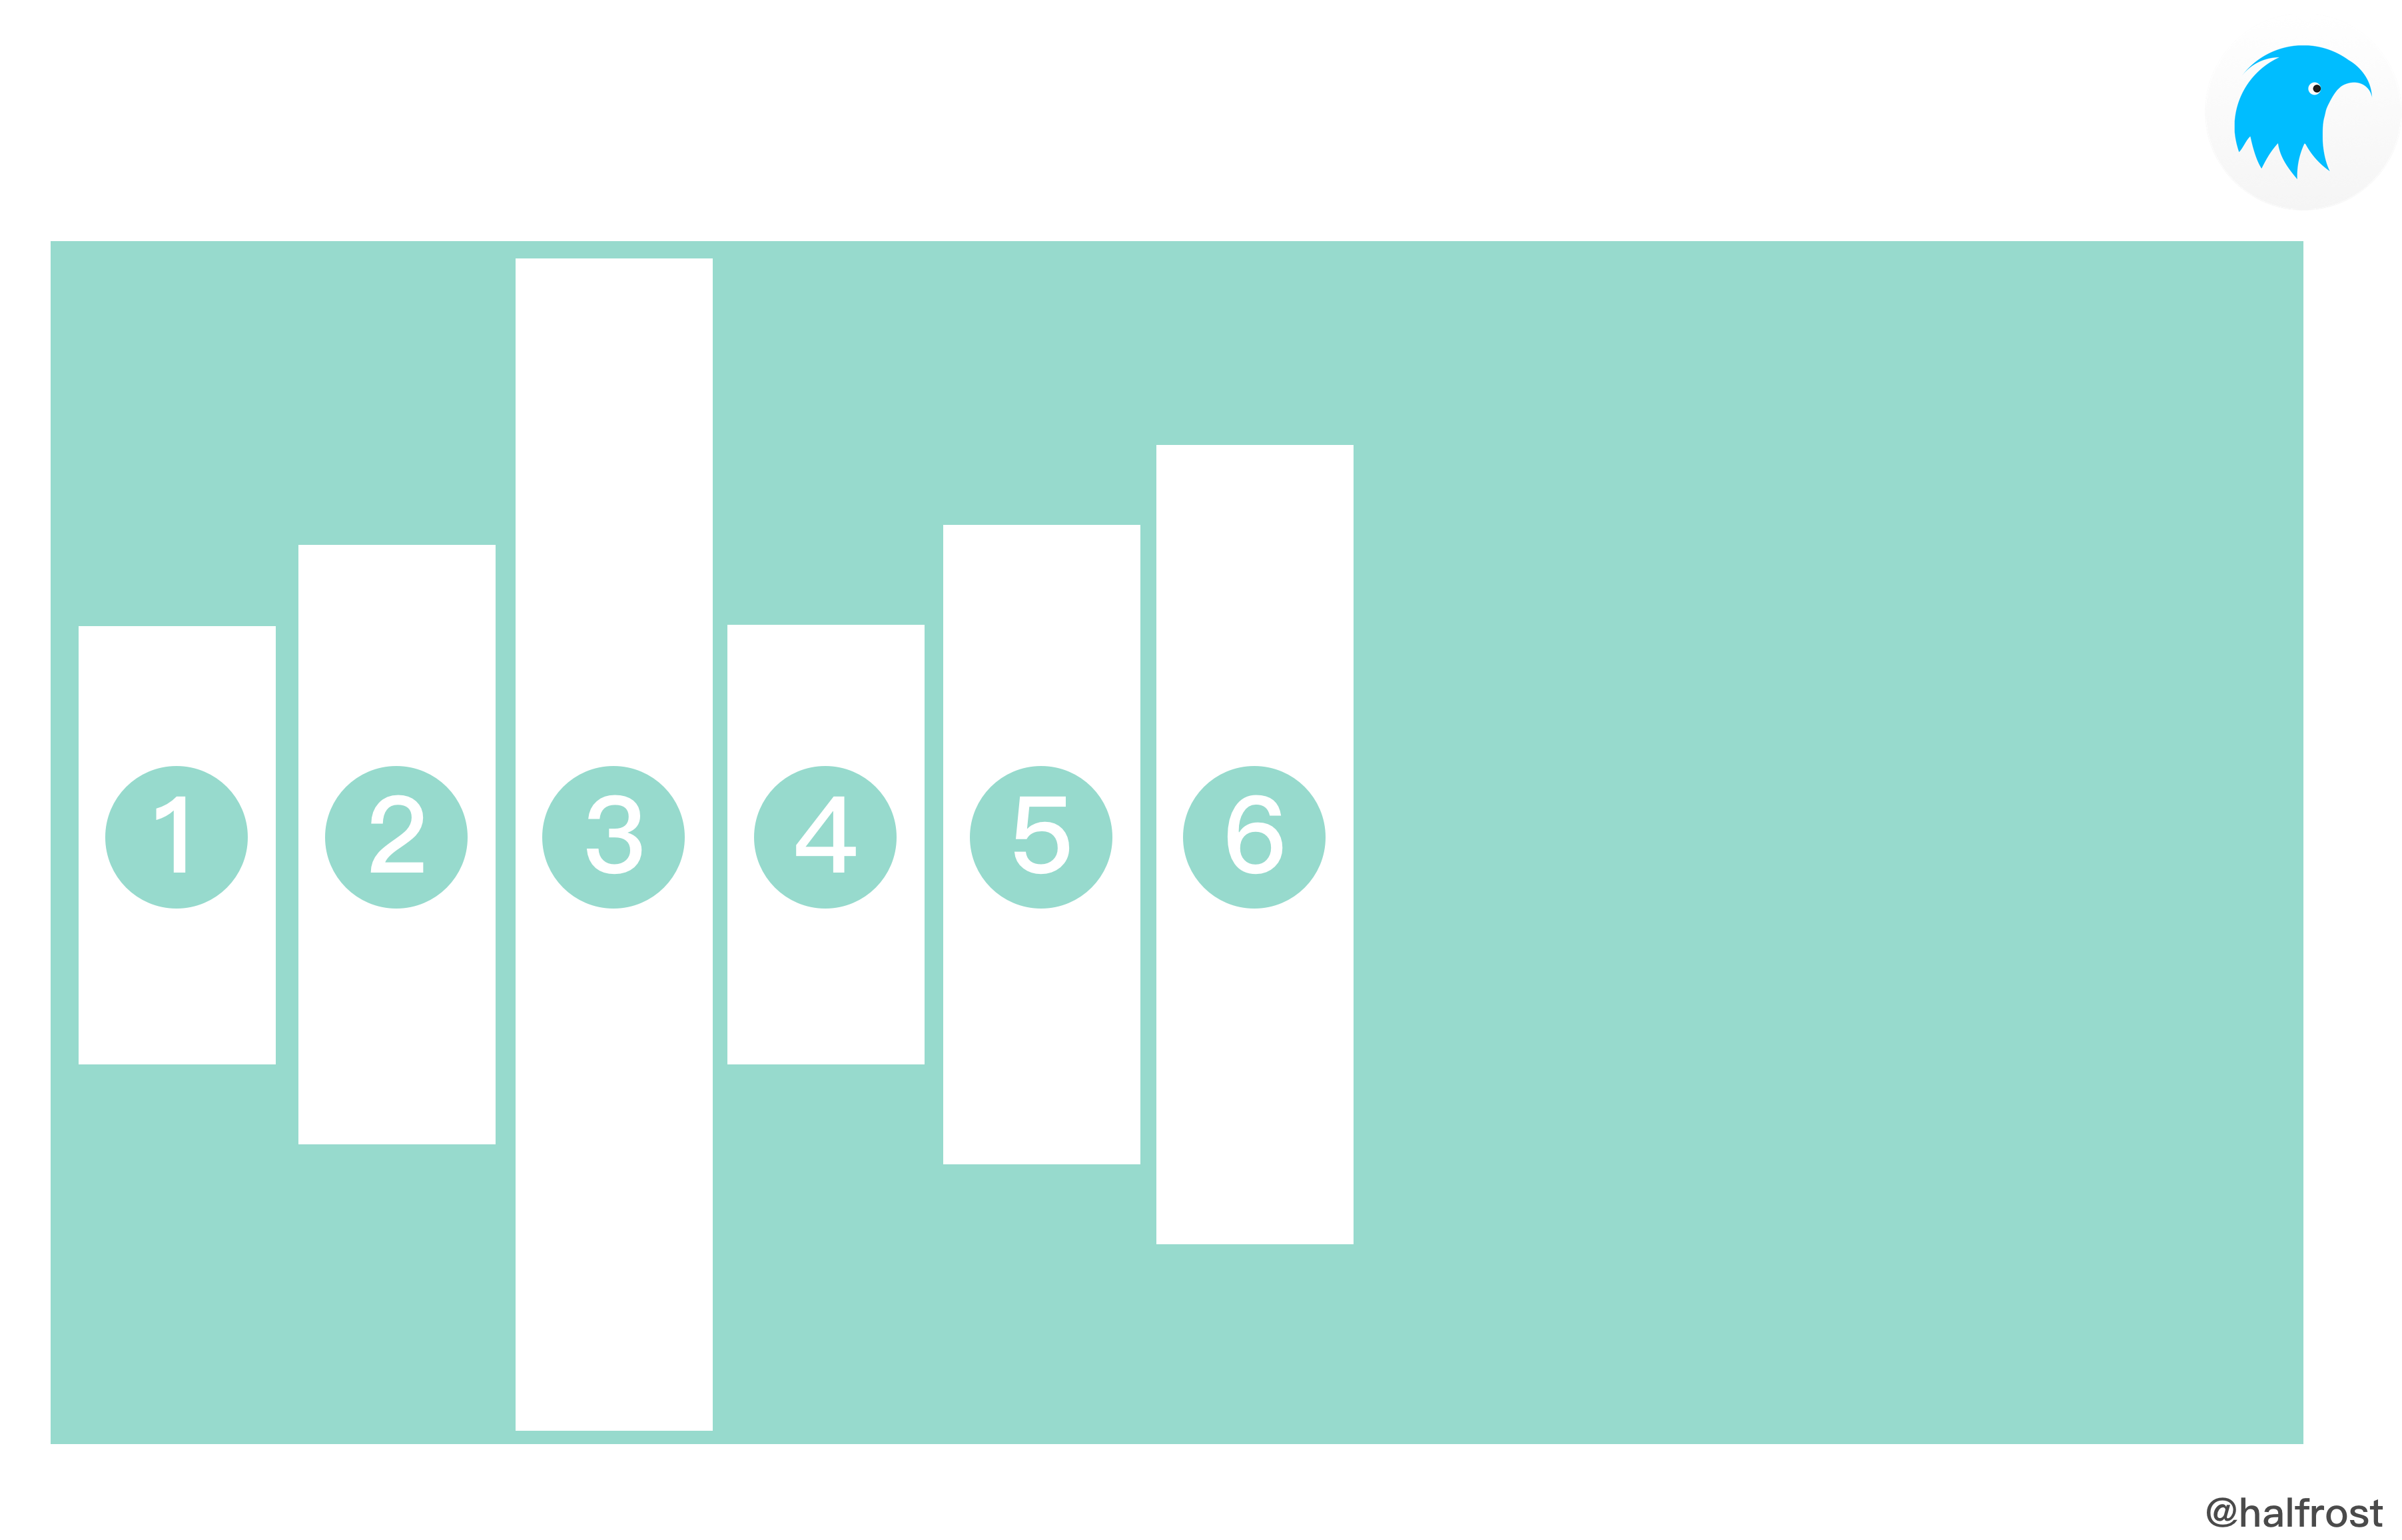
The image above shows ALIGN_CENTER
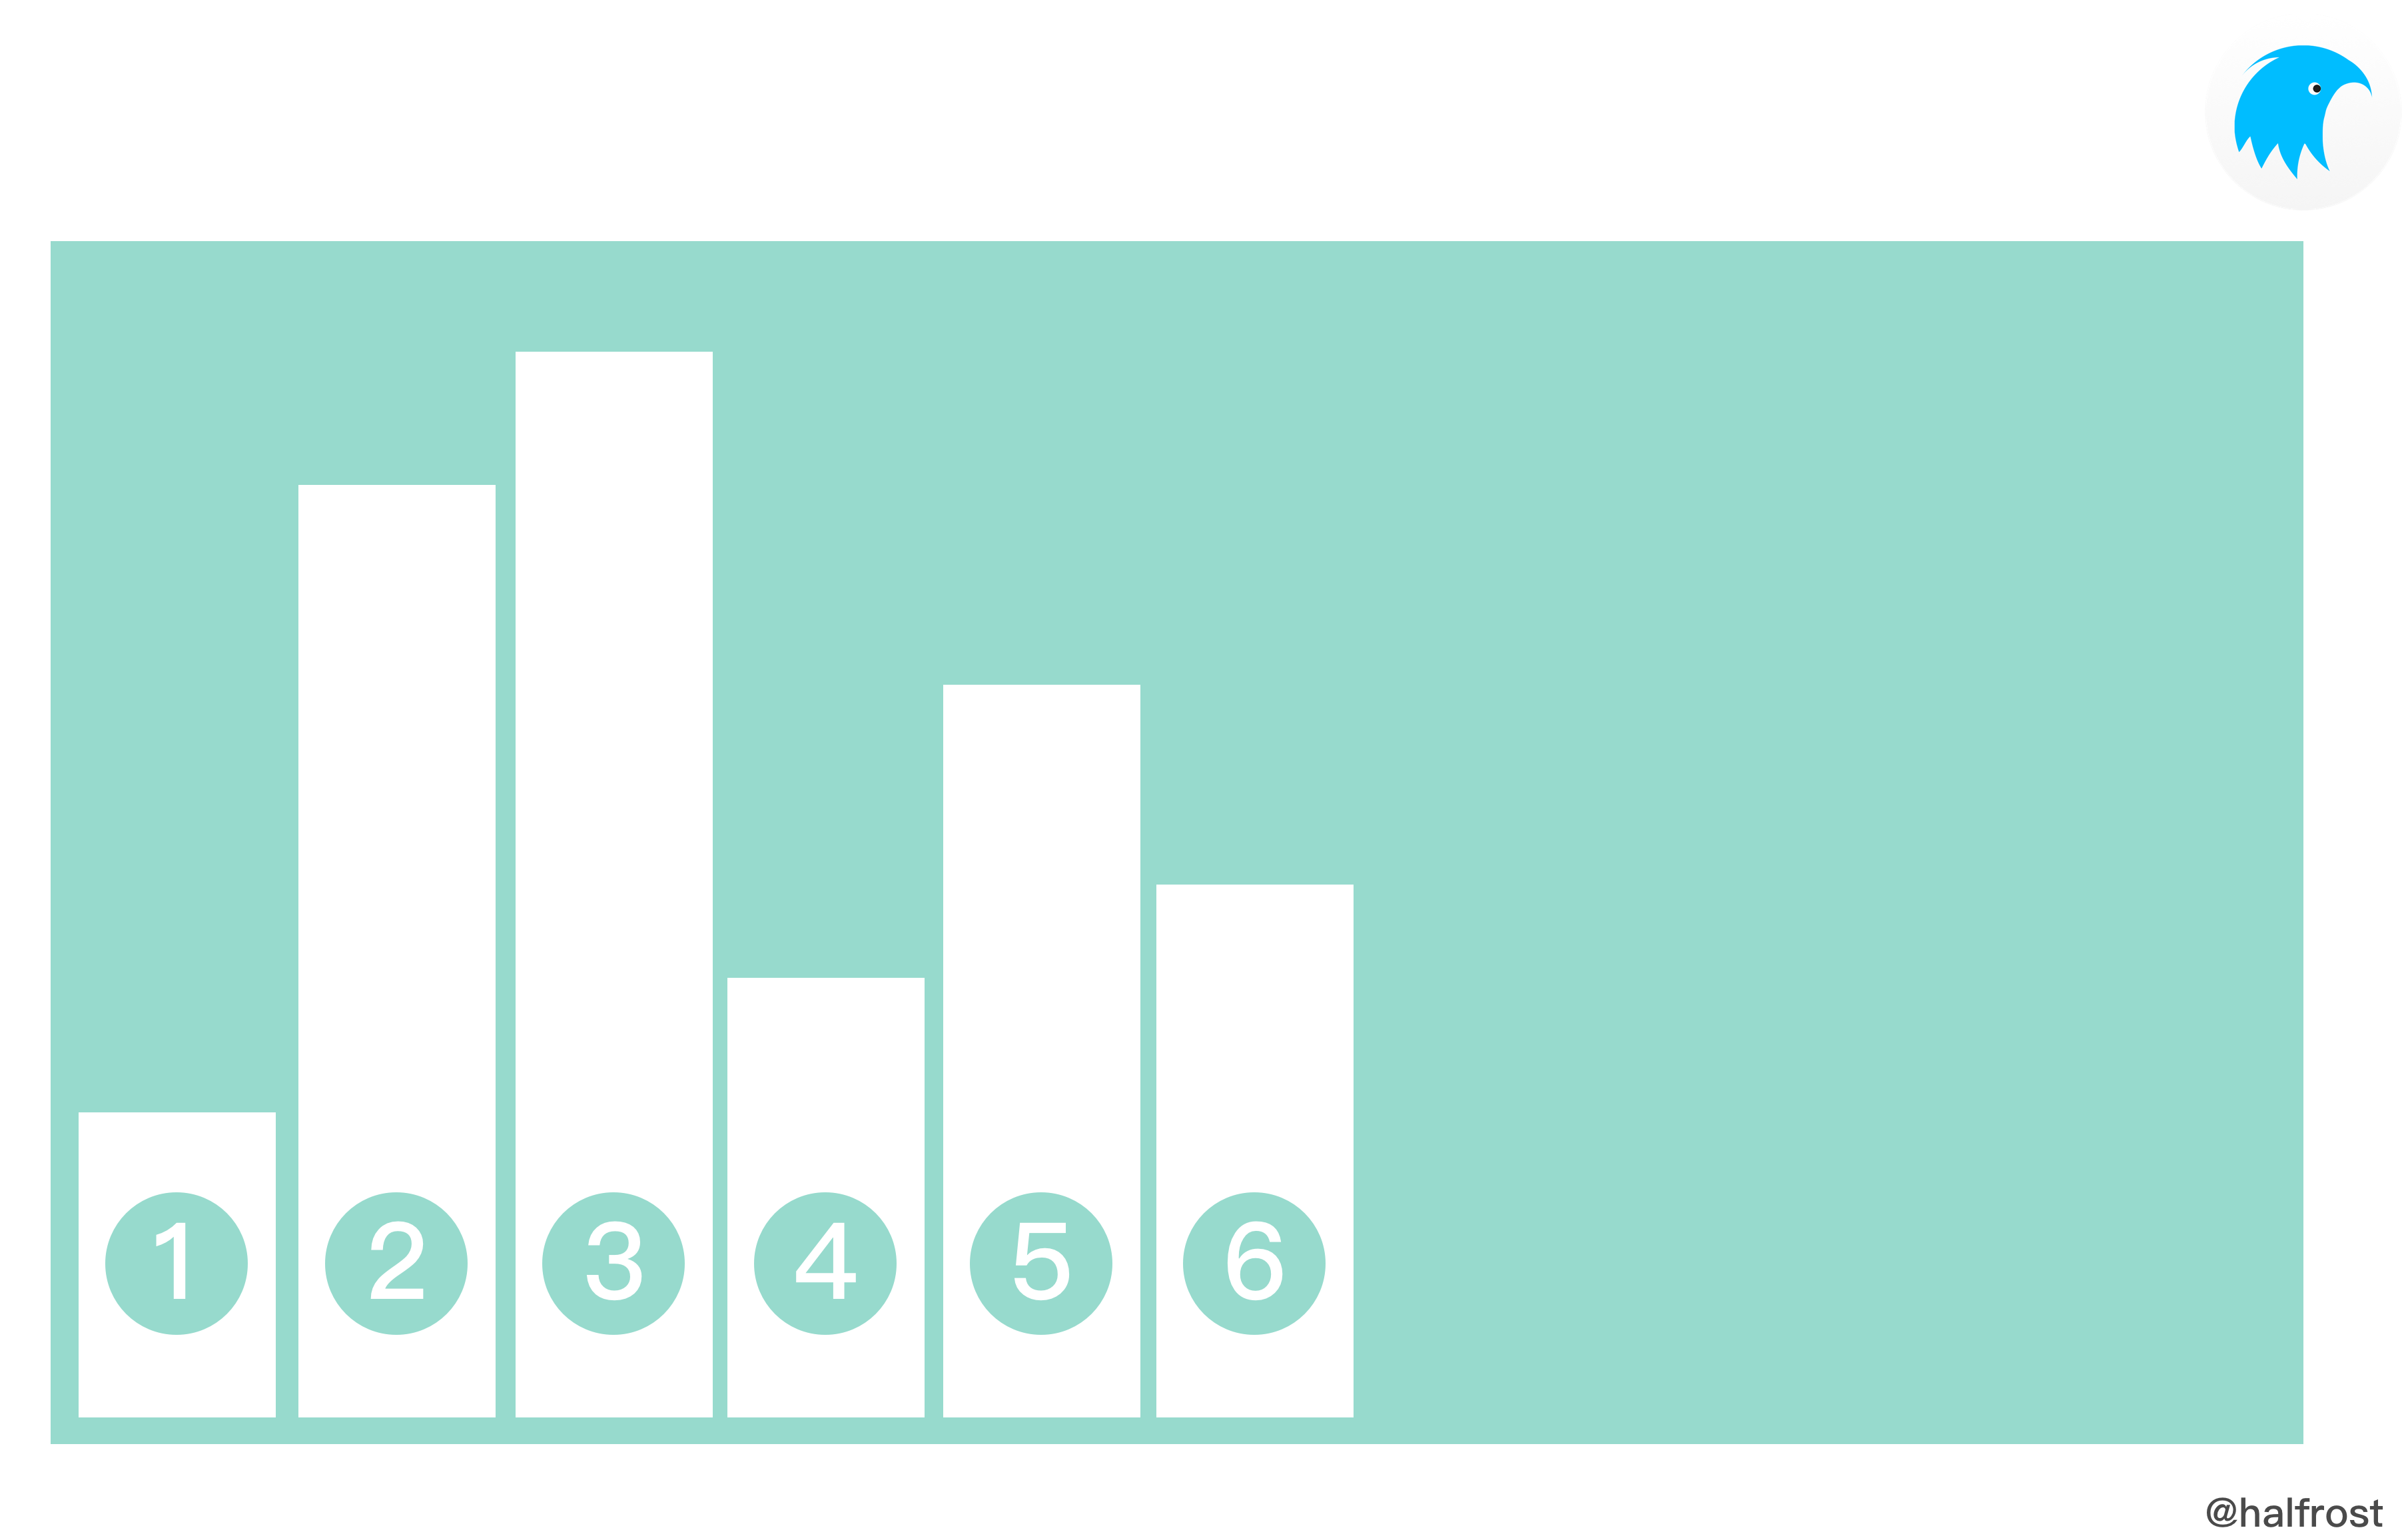
The image above shows ALIGN_FLEX_END
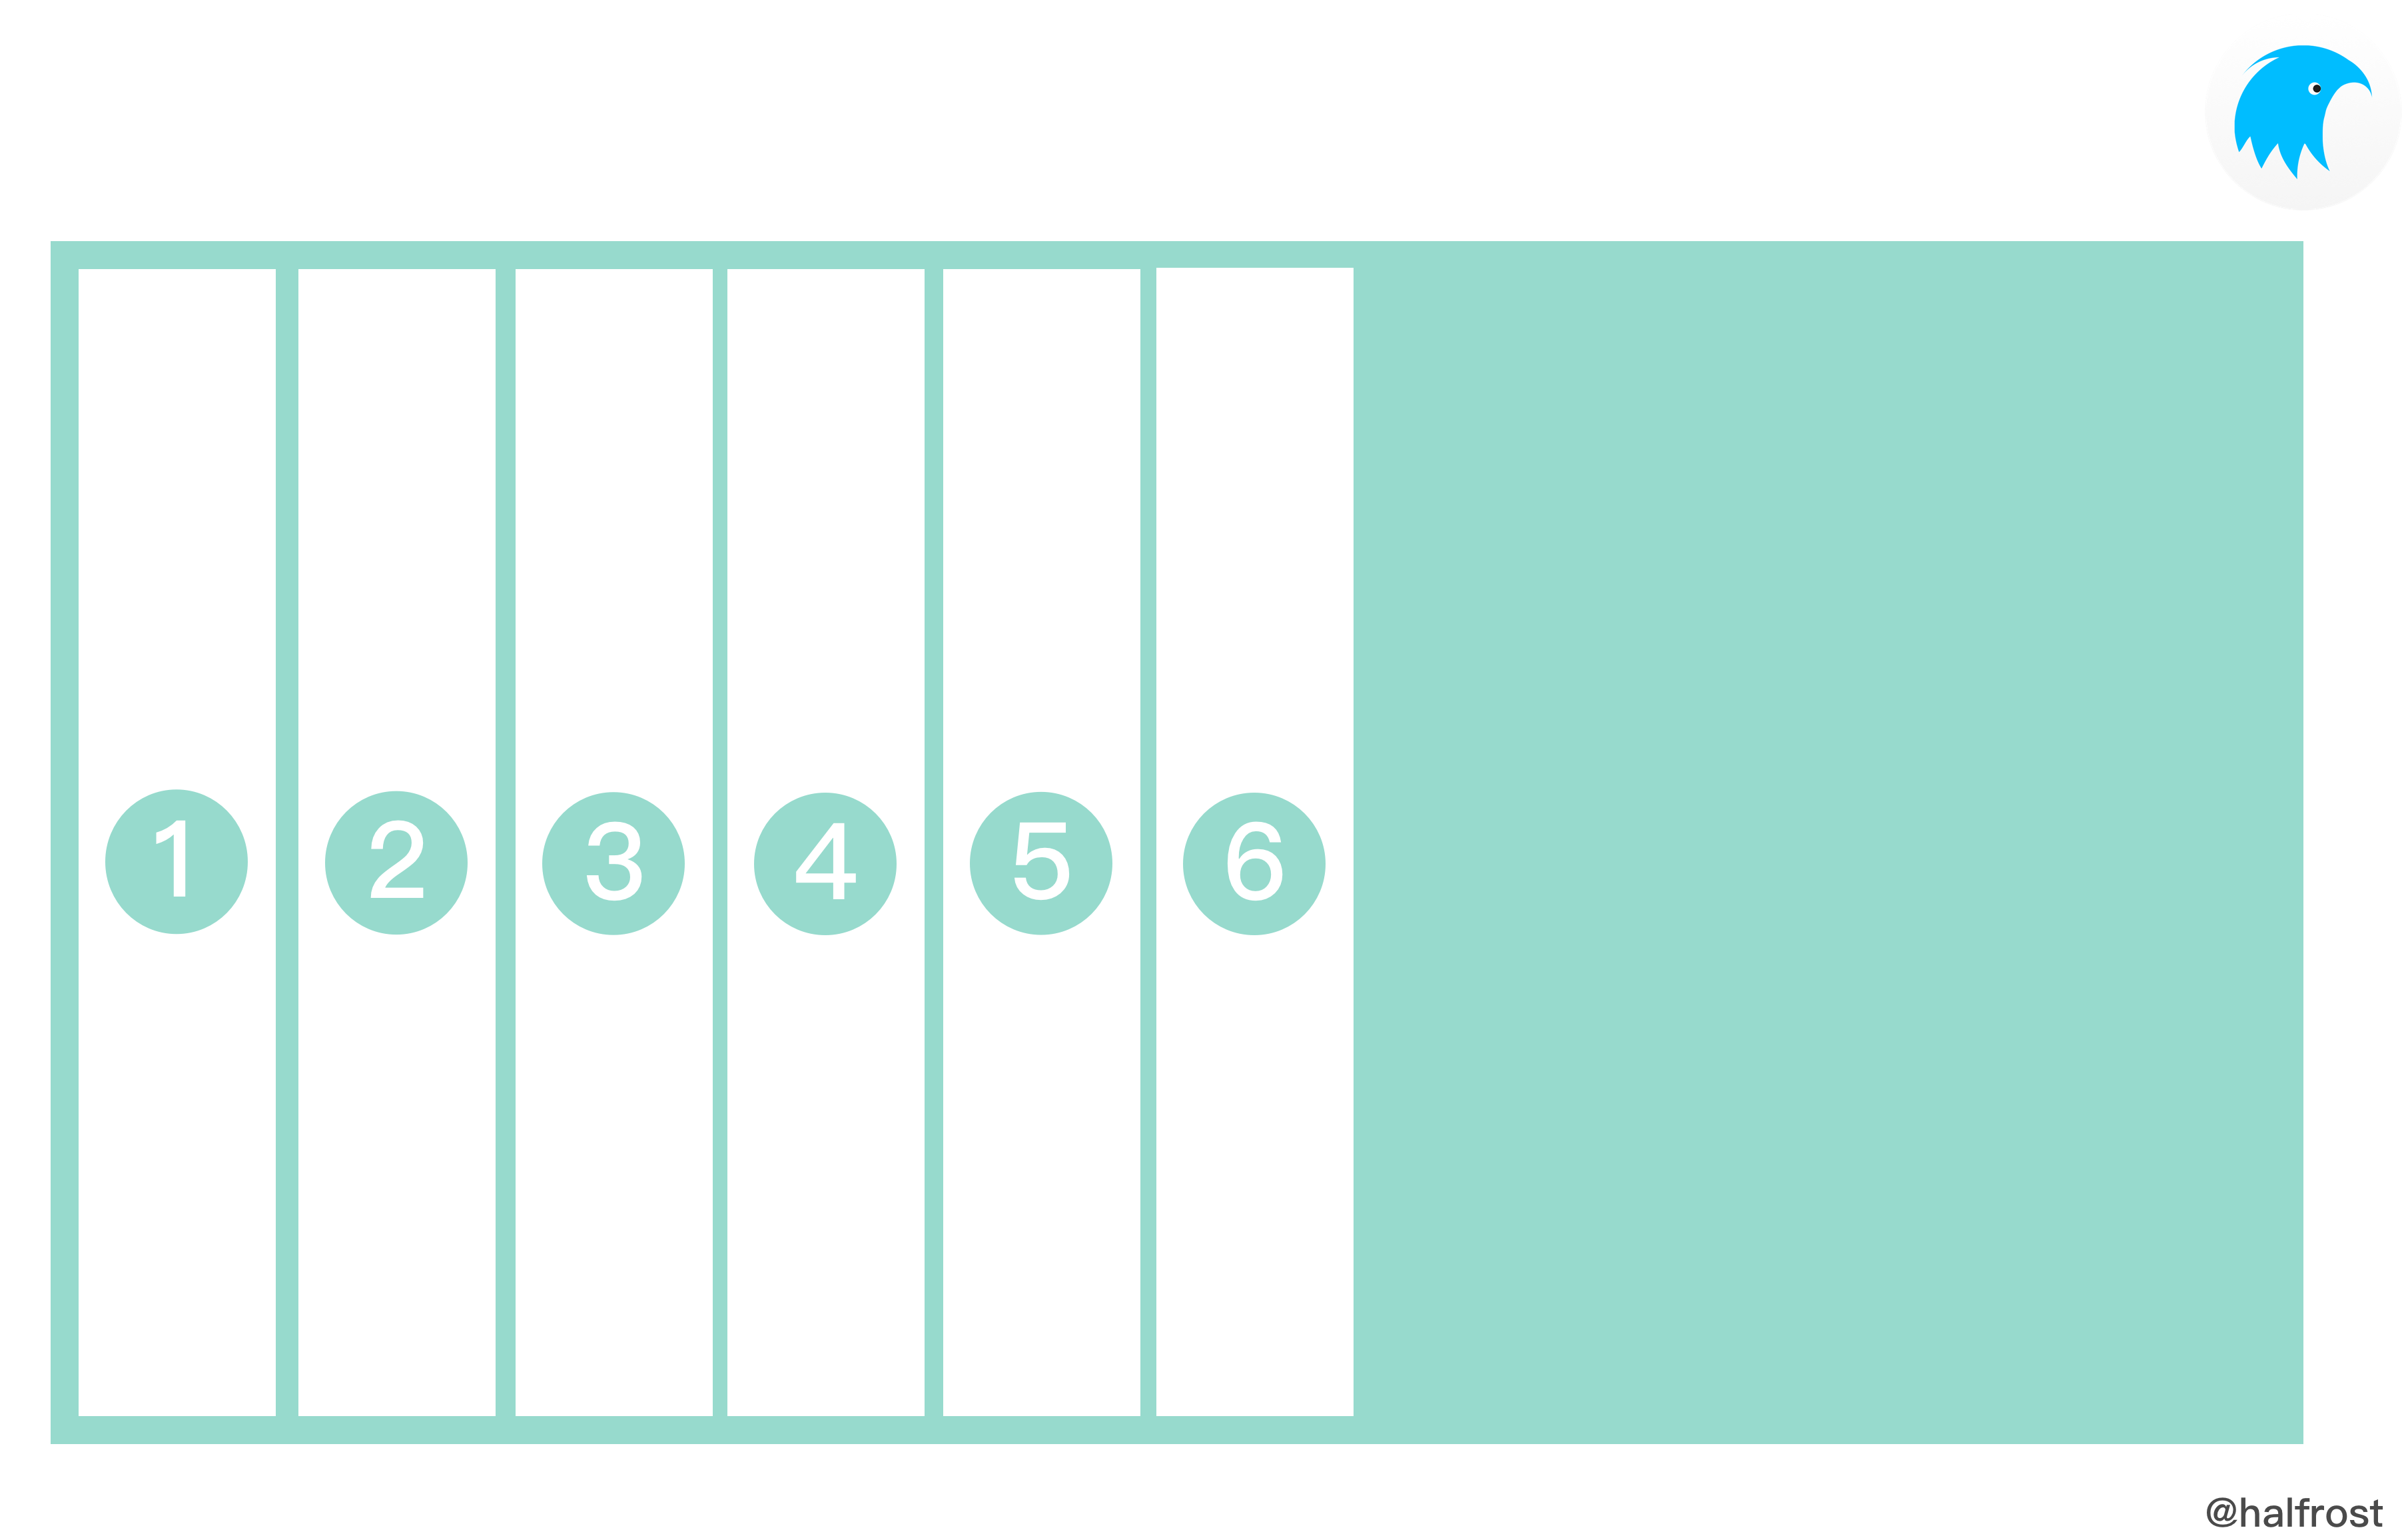
The image above shows ALIGN_STRETCH
In the W3C definition of align_items, there is actually another alignment mode: baseline. It is not included in this definition.
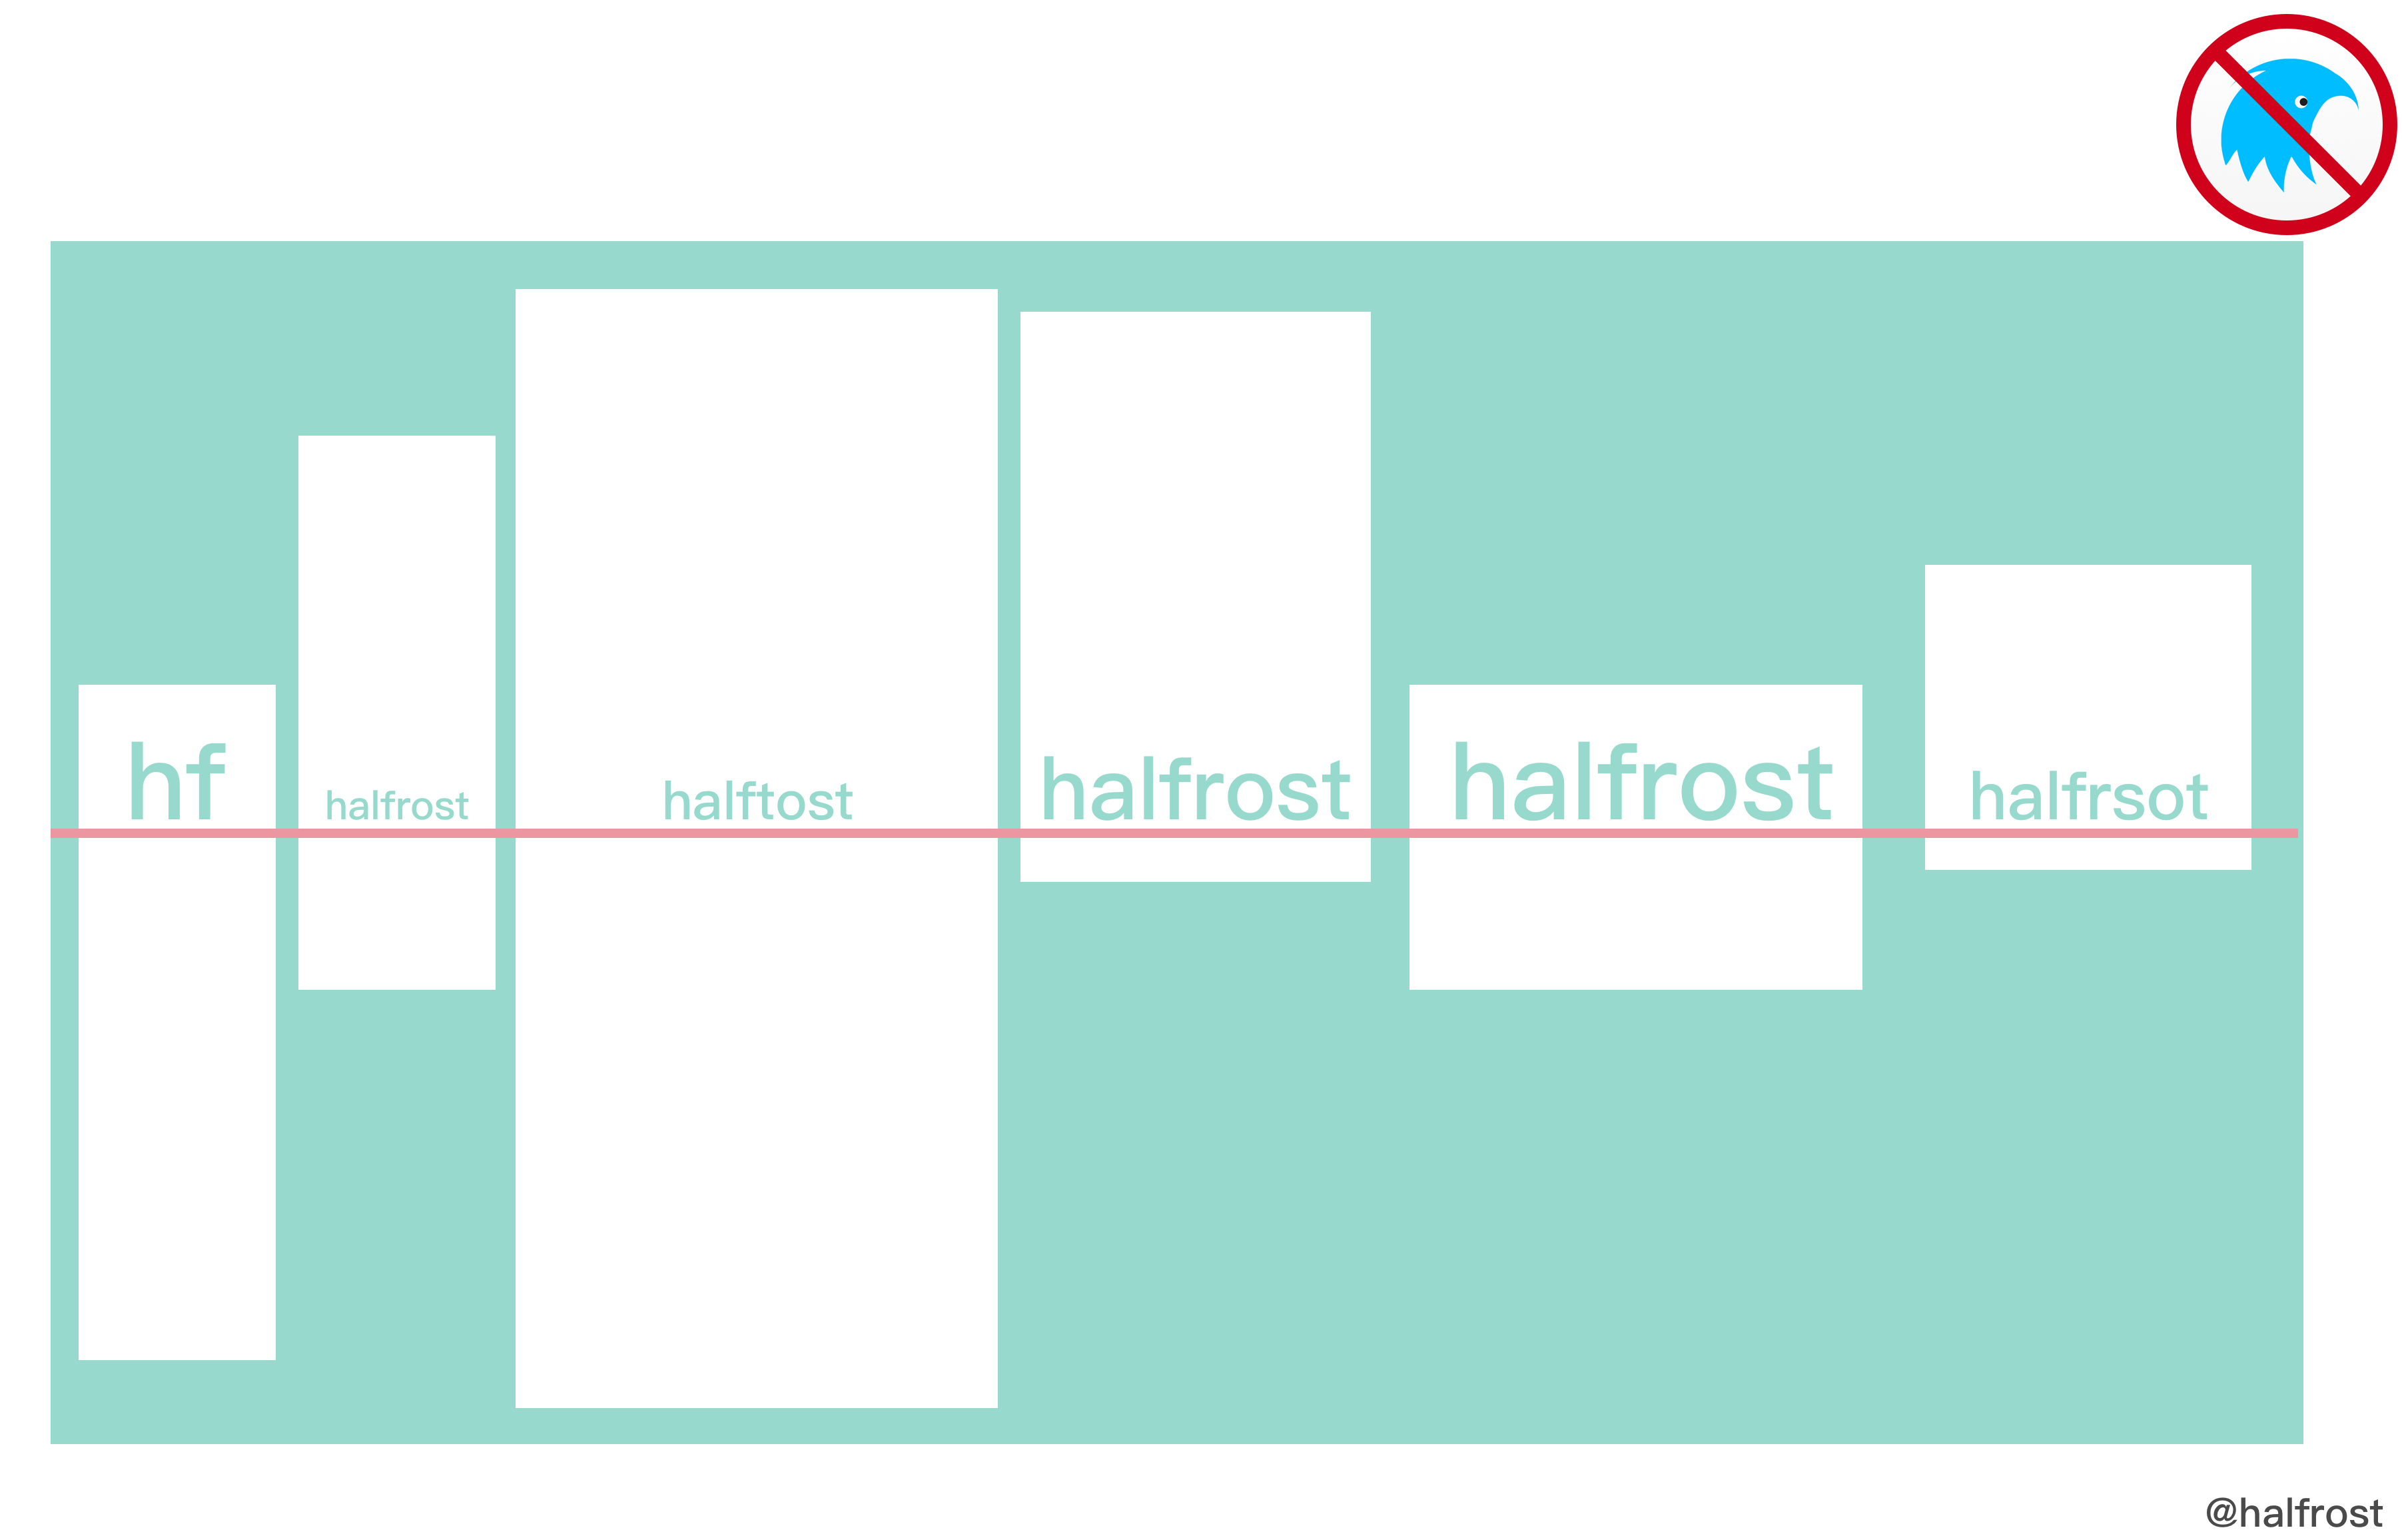
Note that the baseline alignment shown above is not defined in Weex!
2. align_content
align_content defines how rows of child views are arranged relative to one another on the cross axis.
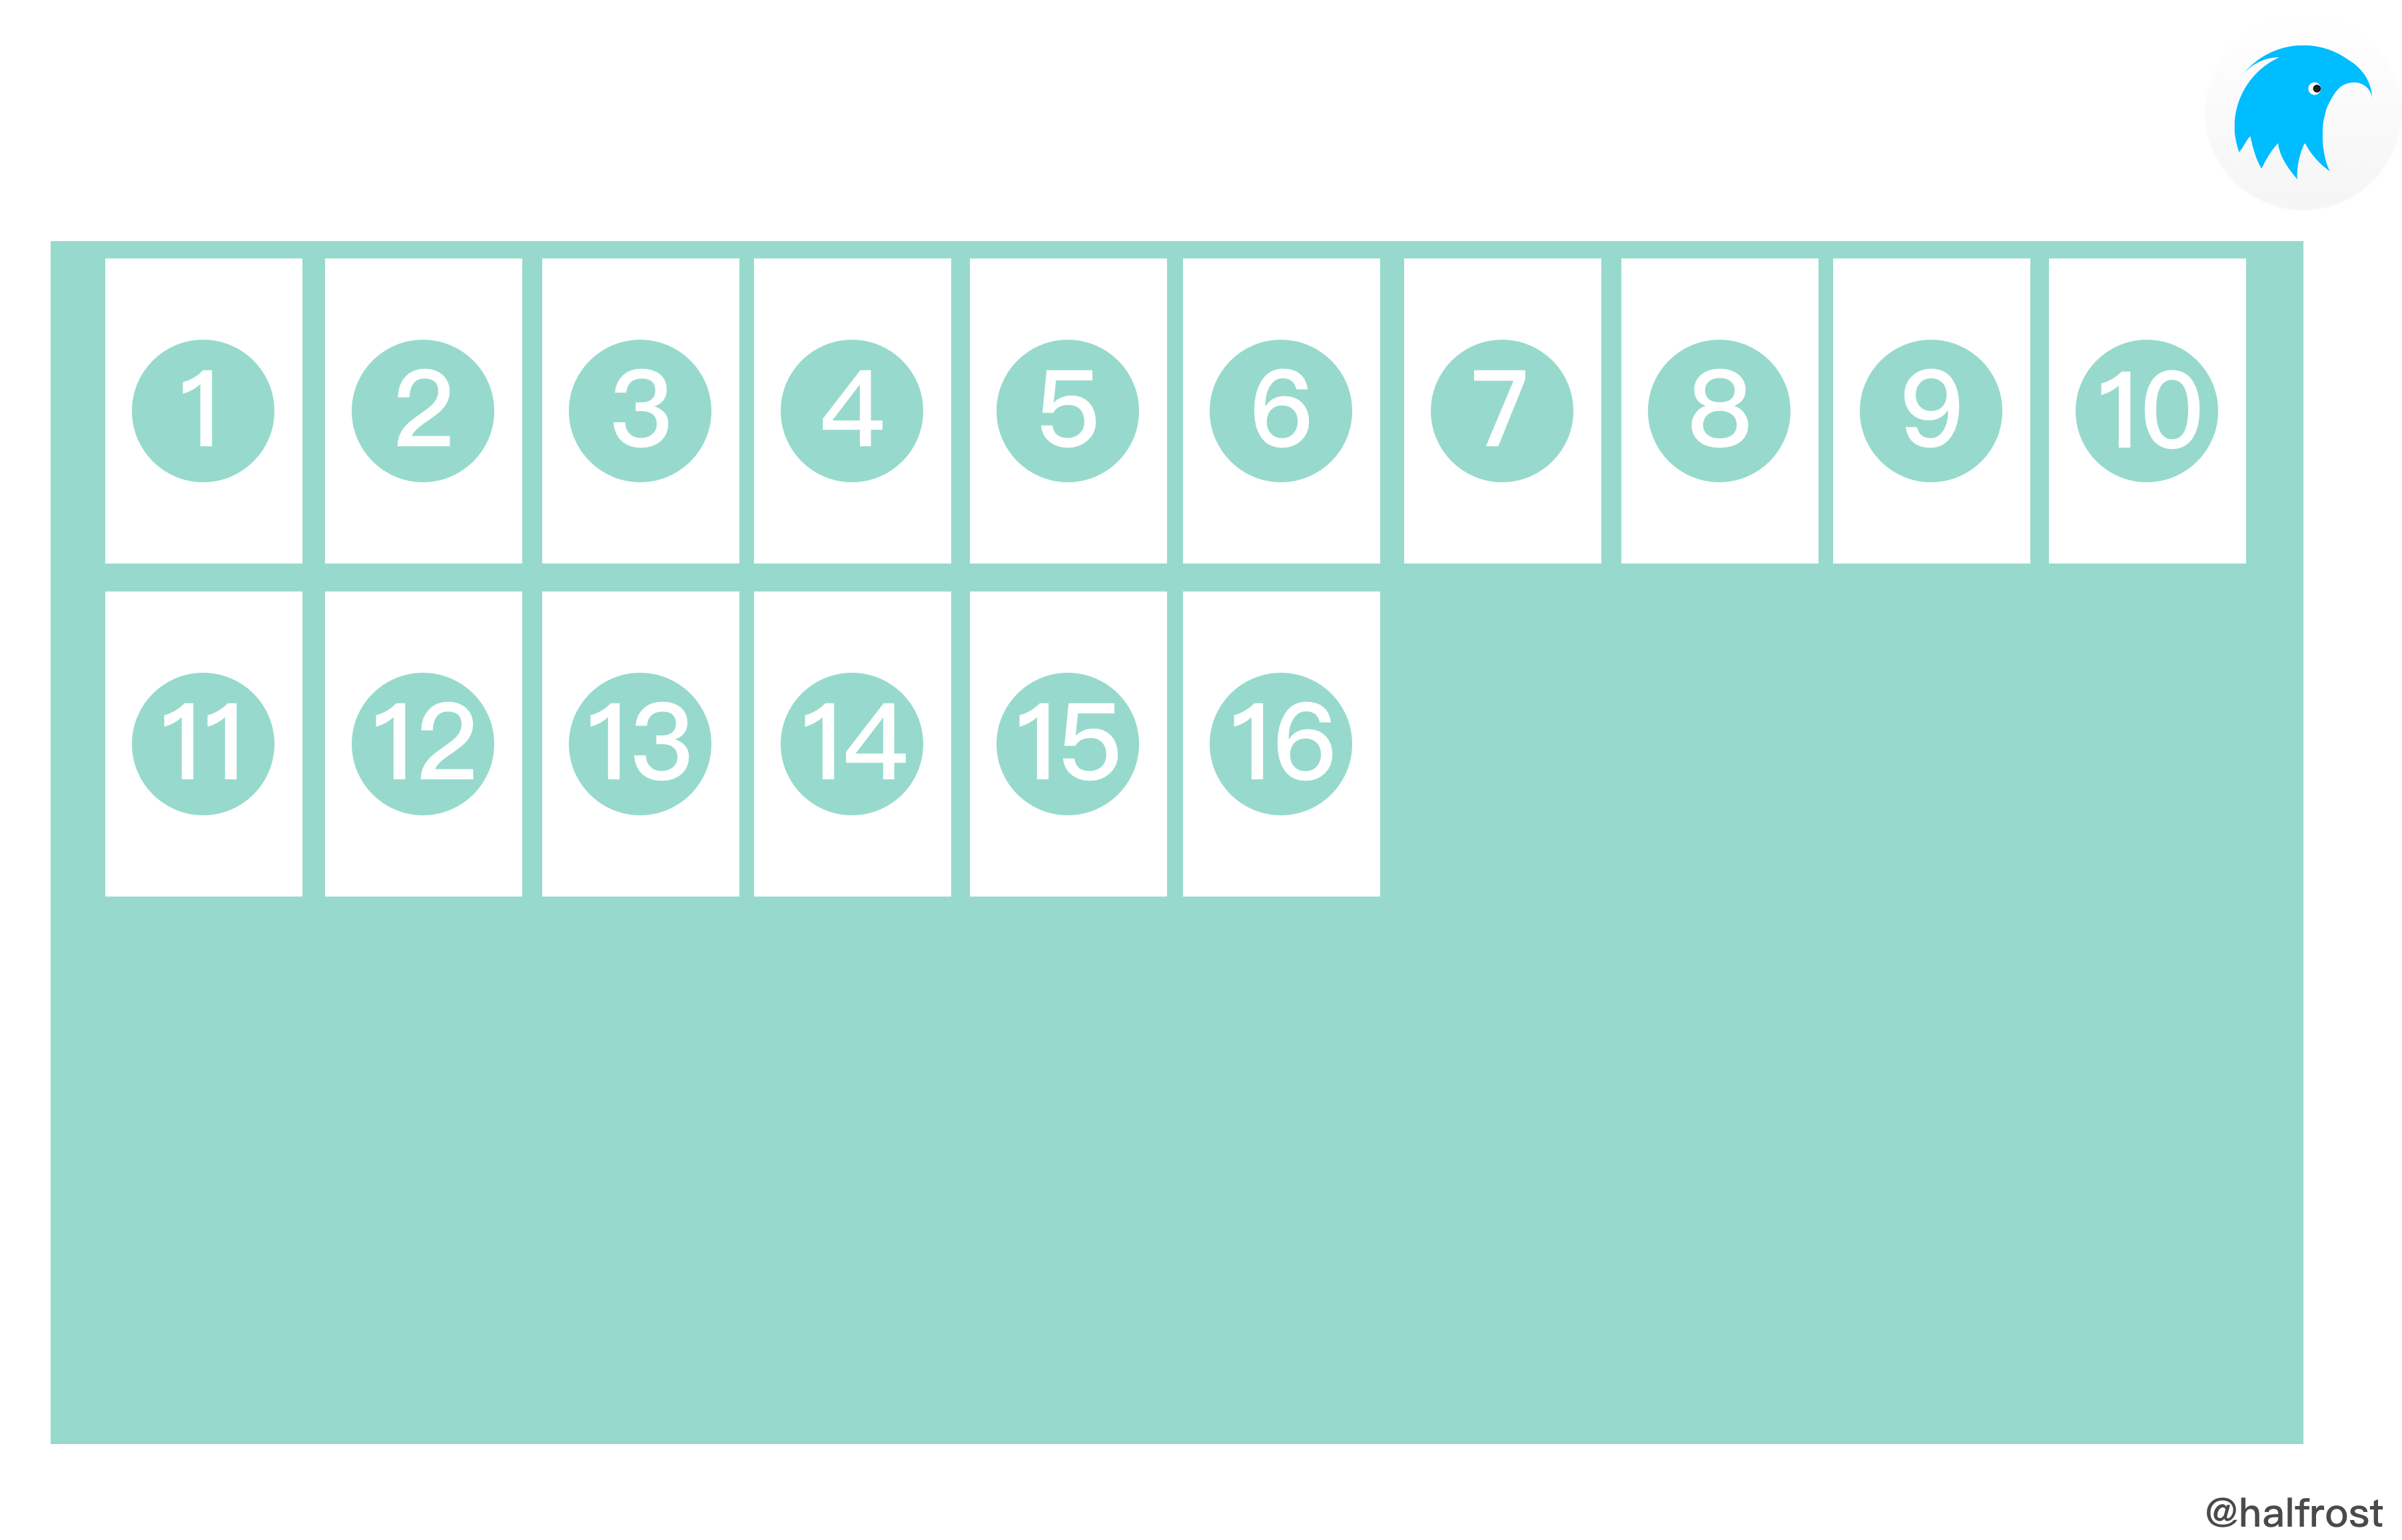
The image above shows ALIGN_FLEX_START
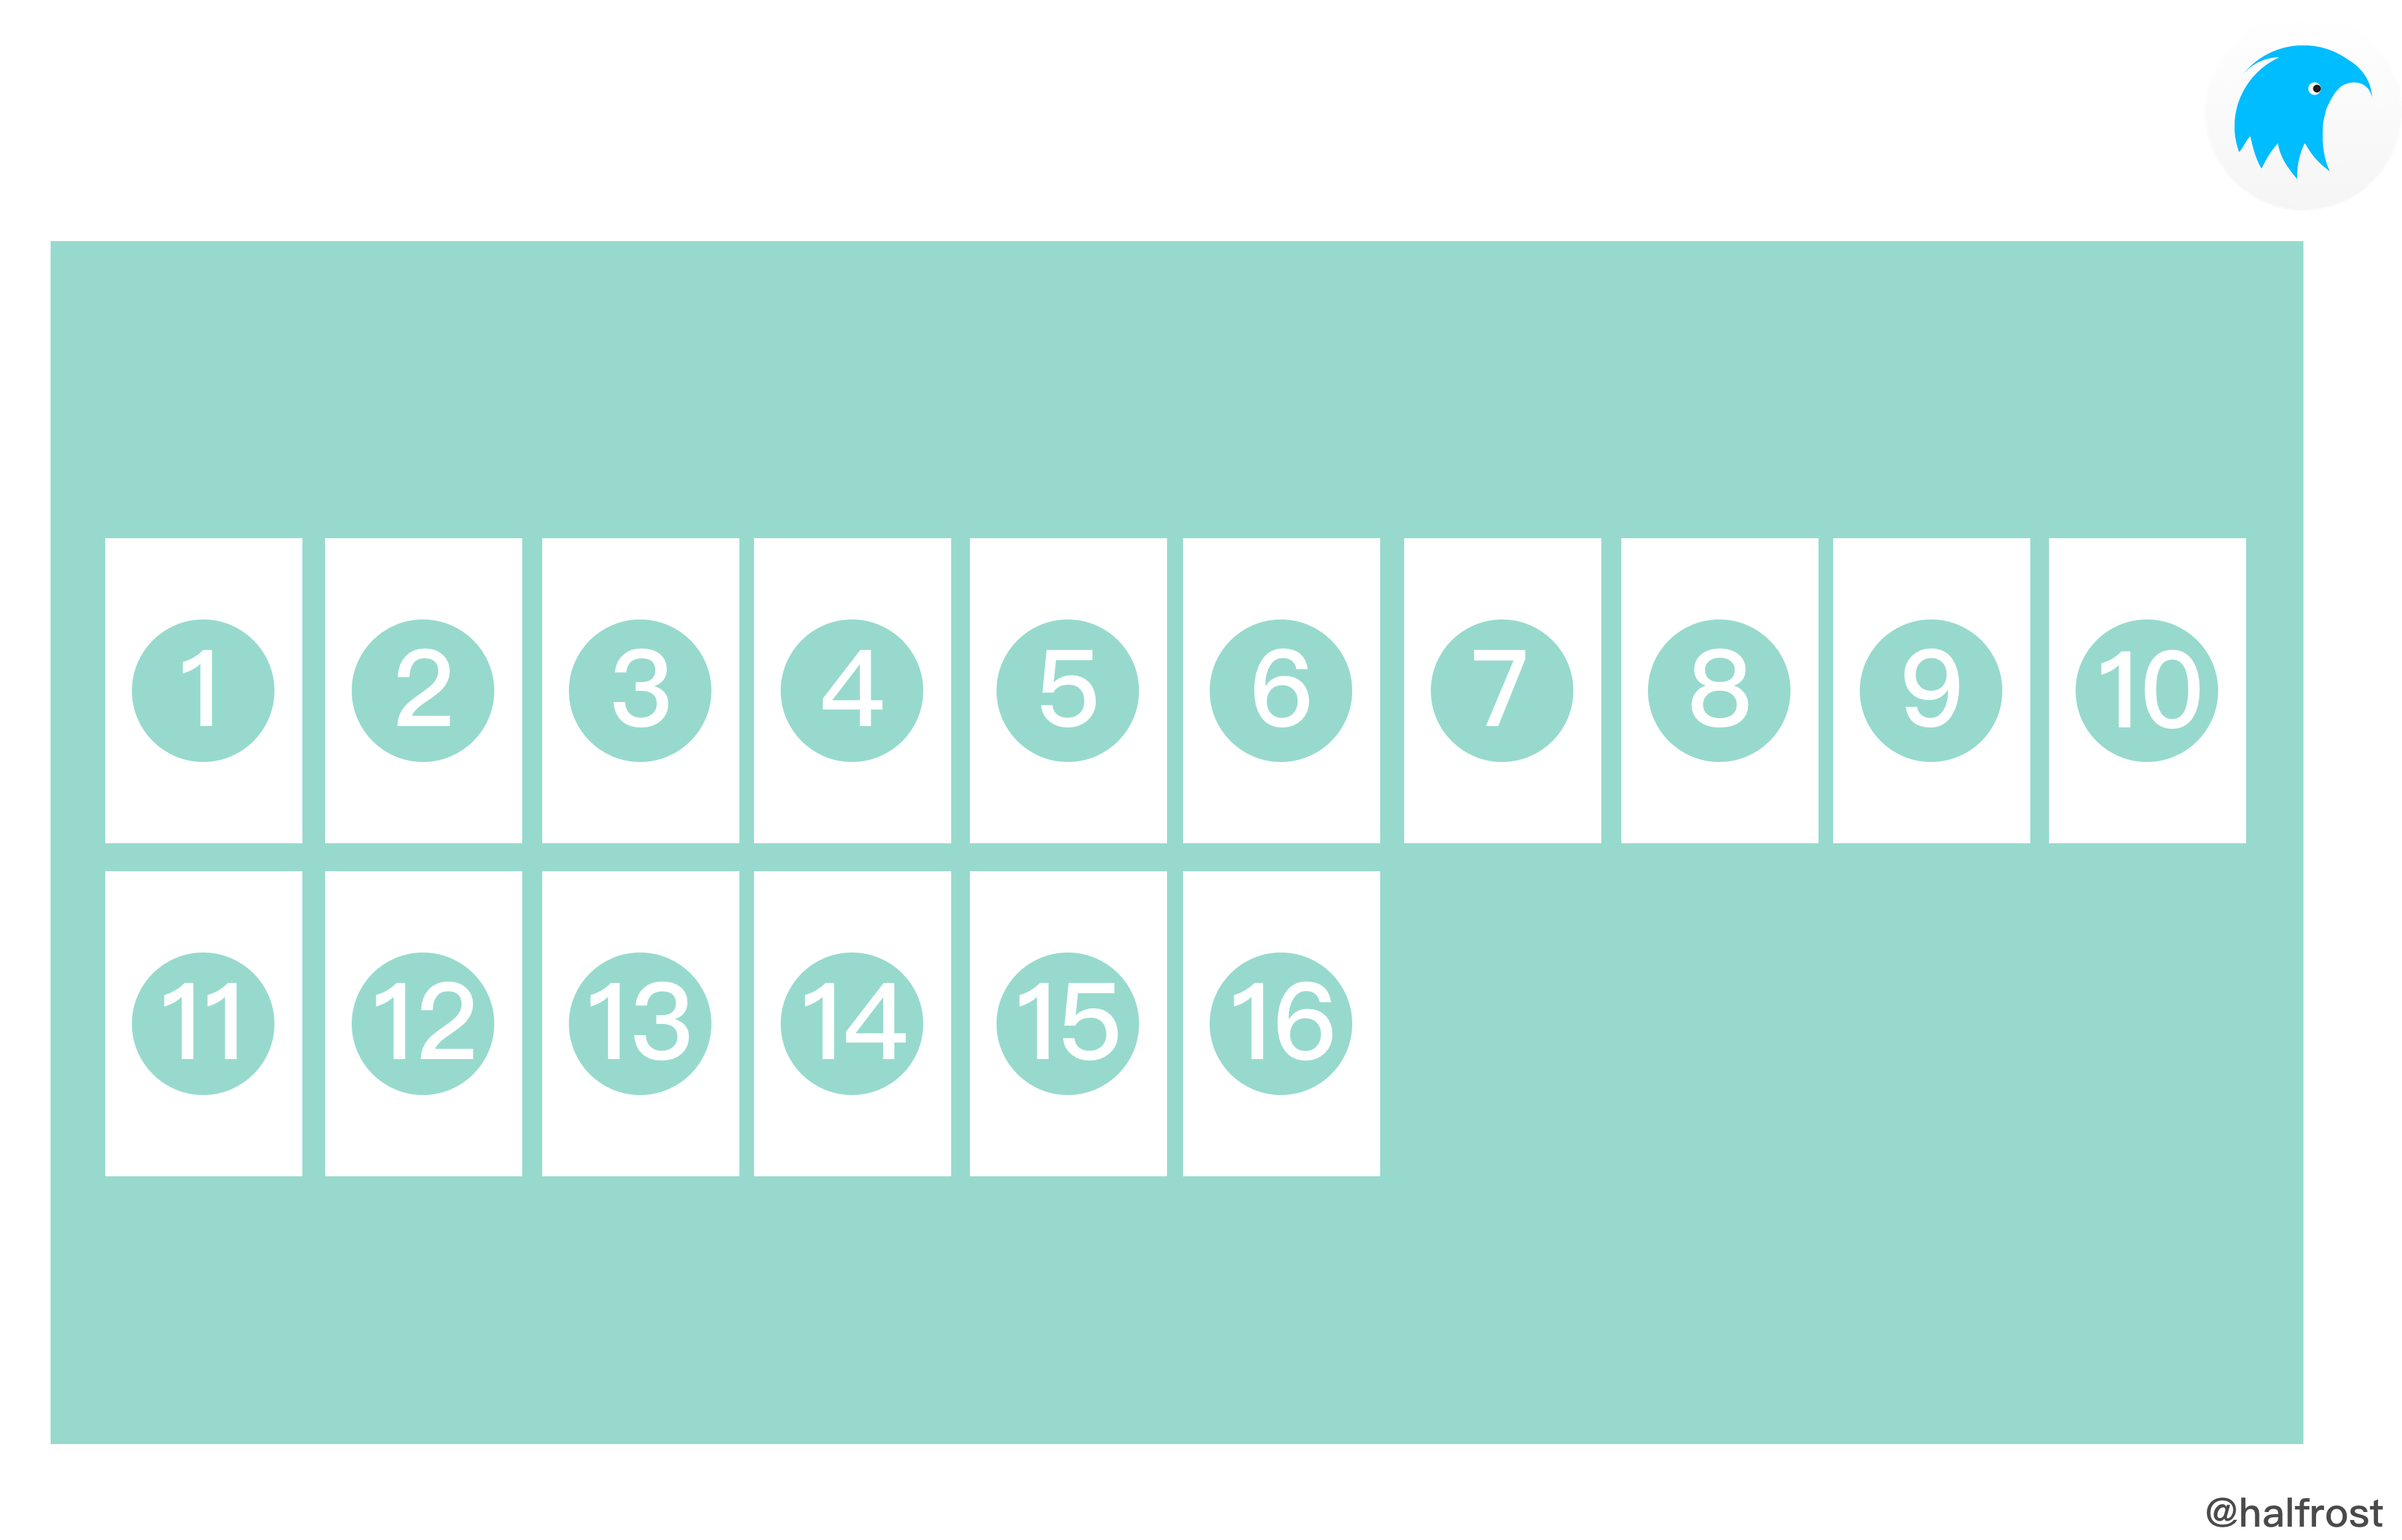
The image above shows ALIGN_CENTER
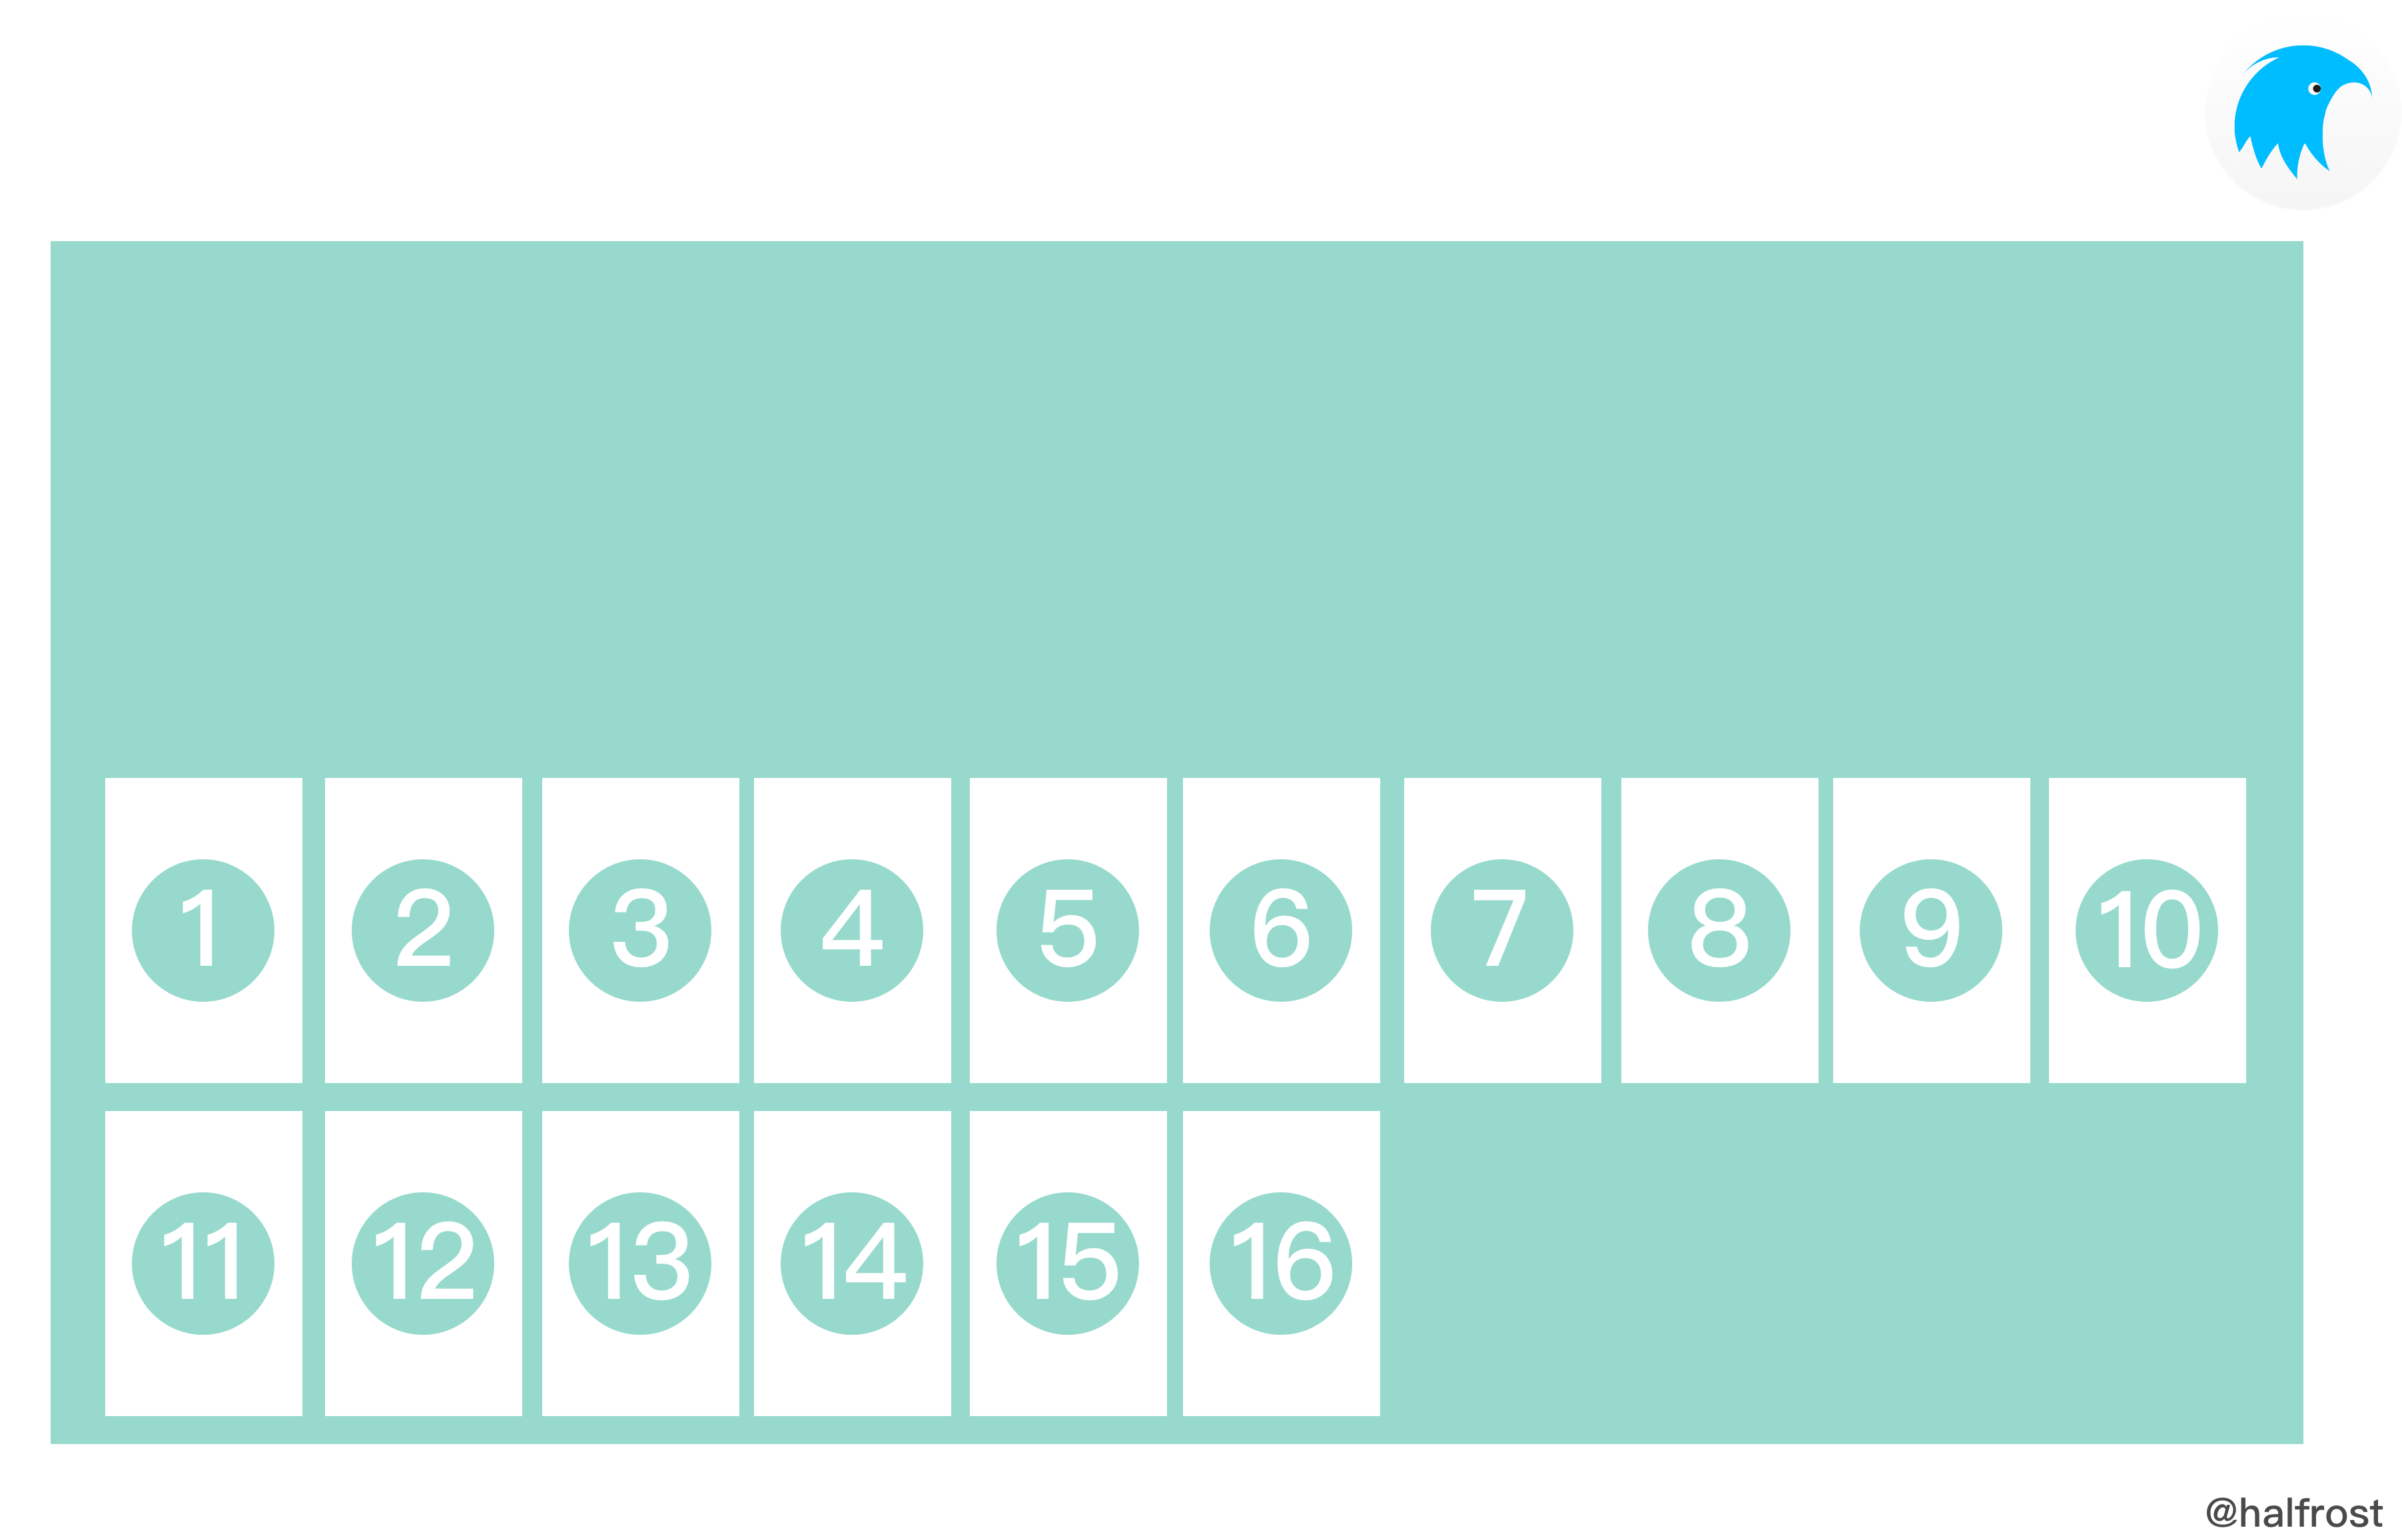
The image above shows ALIGN_FLEX_END
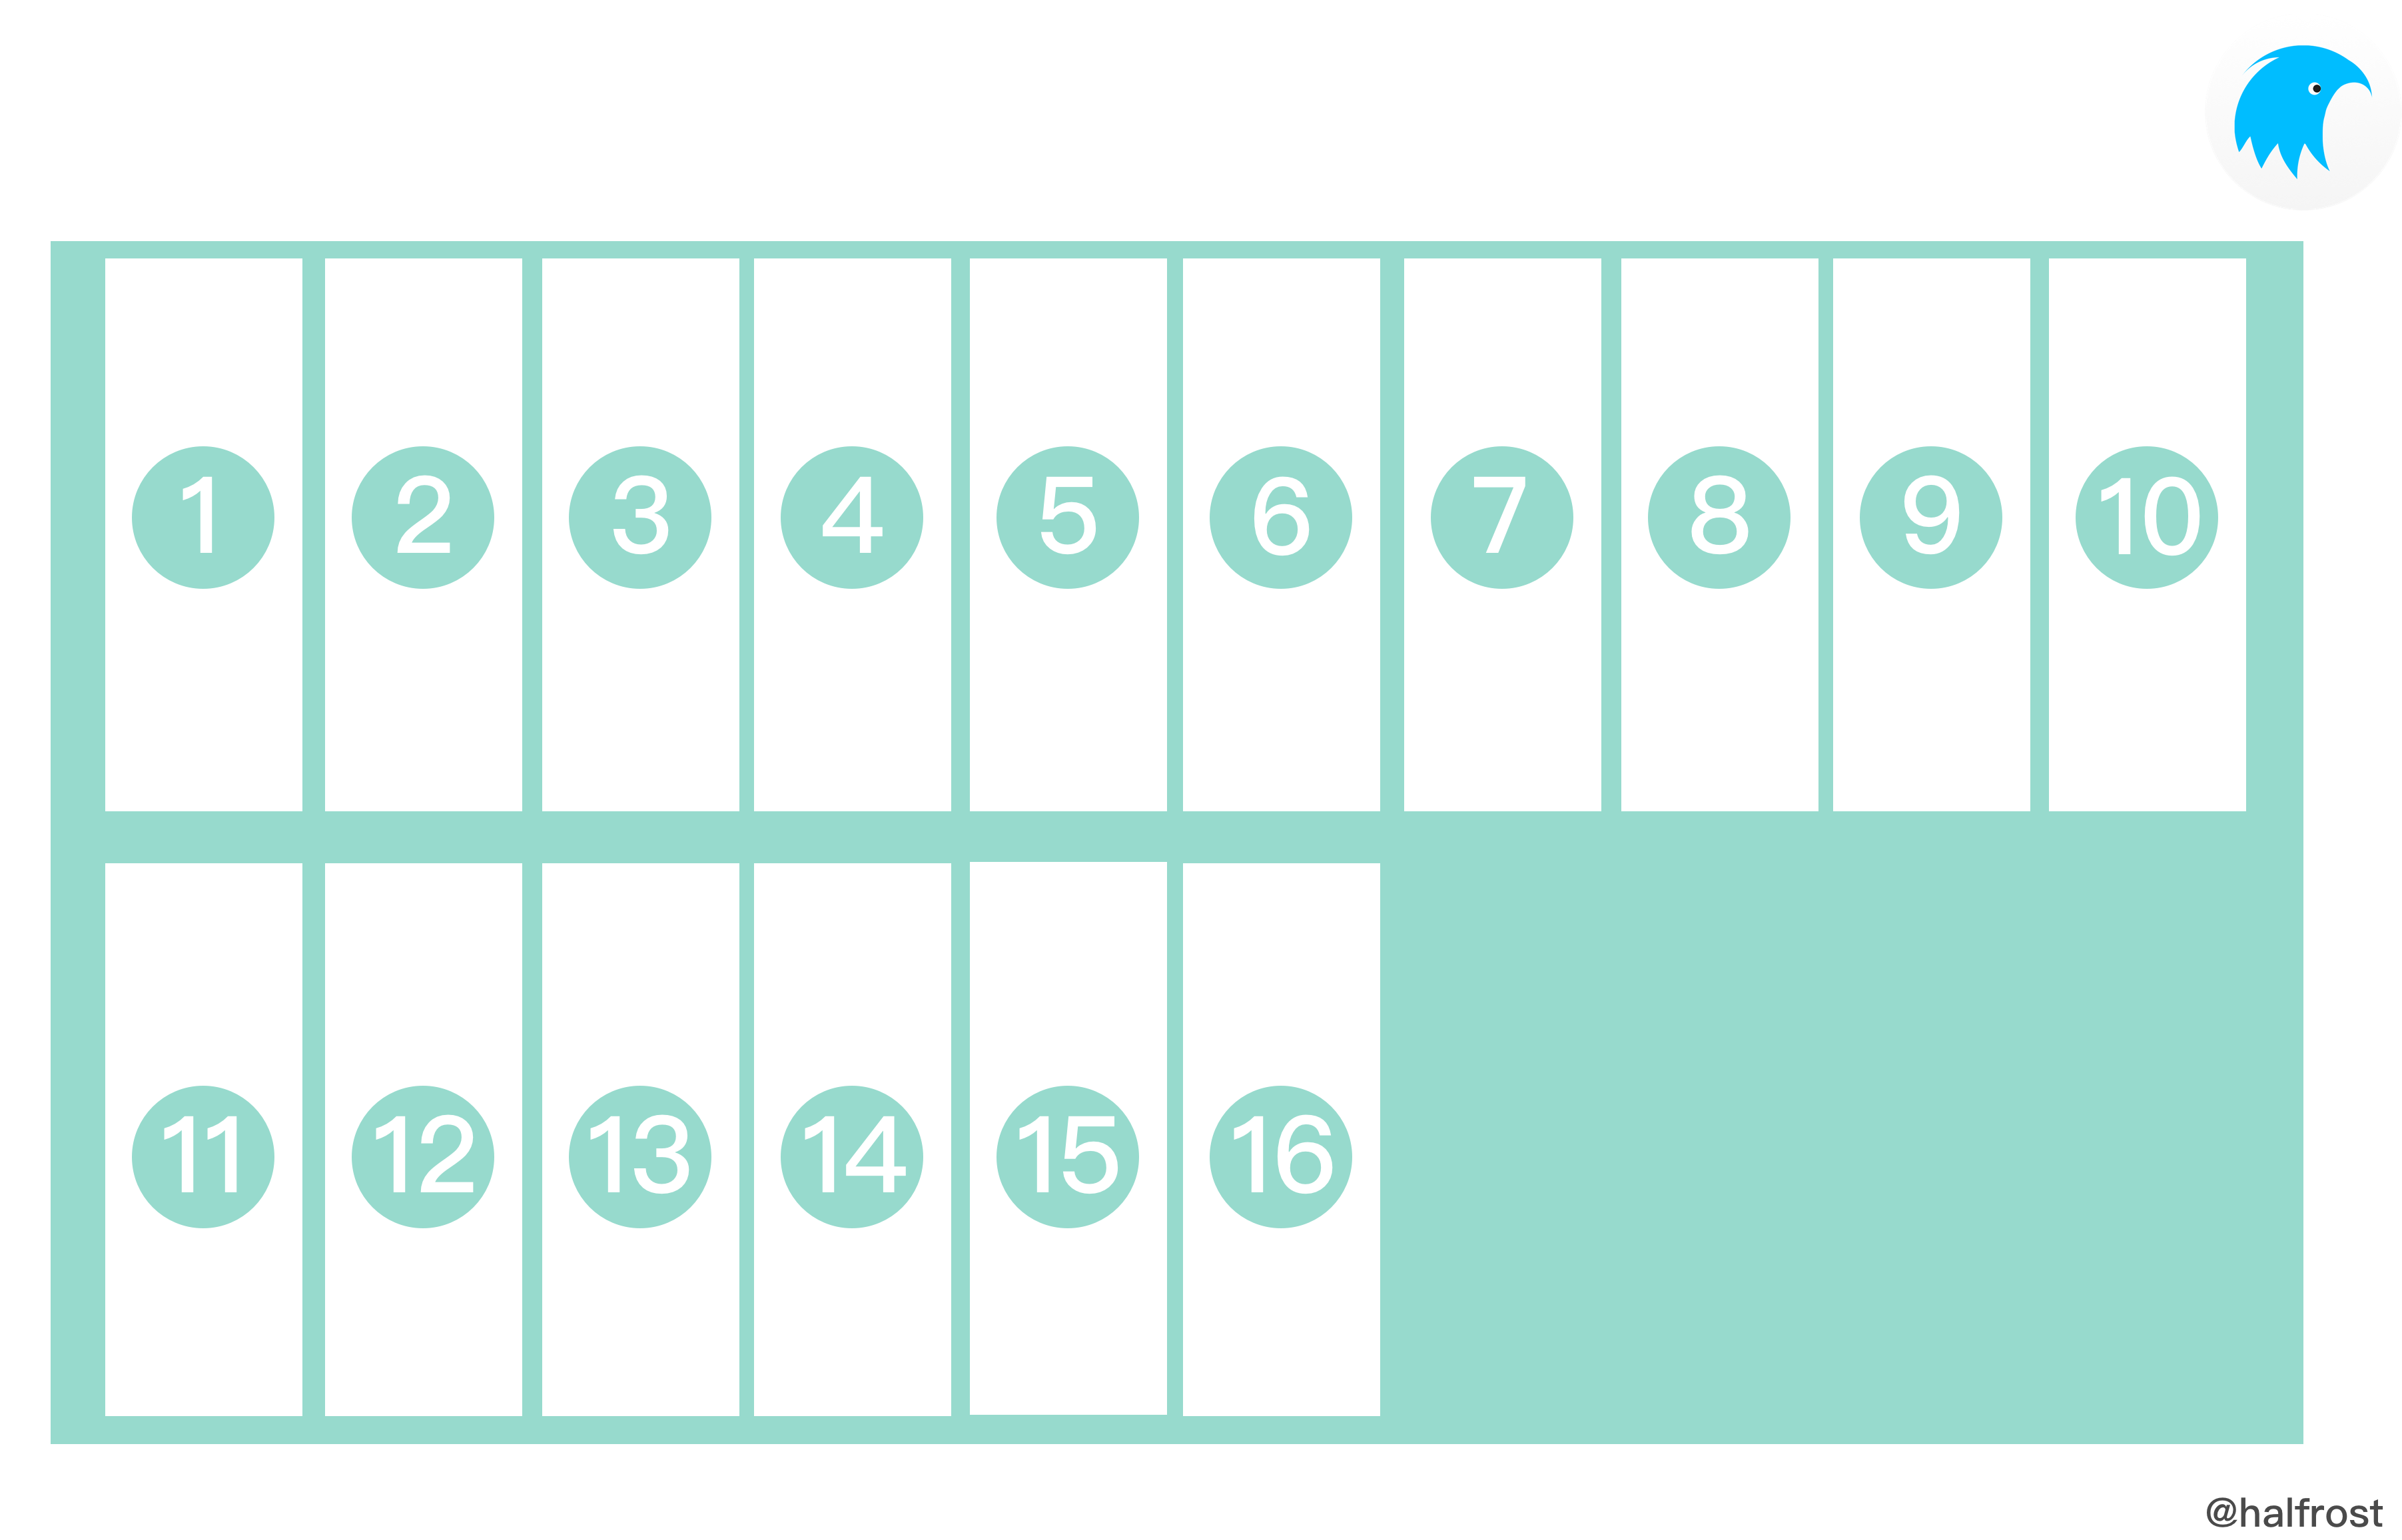
The image above shows ALIGN_STRETCH
In the W3C definition of FlexBox, there are actually two additional modes that are not defined in Weex.
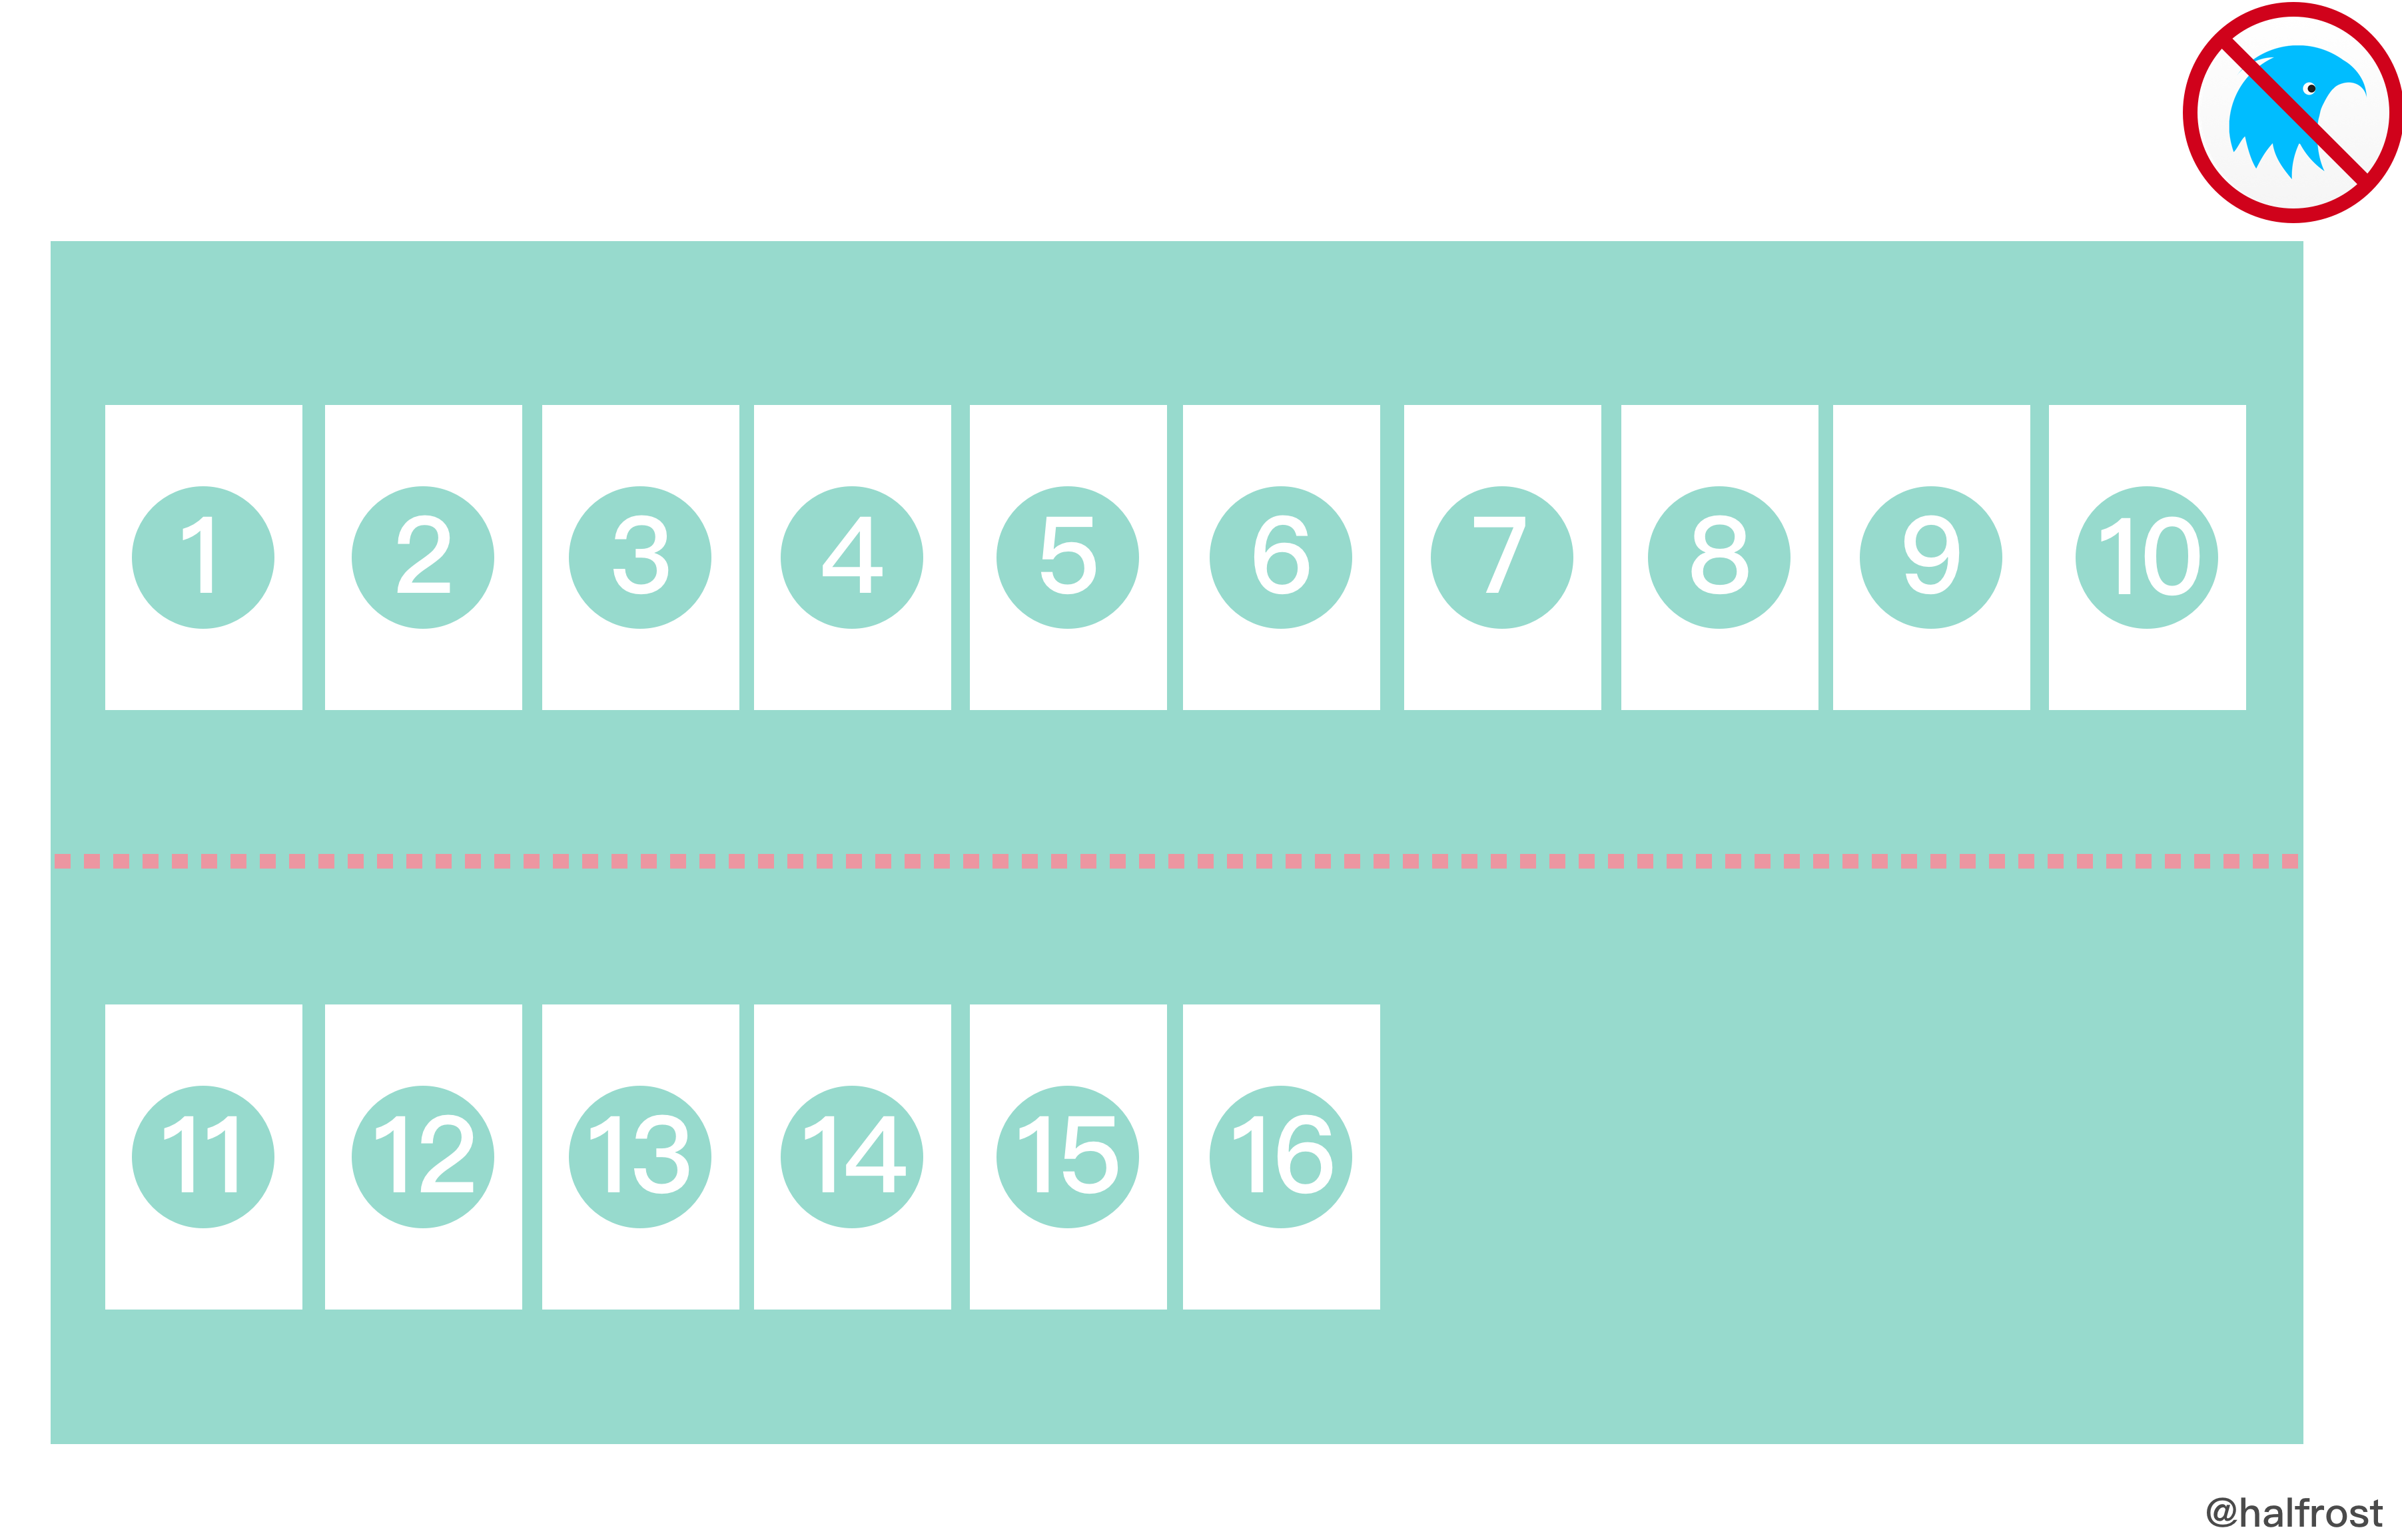
The alignment mode shown above corresponds to JUSTIFY_SPACE_AROUND in justify. The space-around alignment mode in align-content is not available in Weex.
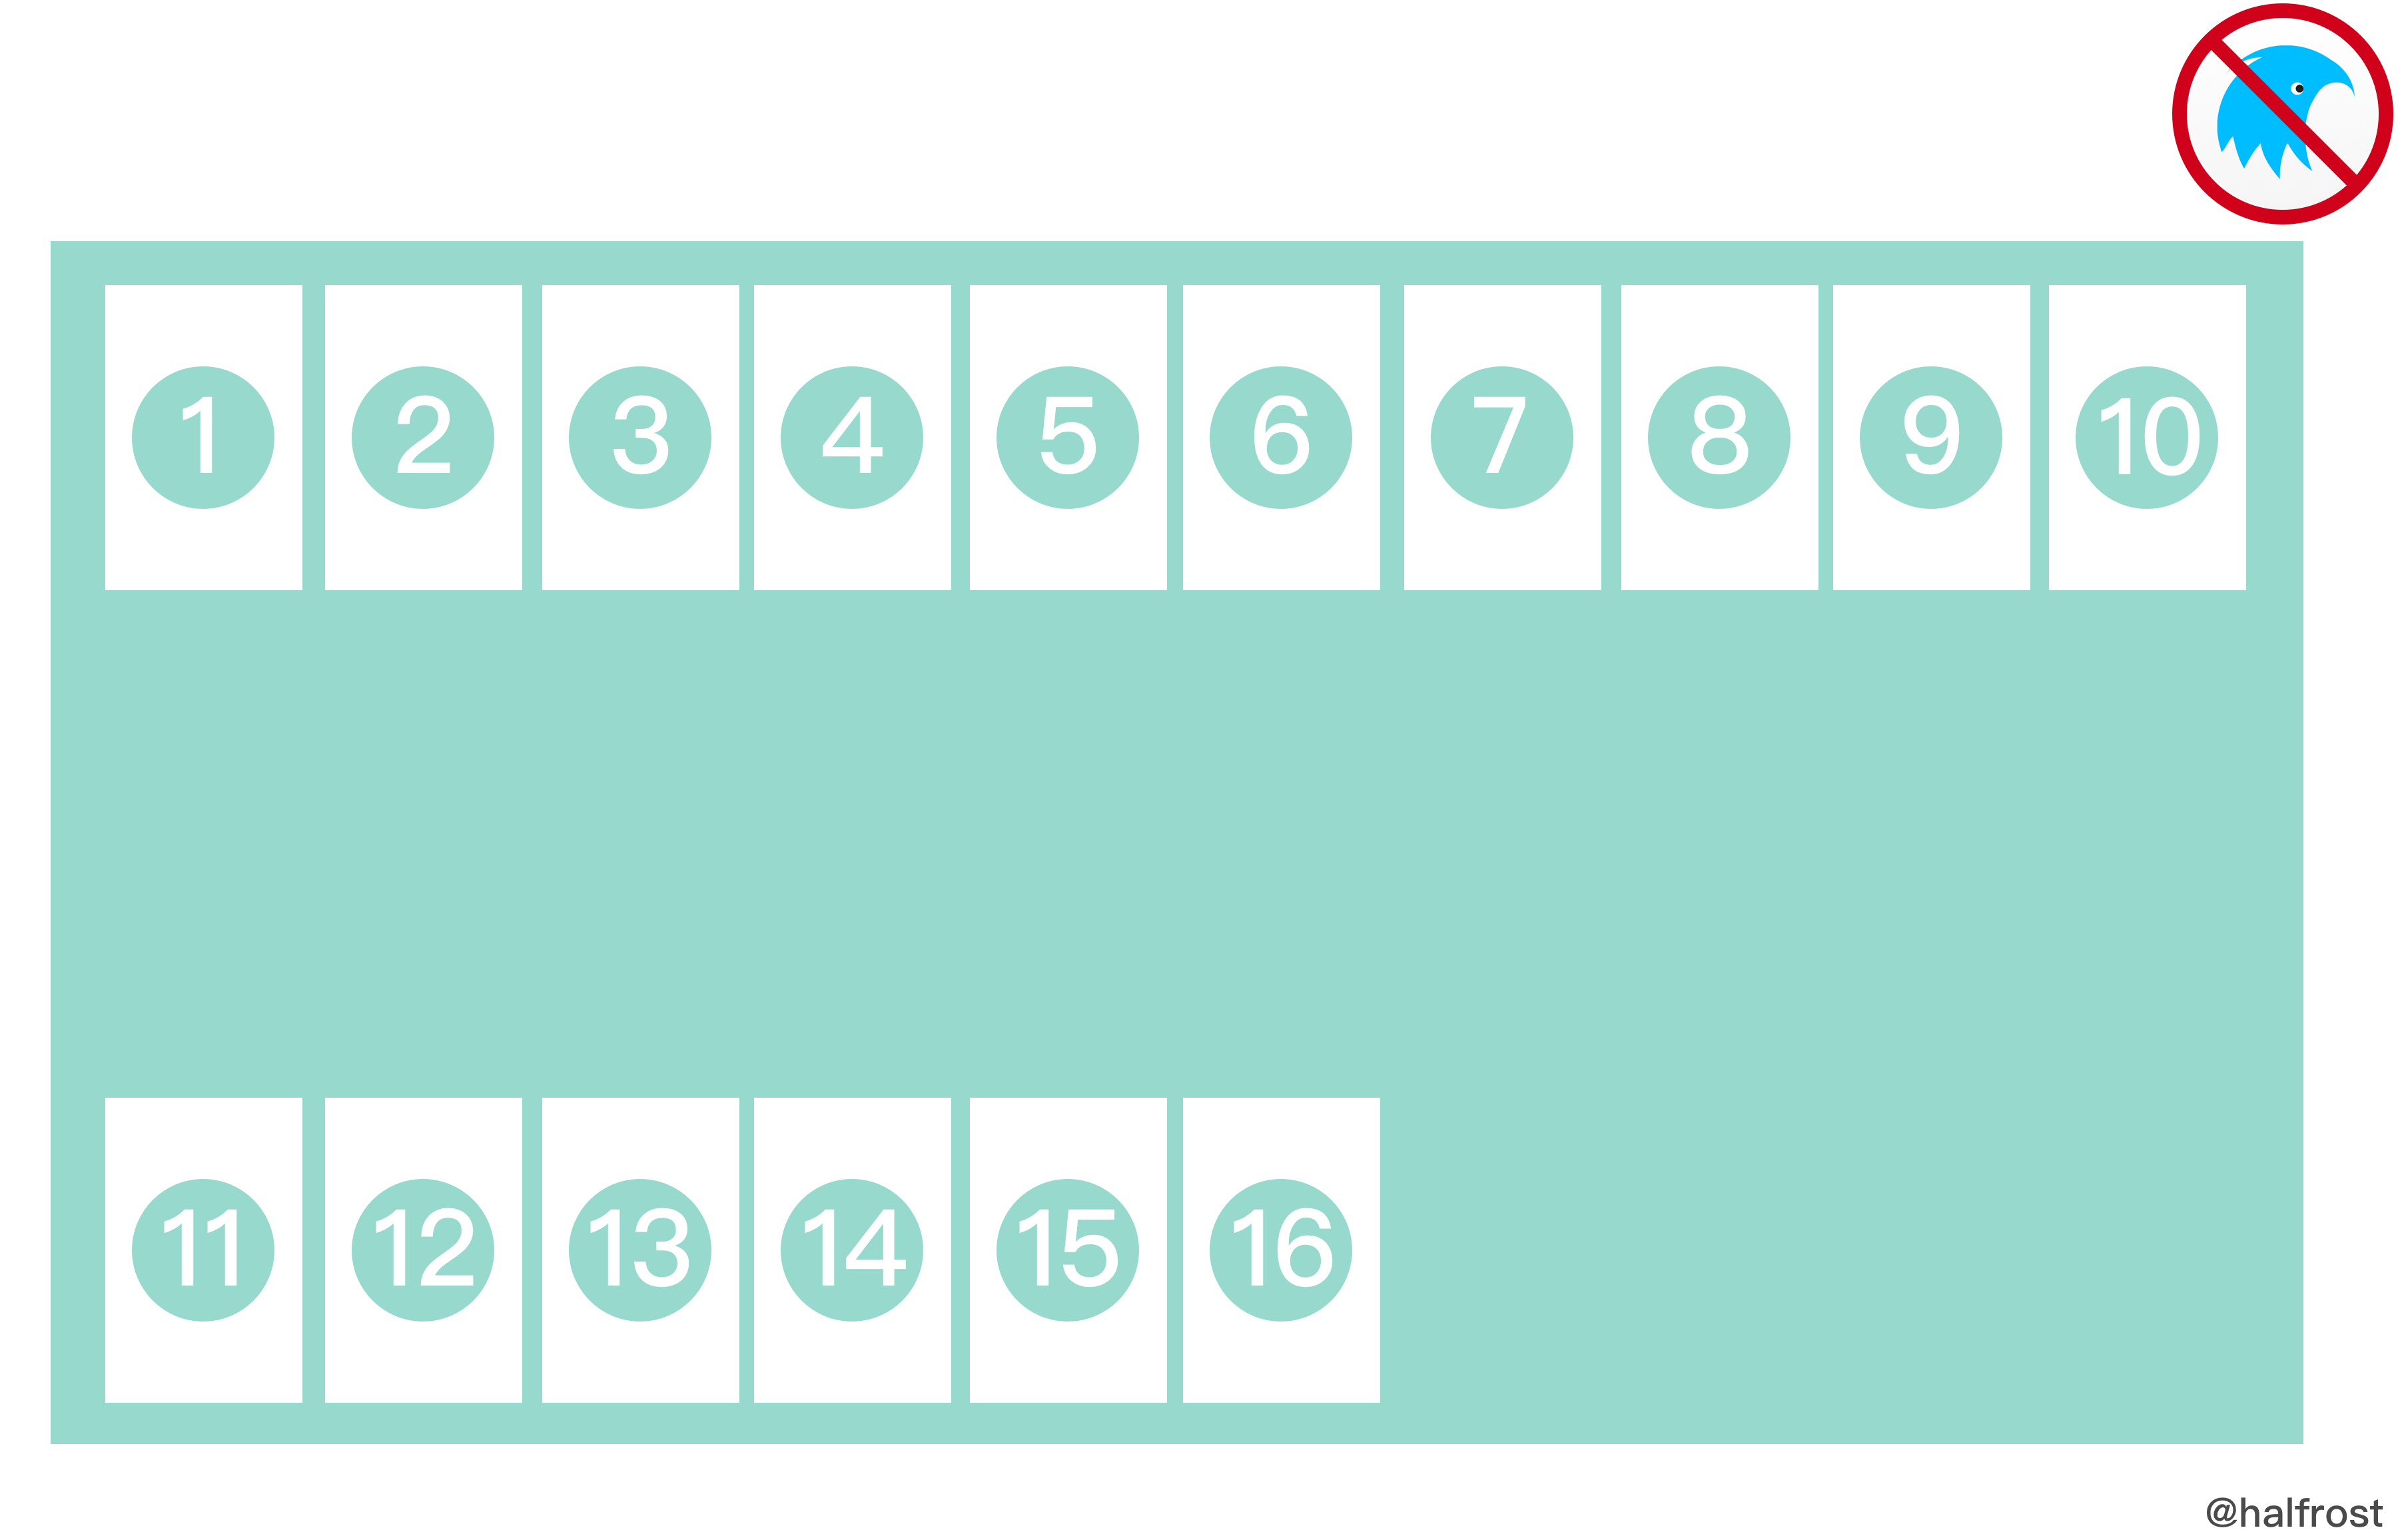
The alignment mode shown above corresponds to JUSTIFY_SPACE_BETWEEN in justify. The space-between alignment mode in align-content is not available in Weex.
3.align_self
This last alignment mode lets you customize the alignment of each child view individually on top of align_items. If it is auto, it uses the same mode as align_items.
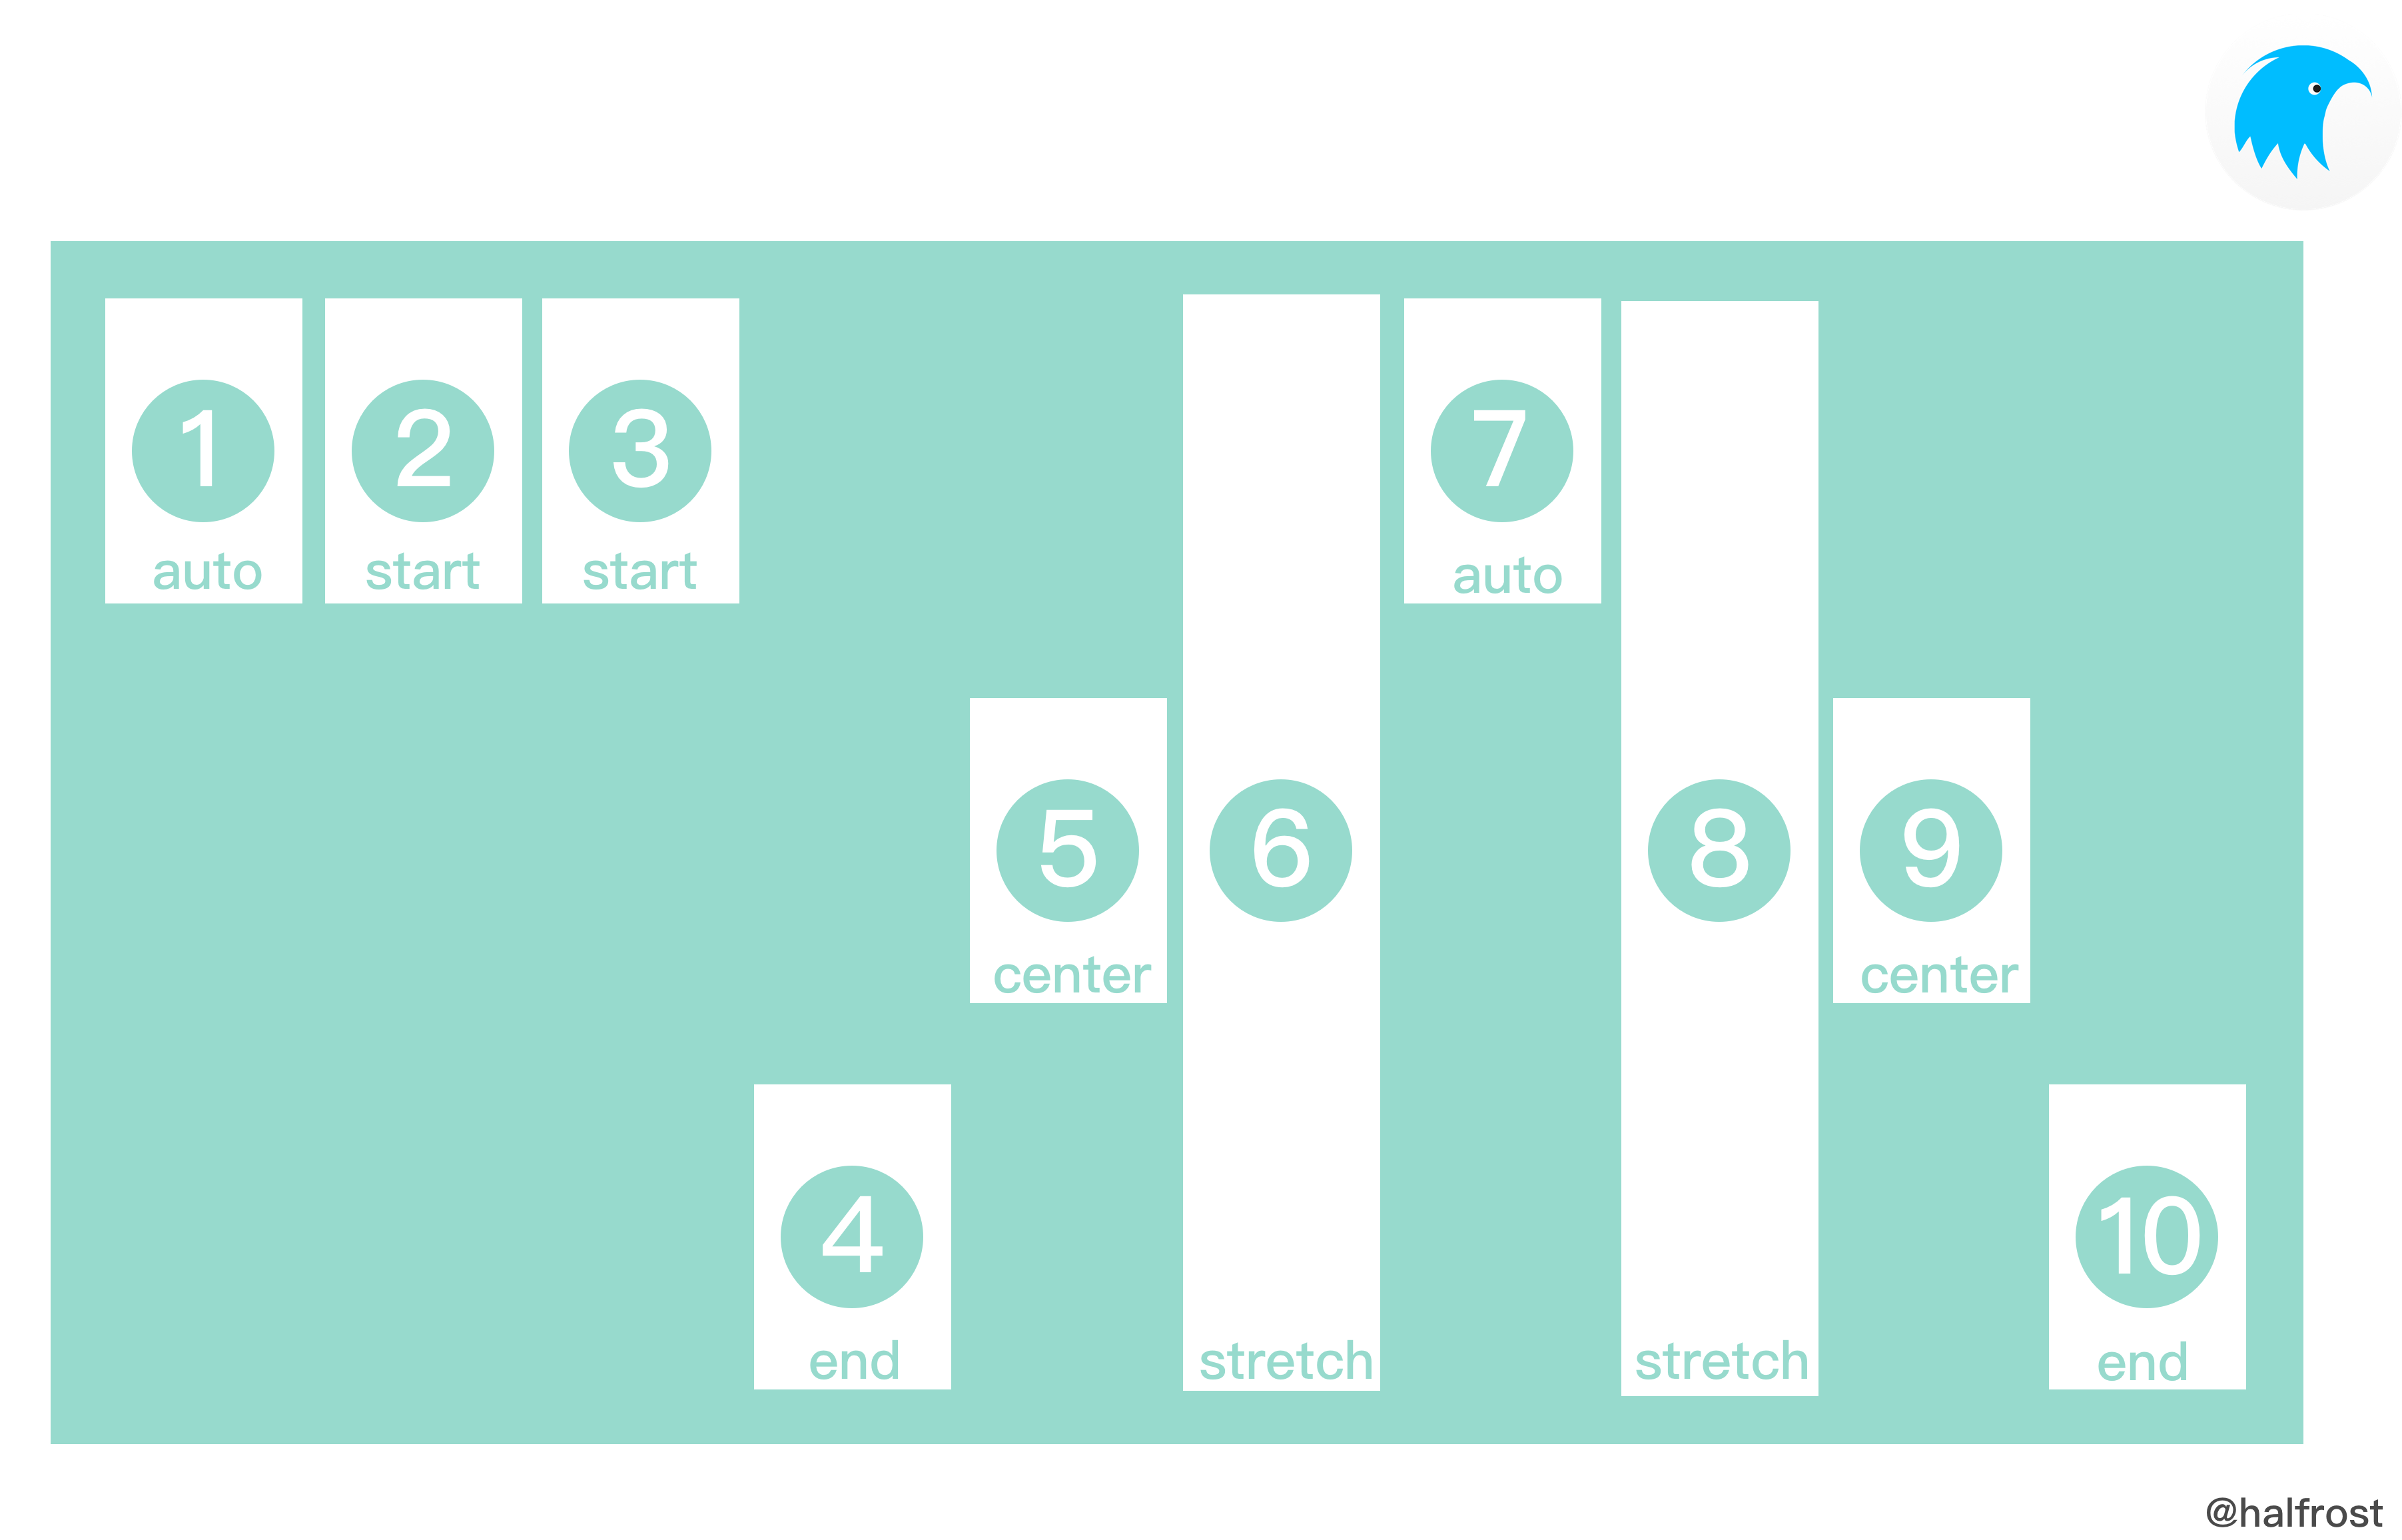
typedef enum {
  CSS_POSITION_RELATIVE = 0,
  CSS_POSITION_ABSOLUTE
} css_position_type_t;
This defines the type for coordinate addresses, with two variants: relative coordinates and absolute coordinates.
typedef enum {
  CSS_NOWRAP = 0,
  CSS_WRAP
} css_wrap_type_t;
In Weex, wrap has only two types.
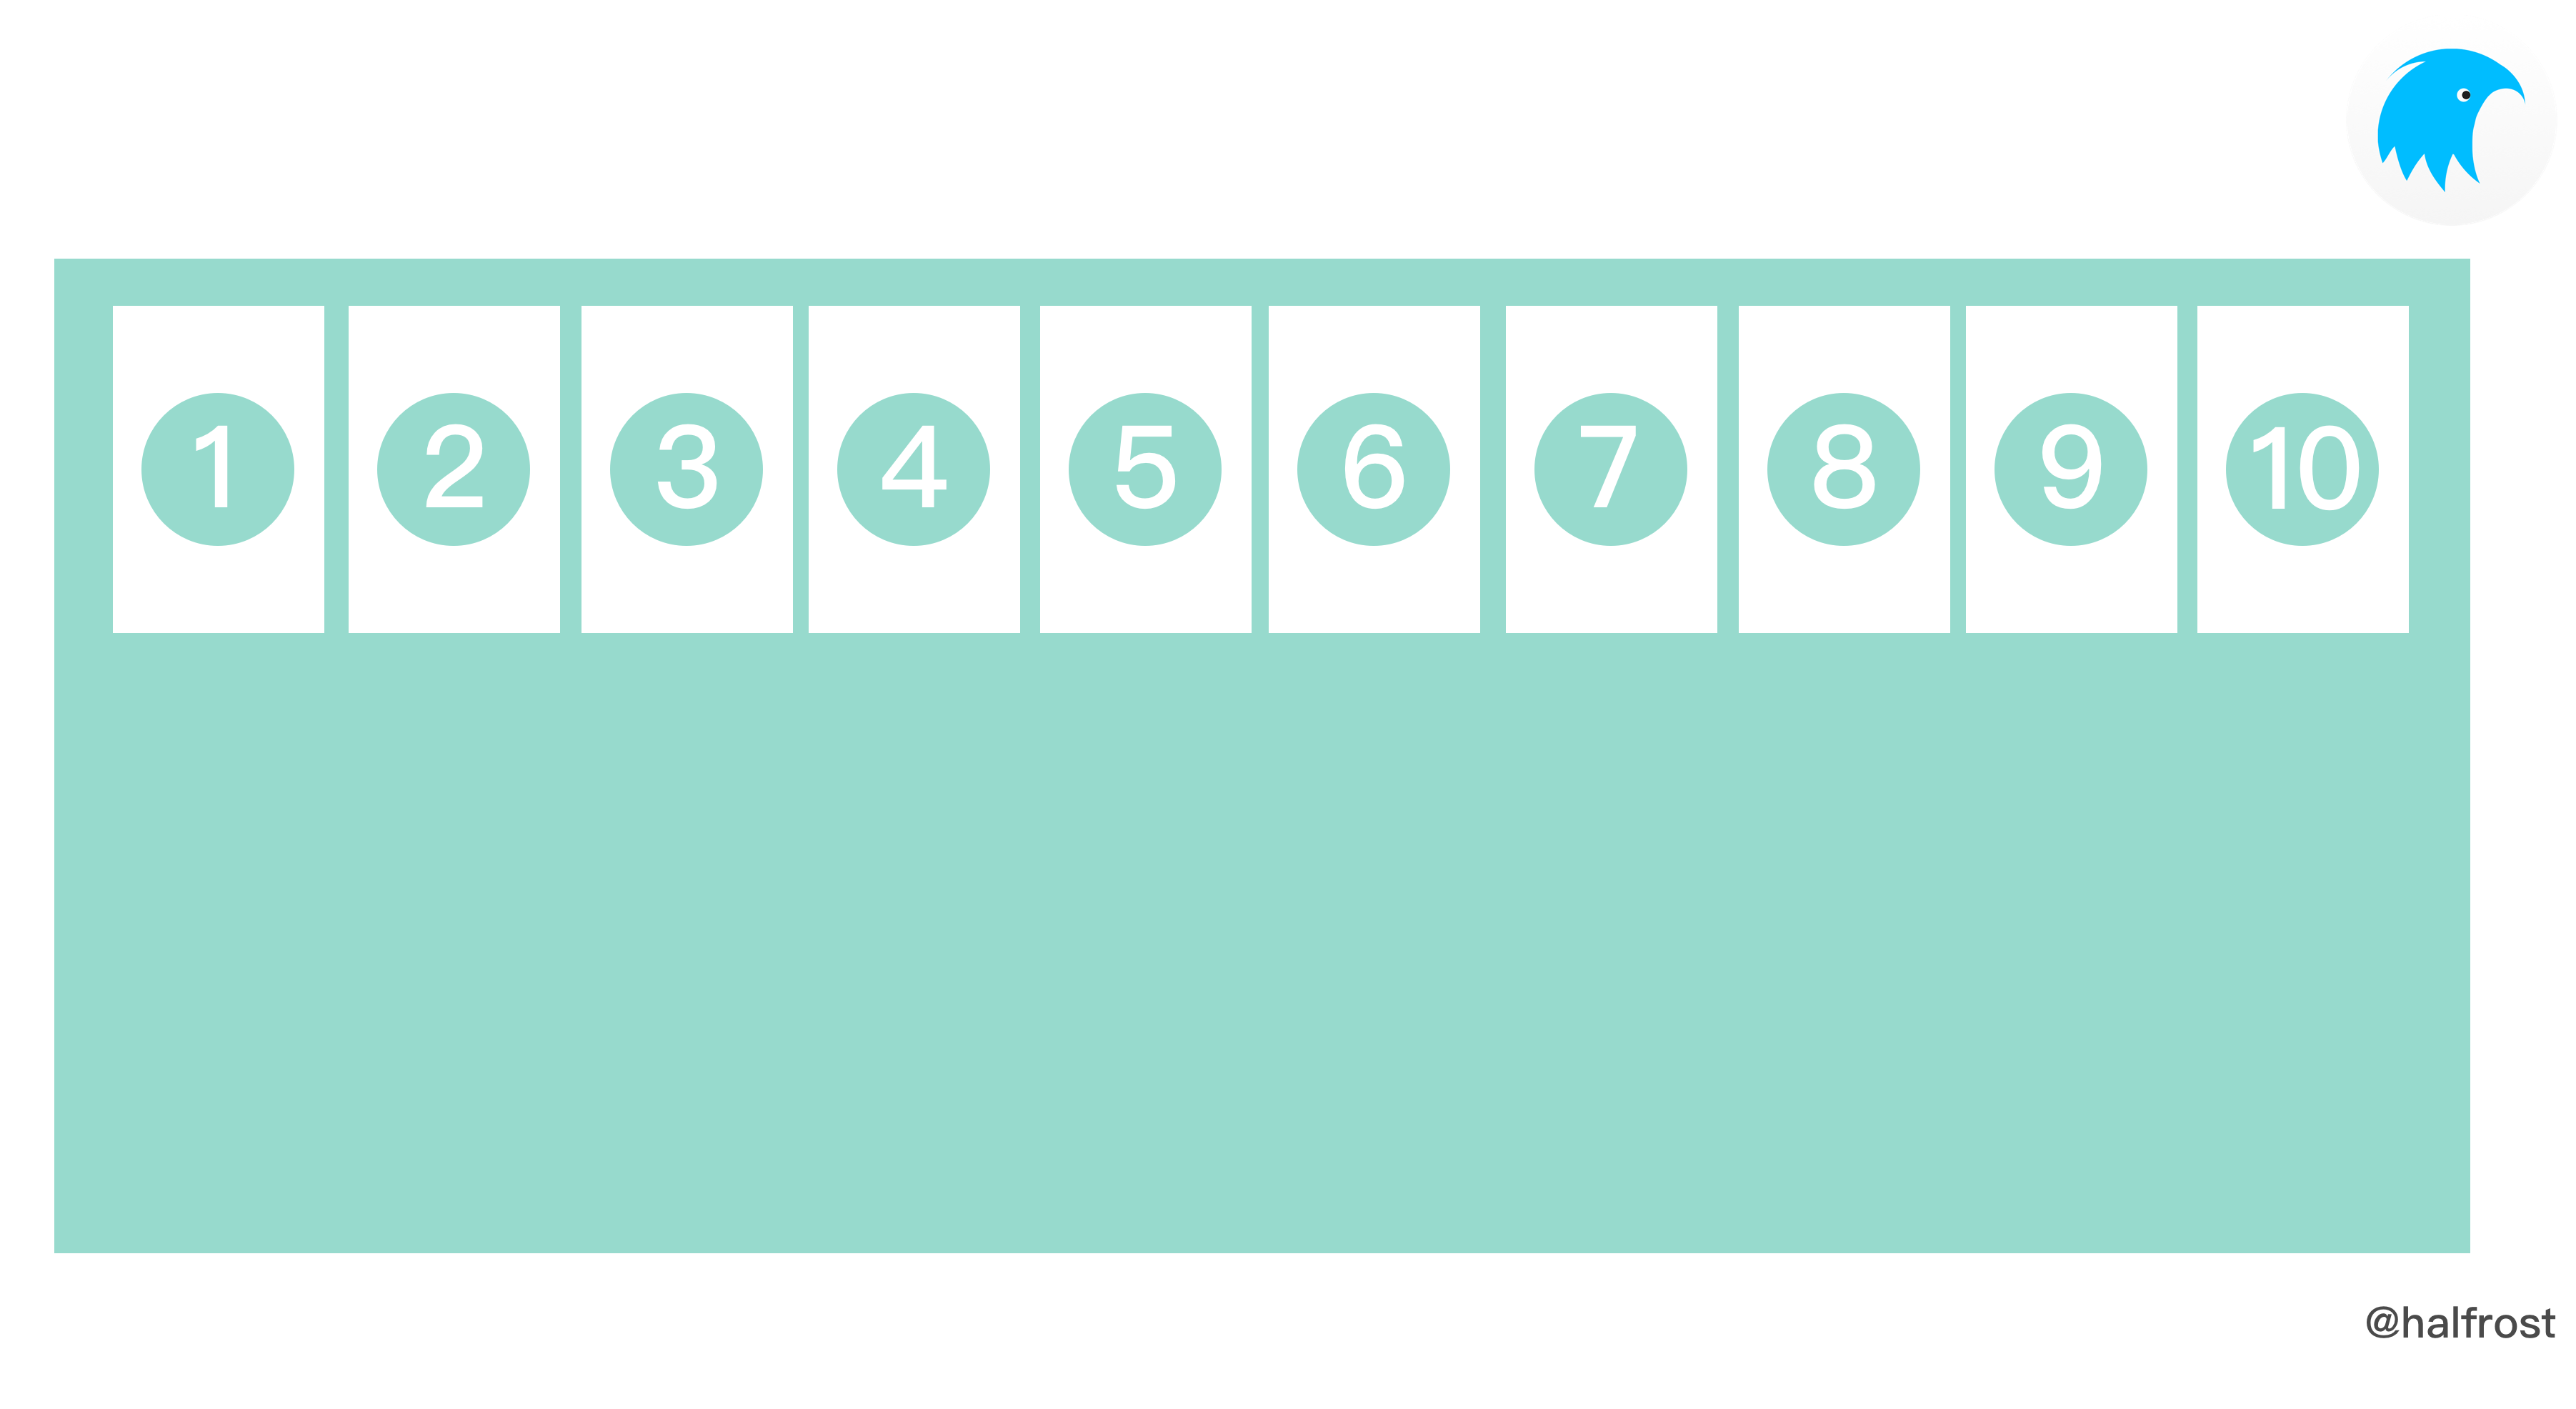
The image above shows NOWRAP. All child views are laid out in a single row.
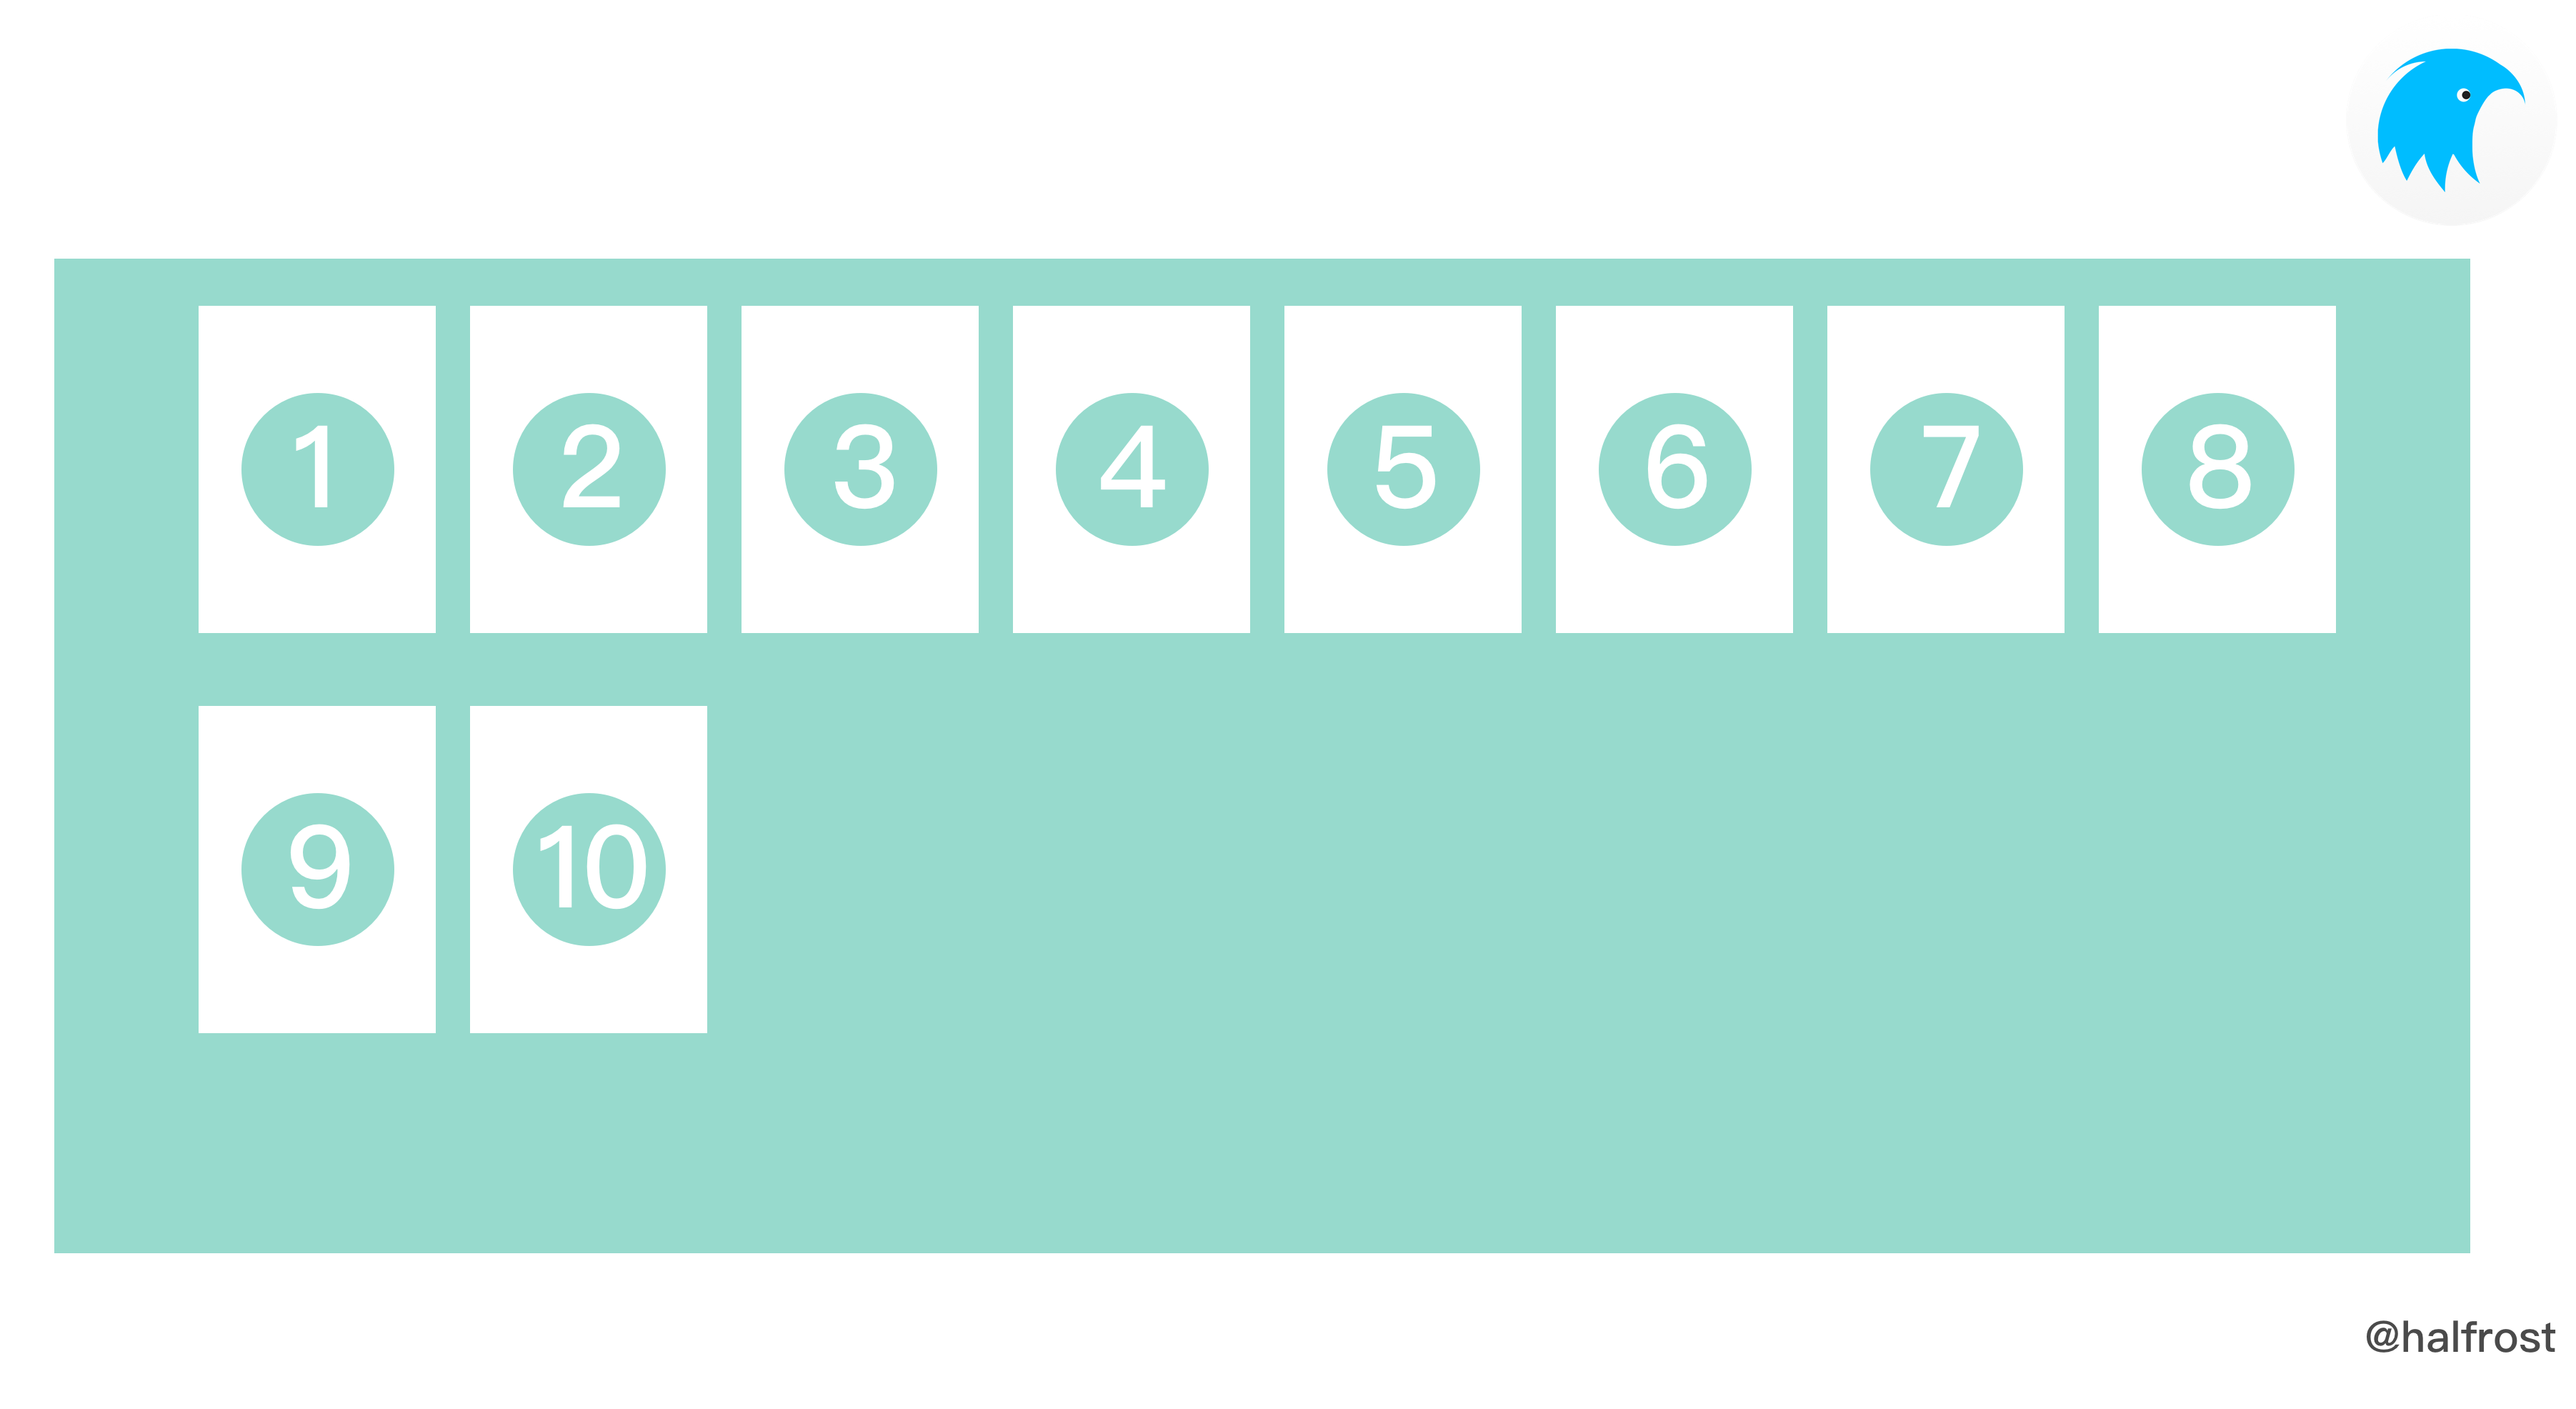
The image above shows WRAP. All child views are laid out from left to right and from top to bottom.
The W3C standard also defines another wrapping mode: wrap_reverse.
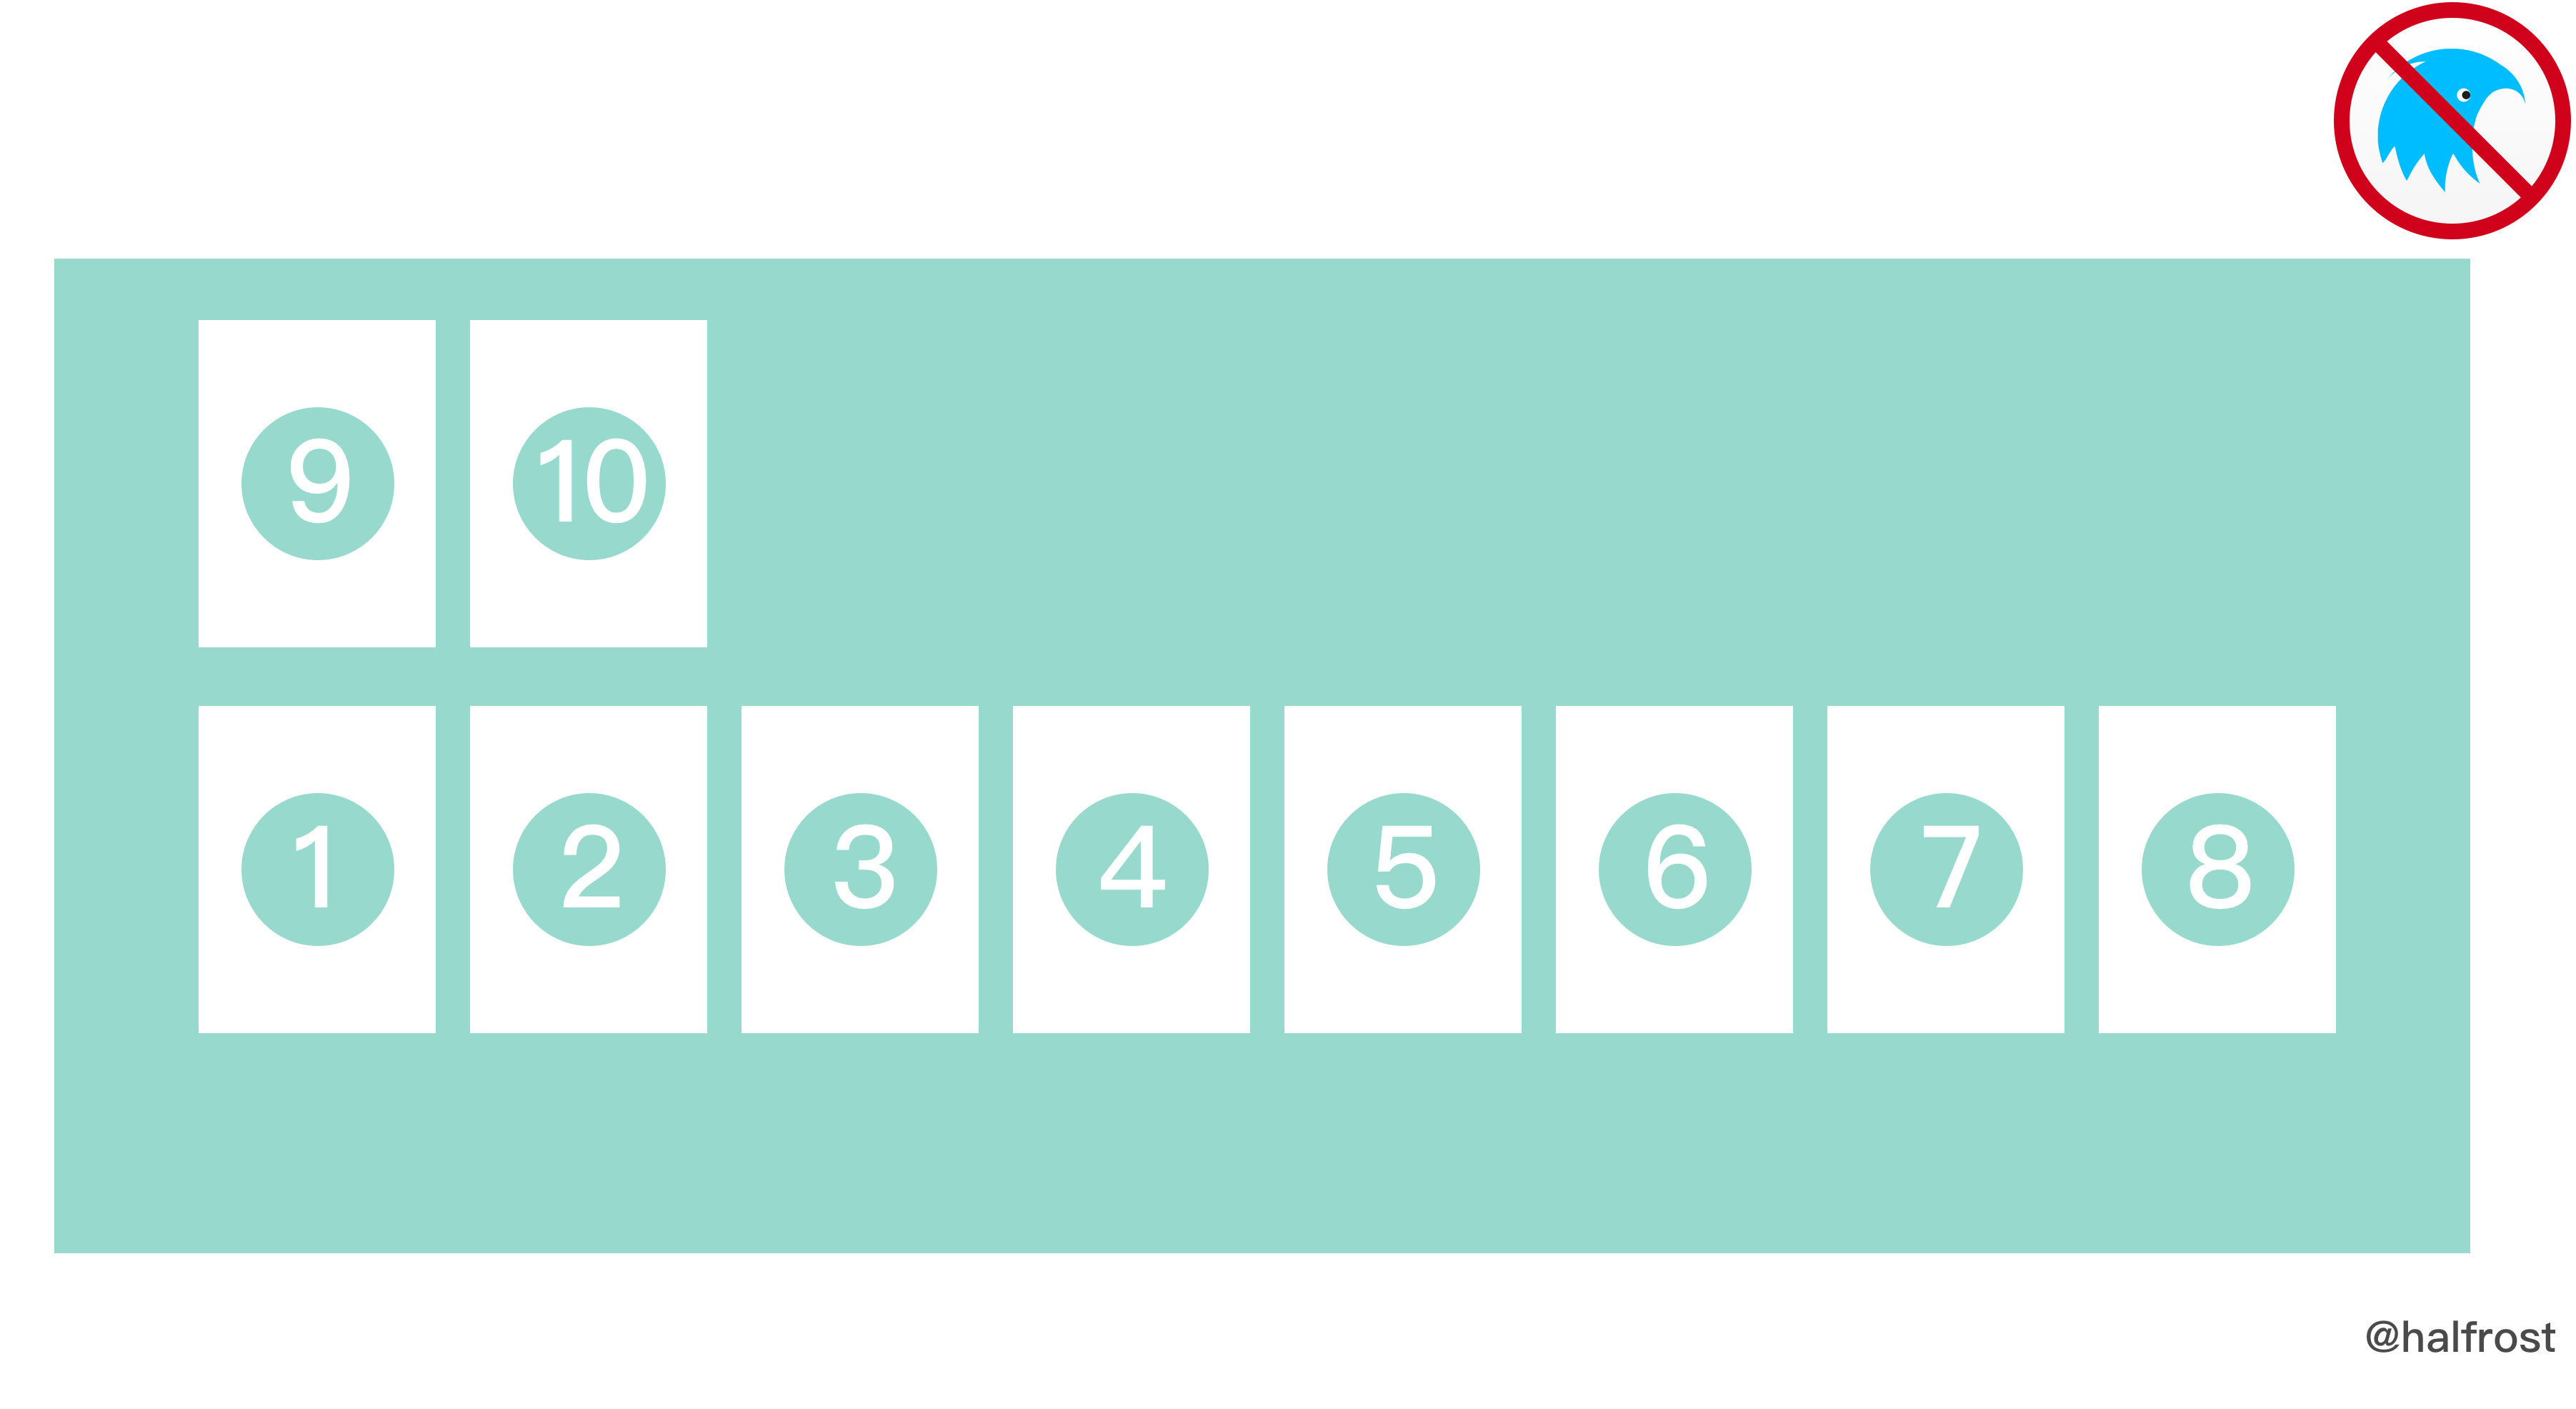
With this layout mode, items are laid out from left to right and from bottom to top. It is currently not defined in Weex.
typedef enum {
  CSS_LEFT = 0,
  CSS_TOP,
  CSS_RIGHT,
  CSS_BOTTOM,
  CSS_START,
  CSS_END,
  CSS_POSITION_COUNT
} css_position_t;
This defines the coordinate description. Because Left and Top appear in position[2] and position[4], they are listed before Right and Bottom.
typedef enum {
  CSS_MEASURE_MODE_UNDEFINED = 0,
  CSS_MEASURE_MODE_EXACTLY,
  CSS_MEASURE_MODE_AT_MOST
} css_measure_mode_t;
This defines the computation method: one is exact computation, and the other is an estimated approximation.
typedef enum {
  CSS_WIDTH = 0,
  CSS_HEIGHT
} css_dimension_t;
This defines the subview’s dimensions: width and height.
typedef struct {
  float position[4];
  float dimensions[2];
  css_direction_t direction;

  // Cache some information to avoid recalculating it during every Layout pass
  bool should_update;
  float last_requested_dimensions[2];
  float last_parent_max_width;
  float last_parent_max_height;
  float last_dimensions[2];
  float last_position[2];
  css_direction_t last_direction;
} css_layout_t;
Here a css_layout_t struct is defined. In the struct, the position and dimensions arrays store the positions of the four edges and the width/height dimensions, respectively. direction stores whether the direction is LTR or RTL.
The remaining variables below are all cached data, used to avoid recomputing the layout when it has not changed.
typedef struct {
  float dimensions[2];
} css_dim_t;
The css_dim_t struct contains the child view’s size information: width and height.
typedef struct {
  // Direction of the entire page CSS, LTR, RTL
  css_direction_t direction;
  // Flex direction
  css_flex_direction_t flex_direction;
  // Alignment of child views along the main axis
  css_justify_t justify_content;
  // Alignment between rows of child views on the cross axis
  css_align_t align_content;
  // Alignment of child views on the cross axis
  css_align_t align_items;
  // Alignment of the child view itself
  css_align_t align_self;
  // Coordinate system type of the child view (relative coordinate system, absolute coordinate system)
  css_position_type_t position_type;
  // Wrap type
  css_wrap_type_t flex_wrap;
  float flex;
  // Top, bottom, left, right, start, end
  float margin[6];
  // Top, bottom, left, right
  float position[4];
  // Top, bottom, left, right, start, end
  float padding[6];
  // Top, bottom, left, right, start, end
  float border[6];
  // Width, height
  float dimensions[2];
  // Minimum width and height
  float minDimensions[2];
  // Maximum width and height
  float maxDimensions[2];
} css_style_t;
css_style_t records all information for the entire style. The meaning of each variable is described in the comments above.
typedef struct css_node css_node_t;
struct css_node {
  css_style_t style;
  css_layout_t layout;
  int children_count;
  int line_index;

  css_node_t *next_absolute_child;
  css_node_t *next_flex_child;

  css_dim_t (*measure)(void *context, float width, css_measure_mode_t widthMode, float height, css_measure_mode_t heightMode);
  void (*print)(void *context);
  struct css_node* (*get_child)(void *context, int i);
  bool (*is_dirty)(void *context);
  void *context;
};
css_node defines the data structure for a FlexBox node. It contains the previously mentioned css_style_t and css_layout_t. Since member functions cannot be defined inside a struct, it includes the following four function pointers.
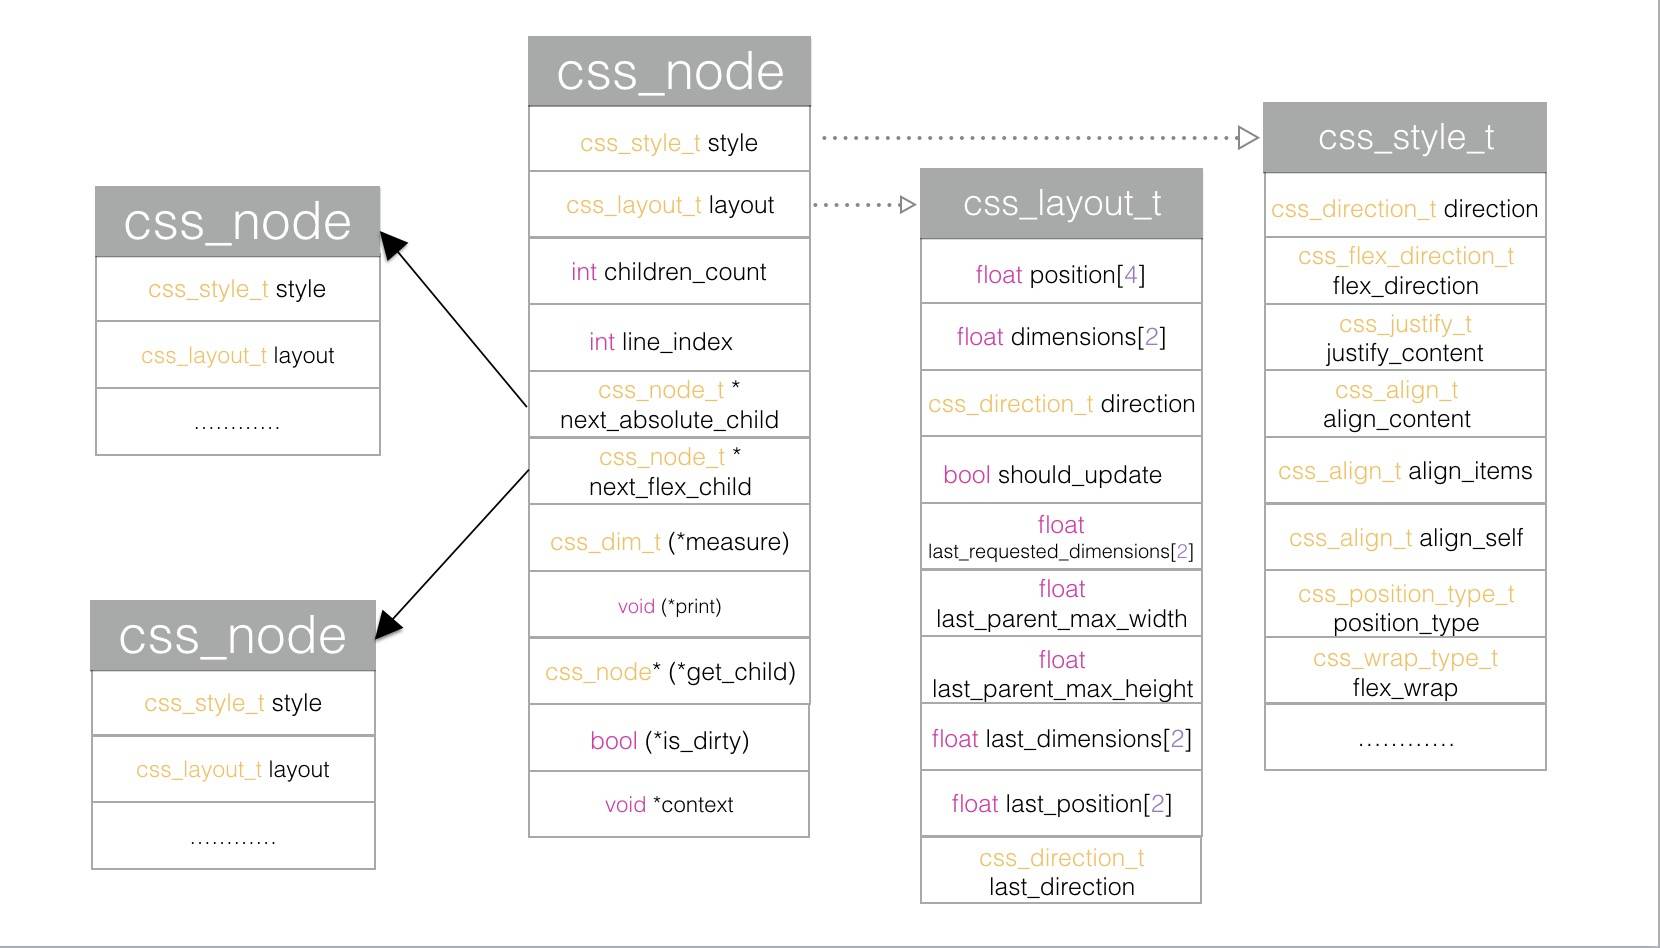
css_node_t *new_css_node(void);
void init_css_node(css_node_t *node);
void free_css_node(css_node_t *node);
The three functions above are related to the lifecycle of css_node.
// Create a new node
css_node_t *new_css_node() {
  css_node_t *node = (css_node_t *)calloc(1, sizeof(*node));
  init_css_node(node);
  return node;
}

// Free the node
void free_css_node(css_node_t *node) {
  free(node);
}
When a new node is created, the init_css_node method is called.
void init_css_node(css_node_t *node) {
  node->style.align_items = CSS_ALIGN_STRETCH;
  node->style.align_content = CSS_ALIGN_FLEX_START;

  node->style.direction = CSS_DIRECTION_INHERIT;
  node->style.flex_direction = CSS_FLEX_DIRECTION_COLUMN;

  // Note that the values in these arrays below are initialized to undefined, not 0
  node->style.dimensions[CSS_WIDTH] = CSS_UNDEFINED;
  node->style.dimensions[CSS_HEIGHT] = CSS_UNDEFINED;

  node->style.minDimensions[CSS_WIDTH] = CSS_UNDEFINED;
  node->style.minDimensions[CSS_HEIGHT] = CSS_UNDEFINED;

  node->style.maxDimensions[CSS_WIDTH] = CSS_UNDEFINED;
  node->style.maxDimensions[CSS_HEIGHT] = CSS_UNDEFINED;

  node->style.position[CSS_LEFT] = CSS_UNDEFINED;
  node->style.position[CSS_TOP] = CSS_UNDEFINED;
  node->style.position[CSS_RIGHT] = CSS_UNDEFINED;
  node->style.position[CSS_BOTTOM] = CSS_UNDEFINED;

  node->style.margin[CSS_START] = CSS_UNDEFINED;
  node->style.margin[CSS_END] = CSS_UNDEFINED;
  node->style.padding[CSS_START] = CSS_UNDEFINED;
  node->style.padding[CSS_END] = CSS_UNDEFINED;
  node->style.border[CSS_START] = CSS_UNDEFINED;
  node->style.border[CSS_END] = CSS_UNDEFINED;

  node->layout.dimensions[CSS_WIDTH] = CSS_UNDEFINED;
  node->layout.dimensions[CSS_HEIGHT] = CSS_UNDEFINED;

  // The following cached variables used to compare whether changes occurred all have an initial value of -1.
  node->layout.last_requested_dimensions[CSS_WIDTH] = -1;
  node->layout.last_requested_dimensions[CSS_HEIGHT] = -1;
  node->layout.last_parent_max_width = -1;
  node->layout.last_parent_max_height = -1;
  node->layout.last_direction = (css_direction_t)-1;
  node->layout.should_update = true;
}
The initial align_items of css_node is ALIGN_STRETCH, align_content is ALIGN_FLEX_START, direction is inherited from the parent class, and flex_direction is arranged by column.
Next, the arrays below store UNDEFINED rather than 0, because 0 would conflict with the 0 values in the struct.
Finally, the cached variables are all initialized to -1.
Next, four global arrays are defined. These four arrays are very useful: they determine the direction and properties of the subsequent layout. The four arrays are correlated with the axis directions.
static css_position_t leading[4] = {
  /* CSS_FLEX_DIRECTION_COLUMN = */ CSS_TOP,
  /* CSS_FLEX_DIRECTION_COLUMN_REVERSE = */ CSS_BOTTOM,
  /* CSS_FLEX_DIRECTION_ROW = */ CSS_LEFT,
  /* CSS_FLEX_DIRECTION_ROW_REVERSE = */ CSS_RIGHT
};
If the main axis is vertical in the COLUMN direction, the child view’s leading edge is CSS_TOP; if the direction is COLUMN_REVERSE, the child view’s leading edge is CSS_BOTTOM. If the main axis is horizontal in the ROW direction, the child view’s leading edge is CSS_LEFT; if the direction is ROW_REVERSE, the child view’s leading edge is CSS_RIGHT.
static css_position_t trailing[4] = {
  /* CSS_FLEX_DIRECTION_COLUMN = */ CSS_BOTTOM,
  /* CSS_FLEX_DIRECTION_COLUMN_REVERSE = */ CSS_TOP,
  /* CSS_FLEX_DIRECTION_ROW = */ CSS_RIGHT,
  /* CSS_FLEX_DIRECTION_ROW_REVERSE = */ CSS_LEFT
};
If the main axis is vertical in the COLUMN direction, the child view’s trailing edge is CSS_BOTTOM; if the direction is COLUMN_REVERSE, the child view’s trailing edge is CSS_TOP. If the main axis is horizontal in the ROW direction, the child view’s trailing edge is CSS_RIGHT; if the direction is ROW_REVERSE, the child view’s trailing edge is CSS_LEFT.
static css_position_t pos[4] = {
  /* CSS_FLEX_DIRECTION_COLUMN = */ CSS_TOP,
  /* CSS_FLEX_DIRECTION_COLUMN_REVERSE = */ CSS_BOTTOM,
  /* CSS_FLEX_DIRECTION_ROW = */ CSS_LEFT,
  /* CSS_FLEX_DIRECTION_ROW_REVERSE = */ CSS_RIGHT
};
If the main axis is in the vertical COLUMN direction, the child view’s position starts from CSS_TOP. If the direction is COLUMN_REVERSE, the child view’s position starts from CSS_BOTTOM. If the main axis is in the horizontal ROW direction, the child view’s position starts from CSS_LEFT. If the direction is ROW_REVERSE, the child view’s position starts from CSS_RIGHT.
static css_dimension_t dim[4] = {
  /* CSS_FLEX_DIRECTION_COLUMN = */ CSS_HEIGHT,
  /* CSS_FLEX_DIRECTION_COLUMN_REVERSE = */ CSS_HEIGHT,
  /* CSS_FLEX_DIRECTION_ROW = */ CSS_WIDTH,
  /* CSS_FLEX_DIRECTION_ROW_REVERSE = */ CSS_WIDTH
};
If the main axis is in the vertical direction, COLUMN, then the size of the child view along this direction is CSS_HEIGHT; if the direction is COLUMN_REVERSE, then the size of the child view along this direction is also CSS_HEIGHT. If the main axis is in the horizontal direction, ROW, then the size of the child view along this direction is CSS_WIDTH; if the direction is ROW_REVERSE, then the size of the child view along this direction is CSS_WIDTH.
(2) Layout Algorithm in FlexBox
The Weex box model is based on the CSS box model. Every Weex element can be regarded as a box. When discussing design or layout, we generally refer to the concept of the “box model.”
The box model describes the space occupied by an element. Each box has four boundaries: the margin edge, border edge, padding edge, and content edge. These four layers of boundaries form nested boxes, which is the general meaning of the box model.
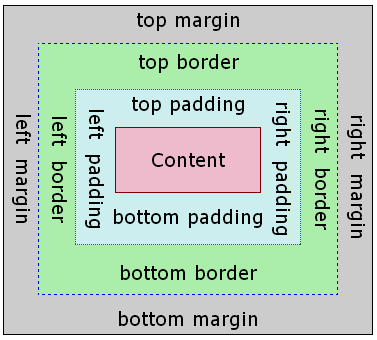
The box model is shown above. This diagram is based on LTR, with the main axis in the horizontal direction.
Therefore, different main-axis directions may result in different cases.
Note: The default
box-sizingof the Weex box model isborder-box, meaning the box’s width and height include the content, padding, and border width, but exclude the margin width.
// Determine whether the axis is horizontal
static bool isRowDirection(css_flex_direction_t flex_direction) {
  return flex_direction == CSS_FLEX_DIRECTION_ROW ||
         flex_direction == CSS_FLEX_DIRECTION_ROW_REVERSE;
}

// Determine whether the axis is vertical
static bool isColumnDirection(css_flex_direction_t flex_direction) {
  return flex_direction == CSS_FLEX_DIRECTION_COLUMN ||
         flex_direction == CSS_FLEX_DIRECTION_COLUMN_REVERSE;
}
The ways to determine the axis direction are the two described above.
Next, we also need to calculate the padding, border, and margin in the four directions. Here, we’ll use one direction as an example.
First, how is the margin calculated?
static float getLeadingMargin(css_node_t *node, css_flex_direction_t axis) {
  if (isRowDirection(axis) && !isUndefined(node->style.margin[CSS_START])) {
    return node->style.margin[CSS_START];
  }
  return node->style.margin[leading[axis]];
}
Determine whether the axis direction is horizontal. If it is horizontal, directly take CSS_START from the node’s margin as the LeadingMargin. If it is vertical, take the margin value in the leading direction on the vertical axis.
If taking the TrailingMargin, use margin[CSS_END].
static float getTrailingMargin(css_node_t *node, css_flex_direction_t axis) {
  if (isRowDirection(axis) && !isUndefined(node->style.margin[CSS_END])) {
    return node->style.margin[CSS_END];
  }

  return node->style.margin[trailing[axis]];
}
The arrays for the three values padding, border, and margin each store six values. For the horizontal direction, CSS_START stores Leading values, and CSS_END stores Trailing values. Unless otherwise specified below, this rule applies throughout.
static float getLeadingPadding(css_node_t *node, css_flex_direction_t axis) {
  if (isRowDirection(axis) &&
      !isUndefined(node->style.padding[CSS_START]) &&
      node->style.padding[CSS_START] >= 0) {
    return node->style.padding[CSS_START];
  }

  if (node->style.padding[leading[axis]] >= 0) {
    return node->style.padding[leading[axis]];
  }

  return 0;
}
The approach for retrieving Padding is the same as for retrieving Margin. In the horizontal direction, take padding[CSS_START] from the array; in the vertical direction, take the value of padding[leading[axis]] accordingly.
static float getLeadingBorder(css_node_t *node, css_flex_direction_t axis) {
  if (isRowDirection(axis) &&
      !isUndefined(node->style.border[CSS_START]) &&
      node->style.border[CSS_START] >= 0) {
    return node->style.border[CSS_START];
  }

  if (node->style.border[leading[axis]] >= 0) {
    return node->style.border[leading[axis]];
  }

  return 0;
}
Finally, the calculation method for Border is exactly the same as the Padding and Margin described above, so I won’t repeat it here.
With the calculation methods for the margins on all four sides implemented, the next step is how to perform layout.
// Method for calculating layout
void layoutNode(css_node_t *node, float maxWidth, float maxHeight, css_direction_t parentDirection);

// Before calling layoutNode, the layout of the node can be reset
void resetNodeLayout(css_node_t *node);
The method for resetting a node is to reset the node’s coordinates to 0, and then reset both its width and height to UNDEFINED.
void resetNodeLayout(css_node_t *node) {
  node->layout.dimensions[CSS_WIDTH] = CSS_UNDEFINED;
  node->layout.dimensions[CSS_HEIGHT] = CSS_UNDEFINED;
  node->layout.position[CSS_LEFT] = 0;
  node->layout.position[CSS_TOP] = 0;
}
Finally, the layout method is as follows:
void layoutNode(css_node_t *node, float parentMaxWidth, float parentMaxHeight, css_direction_t parentDirection) {
  css_layout_t *layout = &node->layout;
  css_direction_t direction = node->style.direction;
  layout->should_update = true;

  // Check whether the current environment is "clean", and whether the node to lay out is exactly the same as the last node.
  bool skipLayout =
    !node->is_dirty(node->context) &&
    eq(layout->last_requested_dimensions[CSS_WIDTH], layout->dimensions[CSS_WIDTH]) &&
    eq(layout->last_requested_dimensions[CSS_HEIGHT], layout->dimensions[CSS_HEIGHT]) &&
    eq(layout->last_parent_max_width, parentMaxWidth) &&
    eq(layout->last_parent_max_height, parentMaxHeight) &&
    eq(layout->last_direction, direction);

  if (skipLayout) {
    // Assign the cached values directly to the current layout
    layout->dimensions[CSS_WIDTH] = layout->last_dimensions[CSS_WIDTH];
    layout->dimensions[CSS_HEIGHT] = layout->last_dimensions[CSS_HEIGHT];
    layout->position[CSS_TOP] = layout->last_position[CSS_TOP];
    layout->position[CSS_LEFT] = layout->last_position[CSS_LEFT];
  } else {
    // Cache the node
    layout->last_requested_dimensions[CSS_WIDTH] = layout->dimensions[CSS_WIDTH];
    layout->last_requested_dimensions[CSS_HEIGHT] = layout->dimensions[CSS_HEIGHT];
    layout->last_parent_max_width = parentMaxWidth;
    layout->last_parent_max_height = parentMaxHeight;
    layout->last_direction = direction;

    // Initialize the size and position of all child view nodes
    for (int i = 0, childCount = node->children_count; i < childCount; i++) {
      resetNodeLayout(node->get_child(node->context, i));
    }

    // Core implementation of view layout
    layoutNodeImpl(node, parentMaxWidth, parentMaxHeight, parentDirection);

    // After layout is complete, cache this layout to avoid recalculating the same layout next time
    layout->last_dimensions[CSS_WIDTH] = layout->dimensions[CSS_WIDTH];
    layout->last_dimensions[CSS_HEIGHT] = layout->dimensions[CSS_HEIGHT];
    layout->last_position[CSS_TOP] = layout->position[CSS_TOP];
    layout->last_position[CSS_LEFT] = layout->position[CSS_LEFT];
  }
}
Each step is annotated; see the comments in the code above. Before invoking layoutNodeImpl, the core layout implementation, resetNodeLayout is called in a loop to initialize all child views.
The entire core implementation lives in the layoutNodeImpl method. In Weex, this method is more than 700 lines long; in Yoga’s implementation, the layout algorithm is more than 1,000 lines long.
static void layoutNodeImpl(css_node_t *node, float parentMaxWidth, float parentMaxHeight, css_direction_t parentDirection) {

}
Here is an analysis of the main flow of this algorithm. In this Weex implementation, there are seven loops; let’s label them A, B, C, D, E, F, and G in order.
First, let’s look at loop A.
    float mainContentDim = 0;
    // There are three types of child views: flex children, non-flex children, and absolutely positioned children. We need to know which children are waiting for space allocation.
    int flexibleChildrenCount = 0;
    float totalFlexible = 0;
    int nonFlexibleChildrenCount = 0;

    // Use one loop to simply stack child views on the main axis; in loop C, ignore the child views already laid out in loop A.
    bool isSimpleStackMain =
        (isMainDimDefined && justifyContent == CSS_JUSTIFY_FLEX_START) ||
        (!isMainDimDefined && justifyContent != CSS_JUSTIFY_CENTER);
    int firstComplexMain = (isSimpleStackMain ? childCount : startLine);

    // Use one loop to simply stack child views on the cross axis; in loop D, ignore the child views already laid out in loop A.
    bool isSimpleStackCross = true;
    int firstComplexCross = childCount;

    css_node_t* firstFlexChild = NULL;
    css_node_t* currentFlexChild = NULL;

    float mainDim = leadingPaddingAndBorderMain;
    float crossDim = 0;

    float maxWidth = CSS_UNDEFINED;
    float maxHeight = CSS_UNDEFINED;

    // Loop A starts here
    for (i = startLine; i < childCount; ++i) {
      child = node->get_child(node->context, i);
      child->line_index = linesCount;

      child->next_absolute_child = NULL;
      child->next_flex_child = NULL;

      css_align_t alignItem = getAlignItem(node, child);

      // Before recursive layout, prefill stretchable child views on the cross axis
      if (alignItem == CSS_ALIGN_STRETCH &&
          child->style.position_type == CSS_POSITION_RELATIVE &&
          isCrossDimDefined &&
          !isStyleDimDefined(child, crossAxis)) {

        // Compare the child's size on the cross axis with the stretchable space left after subtracting margins, padding, and borders, since stretching does not shrink the original size.
        child->layout.dimensions[dim[crossAxis]] = fmaxf(
          boundAxis(child, crossAxis, node->layout.dimensions[dim[crossAxis]] -
            paddingAndBorderAxisCross - getMarginAxis(child, crossAxis)),
          getPaddingAndBorderAxis(child, crossAxis)
        );
      } else if (child->style.position_type == CSS_POSITION_ABSOLUTE) {
        // Store a linked list of absolutely positioned child views here so we can quickly skip them during later layout.
        if (firstAbsoluteChild == NULL) {
          firstAbsoluteChild = child;
        }
        if (currentAbsoluteChild != NULL) {
          currentAbsoluteChild->next_absolute_child = child;
        }
        currentAbsoluteChild = child;

        // Prefill the child view; this needs the view's absolute coordinates on the axis: left/right offsets for a horizontal axis, top/bottom offsets for a vertical axis.
        for (ii = 0; ii < 2; ii++) {
          axis = (ii != 0) ? CSS_FLEX_DIRECTION_ROW : CSS_FLEX_DIRECTION_COLUMN;
          if (isLayoutDimDefined(node, axis) &&
              !isStyleDimDefined(child, axis) &&
              isPosDefined(child, leading[axis]) &&
              isPosDefined(child, trailing[axis])) {
            child->layout.dimensions[dim[axis]] = fmaxf(
              // This is absolute layout, so leading and trailing must also be subtracted
              boundAxis(child, axis, node->layout.dimensions[dim[axis]] -
                getPaddingAndBorderAxis(node, axis) -
                getMarginAxis(child, axis) -
                getPosition(child, leading[axis]) -
                getPosition(child, trailing[axis])),
              getPaddingAndBorderAxis(child, axis)
            );
          }
        }
      }
The specific implementation of Loop A is shown above; see the code comments for details.
Loop A is primarily responsible for laying out child views in the layout that cannot flex. The mainContentDim variable records the sum of all dimensions and the margins of all child views that cannot flex. It is used to set the size of the node, and to calculate the remaining space so that flex-capable child views can stretch and adapt accordingly.
Each node’s next\_absolute\_child maintains a linked list, which stores the linked list of absolutely positioned views in order.
Next, the flex-capable child views need to be counted.
      float nextContentDim = 0;

      // Count flex-capable child views
      if (isMainDimDefined && isFlex(child)) {
        flexibleChildrenCount++;
        totalFlexible += child->style.flex;

        // Store a linked list to track flex-capable child views
        if (firstFlexChild == NULL) {
          firstFlexChild = child;
        }
        if (currentFlexChild != NULL) {
          currentFlexChild->next_flex_child = child;
        }
        currentFlexChild = child;

        // At this point, although we don't know the exact size info, we already know the padding, border, and margin, so we can use these to determine a minimum size for the child view and compute the remaining available space.
        // The distance to the next content equals the sum of the current child view's leading and trailing padding, border, and margin: six dimensions.
        nextContentDim = getPaddingAndBorderAxis(child, mainAxis) +
          getMarginAxis(child, mainAxis);

      } else {
        maxWidth = CSS_UNDEFINED;
        maxHeight = CSS_UNDEFINED;

       // Calculate the maximum width and height
        if (!isMainRowDirection) {
          if (isLayoutDimDefined(node, resolvedRowAxis)) {
            maxWidth = node->layout.dimensions[dim[resolvedRowAxis]] -
              paddingAndBorderAxisResolvedRow;
          } else {
            maxWidth = parentMaxWidth -
              getMarginAxis(node, resolvedRowAxis) -
              paddingAndBorderAxisResolvedRow;
          }
        } else {
          if (isLayoutDimDefined(node, CSS_FLEX_DIRECTION_COLUMN)) {
            maxHeight = node->layout.dimensions[dim[CSS_FLEX_DIRECTION_COLUMN]] -
                paddingAndBorderAxisColumn;
          } else {
            maxHeight = parentMaxHeight -
              getMarginAxis(node, CSS_FLEX_DIRECTION_COLUMN) -
              paddingAndBorderAxisColumn;
          }
        }

        // Recursively call the layout function to lay out child views that cannot stretch.
        if (alreadyComputedNextLayout == 0) {
          layoutNode(child, maxWidth, maxHeight, direction);
        }

        // Since the positions of absolutely positioned child views are unrelated to layout, we cannot use them to compute mainContentDim
        if (child->style.position_type == CSS_POSITION_RELATIVE) {
          nonFlexibleChildrenCount++;
          nextContentDim = getDimWithMargin(child, mainAxis);
        }
      }
The code above determines the layout of the non-stretchable subviews.
Each node’s next_flex_child maintains a linked list; this list stores, in order, the views that can be stretched by flex.
      // The element to be added may be pushed to the next line
      if (isNodeFlexWrap &&
          isMainDimDefined &&
          mainContentDim + nextContentDim > definedMainDim &&
          // If there is only one element here, it may need a line of its own
          i != startLine) {
        nonFlexibleChildrenCount--;
        alreadyComputedNextLayout = 1;
        break;
      }

      // Stop stacking child views on the main axis; remaining child views are laid out in loop C
      if (isSimpleStackMain &&
          (child->style.position_type != CSS_POSITION_RELATIVE || isFlex(child))) {
        isSimpleStackMain = false;
        firstComplexMain = i;
      }

      // Stop stacking child views on the cross axis; remaining child views are laid out in loop D
      if (isSimpleStackCross &&
          (child->style.position_type != CSS_POSITION_RELATIVE ||
              (alignItem != CSS_ALIGN_STRETCH && alignItem != CSS_ALIGN_FLEX_START) ||
              (alignItem == CSS_ALIGN_STRETCH && !isCrossDimDefined))) {
        isSimpleStackCross = false;
        firstComplexCross = i;
      }

      if (isSimpleStackMain) {
        child->layout.position[pos[mainAxis]] += mainDim;
        if (isMainDimDefined) {
        // Set the child view's TrailingPosition on the main axis
          setTrailingPosition(node, child, mainAxis);
        }
        // The main-axis size can now be calculated
        mainDim += getDimWithMargin(child, mainAxis);
        // The cross-axis size can now be calculated
        crossDim = fmaxf(crossDim, boundAxis(child, crossAxis, getDimWithMargin(child, crossAxis)));
      }

      if (isSimpleStackCross) {
        child->layout.position[pos[crossAxis]] += linesCrossDim + leadingPaddingAndBorderCross;
        if (isCrossDimDefined) {
        // Set the child view's TrailingPosition on the cross axis
          setTrailingPosition(node, child, crossAxis);
        }
      }

      alreadyComputedNextLayout = 0;
      mainContentDim += nextContentDim;
      endLine = i + 1;
    }
// Loop A ends here
After Loop A finishes, endLine is computed, along with the size on the main axis and the size on the cross axis. The layout of non-stretchable subviews is also determined.
Next, the process enters the Loop B phase.
Loop B is mainly divided into two parts. The first part is used to lay out stretchable subviews.
    // To lay out along the main axis, need to control two spaces: one between the first child view and the far left, and one between child views
    float leadingMainDim = 0;
    float betweenMainDim = 0;

    // Record the remaining available space
    float remainingMainDim = 0;
    if (isMainDimDefined) {
      remainingMainDim = definedMainDim - mainContentDim;
    } else {
      remainingMainDim = fmaxf(mainContentDim, 0) - mainContentDim;
    }

    // If there are still stretchable child views, they should fill the remaining available space
    if (flexibleChildrenCount != 0) {
      float flexibleMainDim = remainingMainDim / totalFlexible;
      float baseMainDim;
      float boundMainDim;

      // If the remaining space cannot be allocated to stretchable child views and cannot satisfy their max or min bounds, exclude these child views from the stretch calculation
      currentFlexChild = firstFlexChild;
      while (currentFlexChild != NULL) {
        baseMainDim = flexibleMainDim * currentFlexChild->style.flex +
            getPaddingAndBorderAxis(currentFlexChild, mainAxis);
        boundMainDim = boundAxis(currentFlexChild, mainAxis, baseMainDim);

        if (baseMainDim != boundMainDim) {
          remainingMainDim -= boundMainDim;
          totalFlexible -= currentFlexChild->style.flex;
        }

        currentFlexChild = currentFlexChild->next_flex_child;
      }
      flexibleMainDim = remainingMainDim / totalFlexible;

      // Non-stretchable child views can overflow inside the parent view; in this case, assume there is no available stretch space
      if (flexibleMainDim < 0) {
        flexibleMainDim = 0;
      }

      currentFlexChild = firstFlexChild;
      while (currentFlexChild != NULL) {
        // In this loop, we can now determine the final size of the child view
        currentFlexChild->layout.dimensions[dim[mainAxis]] = boundAxis(currentFlexChild, mainAxis,
          flexibleMainDim * currentFlexChild->style.flex +
              getPaddingAndBorderAxis(currentFlexChild, mainAxis)
        );

        // Calculate the maximum width of the child view on the horizontal axis
        maxWidth = CSS_UNDEFINED;
        if (isLayoutDimDefined(node, resolvedRowAxis)) {
          maxWidth = node->layout.dimensions[dim[resolvedRowAxis]] -
            paddingAndBorderAxisResolvedRow;
        } else if (!isMainRowDirection) {
          maxWidth = parentMaxWidth -
            getMarginAxis(node, resolvedRowAxis) -
            paddingAndBorderAxisResolvedRow;
        }

        // Calculate the maximum height of the child view on the vertical axis
        maxHeight = CSS_UNDEFINED;
        if (isLayoutDimDefined(node, CSS_FLEX_DIRECTION_COLUMN)) {
          maxHeight = node->layout.dimensions[dim[CSS_FLEX_DIRECTION_COLUMN]] -
            paddingAndBorderAxisColumn;
        } else if (isMainRowDirection) {
          maxHeight = parentMaxHeight -
            getMarginAxis(node, CSS_FLEX_DIRECTION_COLUMN) -
            paddingAndBorderAxisColumn;
        }

        // Recursively lay out the stretchable child views again
        layoutNode(currentFlexChild, maxWidth, maxHeight, direction);

        child = currentFlexChild;
        currentFlexChild = currentFlexChild->next_flex_child;
        child->next_flex_child = NULL;
      }
    }
After the two while loops above complete, all stretchable subviews have been laid out.
 else if (justifyContent != CSS_JUSTIFY_FLEX_START) {
      if (justifyContent == CSS_JUSTIFY_CENTER) {
        leadingMainDim = remainingMainDim / 2;
      } else if (justifyContent == CSS_JUSTIFY_FLEX_END) {
        leadingMainDim = remainingMainDim;
      } else if (justifyContent == CSS_JUSTIFY_SPACE_BETWEEN) {
        remainingMainDim = fmaxf(remainingMainDim, 0);
        if (flexibleChildrenCount + nonFlexibleChildrenCount - 1 != 0) {
          betweenMainDim = remainingMainDim /
            (flexibleChildrenCount + nonFlexibleChildrenCount - 1);
        } else {
          betweenMainDim = 0;
        }
      } else if (justifyContent == CSS_JUSTIFY_SPACE_AROUND) {
        // Code to implement SPACE_AROUND
        betweenMainDim = remainingMainDim /
          (flexibleChildrenCount + nonFlexibleChildrenCount);
        leadingMainDim = betweenMainDim / 2;
      }
    }
After the layout of flex-stretchable views is complete, this is the wrap-up step: adjust the sizes of betweenMainDim and leadingMainDim based on justifyContent.
Next comes loop C.
    // In this loop, the width and height of all child views will be determined. When determining each child view's coordinates, the parent view's width and height will also be determined.
    mainDim += leadingMainDim;

    // Loop through line by line
    for (i = firstComplexMain; i < endLine; ++i) {
      child = node->get_child(node->context, i);

      if (child->style.position_type == CSS_POSITION_ABSOLUTE &&
          isPosDefined(child, leading[mainAxis])) {
        // At this point, the coordinates of the absolutely positioned child view have been determined, and the left and top margins have been set. The child view's absolute coordinates can now be determined.
        child->layout.position[pos[mainAxis]] = getPosition(child, leading[mainAxis]) +
          getLeadingBorder(node, mainAxis) +
          getLeadingMargin(child, mainAxis);
      } else {
        // If the child view is not absolutely positioned, its coordinates are relative, or the left and top margins have not yet been determined, determine the coordinates based on the current position
        child->layout.position[pos[mainAxis]] += mainDim;

        // Determine the trailing coordinate position
        if (isMainDimDefined) {
          setTrailingPosition(node, child, mainAxis);
        }

        // Next, process the relatively positioned child views; absolutely positioned child views do not participate in the layout calculations below
        if (child->style.position_type == CSS_POSITION_RELATIVE) {
          // The width on the main axis is the sum of all child view widths
          mainDim += betweenMainDim + getDimWithMargin(child, mainAxis);
          // The height on the cross axis is determined by the tallest child view
          crossDim = fmaxf(crossDim, boundAxis(child, crossAxis, getDimWithMargin(child, crossAxis)));
        }
      }
    }

    float containerCrossAxis = node->layout.dimensions[dim[crossAxis]];
    if (!isCrossDimDefined) {
      containerCrossAxis = fmaxf(
        // When calculating the parent view, the top and bottom padding and border must be added.
        boundAxis(node, crossAxis, crossDim + paddingAndBorderAxisCross),
        paddingAndBorderAxisCross
      );
    }
In loop C, the coordinates of all subviews on the main axis are calculated, including the width and height of each subview.
Next, the flow moves on to loop D.
     for (i = firstComplexCross; i < endLine; ++i) {
      child = node->get_child(node->context, i);

      if (child->style.position_type == CSS_POSITION_ABSOLUTE &&
          isPosDefined(child, leading[crossAxis])) {
        // At this point, the coordinates of the absolutely positioned child view have been determined; at least one of top, bottom, left, or right is set. The child's absolute position can now be determined.
        child->layout.position[pos[crossAxis]] = getPosition(child, leading[crossAxis]) +
          getLeadingBorder(node, crossAxis) +
          getLeadingMargin(child, crossAxis);

      } else {
        float leadingCrossDim = leadingPaddingAndBorderCross;

        // On the cross axis, for relatively positioned child views, use the parent's alignItems or the child's alignSelf to determine the specific position.
        if (child->style.position_type == CSS_POSITION_RELATIVE) {
          // Get the child view's AlignItem value
          css_align_t alignItem = getAlignItem(node, child);
          if (alignItem == CSS_ALIGN_STRETCH) {
            // Stretch on the cross axis only if the child view's size has not yet been determined.
            if (!isStyleDimDefined(child, crossAxis)) {
              float dimCrossAxis = child->layout.dimensions[dim[crossAxis]];
              child->layout.dimensions[dim[crossAxis]] = fmaxf(
                boundAxis(child, crossAxis, containerCrossAxis -
                  paddingAndBorderAxisCross - getMarginAxis(child, crossAxis)),
                getPaddingAndBorderAxis(child, crossAxis)
              );

              // If the view's size changed, its child views also need to be laid out again.
              if (dimCrossAxis != child->layout.dimensions[dim[crossAxis]] && child->children_count > 0) {
                // Reset child margins before re-layout as they are added back in layoutNode and would be doubled
                child->layout.position[leading[mainAxis]] -= getLeadingMargin(child, mainAxis) +
                  getRelativePosition(child, mainAxis);
                child->layout.position[trailing[mainAxis]] -= getTrailingMargin(child, mainAxis) +
                  getRelativePosition(child, mainAxis);
                child->layout.position[leading[crossAxis]] -= getLeadingMargin(child, crossAxis) +
                  getRelativePosition(child, crossAxis);
                child->layout.position[trailing[crossAxis]] -= getTrailingMargin(child, crossAxis) +
                  getRelativePosition(child, crossAxis);

                // Recursively lay out child views
                layoutNode(child, maxWidth, maxHeight, direction);
              }
            }
          } else if (alignItem != CSS_ALIGN_FLEX_START) {
            // The remaining space on the cross axis equals the parent's cross-axis height minus the child's cross-axis padding, border, margin, and height.
            float remainingCrossDim = containerCrossAxis -
              paddingAndBorderAxisCross - getDimWithMargin(child, crossAxis);

            if (alignItem == CSS_ALIGN_CENTER) {
              leadingCrossDim += remainingCrossDim / 2;
            } else { // CSS_ALIGN_FLEX_END
              leadingCrossDim += remainingCrossDim;
            }
          }
        }

        // Determine the child view's position on the cross axis
        child->layout.position[pos[crossAxis]] += linesCrossDim + leadingCrossDim;

        // Determine the trailing coordinate
        if (isCrossDimDefined) {
          setTrailingPosition(node, child, crossAxis);
        }
      }
    }

    linesCrossDim += crossDim;
    linesMainDim = fmaxf(linesMainDim, mainDim);
    linesCount += 1;
    startLine = endLine;
  }
Loop D above mainly calculates the subviews’ coordinates on the cross axis. If the view’s size has changed, it also needs to recurse into the subviews and lay them out again.
Next is loop E
  if (linesCount > 1 && isCrossDimDefined) {
    float nodeCrossAxisInnerSize = node->layout.dimensions[dim[crossAxis]] -
        paddingAndBorderAxisCross;
    float remainingAlignContentDim = nodeCrossAxisInnerSize - linesCrossDim;

    float crossDimLead = 0;
    float currentLead = leadingPaddingAndBorderCross;

    // Layout alignContent
    css_align_t alignContent = node->style.align_content;
    if (alignContent == CSS_ALIGN_FLEX_END) {
      currentLead += remainingAlignContentDim;
    } else if (alignContent == CSS_ALIGN_CENTER) {
      currentLead += remainingAlignContentDim / 2;
    } else if (alignContent == CSS_ALIGN_STRETCH) {
      if (nodeCrossAxisInnerSize > linesCrossDim) {
        crossDimLead = (remainingAlignContentDim / linesCount);
      }
    }

    int endIndex = 0;
    for (i = 0; i < linesCount; ++i) {
      int startIndex = endIndex;

      // Calculate the line height for each row; compare lineHeight with the sum of each child view's cross-axis height and top/bottom margins, and take the maximum
      float lineHeight = 0;
      for (ii = startIndex; ii < childCount; ++ii) {
        child = node->get_child(node->context, ii);
        if (child->style.position_type != CSS_POSITION_RELATIVE) {
          continue;
        }
        if (child->line_index != i) {
          break;
        }
        if (isLayoutDimDefined(child, crossAxis)) {
          lineHeight = fmaxf(
            lineHeight,
            child->layout.dimensions[dim[crossAxis]] + getMarginAxis(child, crossAxis)
          );
        }
      }
      endIndex = ii;
      lineHeight += crossDimLead;

      for (ii = startIndex; ii < endIndex; ++ii) {
        child = node->get_child(node->context, ii);
        if (child->style.position_type != CSS_POSITION_RELATIVE) {
          continue;
        }

        // Layout AlignItem
        css_align_t alignContentAlignItem = getAlignItem(node, child);
        if (alignContentAlignItem == CSS_ALIGN_FLEX_START) {
          child->layout.position[pos[crossAxis]] = currentLead + getLeadingMargin(child, crossAxis);
        } else if (alignContentAlignItem == CSS_ALIGN_FLEX_END) {
          child->layout.position[pos[crossAxis]] = currentLead + lineHeight - getTrailingMargin(child, crossAxis) - child->layout.dimensions[dim[crossAxis]];
        } else if (alignContentAlignItem == CSS_ALIGN_CENTER) {
          float childHeight = child->layout.dimensions[dim[crossAxis]];
          child->layout.position[pos[crossAxis]] = currentLead + (lineHeight - childHeight) / 2;
        } else if (alignContentAlignItem == CSS_ALIGN_STRETCH) {
          child->layout.position[pos[crossAxis]] = currentLead + getLeadingMargin(child, crossAxis);
          // TODO(prenaux): Correctly set the height of items with undefined
          //                (auto) crossAxis dimension.
        }
      }

      currentLead += lineHeight;
    }
  }
Loop E is executed only under the prerequisite that there is more than one line and that a height is defined on the cross axis. Only after this prerequisite is satisfied will the following align rules be applied.
Loop E handles the align-based stretching rules on the cross axis. This is where alignContent and AlignItem are laid out.
For the algorithm implemented by this code, see http://www.w3.org/TR/2012/CR-css3-flexbox-20120918/#layout-algorithm, section 9.4.
At this point, there may still be some views with no specified width or height; these will be handled in one final pass.
  // If a view has no specified width or height, and its parent has not set its width or height either, set them here based on its child views.
  if (!isMainDimDefined) {
    // The view's width equals the child views' width plus trailing padding and border, or the main-axis leading padding/border + trailing padding/border, whichever is larger.
    node->layout.dimensions[dim[mainAxis]] = fmaxf(
      boundAxis(node, mainAxis, linesMainDim + getTrailingPaddingAndBorder(node, mainAxis)),
      paddingAndBorderAxisMain
    );

    if (mainAxis == CSS_FLEX_DIRECTION_ROW_REVERSE ||
        mainAxis == CSS_FLEX_DIRECTION_COLUMN_REVERSE) {
      needsMainTrailingPos = true;
    }
  }

  if (!isCrossDimDefined) {
    node->layout.dimensions[dim[crossAxis]] = fmaxf(
      // The view's height equals the child views' height plus top/bottom padding and border, or the cross-axis padding/border, whichever is larger.
      boundAxis(node, crossAxis, linesCrossDim + paddingAndBorderAxisCross),
      paddingAndBorderAxisCross
    );

    if (crossAxis == CSS_FLEX_DIRECTION_ROW_REVERSE ||
        crossAxis == CSS_FLEX_DIRECTION_COLUMN_REVERSE) {
      needsCrossTrailingPos = true;
    }
  }
For subviews whose width and height are not fixed, their width and height are determined by the parent view. See the code above for the method.
Next is looping over F.
  if (needsMainTrailingPos || needsCrossTrailingPos) {
    for (i = 0; i < childCount; ++i) {
      child = node->get_child(node->context, i);

      if (needsMainTrailingPos) {
        setTrailingPosition(node, child, mainAxis);
      }

      if (needsCrossTrailingPos) {
        setTrailingPosition(node, child, crossAxis);
      }
    }
  }
This step sets the Trailing coordinate of the current node, if necessary. If it is not needed, this step is skipped directly.
The final step is to loop through G.
  currentAbsoluteChild = firstAbsoluteChild;
  while (currentAbsoluteChild != NULL) {
    for (ii = 0; ii < 2; ii++) {
      axis = (ii != 0) ? CSS_FLEX_DIRECTION_ROW : CSS_FLEX_DIRECTION_COLUMN;

      if (isLayoutDimDefined(node, axis) &&
          !isStyleDimDefined(currentAbsoluteChild, axis) &&
          isPosDefined(currentAbsoluteChild, leading[axis]) &&
          isPosDefined(currentAbsoluteChild, trailing[axis])) {
        // The width of an absolutely positioned child view on the main axis and its height on the cross axis cannot be less than the sum of Padding and Border.
        currentAbsoluteChild->layout.dimensions[dim[axis]] = fmaxf(
          boundAxis(currentAbsoluteChild, axis, node->layout.dimensions[dim[axis]] -
            getBorderAxis(node, axis) -
            getMarginAxis(currentAbsoluteChild, axis) -
            getPosition(currentAbsoluteChild, leading[axis]) -
            getPosition(currentAbsoluteChild, trailing[axis])
          ),
          getPaddingAndBorderAxis(currentAbsoluteChild, axis)
        );
      }

      if (isPosDefined(currentAbsoluteChild, trailing[axis]) &&
          !isPosDefined(currentAbsoluteChild, leading[axis])) {
        // The current child view's coordinate equals the current view's width minus the child view's width, then minus trailing
        currentAbsoluteChild->layout.position[leading[axis]] =
          node->layout.dimensions[dim[axis]] -
          currentAbsoluteChild->layout.dimensions[dim[axis]] -
          getPosition(currentAbsoluteChild, trailing[axis]);
      }
    }

    child = currentAbsoluteChild;
    currentAbsoluteChild = currentAbsoluteChild->next_absolute_child;
    child->next_absolute_child = NULL;
  }
The final loop G is used to compute the width and height of subviews with absolute coordinates.
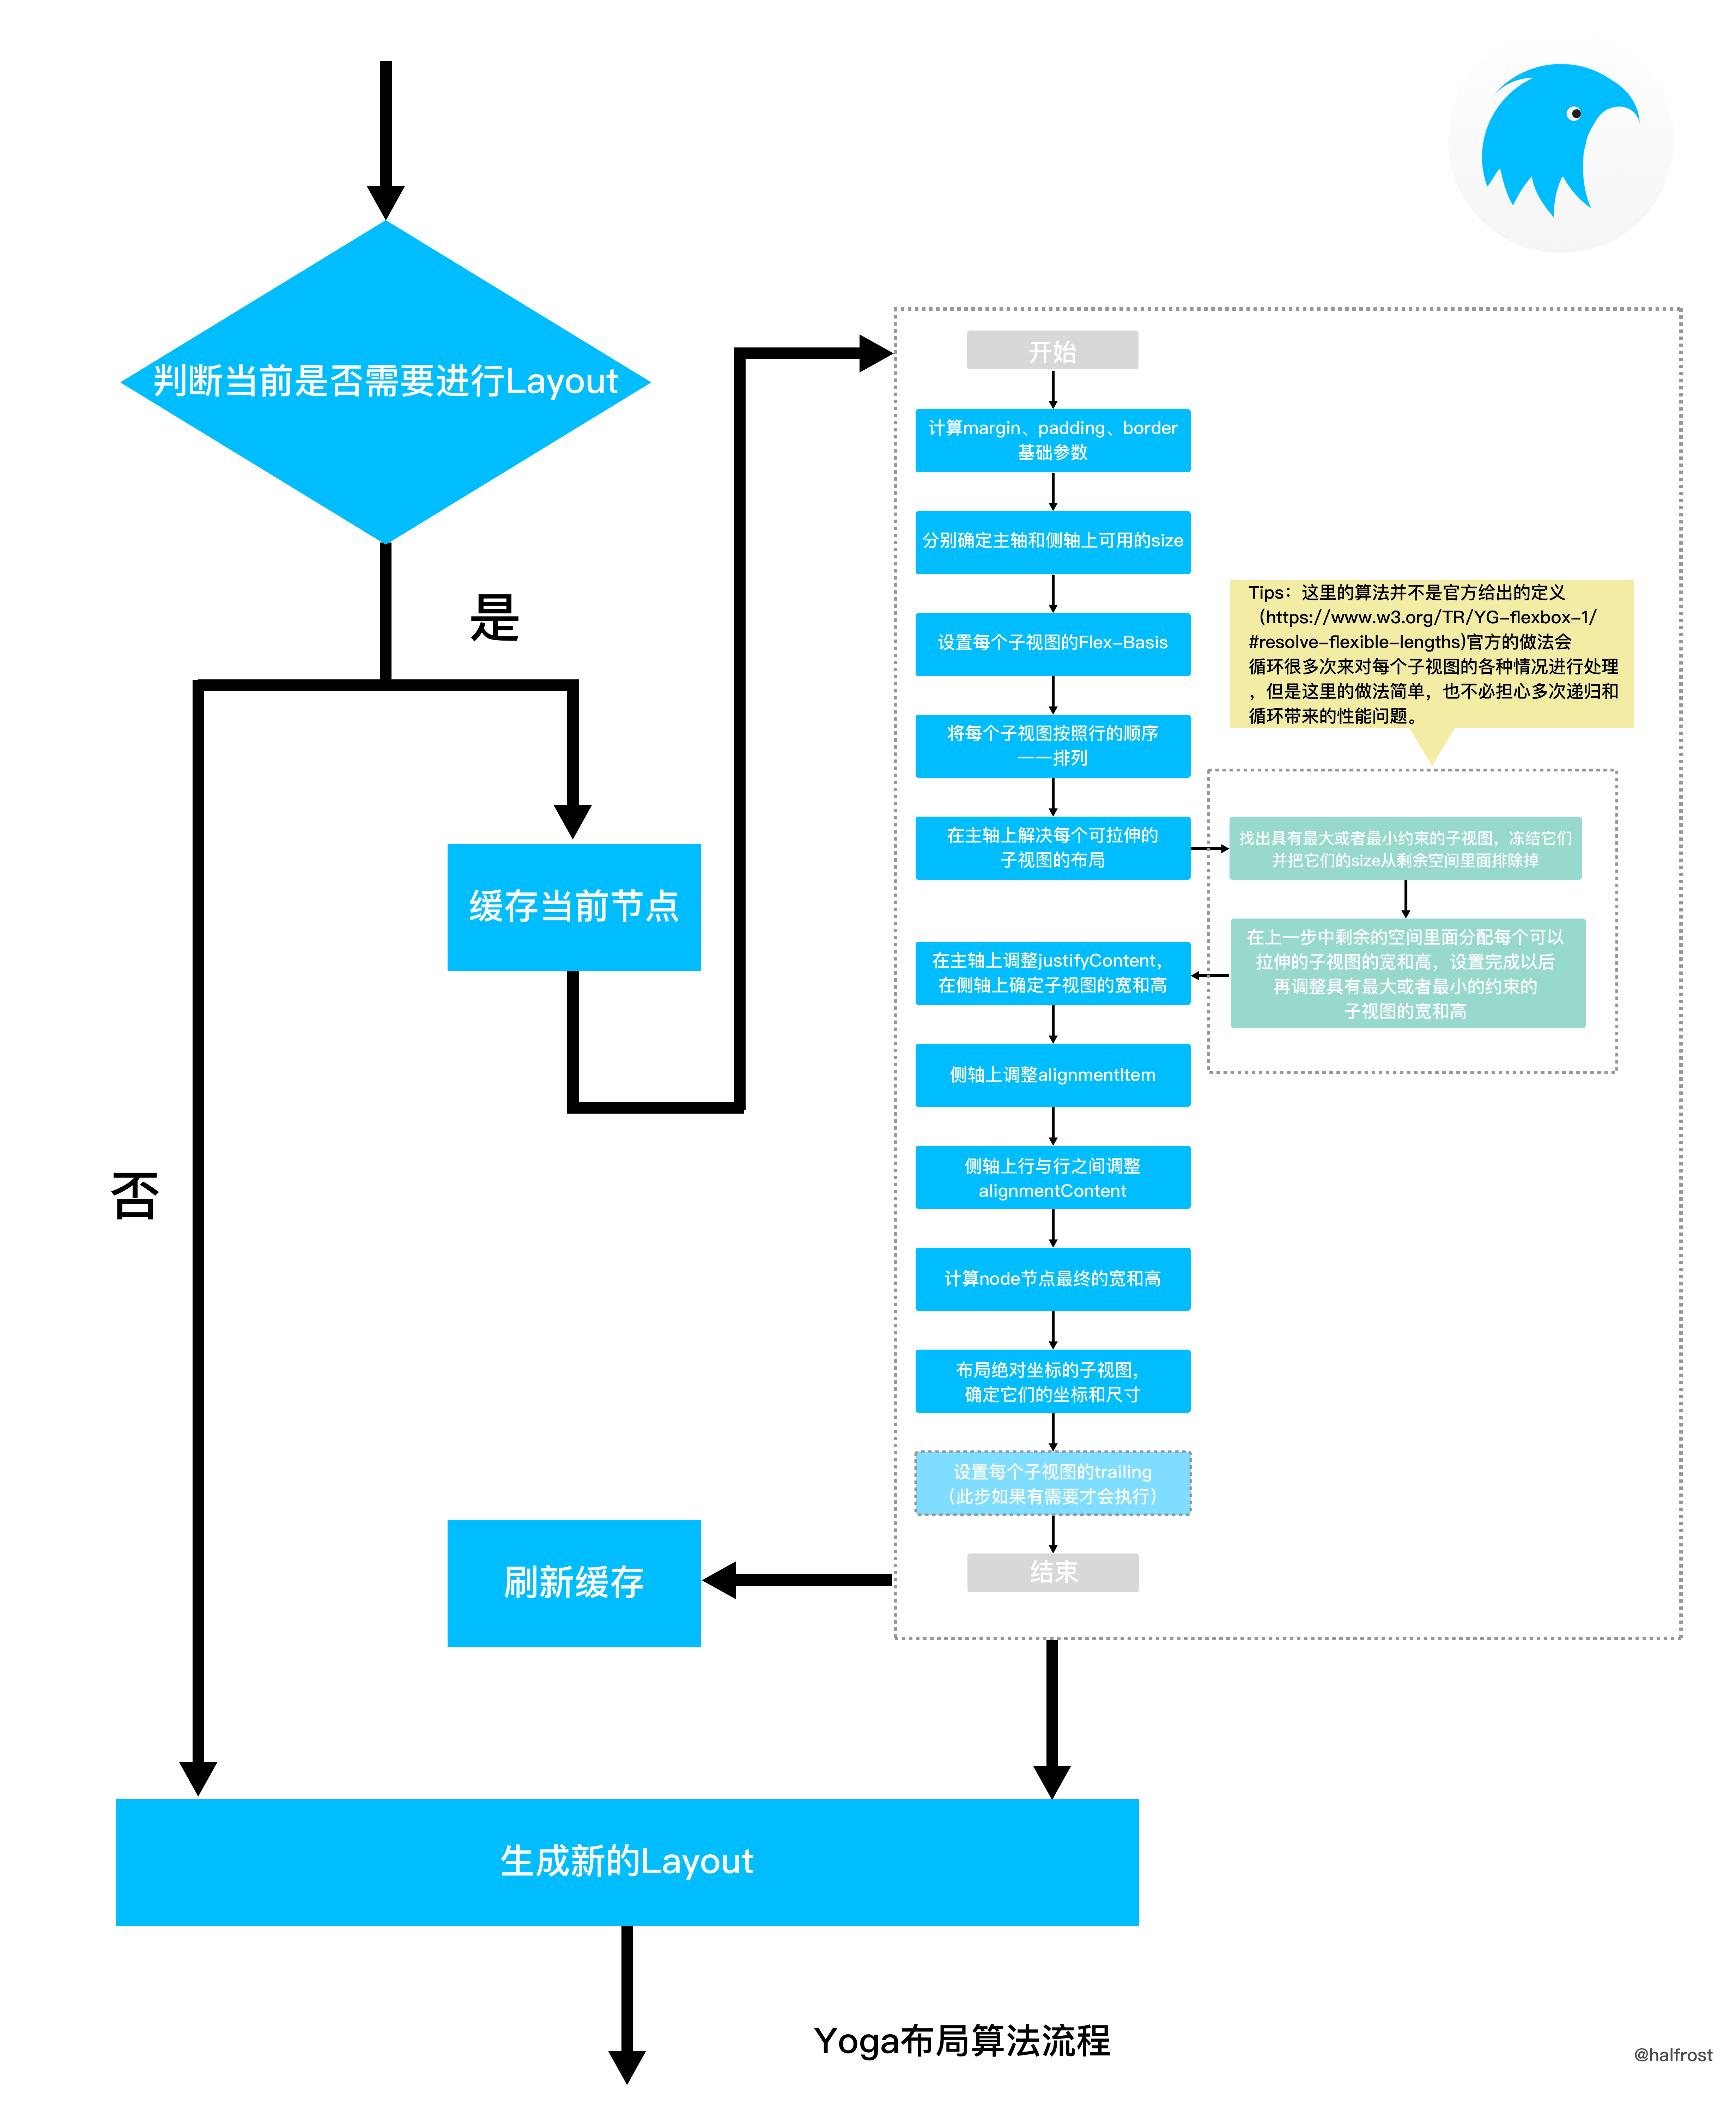
After the seven passes above have completed, all subviews have been laid out.
To summarize the process above, see the diagram below:
2. Performance Analysis of the Weex Layout Algorithm
1. Analysis of the Algorithm Implementation
The previous section covered the implementation of Weex’s layout algorithm. This section analyzes how capable this implementation actually is.
The Weex implementation is the predecessor of Facebook’s open-source Yoga library, so the two can be regarded as the same kind of implementation here.
This Flexbox implementation in Weex is actually only a subset of one implementation of the W3C standard, because some parts of the official Flexbox standard are not implemented. The W3C-defined Flexbox standard is documented here.
The Flexbox standard defines:
For the parent view (flex container):
- display
- flex-direction
- flex-wrap
- flex-flow
- justify-content
- align-items
- align-content
For child views (flex items):
- order
- flex-grow
- flex-shrink
- flex-basis
- flex
- align-self

Compared with the official definition, the implementation above has several limitations:
- All node nodes with display properties are assumed by default to be Flex views, except for text nodes, which are assumed to be inline-flex.
- The zIndex property is not supported, nor is any ordering on the z-axis. All node nodes are arranged in the order in which they are written in code. Weex currently also does not support using z-index to set element stacking relationships, but later elements have a higher stacking level. Therefore, elements that need a higher stacking level can be placed later.
- The order property defined in Flexbox is also not supported. flex items are ordered by default according to the order in which they are written in code.
- The visibility property is visible by default. The collapse and hidden properties are not currently supported.
- forced breaks are not supported.
- Vertical inline layout is not supported, such as top-to-bottom text or bottom-to-top text.
The concrete implementation of Flexbox on iOS was already analyzed in the previous section.

Next, let’s take a closer look at the concrete implementation of Auto Layout.
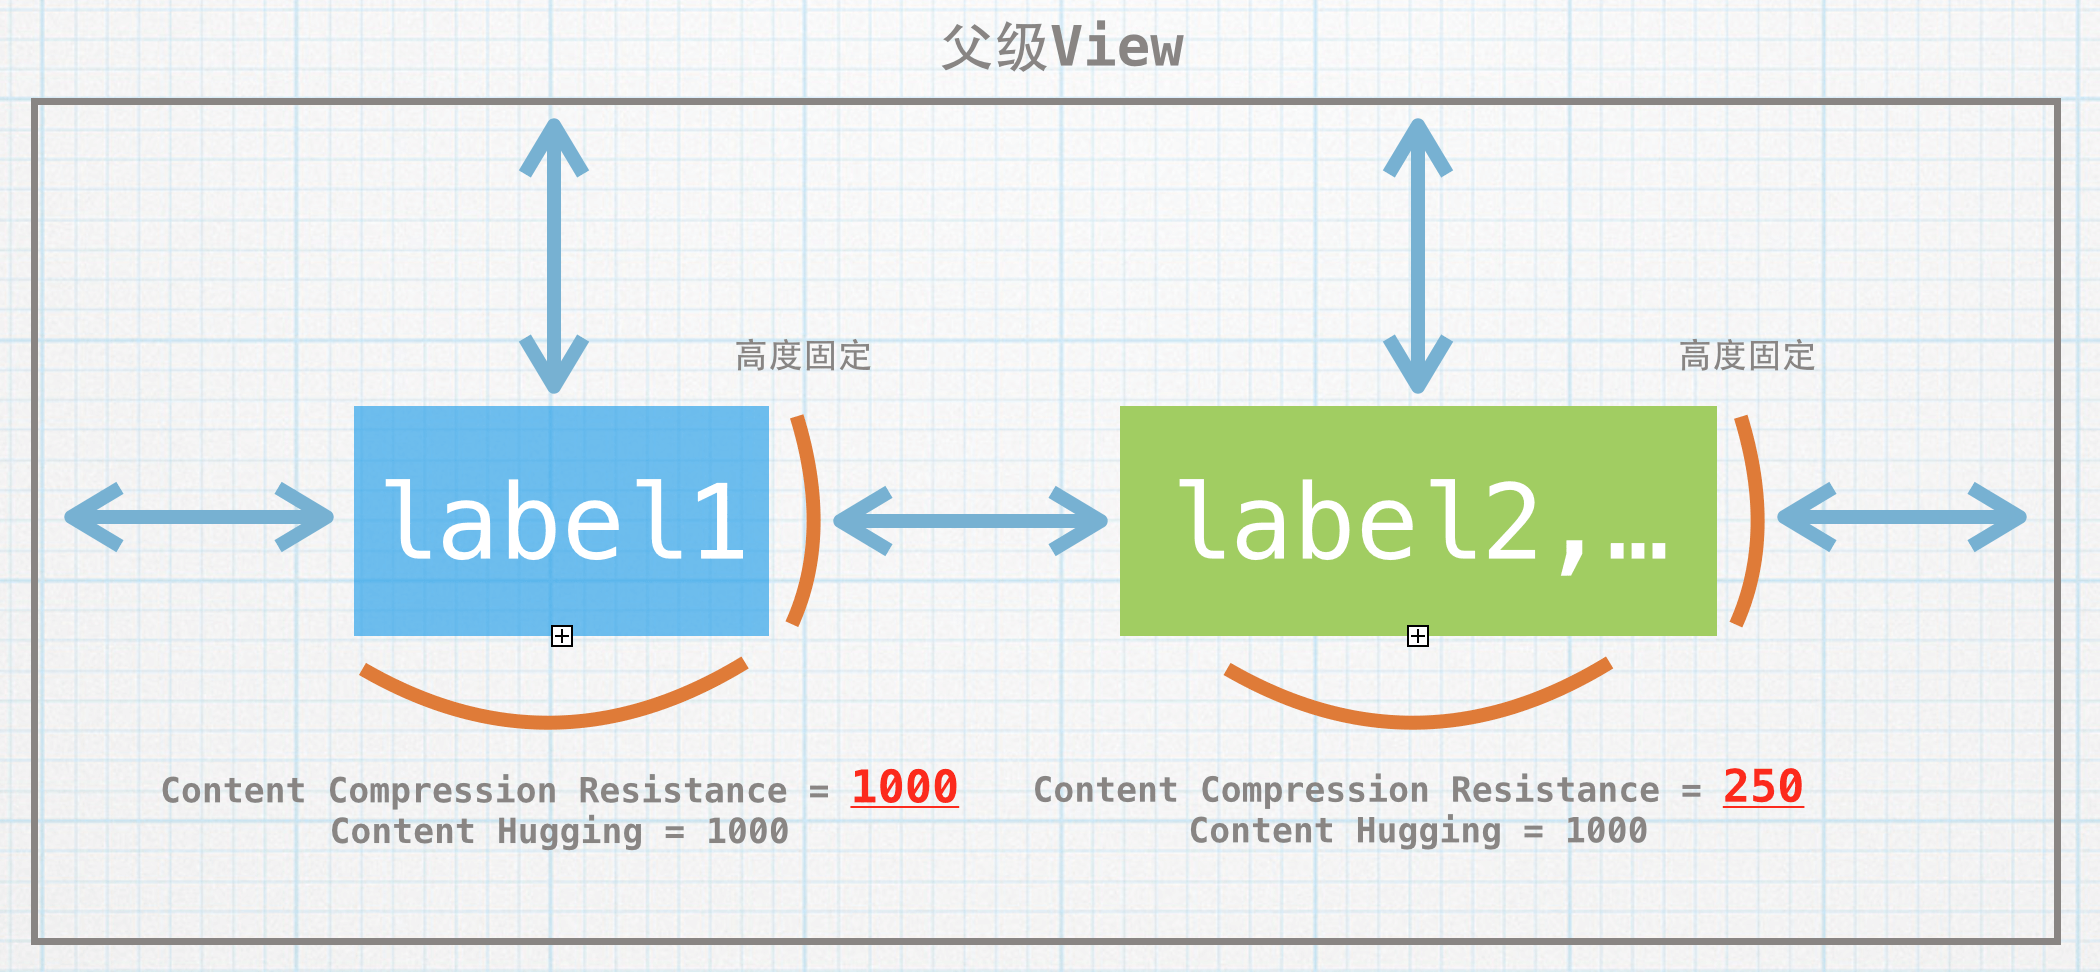
Previously, when we used Frame for layout, knowing one point (origin or center) plus the width and height was enough to determine a View.
Now that we use Auto Layout, each View needs four dimensions: left, top, width, and height.
However, a View’s constraints are relative to another View, such as relative to its parent view, or relative to another View.
That means constraints between any two Views become a linear system with eight variables.
Solving this system of equations may result in the following three cases:
- If the system has infinitely many solutions, the final result is an under-constrained, ambiguous layout.
- If the system has no solution, the constraints are in conflict.
- Only when the system has a unique solution can we obtain a stable layout.
Auto Layout is essentially a linear equation solver that attempts to find a geometric expression that satisfies its rules.
The underlying mathematical model of Auto Layout is the linear arithmetic constraint problem.
For this problem, as early as 1940, Dantzig proposed the simplex algorithm. However, because that algorithm was very difficult to apply to UI applications, it did not become widely used. It was not until 1997, when two students at Australia’s Monash University, Alan Borning and Kim Marriott, implemented the Cassowary linear constraint algorithm, that this type of approach began to be widely used in UI applications.
The Cassowary linear constraint algorithm is based on the dual simplex algorithm. When constraints are added or an object is removed, it can incrementally handle constraints of different levels very well through local error gain and weighted-sum comparison. The Cassowary linear constraint algorithm is suitable for GUI layout systems and is used to compute positions between views. Developers can specify positional relationships and constraint relationships between different Views, and the Cassowary linear constraint algorithm will compute the optimal values that satisfy those conditions.
Below are the related papers written by the two students. If you are interested, you can read them to understand the concrete implementation of the algorithm:
- Alan Borning, Kim Marriott, Peter Stuckey, and Yi Xiao, Solving Linear Arithmetic Constraints for User Interface Applications, Proceedings of the 1997 ACM Symposium on User Interface Software and Technology, October 1997, pages 87-96.
- Greg J. Badros and Alan Borning, “The Cassowary Linear Arithmetic Constraint Solving Algorithm: Interface and Implementation”, Technical Report UW-CSE-98-06-04, June 1998 (pdf)
- Greg J. Badros, Alan Borning, and Peter J. Stuckey, “The Cassowary Linear Arithmetic Constraint Solving Algorithm,” ACM Transactions on Computer Human Interaction, Vol. 8 No. 4, December 2001, pages 267-306. (pdf)
The pseudocode for the Cassowary linear constraint algorithm is as follows:
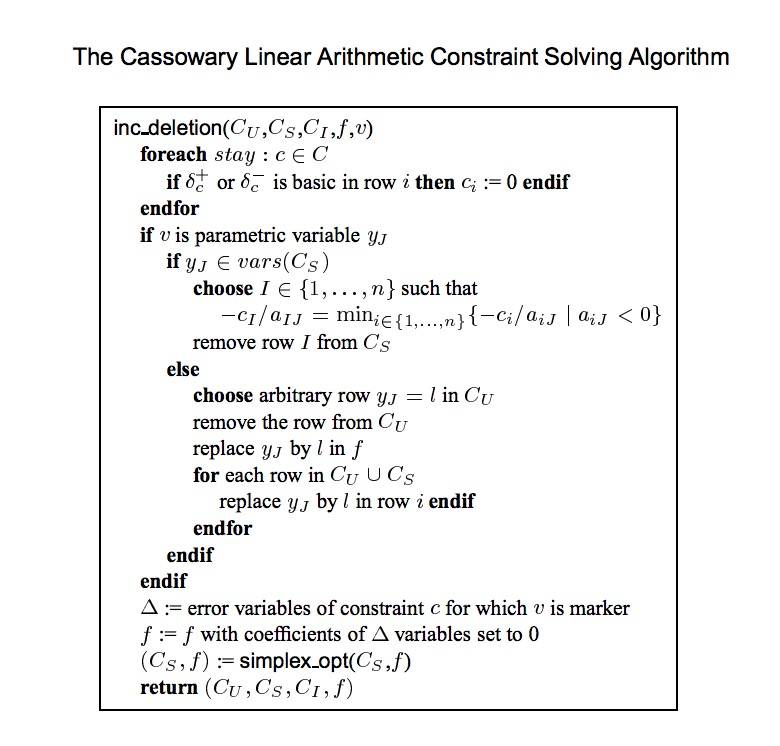
This algorithm has already been implemented in various versions. One year later, a new algorithm, QOCA, was introduced. The following passage is excerpted from an authoritative ACM paper from 1997:
Both of our algorithms have been implemented, Cassowary in Smalltalk and QOCA in C++. They perform surprisingly well. The QOCA implementation is considerably more sophisticated and has much better performance than the current version of Cassowary. However, QOCA is inherently a more complex algorithm, and re-implementing it with a comparable level of performance would be a daunting task. In contrast, Cassowary is straightforward, and a reimplementation based on this paper is more reasonable, given a knowledge of the simplex algorithm.
Cassowary (project homepage) was also first implemented in Smalltalk, and it is also used in Auto Layout technology. There is also the more complex QOCA algorithm, which will not be discussed in detail here. Interested readers can look at the three papers above, which describe it in detail.
2. Preparation for Algorithm Performance Testing
At first, I planned to also benchmark Weex’s layout performance. However, because Weex performs layout on a background thread and then returns to the main thread for refresh and rendering, testing the case where everything runs on the main thread would require modifying some code. In addition, Weex’s native layout is invoked from JS; using that approach would introduce extra overhead and affect the test results. Therefore, I switched to testing the Yoga algorithm, which uses the same layout approach as Weex. Facebook has wrapped it very well, so it is also convenient to use. Although the Layout algorithm differs from Weex in some ways, that does not affect the qualitative comparison.
The test subjects were finalized as: Frame, Flexbox (Yoga implementation), and Auto Layout.
Before testing, test models also need to be prepared. Three test models were selected here.
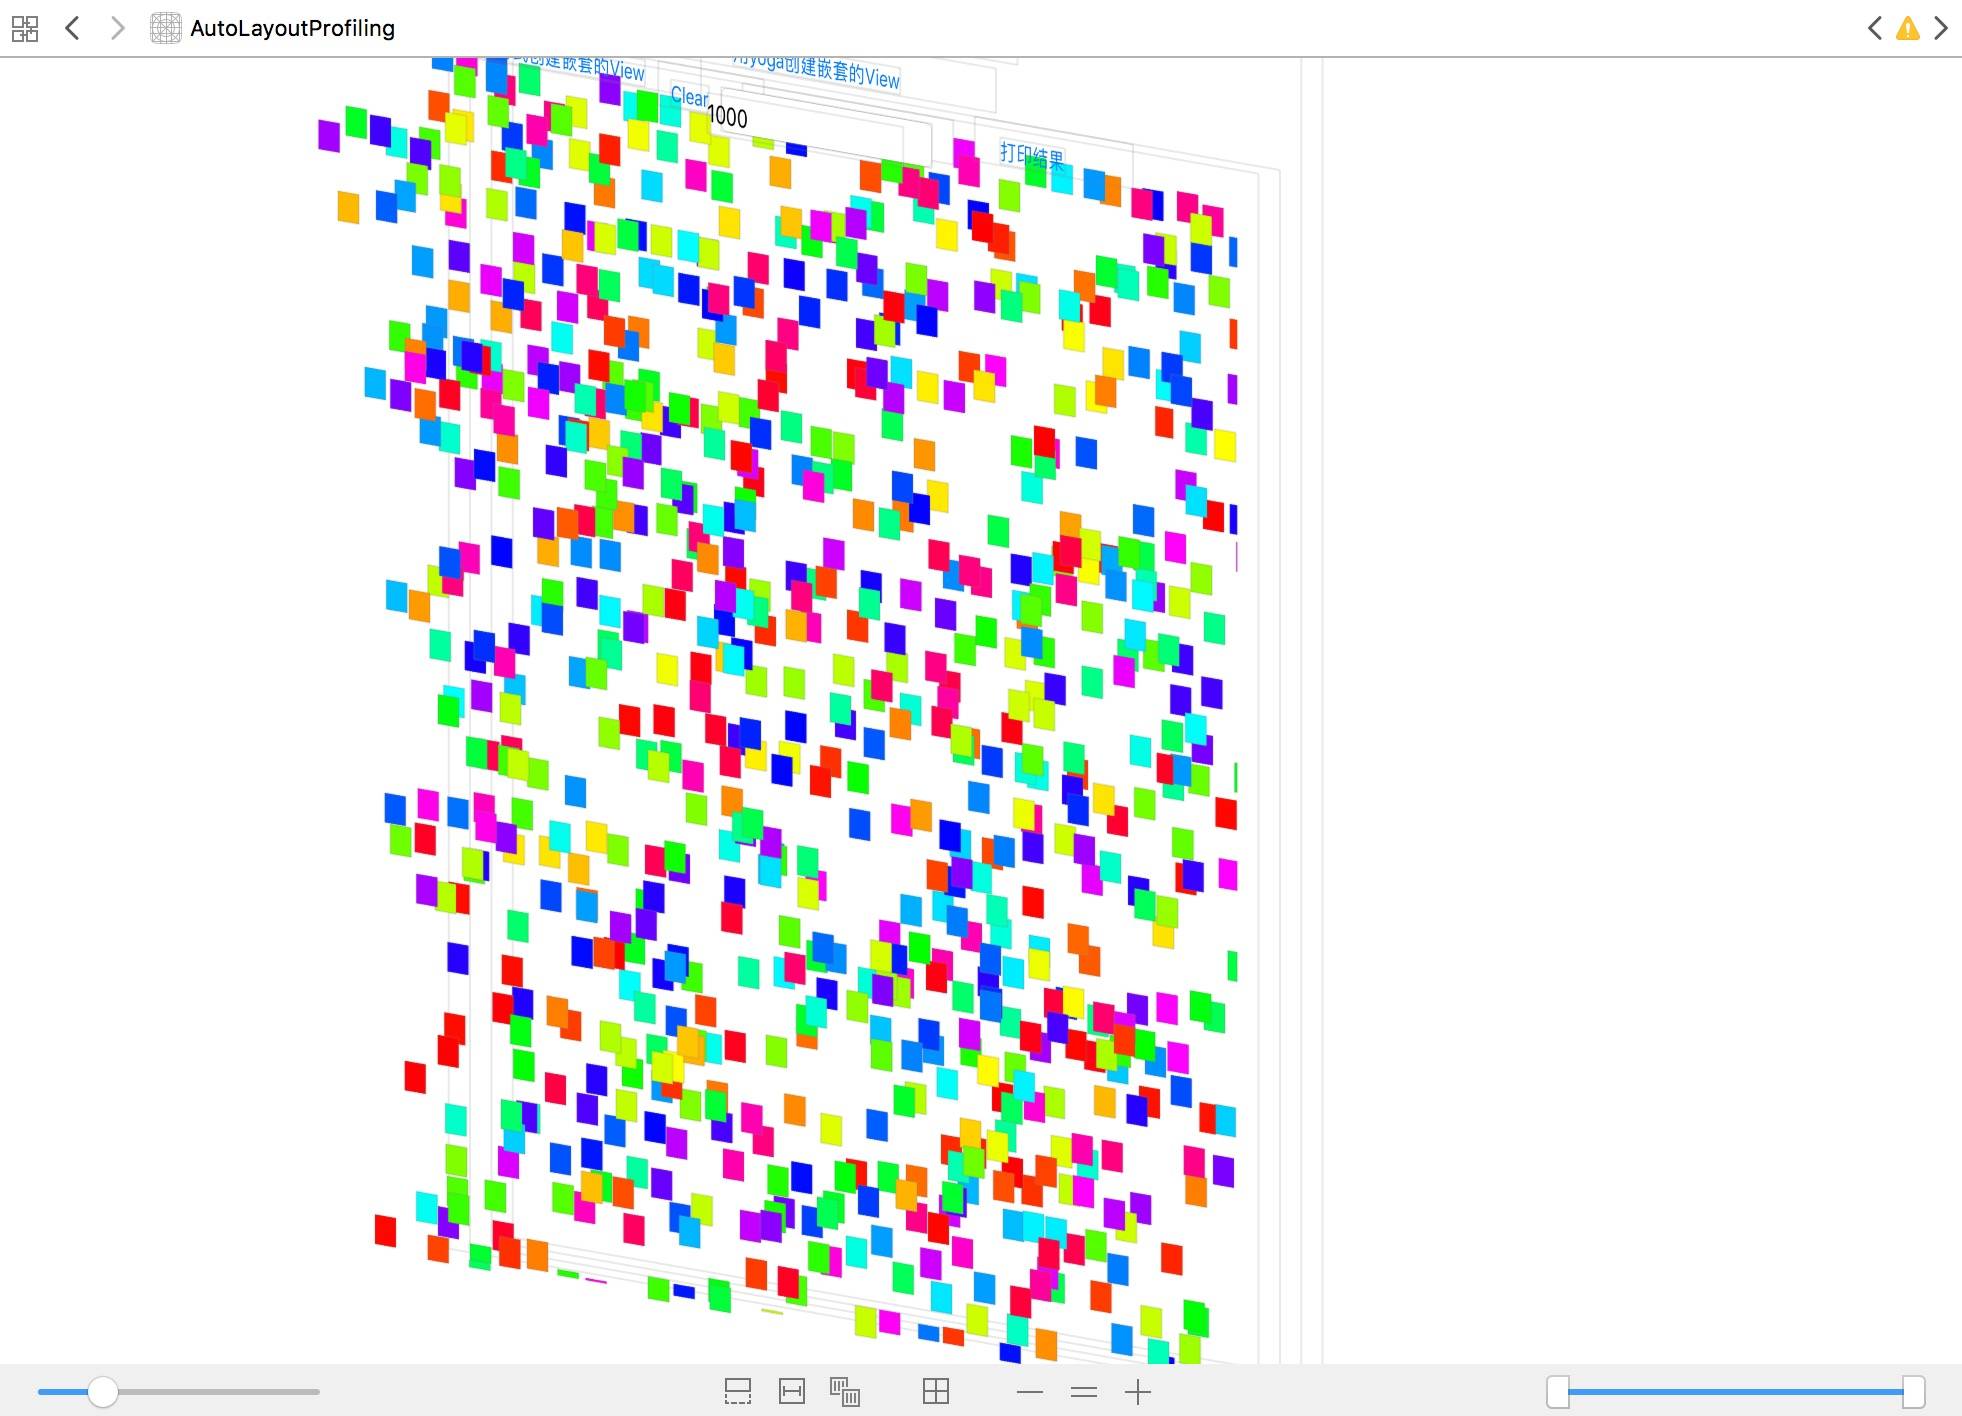
The first test model randomly generates completely unrelated Views, as shown below:
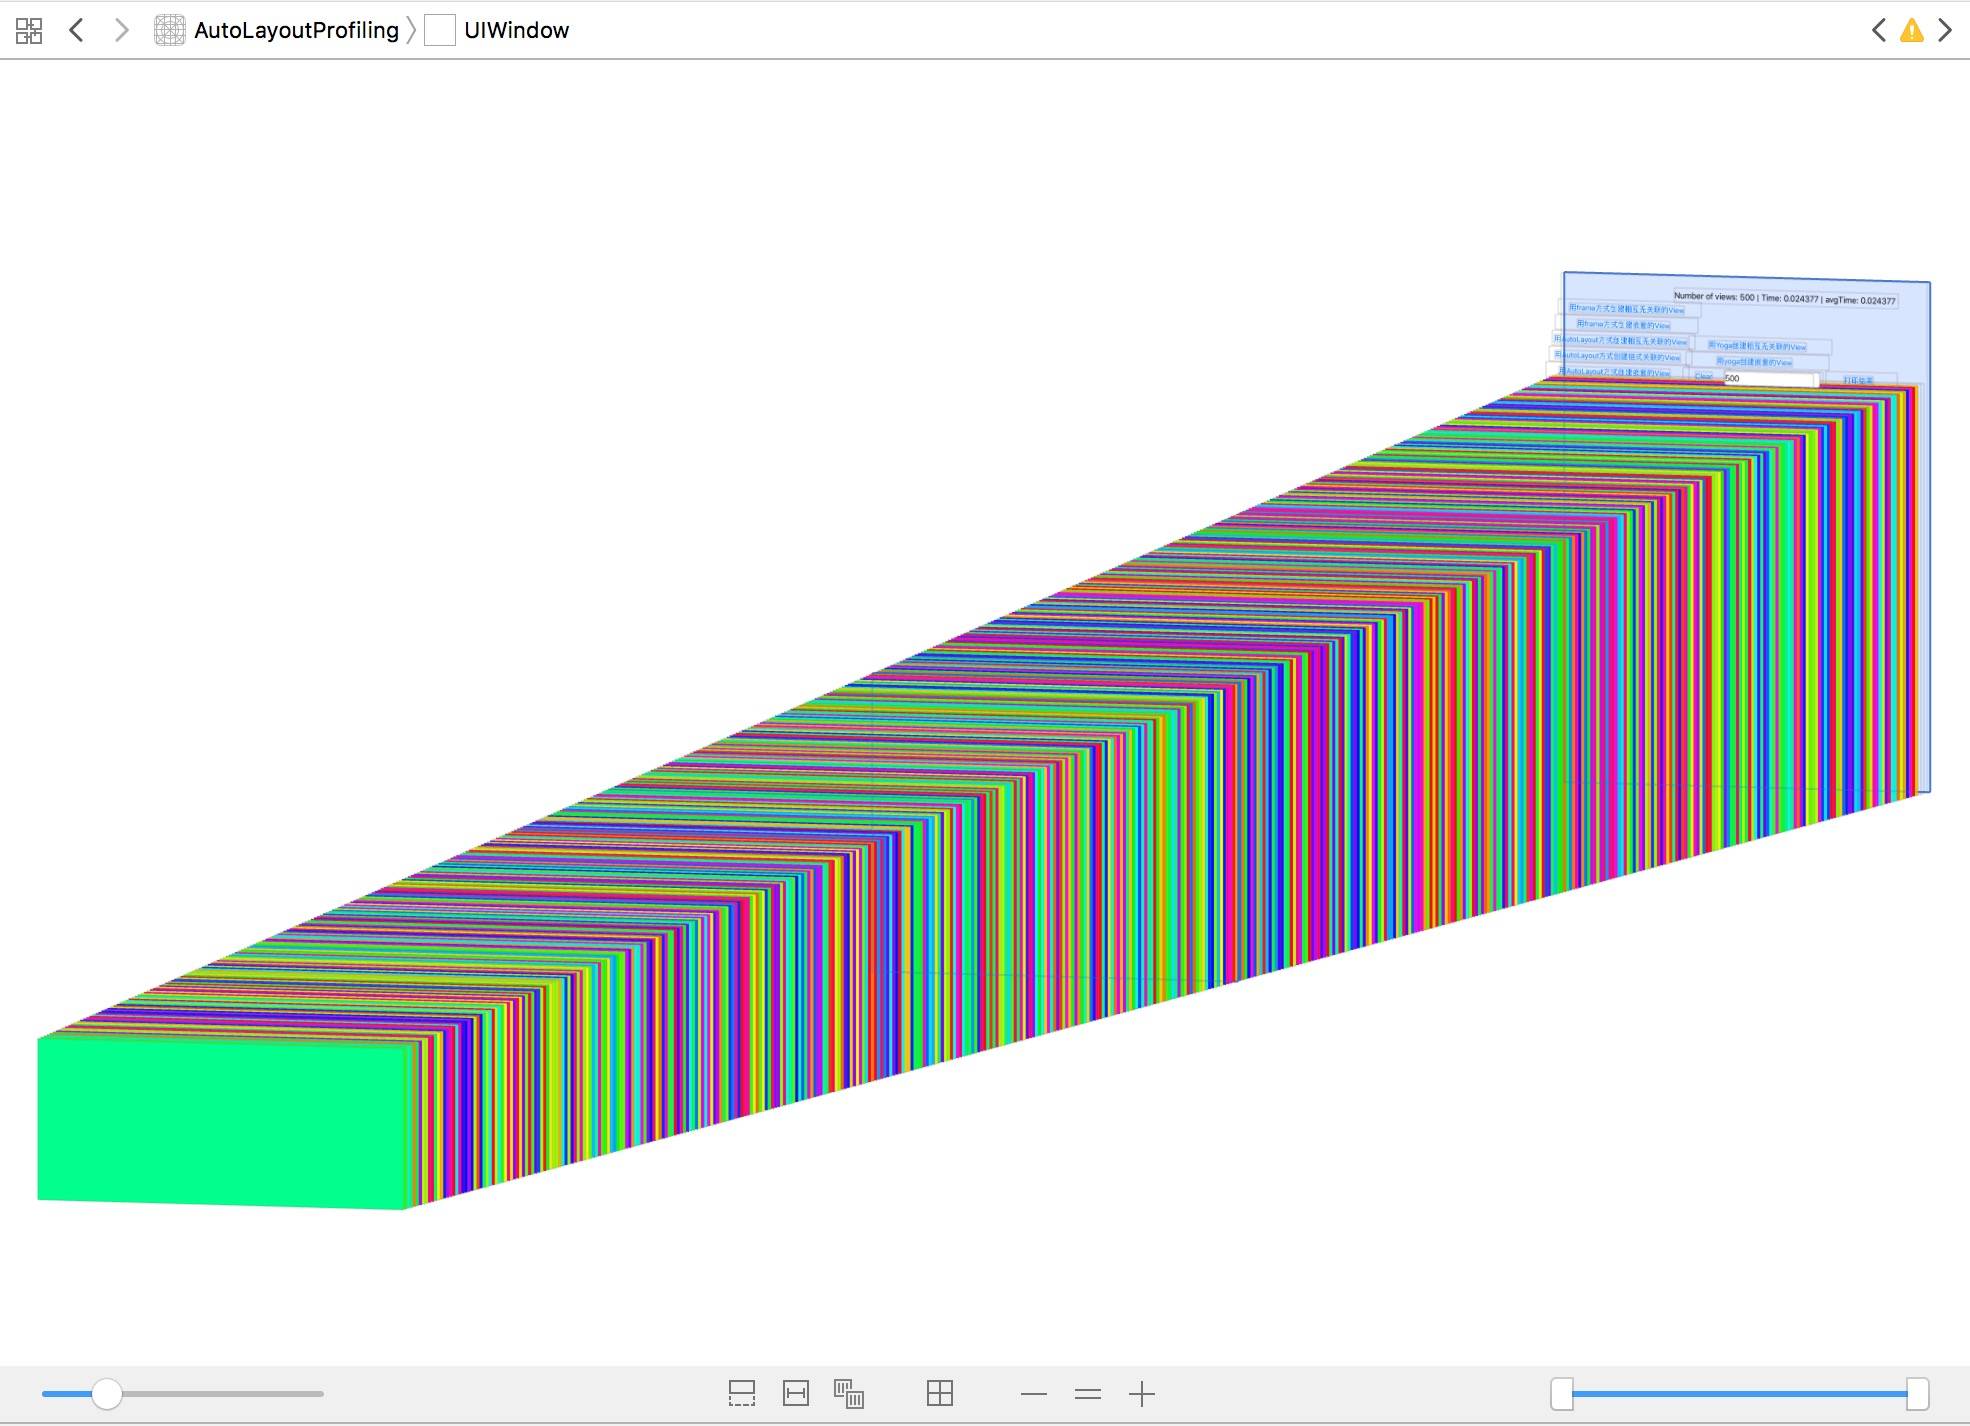
The second test model generates mutually nested Views. The nesting rule is simple: each child view is one pixel shorter in height than its parent view. The following is an example result of 500 mutually nested Views:
The third test model was added specifically for Auto Layout. Because of the particular nature of Auto Layout constraints, an additional test model was added for chained constraints. The rule is to add constraints sequentially between each pair of adjacent Views. The following is an example result of 500 Views with chained constraints:
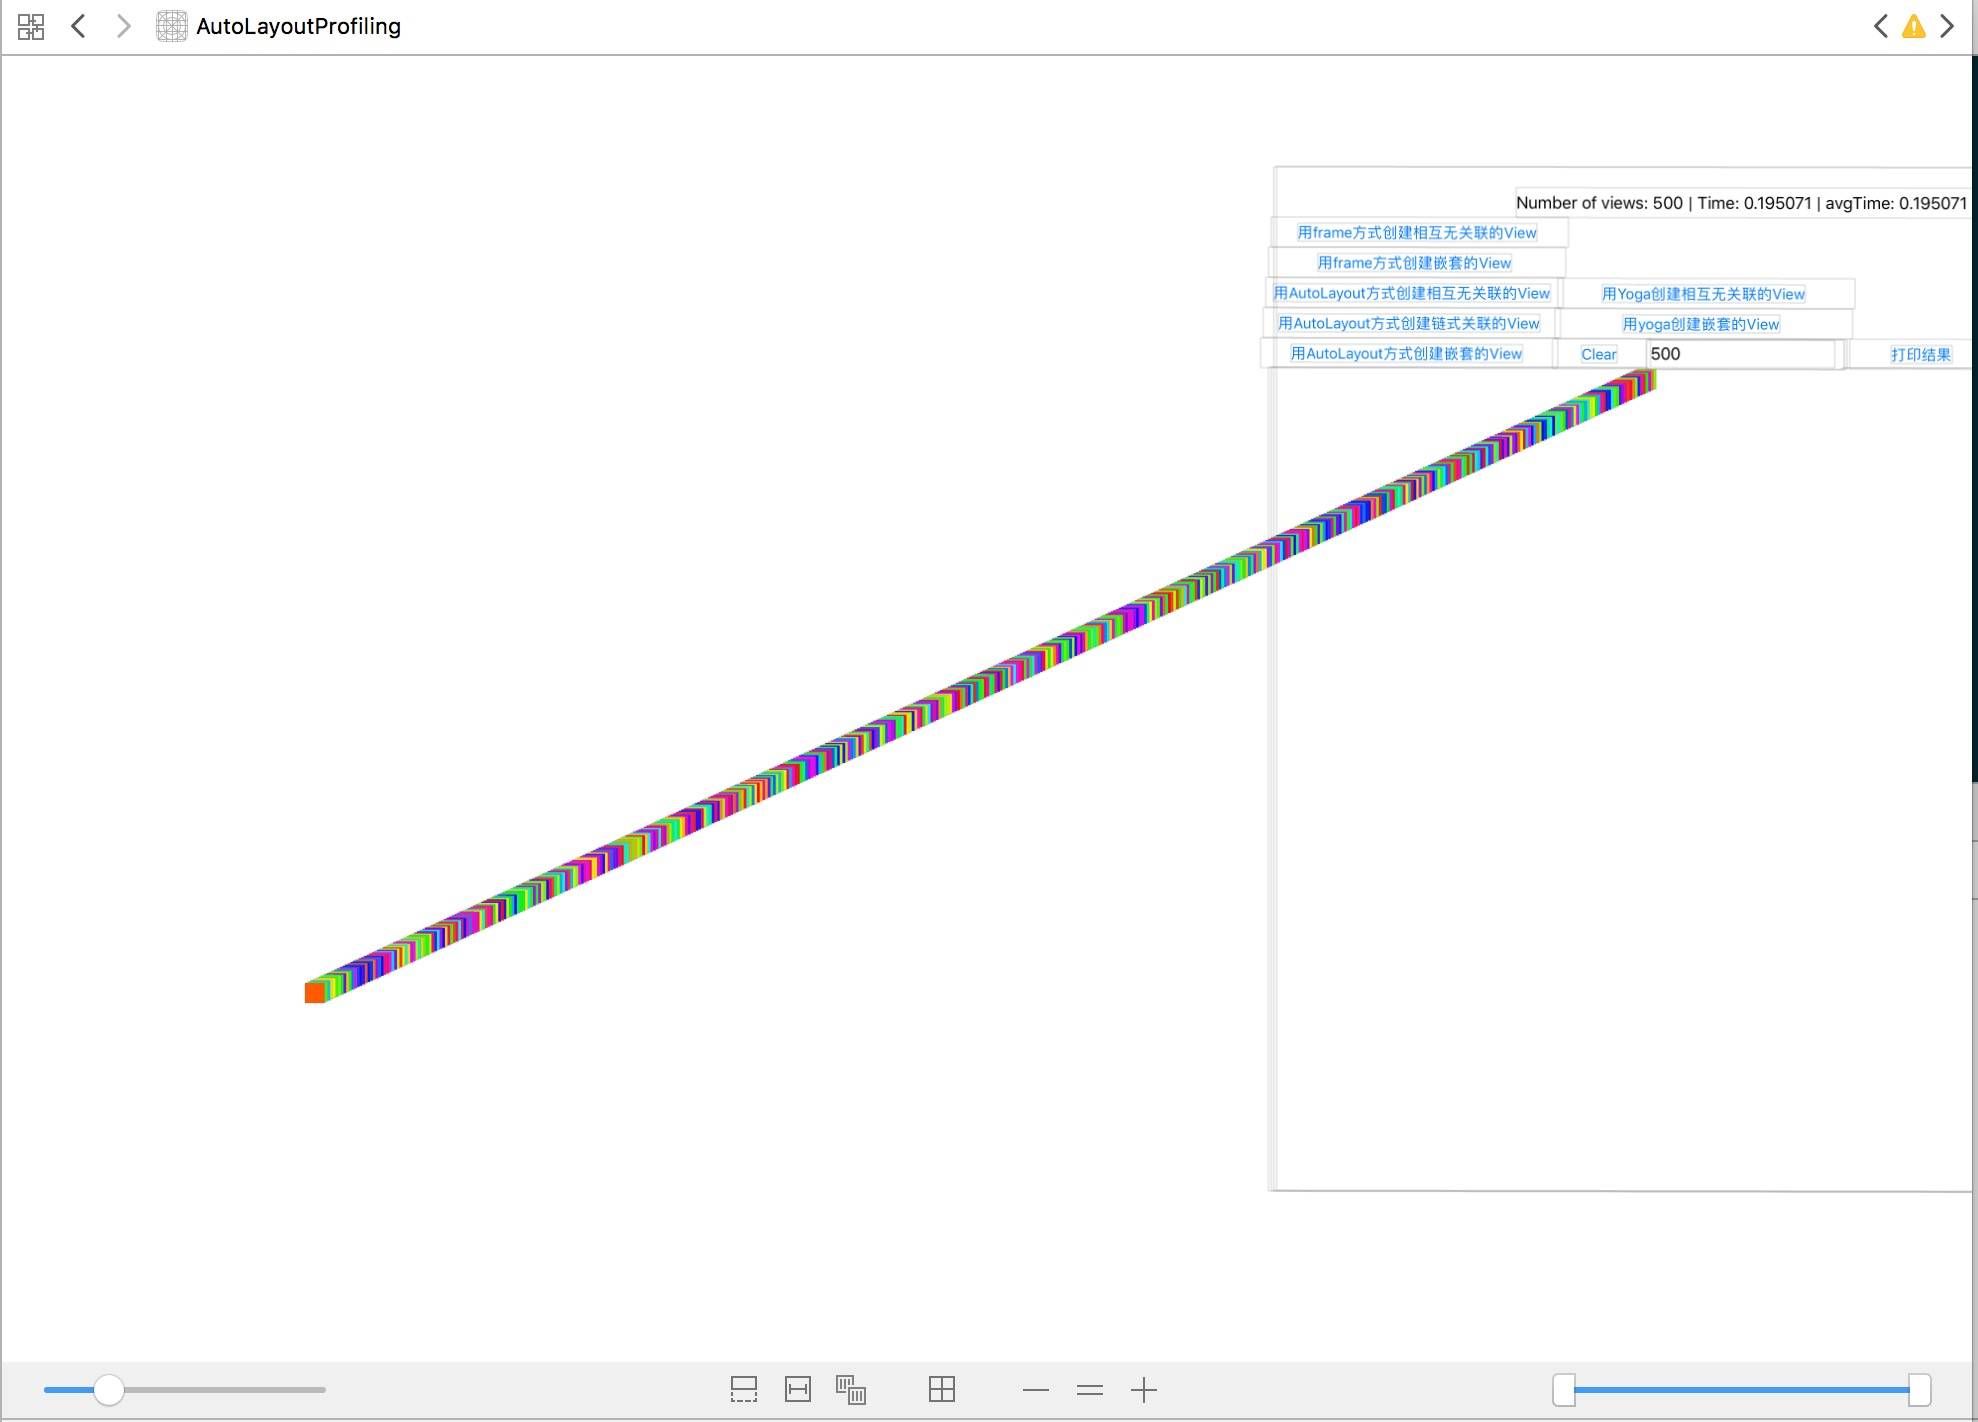
Based on the test models, we can obtain the following seven groups of test cases to be tested:
1.Frame 2.Nested Frame 3.Yoga 4.Nested Yoga 5.Auto Layout 6.Nested Auto Layout 7.Chained Auto Layout
Test samples: Since the generality of the test needs to be considered, the samples should be as random as possible. Therefore, all randomly generated coordinates are fully randomized, and the colors of the Views are also fully randomized, ensuring that the tests are broadly representative, impartial, and fair.
Number of test runs: To ensure that the test data is as close to reality as possible, I spent a large amount of time here. Each test case was tested with 100, 200, 300, 400, 500, 600, 700, 800, 900, and 1000 views. To ensure the generality of the tests, each test was run 10,000 times, and the results of those 10,000 runs were summed and averaged. The averaged value is kept to five decimal places. (The statistics for the 10,000 runs were computed by the computer, but they were truly, truly, truly time-consuming. If you are interested, you can try it on your own machine.)
Finally, here are the test machine configuration and system version:
(Because a real iPhone imposes memory limits on each App, generating 1000 nested views and running 10,000 trials was completely beyond what a real iPhone could handle. The App crashed immediately. Therefore, halfway through testing on a real device, I switched to testing on the simulator. With the help of the Mac’s performance, I gritted my teeth, started over from zero, and recollected the data for all test cases.) If you have a more powerful Mac (the “trash can” Mac Pro), the entire test process may take less time.
The configuration of the machine I used is as follows:

The simulator used for testing was an iPad Pro (12.9 inch) running iOS 10.3 (14E269).
I have also published the test code I used. If you are interested, you can run the tests yourself. The test code is here
3. Algorithm Performance Test Results
Here are the test results:
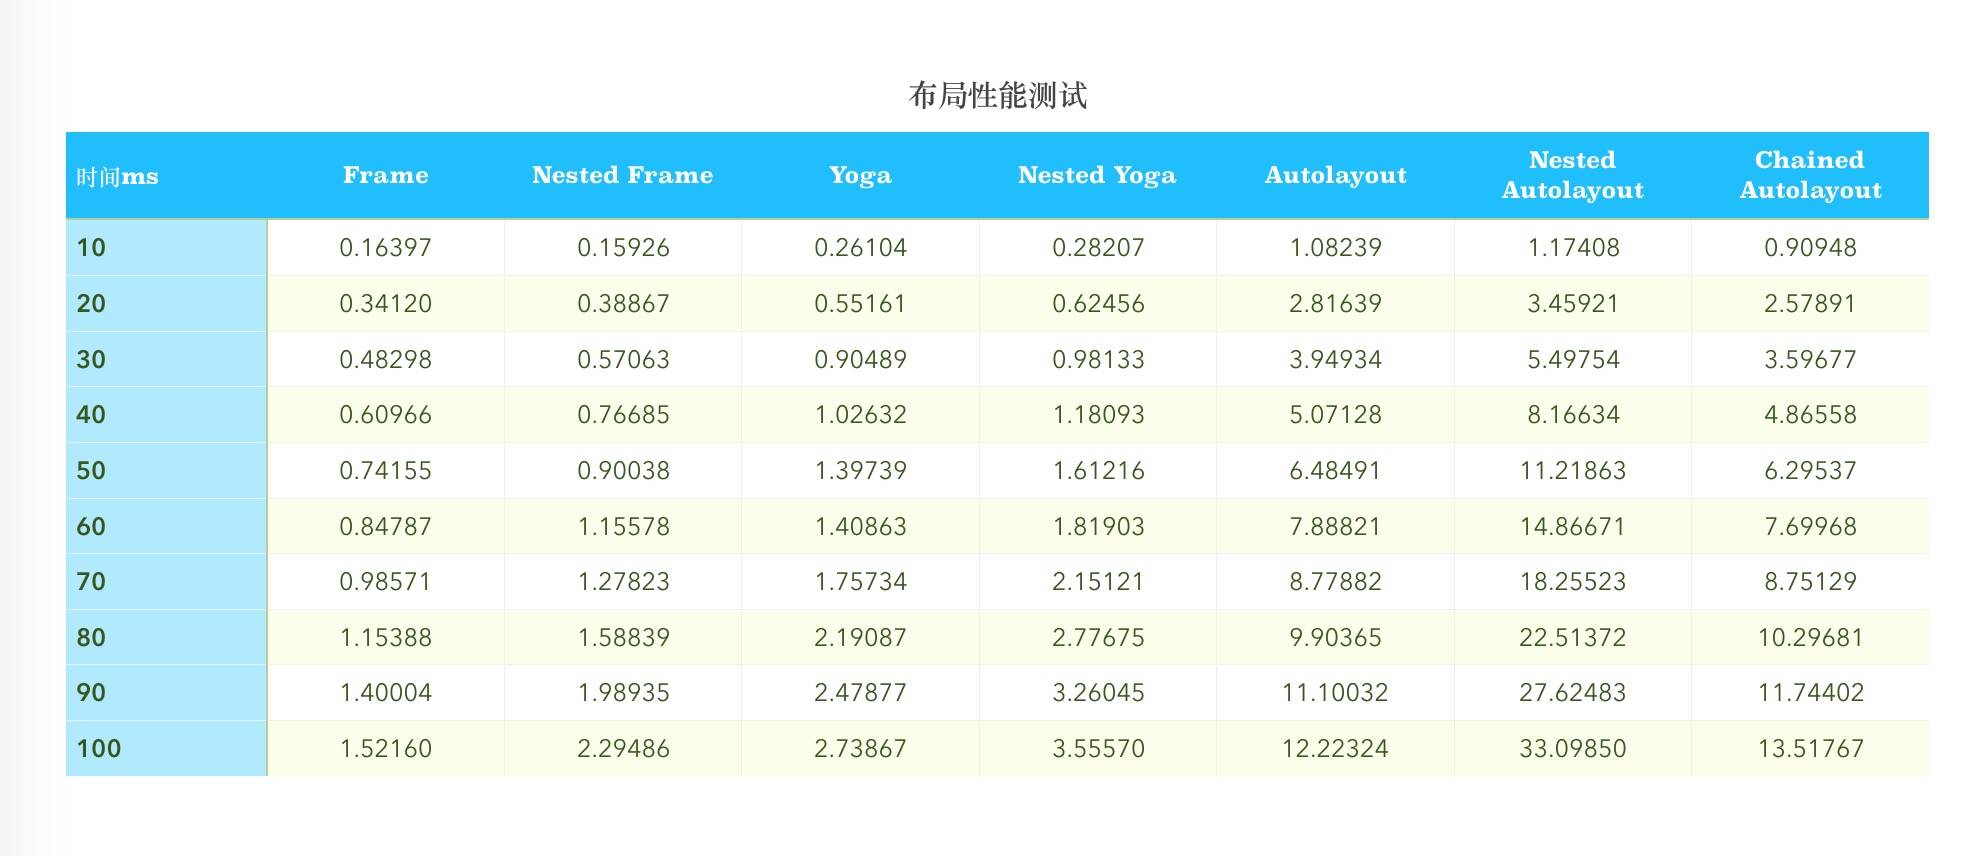
The data in the figure above shows the results from 7 test cases run against 10, 20, 30, 40, 50, 60, 70, 80, 90, and 100 views respectively. Plotting the results above as a line chart gives the following:
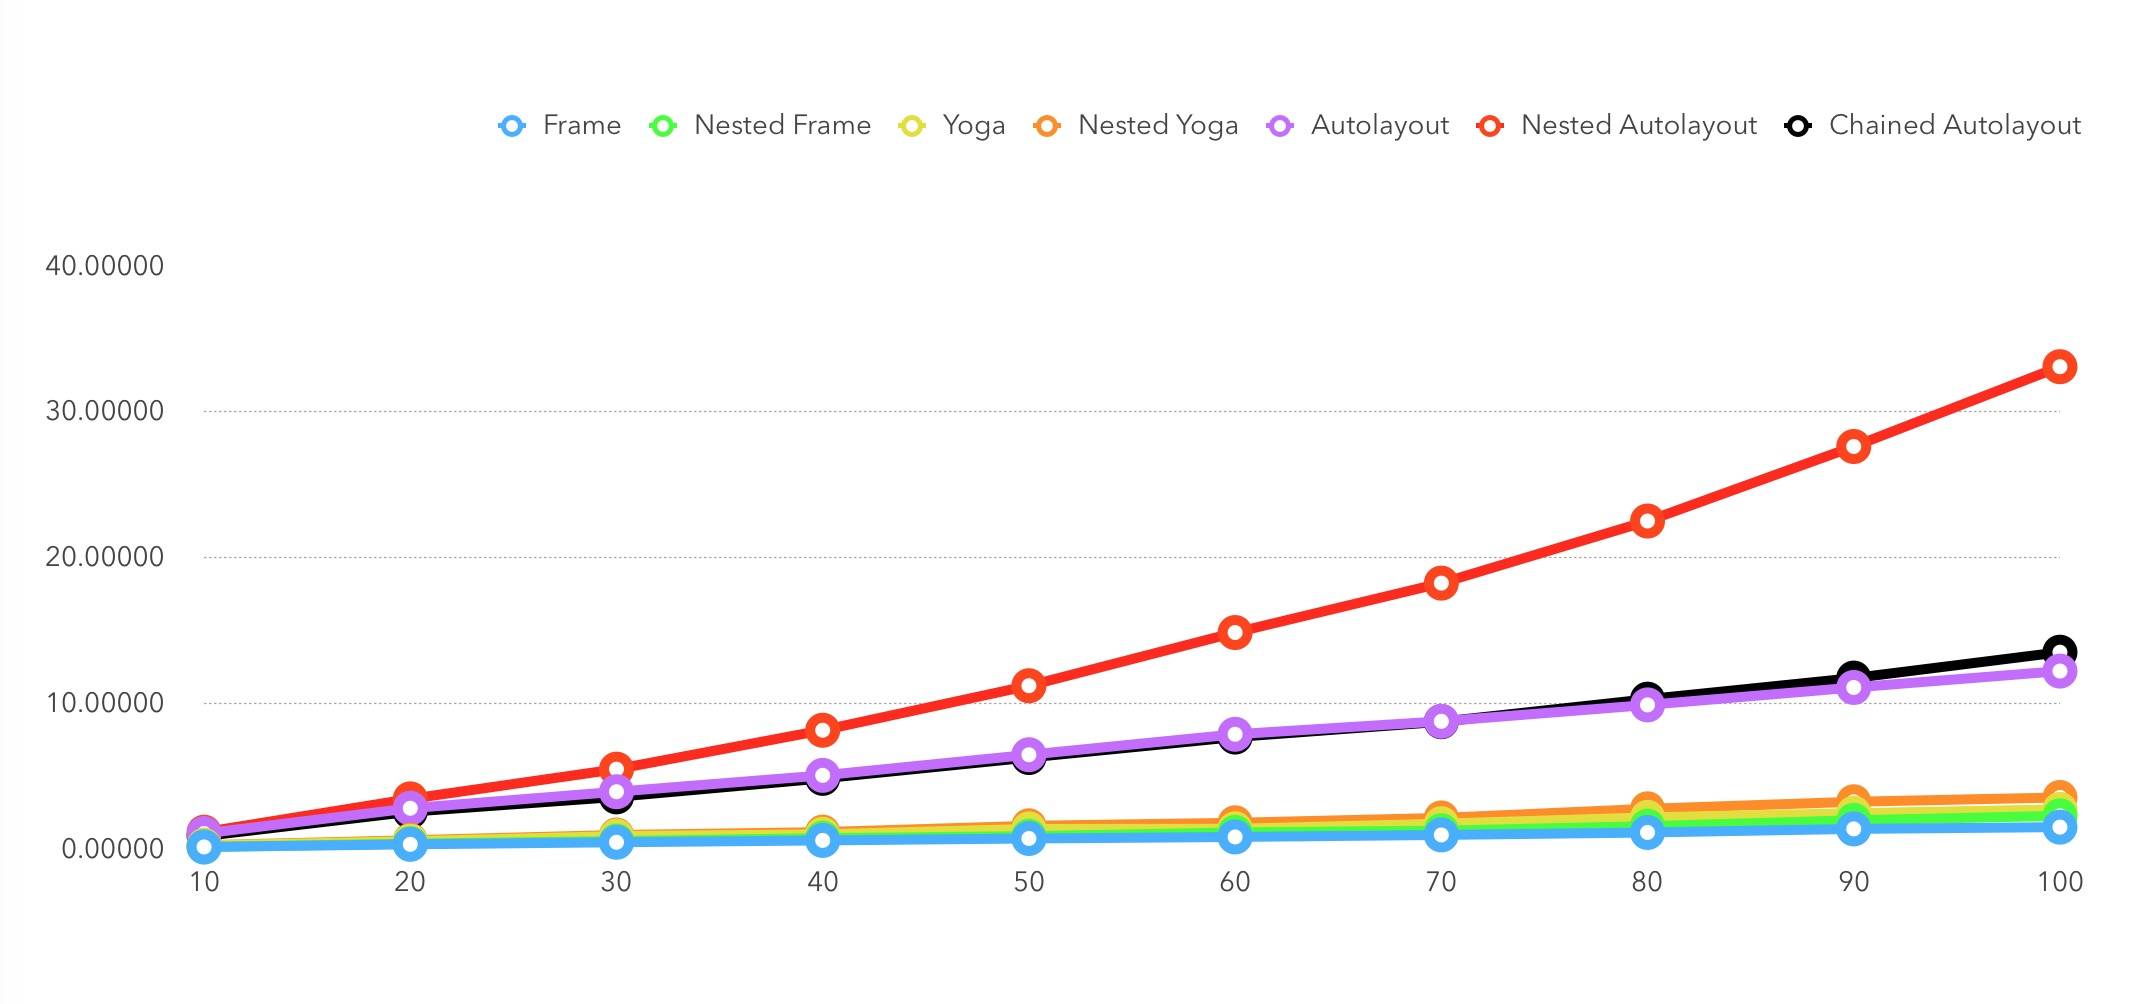
The results still show that all three Auto Layout approaches are slower than the other four layout methods.
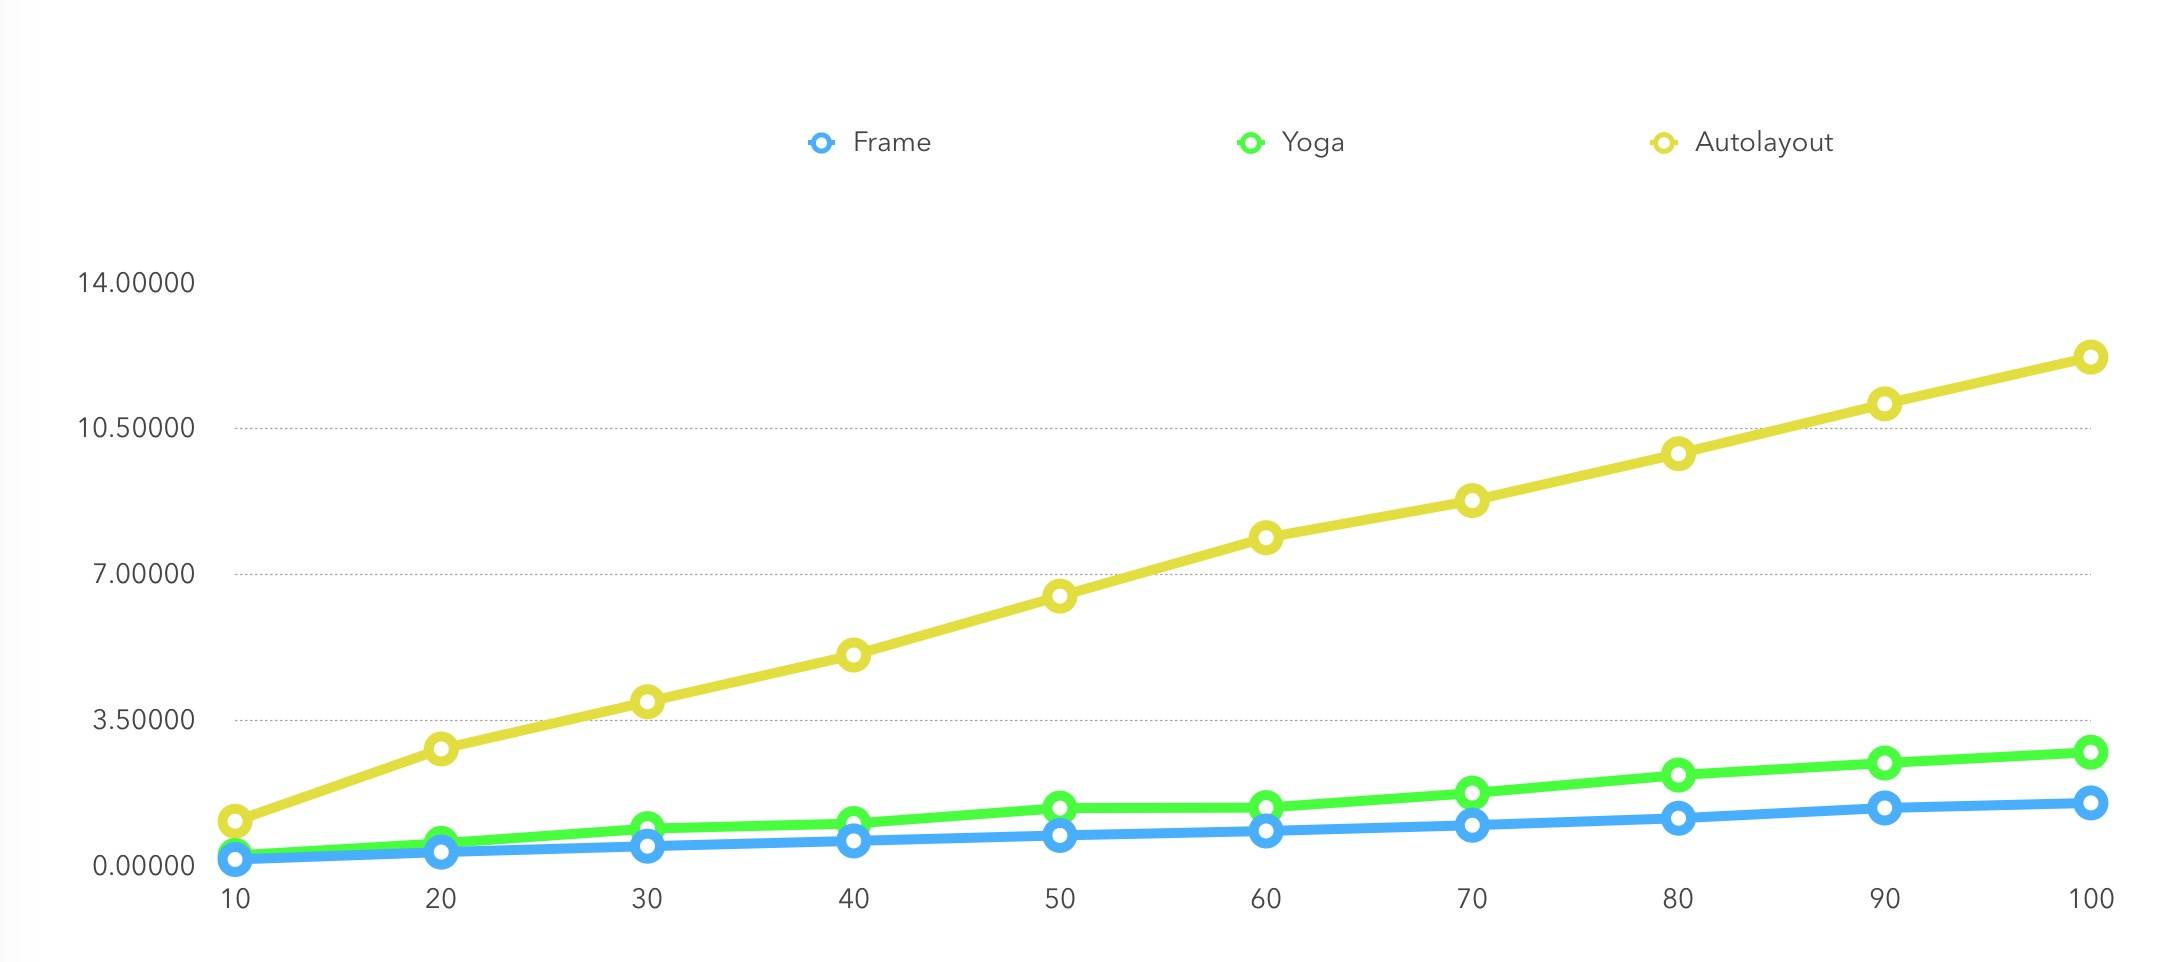
The figure above compares the performance of the three layout algorithms in a normal scenario. As you can see, FlexBox performs close to native Frame layout.
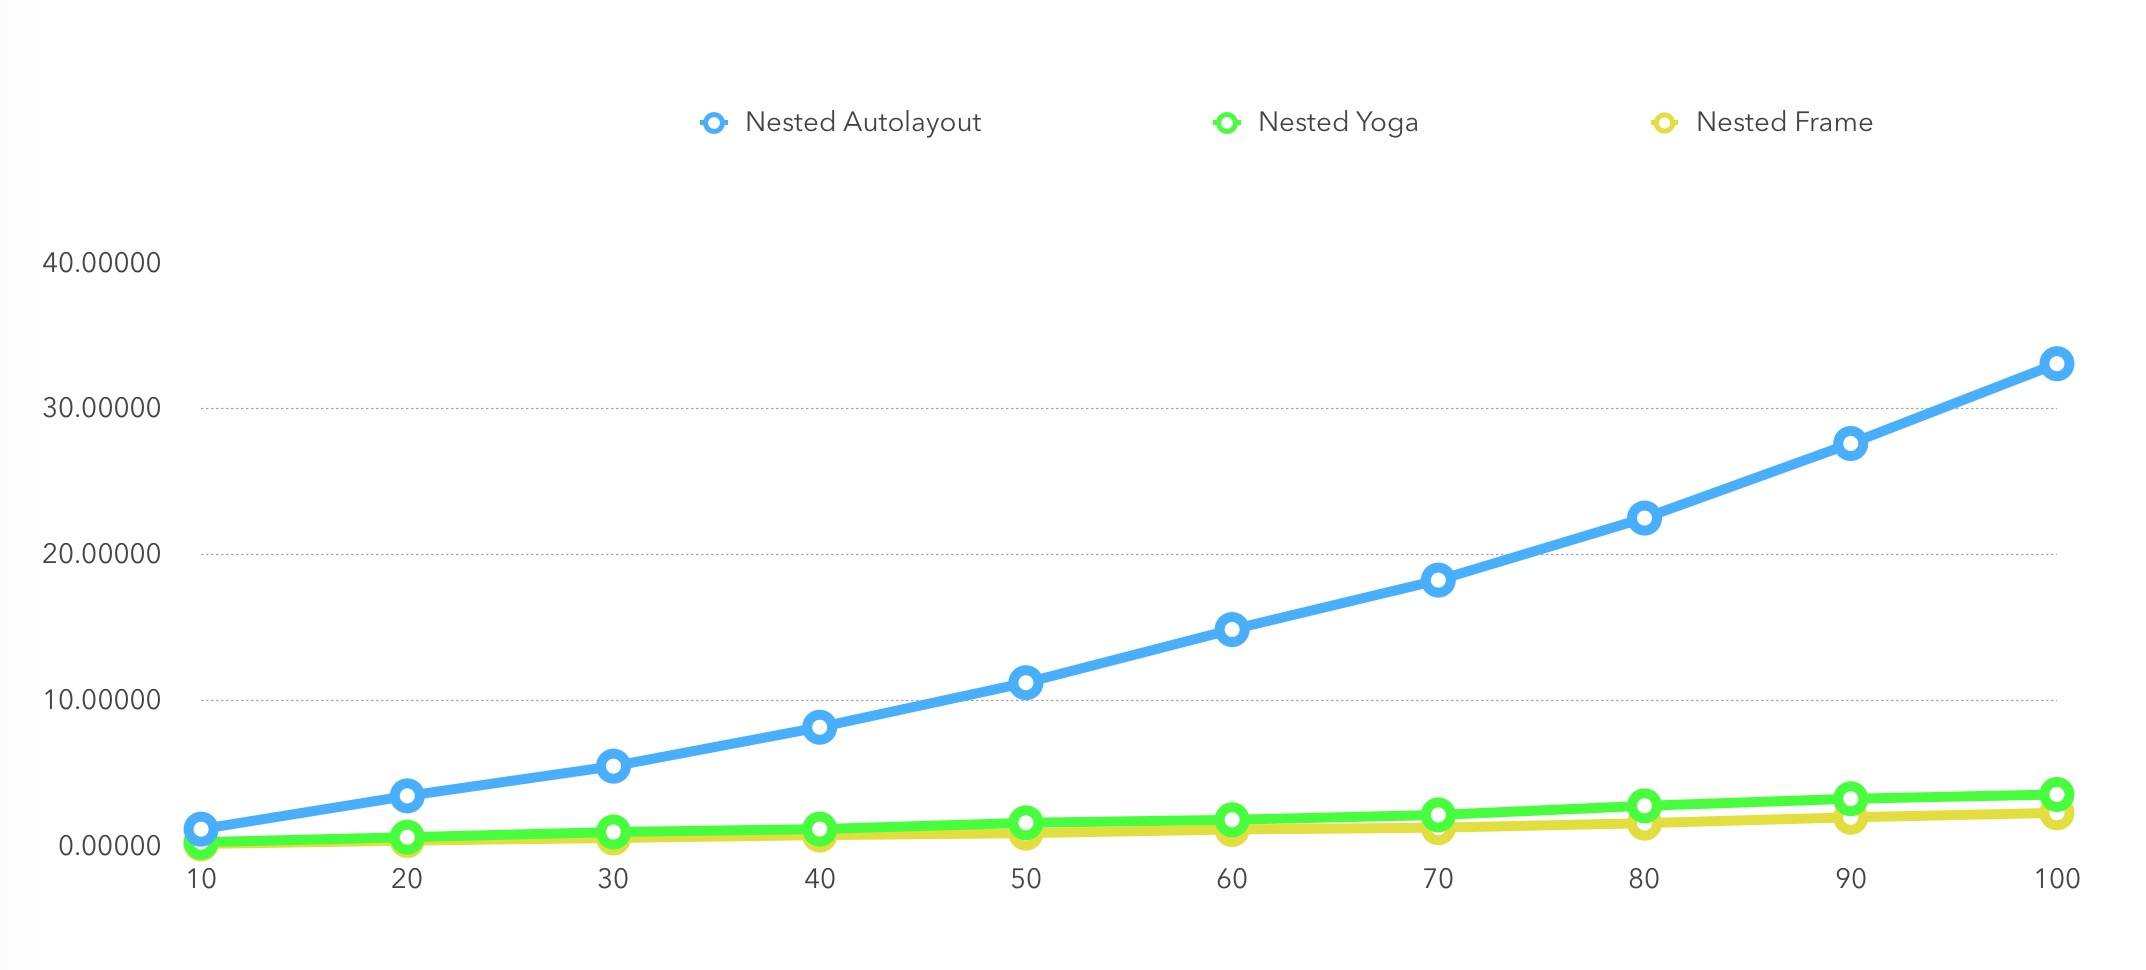
The figure above compares the performance of the three layout algorithms in nested scenarios. As you can see, FlexBox still performs close to native Frame layout, while the performance of Auto Layout drops sharply under nesting.
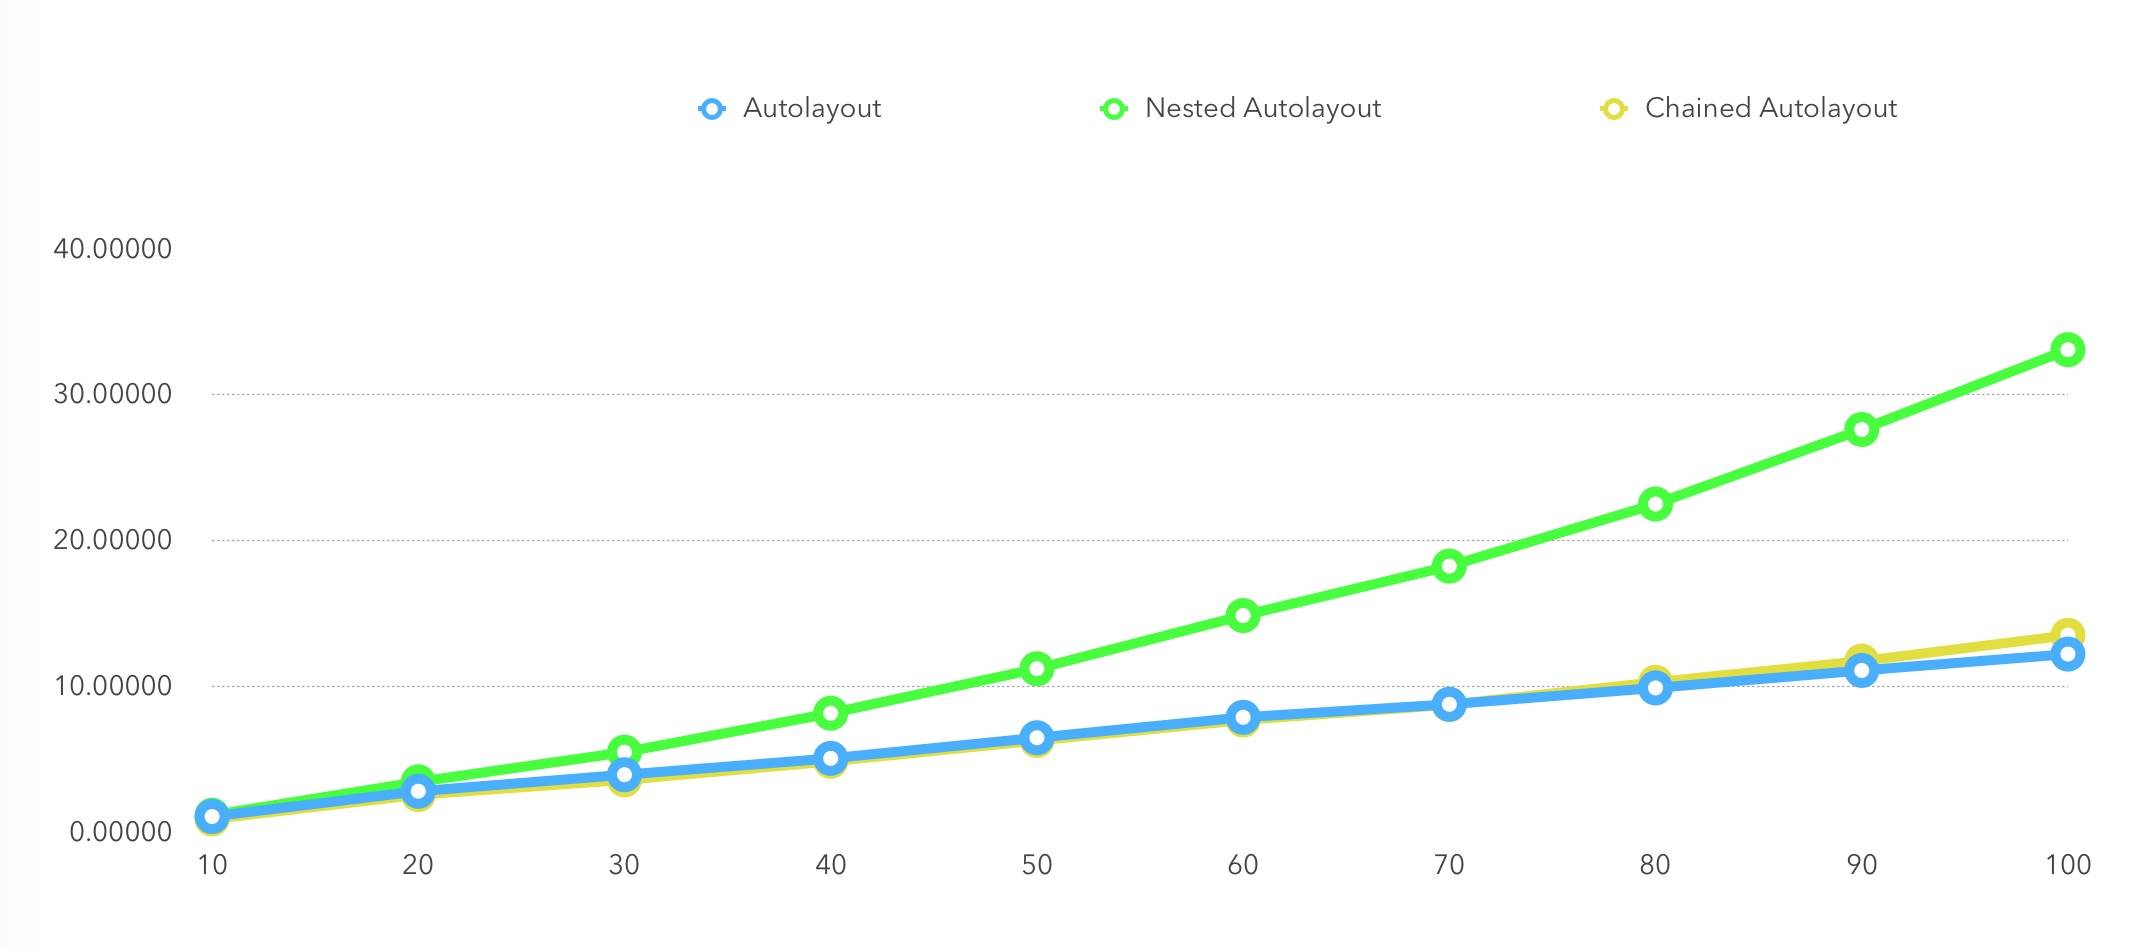
This final chart is an additional test specifically for Auto Layout. The goal is to compare the performance of different Auto Layout approaches across three scenarios. As you can see, nested Auto Layout still performs the worst!
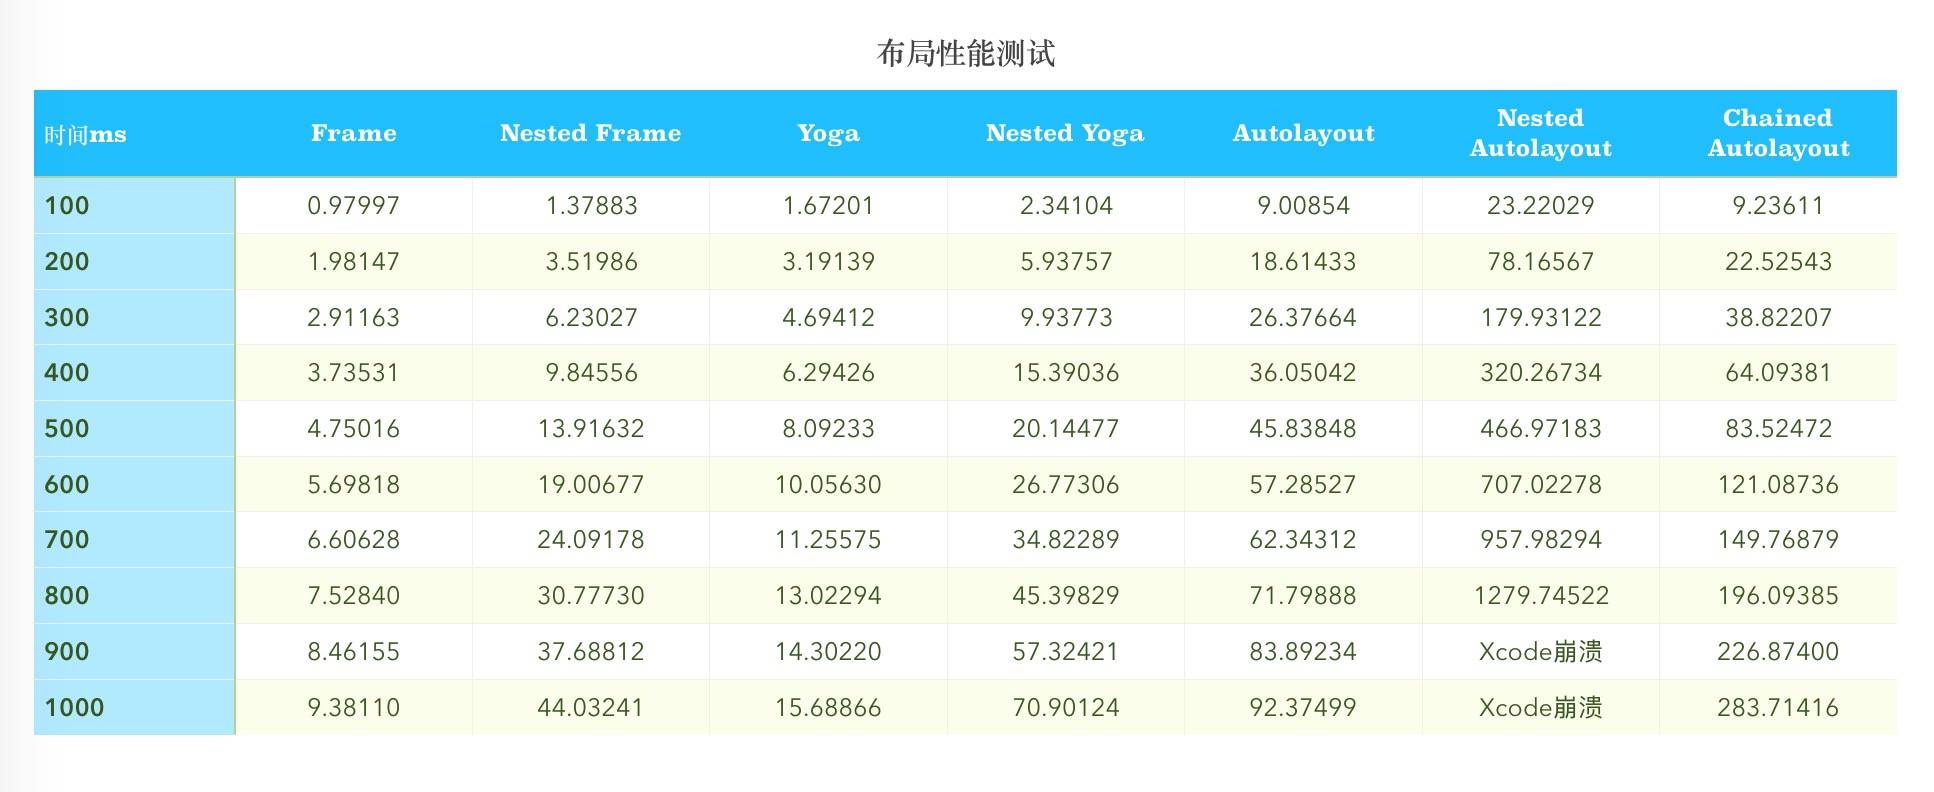
The data in the figure above shows the results from 7 test cases run against 100, 200, 300, 400, 500, 600, 700, 800, 900, and 1000 views respectively. Plotting the results above as a line chart gives the following:
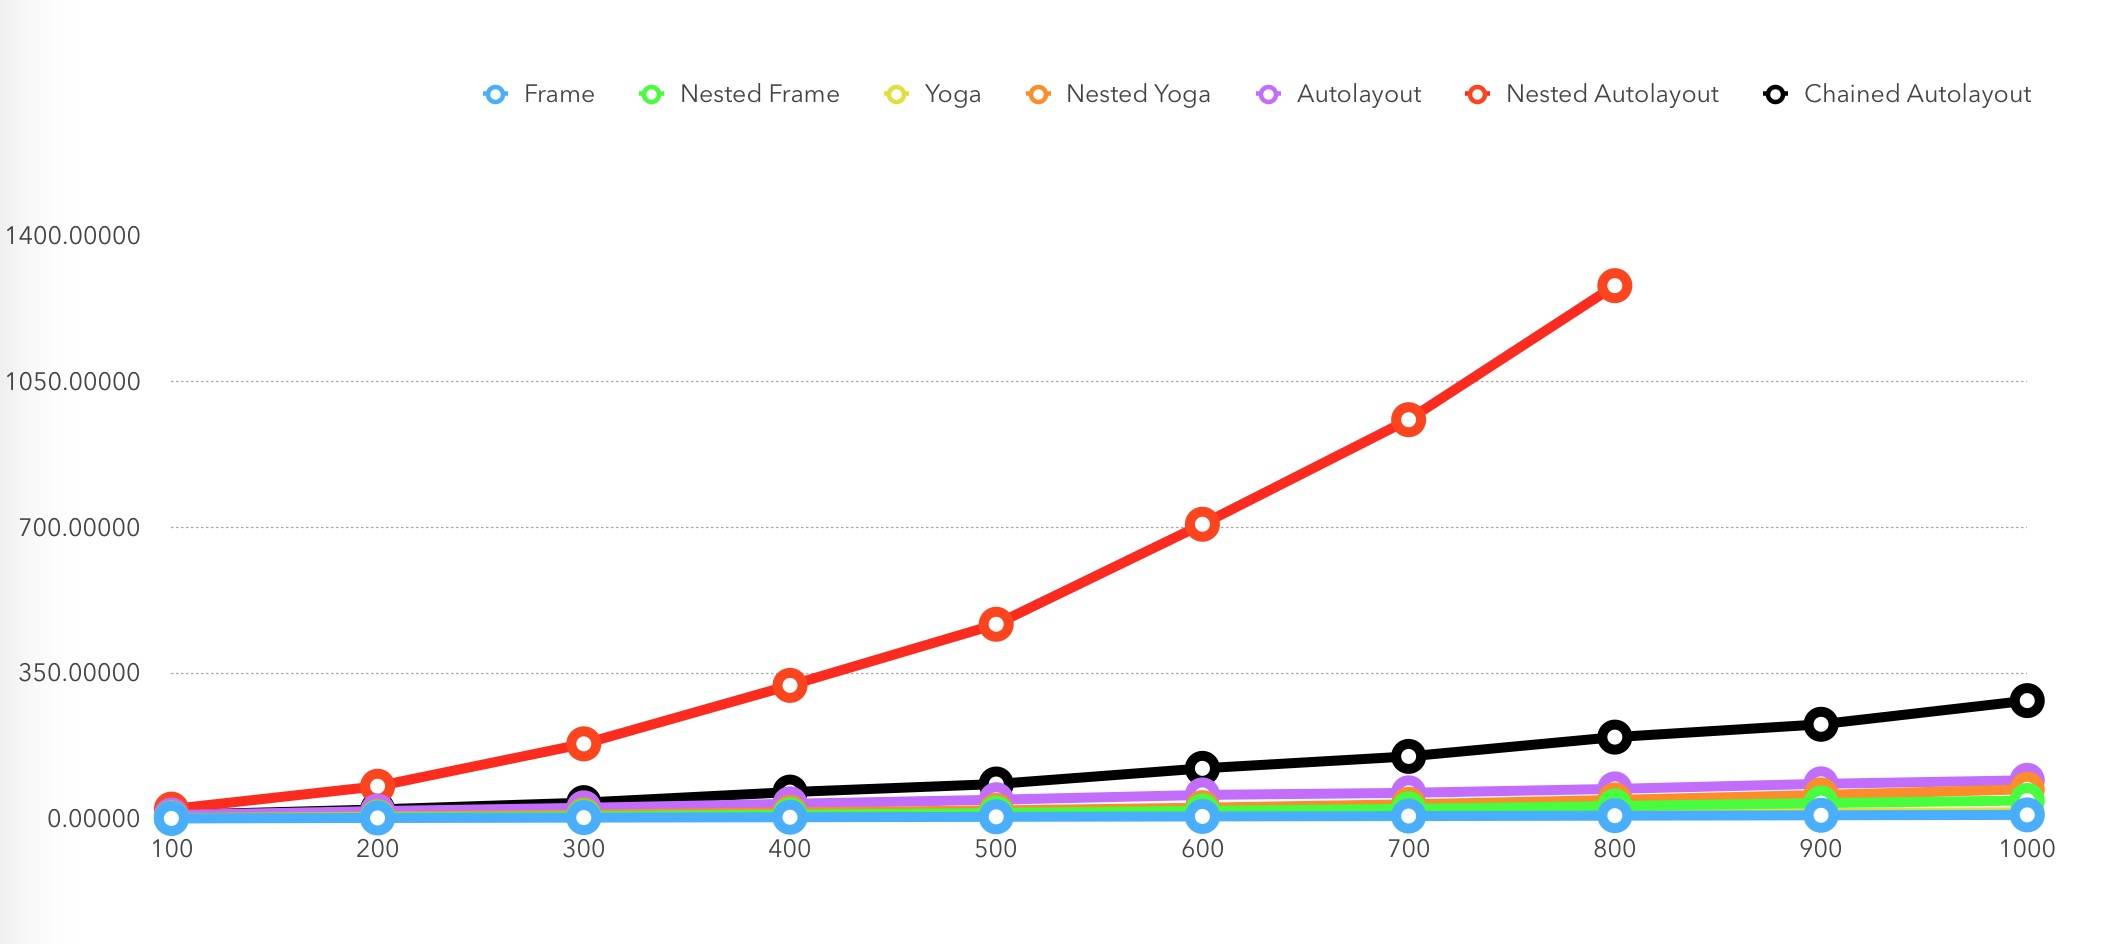
When the number of views reached 900 or 1000, nested Auto Layout directly caused the simulator to crash.
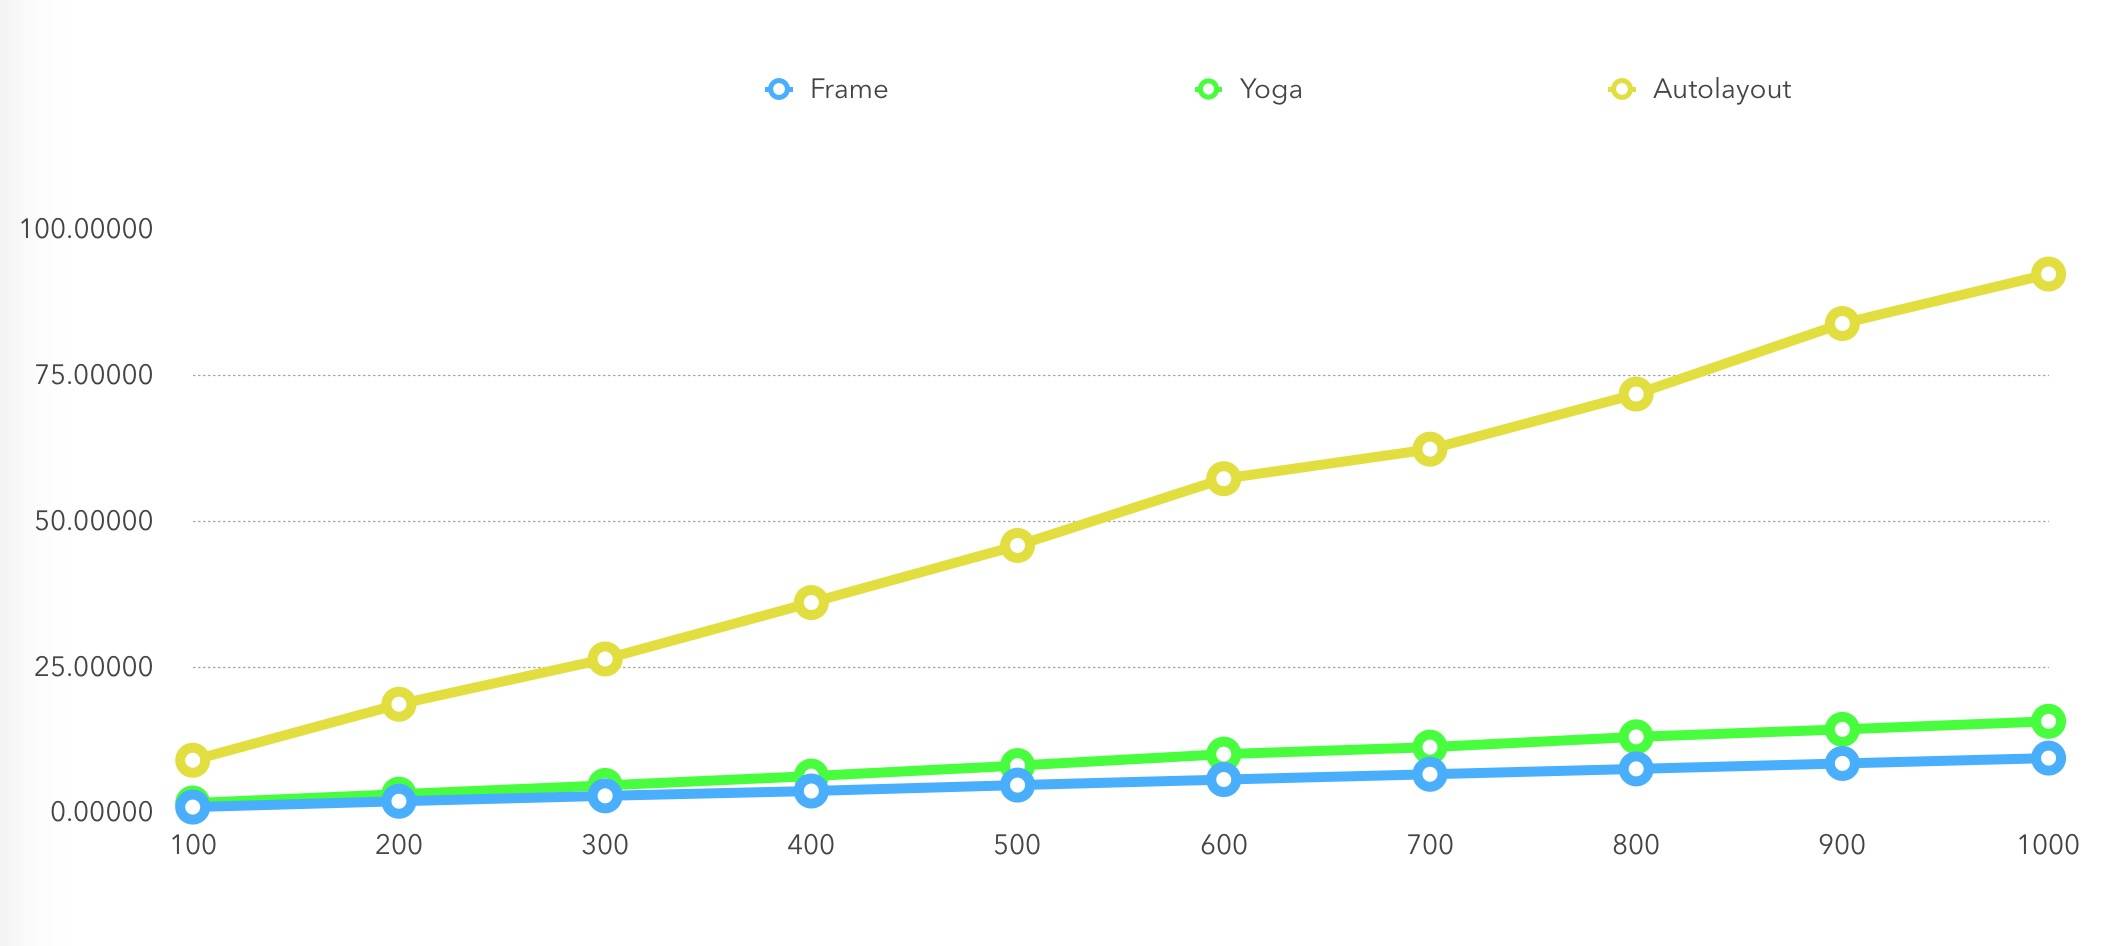
The figure above compares the performance of the three layout algorithms in a normal scenario. As you can see, FlexBox performs close to native Frame layout.
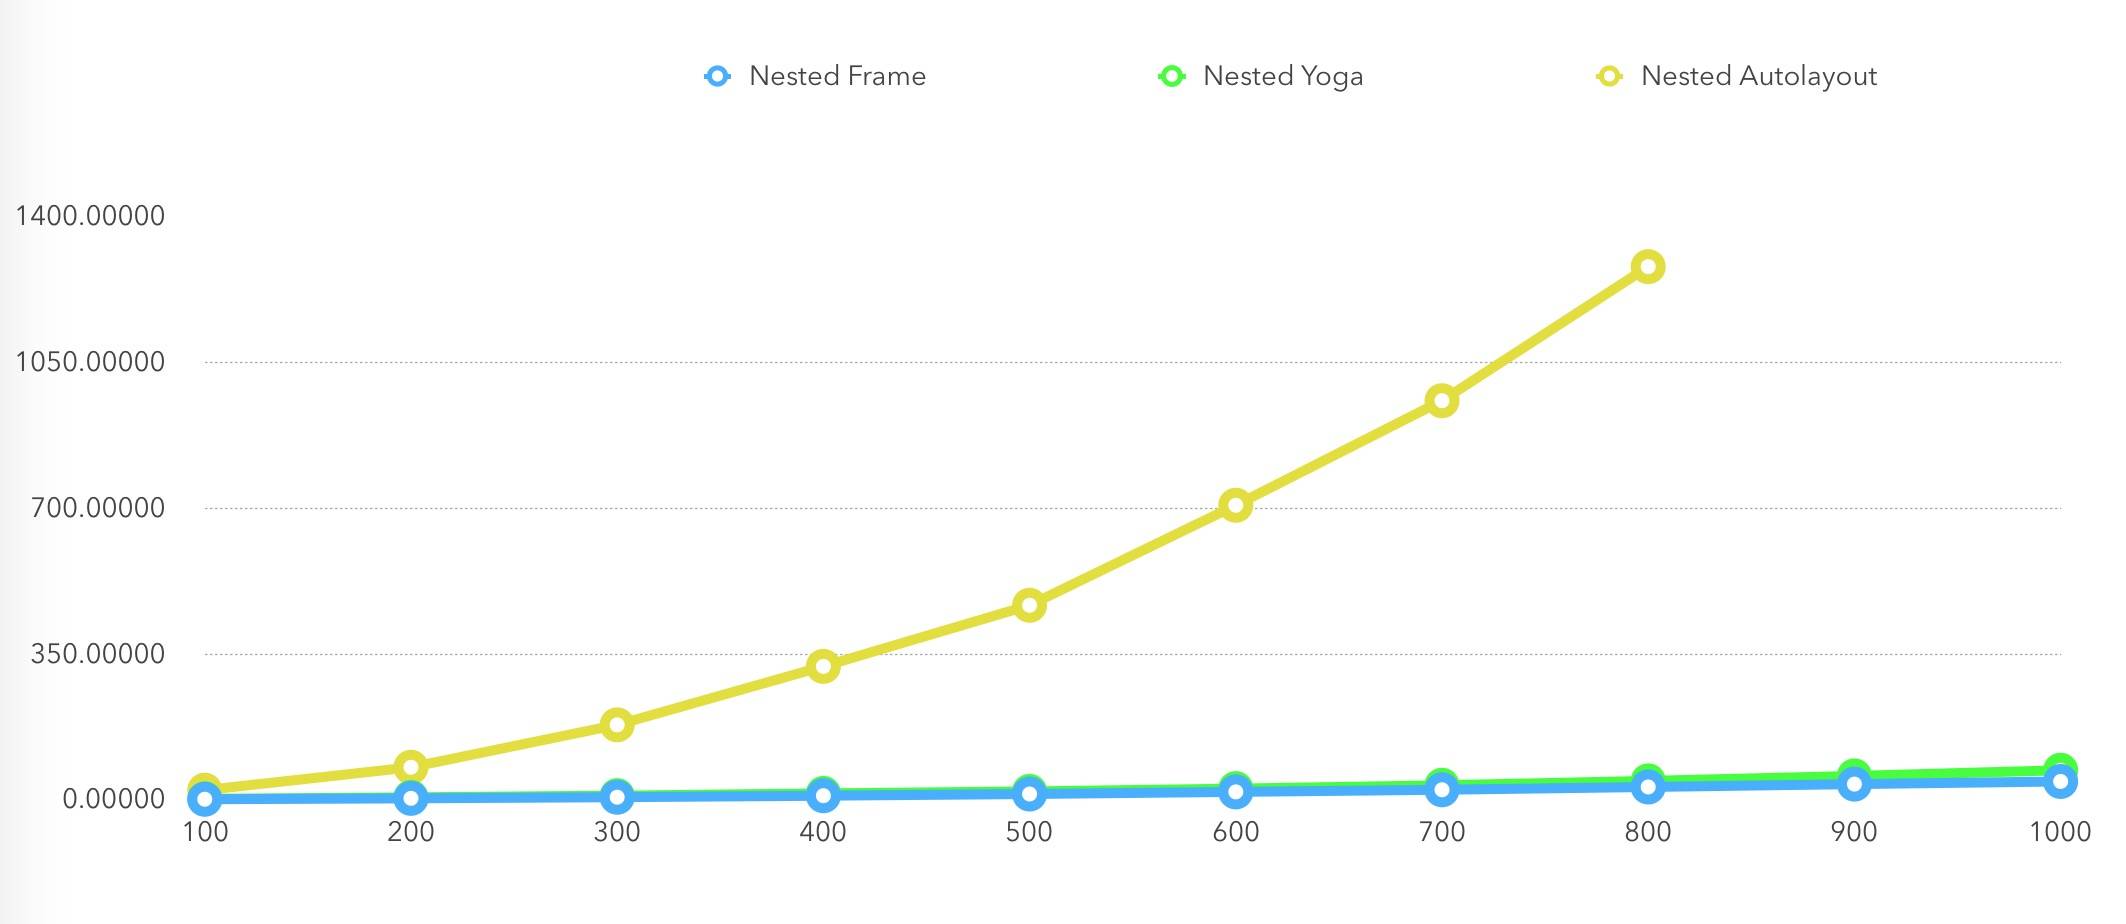
The figure above compares the performance of the three layout algorithms in nested scenarios. As you can see, FlexBox still performs close to native Frame layout, while the performance of Auto Layout drops sharply under nesting.
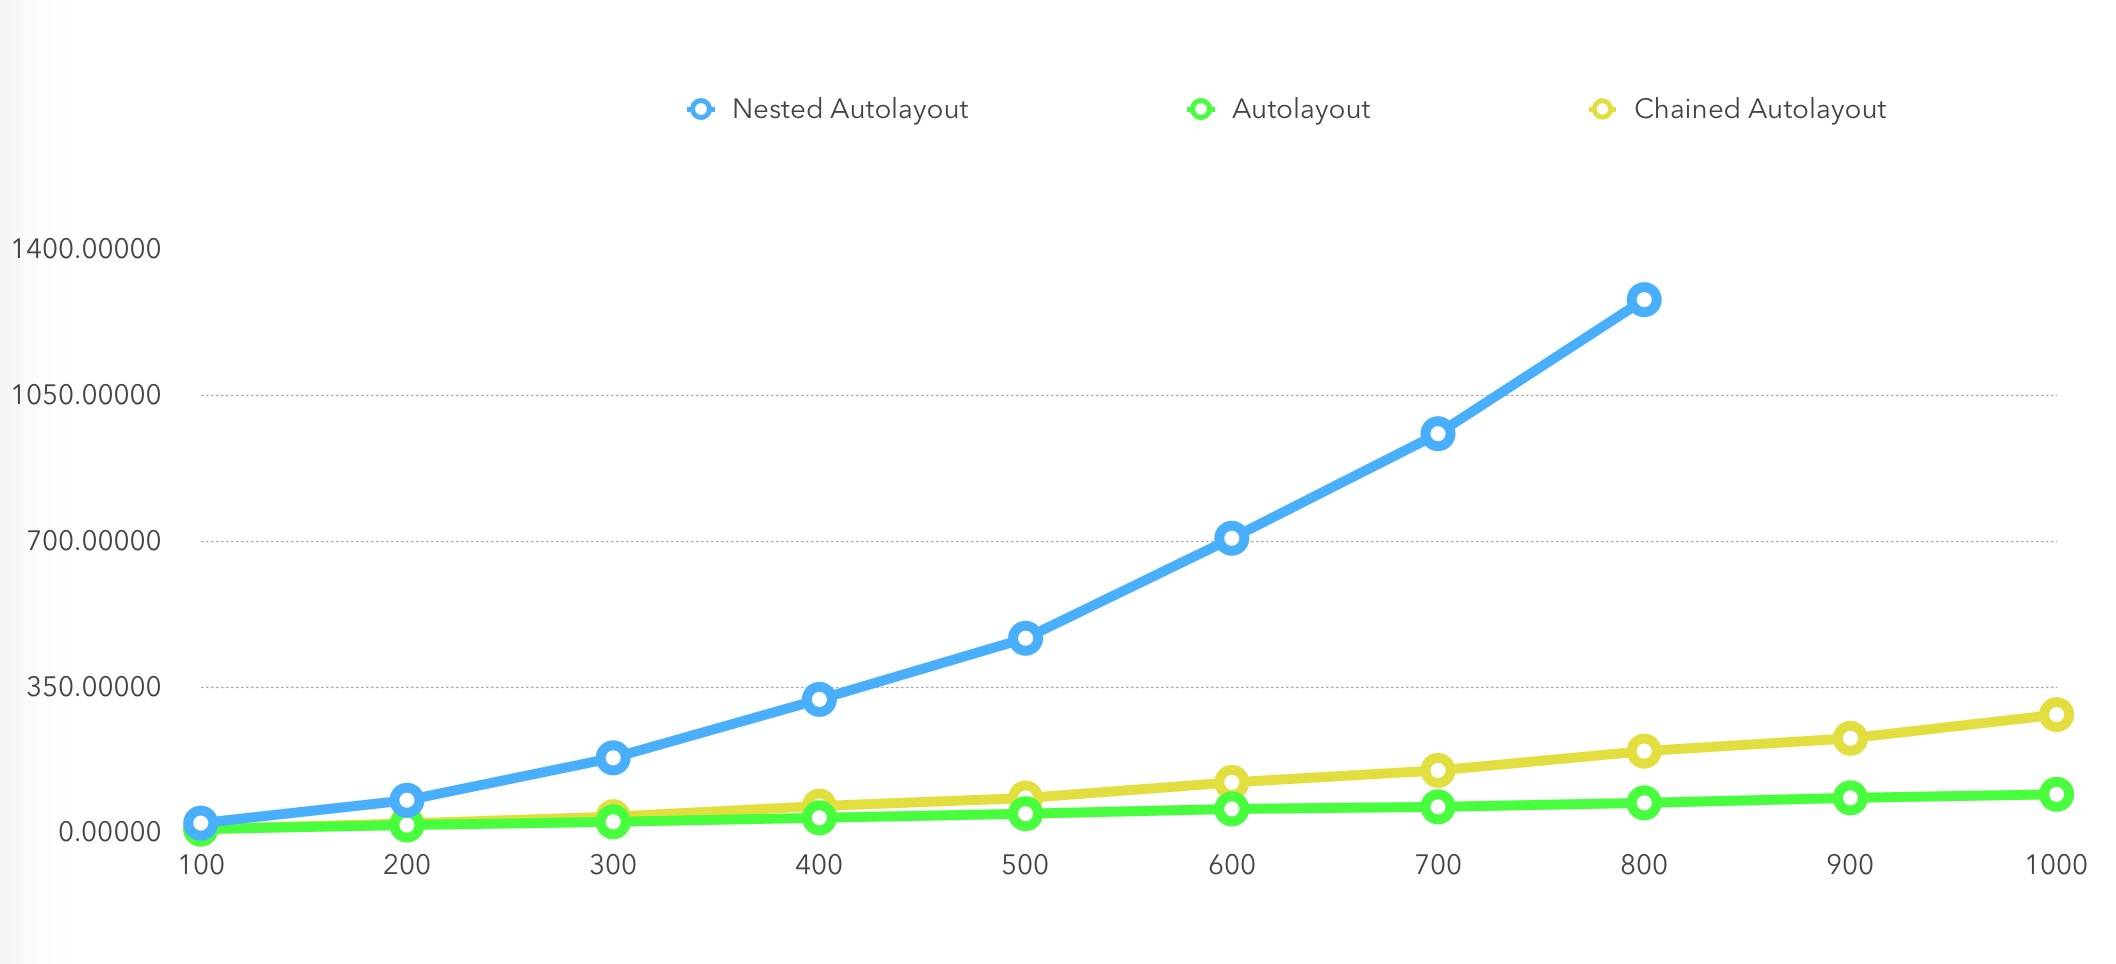
This final chart is an additional test specifically for Auto Layout. The goal is to compare the performance of different Auto Layout approaches across three scenarios. As you can see, the nested Auto Layout we commonly use in practice performs the worst!
III. How Weex Lays Out Native Interfaces
In the previous section, we looked at the powerful layout capabilities of the FlexBox algorithm. In this section, let’s look at exactly how Weex uses that capability to lay out native views.
Before answering the question above, let’s first review something mentioned in the previous article, “How Weex Runs on the iOS Client”: before JSFramework transforms the JS file downloaded from the network, the local side first registers four important callback functions.
typedef NSInteger(^WXJSCallNative)(NSString *instance, NSArray *tasks, NSString *callback);
typedef NSInteger(^WXJSCallAddElement)(NSString *instanceId,  NSString *parentRef, NSDictionary *elementData, NSInteger index);
typedef NSInvocation *(^WXJSCallNativeModule)(NSString *instanceId, NSString *moduleName, NSString *methodName, NSArray *args, NSDictionary *options);
typedef void (^WXJSCallNativeComponent)(NSString *instanceId, NSString *componentRef, NSString *methodName, NSArray *args, NSDictionary *options);
These four blocks are extremely important; they are the four core functions that enable mutual calls between JS and OC.
First, let’s review which closures are wrapped when these four core functions are registered.
@interface WXBridgeContext ()
@property (nonatomic, strong) id<WXBridgeProtocol>  jsBridge;
In the WXBridgeContext class, there is a jsBridge. When jsBridge is initialized, it registers these four global functions.
The first closure function:
    [_jsBridge registerCallNative:^NSInteger(NSString *instance, NSArray *tasks, NSString *callback) {
        return [weakSelf invokeNative:instance tasks:tasks callback:callback];
    }];
The closure function here will be passed into the following function:
- (void)registerCallNative:(WXJSCallNative)callNative
{
    JSValue* (^callNativeBlock)(JSValue *, JSValue *, JSValue *) = ^JSValue*(JSValue *instance, JSValue *tasks, JSValue *callback){
        NSString *instanceId = [instance toString];
        NSArray *tasksArray = [tasks toArray];
        NSString *callbackId = [callback toString];

        WXLogDebug(@"Calling native... instance:%@, tasks:%@, callback:%@", instanceId, tasksArray, callbackId);
        return [JSValue valueWithInt32:(int32_t)callNative(instanceId, tasksArray, callbackId) inContext:[JSContext currentContext]];
    };

    _jsContext[@"callNative"] = callNativeBlock;
}
Here, a function is encapsulated and exposed for JS to use. The method is named callNative, and it takes three parameters: instanceId, the tasksArray task array, and callbackId.
All OC closures need to be wrapped in an additional layer, because methods exposed to JS cannot contain colons. All parameters are placed directly in the parameter list inside the parentheses, since that is how JS functions are defined.
After JS calls the callNative method, it will ultimately execute the [weakSelf invokeNative:instance tasks:tasks callback:callback] method in the WXBridgeContext class.
The second closure function:
    [_jsBridge registerCallAddElement:^NSInteger(NSString *instanceId, NSString *parentRef, NSDictionary *elementData, NSInteger index) {
        // Temporary here , in order to improve performance, will be refactored next version.
        WXSDKInstance *instance = [WXSDKManager instanceForID:instanceId];

        if (!instance) {
            WXLogInfo(@"instance not found, maybe already destroyed");
            return -1;
        }
        WXPerformBlockOnComponentThread(^{
            WXComponentManager *manager = instance.componentManager;
            if (!manager.isValid) {
                return;
            }
            [manager startComponentTasks];
            [manager addComponent:elementData toSupercomponent:parentRef atIndex:index appendingInTree:NO];
        });

        return 0;
    }];
This closure will be passed to the function below:
- (void)registerCallAddElement:(WXJSCallAddElement)callAddElement
{
    id callAddElementBlock = ^(JSValue *instanceId, JSValue *ref, JSValue *element, JSValue *index, JSValue *ifCallback) {

        NSString *instanceIdString = [instanceId toString];
        NSDictionary *componentData = [element toDictionary];
        NSString *parentRef = [ref toString];
        NSInteger insertIndex = [[index toNumber] integerValue];

         WXLogDebug(@"callAddElement...%@, %@, %@, %ld", instanceIdString, parentRef, componentData, (long)insertIndex);

        return [JSValue valueWithInt32:(int32_t)callAddElement(instanceIdString, parentRef, componentData, insertIndex) inContext:[JSContext currentContext]];
    };

    _jsContext[@"callAddElement"] = callAddElementBlock;
}
The wrapper method here is the same as the first method. The method exposed to JS here is named callAddElement, and it takes four parameters: instanceIdString, componentData (the component’s data), parentRef (the reference ID), and insertIndex (the index at which to insert the view).
When JS calls the callAddElement method, it will ultimately execute the WXPerformBlockOnComponentThread closure in the WXBridgeContext class.
The third closure function:
    [_jsBridge registerCallNativeModule:^NSInvocation*(NSString *instanceId, NSString *moduleName, NSString *methodName, NSArray *arguments, NSDictionary *options) {
        WXSDKInstance *instance = [WXSDKManager instanceForID:instanceId];

        if (!instance) {
            WXLogInfo(@"instance not found for callNativeModule:%@.%@, maybe already destroyed", moduleName, methodName);
            return nil;
        }

        WXModuleMethod *method = [[WXModuleMethod alloc] initWithModuleName:moduleName methodName:methodName arguments:arguments instance:instance];
        return [method invoke];
    }];
This closure will be passed to the following function:
- (void)registerCallNativeModule:(WXJSCallNativeModule)callNativeModuleBlock
{
    _jsContext[@"callNativeModule"] = ^JSValue *(JSValue *instanceId, JSValue *moduleName, JSValue *methodName, JSValue *args, JSValue *options) {
        NSString *instanceIdString = [instanceId toString];
        NSString *moduleNameString = [moduleName toString];
        NSString *methodNameString = [methodName toString];
        NSArray *argsArray = [args toArray];
        NSDictionary *optionsDic = [options toDictionary];

        WXLogDebug(@"callNativeModule...%@,%@,%@,%@", instanceIdString, moduleNameString, methodNameString, argsArray);

        NSInvocation *invocation = callNativeModuleBlock(instanceIdString, moduleNameString, methodNameString, argsArray, optionsDic);
        JSValue *returnValue = [JSValue wx_valueWithReturnValueFromInvocation:invocation inContext:[JSContext currentContext]];
        return returnValue;
    };
}
The method exposed to JS is named callNativeModule. It takes five parameters: instanceIdString, moduleNameString (module name), methodNameString (method name), argsArray (argument array), and optionsDic (dictionary).
When JS calls the callNativeModule method, it ultimately executes the WXModuleMethod method in the WXBridgeContext class.
The fourth closure function:
    [_jsBridge registerCallNativeComponent:^void(NSString *instanceId, NSString *componentRef, NSString *methodName, NSArray *args, NSDictionary *options) {
        WXSDKInstance *instance = [WXSDKManager instanceForID:instanceId];
        WXComponentMethod *method = [[WXComponentMethod alloc] initWithComponentRef:componentRef methodName:methodName arguments:args instance:instance];
        [method invoke];
    }];
This closure will be passed to the function below:
- (void)registerCallNativeComponent:(WXJSCallNativeComponent)callNativeComponentBlock
{
    _jsContext[@"callNativeComponent"] = ^void(JSValue *instanceId, JSValue *componentName, JSValue *methodName, JSValue *args, JSValue *options) {
        NSString *instanceIdString = [instanceId toString];
        NSString *componentNameString = [componentName toString];
        NSString *methodNameString = [methodName toString];
        NSArray *argsArray = [args toArray];
        NSDictionary *optionsDic = [options toDictionary];

        WXLogDebug(@"callNativeComponent...%@,%@,%@,%@", instanceIdString, componentNameString, methodNameString, argsArray);

        callNativeComponentBlock(instanceIdString, componentNameString, methodNameString, argsArray, optionsDic);
    };
}
The method exposed to JS is named callNativeComponent. It takes 5 parameters: instanceIdString, componentNameString (component name), methodNameString (method name), argsArray (argument array), and optionsDic (dictionary).
When JS calls callNativeComponent, it ultimately executes the WXComponentMethod method in the WXBridgeContext class.
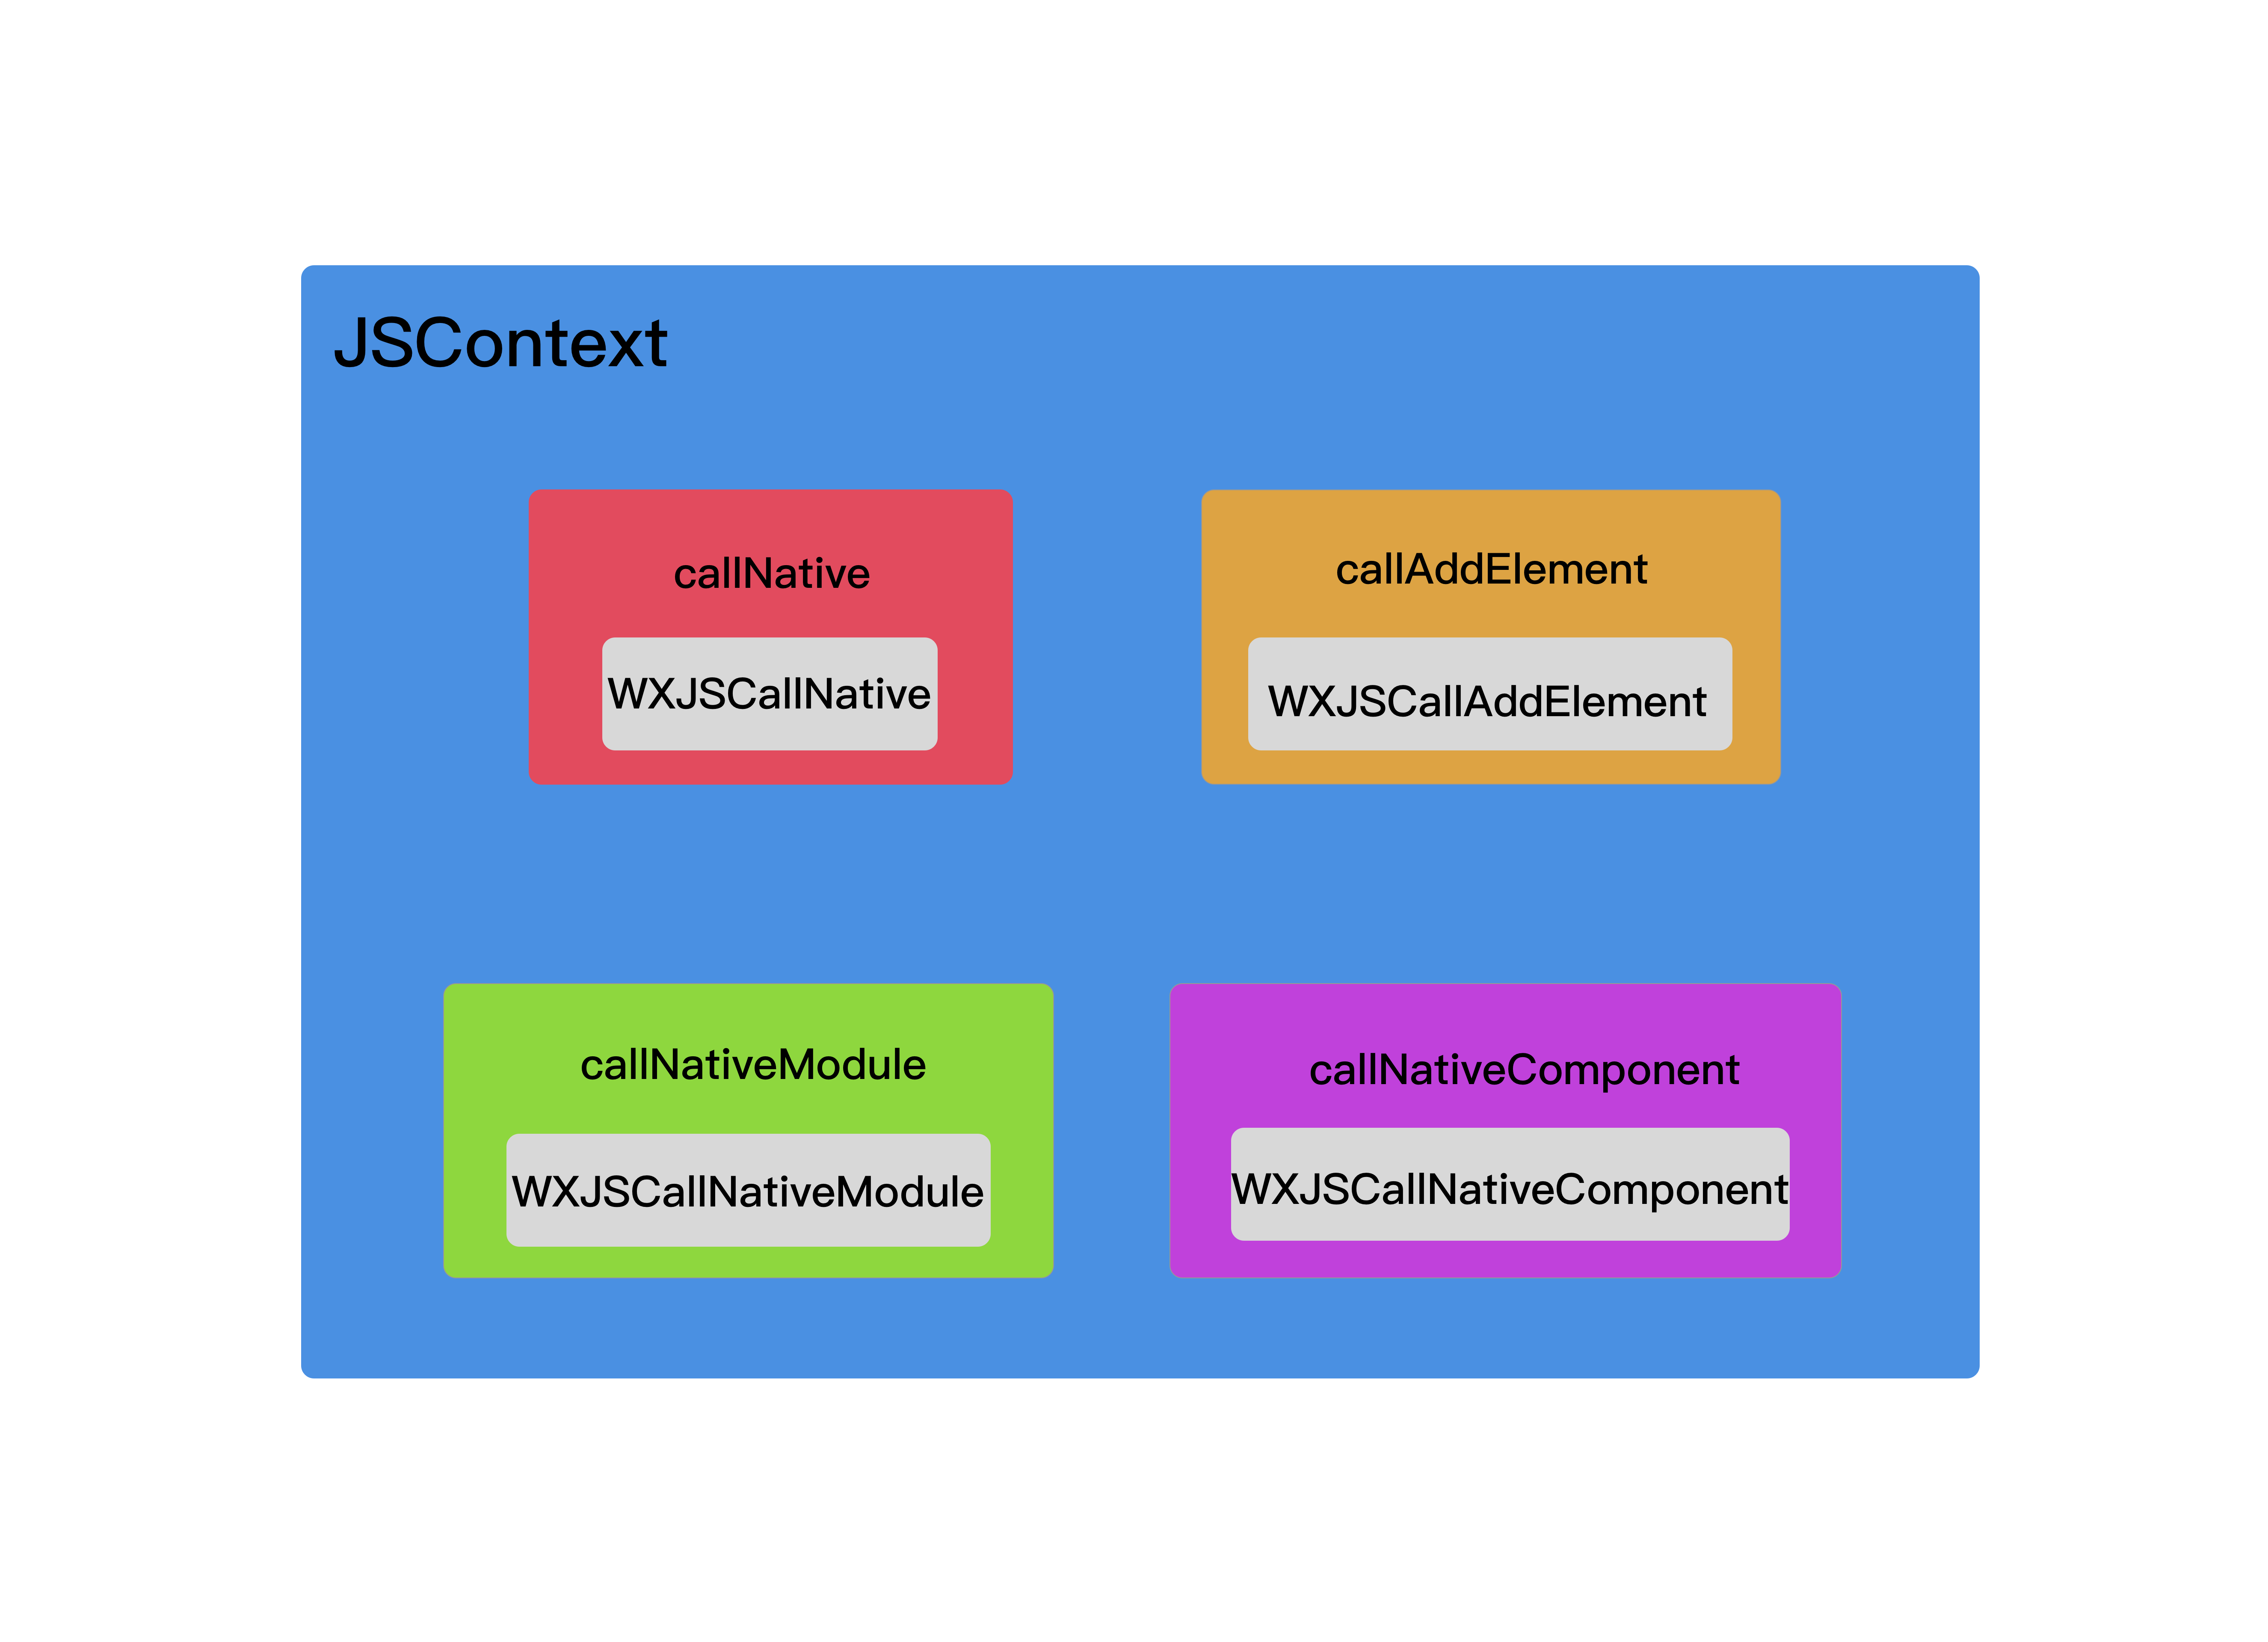
To summarize the 4 methods exposed to JS above:
callNative This method is used by JS to call any Native method.
callAddElement This method is used by JS to add view elements to the current page.
callNativeModule This method is used by JS to call methods exposed by a module.
callNativeComponent This method is used by JS to call methods exposed by a component.
During layout, Weex only uses the first 2 methods.
####(1) createRoot:
After JSFramework converts the JS file into a JSON-like file, it starts calling the Native callNative method.
The callNative method ultimately executes the [weakSelf invokeNative:instance tasks:tasks callback:callback] method in the WXBridgeContext class.
The current operation is running on the child thread “com.taobao.weex.bridge”.
- (NSInteger)invokeNative:(NSString *)instanceId tasks:(NSArray *)tasks callback:(NSString __unused*)callback
{
    WXAssertBridgeThread();

    if (!instanceId || !tasks) {
        WX_MONITOR_FAIL(WXMTNativeRender, WX_ERR_JSFUNC_PARAM, @"JS call Native params error!");
        return 0;
    }

    WXSDKInstance *instance = [WXSDKManager instanceForID:instanceId];
    if (!instance) {
        WXLogInfo(@"instance already destroyed, task ignored");
        return -1;
    }


    // Convert methods sent from JS into Native method calls
    for (NSDictionary *task in tasks) {
        NSString *methodName = task[@"method"];
        NSArray *arguments = task[@"args"];
        if (task[@"component"]) {
            NSString *ref = task[@"ref"];
            WXComponentMethod *method = [[WXComponentMethod alloc] initWithComponentRef:ref methodName:methodName arguments:arguments instance:instance];
            [method invoke];
        } else {
            NSString *moduleName = task[@"module"];
            WXModuleMethod *method = [[WXModuleMethod alloc] initWithModuleName:moduleName methodName:methodName arguments:arguments instance:instance];
            [method invoke];
        }
    }

    // If there is a callback, call back to JS
    [self performSelector:@selector(_sendQueueLoop) withObject:nil];

    return 1;
}
Here, the JS callNative method sent over is converted into a method call on a Native component component or a Native module module.
For example:
JS passes three arguments through the callNative method.
instance:0,

tasks:(
        {
        args =         (
                        {
                attr =                 {
                };
                ref = "_root";
                style =                 {
                    alignItems = center;
                };
                type = div;
            }
        );
        method = createBody;
        module = dom;
    }
),

callback:-1
The tasks array is parsed to identify each method and its caller.
In this example, it will resolve to the createBody method of the Dom module.
It will then call the createBody method of the Dom module.
    if (isSync) {
        [invocation invoke];
        return invocation;
    } else {
        [self _dispatchInvocation:invocation moduleInstance:moduleInstance];
        return nil;
    }
Before invoking the method, there is a thread-switching step. If it is a synchronous method, it is invoked directly; if it is an asynchronous method, a thread switch is still required.
The Dom module’s createBody method is asynchronous, so the _dispatchInvocation: moduleInstance: method needs to be called.
- (void)_dispatchInvocation:(NSInvocation *)invocation moduleInstance:(id<WXModuleProtocol>)moduleInstance
{
    // dispatch to user specified queue or thread, default is main thread
    dispatch_block_t dispatchBlock = ^ (){
        [invocation invoke];
    };

    NSThread *targetThread = nil;
    dispatch_queue_t targetQueue = nil;

    if([moduleInstance respondsToSelector:@selector(targetExecuteQueue)]){
        // Check whether a Queue exists; if not, return main_queue; otherwise switch to targetQueue
        targetQueue = [moduleInstance targetExecuteQueue] ?: dispatch_get_main_queue();
    } else if([moduleInstance respondsToSelector:@selector(targetExecuteThread)]){
        // Check whether a Thread exists; if not, return the main thread; otherwise switch to targetThread
        targetThread = [moduleInstance targetExecuteThread] ?: [NSThread mainThread];
    } else {
        targetThread = [NSThread mainThread];
    }

    WXAssert(targetQueue || targetThread, @"No queue or thread found for module:%@", moduleInstance);

    if (targetQueue) {
        dispatch_async(targetQueue, dispatchBlock);
    } else {
        WXPerformBlockOnThread(^{
            dispatchBlock();
        }, targetThread);
    }
}
Across the entire Weex module, only two modules currently have a targetQueue: WXClipboardModule and WXStorageModule. So since there is no targetQueue here, we can only switch to the corresponding targetThread.
void WXPerformBlockOnThread(void (^ _Nonnull block)(), NSThread *thread)
{
    [WXUtility performBlock:block onThread:thread];
}

+ (void)performBlock:(void (^)())block onThread:(NSThread *)thread
{
    if (!thread || !block) return;

    // If the current thread is not the target thread, switch threads
    if ([NSThread currentThread] == thread) {
        block();
    } else {
        [self performSelector:@selector(_performBlock:)
                     onThread:thread
                   withObject:[block copy]
                waitUntilDone:NO];
    }
}
This is where the thread switch happens. If the current thread is not the target thread, it needs to switch threads. The _performBlock: method is called on the target thread, with the originally passed-in block closure still used as the argument.
Before the switch, the thread is the background thread “com.taobao.weex.bridge”.
Call the targetExecuteThread method in WXDomModule.
- (NSThread *)targetExecuteThread
{
    return [WXComponentManager componentThread];
}
After switching threads, the current thread became com.taobao.weex.component.
- (void)createBody:(NSDictionary *)body
{
    [self performBlockOnComponentManager:^(WXComponentManager *manager) {
        [manager createRoot:body];
    }];
}


- (void)performBlockOnComponentManager:(void(^)(WXComponentManager *))block
{
    if (!block) {
        return;
    }
    __weak typeof(self) weakSelf = self;

    WXPerformBlockOnComponentThread(^{
        WXComponentManager *manager = weakSelf.weexInstance.componentManager;
        if (!manager.isValid) {
            return;
        }

        // Start component tasks
        [manager startComponentTasks];
        block(manager);
    });
}
After the Dom module’s createBody method is called, it first calls WXComponentManager’s startComponentTasks method, then calls the createRoot: method.
A WXComponentManager is initialized here.
- (WXComponentManager *)componentManager
{
    if (!_componentManager) {
        _componentManager = [[WXComponentManager alloc] initWithWeexInstance:self];
    }

    return _componentManager;
}


- (instancetype)initWithWeexInstance:(id)weexInstance
{
    if (self = [self init]) {
        _weexInstance = weexInstance;

        _indexDict = [NSMapTable strongToWeakObjectsMapTable];
        _fixedComponents = [NSMutableArray wx_mutableArrayUsingWeakReferences];
        _uiTaskQueue = [NSMutableArray array];
        _isValid = YES;
        [self _startDisplayLink];
    }

    return self;
}
The key point of WXComponentManager initialization is that it starts DisplayLink, which in turn starts a run loop.
- (void)_startDisplayLink
{
    WXAssertComponentThread();

    if(!_displayLink){
        _displayLink = [CADisplayLink displayLinkWithTarget:self selector:@selector(_handleDisplayLink)];
        [_displayLink addToRunLoop:[NSRunLoop currentRunLoop] forMode:NSDefaultRunLoopMode];
    }
}
Once displayLink is enabled, it is added to the current runloop, and the layout refresh method _handleDisplayLink is executed on every runloop iteration.
- (void)startComponentTasks
{
    [self _awakeDisplayLink];
}

- (void)_awakeDisplayLink
{
    WXAssertComponentThread();
    if(_displayLink && _displayLink.paused) {
        _displayLink.paused = NO;
    }
}
WXComponentManager’s startComponentTasks method only changes the paused state of CADisplayLink. CADisplayLink is used to refresh the layout.
@implementation WXComponentManager
{
    // Weak reference to WXSDKInstance
    __weak WXSDKInstance *_weexInstance;
    // Whether the current WXComponentManager is available
    BOOL _isValid;

    // Whether to stop refreshing layout
    BOOL _stopRunning;
    NSUInteger _noTaskTickCount;

    // access only on component thread
    NSMapTable<NSString *, WXComponent *> *_indexDict;
    NSMutableArray<dispatch_block_t> *_uiTaskQueue;

    WXComponent *_rootComponent;
    NSMutableArray *_fixedComponents;

    css_node_t *_rootCSSNode;
    CADisplayLink *_displayLink;
}
The above covers all properties of WXComponentManager. As you can see, WXComponentManager is used to handle UI tasks.
Now let’s look at the createRoot: method:
- (void)createRoot:(NSDictionary *)data
{
    WXAssertComponentThread();
    WXAssertParam(data);

    // 1. Create WXComponent as rootComponent
    _rootComponent = [self _buildComponentForData:data];

    // 2. Initialize css_node_t as rootCSSNode
    [self _initRootCSSNode];

    __weak typeof(self) weakSelf = self;
    // 3. Add UI task to the uiTaskQueue array
    [self _addUITask:^{
        __strong typeof(self) strongSelf = weakSelf;
        strongSelf.weexInstance.rootView.wx_component = strongSelf->_rootComponent;
        [strongSelf.weexInstance.rootView addSubview:strongSelf->_rootComponent.view];
    }];
}
Three things are done here:
1. Create WXComponent
- (WXComponent *)_buildComponentForData:(NSDictionary *)data
{
    NSString *ref = data[@"ref"];
    NSString *type = data[@"type"];
    NSDictionary *styles = data[@"style"];
    NSDictionary *attributes = data[@"attr"];
    NSArray *events = data[@"event"];

    Class clazz = [WXComponentFactory classWithComponentName:type];
    WXComponent *component = [[clazz alloc] initWithRef:ref type:type styles:styles attributes:attributes events:events weexInstance:self.weexInstance];
    WXAssert(component, @"Component build failed for data:%@", data);

    [_indexDict setObject:component forKey:component.ref];

    return component;
}
The input parameter data here is the previous tasks array.
- (instancetype)initWithRef:(NSString *)ref
                       type:(NSString *)type
                     styles:(NSDictionary *)styles
                 attributes:(NSDictionary *)attributes
                     events:(NSArray *)events
               weexInstance:(WXSDKInstance *)weexInstance
{
    if (self = [super init]) {
        pthread_mutexattr_init(&_propertMutexAttr);
        pthread_mutexattr_settype(&_propertMutexAttr, PTHREAD_MUTEX_RECURSIVE);
        pthread_mutex_init(&_propertyMutex, &_propertMutexAttr);

        _ref = ref;
        _type = type;
        _weexInstance = weexInstance;
        _styles = [self parseStyles:styles];
        _attributes = attributes ? [NSMutableDictionary dictionaryWithDictionary:attributes] : [NSMutableDictionary dictionary];
        _events = events ? [NSMutableArray arrayWithArray:events] : [NSMutableArray array];
        _subcomponents = [NSMutableArray array];

        _absolutePosition = CGPointMake(NAN, NAN);

        _isNeedJoinLayoutSystem = YES;
        _isLayoutDirty = YES;
        _isViewFrameSyncWithCalculated = YES;

        _async = NO;

        //TODO set indicator style
        if ([type isEqualToString:@"indicator"]) {
            _styles[@"position"] = @"absolute";
            if (!_styles[@"left"] && !_styles[@"right"]) {
                _styles[@"left"] = @0.0f;
            }
            if (!_styles[@"top"] && !_styles[@"bottom"]) {
                _styles[@"top"] = @0.0f;
            }
        }

        // Set the NavBar style
        [self _setupNavBarWithStyles:_styles attributes:_attributes];
        // Initialize the cssNode data structure based on style
        [self _initCSSNodeWithStyles:_styles];
        // Initialize the View properties based on style
        [self _initViewPropertyWithStyles:_styles];
        // Handle Border properties such as corner radius, border width, and background color
        [self _handleBorders:styles isUpdating:NO];
    }

    return self;
}
The function above initializes the various layout properties of WXComponent. The methods that use some of FlexBox’s property-calculation logic are in the _initCSSNodeWithStyles: method.
- (void)_initCSSNodeWithStyles:(NSDictionary *)styles
{
    _cssNode = new_css_node();

    _cssNode->print = cssNodePrint;
    _cssNode->get_child = cssNodeGetChild;
    _cssNode->is_dirty = cssNodeIsDirty;
    if ([self measureBlock]) {
        _cssNode->measure = cssNodeMeasure;
    }
    _cssNode->context = (__bridge void *)self;

    // Recalculate the number of child views that need layout in _cssNode
    [self _recomputeCSSNodeChildren];
    // Fill each style property into the cssNode data structure
    [self _fillCSSNode:styles];

    // To be in conformity with Android/Web, hopefully remove this in the future.
    if ([self.ref isEqualToString:WX_SDK_ROOT_REF]) {
        if (isUndefined(_cssNode->style.dimensions[CSS_HEIGHT]) && self.weexInstance.frame.size.height) {
            _cssNode->style.dimensions[CSS_HEIGHT] = self.weexInstance.frame.size.height;
        }

        if (isUndefined(_cssNode->style.dimensions[CSS_WIDTH]) && self.weexInstance.frame.size.width) {
            _cssNode->style.dimensions[CSS_WIDTH] = self.weexInstance.frame.size.width;
        }
    }
}
In the _fillCSSNode: method, each property value defined in the FlexBox algorithm is assigned.
2. Initialize css_node_t
Here, before starting Layout, we need to initialize rootCSSNode first.
- (void)_initRootCSSNode
{
    _rootCSSNode = new_css_node();

    // Set rootCSSNode's coordinates and size based on the page weexInstance
    [self _applyRootFrame:self.weexInstance.frame toRootCSSNode:_rootCSSNode];

    _rootCSSNode->style.flex_wrap = CSS_NOWRAP;
    _rootCSSNode->is_dirty = rootNodeIsDirty;
    _rootCSSNode->get_child = rootNodeGetChild;
    _rootCSSNode->context = (__bridge void *)(self);
    _rootCSSNode->children_count = 1;
}
In the method above, the coordinates and width/height dimensions of rootCSSNode are initialized.
3. Add the UI task to the uiTaskQueue array
    [self _addUITask:^{
        __strong typeof(self) strongSelf = weakSelf;
        strongSelf.weexInstance.rootView.wx_component = strongSelf->_rootComponent;
        [strongSelf.weexInstance.rootView addSubview:strongSelf->_rootComponent.view];
    }];
WXComponentManager adds the task of adding the current component and its corresponding View to the page Instance’s rootView into the uiTaskQueue array.
_rootComponent.view creates the WXView corresponding to the component, which inherits from UIView. Therefore, the controls created by Weex through JS code are all native controls, all of type WXView, and are essentially UIViews. The step of creating the UIView is again executed on the main thread.
The final work of displaying it on the page is handled by displayLink’s refresh method, which refreshes the UI display on the main thread.
- (void)_handleDisplayLink
{
    [self _layoutAndSyncUI];
}

- (void)_layoutAndSyncUI
{
    // Flexbox layout
    [self _layout];
    if(_uiTaskQueue.count > 0){
        // Synchronously execute UI tasks
        [self _syncUITasks];
        _noTaskTickCount = 0;
    } else {
        // If there are no tasks in the current second, smartly suspend the displaylink to save CPU time
        _noTaskTickCount ++;
        if (_noTaskTickCount > 60) {
            [self _suspendDisplayLink];
        }
    }
}
_layoutAndSyncUI is the core flow for laying out and refreshing the UI. On each refresh, it first invokes the Flexbox algorithm’s Layout pass to perform layout. This layout runs on the background thread “com.taobao.weex.component”. It then checks whether there are any UI tasks that need to be executed; if so, it switches to the main thread to perform the UI refresh operations.
There is also an intelligent suspend operation here: if it determines that there have been no tasks within one second, it suspends the displaylink to save CPU time.
- (void)_layout
{
    BOOL needsLayout = NO;
    NSEnumerator *enumerator = [_indexDict objectEnumerator];
    WXComponent *component;
    // Determine whether layout is currently needed, i.e. check the current component's _isLayoutDirty BOOL property
    while ((component = [enumerator nextObject])) {
        if ([component needsLayout]) {
            needsLayout = YES;
            break;
        }
    }

    if (!needsLayout) {
        return;
    }

    // Core function of the Flexbox algorithm
    layoutNode(_rootCSSNode, _rootCSSNode->style.dimensions[CSS_WIDTH], _rootCSSNode->style.dimensions[CSS_HEIGHT], CSS_DIRECTION_INHERIT);

    NSMutableSet<WXComponent *> *dirtyComponents = [NSMutableSet set];
    [_rootComponent _calculateFrameWithSuperAbsolutePosition:CGPointZero gatherDirtyComponents:dirtyComponents];
    // Calculate the current weexInstance's rootView.frame and reset the rootCSSNode's layout
    [self _calculateRootFrame];

    // For each component that needs layout
    for (WXComponent *dirtyComponent in dirtyComponents) {
        [self _addUITask:^{
            [dirtyComponent _layoutDidFinish];
        }];
    }
}
_indexDict maintains a Map of the layout structure for the entire page. For example:
NSMapTable {
[7] _root -> <div ref=_root> <WXView: 0x7fc59a416140; frame = (0 0; 331.333 331.333); layer = <WXLayer: 0x608000223180>>
[12] 5 -> <image ref=5> <WXImageView: 0x7fc59a724430; baseClass = UIImageView; frame = (110.333 192.333; 110.333 110.333); clipsToBounds = YES; layer = <WXLayer: 0x60000002f780>>
[13] 3 -> <image ref=3> <WXImageView: 0x7fc59a617a00; baseClass = UIImageView; frame = (110.333 55.3333; 110.333 110.333); clipsToBounds = YES; opaque = NO; gestureRecognizers = <NSArray: 0x60000024b760>; layer = <WXLayer: 0x60000003e8c0>>
[15] 4 -> <text ref=4> <WXText: 0x7fc59a509840; text: hello Weex; frame:0.000000,441.666667,331.333333,26.666667 frame = (0 441.667; 331.333 26.6667); opaque = NO; layer = <WXLayer: 0x608000223480>>
}
All components are stored with the ref reference value as the key. As long as you know the globally unique ref on this page, you can retrieve the component corresponding to that ref.
_layout first checks whether there are any components that need layout. If there are, it starts from rootCSSNode and performs layout using the Flexbox algorithm. After execution completes, it also needs to adjust the frame of rootView once. Finally, it adds a UI task to taskQueue; this task indicates that component layout has completed.
Note that all of the layout operations described above are executed on the background thread com.taobao.weex.component.
- (void)_syncUITasks
{
    // Use blocks to hold all existing tasks in uiTaskQueue
    NSArray<dispatch_block_t> *blocks = _uiTaskQueue;
    // Clear uiTaskQueue
    _uiTaskQueue = [NSMutableArray array];
    // Execute all closures in uiTaskQueue sequentially on the main thread
    dispatch_async(dispatch_get_main_queue(), ^{
        for(dispatch_block_t block in blocks) {
            block();
        }
    });
}
After layout is complete, call the synchronous UI refresh method. Note that this operates on the UI, so you must switch back to the main thread.

(2) callAddElement
In the background thread “com.taobao.weex.bridge”, it continuously responds to Native method calls from JSFramework.
    [_jsBridge registerCallAddElement:^NSInteger(NSString *instanceId, NSString *parentRef, NSDictionary *elementData, NSInteger index) {
        // Temporary here , in order to improve performance, will be refactored next version.
        WXSDKInstance *instance = [WXSDKManager instanceForID:instanceId];

        if (!instance) {
            WXLogInfo(@"instance not found, maybe already destroyed");
            return -1;
        }

        WXPerformBlockOnComponentThread(^{
            WXComponentManager *manager = instance.componentManager;
            if (!manager.isValid) {
                return;
            }
            [manager startComponentTasks];
            [manager addComponent:elementData toSupercomponent:parentRef atIndex:index appendingInTree:NO];
        });

        return 0;
    }];
When JSFramework calls the callAddElement method, the closure function in the code above is executed. It receives four arguments from JS.
For example, JSFramework might pass the following four arguments through the callAddElement method:
0,
_root,
{
    attr =     {
        value = "Hello World";
    };
    ref = 4;
    style =     {
        color = "#000000";
        fontSize = 40;
    };
    type = text;
},
-1
Here, insertIndex is 0, parentRef is _root, componentData contains the information for the component currently being created, and instanceIdString is -1.
After that, WXComponentManager calls startComponentTasks to start the display link and continue preparing for the layout refresh. Finally, it calls addComponent: toSupercomponent: atIndex: appendingInTree: to add the new component.
Note that these two operations in WXComponentManager also require a thread switch, to the com.taobao.weex.component background thread.
- (void)addComponent:(NSDictionary *)componentData toSupercomponent:(NSString *)superRef atIndex:(NSInteger)index appendingInTree:(BOOL)appendingInTree
{
    WXComponent *supercomponent = [_indexDict objectForKey:superRef];
    WXAssertComponentExist(supercomponent);

    [self _recursivelyAddComponent:componentData toSupercomponent:supercomponent atIndex:index appendingInTree:appendingInTree];
}
WXComponentManager recursively adds child components on the “com.taobao.weex.component” worker thread.
- (void)_recursivelyAddComponent:(NSDictionary *)componentData toSupercomponent:(WXComponent *)supercomponent atIndex:(NSInteger)index appendingInTree:(BOOL)appendingInTree
{

   // Build component from componentData
    WXComponent *component = [self _buildComponentForData:componentData];

    index = (index == -1 ? supercomponent->_subcomponents.count : index);

    [supercomponent _insertSubcomponent:component atIndex:index];
    // Use _lazyCreateView to mark lazy loading
    if(supercomponent && component && supercomponent->_lazyCreateView) {
        component->_lazyCreateView = YES;
    }

    // Add a UI task
    [self _addUITask:^{
        [supercomponent insertSubview:component atIndex:index];
    }];

    NSArray *subcomponentsData = [componentData valueForKey:@"children"];

    BOOL appendTree = !appendingInTree && [component.attributes[@"append"] isEqualToString:@"tree"];
    // Recursive rule: if the parent view is a tree, the child view must not be laid out again even if it is also a tree.
    for(NSDictionary *subcomponentData in subcomponentsData){
        [self _recursivelyAddComponent:subcomponentData toSupercomponent:component atIndex:-1 appendingInTree:appendTree || appendingInTree];
    }
    if (appendTree) {
        // If the current component is a tree, force a layout refresh to prevent too many sync tasks from accumulating in syncQueue.
        [self _layoutAndSyncUI];
    }
}
When recursively adding child components, if the structure is tree-shaped, a layout pass must be forced again to synchronize the UI once more. The call to the [self _layoutAndSyncUI] method here is exactly the same as the implementation in createRoot:, so it will not be repeated below.
Here, multiple subviews are added in a loop, and accordingly the Layout method will be called multiple times as well.

(3) createFinish
After all views have been added, JSFramework calls the callNative method again.
It still passes in three parameters.
instance:0,
tasks:(
        {
        args =         (
        );
        method = createFinish;
        module = dom;
    }
),
callback:-1
callNative invokes the createFinish method of WXDomModule via this parameter. For the specific implementation, see callNative in step 1; it will not be repeated here.
- (void)createFinish
{
    [self performBlockOnComponentManager:^(WXComponentManager *manager) {
        [manager createFinish];
    }];
}
Ultimately, this will also call createFinish in WXComponentManager. Of course, a thread switch occurs here, switching to the WXComponentManager thread—the com.taobao.weex.component child thread.
- (void)createFinish
{
    WXAssertComponentThread();

    WXSDKInstance *instance  = self.weexInstance;
    [self _addUITask:^{
        UIView *rootView = instance.rootView;

        WX_MONITOR_INSTANCE_PERF_END(WXPTFirstScreenRender, instance);
        WX_MONITOR_INSTANCE_PERF_END(WXPTAllRender, instance);
        WX_MONITOR_SUCCESS(WXMTJSBridge);
        WX_MONITOR_SUCCESS(WXMTNativeRender);

        if(instance.renderFinish){
            instance.renderFinish(rootView);
        }
    }];
}
WXComponentManager’s createFinish method ultimately just adds a UI task, which calls back into the renderFinish method on the main thread.

At this point, Weex’s layout process is complete.
Finally

Although Auto Layout is Apple’s native automatic layout solution, performance issues can appear with even moderately complex interfaces. About half a year ago, Draveness’s article “Discussing Performance from Auto Layout’s Layout Algorithm” also somewhat “criticized” Auto Layout’s performance issues, but the article ultimately proposed using ASDK to solve the problem. This article presents another viable layout approach—FlexBox—and includes data from extensive testing, as a tribute to Dazuo’s classic article!
Today, the main available layout approaches on iOS are: native frame-based layout, native Auto Layout, Yoga’s implementation of FlexBox, and ASDK.
Of course, beyond these four basic approaches, there are also some hybrid methods. For example, Weex parses CSS in JS into a JSON-like DOM, then calls the native FlexBox algorithm for layout. Recently, Meituan’s article “The Future of Layout Coding” also mentioned the Picasso layout approach. Its principle also involves JSCore: JSON written in JS, or a custom DSL, is converted into native layout through the local picassoEngine layout engine, and ultimately achieves efficient layout by leveraging the concept of anchors.
Finally, I recommend two excellent open-source libraries on iOS that use the principles of FlexBox:
yoga from Facebook
FlexBoxLayout from Ele.me
