Weex 中别具匠心的 JS Framework
前言
Weex为了提高Native的极致性能,做了很多优化的工作
为了达到所有页面在用户端达到秒开,也就是网络(JS Bundle下载)和首屏渲染(展现在用户第一屏的渲染时间)时间和小于1s。
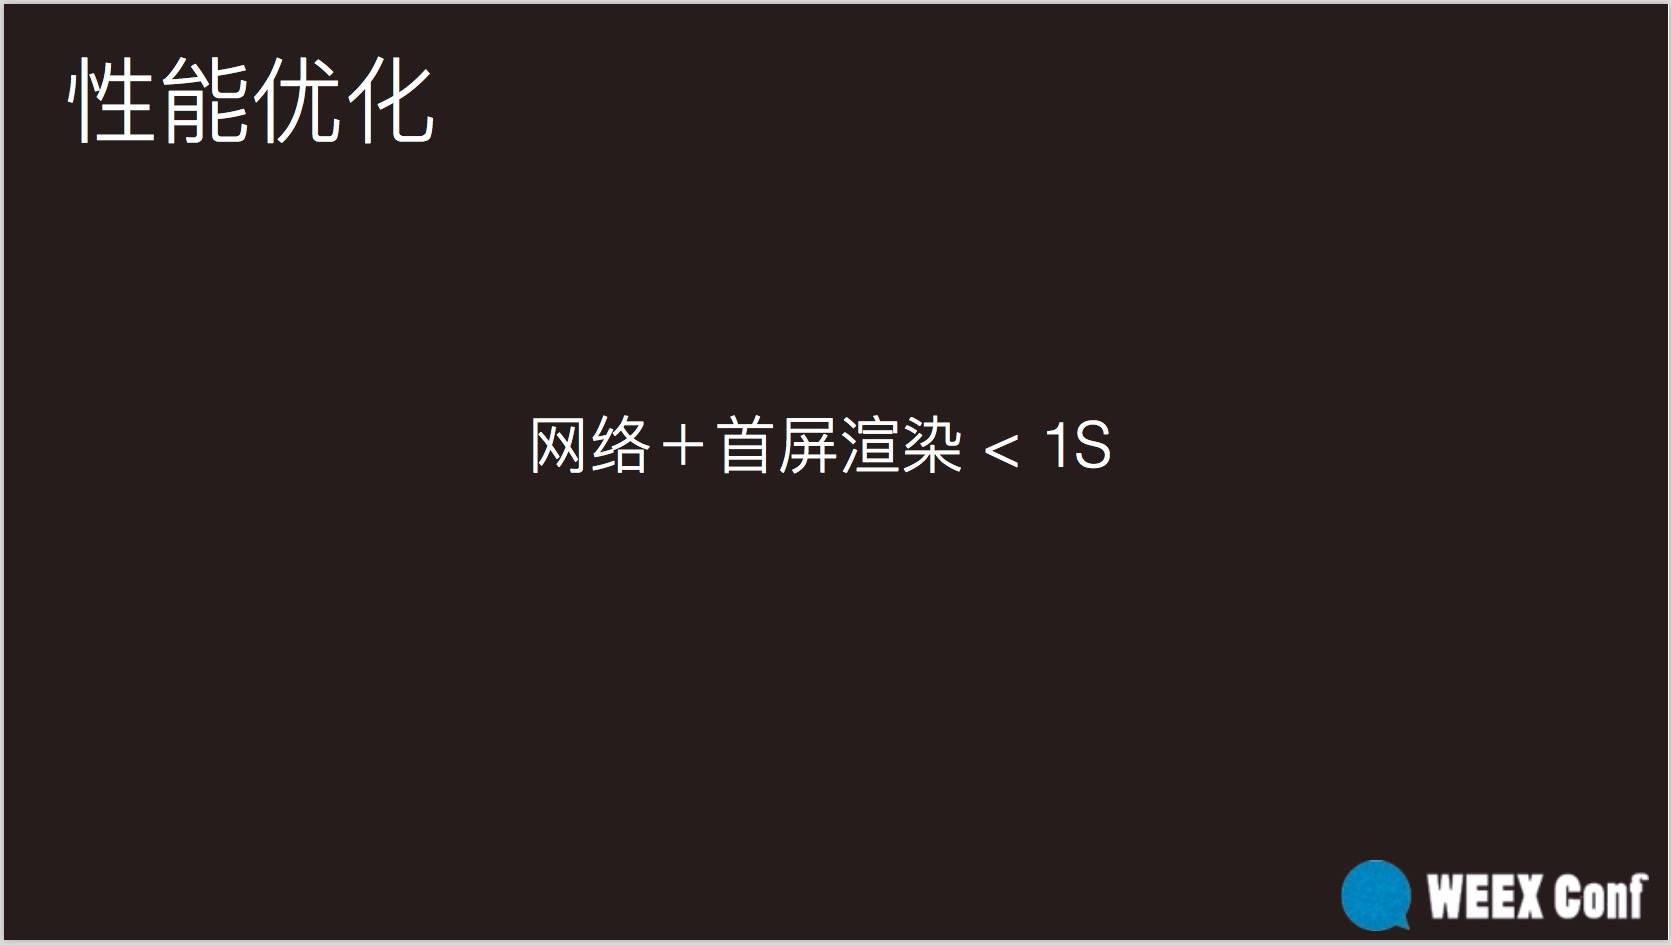
手淘团队在对Weex进行性能优化时,遇到了很多问题和挑战:
JS Bundle下载慢,压缩后60k左右大小的JS Bundle,在全网环境下,平均下载速度大于800ms(在2G/3G下甚至是2s以上)。 JS和Native通信效率低,拖慢了首屏加载时间。
最终想到的办法就是把JSFramework内置到SDK中,达到极致优化的作用。
客户端访问Weex页面时,首先会网络请求JS Bundle,JS Bundle被加载到客户端本地后,传入JSFramework中进行解析渲染。JS Framework解析和渲染的过程其实是根据JS Bundle的数据结构创建Virtual DOM 和数据绑定,然后传递给客户端渲染。
由于JSFramework在本地,所以就减少了JS Bundle的体积,每个JS Bundle都可以减少一部分体积,Bundle里面只保留业务代码。每个页面下载Bundle的时间都可以节约10-20ms。如果Weex页面非常多,那么每个页面累计起来节约的时间就很多了。 Weex这种默认就拆包加载的设计,比ReactNative强,也就不需要考虑一直困扰ReactNative头疼的拆包的问题了。整个过程中,JSFramework将整个页面的渲染分拆成一个个渲染指令,然后通过JS Bridge发送给各个平台的RenderEngine进行Native渲染。因此,尽管在开发时写的是 HTML / CSS / JS,但最后在各个移动端(在iOS上对应的是iOS的Native UI、在Android上对应的是Android的Native UI)渲染后产生的结果是纯Native页面。 由于JSFramework在本地SDK中,只用在初始化的时候初始化一次,之后每个页面都无须再初始化了。也进一步的提高了与Native的通信效率。
JSFramework在客户端的作用在前几篇文章里面也提到了。它的在Native端的职责有3个:
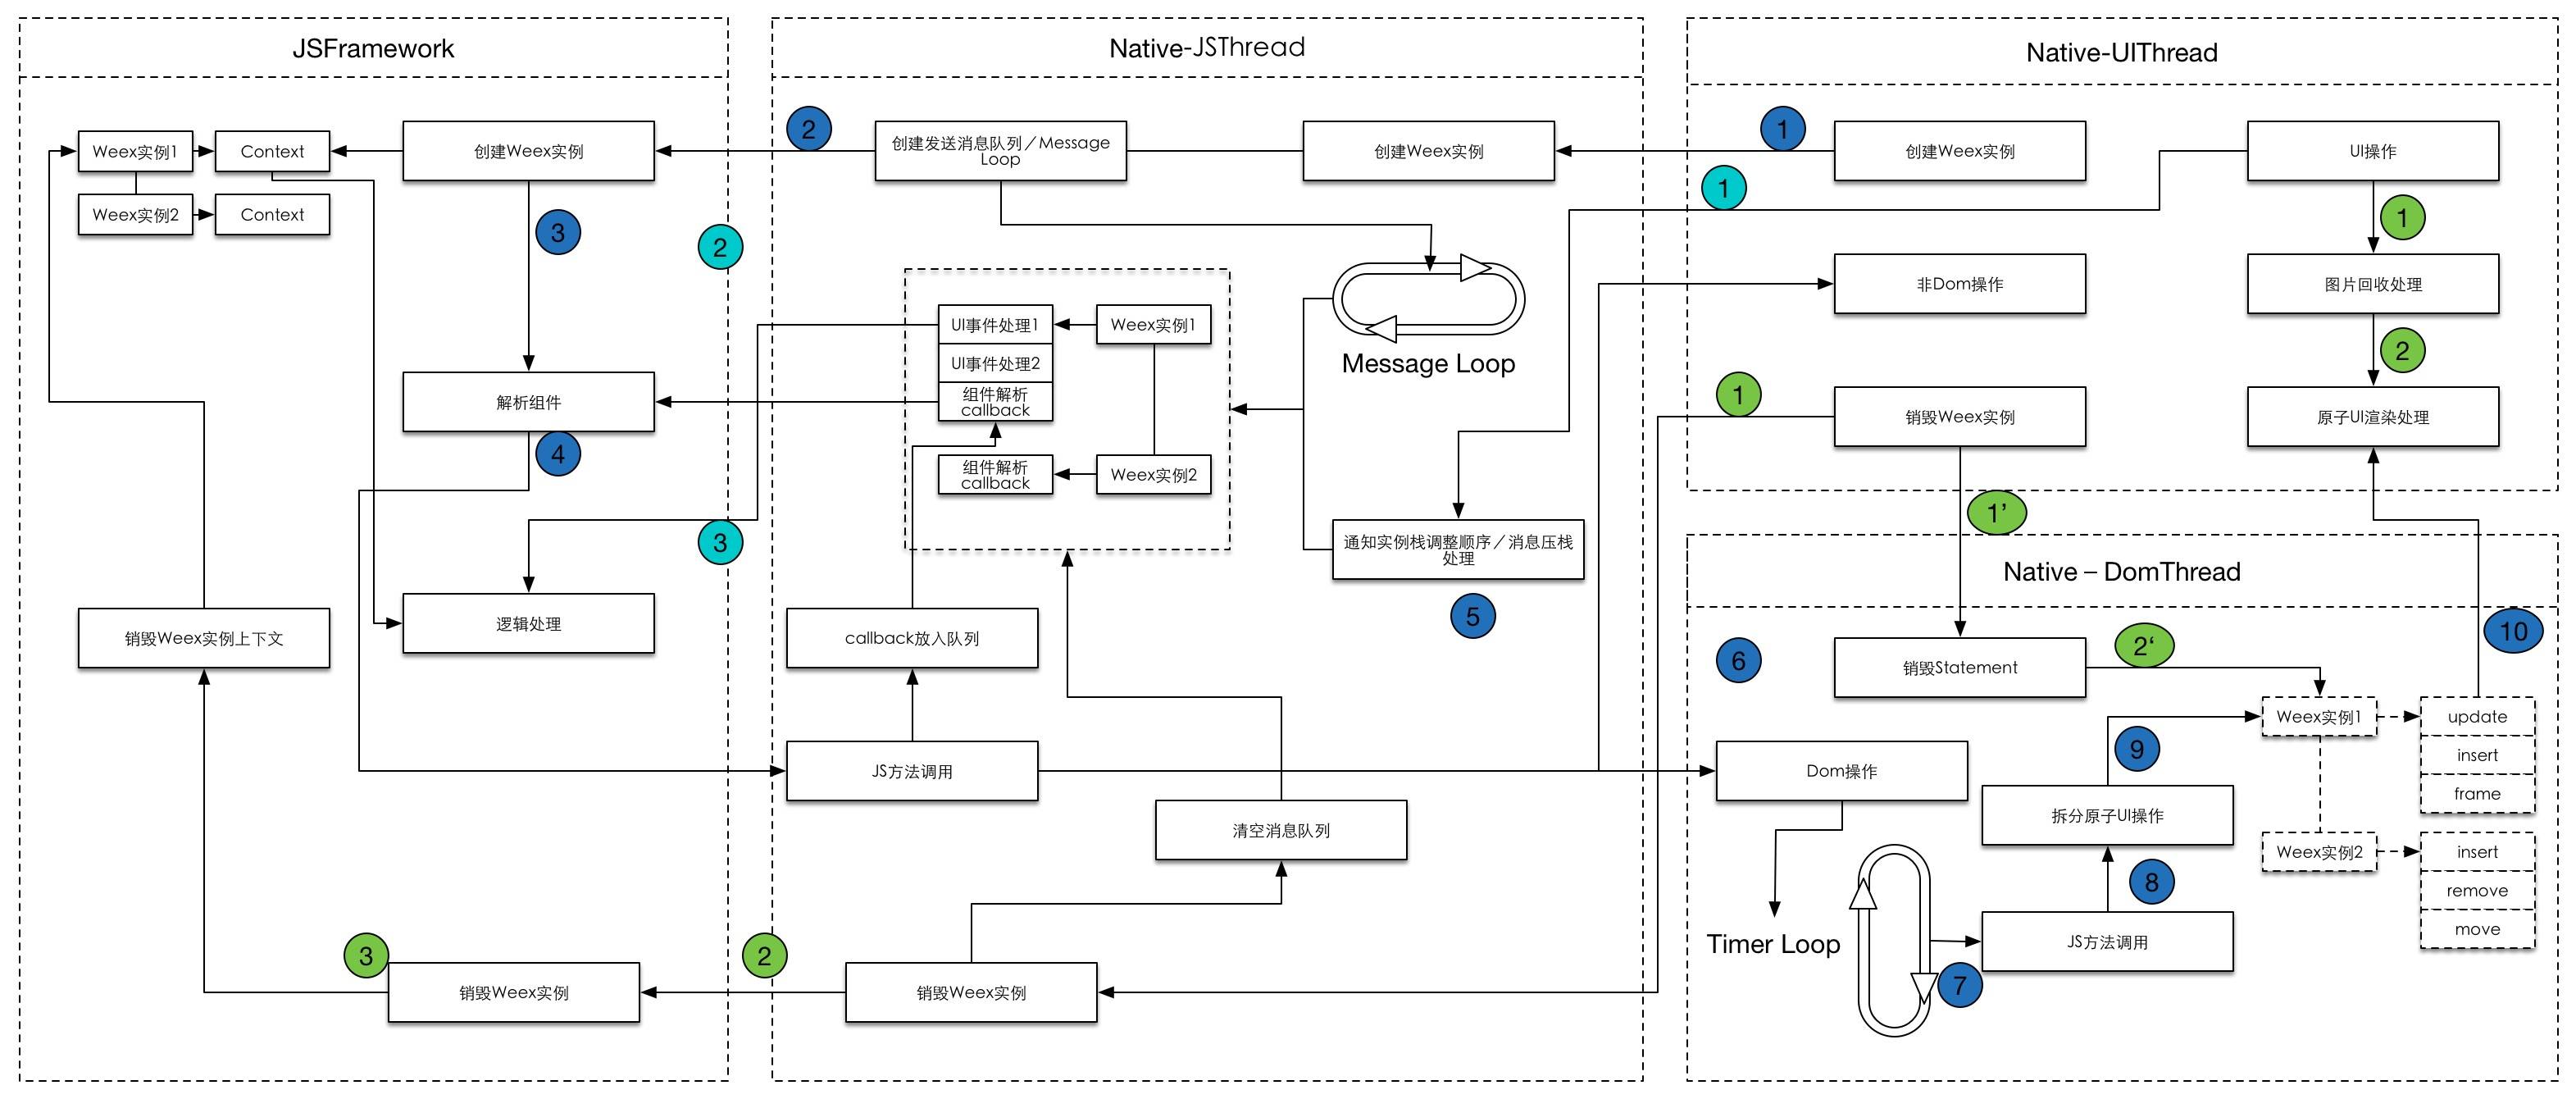
- 管理每个Weex instance实例的生命周期。
- 不断的接收Native传过来的JS Bundle,转换成Virtual DOM,再调用Native的方法,构建页面布局。
- 响应Native传过来的事件,进行响应。
接下来,笔者从源码的角度详细分析一下Weex 中别具匠心的JS Framework是如何实现上述的特性的。
目录
- 1.Weex JS Framework 初始化
- 2.Weex JS Framework 管理实例的生命周期
- 3.Weex JS Framework 构建Virtual DOM
- 4.Weex JS Framework 处理Native触发的事件
- 5.Weex JS Framework 未来可能做更多的事情
一. Weex JS Framework 初始化
分析Weex JS Framework 之前,先来看看整个Weex JS Framework的代码文件结构树状图。以下的代码版本是0.19.8。
weex/html5/frameworks
    ├── index.js
    ├── legacy
    │     ├── api         // 定义 Vm 上的接口
    │     │   ├── methods.js        // 以$开头的一些内部方法
    │     │   └── modules.js        // 一些组件的信息
    │     ├── app        // 页面实例相关代码
    │     │   ├── bundle            // 打包编译的主代码
    │     │   │     ├── bootstrap.js
    │     │   │     ├── define.js
    │     │   │     └── index.js  // 处理jsbundle的入口
    │     │   ├── ctrl              // 处理Native触发回来方法
    │     │   │     ├── index.js
    │     │   │     ├── init.js
    │     │   │     └── misc.js
    │     │   ├── differ.js        // differ相关的处理方法
    │     │   ├── downgrade.js     //  H5降级相关的处理方法
    │     │   ├── index.js
    │     │   ├── instance.js      // Weex实例的构造函数
    │     │   ├── register.js      // 注册模块和组件的处理方法
    │     │   ├── viewport.js
    │     ├── core       // 数据监听相关代码,ViewModel的核心代码
    │     │   ├── array.js
    │     │   ├── dep.js
    │     │   ├── LICENSE
    │     │   ├── object.js
    │     │   ├── observer.js
    │     │   ├── state.js
    │     │   └── watcher.js
    │     ├── static     // 一些静态的方法
    │     │   ├── bridge.js
    │     │   ├── create.js
    │     │   ├── life.js
    │     │   ├── map.js
    │     │   ├── misc.js
    │     │   └── register.js
    │     ├── util        // 工具函数如isReserved,toArray,isObject等方法
    │     │   ├── index.js
    │     │   └── LICENSE
    │     │   └── shared.js
    │     ├── vm         // 组件模型相关代码
    │     │   ├── compiler.js     // ViewModel模板解析器和数据绑定操作
    │     │   ├── directive.js    // 指令编译器
    │     │   ├── dom-helper.js   // Dom 元素的helper
    │     │   ├── events.js       // 组件的所有事件以及生命周期
    │     │   └── index.js        // ViewModel的构造器和定义
    │     ├── config.js
    │     └── index.js // 入口文件
    └── vanilla
          └── index.js
还会用到runtime文件夹里面的文件,所以runtime的文件结构也梳理一遍。
weex/html5/runtime
    ├── callback-manager.js
    ├── config.js
    ├── handler.js
    ├── index.js
    ├── init.js
    ├── listener.js
    ├── service.js
    ├── task-center.js
    └── vdom
          ├── comment.js
          ├── document.js
          ├── element-types.js
          ├── element.js
          ├── index.js
          ├── node.js
          └── operation.js
接下来开始分析Weex JS Framework 初始化。
Weex JS Framework 初始化是从对应的入口文件是 html5/render/native/index.js
import { subversion } from '../../../package.json'
import runtime from '../../runtime'
import frameworks from '../../frameworks/index'
import services from '../../services/index'

const { init, config } = runtime
config.frameworks = frameworks
const { native, transformer } = subversion

// 根据serviceName注册service
for (const serviceName in services) {
  runtime.service.register(serviceName, services[serviceName])
}

// 调用runtime里面的freezePrototype()方法,防止修改现有属性的特性和值,并阻止添加新属性。
runtime.freezePrototype()

// 调用runtime里面的setNativeConsole()方法,根据Native设置的logLevel等级设置相应的Console
runtime.setNativeConsole()

// 注册 framework 元信息
global.frameworkVersion = native
global.transformerVersion = transformer

// 初始化 frameworks
const globalMethods = init(config)

// 设置全局方法
for (const methodName in globalMethods) {
  global[methodName] = (...args) => {
    const ret = globalMethods[methodName](...args)
    if (ret instanceof Error) {
      console.error(ret.toString())
    }
    return ret
  }
}
上述方法中会调用init( )方法,这个方法就会进行JS Framework的初始化。
init( )方法在weex/html5/runtime/init.js里面。
export default function init (config) {
  runtimeConfig = config || {}
  frameworks = runtimeConfig.frameworks || {}
  initTaskHandler()

  // 每个framework都是由init初始化,
  // config里面都包含3个重要的virtual-DOM类,`Document`,`Element`,`Comment`和一个JS bridge 方法sendTasks(...args)
  for (const name in frameworks) {
    const framework = frameworks[name]
    framework.init(config)
  }

  // @todo: The method `registerMethods` will be re-designed or removed later.
  ; ['registerComponents', 'registerModules', 'registerMethods'].forEach(genInit)

  ; ['destroyInstance', 'refreshInstance', 'receiveTasks', 'getRoot'].forEach(genInstance)

  adaptInstance('receiveTasks', 'callJS')

  return methods
}
在初始化方法里面传入了config,这个入参是从weex/html5/runtime/config.js里面传入的。
import { Document, Element, Comment } from './vdom'
import Listener from './listener'
import { TaskCenter } from './task-center'

const config = {
  Document, Element, Comment, Listener,
  TaskCenter,
  sendTasks (...args) {
    return global.callNative(...args)
  }
}

Document.handler = config.sendTasks

export default config
config里面包含Document,Element,Comment,Listener,TaskCenter,以及一个sendTasks方法。
config初始化以后还会添加一个framework属性,这个属性是由weex/html5/frameworks/index.js传进来的。
import * as Vanilla from './vanilla/index'
import * as Vue from 'weex-vue-framework'
import * as Weex from './legacy/index'
import Rax from 'weex-rax-framework'

export default {
  Vanilla,
  Vue,
  Rax,
  Weex
}
init( )获取到config和config.frameworks以后,开始执行initTaskHandler()方法。
import { init as initTaskHandler } from './task-center'
initTaskHandler( )方法来自于task-center.js里面的init( )方法。
export function init () {
  const DOM_METHODS = {
    createFinish: global.callCreateFinish,
    updateFinish: global.callUpdateFinish,
    refreshFinish: global.callRefreshFinish,

    createBody: global.callCreateBody,

    addElement: global.callAddElement,
    removeElement: global.callRemoveElement,
    moveElement: global.callMoveElement,
    updateAttrs: global.callUpdateAttrs,
    updateStyle: global.callUpdateStyle,

    addEvent: global.callAddEvent,
    removeEvent: global.callRemoveEvent
  }
  const proto = TaskCenter.prototype

  for (const name in DOM_METHODS) {
    const method = DOM_METHODS[name]
    proto[name] = method ?
      (id, args) => method(id, ...args) :
      (id, args) => fallback(id, [{ module: 'dom', method: name, args }], '-1')
  }

  proto.componentHandler = global.callNativeComponent ||
    ((id, ref, method, args, options) =>
      fallback(id, [{ component: options.component, ref, method, args }]))

  proto.moduleHandler = global.callNativeModule ||
    ((id, module, method, args) =>
      fallback(id, [{ module, method, args }]))
}
这里的初始化方法就是往prototype上11个方法:createFinish,updateFinish,refreshFinish,createBody,addElement,removeElement,moveElement,updateAttrs,updateStyle,addEvent,removeEvent。
如果method存在,就用method(id, …args)方法初始化,如果不存在,就用fallback(id, [{ module: ‘dom’, method: name, args }], ‘-1’)初始化。
最后再加上componentHandler和moduleHandler。
initTaskHandler( )方法初始化了13个方法(其中2个handler),都绑定到了prototype上
    createFinish(id, [{ module: 'dom', method: createFinish, args }], '-1')
    updateFinish(id, [{ module: 'dom', method: updateFinish, args }], '-1')
    refreshFinish(id, [{ module: 'dom', method: refreshFinish, args }], '-1')
    createBody:(id, [{ module: 'dom', method: createBody, args }], '-1')

    addElement:(id, [{ module: 'dom', method: addElement, args }], '-1')
    removeElement:(id, [{ module: 'dom', method: removeElement, args }], '-1')
    moveElement:(id, [{ module: 'dom', method: moveElement, args }], '-1')
    updateAttrs:(id, [{ module: 'dom', method: updateAttrs, args }], '-1')
    updateStyle:(id, [{ module: 'dom', method: updateStyle, args }], '-1')

    addEvent:(id, [{ module: 'dom', method: addEvent, args }], '-1')
    removeEvent:(id, [{ module: 'dom', method: removeEvent, args }], '-1')

    componentHandler(id, [{ component: options.component, ref, method, args }]))
    moduleHandler(id, [{ module, method, args }]))
回到init( )方法,处理完initTaskHandler()之后有一个循环:
  for (const name in frameworks) {
    const framework = frameworks[name]
    framework.init(config)
  }
在这个循环里面会对frameworks里面每个对象调用init方法,入参都传入config。
比如Vanilla的init( )实现如下:
function init (cfg) {
  config.Document = cfg.Document
  config.Element = cfg.Element
  config.Comment = cfg.Comment
  config.sendTasks = cfg.sendTasks
}
Weex的init( )实现如下:
export function init (cfg) {
  config.Document = cfg.Document
  config.Element = cfg.Element
  config.Comment = cfg.Comment
  config.sendTasks = cfg.sendTasks
  config.Listener = cfg.Listener
}
初始化config以后就开始执行genInit
['registerComponents', 'registerModules', 'registerMethods'].forEach(genInit)
function genInit (methodName) {
  methods[methodName] = function (...args) {
    if (methodName === 'registerComponents') {
      checkComponentMethods(args[0])
    }
    for (const name in frameworks) {
      const framework = frameworks[name]
      if (framework && framework[methodName]) {
        framework[methodName](...args)
      }
    }
  }
}
methods默认有3个方法
const methods = {
  createInstance,
  registerService: register,
  unregisterService: unregister
}
除去这3个方法以外都是调用framework对应的方法。
export function registerComponents (components) {
  if (Array.isArray(components)) {
    components.forEach(function register (name) {
      /* istanbul ignore if */
      if (!name) {
        return
      }
      if (typeof name === 'string') {
        nativeComponentMap[name] = true
      }
      /* istanbul ignore else */
      else if (typeof name === 'object' && typeof name.type === 'string') {
        nativeComponentMap[name.type] = name
      }
    })
  }
}
上述方法就是注册Native的组件的核心代码实现。最终的注册信息都存在nativeComponentMap对象中,nativeComponentMap对象最初里面有如下的数据:
export default {
  nativeComponentMap: {
    text: true,
    image: true,
    container: true,
    slider: {
      type: 'slider',
      append: 'tree'
    },
    cell: {
      type: 'cell',
      append: 'tree'
    }
  }
}
接着会调用registerModules方法:
export function registerModules (modules) {
  /* istanbul ignore else */
  if (typeof modules === 'object') {
    initModules(modules)
  }
}
initModules是来自./frameworks/legacy/app/register.js,在这个文件里面会调用initModules (modules, ifReplace)进行初始化。这个方法里面是注册Native的模块的核心代码实现。
最后调用registerMethods
export function registerMethods (methods) {
  /* istanbul ignore else */
  if (typeof methods === 'object') {
    initMethods(Vm, methods)
  }
}
initMethods是来自./frameworks/legacy/app/register.js,在这个方法里面会调用initMethods (Vm, apis)进行初始化,initMethods方法里面是注册Native的handler的核心实现。
当registerComponents,registerModules,registerMethods初始化完成之后,就开始注册每个instance实例的方法
['destroyInstance', 'refreshInstance', 'receiveTasks', 'getRoot'].forEach(genInstance)
这里会给genInstance分别传入destroyInstance,refreshInstance,receiveTasks,getRoot四个方法名。
function genInstance (methodName) {
  methods[methodName] = function (...args) {
    const id = args[0]
    const info = instanceMap[id]
    if (info && frameworks[info.framework]) {
      const result = frameworks[info.framework][methodName](...args)

      // Lifecycle methods
      if (methodName === 'refreshInstance') {
        services.forEach(service => {
          const refresh = service.options.refresh
          if (refresh) {
            refresh(id, { info, runtime: runtimeConfig })
          }
        })
      }
      else if (methodName === 'destroyInstance') {
        services.forEach(service => {
          const destroy = service.options.destroy
          if (destroy) {
            destroy(id, { info, runtime: runtimeConfig })
          }
        })
        delete instanceMap[id]
      }

      return result
    }
    return new Error(`invalid instance id "${id}"`)
  }
}
上面的代码就是给每个instance注册方法的具体实现,在Weex里面每个instance默认都会有三个生命周期的方法:createInstance,refreshInstance,destroyInstance。所有Instance的方法都会存在services中。
init( )初始化的最后一步就是给每个实例添加callJS的方法
adaptInstance('receiveTasks', 'callJS')
function adaptInstance (methodName, nativeMethodName) {
  methods[nativeMethodName] = function (...args) {
    const id = args[0]
    const info = instanceMap[id]
    if (info && frameworks[info.framework]) {
      return frameworks[info.framework][methodName](...args)
    }
    return new Error(`invalid instance id "${id}"`)
  }
}
当Native调用callJS方法的时候,就会调用到对应id的instance的receiveTasks方法。
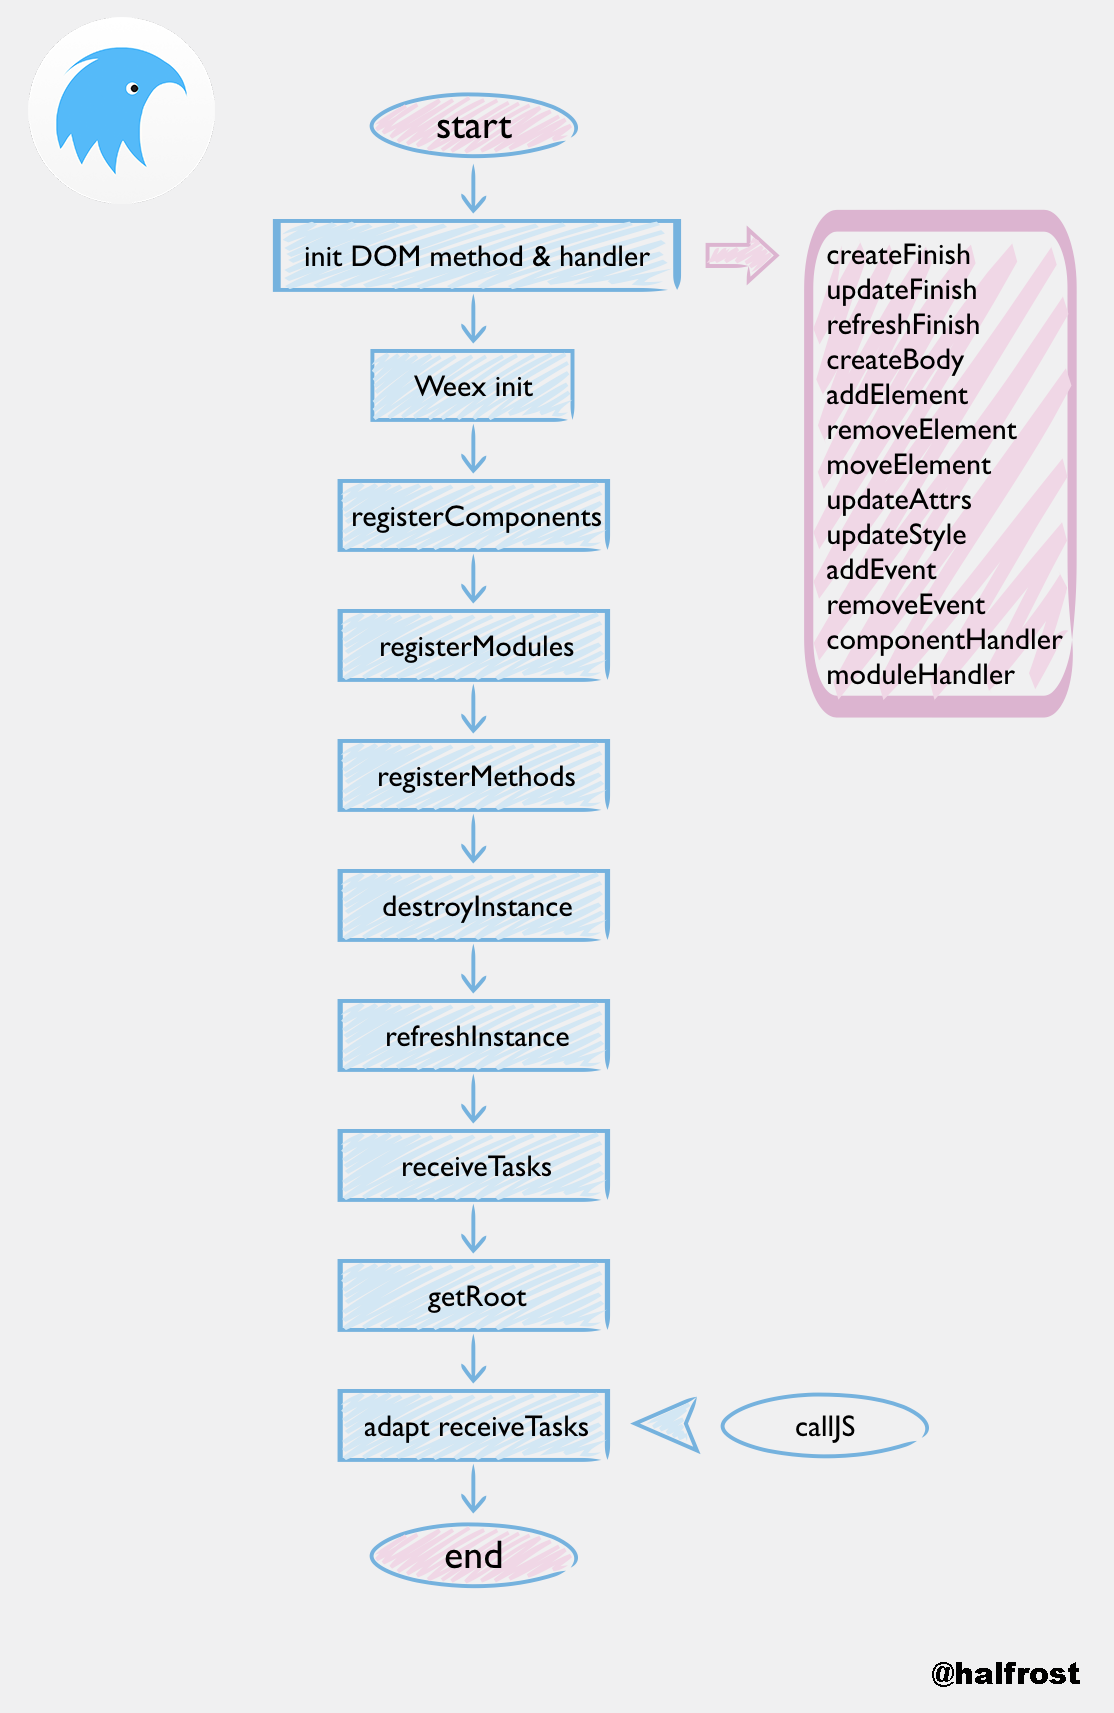
整个init流程总结如上图。
init结束以后会设置全局方法。
for (const methodName in globalMethods) {
  global[methodName] = (...args) => {
    const ret = globalMethods[methodName](...args)
    if (ret instanceof Error) {
      console.error(ret.toString())
    }
    return ret
  }
}
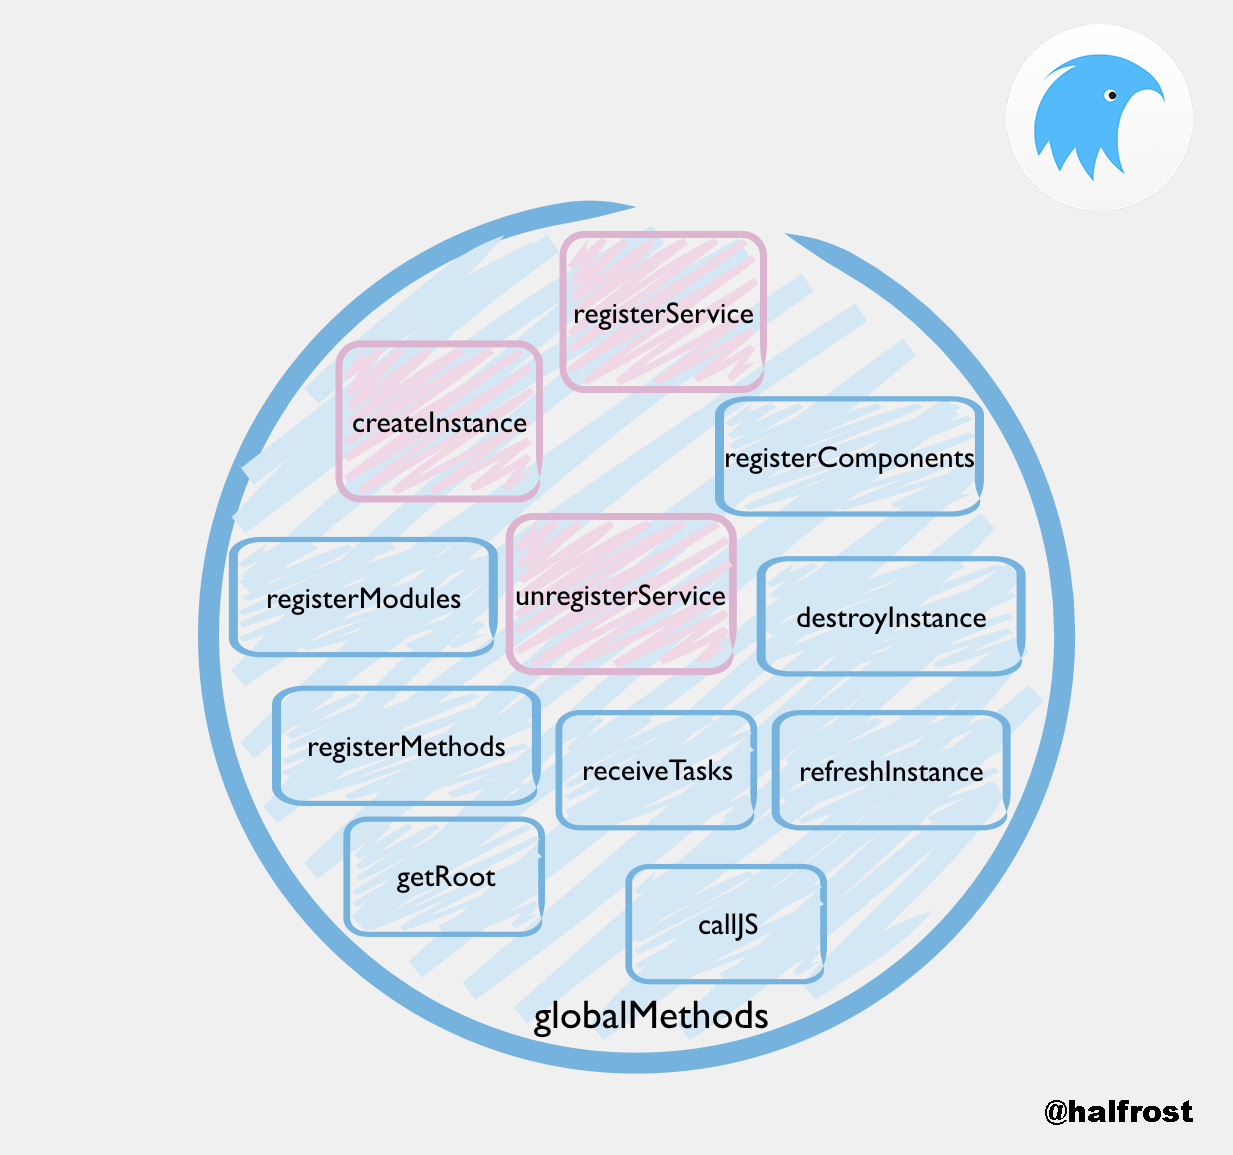
图上标的红色的3个方法表示的是默认就有的方法。
至此,Weex JS Framework就算初始化完成。
二. Weex JS Framework 管理实例的生命周期
当Native初始化完成Component,Module,handler之后,从远端请求到了JS Bundle,Native通过调用createInstance方法,把JS Bundle传给JS Framework。于是接下来的这一切从createInstance开始说起。
Native通过调用createInstance,就会执行到html5/runtime/init.js里面的function createInstance (id, code, config, data)方法。
function createInstance (id, code, config, data) {
  let info = instanceMap[id]

  if (!info) {
    // 检查版本信息
    info = checkVersion(code) || {}
    if (!frameworks[info.framework]) {
      info.framework = 'Weex'
    }

    // 初始化 instance 的 config.
    config = JSON.parse(JSON.stringify(config || {}))
    config.bundleVersion = info.version
    config.env = JSON.parse(JSON.stringify(global.WXEnvironment || {}))
    console.debug(`[JS Framework] create an ${info.framework}@${config.bundleVersion} instance from ${config.bundleVersion}`)

    const env = {
      info,
      config,
      created: Date.now(),
      framework: info.framework
    }
    env.services = createServices(id, env, runtimeConfig)
    instanceMap[id] = env

    return frameworks[info.framework].createInstance(id, code, config, data, env)
  }
  return new Error(`invalid instance id "${id}"`)
}
这个方法里面就是对版本信息,config,日期等信息进行初始化。并在Native记录一条日志信息:
[JS Framework] create an Weex@undefined instance from undefined
上面这个createInstance方法最终还是要调用html5/framework/legacy/static/create.js里面的createInstance (id, code, options, data, info)方法。
export function createInstance (id, code, options, data, info) {
  const { services } = info || {}
  // 初始化target
  resetTarget()
  let instance = instanceMap[id]
  /* istanbul ignore else */
  options = options || {}
  let result
  /* istanbul ignore else */
  if (!instance) {
    instance = new App(id, options)
    instanceMap[id] = instance
    result = initApp(instance, code, data, services)
  }
  else {
    result = new Error(`invalid instance id "${id}"`)
  }
  return result
}
new App()方法会创建新的 App 实例对象,并且把对象放入 instanceMap 中。
App对象的定义如下:
export default function App (id, options) {
  this.id = id
  this.options = options || {}
  this.vm = null
  this.customComponentMap = {}
  this.commonModules = {}

  // document
  this.doc = new renderer.Document(
    id,
    this.options.bundleUrl,
    null,
    renderer.Listener
  )
  this.differ = new Differ(id)
}
其中有三个比较重要的属性:
- id 是 JS Framework 与 Native 端通信时的唯一标识。
- vm 是 View Model,组件模型,包含了数据绑定相关功能。
- doc 是 Virtual DOM 中的根节点。
举个例子,假设Native传入了如下的信息进行createInstance初始化:
args:(
      0,
       “(这里是网络上下载的JS,由于太长了,省略)”,
      {
        bundleUrl = "http://192.168.31.117:8081/HelloWeex.js";
        debug = 1;
      }
)
那么instance = 0,code就是JS代码,data对应的是下面那个字典,service = @{ }。通过这个入参传入initApp(instance, code, data, services)方法。这个方法在html5/framework/legacy/app/ctrl/init.js里面。
export function init (app, code, data, services) {
  console.debug('[JS Framework] Intialize an instance with:\n', data)
  let result

  /* 此处省略了一些代码*/

  // 初始化weexGlobalObject
  const weexGlobalObject = {
    config: app.options,
    define: bundleDefine,
    bootstrap: bundleBootstrap,
    requireModule: bundleRequireModule,
    document: bundleDocument,
    Vm: bundleVm
  }

  // 防止weexGlobalObject被修改
  Object.freeze(weexGlobalObject)
  /* 此处省略了一些代码*/

  // 下面开始转换JS Boudle的代码
  let functionBody
  /* istanbul ignore if */
  if (typeof code === 'function') {
    // `function () {...}` -> `{...}`
    // not very strict
    functionBody = code.toString().substr(12)
  }
  /* istanbul ignore next */
  else if (code) {
    functionBody = code.toString()
  }
  // wrap IFFE and use strict mode
  functionBody = `(function(global){\n\n"use strict";\n\n ${functionBody} \n\n})(Object.create(this))`

  // run code and get result
  const globalObjects = Object.assign({
    define: bundleDefine,
    require: bundleRequire,
    bootstrap: bundleBootstrap,
    register: bundleRegister,
    render: bundleRender,
    __weex_define__: bundleDefine, // alias for define
    __weex_bootstrap__: bundleBootstrap, // alias for bootstrap
    __weex_document__: bundleDocument,
    __weex_require__: bundleRequireModule,
    __weex_viewmodel__: bundleVm,
    weex: weexGlobalObject
  }, timerAPIs, services)

  callFunction(globalObjects, functionBody)

  return result
}
上面这个方法很重要。在上面这个方法中封装了一个globalObjects对象,里面装了define 、require 、bootstrap 、register 、render这5个方法。
也会在Native本地记录一条日志:
[JS Framework] Intialize an instance with: undefined
在上述5个方法中:
/**
 * @deprecated
 */
export function register (app, type, options) {
  console.warn('[JS Framework] Register is deprecated, please install lastest transformer.')
  registerCustomComponent(app, type, options)
}
其中register、render、require是已经废弃的方法。
bundleDefine函数原型:
(...args) => defineFn(app, ...args)
bundleBootstrap函数原型:
(name, config, _data) => {
    result = bootstrap(app, name, config, _data || data)
    updateActions(app)
    app.doc.listener.createFinish()
    console.debug(`[JS Framework] After intialized an instance(${app.id})`)
  }
bundleRequire函数原型:
name => _data => {
    result = bootstrap(app, name, {}, _data)
  }
bundleRegister函数原型:
(...args) => register(app, ...args)
bundleRender函数原型:
(name, _data) => {
    result = bootstrap(app, name, {}, _data)
  }
上述5个方法封装到globalObjects中,传到 JS Bundle 中。
function callFunction (globalObjects, body) {
  const globalKeys = []
  const globalValues = []
  for (const key in globalObjects) {
    globalKeys.push(key)
    globalValues.push(globalObjects[key])
  }
  globalKeys.push(body)
  // 最终JS Bundle会通过new Function( )的方式被执行
  const result = new Function(...globalKeys)
  return result(...globalValues)
}
最终JS Bundle是会通过new Function( )的方式被执行。JS Bundle的代码将会在全局环境中执行,并不能获取到 JS Framework 执行环境中的数据,只能用globalObjects对象里面的方法。JS Bundle 本身也用了IFFE 和 严格模式,也并不会污染全局环境。
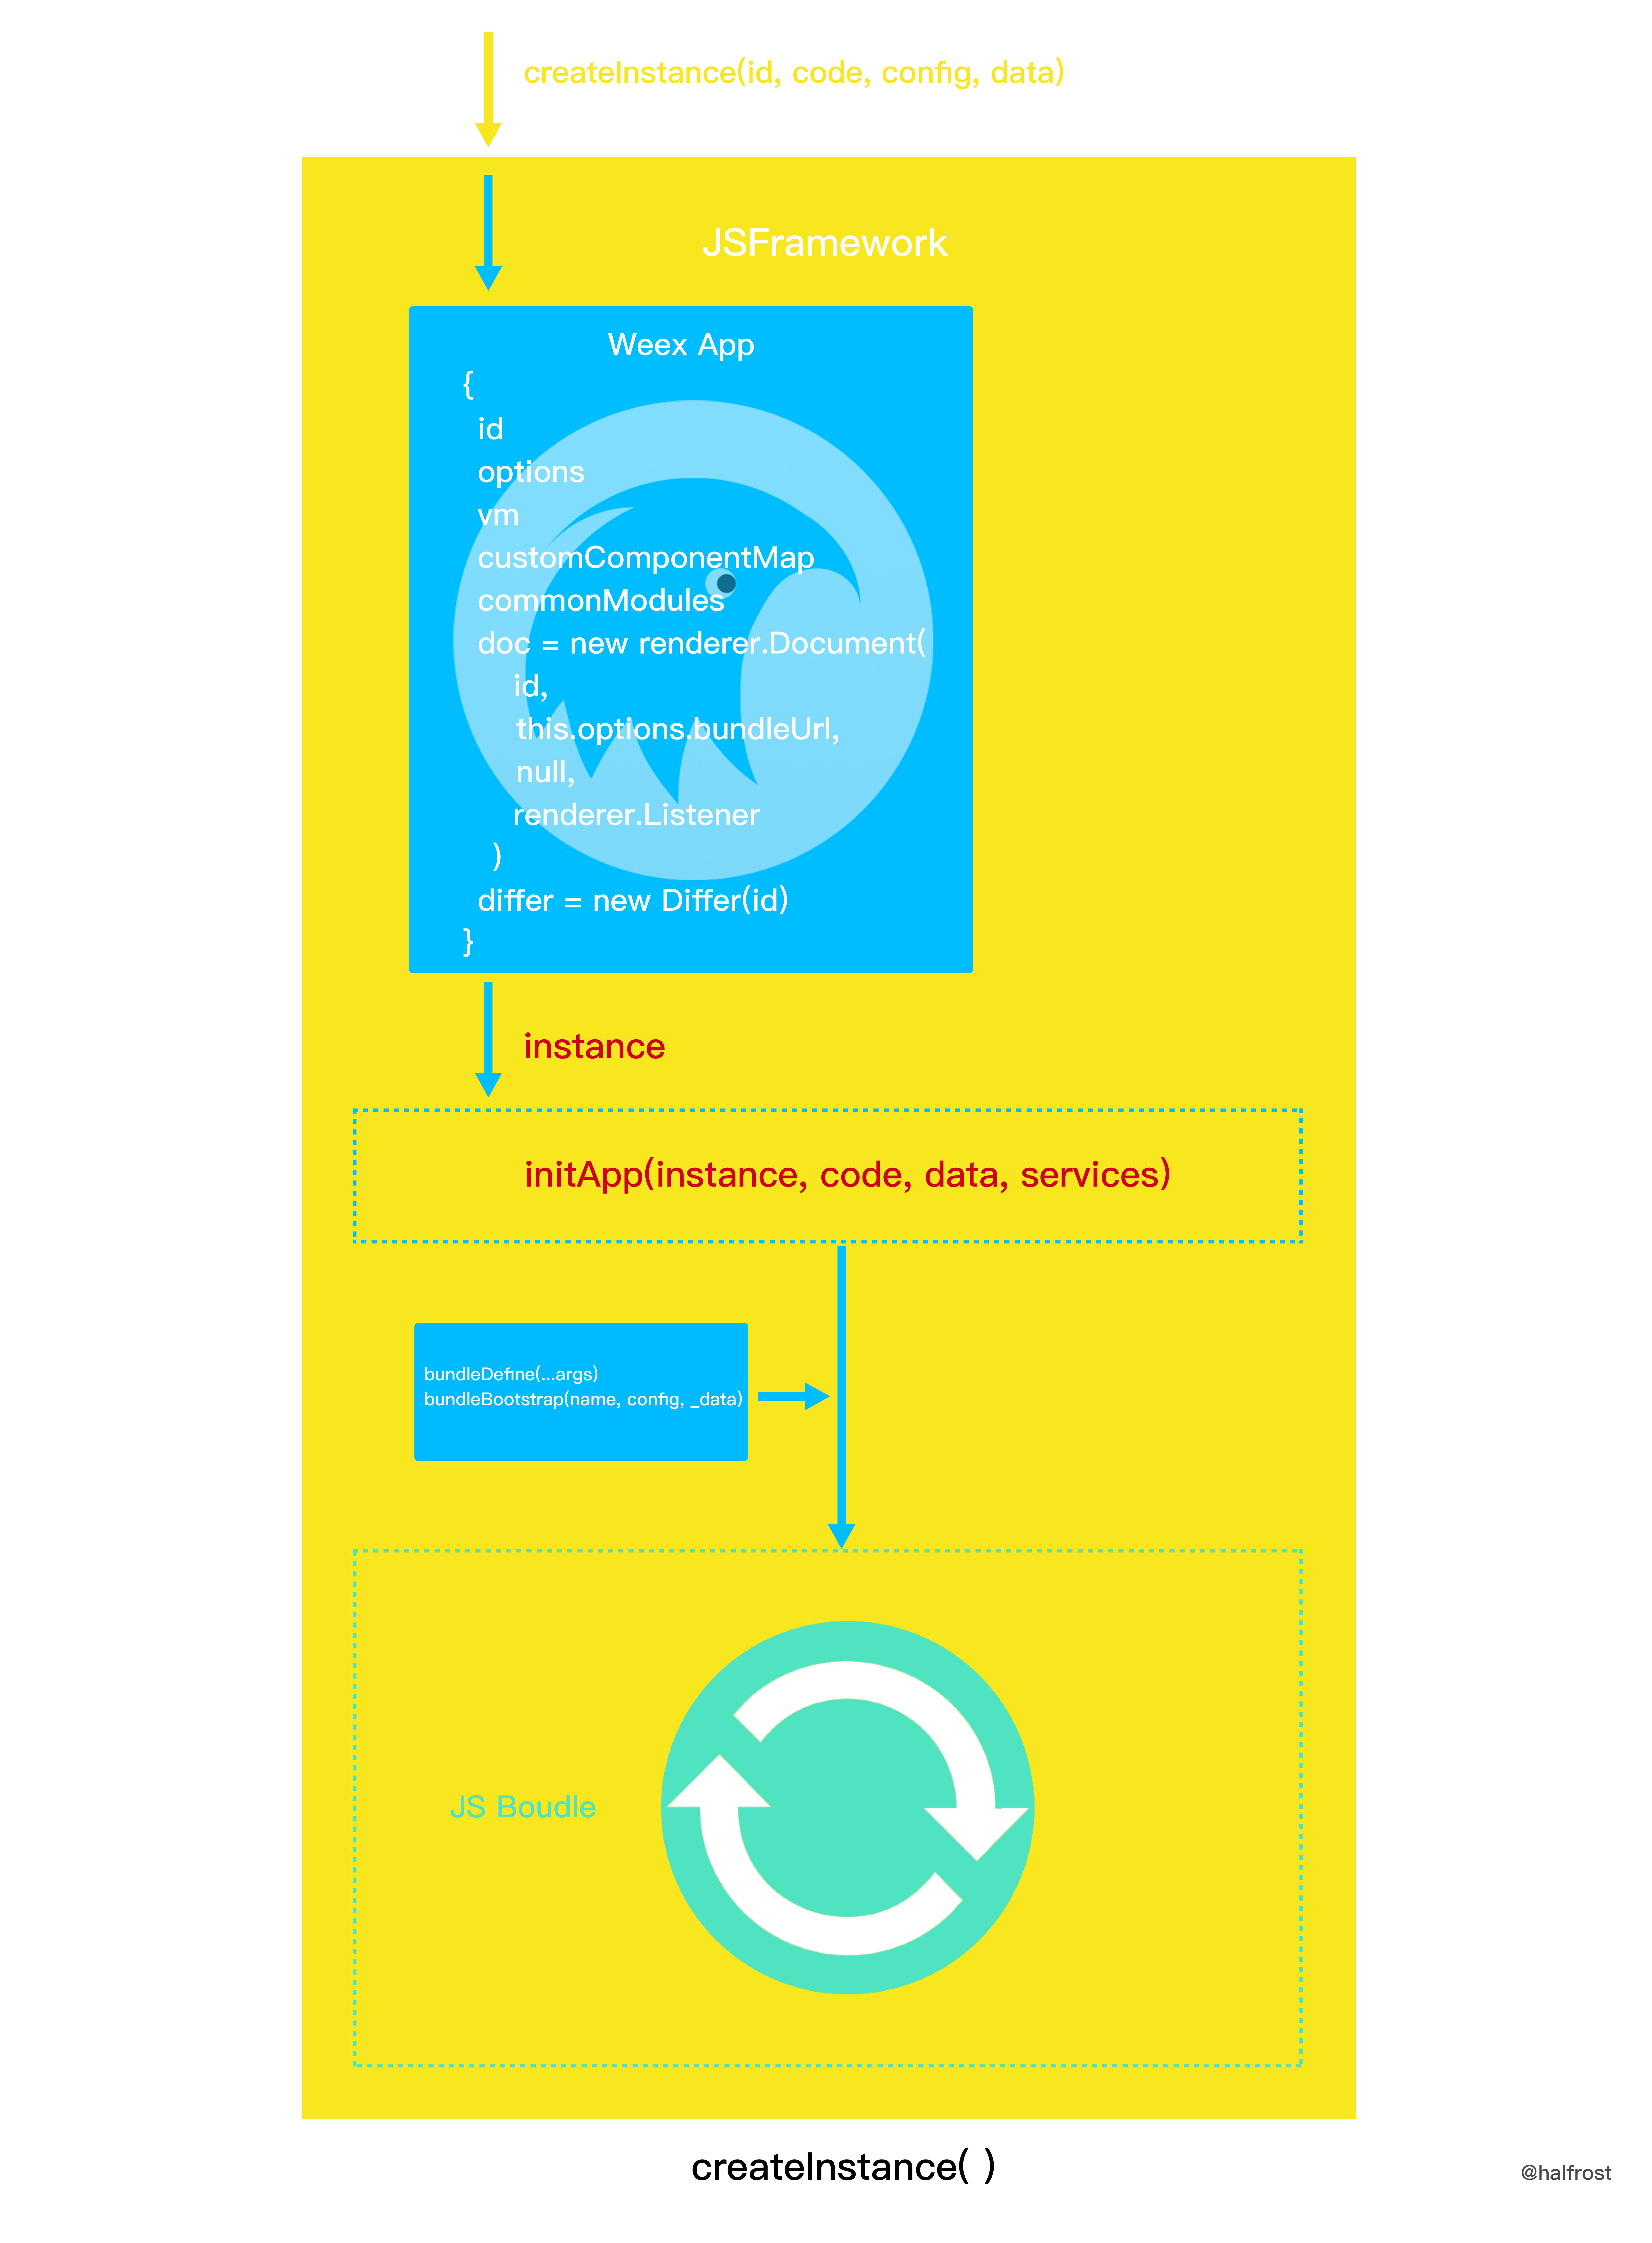
以上就是createInstance做的所有事情,在接收到Native的createInstance调用的时候,先会在JSFramework中新建App实例对象并保存在instanceMap 中。再把5个方法(其中3个方法已经废弃了)传入到new Function( )中。new Function( )会进行JSFramework最重要的事情,将 JS Bundle 转换成 Virtual DOM 发送到原生模块渲染。
三. Weex JS Framework 构建Virtual DOM
构建Virtual DOM的过程就是编译执行JS Boudle的过程。
先给一个实际的JS Boudle的例子,比如如下的代码:
// { "framework": "Weex" }
/******/ (function(modules) { // webpackBootstrap
/******/ 	// The module cache
/******/ 	var installedModules = {};

/******/ 	// The require function
/******/ 	function __webpack_require__(moduleId) {

/******/ 		// Check if module is in cache
/******/ 		if(installedModules[moduleId])
/******/ 			return installedModules[moduleId].exports;

/******/ 		// Create a new module (and put it into the cache)
/******/ 		var module = installedModules[moduleId] = {
/******/ 			exports: {},
/******/ 			id: moduleId,
/******/ 			loaded: false
/******/ 		};

/******/ 		// Execute the module function
/******/ 		modules[moduleId].call(module.exports, module, module.exports, __webpack_require__);

/******/ 		// Flag the module as loaded
/******/ 		module.loaded = true;

/******/ 		// Return the exports of the module
/******/ 		return module.exports;
/******/ 	}


/******/ 	// expose the modules object (__webpack_modules__)
/******/ 	__webpack_require__.m = modules;

/******/ 	// expose the module cache
/******/ 	__webpack_require__.c = installedModules;

/******/ 	// __webpack_public_path__
/******/ 	__webpack_require__.p = "";

/******/ 	// Load entry module and return exports
/******/ 	return __webpack_require__(0);
/******/ })
/************************************************************************/
/******/ ([
/* 0 */
/***/ function(module, exports, __webpack_require__) {

	var __weex_template__ = __webpack_require__(1)
	var __weex_style__ = __webpack_require__(2)
	var __weex_script__ = __webpack_require__(3)

	__weex_define__('@weex-component/916f9ecb075bbff1f4ea98389a4bb514', [], function(__weex_require__, __weex_exports__, __weex_module__) {

	    __weex_script__(__weex_module__, __weex_exports__, __weex_require__)
	    if (__weex_exports__.__esModule && __weex_exports__.default) {
	      __weex_module__.exports = __weex_exports__.default
	    }

	    __weex_module__.exports.template = __weex_template__

	    __weex_module__.exports.style = __weex_style__

	})

	__weex_bootstrap__('@weex-component/916f9ecb075bbff1f4ea98389a4bb514',undefined,undefined)

/***/ },
/* 1 */
/***/ function(module, exports) {

	module.exports = {
	  "type": "div",
	  "classList": [
	    "container"
	  ],
	  "children": [
	    {
	      "type": "image",
	      "attr": {
	        "src": "http://9.pic.paopaoche.net/up/2016-7/201671315341.png"
	      },
	      "classList": [
	        "pic"
	      ],
	      "events": {
	        "click": "picClick"
	      }
	    },
	    {
	      "type": "text",
	      "classList": [
	        "text"
	      ],
	      "attr": {
	        "value": function () {return this.title}
	      }
	    }
	  ]
	}

/***/ },
/* 2 */
/***/ function(module, exports) {

	module.exports = {
	  "container": {
	    "alignItems": "center"
	  },
	  "pic": {
	    "width": 200,
	    "height": 200
	  },
	  "text": {
	    "fontSize": 40,
	    "color": "#000000"
	  }
	}

/***/ },
/* 3 */
/***/ function(module, exports) {

	module.exports = function(module, exports, __weex_require__){'use strict';

	module.exports = {
	    data: function () {return {
	        title: 'Hello World',
	        toggle: false
	    }},
	    ready: function ready() {
	        console.log('this.title == ' + this.title);
	        this.title = 'hello Weex';
	        console.log('this.title == ' + this.title);
	    },
	    methods: {
	        picClick: function picClick() {
	            this.toggle = !this.toggle;
	            if (this.toggle) {
	                this.title = '图片被点击';
	            } else {
	                this.title = 'Hello Weex';
	            }
	        }
	    }
	};}
	/* generated by weex-loader */


/***/ }
/******/ ]);
JS Framework拿到JS Boudle以后,会先执行bundleDefine。
export const defineFn = function (app, name, ...args) {
  console.debug(`[JS Framework] define a component ${name}`)

  /*以下代码省略*/
  /*在这个方法里面注册自定义组件和普通的模块*/

}
用户自定义的组件放在app.customComponentMap中。执行完bundleDefine以后调用bundleBootstrap方法。
- define: 用来自定义一个复合组件
- bootstrap: 用来以某个复合组件为根结点渲染页面
bundleDefine会解析代码中的__weex_define__("@weex-component/")定义的component,包含依赖的子组件。并将component记录到customComponentMap[name] = exports数组中,维护组件与组件代码的对应关系。由于会依赖子组件,因此会被多次调用,直到所有的组件都被解析完全。
export function bootstrap (app, name, config, data) {
  console.debug(`[JS Framework] bootstrap for ${name}`)

  // 1. 验证自定义的Component的名字
  let cleanName
  if (isWeexComponent(name)) {
    cleanName = removeWeexPrefix(name)
  }
  else if (isNpmModule(name)) {
    cleanName = removeJSSurfix(name)
    // 检查是否通过老的 'define' 方法定义的
    if (!requireCustomComponent(app, cleanName)) {
      return new Error(`It's not a component: ${name}`)
    }
  }
  else {
    return new Error(`Wrong component name: ${name}`)
  }

  // 2. 验证 configuration
  config = isPlainObject(config) ? config : {}
  // 2.1 transformer的版本检查
  if (typeof config.transformerVersion === 'string' &&
    typeof global.transformerVersion === 'string' &&
    !semver.satisfies(config.transformerVersion,
      global.transformerVersion)) {
    return new Error(`JS Bundle version: ${config.transformerVersion} ` +
      `not compatible with ${global.transformerVersion}`)
  }
  // 2.2 降级版本检查
  const downgradeResult = downgrade.check(config.downgrade)

  if (downgradeResult.isDowngrade) {
    app.callTasks([{
      module: 'instanceWrap',
      method: 'error',
      args: [
        downgradeResult.errorType,
        downgradeResult.code,
        downgradeResult.errorMessage
      ]
    }])
    return new Error(`Downgrade[${downgradeResult.code}]: ${downgradeResult.errorMessage}`)
  }

  // 设置 viewport
  if (config.viewport) {
    setViewport(app, config.viewport)
  }

  // 3. 新建一个新的自定义的Component组件名字和数据的viewModel
  app.vm = new Vm(cleanName, null, { _app: app }, null, data)
}
bootstrap方法会在Native本地日志记录:
[JS Framework] bootstrap for @weex-component/677c57764d82d558f236d5241843a2a2(此处的编号是举一个例子)
bootstrap方法的作用是校验参数和环境信息,如果不符合当前条件,会触发页面降级,(也可以手动进行,比如Native出现问题了,降级到H5)。最后会根据Component新建对应的viewModel。
export default function Vm (
  type,
  options,
  parentVm,
  parentEl,
  mergedData,
  externalEvents
) {
  /*省略部分代码*/
  // 初始化
  this._options = options
  this._methods = options.methods || {}
  this._computed = options.computed || {}
  this._css = options.style || {}
  this._ids = {}
  this._vmEvents = {}
  this._childrenVms = []
  this._type = type

  // 绑定事件和生命周期
  initEvents(this, externalEvents)

  console.debug(`[JS Framework] "init" lifecycle in
  Vm(${this._type})`)
  this.$emit('hook:init')
  this._inited = true

  // 绑定数据到viewModel上
  this._data = typeof data === 'function' ? data() : data
  if (mergedData) {
    extend(this._data, mergedData)
  }
  initState(this)

  console.debug(`[JS Framework] "created" lifecycle in Vm(${this._type})`)
  this.$emit('hook:created')
  this._created = true

  // backward old ready entry
  if (options.methods && options.methods.ready) {
    console.warn('"exports.methods.ready" is deprecated, ' +
      'please use "exports.created" instead')
    options.methods.ready.call(this)
  }

  if (!this._app.doc) {
    return
  }

  // 如果没有parentElement,那么就指定为documentElement
  this._parentEl = parentEl || this._app.doc.documentElement
  // 构建模板
  build(this)
}
上述代码就是关键的新建viewModel的代码,在这个函数中,如果正常运行完,会在Native记录下两条日志信息:
[JS Framework] "init" lifecycle in Vm(677c57764d82d558f236d5241843a2a2)  [;
[JS Framework] "created" lifecycle in Vm(677c57764d82d558f236d5241843a2a2)  [;
同时干了三件事情:
- initEvents 初始化事件和生命周期
- initState 实现数据绑定功能
- build模板并绘制 Native UI
1. initEvents 初始化事件和生命周期
export function initEvents (vm, externalEvents) {
  const options = vm._options || {}
  const events = options.events || {}
  for (const type1 in events) {
    vm.$on(type1, events[type1])
  }
  for (const type2 in externalEvents) {
    vm.$on(type2, externalEvents[type2])
  }
  LIFE_CYCLE_TYPES.forEach((type) => {
    vm.$on(`hook:${type}`, options[type])
  })
}
在initEvents方法里面会监听三类事件:
- 组件options里面定义的事情
- 一些外部的事件externalEvents
- 还要绑定生命周期的hook钩子
const LIFE_CYCLE_TYPES = ['init', 'created', 'ready', 'destroyed']
生命周期的钩子包含上述4种,init,created,ready,destroyed。
$on方法是增加事件监听者listener的。$emit方式是用来执行方法的,但是不进行dispatch和broadcast。$dispatch方法是派发事件,沿着父类往上传递。$broadcast方法是广播事件,沿着子类往下传递。$off方法是移除事件监听者listener。
事件object的定义如下:
function Evt (type, detail) {
  if (detail instanceof Evt) {
    return detail
  }

  this.timestamp = Date.now()
  this.detail = detail
  this.type = type

  let shouldStop = false
  this.stop = function () {
    shouldStop = true
  }
  this.hasStopped = function () {
    return shouldStop
  }
}
每个组件的事件包含事件的object,事件的监听者,事件的emitter,生命周期的hook钩子。
initEvents的作用就是对当前的viewModel绑定上上述三种事件的监听者listener。
2. initState 实现数据绑定功能
export function initState (vm) {
  vm._watchers = []
  initData(vm)
  initComputed(vm)
  initMethods(vm)
}
- initData,设置 proxy,监听 _data 中的属性;然后添加 reactiveGetter & reactiveSetter 实现数据监听。 (
- initComputed,初始化计算属性,只有 getter,在 _data 中没有对应的值。
- initMethods 将 _method 中的方法挂在实例上。
export function initData (vm) {
  let data = vm._data

  if (!isPlainObject(data)) {
    data = {}
  }
  // proxy data on instance
  const keys = Object.keys(data)
  let i = keys.length
  while (i--) {
    proxy(vm, keys[i])
  }
  // observe data
  observe(data, vm)
}
在initData方法里面最后一步会进行data的observe。
数据绑定的核心思想是基于 ES5 的 Object.defineProperty 方法,在 vm 实例上创建了一系列的 getter / setter,支持数组和深层对象,在设置属性值的时候,会派发更新事件。
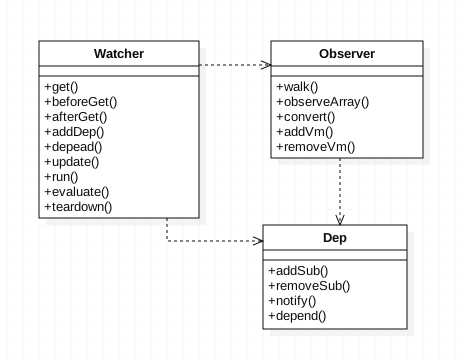
这块数据绑定的思想,一部分是借鉴了Vue的实现,这块打算以后写篇文章专门谈谈。
3. build模板
export function build (vm) {
  const opt = vm._options || {}
  const template = opt.template || {}

  if (opt.replace) {
    if (template.children && template.children.length === 1) {
      compile(vm, template.children[0], vm._parentEl)
    }
    else {
      compile(vm, template.children, vm._parentEl)
    }
  }
  else {
    compile(vm, template, vm._parentEl)
  }

  console.debug(`[JS Framework] "ready" lifecycle in Vm(${vm._type})`)
  vm.$emit('hook:ready')
  vm._ready = true
}
build构建思路如下:
compile(template, parentNode)
- 如果 type 是 content ,就创建contentNode。
- 否则 如果含有 v-for 标签, 那么就循环遍历,创建context,继续compile(templateWithoutFor, parentNode)
- 否则 如果含有 v-if 标签,继续compile(templateWithoutIf, parentNode)
- 否则如果 type 是 dynamic ,继续compile(templateWithoutDynamicType, parentNode)
- 否则如果 type 是 custom ,那么调用addChildVm(vm, parentVm),build(externalDirs),遍历子节点,然后再compile(childNode, template)
- 最后如果 type 是 Native ,更新(id/attr/style/class),append(template, parentNode),遍历子节点,compile(childNode, template)
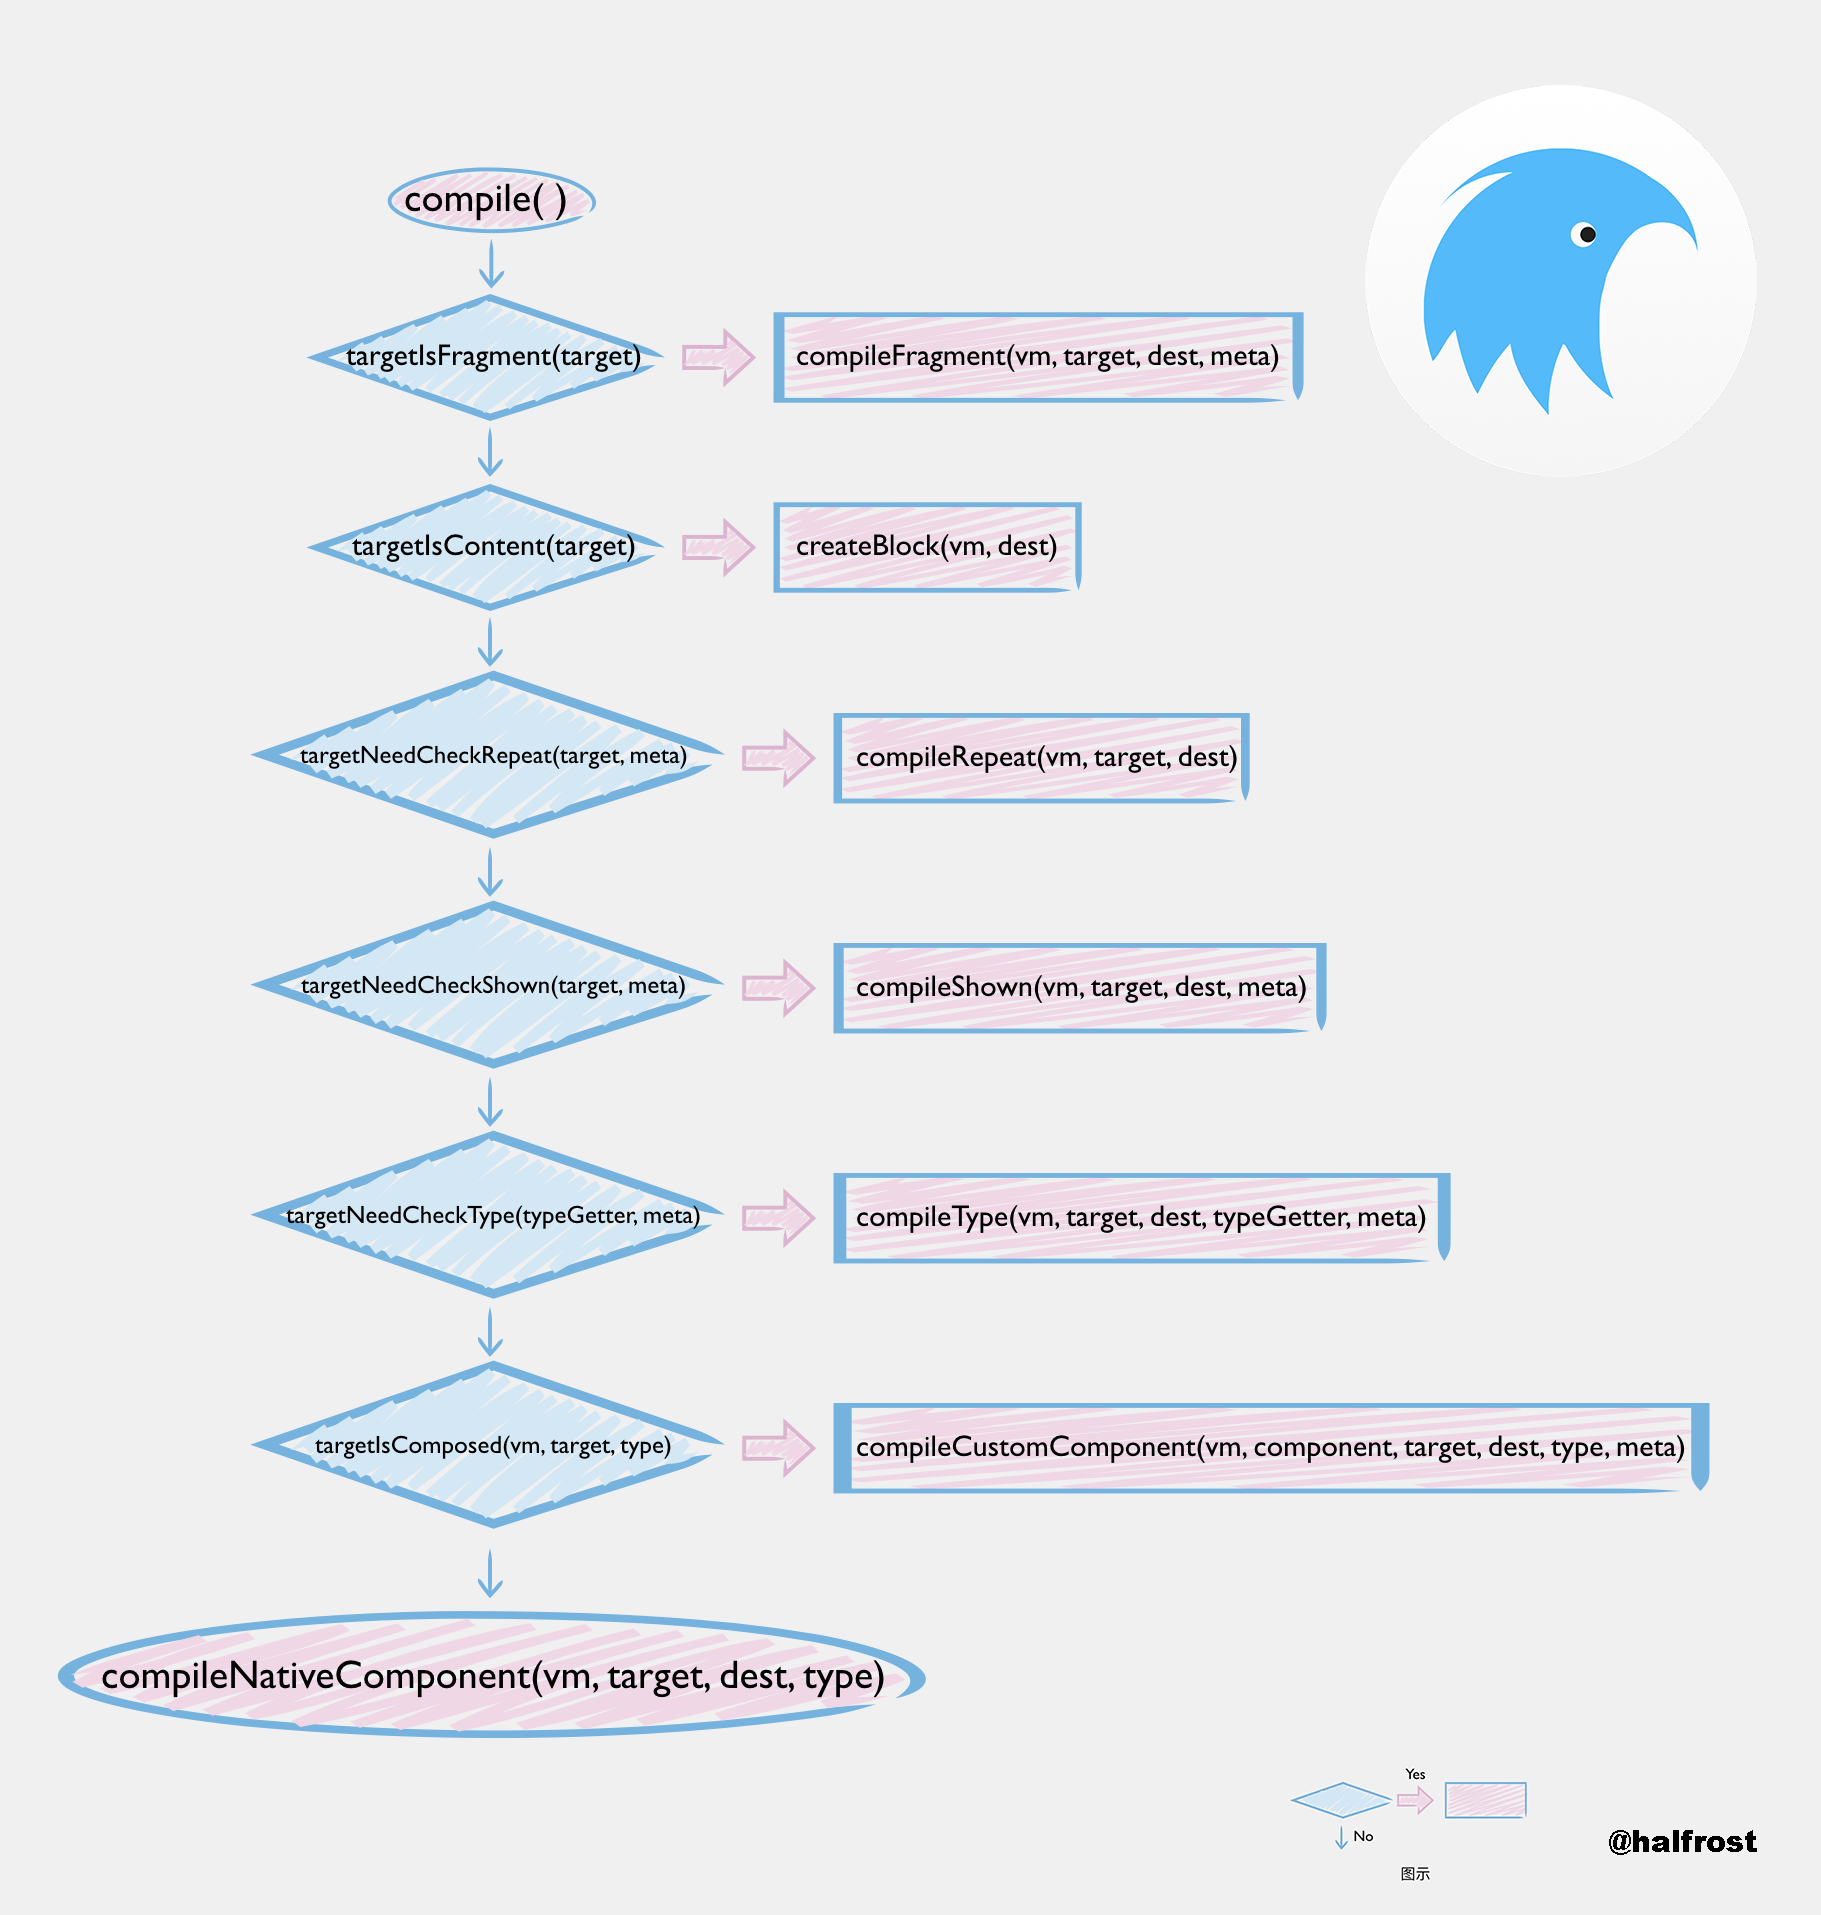
在上述一系列的compile方法中,有4个参数,
- vm: 待编译的 Vm 对象。
- target: 待编译的节点,是模板中的标签经过 transformer 转换后的结构。
- dest: 当前节点父节点的 Virtual DOM。
- meta: 元数据,在内部调用时可以用来传递数据。
编译的方法也分为以下7种:
- compileFragment 编译多个节点,创建 Fragment 片段。
- compileBlock 创建特殊的Block。
- compileRepeat 编译 repeat 指令,同时会执行数据绑定,在数据变动时会触发 DOM 节点的更新。
- compileShown 编译 if 指令,也会执行数据绑定。
- compileType 编译动态类型的组件。
- compileCustomComponent 编译展开用户自定义的组件,这个过程会递归创建子 vm,并且绑定父子关系,也会触发子组件的生命周期函数。
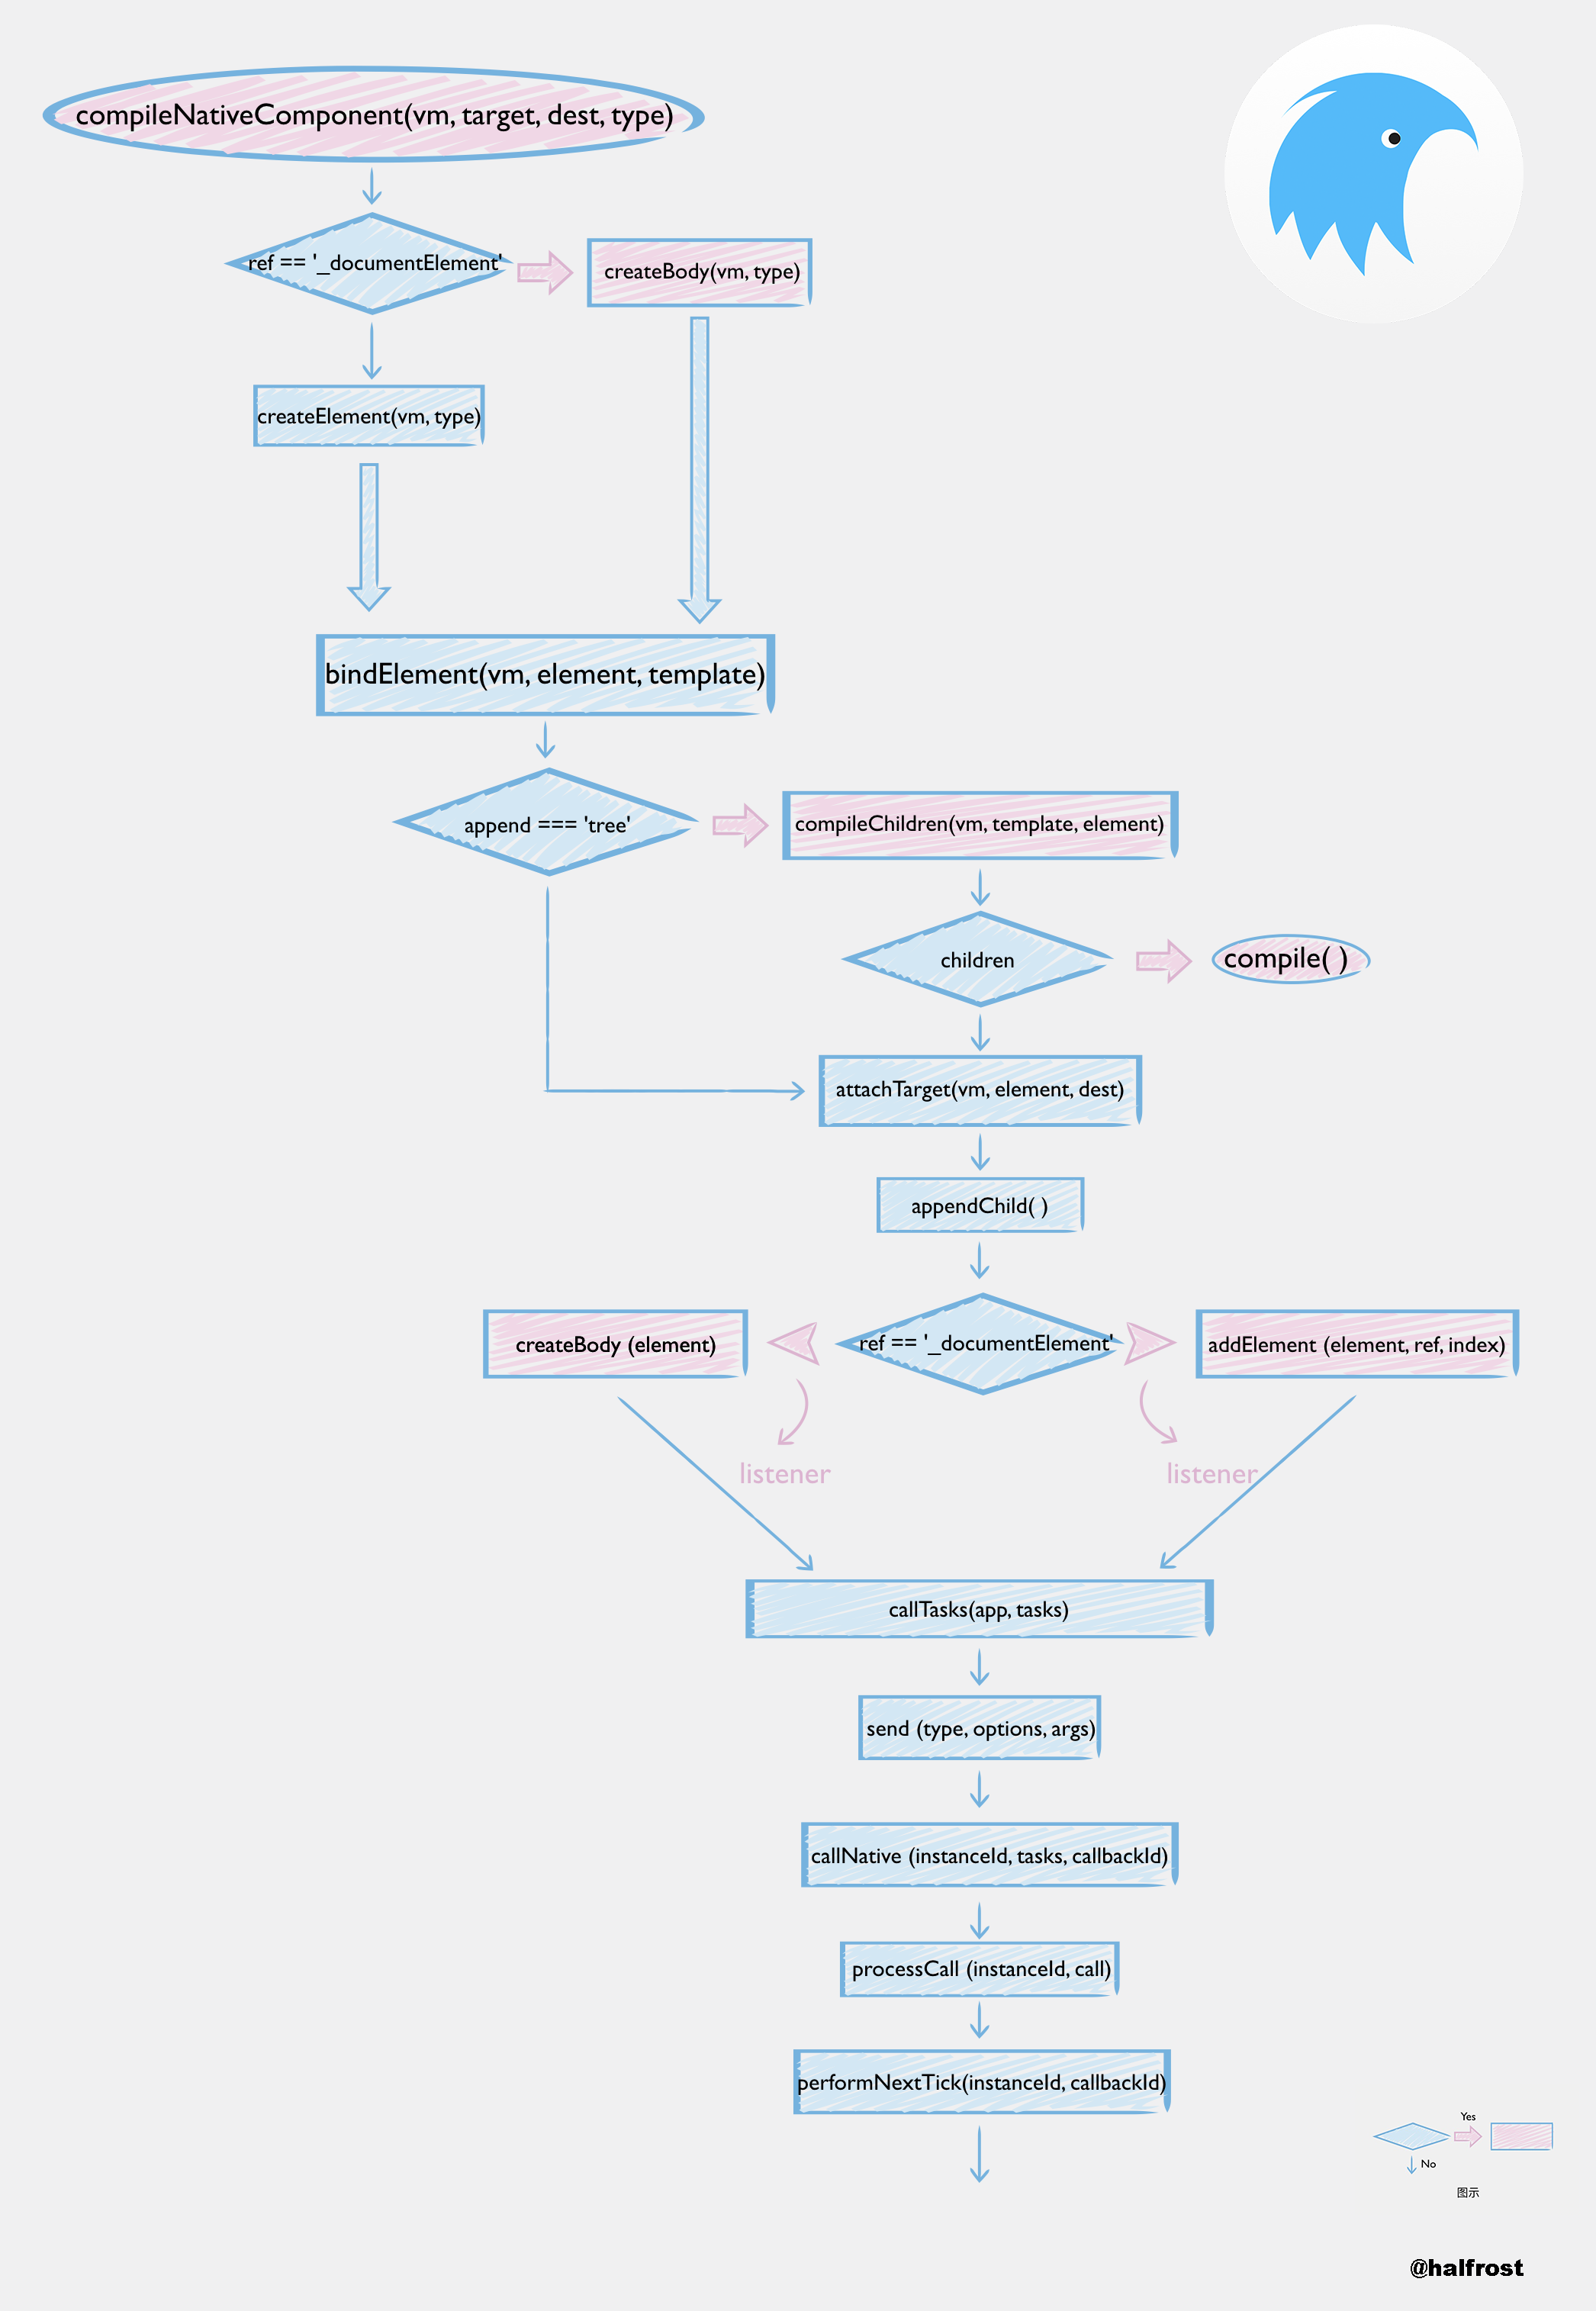
- compileNativeComponent 编译内置原生组件。这个方法会调用 createBody 或 createElement 与原生模块通信并创建 Native UI。
上述7个方法里面,除了compileBlock和compileNativeComponent以外的5个方法,都会递归调用。
编译好模板以后,原来的JS Boudle就都被转变成了类似Json格式的 Virtual DOM 了。下一步开始绘制Native UI。
4. 绘制 Native UI
绘制Native UI的核心方法就是compileNativeComponent (vm, template, dest, type)。
compileNativeComponent的核心实现如下:
function compileNativeComponent (vm, template, dest, type) {
  applyNaitveComponentOptions(template)

  let element
  if (dest.ref === '_documentElement') {
    // if its parent is documentElement then it's a body
    console.debug(`[JS Framework] compile to create body for ${type}`)
    // 构建DOM根
    element = createBody(vm, type)
  }
  else {
    console.debug(`[JS Framework] compile to create element for ${type}`)
    // 添加元素
    element = createElement(vm, type)
  }

  if (!vm._rootEl) {
    vm._rootEl = element
    // bind event earlier because of lifecycle issues
    const binding = vm._externalBinding || {}
    const target = binding.template
    const parentVm = binding.parent
    if (target && target.events && parentVm && element) {
      for (const type in target.events) {
        const handler = parentVm[target.events[type]]
        if (handler) {
          element.addEvent(type, bind(handler, parentVm))
        }
      }
    }
  }

  bindElement(vm, element, template)

  if (template.attr && template.attr.append) { // backward, append prop in attr
    template.append = template.attr.append
  }

  if (template.append) { // give the append attribute for ios adaptation
    element.attr = element.attr || {}
    element.attr.append = template.append
  }

  const treeMode = template.append === 'tree'
  const app = vm._app || {}
  if (app.lastSignal !== -1 && !treeMode) {
    console.debug('[JS Framework] compile to append single node for', element)
    app.lastSignal = attachTarget(vm, element, dest)
  }
  if (app.lastSignal !== -1) {
    compileChildren(vm, template, element)
  }
  if (app.lastSignal !== -1 && treeMode) {
    console.debug('[JS Framework] compile to append whole tree for', element)
    app.lastSignal = attachTarget(vm, element, dest)
  }
}
绘制Native的UI会先绘制DOM的根,然后绘制上面的子孩子元素。子孩子需要递归判断,如果还有子孩子,还需要继续进行之前的compile的流程。
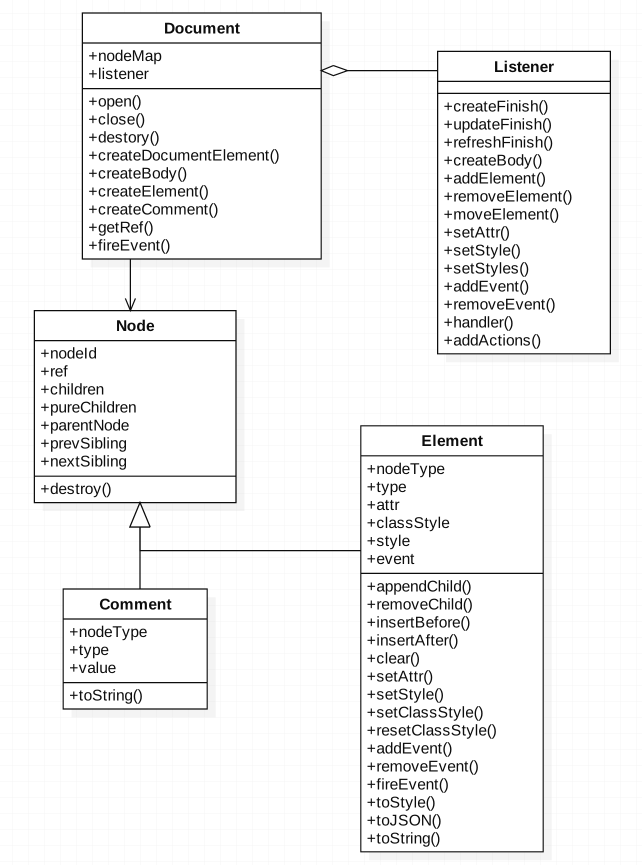
每个 Document 对象中都会包含一个 listener 属性,它可以向 Native 端发送消息,每当创建元素或者是有更新操作时,listener 就会拼装出制定格式的 action,并且最终调用 callNative 把 action 传递给原生模块,原生模块中也定义了相应的方法来执行 action 。
例如当某个元素执行了 element.appendChild() 时,就会调用 listener.addElement(),然后就会拼成一个类似Json格式的数据,再调用callTasks方法。
export function callTasks (app, tasks) {
  let result

  /* istanbul ignore next */
  if (typof(tasks) !== 'array') {
    tasks = [tasks]
  }

  tasks.forEach(task => {
    result = app.doc.taskCenter.send(
      'module',
      {
        module: task.module,
        method: task.method
      },
      task.args
    )
  })

  return result
}
在上述方法中会继续调用在html5/runtime/task-center.js中的send方法。
send (type, options, args) {
    const { action, component, ref, module, method } = options

    args = args.map(arg => this.normalize(arg))

    switch (type) {
      case 'dom':
        return this[action](this.instanceId, args)
      case 'component':
        return this.componentHandler(this.instanceId, ref, method, args, { component })
      default:
        return this.moduleHandler(this.instanceId, module, method, args, {})
    }
  }
这里存在有2个handler,它们的实现是之前传进来的sendTasks方法。
const config = {
  Document, Element, Comment, Listener,
  TaskCenter,
  sendTasks (...args) {
    return global.callNative(...args)
  }
}
sendTasks方法最终会调用callNative,调用本地原生的UI进行绘制。
四. Weex JS Framework 处理Native触发的事件
最后来看看Weex JS Framework是如何处理Native传递过来的事件的。
在html5/framework/legacy/static/bridge.js里面对应的是Native的传递过来的事件处理方法。
const jsHandlers = {
  fireEvent: (id, ...args) => {
    return fireEvent(instanceMap[id], ...args)
  },
  callback: (id, ...args) => {
    return callback(instanceMap[id], ...args)
  }
}

/**
 * 接收来自Native的事件和回调
 */
export function receiveTasks (id, tasks) {
  const instance = instanceMap[id]
  if (instance && Array.isArray(tasks)) {
    const results = []
    tasks.forEach((task) => {
      const handler = jsHandlers[task.method]
      const args = [...task.args]
      /* istanbul ignore else */
      if (typeof handler === 'function') {
        args.unshift(id)
        results.push(handler(...args))
      }
    })
    return results
  }
  return new Error(`invalid instance id "${id}" or tasks`)
}
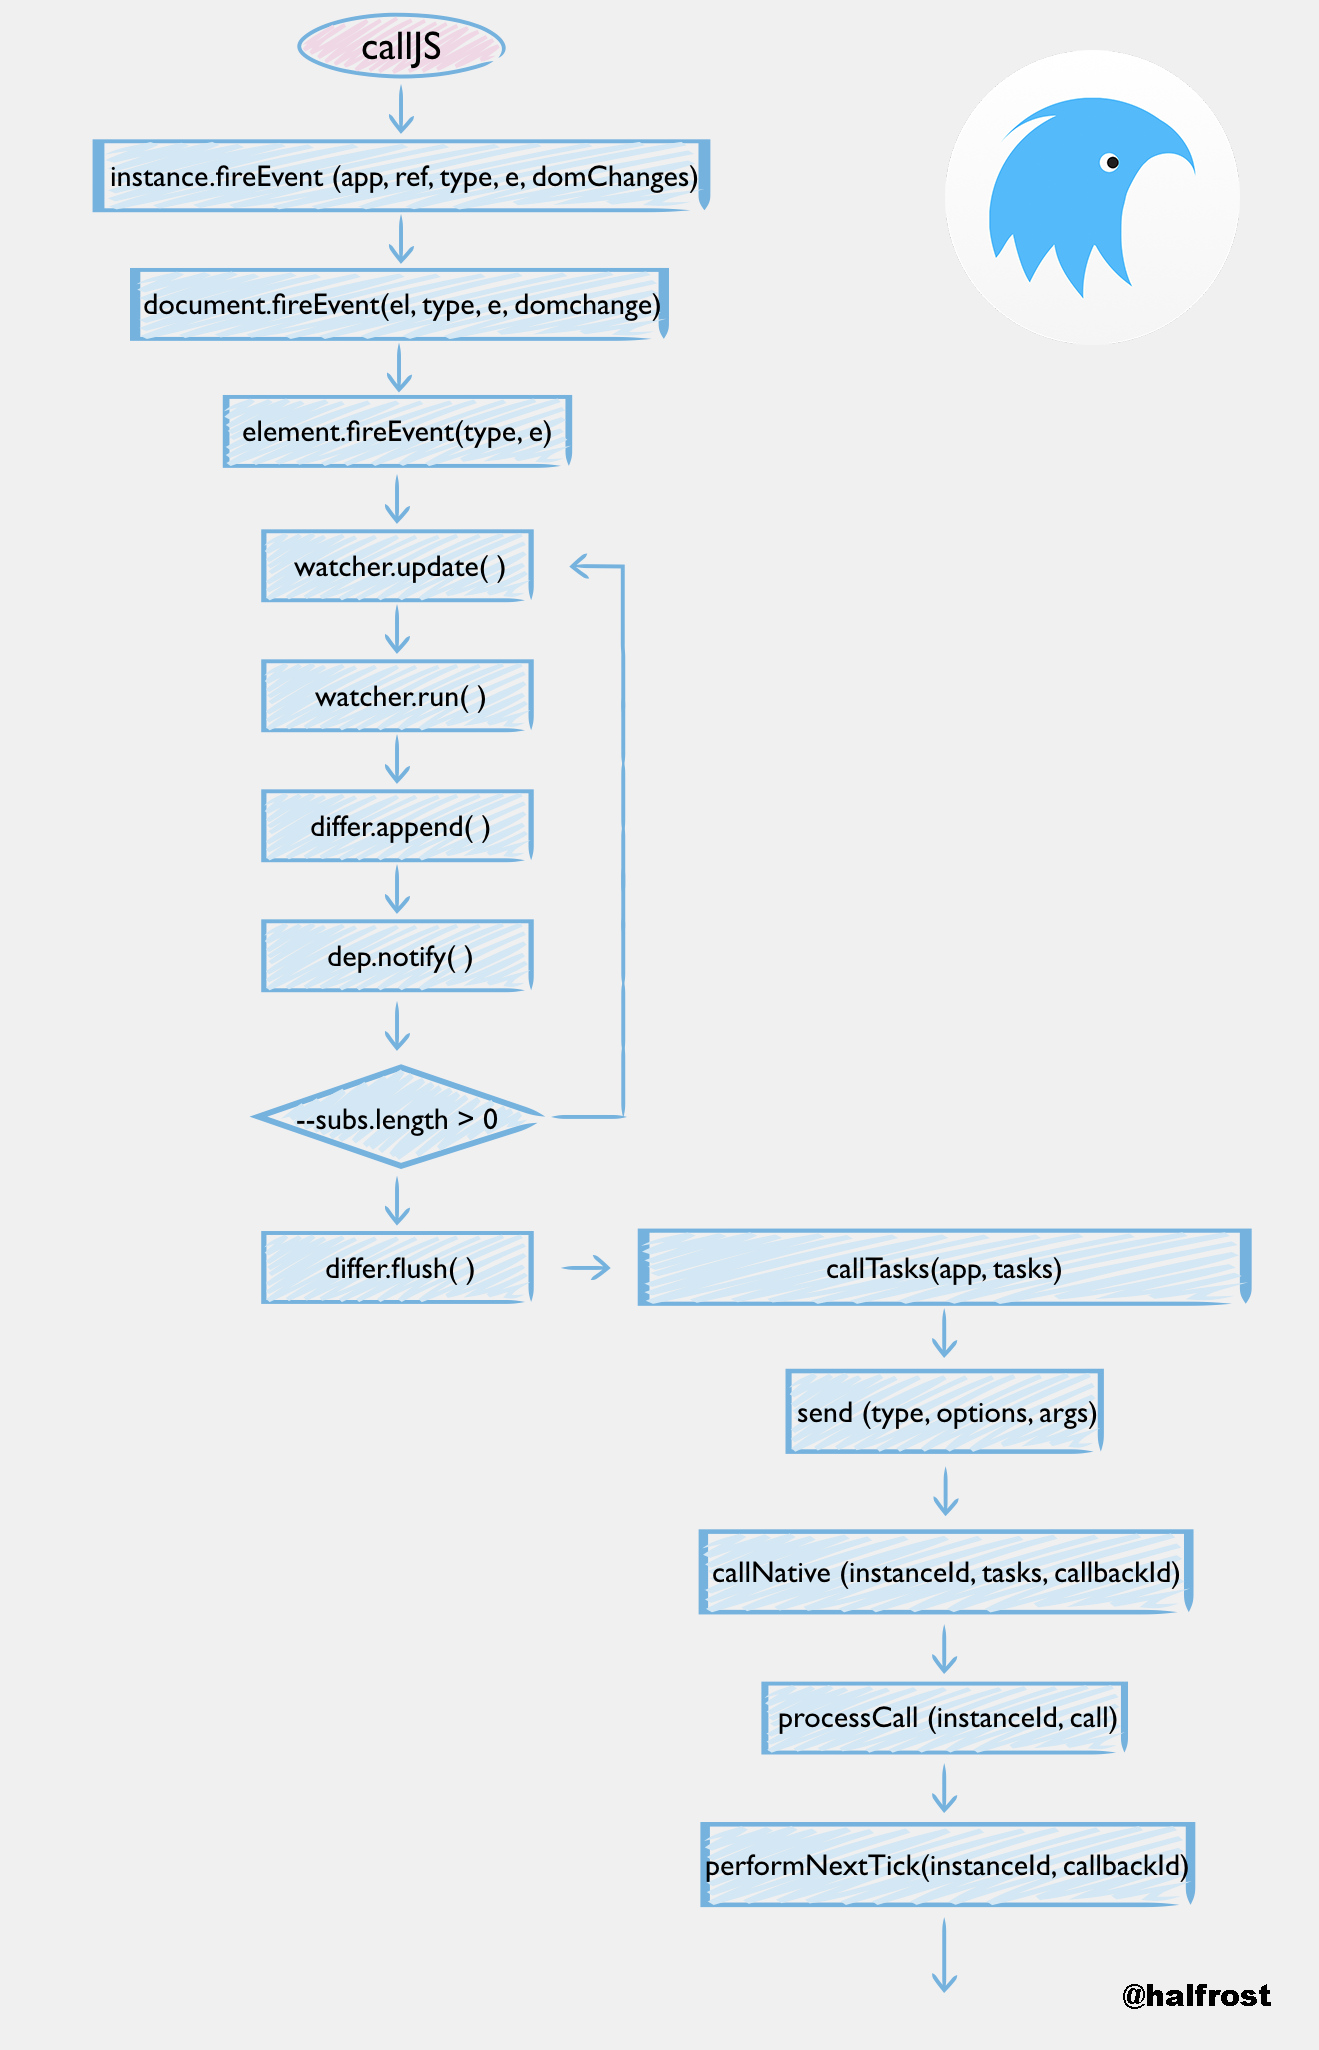
在Weex 每个instance实例里面都包含有一个callJS的全局方法,当本地调用了callJS这个方法以后,会调用receiveTasks方法。
关于Native会传递过来哪些事件,可以看这篇文章《Weex 事件传递的那些事儿》
在jsHandler里面封装了fireEvent和callback方法,这两个方法在html5/frameworks/legacy/app/ctrl/misc.js方法中。
export function fireEvent (app, ref, type, e, domChanges) {
  console.debug(`[JS Framework] Fire a "${type}" event on an element(${ref}) in instance(${app.id})`)
  if (Array.isArray(ref)) {
    ref.some((ref) => {
      return fireEvent(app, ref, type, e) !== false
    })
    return
  }
  const el = app.doc.getRef(ref)
  if (el) {
    const result = app.doc.fireEvent(el, type, e, domChanges)
    app.differ.flush()
    app.doc.taskCenter.send('dom', { action: 'updateFinish' }, [])
    return result
  }
  return new Error(`invalid element reference "${ref}"`)
}
fireEvent传递过来的参数包含,事件类型,事件object,是一个元素的ref。如果事件会引起DOM的变化,那么还会带一个参数描述DOM的变化。
在htlm5/frameworks/runtime/vdom/document.js里面
  fireEvent (el, type, e, domChanges) {
    if (!el) {
      return
    }
    e = e || {}
    e.type = type
    e.target = el
    e.timestamp = Date.now()
    if (domChanges) {
      updateElement(el, domChanges)
    }
    return el.fireEvent(type, e)
  }
这里可以发现,其实对DOM的更新是单独做的,然后接着把事件继续往下传,传给element。
接着在htlm5/frameworks/runtime/vdom/element.js里面
  fireEvent (type, e) {
    const handler = this.event[type]
    if (handler) {
      return handler.call(this, e)
    }
  }
最终事件在这里通过handler的call方法进行调用。
当有数据发生变化的时候,会触发watcher的数据监听,当前的value和oldValue比较。先会调用watcher的update方法。
Watcher.prototype.update = function (shallow) {
  if (this.lazy) {
    this.dirty = true
  } else {
    this.run()
  }
update方法里面会调用run方法。
Watcher.prototype.run = function () {
  if (this.active) {
    const value = this.get()
    if (
      value !== this.value ||
      // Deep watchers and watchers on Object/Arrays should fire even
      // when the value is the same, because the value may
      // have mutated; but only do so if this is a
      // non-shallow update (caused by a vm digest).
      ((isObject(value) || this.deep) && !this.shallow)
    ) {
      // set new value
      const oldValue = this.value
      this.value = value
      this.cb.call(this.vm, value, oldValue)
    }
    this.queued = this.shallow = false
  }
}
run方法之后会触发differ,dep会通知所有相关的子视图的改变。
Dep.prototype.notify = function () {
  const subs = this.subs.slice()
  for (let i = 0, l = subs.length; i < l; i++) {
    subs[i].update()
  }
}
相关联的子视图也会触发update的方法。
还有一种事件是Native通过模块的callback回调传递事件。
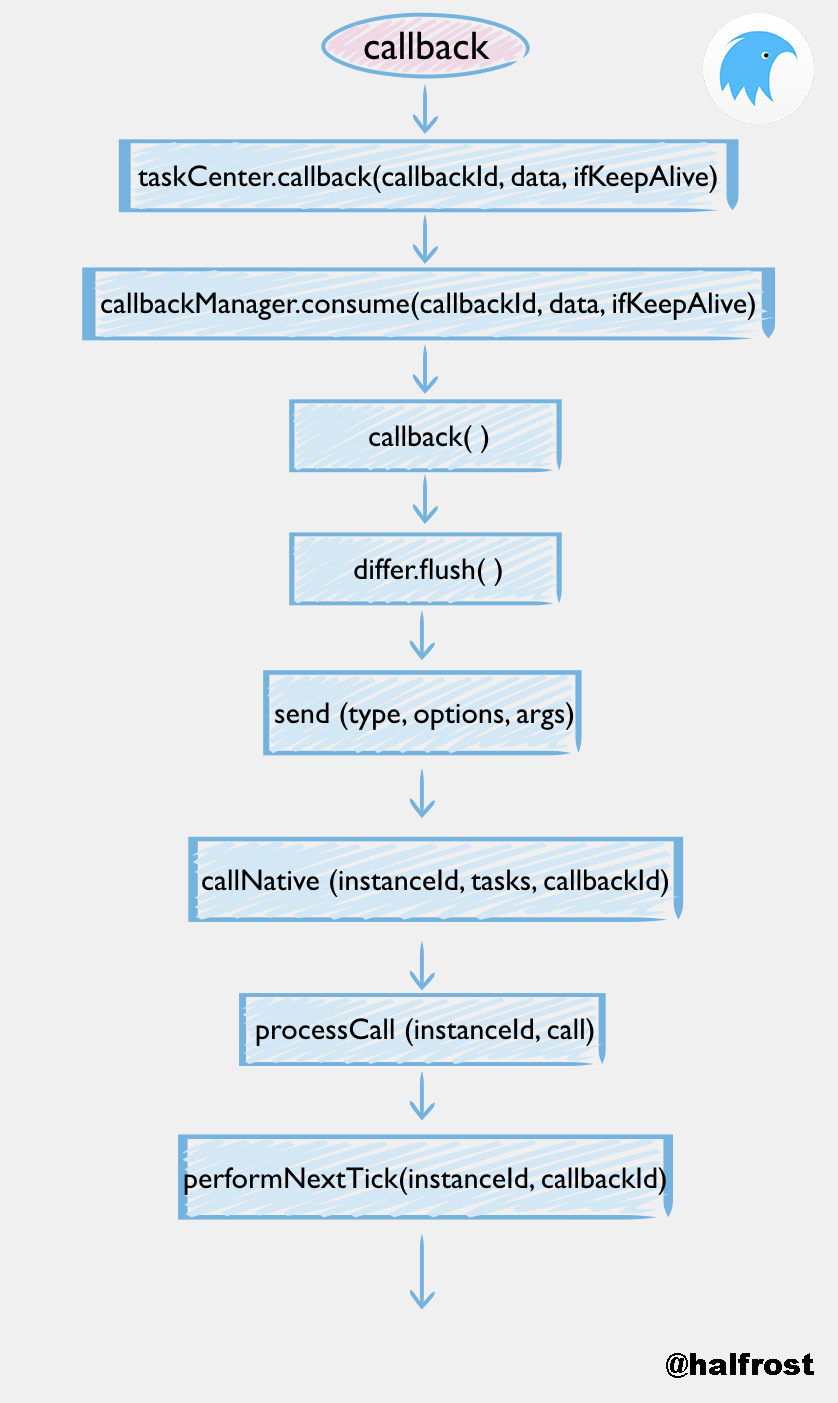
export function callback (app, callbackId, data, ifKeepAlive) {
  console.debug(`[JS Framework] Invoke a callback(${callbackId}) with`, data,
            `in instance(${app.id})`)
  const result = app.doc.taskCenter.callback(callbackId, data, ifKeepAlive)
  updateActions(app)
  app.doc.taskCenter.send('dom', { action: 'updateFinish' }, [])
  return result
}
callback的回调比较简单,taskCenter.callback会调用callbackManager.consume的方法。执行完callback方法以后,接着就是执行differ.flush,最后一步就是回调Native,通知updateFinish。
至此,Weex JS Framework 的三大基本功能都分析完毕了,用一张大图做个总结,描绘它干了哪些事情:

大图点这里
五.Weex JS Framework 未来可能做更多的事情
除了目前官方默认支持的 Vue 2.0,Rax的Framework,还可以支持其他平台的 JS Framework 。Weex还可以支持自己自定义的 JS Framework。只要按照如下的步骤来定制,可以写一套完整的 JS Framework。
- 首先你要有一套完整的 JS Framework。
- 了解 Weex 的 JS 引擎的特性支持情况。
- 适配 Weex 的 native DOM APIs。
- 适配 Weex 的初始化入口和多实例管理机制。
- 在 Weex JS runtime 的 framework 配置中加入自己的 JS Framework 然后打包。
- 基于该 JS Framework 撰写 JS bundle,并加入特定的前缀注释,以便 Weex JS runtime 能够正确识别。
如果经过上述的步骤进行扩展以后,可以出现如下的代码:
import * as Vue from '...'
import * as React from '...'
import * as Angular from '...'
export default { Vue, React, Angular };
这样可以支持Vue,React,Angular。
如果在 JS Bundle 在文件开头带有如下格式的注释:
// { "framework": "Vue" }
...
这样 Weex JS 引擎就会识别出这个 JS bundle 需要用 Vue 框架来解析。并分发给 Vue 框架处理。
这样每个 JS Framework,只要:
- 封装了这几个接口。
- 给自己的 JS Bundle 第一行写好特殊格式的注释,Weex 就可以正常的运行基于各种 JS Framework 的页面了。
Weex 支持同时多种框架在一个移动应用中共存并各自解析基于不同框架的 JS bundle。
这一块笔者暂时还没有实践各自解析不同的 JS bundle,相信这部分未来也许可以干很多有趣的事情。
最后

本篇文章把 Weex 在 Native 端的 JS Framework 的工作原理简单的梳理了一遍,中间唯一没有深究的点可能就是 Weex 是 如何 利用 Vue 进行数据绑定的,如何监听数据变化的,这块打算另外开一篇文章详细的分析一下。到此篇为止,Weex 在 Native 端的所有源码实现就分析完毕了。
请大家多多指点。
References:
Weex 官方文档
Weex 框架中 JS Framework 的结构
浅析weex之vdom渲染
Native 性能稳定性极致优化
