WWDC 2016 Session Notes - New Notification Features in iOS 10
Preface
At Apple’s WWDC developer conference on June 14 this year, Apple introduced its new iOS system—iOS 10. Apple brought ten major updates to iOS 10. Apple Senior Vice President Craig Federighi called this iOS update “the biggest iOS release ever.”
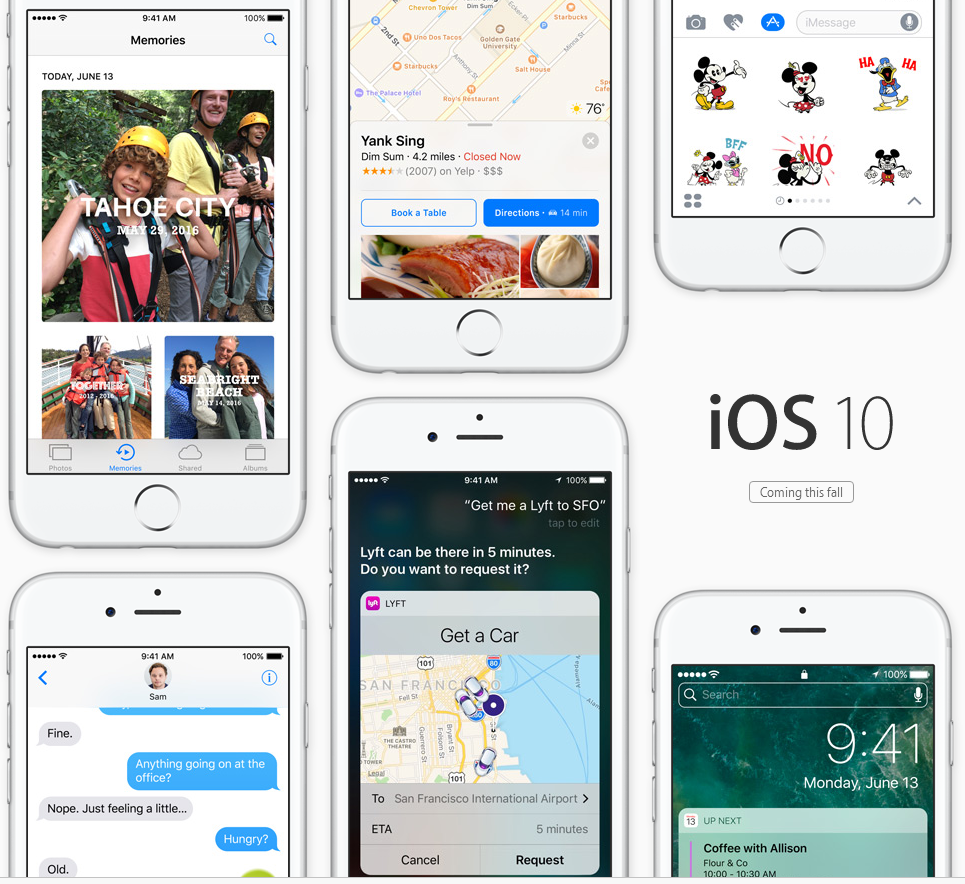
- A new way to view lock-screen notifications: Apple introduced an all-new notification viewing feature in iOS 10. When users raise the iPhone screen, they can see current notifications and updates.
- Apple opens Siri to third-party developers: Users can now have Siri do more, such as sending WeChat messages to their contacts. Apps that Siri can directly support currently include WeChat, WhatsApp, Uber, Didi, Skype, and others.
- Siri will become smarter: Siri will have greater contextual awareness. Based on the user’s location, calendar, contacts, contact addresses, and more, Siri will make intelligent suggestions. Siri will increasingly become an AI assistant with deep-learning capabilities.
- Updates to the Photos app: Based on deep-learning technology, iOS 10 brings significant updates to the Photos app. Photo search in iOS 10 is further improved and can detect new people and scenes. Future iPhones will be able to organize related photos together, such as photos from a trip or a weekend, and automatically edit them. Photos in iOS 10 also adds a new “Memories” tab.
- Apple Maps: Similar to the updates to Siri and Photos, Apple Maps also adds many predictive features. For example, Apple Maps can provide recommendations for nearby restaurants. The Apple Maps interface has also been redesigned to be cleaner, and real-time traffic information has been added. The new Apple Maps will also be integrated into Apple CarPlay, providing users with turn-by-turn navigation. Like Siri, Maps will also be opened to developers.
- Apple Music: The Apple Music interface has been updated. The UI is cleaner, supports multitasking, and adds a recently played list. Apple Music now has 15 million paid subscribers.
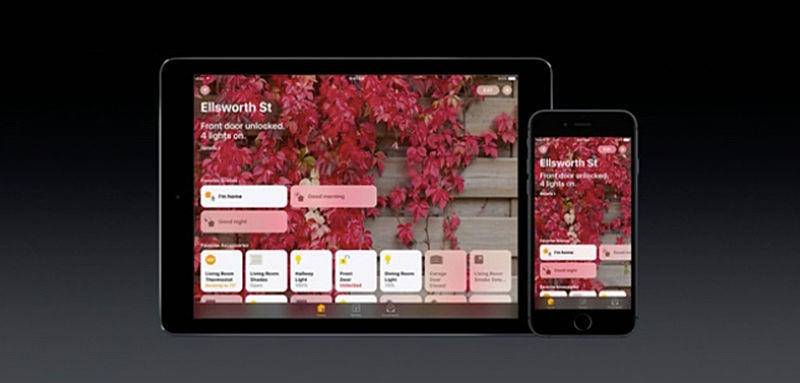
- HomeKit: iOS 10 adds a smart home app, supports one-tap scene modes, and HomeKit can be connected with Siri.
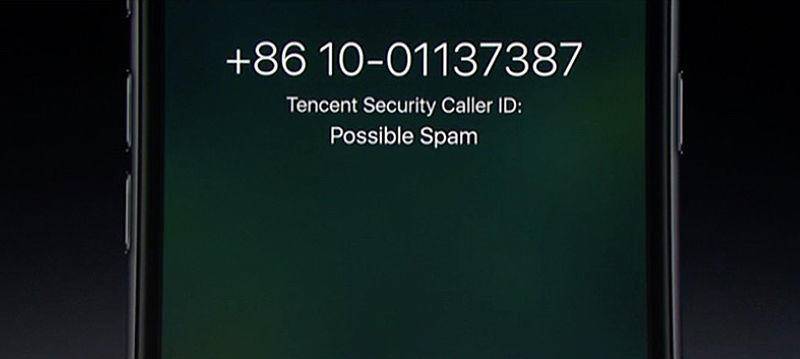
- Apple Phone: Apple updated the Phone feature so that nuisance calls can be identified when they come in.
- iMessage: In iMessage, users can send videos and links directly in the text field and share Live Photos. In addition, Apple added emoji prediction: if the typed text matches an emoji, the relevant emoji will be recommended directly.
The following are my study notes on push notifications, one of the areas that changed significantly in iOS 10.
####Table of Contents
- 1.Notification User Interface
- 2.Media Attachments
- 3.Customize user interface
- 4.Customize Actions
I. Notification User Interface
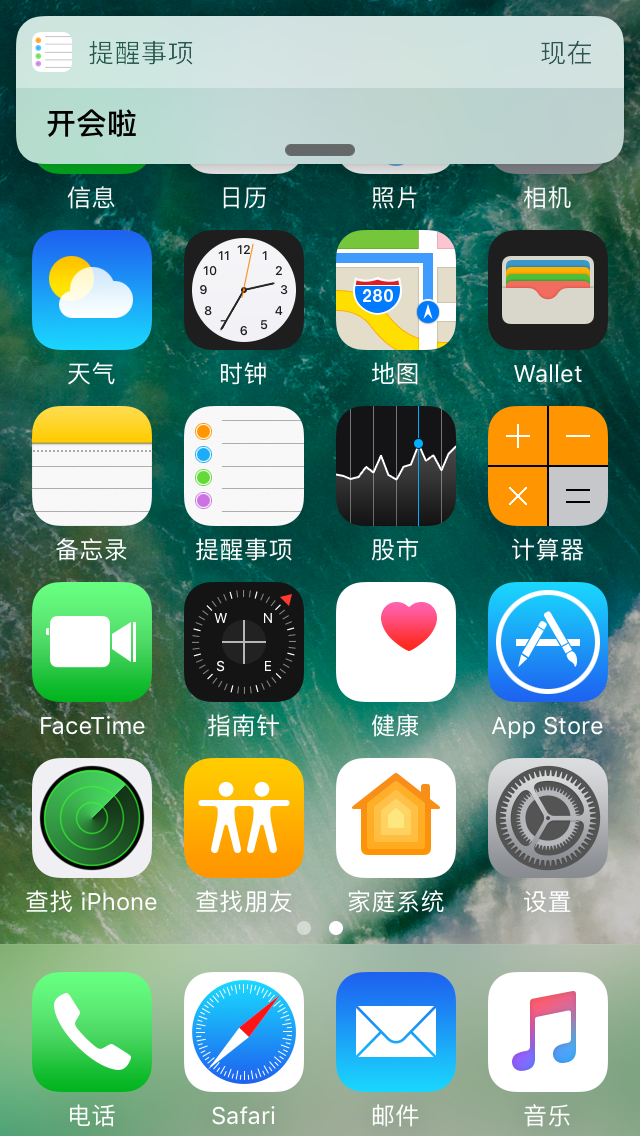
Let’s first look at what user notifications look like in iOS X, as shown below.
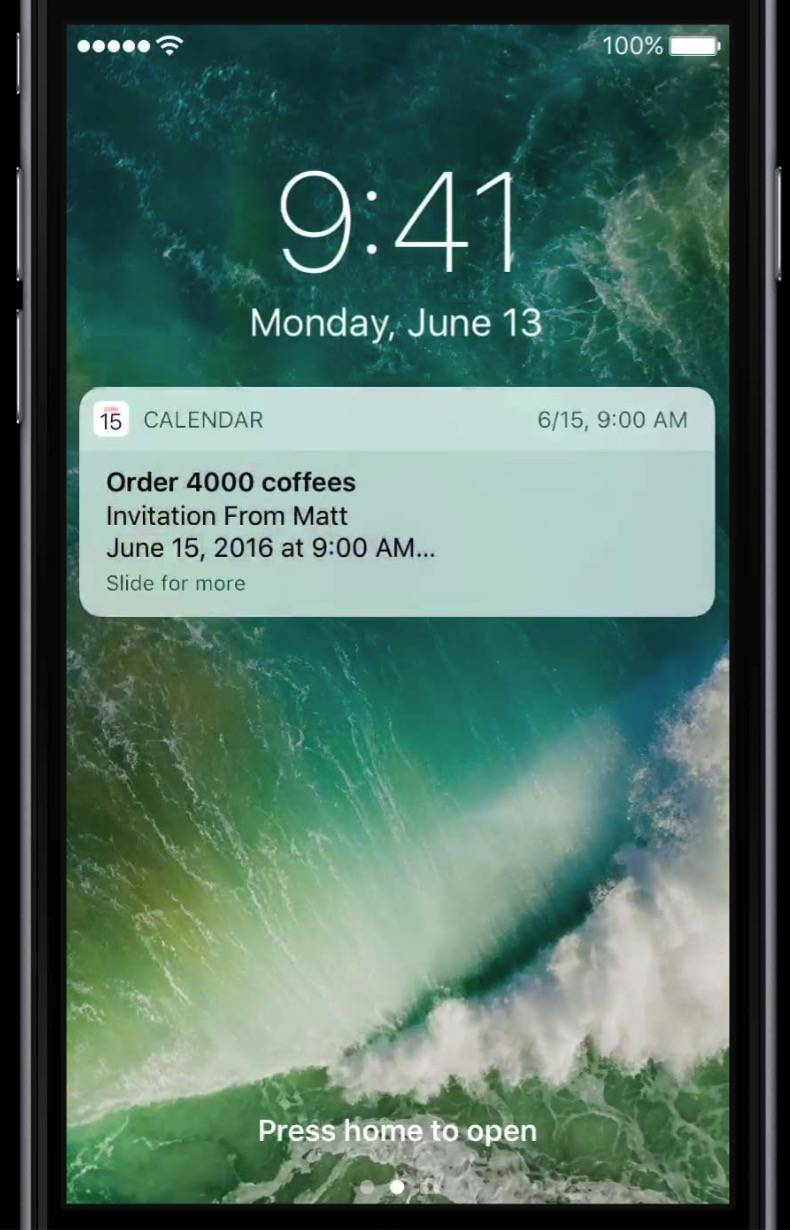
The image above shows a notification on the lock screen. It supports the raise-to-wake feature.
The image above is a banner. You can see that this notification is easier to read and contains more content.
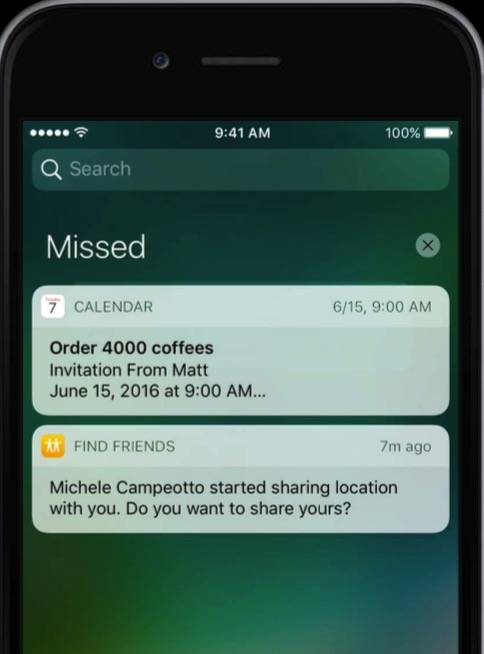
The image above is Notification Center. From the three images above, you can see that they all look the same.
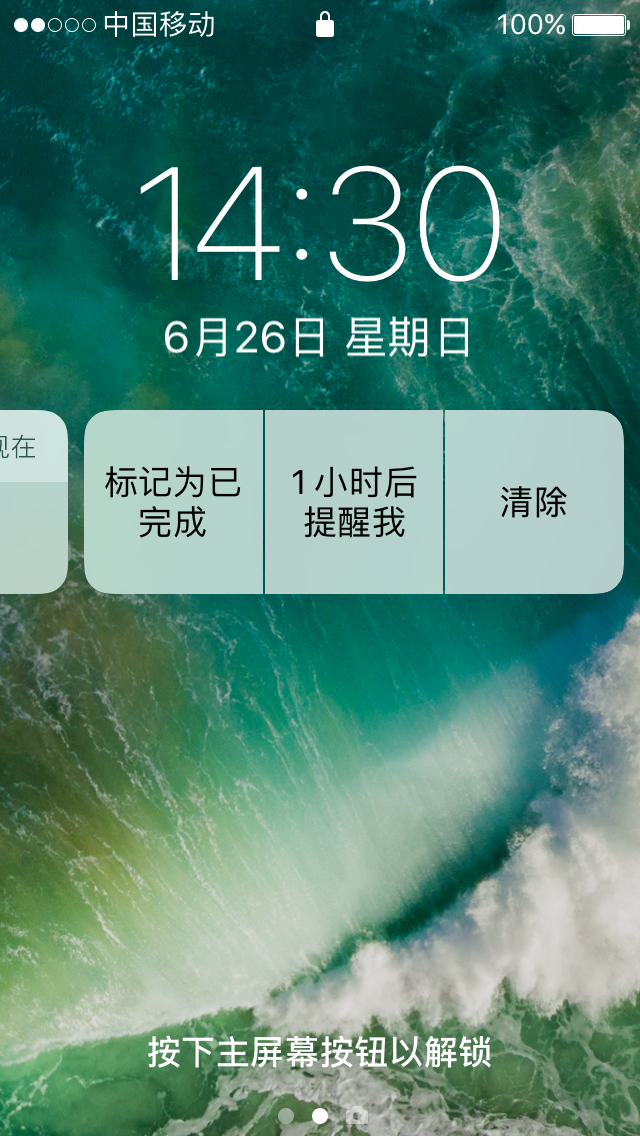
In iOS 8, we could add user actions to notifications, making notifications more interactive and allowing users to handle notifications more quickly. In iOS 9, Apple added Quick Reply, further improving the responsiveness of notifications. Developers can allow users to tap a notification and reply with text. Then, in iOS 10, notifications became even more powerful. In iOS X, notifications are a very important part of the iOS system. In everyday use, we interact with notifications frequently. Notifications are a very important way for us to interact with our devices.
In iOS X, you can press a notification, and it will expand to show a more detailed user interface. The detailed interface provides users with more useful information. Users can handle certain events by tapping the buttons below, and the detailed notification UI can also update as the user interacts with it.
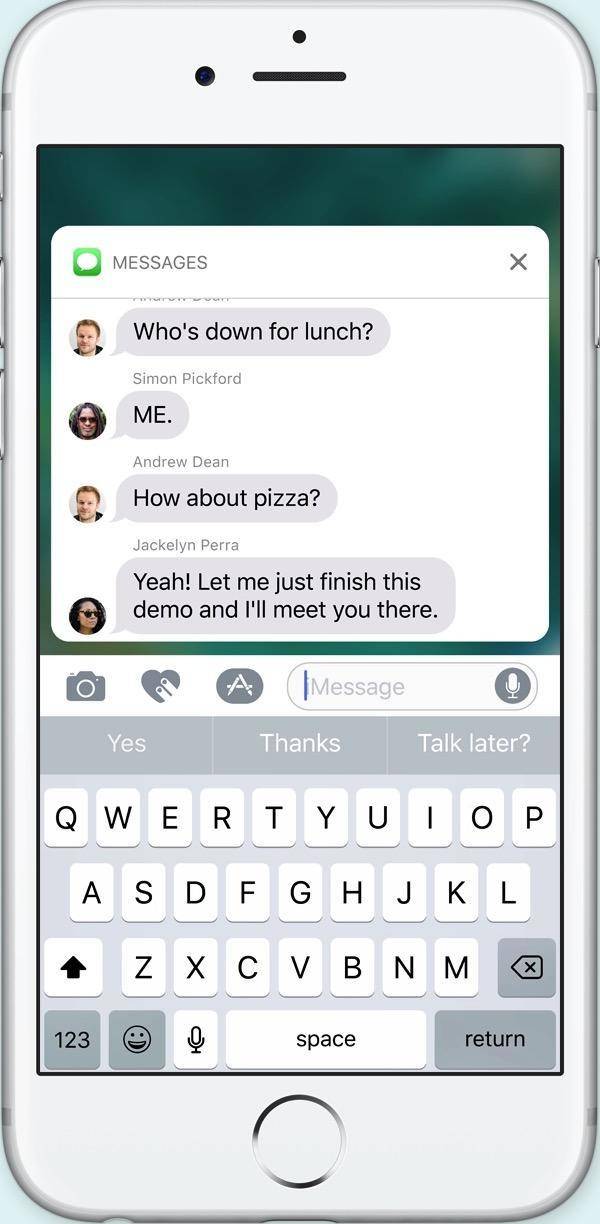
In iOS 8, iMessage supported Quick Reply, but you could only see one message and reply to only one message. In iOS X, however, you can expand the notification, at which point you can see the entire conversation. You can wait for your friend to reply, then reply again, and you can send multiple replies.
That is the power of iOS X. All of the features above can be implemented through the new APIs in iOS X. All of these new capabilities can be reflected in the apps we developers build.
II. Media Attachments
If you often use iMessage, you frequently receive messages with photos or videos attached, so it is very important for notifications to be able to include this kind of media. If a notification contains this media content, users can quickly preview it without opening the app and without downloading it manually. As we all know, push notifications include a push payload. Even though Apple increased the payload size to 4 KB last year, such a small capacity still cannot allow users to send a high-definition image. Even including a thumbnail of that image inside the push notification may not fit. In iOS X, we can use a new feature to solve this problem. We can solve it through the new service extensions.
In order to download the attachment inside the service extension, we must configure your push notification according to the following requirements so that your push notification is mutable.
{
    aps: {
        alert : {……}
        mutable-content : 1
    }
    my-attachment : https://example.com/phtos.jpg"
}
In the code above, you can see that a mutable-content flag is loaded, and then we can reference a link to include the attachments you want to add to the notification. In the example above, we add a URL. For more complex cases, you can even include an identifier to indicate the content you want to add to the notification. This identifier is known to your app, so the app can retrieve the identifier and then know where on your own server to download the content from.
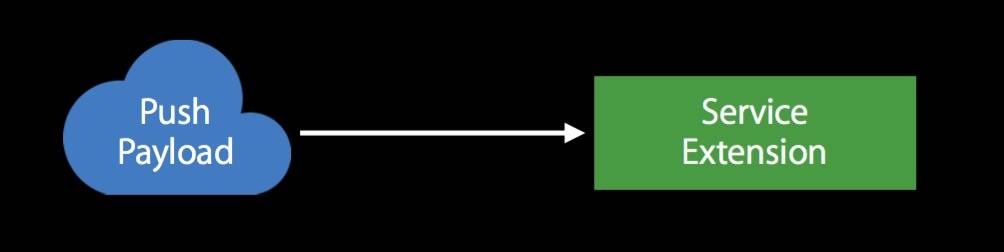
After the above configuration is complete, the notification is delivered to the Service Extension on each device. Inside the Service Extension on each device, you can download any attachment you want. The notification will then be delivered to the phone with the downloaded attachment and displayed.
How do you set up the Service Extension? Take a look at the following code:
// Adding an attachment to a user notification

public class NotificationService: UNNotificationServiceExtension {
    override public func didReceive(_ request: UNNotificationRequest, withContentHandler contentHandler: (UNNotificationContent) -> Void)
    {
        let fileURL = // ...
        let attachment = UNNotificationAttachment(identifier: "image",
                                                  url: fileURL,
                                                  options: nil)
        let content = request.content.mutableCopy as! UNMutableNotificationContent
        content.attachments = [ attachment ]
        contentHandler(content)
    }
}
First, define a didReceive method to receive the request, followed by the withContentHandler callback function.
This NotificationServiceExtension is invoked after a push notification is received, and then it downloads its own attachment inside this method. The download can be done via a URL, or in any way you prefer. Once the download is complete, you can create the attachment object. After creating the UNMutableNotificationContent, we can add it to the push notification’s content. Finally, through the contentHandler callback, it is passed to the iOS system, and iOS will present it to the user.
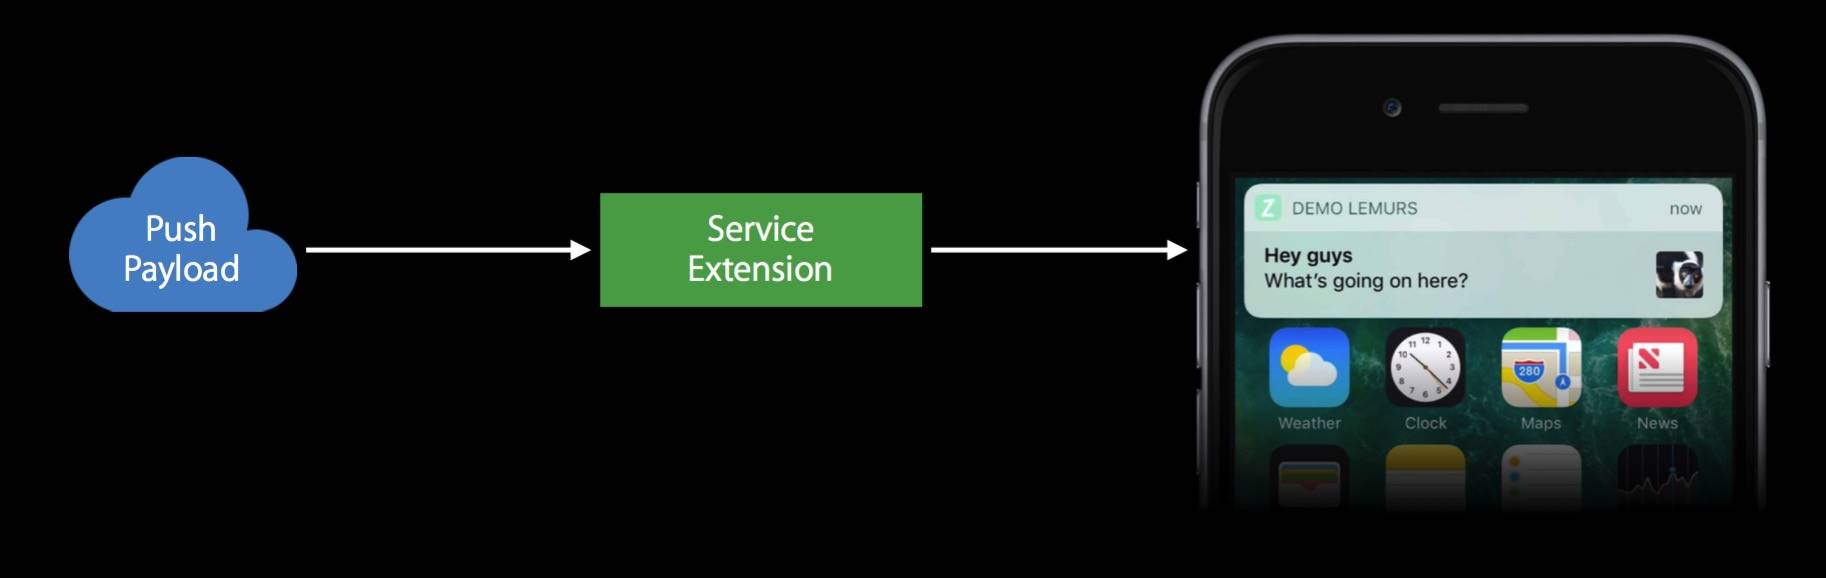
With the configuration above, we can display rich media information in push notifications. Users do not need to open the app, nor do they need to tap to download anything.
A brief overview of Media Attachments:
- This new feature allows push notifications to include Media Attachments. Both local and remote notifications are supported.
- Attachments support images, audio, and video. The system automatically provides a customizable UI specifically for these three types of content.
- Download the attachment inside the service extension, but note that the service extension limits the download time, and the downloaded file size is also limited. After all, this is a push notification, not a mechanism for pushing all content to the user. So you should push scaled-down versions. For example, for images, include a thumbnail in the notification; after the user opens the app, download the full high-resolution image. For video, include a key frame or the first few seconds of the video; after the user opens the app, download the full video.
- Add the downloaded attachment to the notification.
- The attachment files included in the push notification are managed by the system. The system stores these files in a separate location and manages them uniformly.
- One additional note: image attachments in push notifications can also include GIFs.
As you can see from the above, Media Attachments are very cool, and they provide us with richer push notification content.
Next, let’s look at how to customize the push notification user interface.
####III. Customize user interface
To create a custom user interface, you need to use a Notification content extension.
First, let’s discuss the use case for the following example:
Suppose a friend sends me a party invitation in Calendar. A push notification arrives, and the content of the notification includes the party’s time and location. Below the notification are three buttons: accept and decline. The examples below will use this scenario.
A Notification content extension allows developers to add a custom interface. In this interface, you can draw anything you want. However, the most important restriction is that this custom interface is not interactive. It cannot receive tap events, and users cannot tap it. But the push notification can still continue to interact with the user, because the user can use the notification’s actions. The extension can handle these actions.
Next, let’s talk about how to customize the interface.
1. The four parts of a push notification
First, let’s look at an example of a Calendar notification:
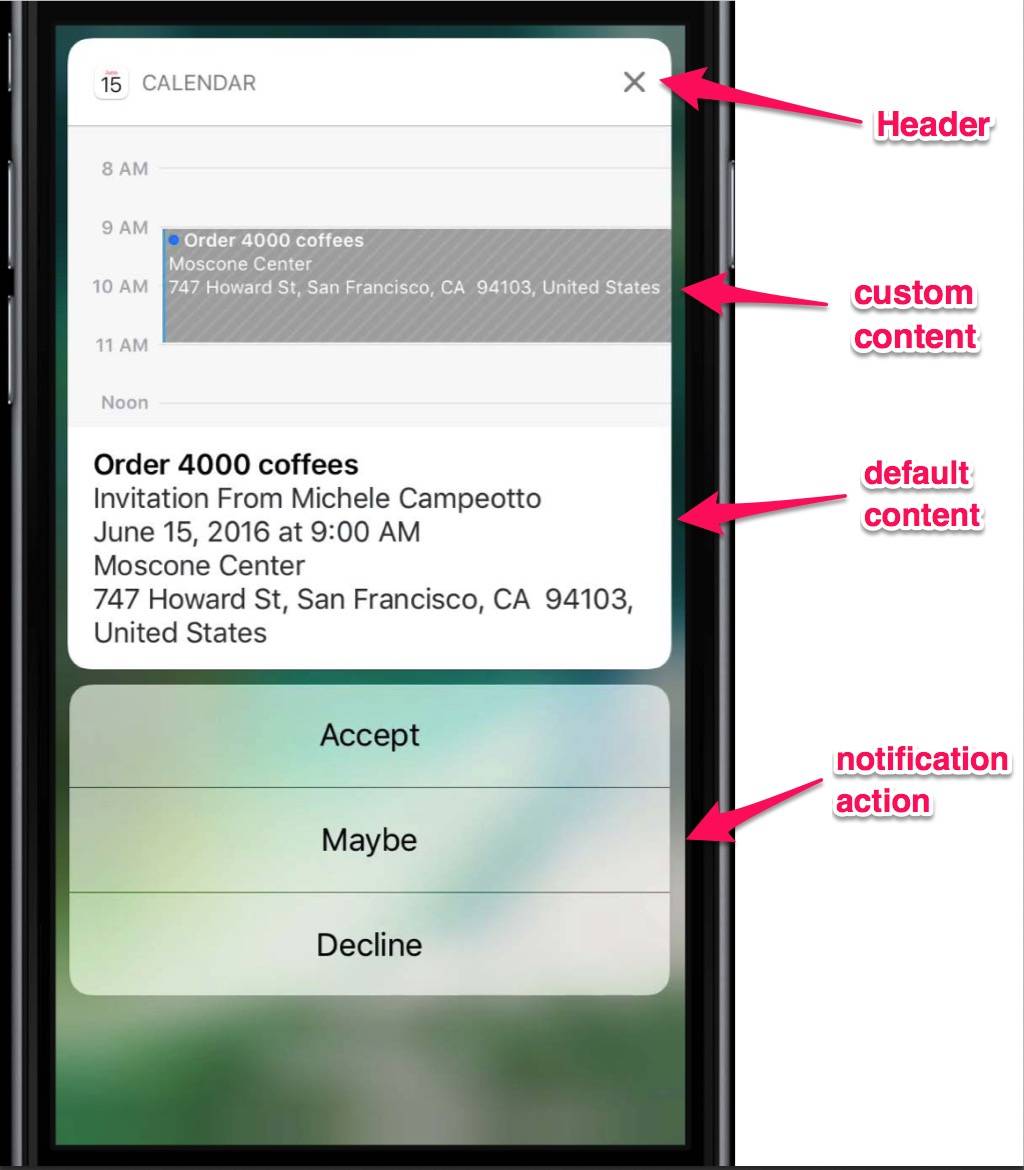
In the image above, the entire push notification is divided into four sections. Users can tap the icon in the Header to open the app, or tap Cancel to dismiss the notification. The Header UI is a standard UI provided by the system. This UI is provided for all push notifications.
Below the Header is the custom content, which is where the Notification content extension is displayed. Here, you can display anything you want to draw. You can show any additional useful information to the user.
Below the content extension is the default content. This is the system interface. The system interface here is the content attached in the payload of the push notification above. This is what push notifications looked like before iOS 9.
The bottom section is the notification actions. In this section, users can trigger certain operations. These operations will also be reflected accordingly in the custom push notification interface, the content extension, above.
2. Create a Notification content extension
Next, let’s look at how to create a Notification content extension.
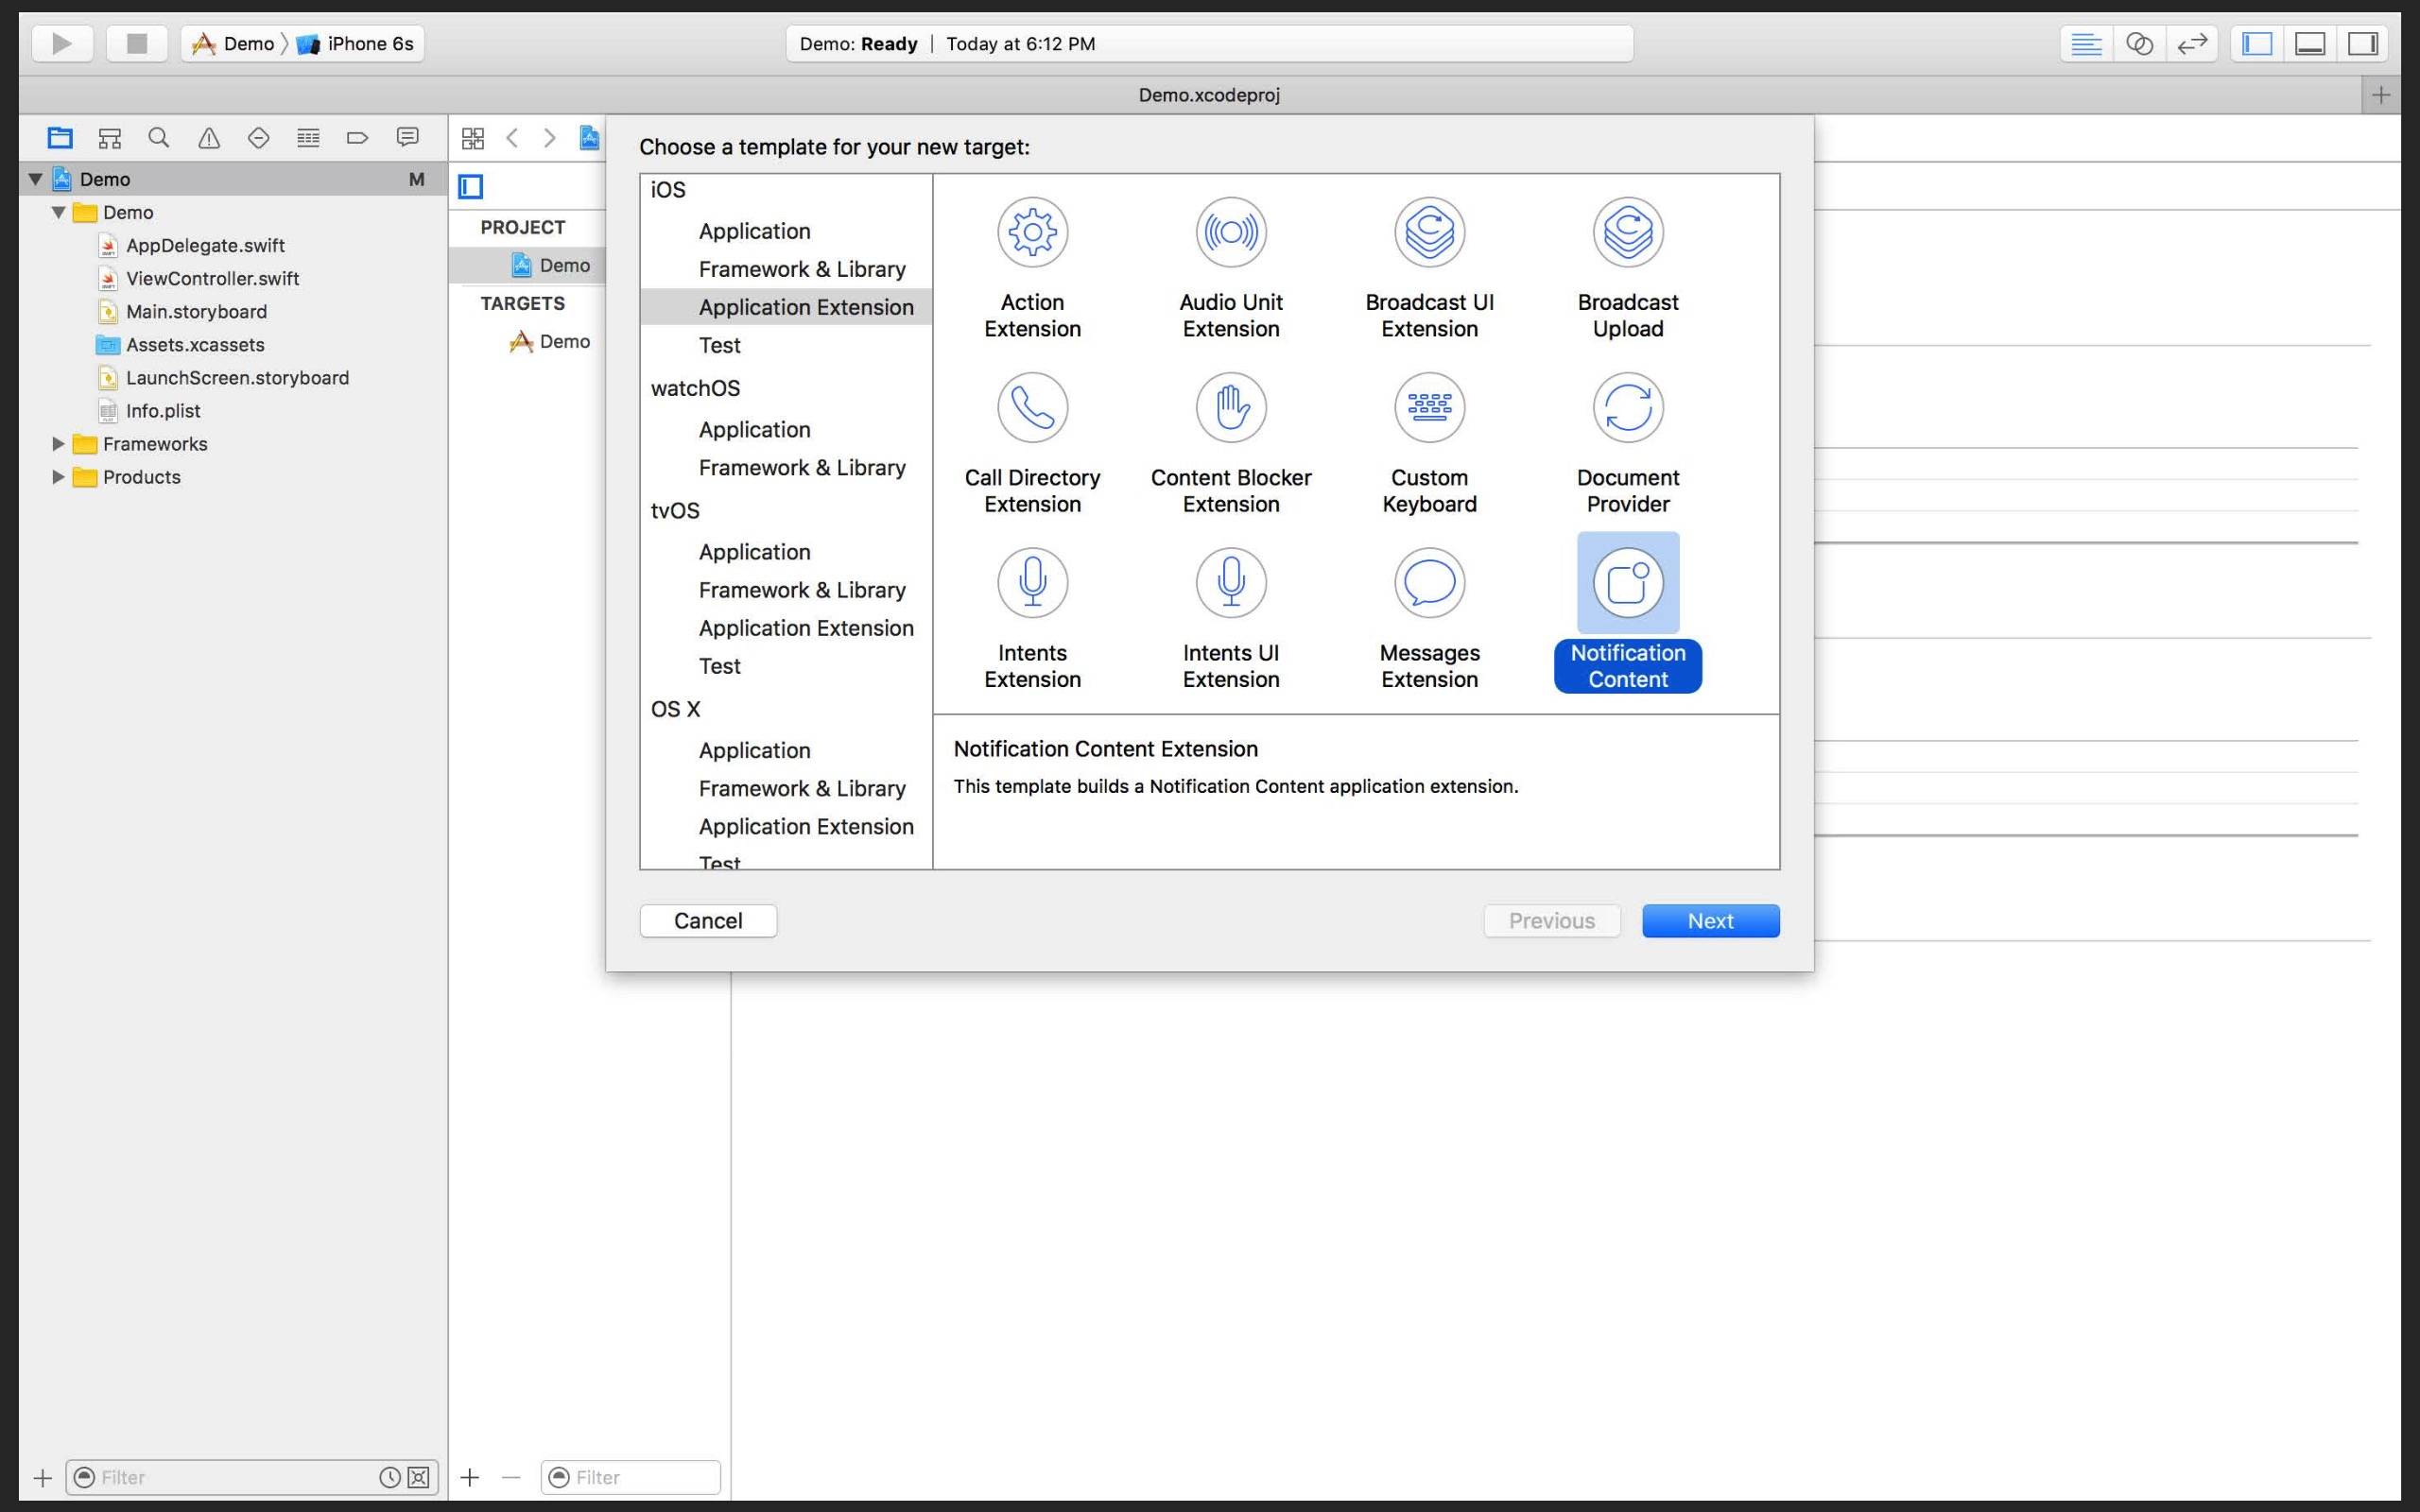
The first thing to do is create a new target. After it is created, Xcode will automatically generate a template for us. The template generates three files in the new target: a new ViewController, a main Interface storyboard, and an info.plist. In info.plist, you can customize some of the target’s configuration.
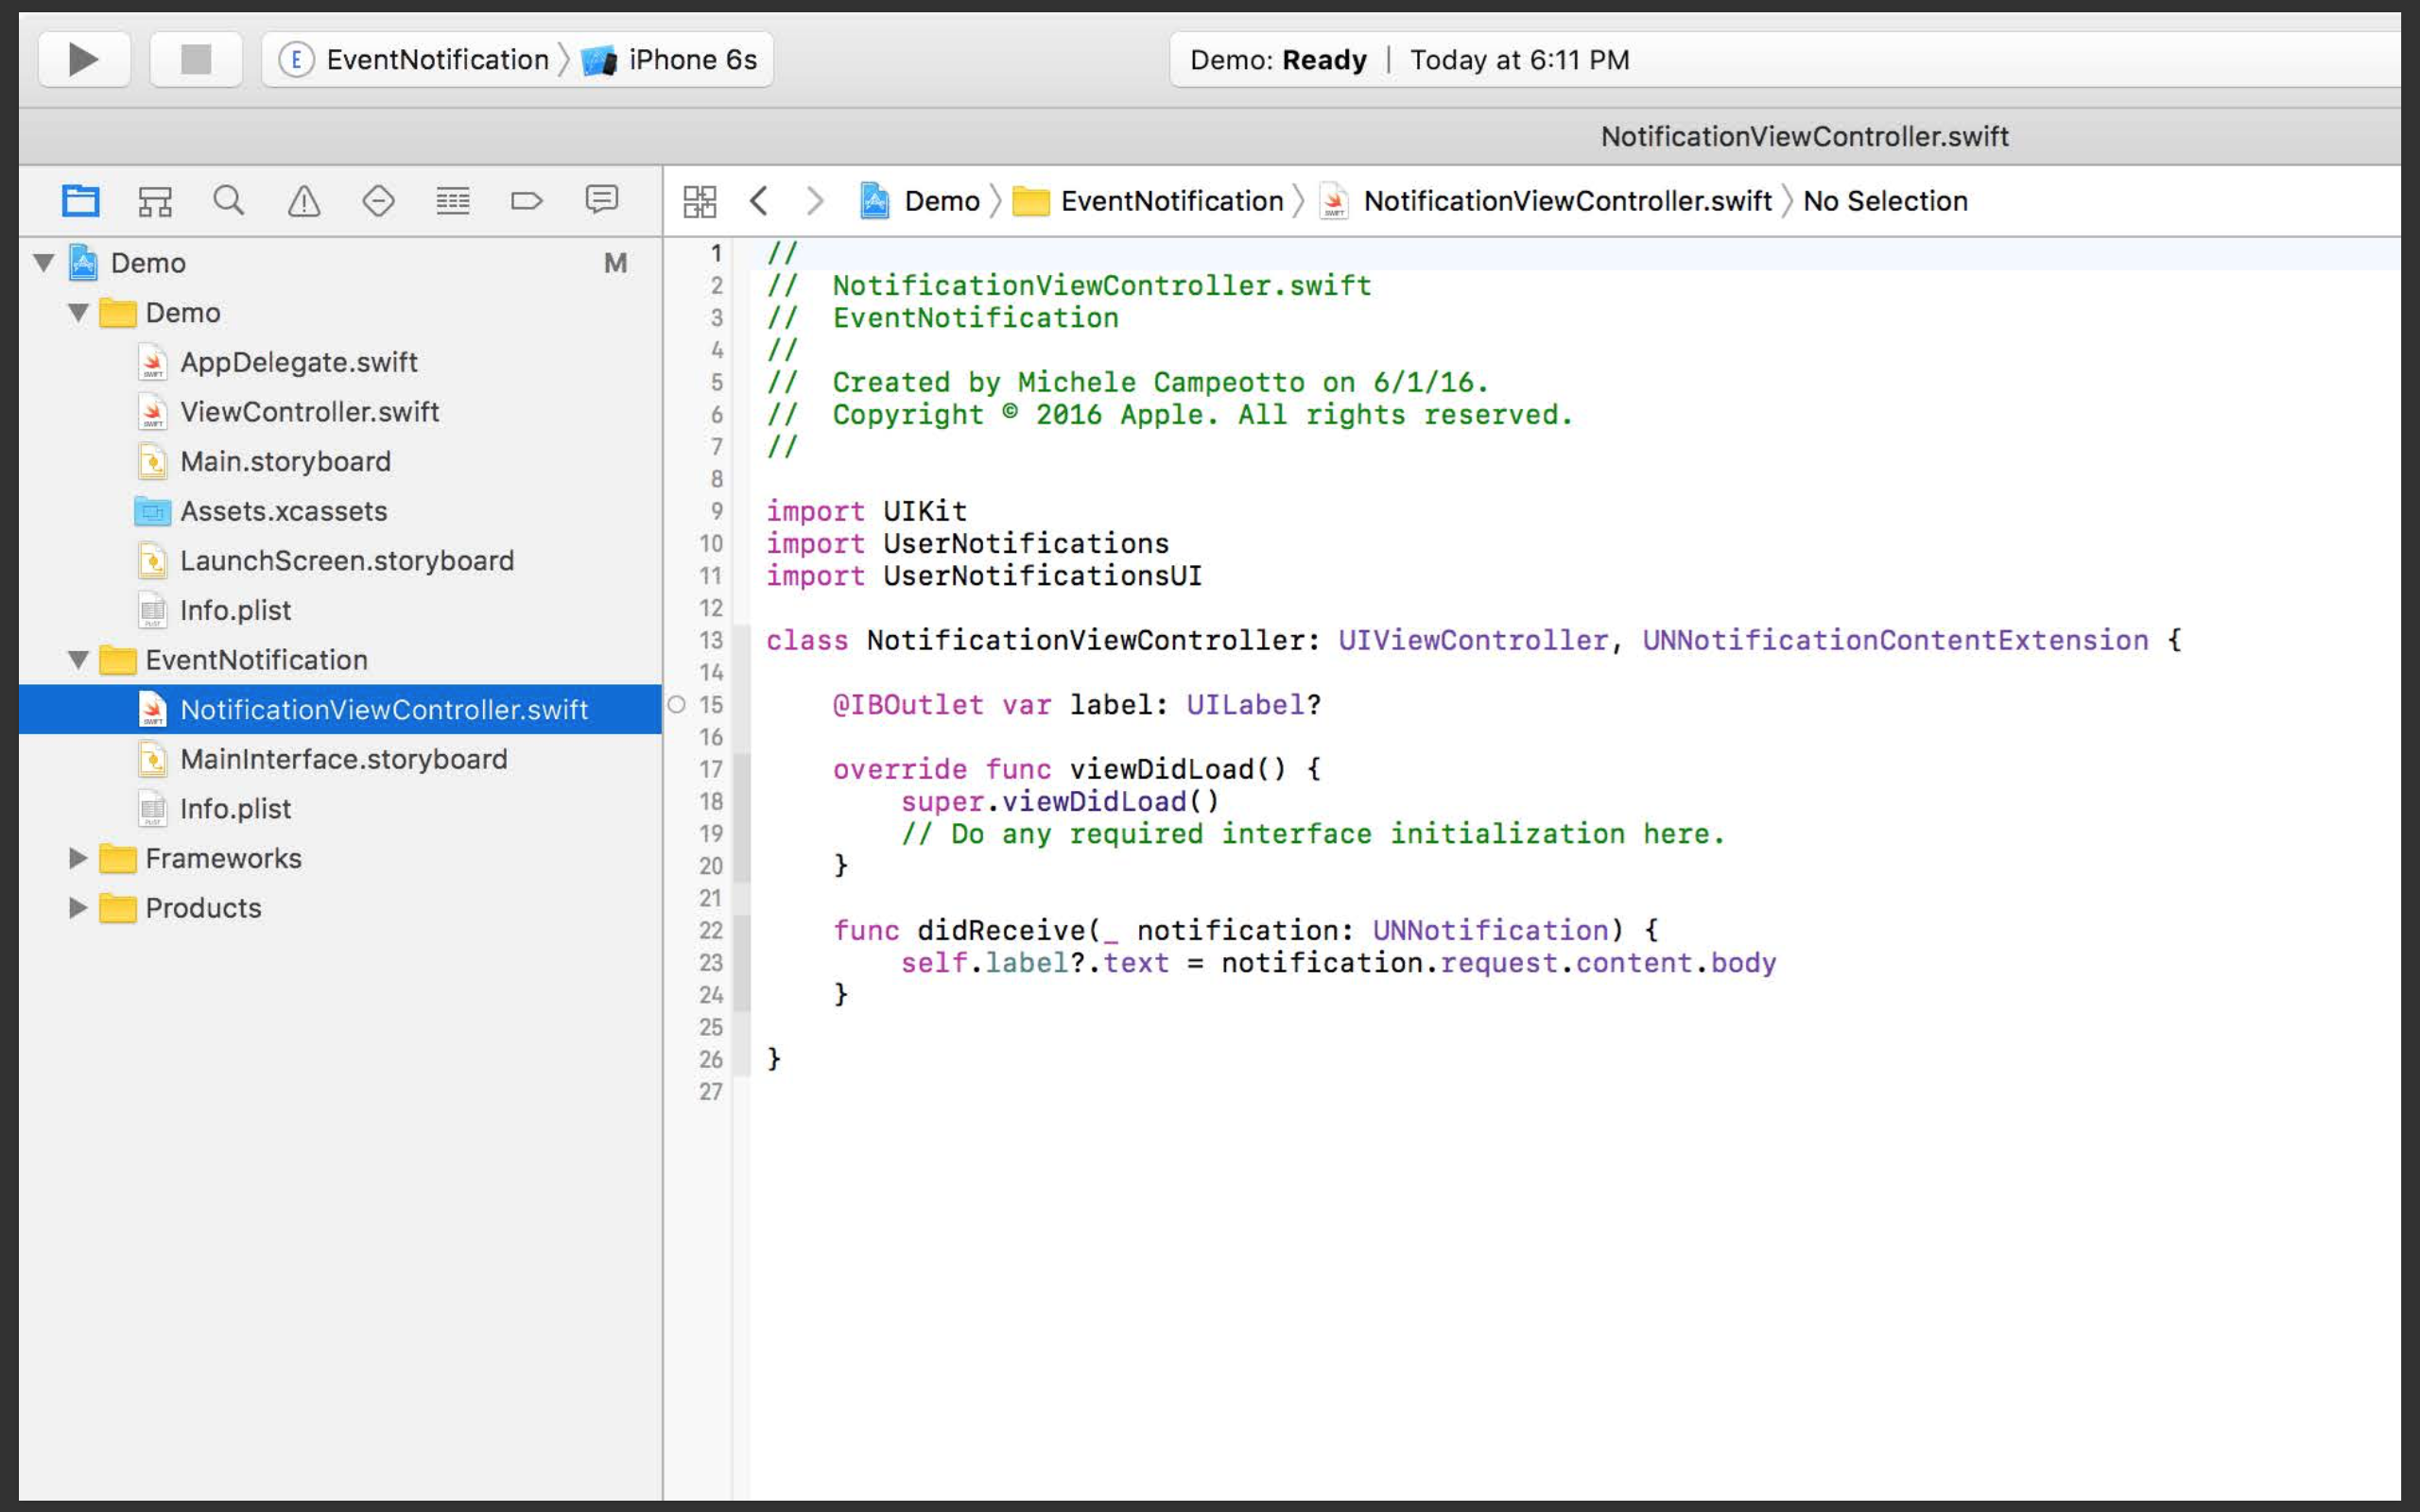
Open the ViewController of the Notification content extension.
// Minimal Content Extension
class NotificationViewController: UIViewController, UNNotificationContentExtension {
    @IBOutlet var label: UILabel?
    override func viewDidLoad() {
        super.viewDidLoad()
        // Do any required interface initialization here.
    }
    func didReceive(_ notification: UNNotification) {
        label?.text = notification.request.content.body
    }
}
We can see that this ViewController is a subclass of UIViewController. In fact, it is just a very ordinary ViewController, no different from the ones we usually use. What follows is the UNNotificationContentExtension protocol, which is a protocol the system requires you to implement.
UNNotificationContentExtension has only one required method: didReceive. After a push notification arrives on your device, this didReceive method is called along with the ViewController lifecycle methods. When the developer adds expands to the push notification, once the notification is delivered, all ViewController lifecycle methods and the didReceive method are invoked. This way, we can receive the notification object and then update the UI.
3. Configure the target
Next, what we need to do is tell the iOS system how to find your custom Notification content extension after the push notification is delivered.
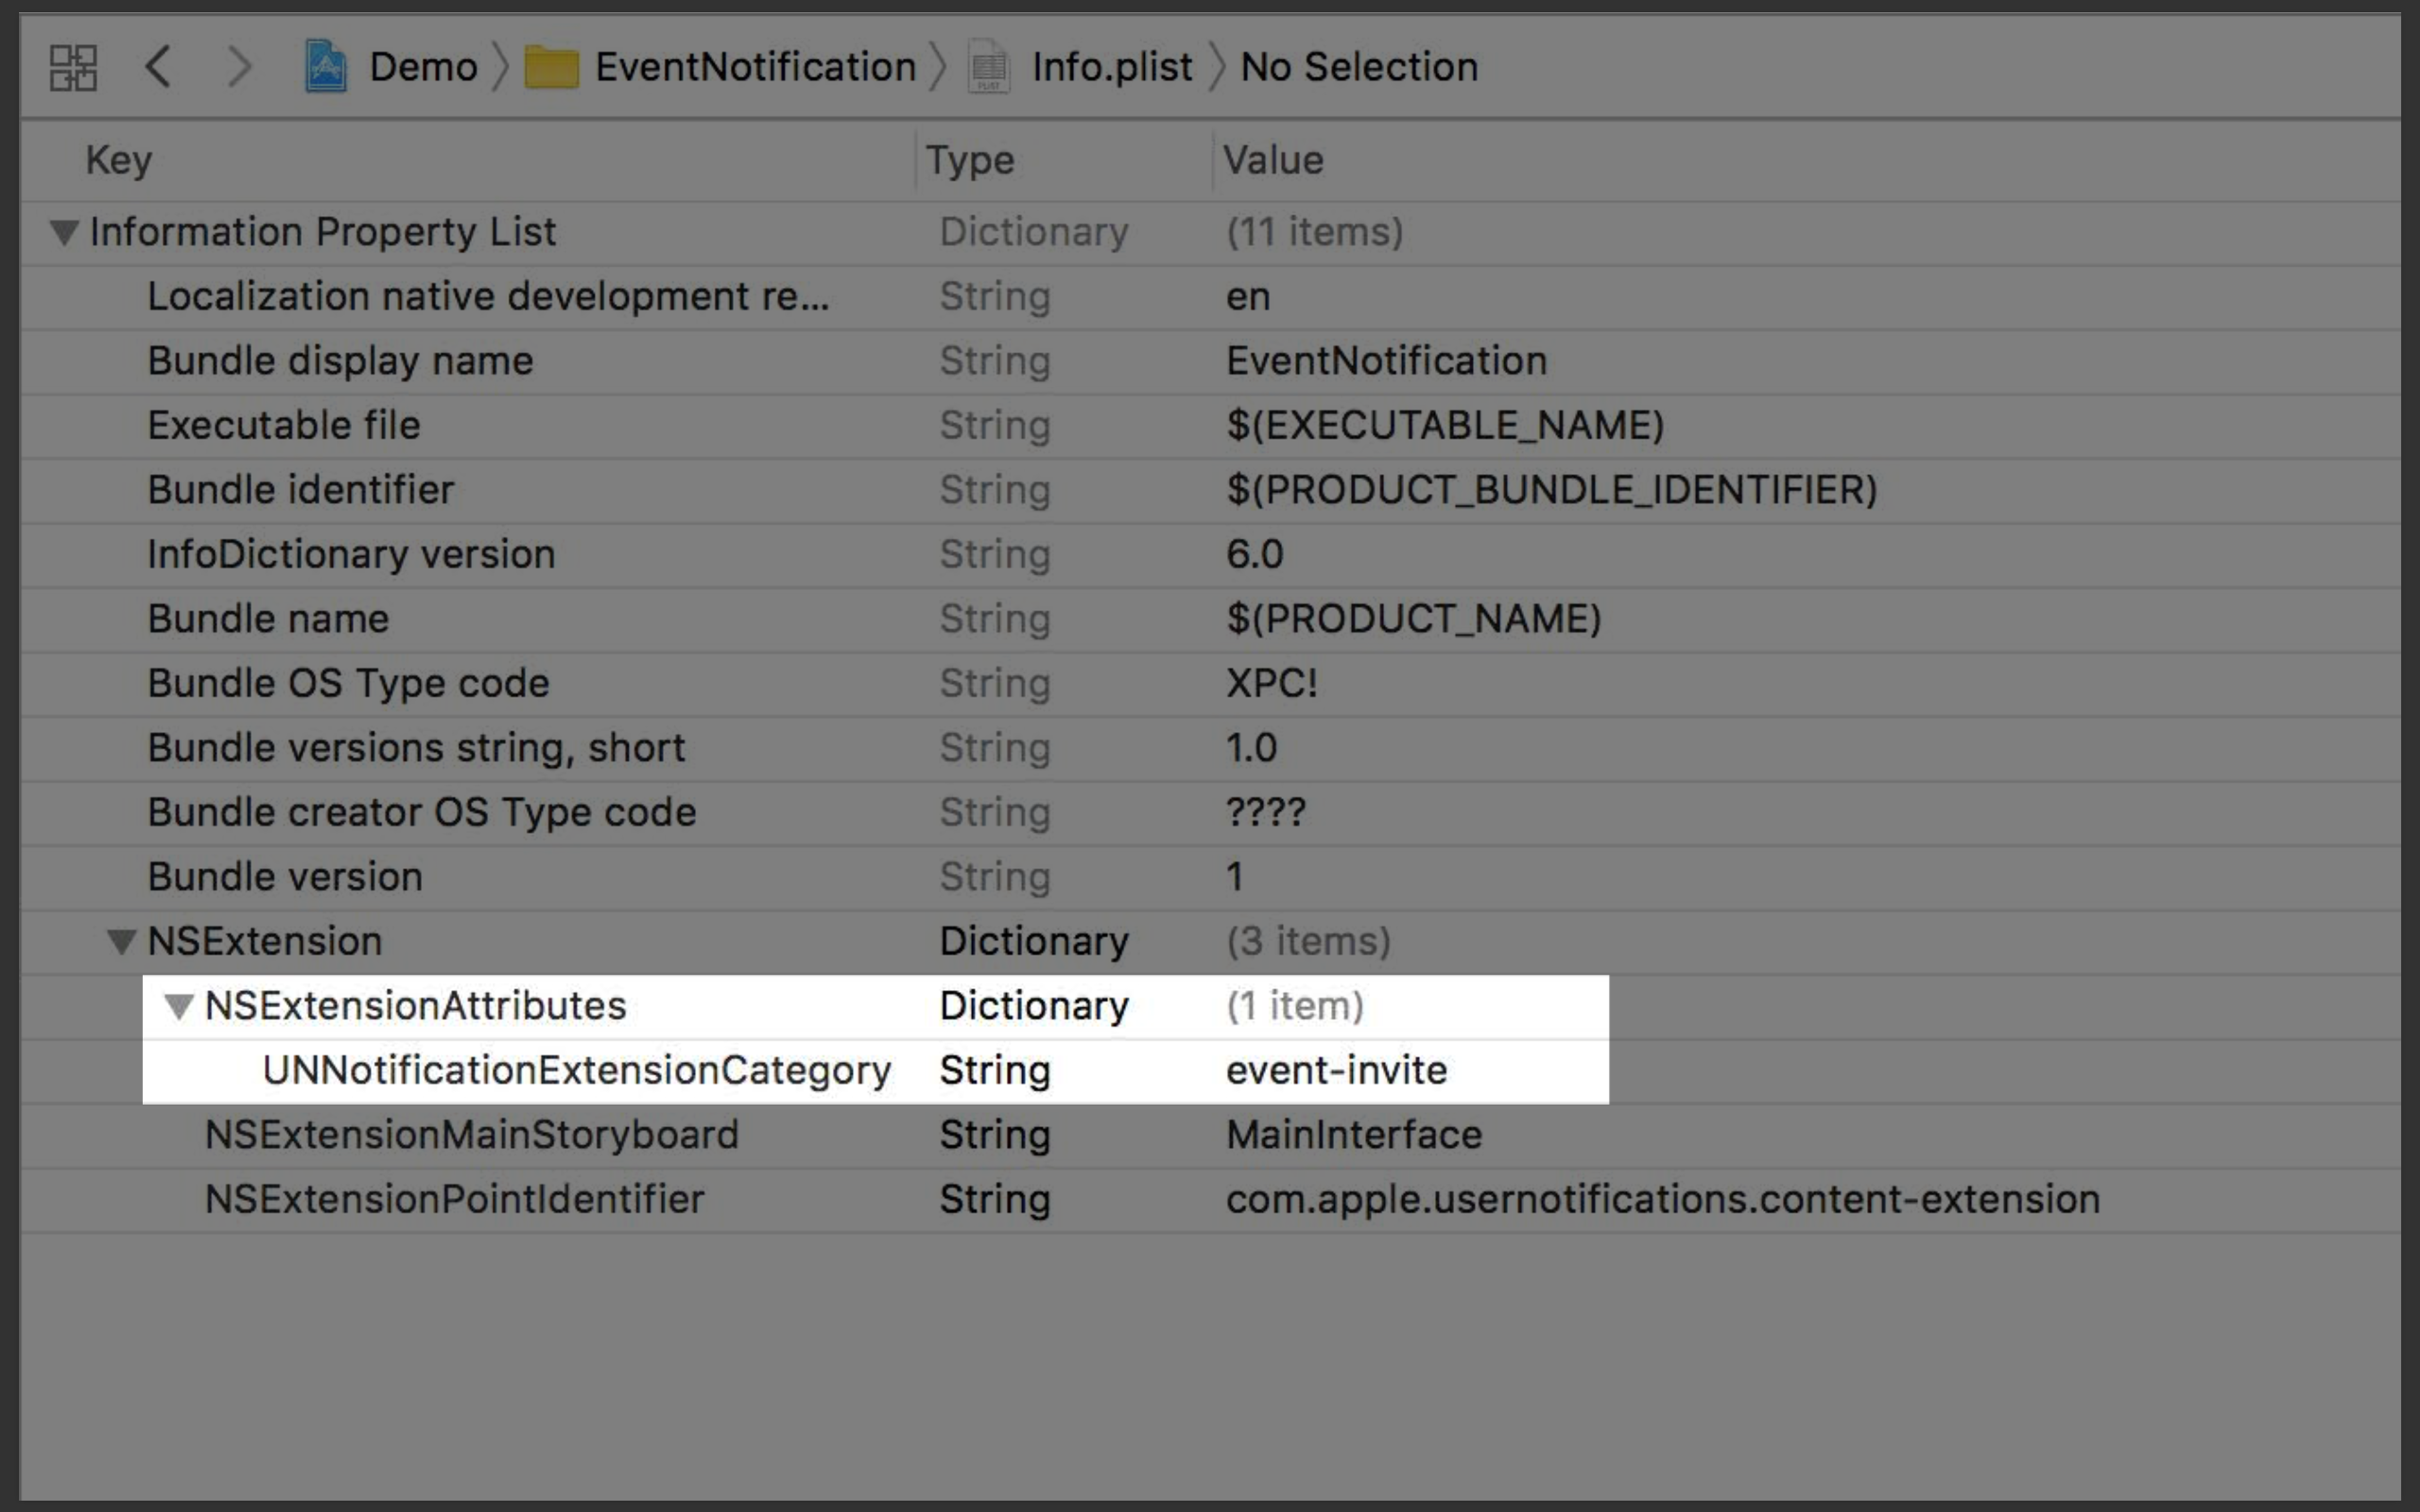
A Notification content extension registers the same category as we do when registering notification actions. In this example, we use event-invite. One point worth mentioning is that the extension here can be an array containing multiple categories. The purpose of this is to allow multiple categories to share the same UI.
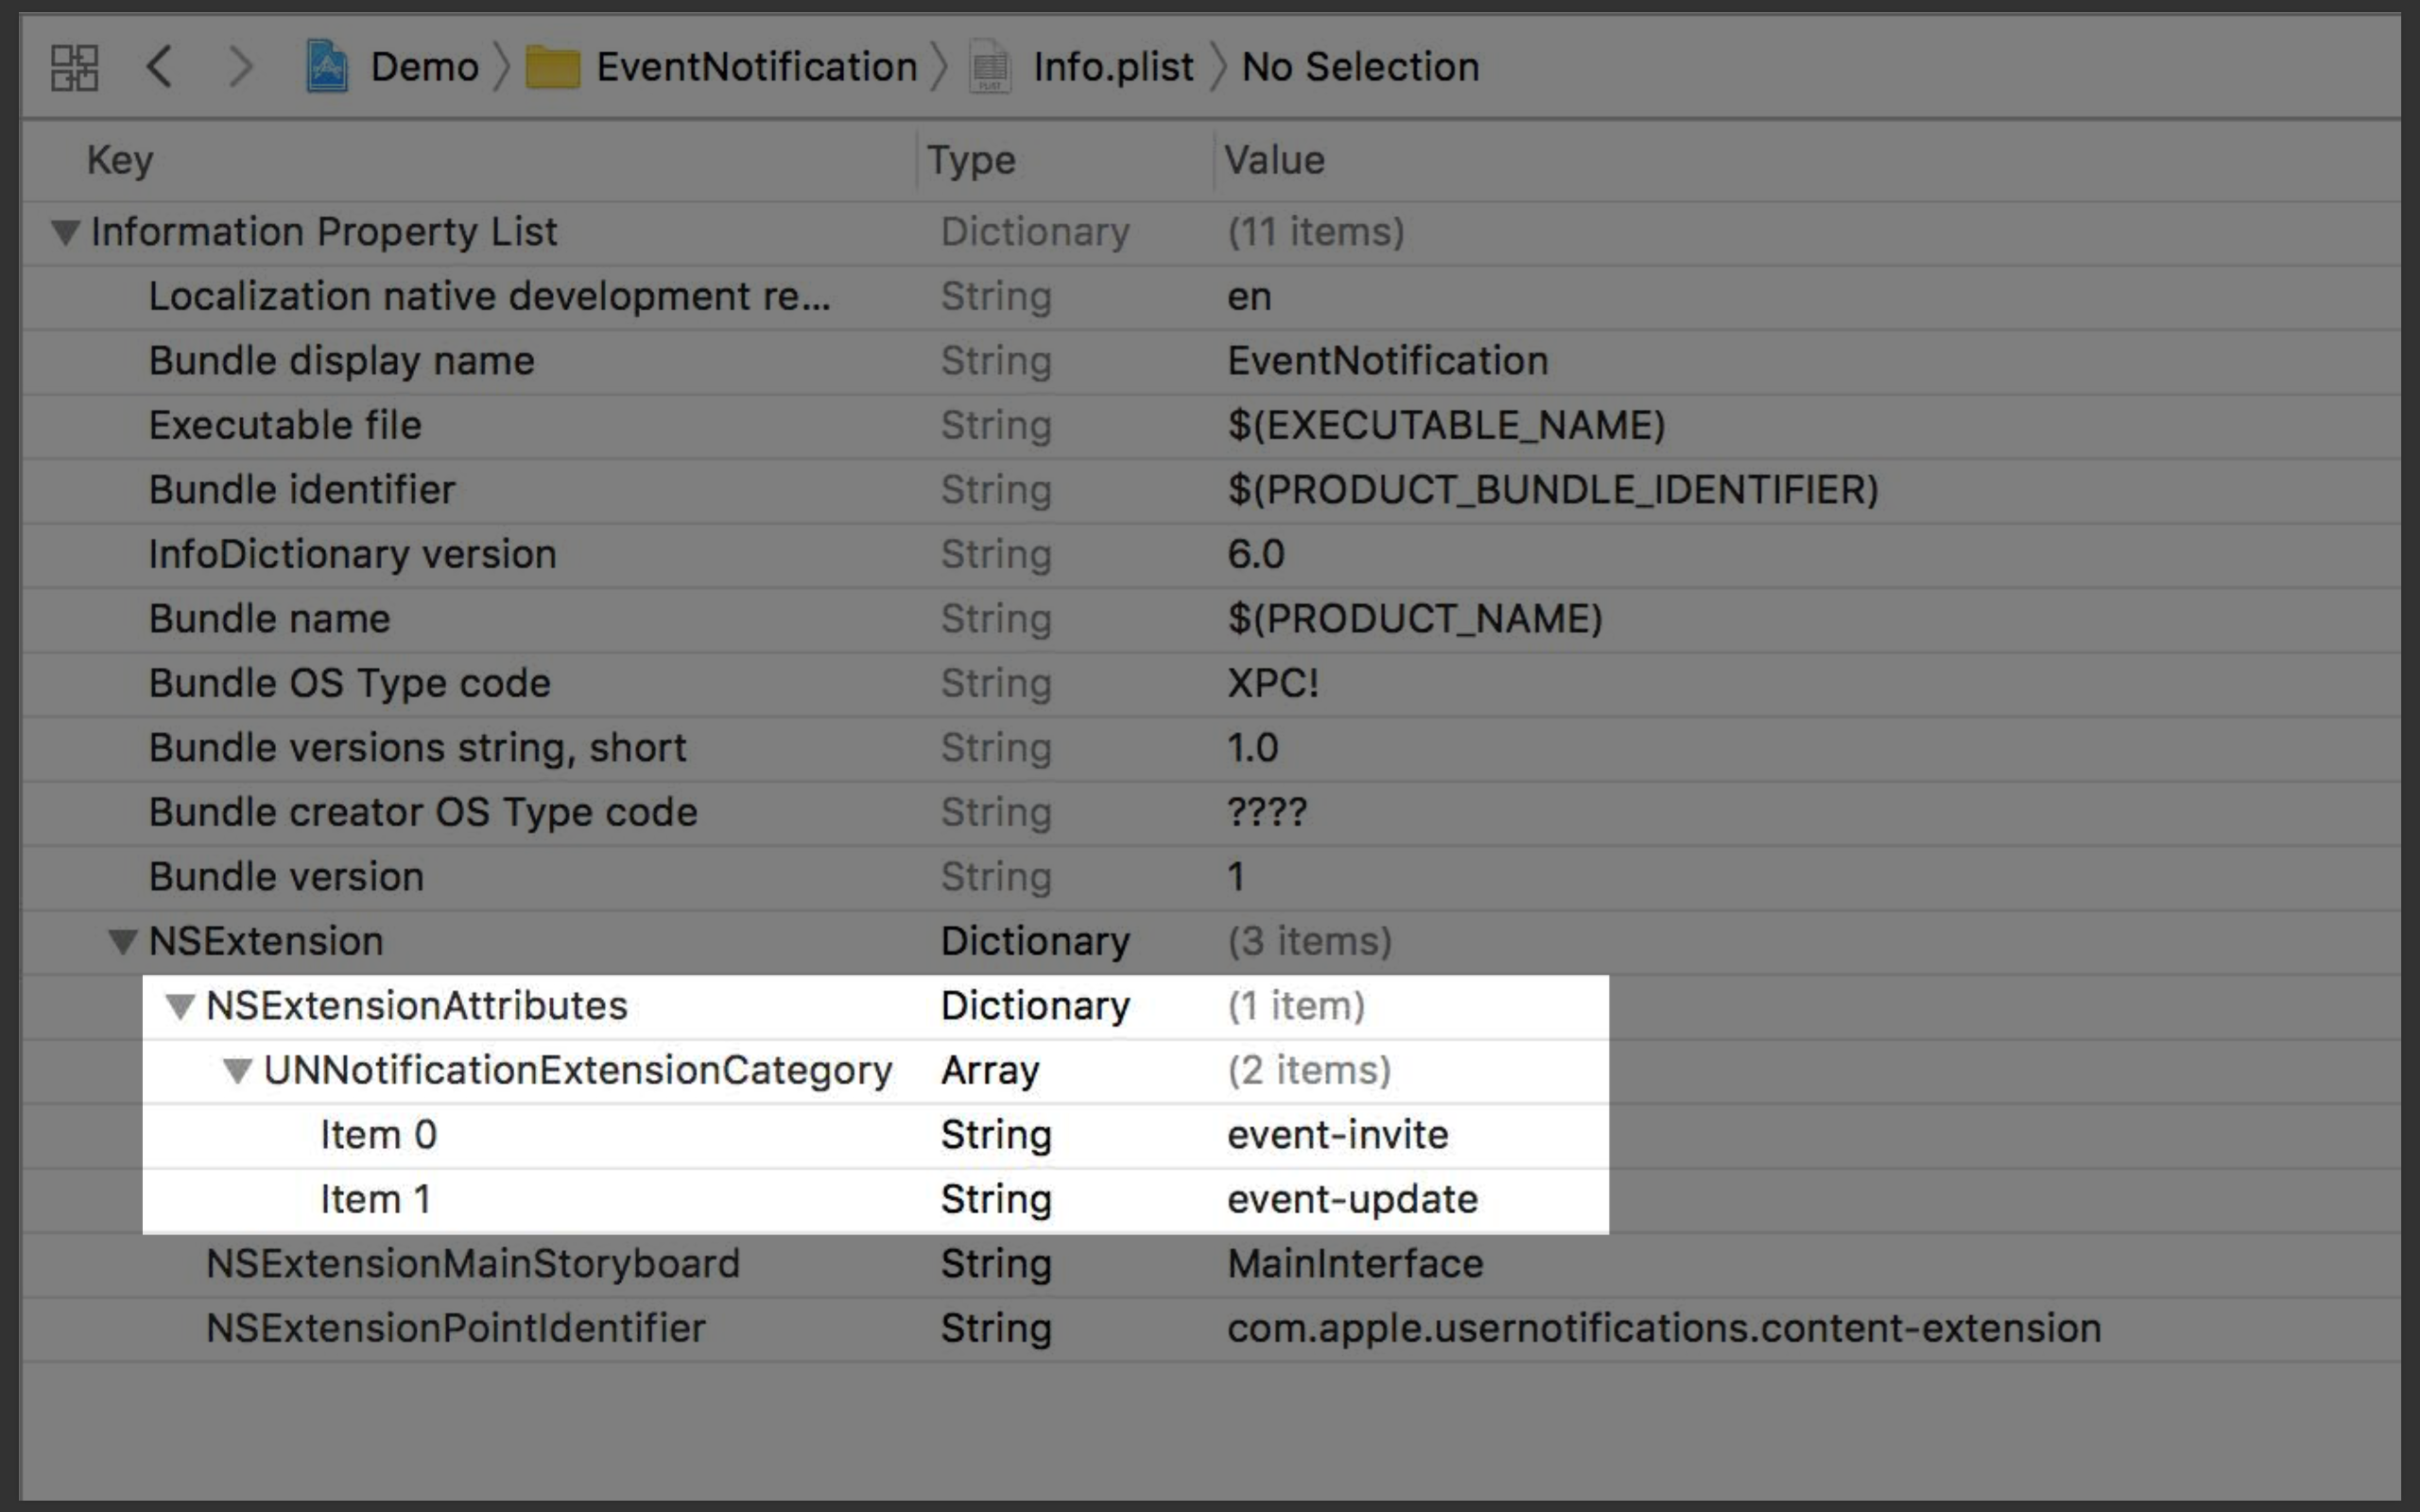
In the figure above, event-invite and event-update share the same UI. This way, we can package them into a single extension. However, different categories are independent, and they can respond to different actions.
With the configuration above, the iOS system now knows about our target.
4. Customize the user UI
Next, let’s customize the UI.
// Notification Content Extension
class NotificationViewController: UIViewController, UNNotificationContentExtension {
    @IBOutlet var eventTitle: UILabel!
    @IBOutlet var eventDate: UILabel!
    @IBOutlet var eventLocation: UILabel!
    @IBOutlet var eventMessage: UILabel!

    func didReceive(_ notification: UNNotification) {
        let content = notification.request.content

        eventTitle.text = content.title
        eventDate.text = content.subtitle
        eventMessage.text = content.body

        if let location = content.userInfo["location"] as? String {
            eventLocation.text = location
        }
    }
}
In the code above, we added some labels in the storyboard. When a push notification is received, we extract the content, obtain the information we need, then set that content on the labels and display it. In the userinfo of the content, we can also add extra information that cannot be displayed by the standard payload, such as location information, and so on.
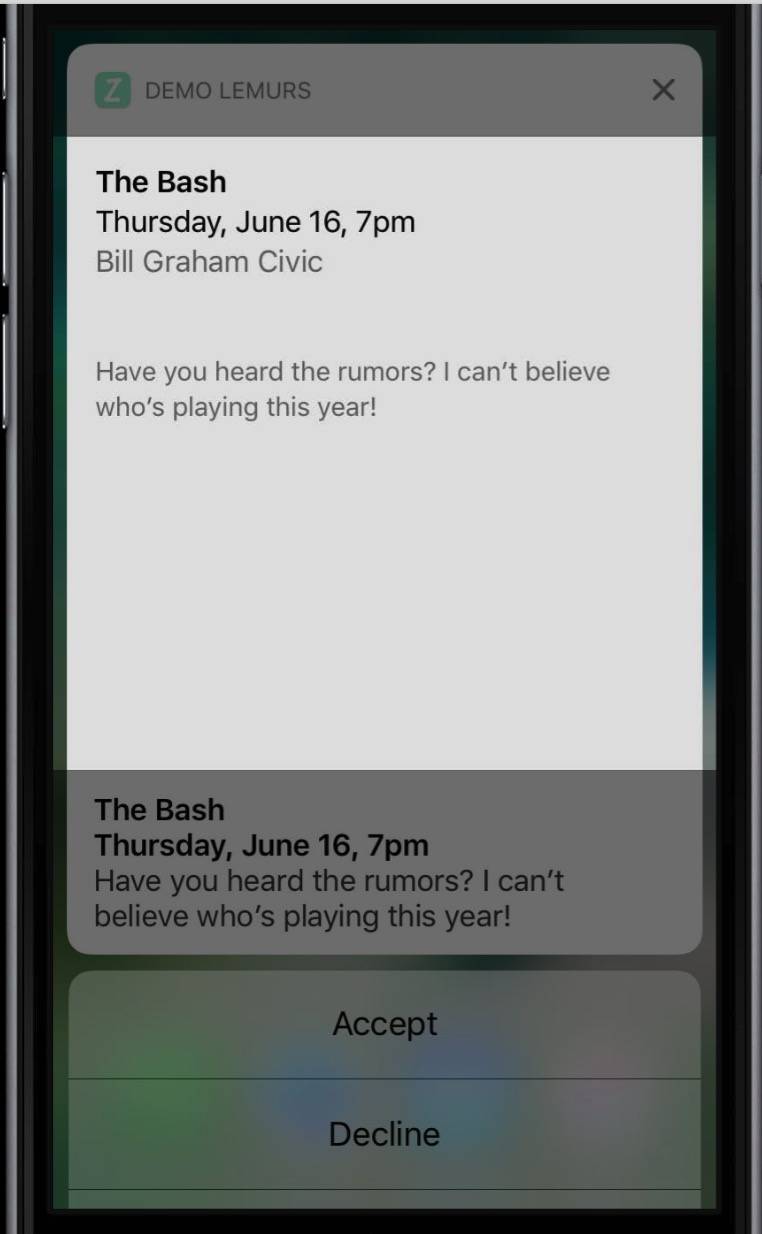
After the code is complete, it looks like the image above. The middle section is our custom UIView. However, this approach has two issues. The first issue is that the custom View is far too large. A large amount of whitespace does not need to be displayed. The second issue is that our custom content duplicates the default push notification content below it. We need to remove one of them.
5. Improvements
Let’s first improve the second issue mentioned above. This issue is very simple; it is essentially just a plist setting. We can hide the default content in the plist. The setting is shown below.
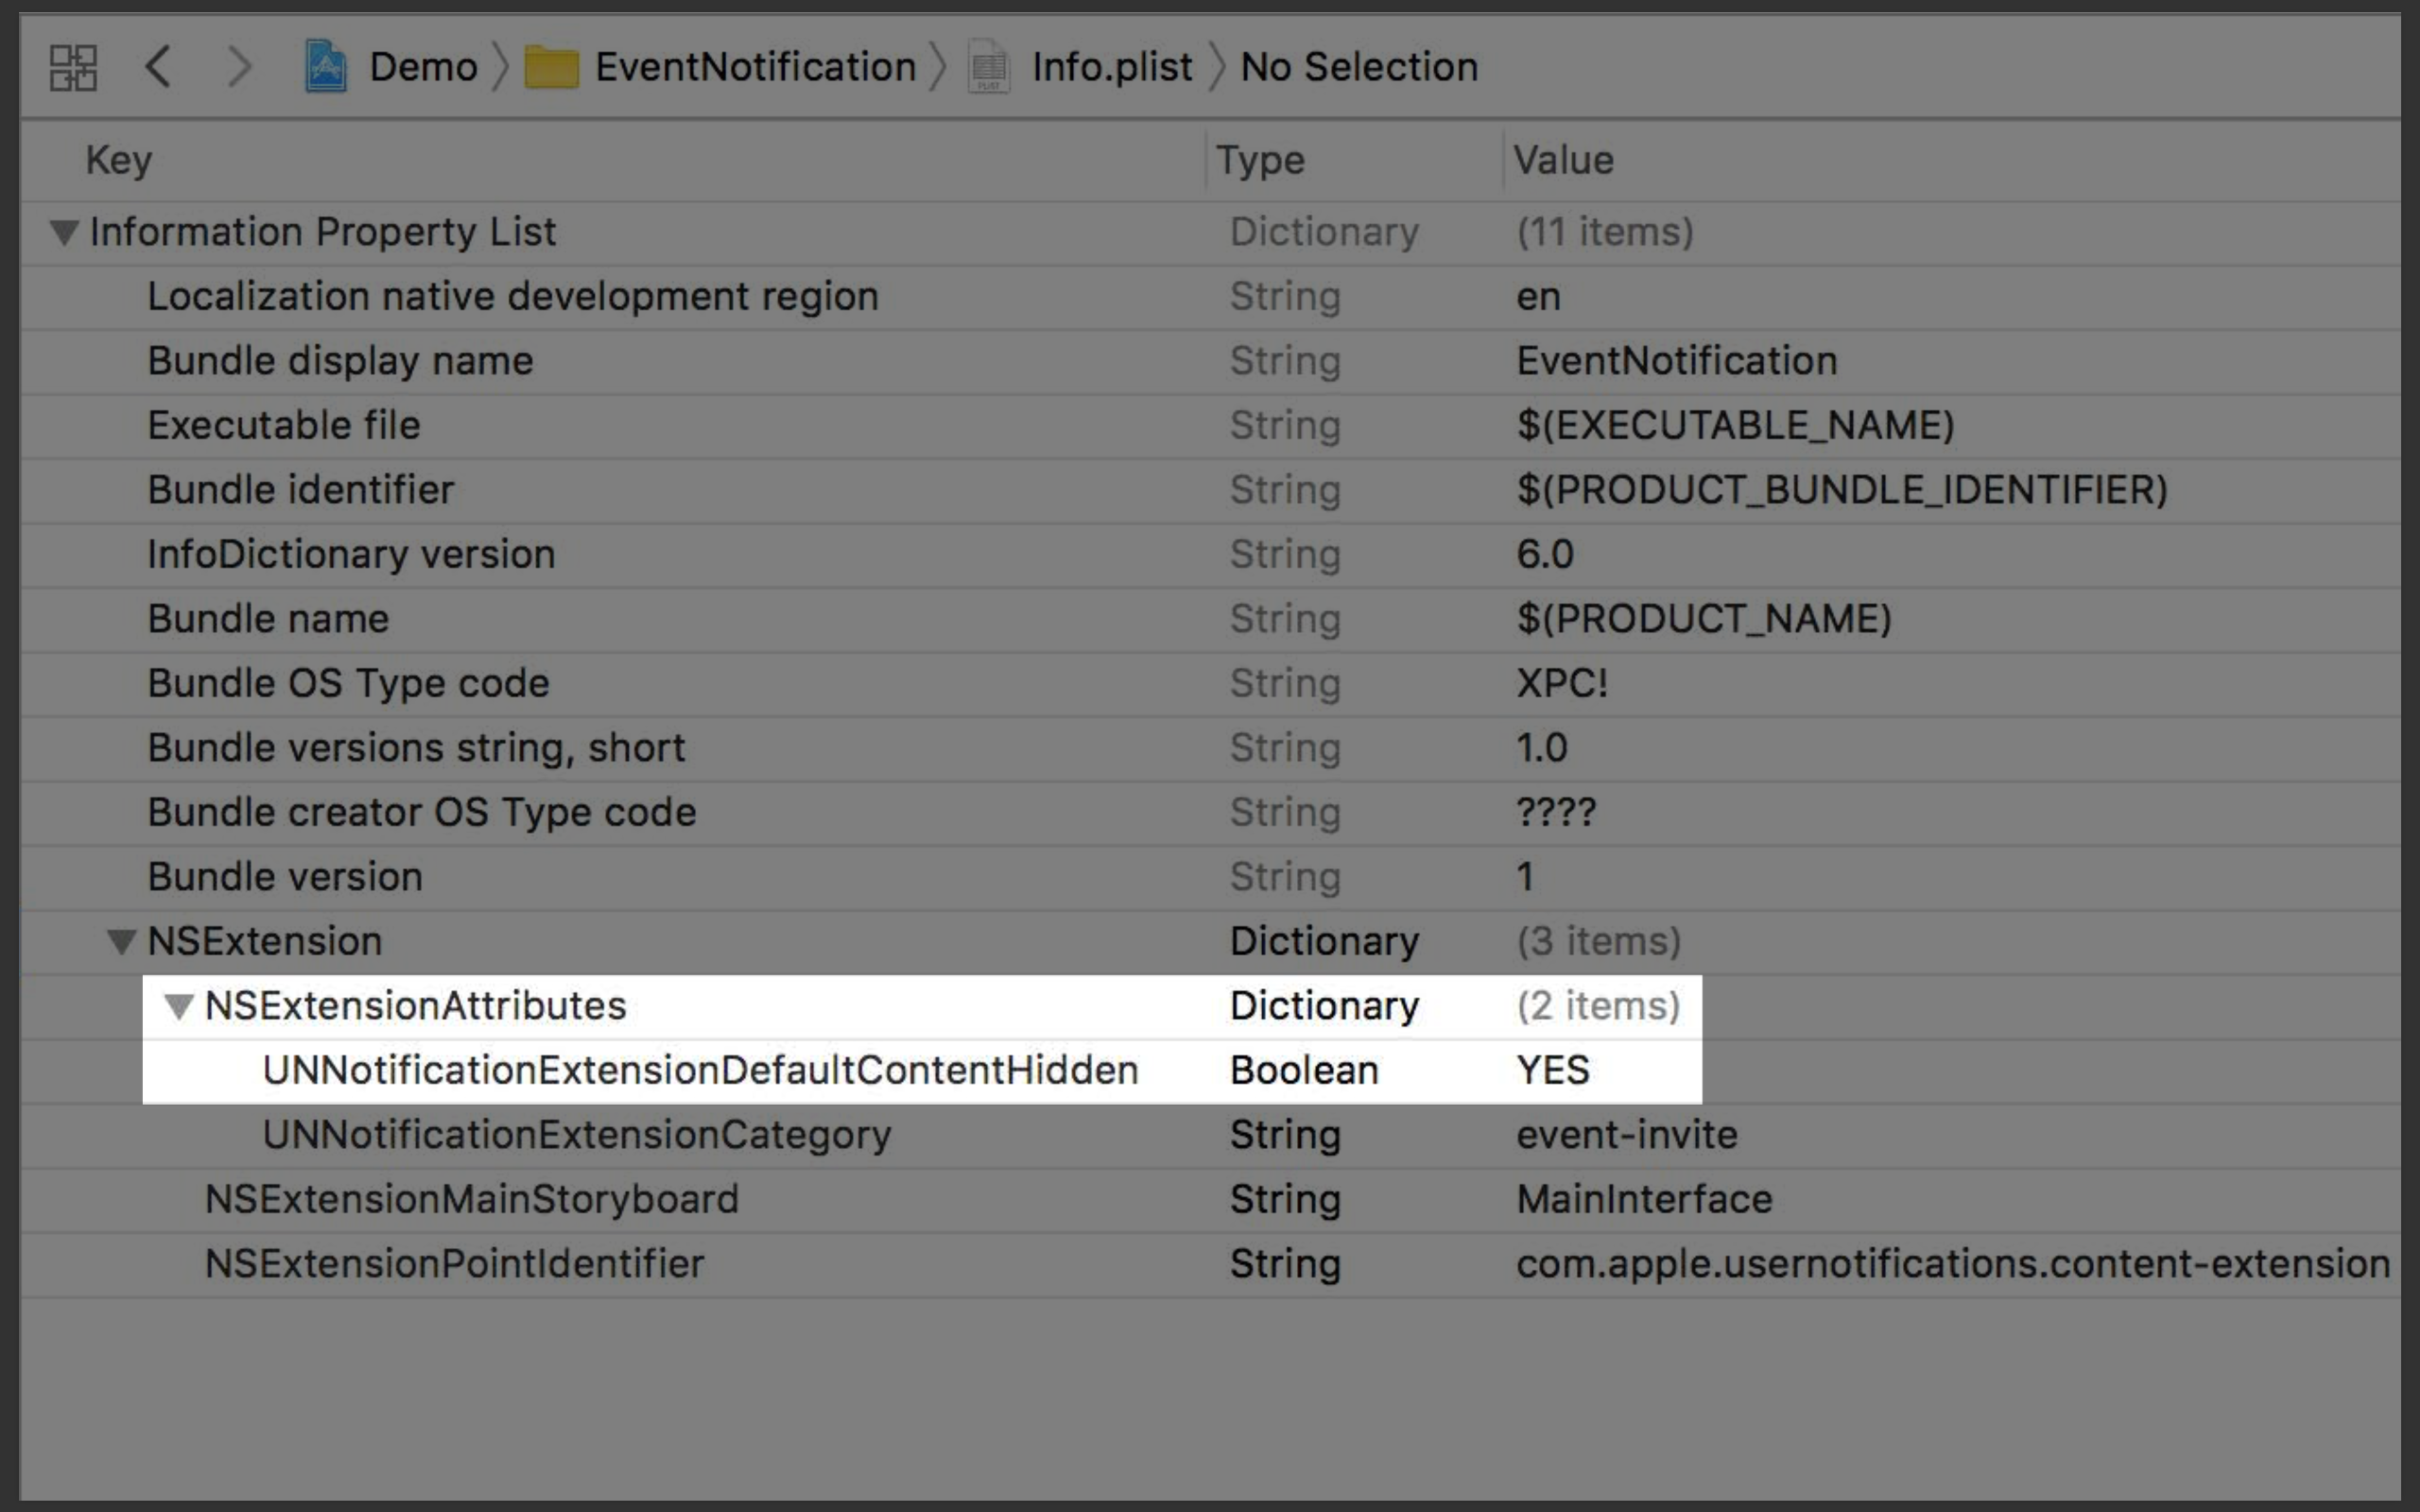
Now let’s talk about the first issue: the size of the UI. We can resize this ViewController in the same way we usually resize other ViewControllers. Let’s look at the following code.
// Notification Content Extension
class NotificationViewController: UIViewController, UNNotificationContentExtension {
    override func viewDidLoad() {

        super.viewDidLoad()
        let size = view.bounds.size

        preferredContentSize = CGSize(width: size.width, height: size.width / 2)
    }

    func didReceive(_ notification: UNNotification) {
        // ...
    }
}
Here we can also add constraints for autolayout.
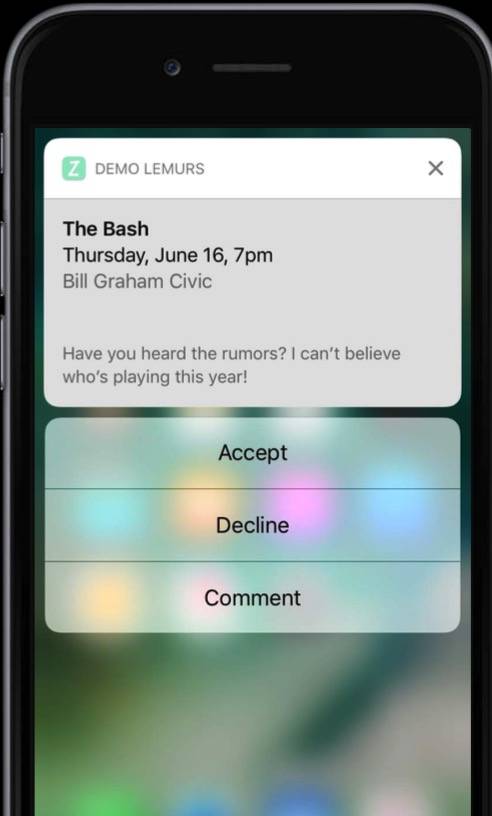
After resolving the two issues above, the UI will look like this. It looks much better than before: the size is correct, there is no extra whitespace, and there is no duplicated information. However, another issue appears. After the notification is displayed, its size is not the normal size we want. iOS performs an animation to resize it. As shown below, the system first displays the first image, then immediately displays the second image, which makes for a poor user experience.
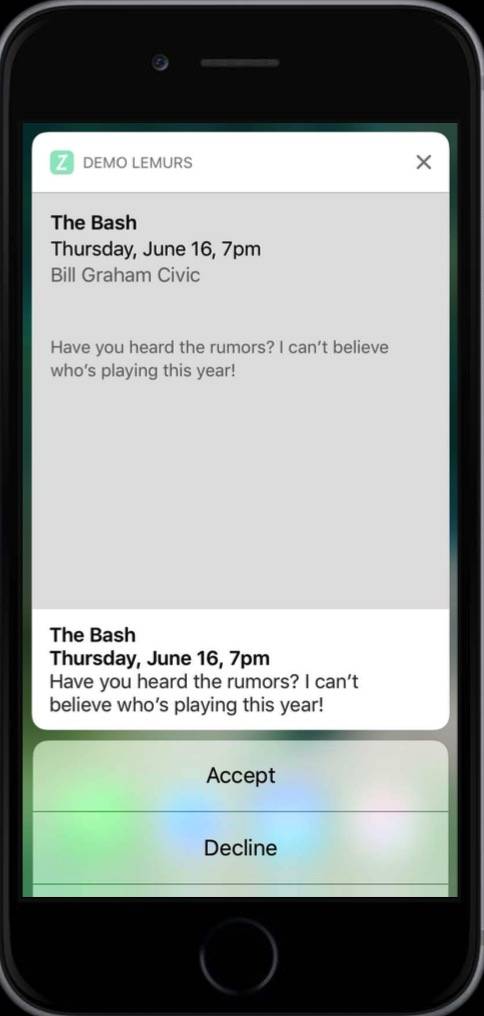
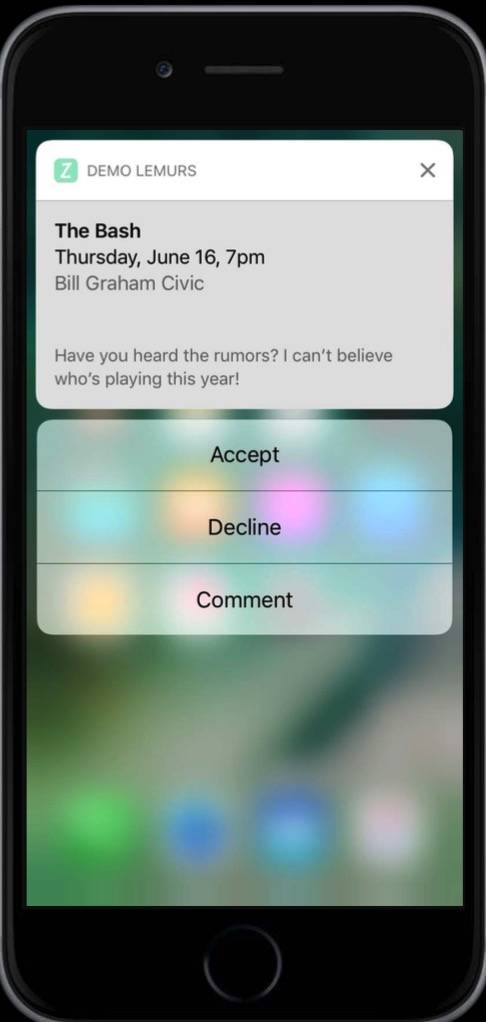
The reason the image above appears is that, at the moment the push notification is delivered, iOS needs to know the final size of our notification UI. However, when the system is about to display the push notification, our custom extension has not yet been launched. So at this point, before any of our code has run, we need to tell iOS the final size that our View should display.
Now there is another problem: these notifications will run on different devices, and different devices have different screen sizes. To solve this, we need to set a content size ratio.
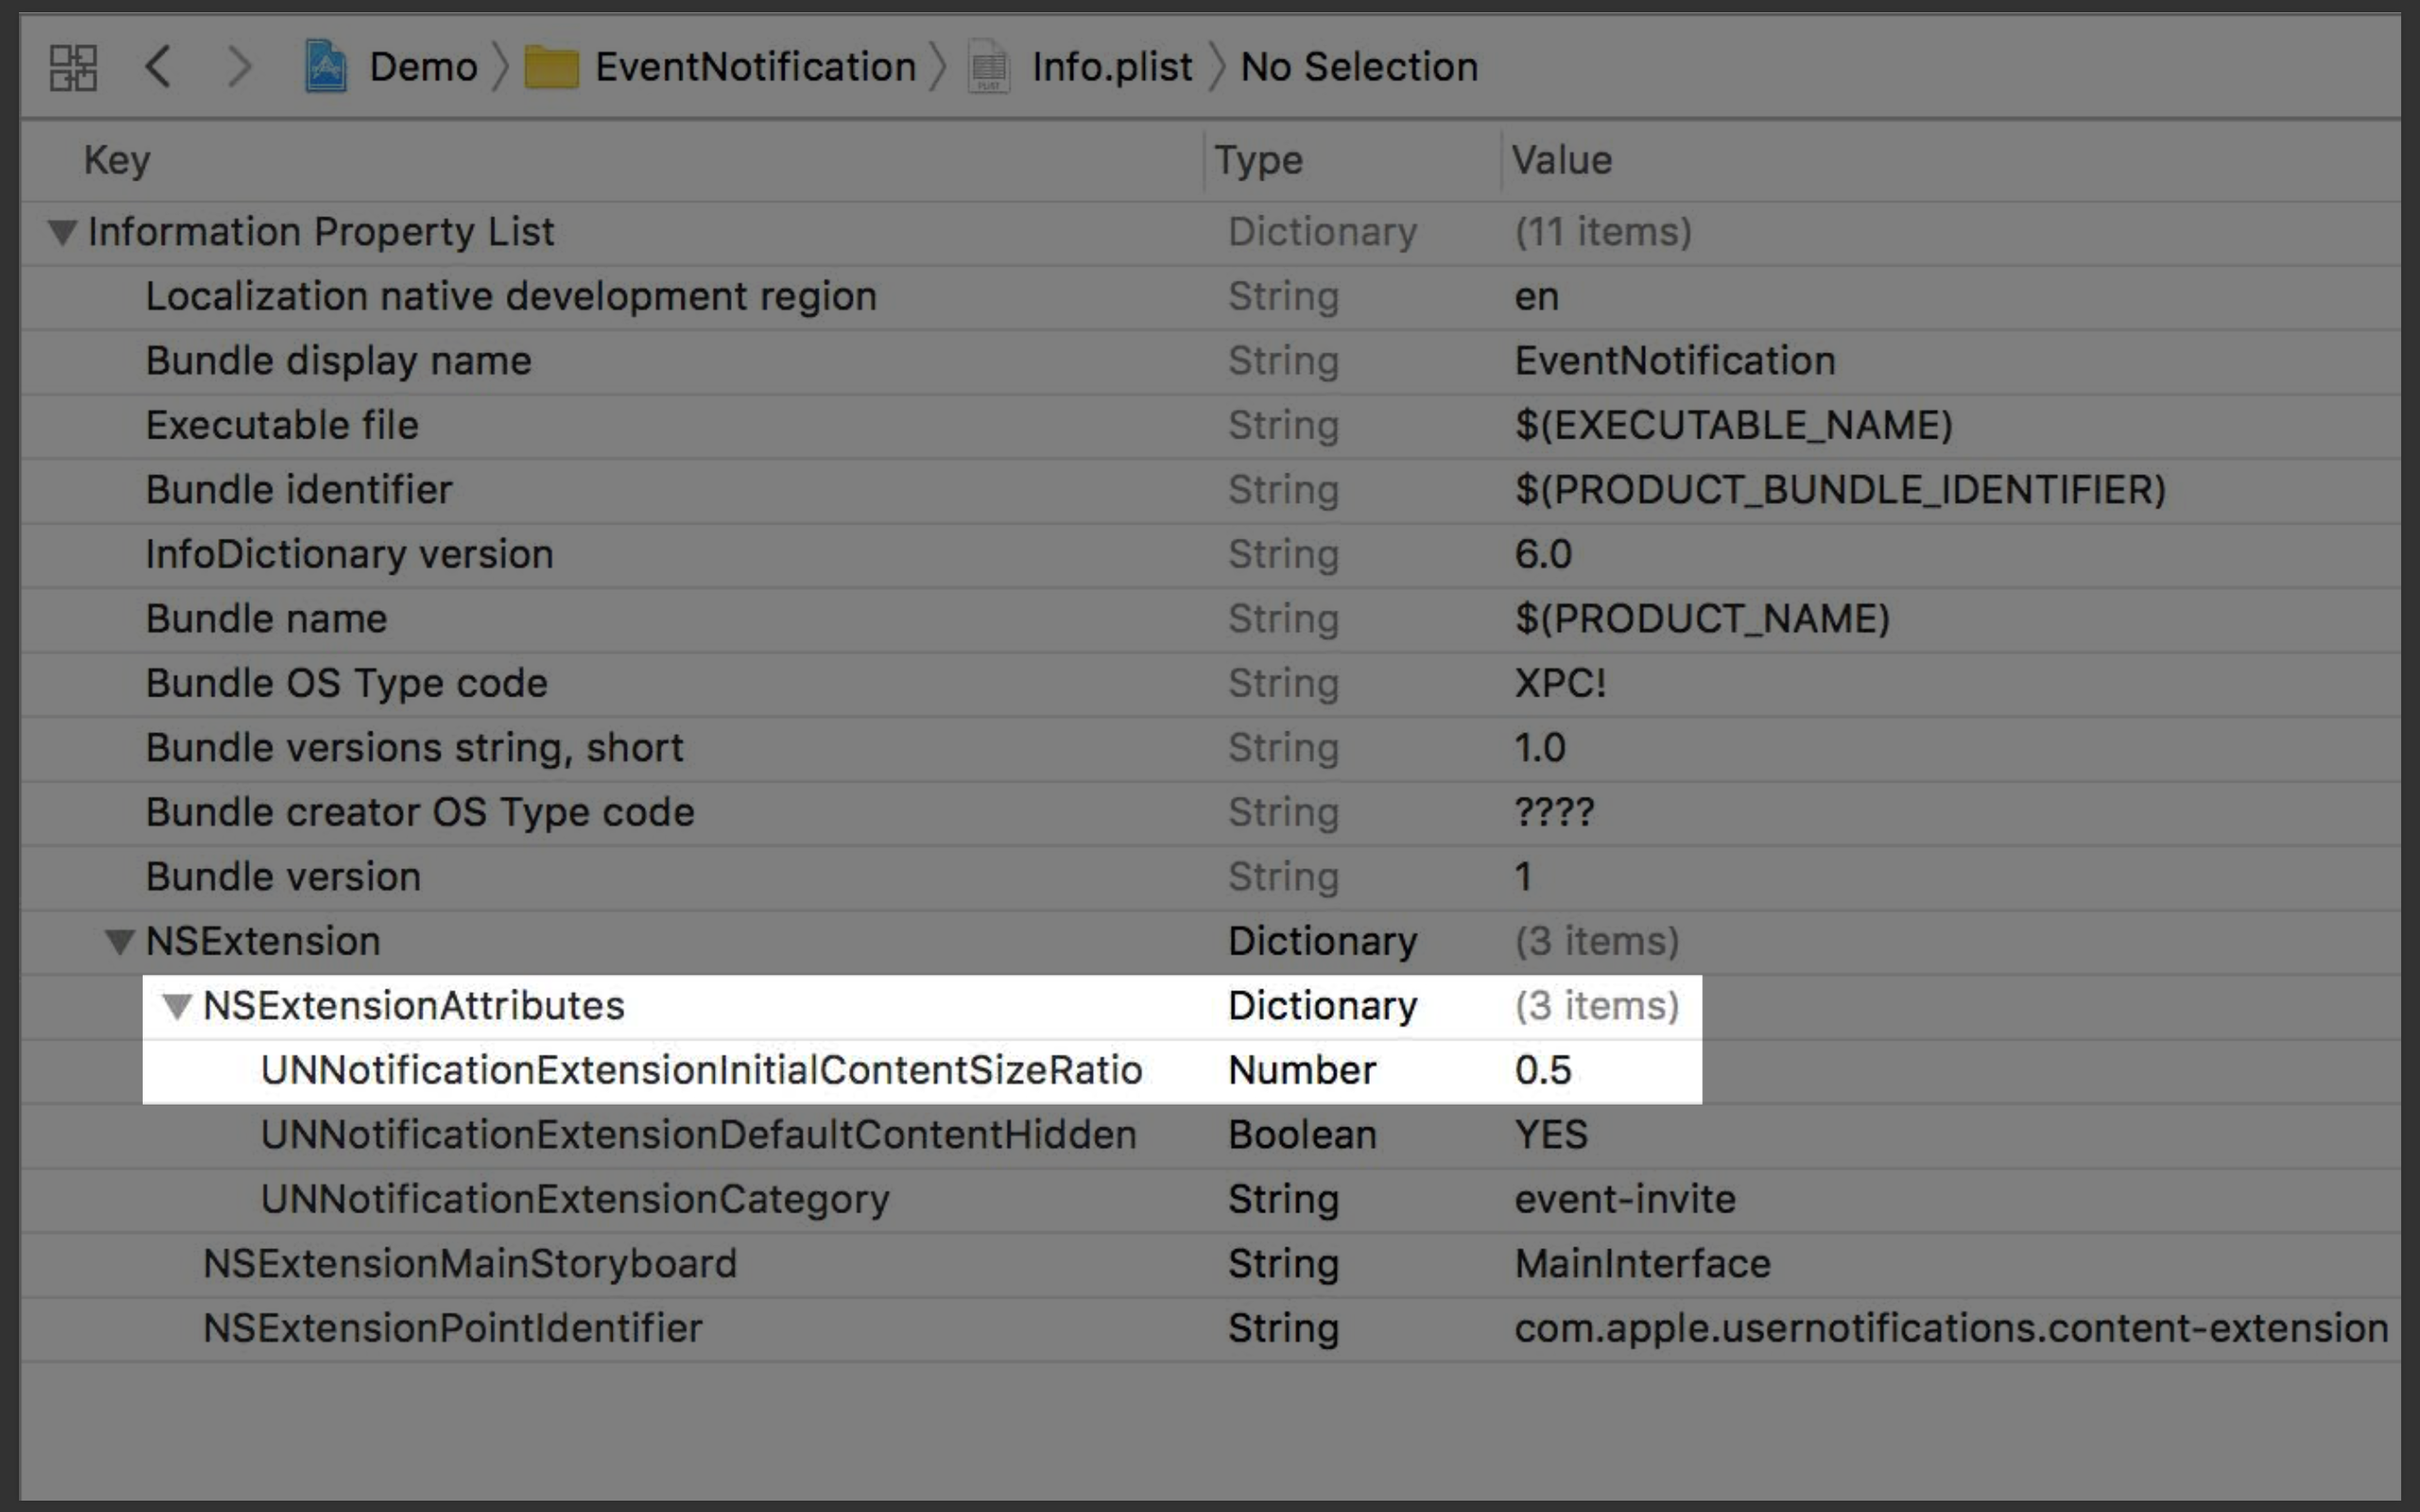
This property defines the ratio between width and height. Of course, setting this ratio is not a silver bullet. You do not know how long the content you receive will be. If you only set the ratio, you still cannot fully display all the content. In some cases, if we can know the final size, using a fixed size is better.
#####6. Further Refinement
We can add Media Attachments to this extension. Once we add Media Attachments, we can use them inside the content extension.
// Notification Content Extension Attachments
class NotificationViewController: UIViewController, UNNotificationContentExtension {
    @IBOutlet var eventImage: UIImageView!
    func didReceive(_ notification: UNNotification) {
        let content = notification.request.content
        if let attachment = content.attachments.first {
            if attachment.url.startAccessingSecurityScopedResource() {
                eventImage.image = UIImage(contentsOfFile: attachment.url.path!)
                attachment.url.stopAccessingSecurityScopedResource()
            }
        }
    }
}
We can extract the attachments from the content. As mentioned earlier, attachments are managed by the system, and the system manages them separately. This means they are stored outside our sandbox. Therefore, before we use an attachment here, we need to tell iOS that we need access to it, and after we are done, tell the system that we have finished using it. In the code above, these correspond to the calls to startAccessingSecurityScopedResource() and stopAccessingSecurityScopedResource(). Once we have obtained access to the attachment, we can use that file to retrieve the information we need.
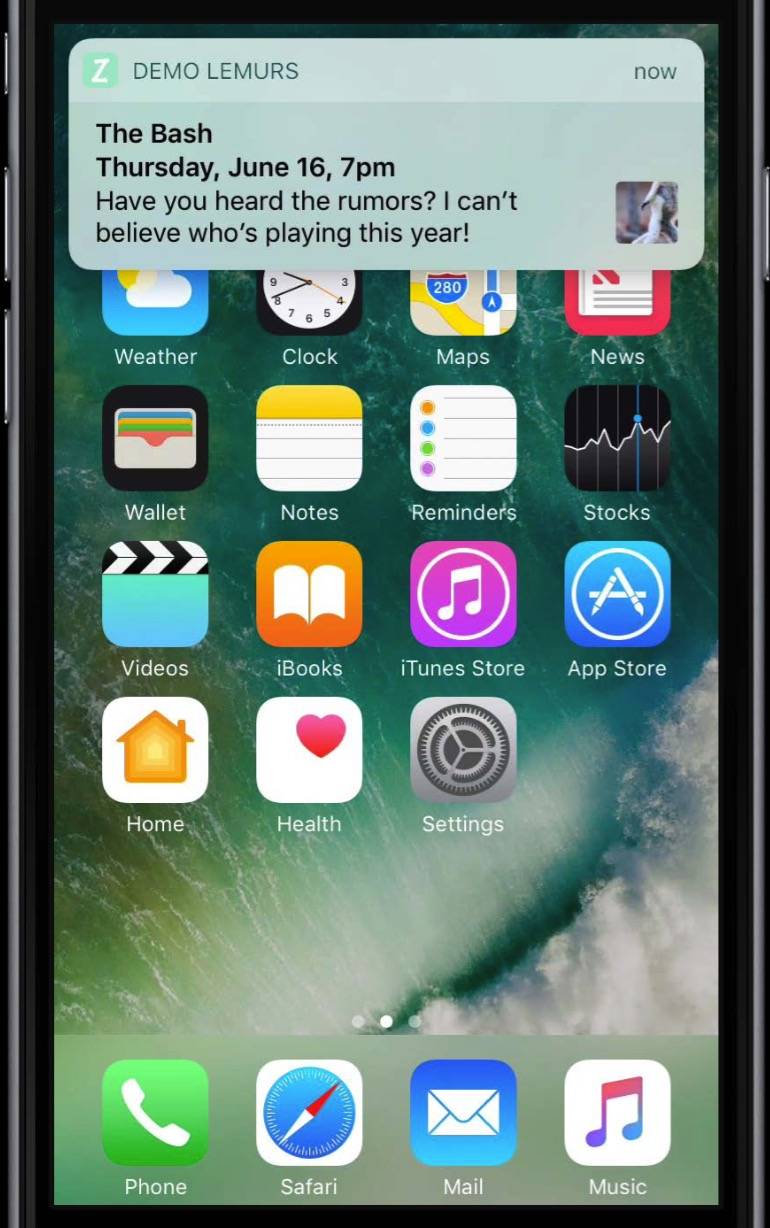
In the example above, we retrieve an image from the attachment and display it in a UIImageView. The notification then looks like this:
IV. Customize Actions
At this point, we need to talk about how actions introduced in iOS 8 work:
By default, the system handles actions as follows: when the user taps a button, the action is passed to the app, and at the same time, the push notification immediately disappears. This behavior is very convenient.
However, there is another scenario. When the user taps a button—for example, to accept a calendar invitation—we may need to reflect that operation immediately in our custom UI. In this case, we can only handle these user tap events with a Notification content extension. When the user taps the button, we pass the action directly to the extension rather than to the app. When actions are delivered to the extension, it can delay the dismissal of the push notification. During this delay, we can handle the user’s button tap and update the UI. After everything has been processed, we then dismiss the push notification.
Here we can use the second method of the UNNotificationContentExtension protocol. This method is optional.
// Intercepting notification action response
class NotificationViewController: UIViewController, UNNotificationContentExtension {
    func didReceive(_ response: UNNotificationResponse, completionHandler done: (UNNotificationContentExtensionResponseOption) -> Void) {
        server.postEventResponse(response.actionIdentifier) {
            if response.actionIdentifier == "accept" {
                eventResponse.text = "Going!"
                eventResponse.textColor = UIColor.green()
            } else if response.actionIdentifier == "decline" {
                eventResponse.text = "Not going :("
                eventResponse.textColor = UIColor.red()
            }
            done(.dismiss)
        }
    }
}
If you do not use this method, you do not need to declare it. But once you declare it, you need to handle all actions in the push notification within this method. This means you cannot handle only one action and ignore the others.
In the code above, when the user taps a button, we synchronize the server information. After receiving the server response, we update the UI. When the user taps “accept”, it means they have accepted the party invitation, so we change the color of the text to green. When the user taps “decline”, it means they have declined, so we change the color of the text to red. After the user taps and the UI has been updated, we dismiss the push notification.
One thing worth mentioning here is that if you also want to pass this action to the app, the final parameter should be as follows.
done(.dismissAndForwardAction)
After the parameters are configured this way, the user’s action will be passed to the app.
If the user also wants to enter text to comment on this push notification at this point, how should we handle it?
This text input requirement comes from iOS 9. Its usage is the same as in iOS 9.
// Text Input Action
private func makeEventExtensionCategory() -> UNNotificationCategory {
    let commentAction = UNTextInputNotificationAction(
        identifier: "comment",
        title: "Comment",
        options: [],
        textInputButtonTitle: "Send",
        textInputPlaceholder: "Type here...")
    return UNNotificationCategory(identifier: "event-invite", actions: [ acceptAction, declineAction, commentAction ],
}
We can create a UNTextInputNotificationAction and set it in the Category in the plist. When the push notification arrives and the user taps the button, the textfield will be displayed. The code for handling the action is as follows:
// Text input action response
class NotificationViewController: UIViewController, UNNotificationContentExtension {
    func didReceive(_ response: UNNotificationResponse,
                      completionHandler done: (UNNotificationContentExtensionResponseOption) -> Void) {
        if let textResponse = response as? UNTextInputNotificationResponse {
            server.send(textResponse.userText) {
            }
        }
    }
}
At this point, when the user taps the comment button, a text field will pop up.
There is another issue here: after the user taps the comment button, the previous Accept and Decline buttons disappear. At this point, the user may want to both leave a comment and accept or decline. So we need to add these two buttons above the keyboard, as shown below.
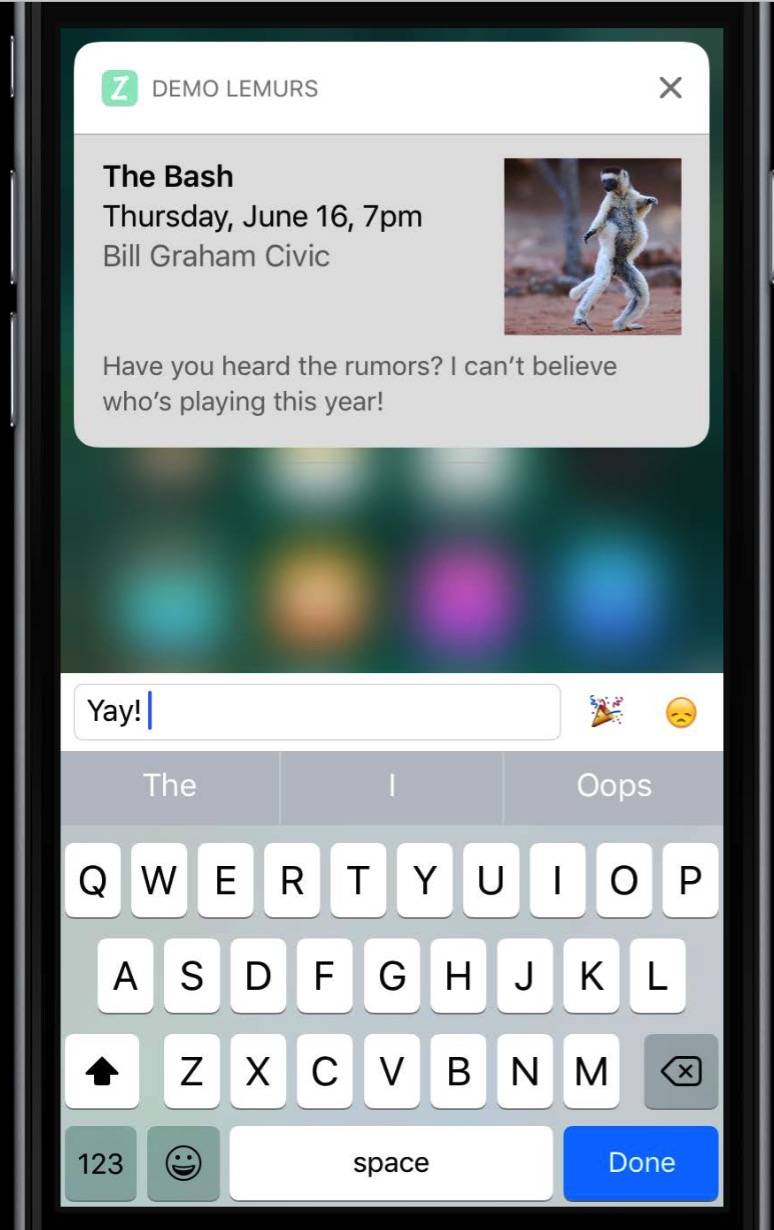
There is no new API here; we still use the original API. We can use the existing UIKit API to customize the input accessory view. It allows developers to add custom buttons.
// Custom input accessory view
class NotificationViewController: UIViewController, UNNotificationContentExtension {
    override func canBecomeFirstResponder() -> Bool {
        return true
    }
    override var inputAccessoryView: UIView { get {
        return inputView
        }
    }
    func didReceive(_ response: UNNotificationResponse,
                      completionHandler done: (UNNotificationContentExtensionResponseOption) -> Void) {
        if response.actionIdentifier == "comment" {
            becomeFirstResponder()
            textField.becomeFirstResponder()
        }
    }
}
Let’s break down the code above. First, we need to make the ViewController become the first responder. This does two things: first, it tells the responder chain that it has become the first responder; second, it tells the iOS system that we do not want to use the system’s standard text field. After that, we can create a custom inputAccessoryView. As shown in the image above, it contains two custom buttons. Then, when the extension receives the action triggered by the user tapping a button, the custom text field becomes the first responder, and the keyboard appears along with it.
Note that two calls to becomeFirstResponder are required here. The first becomeFirstResponder makes the view controller the first responder, so the text field appears. The second becomeFirstResponder makes our custom text field the first responder, so the keyboard is brought up.
Summary
That’s all of the new notification features in iOS X. From the discussion above, we learned the following:
- What an attachment is
- How to use an attachment in a service extension
- How to define the user UI for a content extension
- How to respond to user actions
Finally, feedback and suggestions are very welcome.
