WWDC 2016 Session Notes - New Features in iOS 10 UICollectionView
Preface
The new features of UICollectionView in iOS 10 are mainly reflected in the following three areas:
- A smoother scrolling experience
Today, almost everyone depends on their phone, and people use mobile apps every day. The quality of an app is determined by its user experience. For scrollable views, the scrolling must be smoother and more fluid to win users over. These new
UICollectionViewfeatures can make your app much smoother than before, and you only need to add a small amount of code to achieve that. - Improvements for self-sizing The self-sizing API was introduced in iOS 8. In iOS 10, more features were added to make cells easier to adapt.
- Interactive reordering This feature was introduced in iOS 9, and Apple significantly enhanced it in the iOS 10 API.
####Table of Contents
- 1.Smooth scrolling experience for UICollectionViewCell
- 2.Pre-Fetching for UICollectionViewCell
- 3.Pre-Fetching for UITableViewCell
- 4.Improvements for self-sizing
- 5.Interactive Reordering
- 6.UIRefreshControl
I. Smooth scrolling experience for UICollectionViewCell
As we all know, iOS devices have earned a large user base through excellent user experience. The iOS system responds immediately when the user taps the screen. A large portion of user interactions also come from scrolling gestures. Therefore, smooth scrolling is essential for keeping users immersed in an app. Next, let’s discuss what new features were added in iOS 10.
First, let’s look at the previous UICollectionView experience. Suppose every cell is simply blue; in real app development, cells are often much more complex than this. We first generate 100 cells. When the user scrolls slowly, the stutter is not very noticeable. But when the user scrolls a large distance quickly, the entire UICollectionView stutters quite obviously. If the cell’s data source is loaded from the network, the stutter becomes even worse. The effect is shown below.
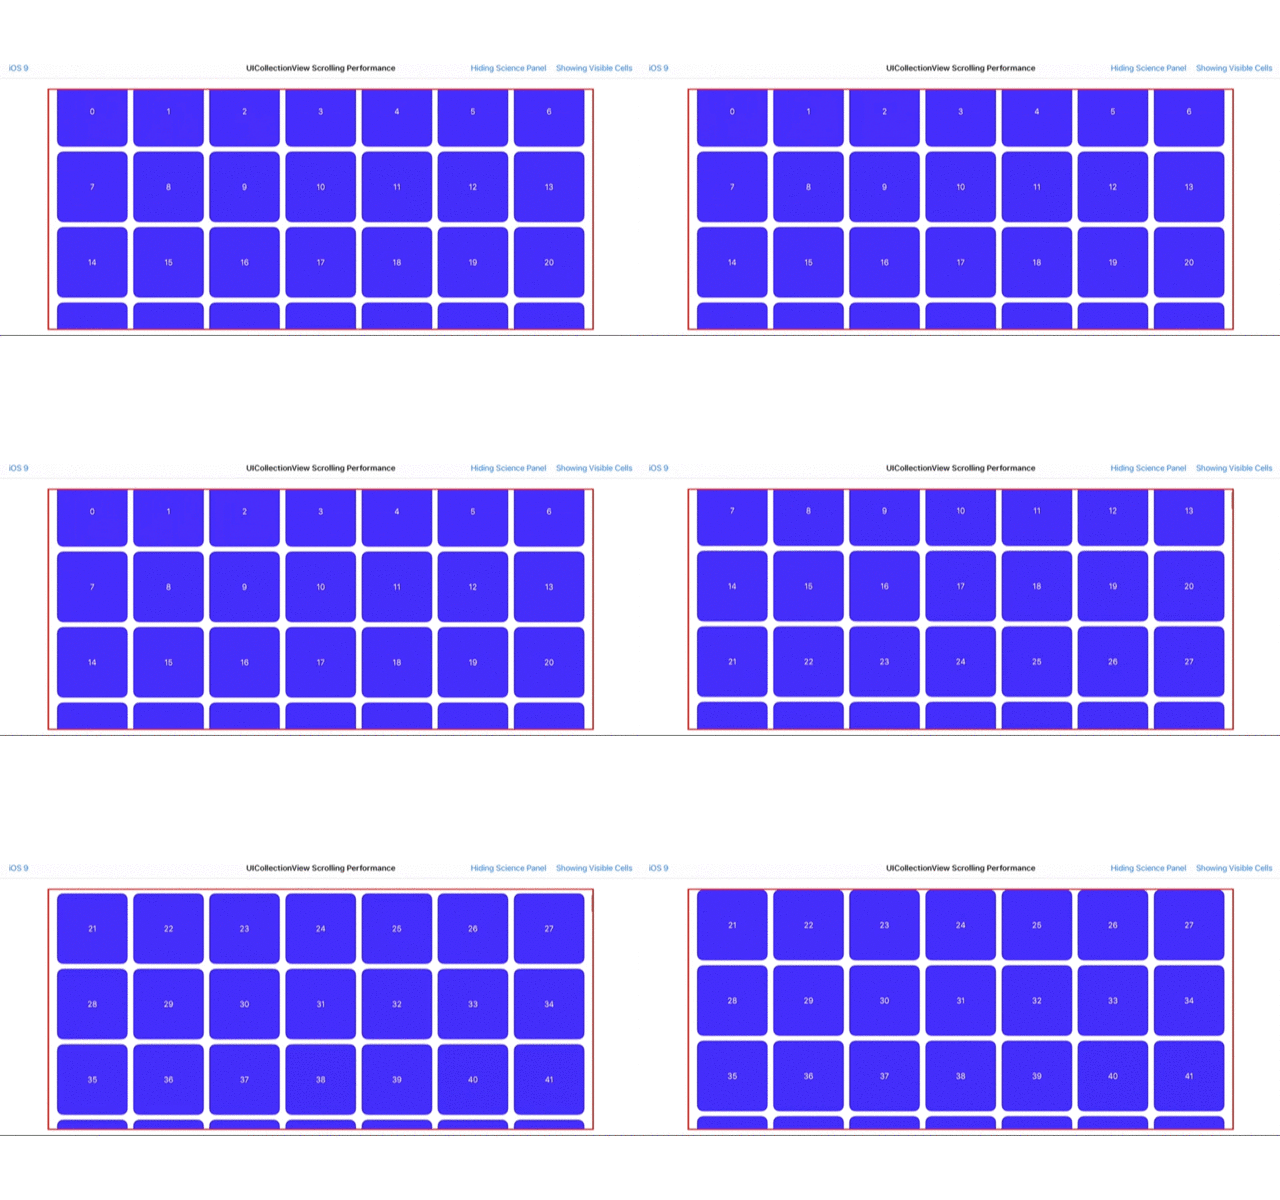
If this kind of app were published to the App Store, users would very likely give it a one-star rating after trying it. But why does this problem occur? Let’s analyze it by simulating how the system handles the reuse mechanism, as shown below.
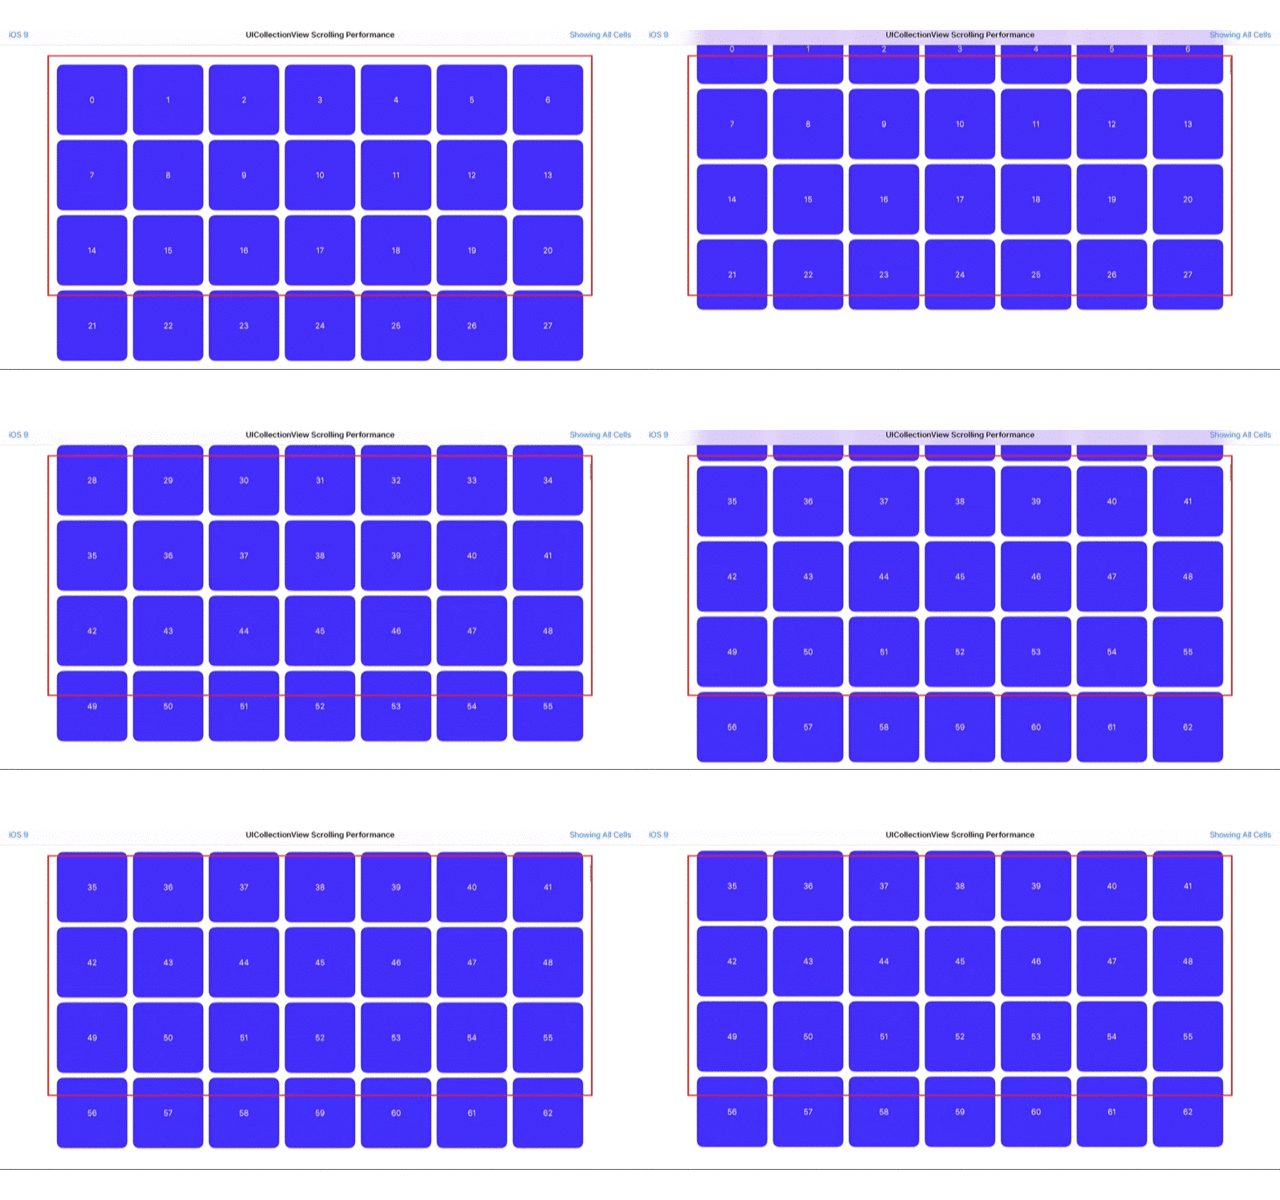
From the image above, we can see that when a cell is about to be loaded onto the screen, the entire cell has already finished loading and is waiting outside the screen. More importantly, the cells waiting outside the screen are an entire row! All cells in that row have already loaded their data. This is the root cause of UICollectionView stutter when the user scrolls aggressively. In professional terms, this is frame dropping.
Next, let’s discuss the frame-dropping issue in detail.
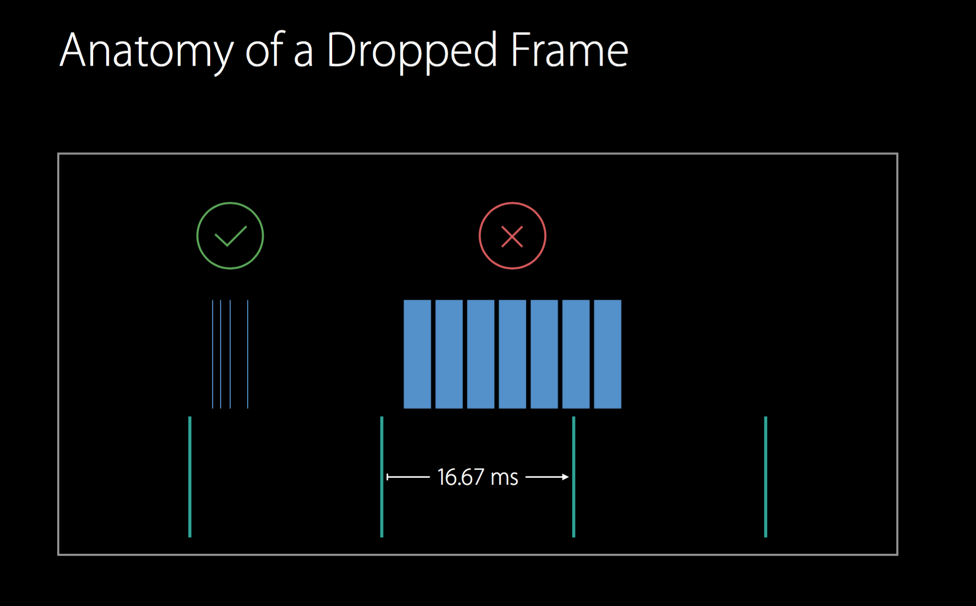
Users today are very demanding. They expect an extremely smooth experience. Even a small amount of stutter can be enough for them to uninstall the app immediately. To make users feel no stutter, our app must maintain a frame rate of 60 frames per second. In mathematical terms, that means each frame must be refreshed every 16 milliseconds.
Let’s analyze the frame-dropping problem using diagrams. Below are two different frame scenarios.
In the first case, the image below shows the user scrolling slightly up and down. At this point, the loading pressure for each cell is not high. iOS has already done a very good job optimizing this scenario, so the user does not perceive any stutter. In this case, no frames are dropped, and users get the smooth app experience they expect.
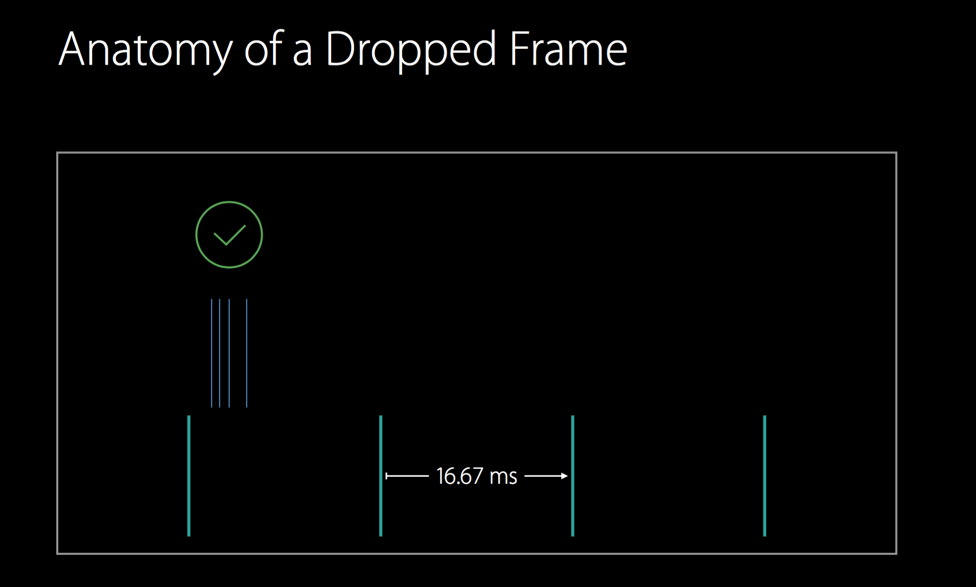
In the second case, when the user scrolls a large distance quickly, each cell has much higher loading pressure. It may require a network request, it may need to read from a database, and each time an entire row of cells is loaded. As a result, the loading time for each cell increases, and the total time to load a row increases significantly, as shown below. In this situation, not only is the current frame used to load cells, but the total time also spills over into the next frame’s time budget. Under these circumstances, the user perceives stutter.
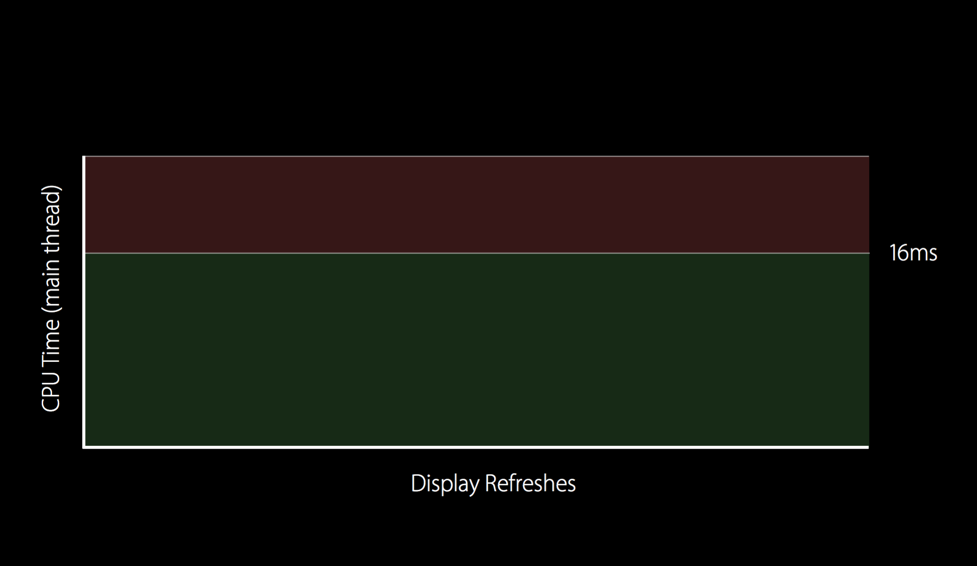
Let’s explain frame drops in these two scenarios from another perspective. We use the following diagram as the standard to evaluate the two scenarios above. The diagram is divided into two parts. The red area at the top represents the frame-dropping region because it is above 16 ms. The boundary between the red and green regions is at 16 ms. The y-axis represents the time the CPU spends on the main thread. The x-axis represents refresh events that occur while the user is scrolling.
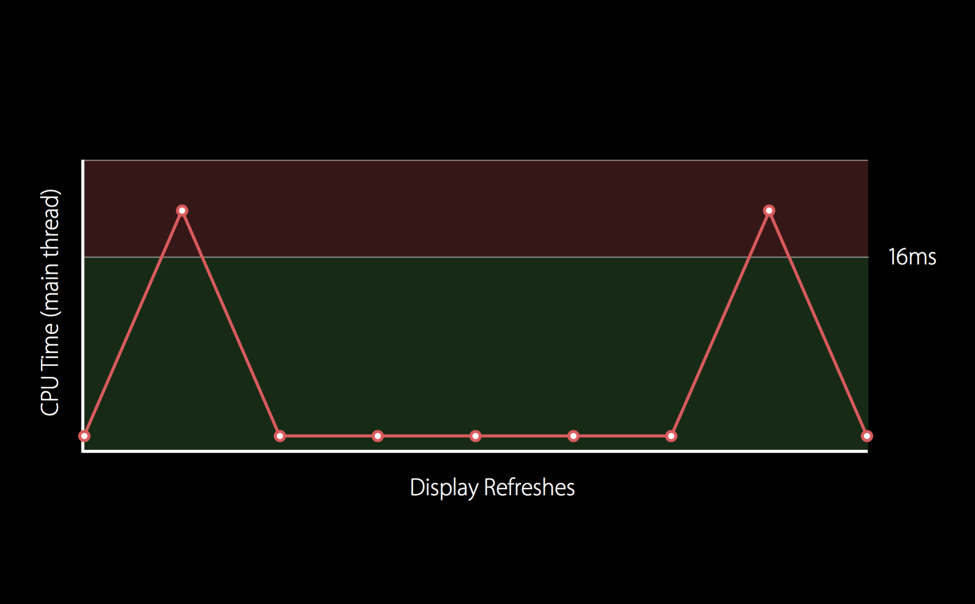
For the frame-dropping situation described above, we can plot experimental data as shown below. What deserves our attention is that the curve is very jagged and far from smooth. When the user scrolls aggressively, the peak exceeds 16 ms. When the user scrolls slowly, the frame rate can still remain in the relatively smooth region. Cells in the green region have very little loading pressure. This is the kind of scenario where frames are dropped intermittently while scrolling is smooth at other times. In this scenario, the user experience is very poor.
So how do we solve this problem? Let’s look at the following image:
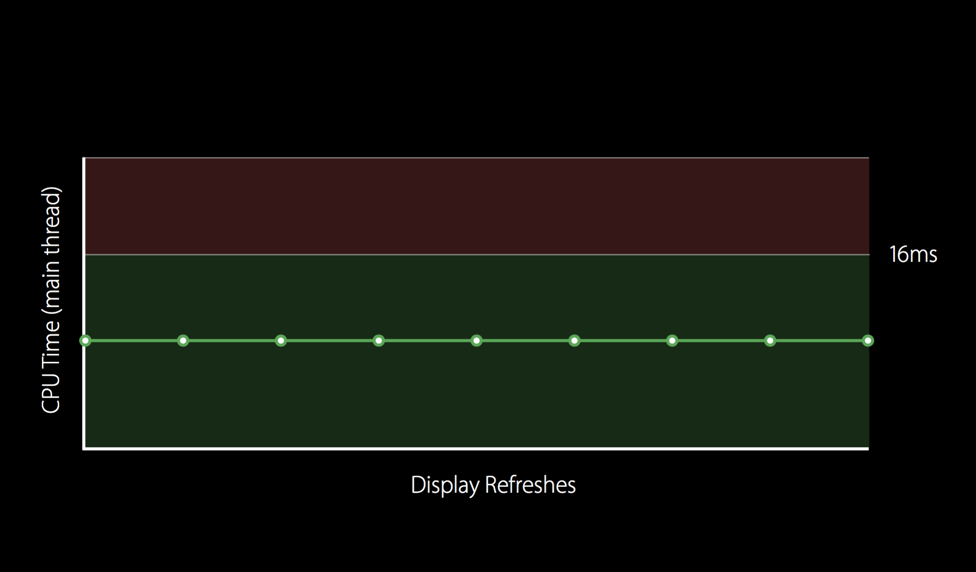
The curve in the image above looks much flatter, and frame drops no longer occur in this scenario. Every scrolling interval can maintain 60 frames per second. How is this achieved? Because the loading work for each cell is evenly distributed. Each cell no longer alternates between the two extremes of being very busy and very idle. This eliminates the previous peaks and valleys, making the curve almost a horizontal straight line.
How can each cell share the pressure of the loading work? This brings us to the new cell lifecycle.
First, let’s look at the old UICollectionViewCell lifecycle. When the user scrolls the screen, a cell outside the screen is about to be loaded and displayed.
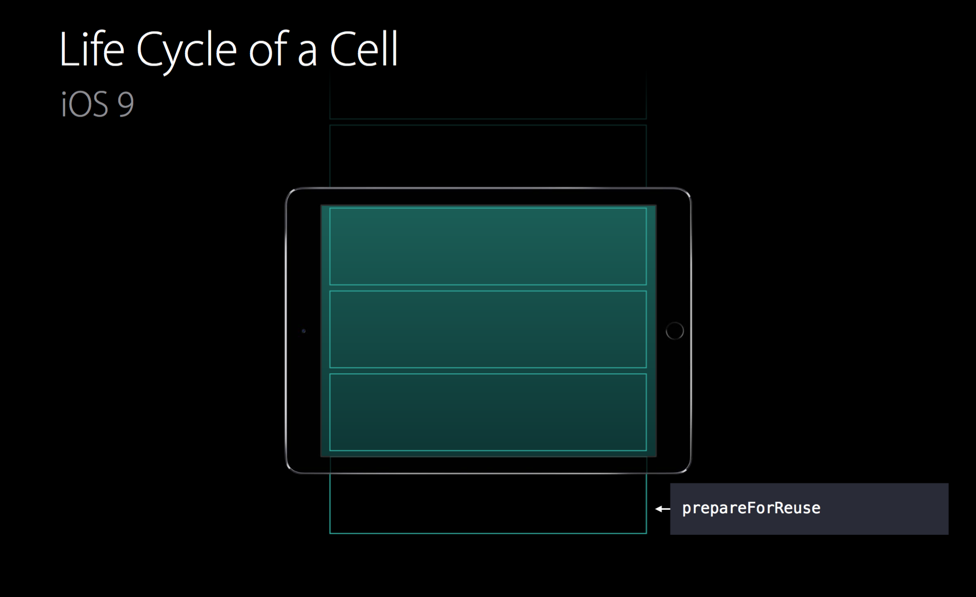
At this point, we take the cell out of the reuse queue and call the prepareForReuse method. This method gives the cell time to reset itself, reset its state, refresh the cell, and load new data.
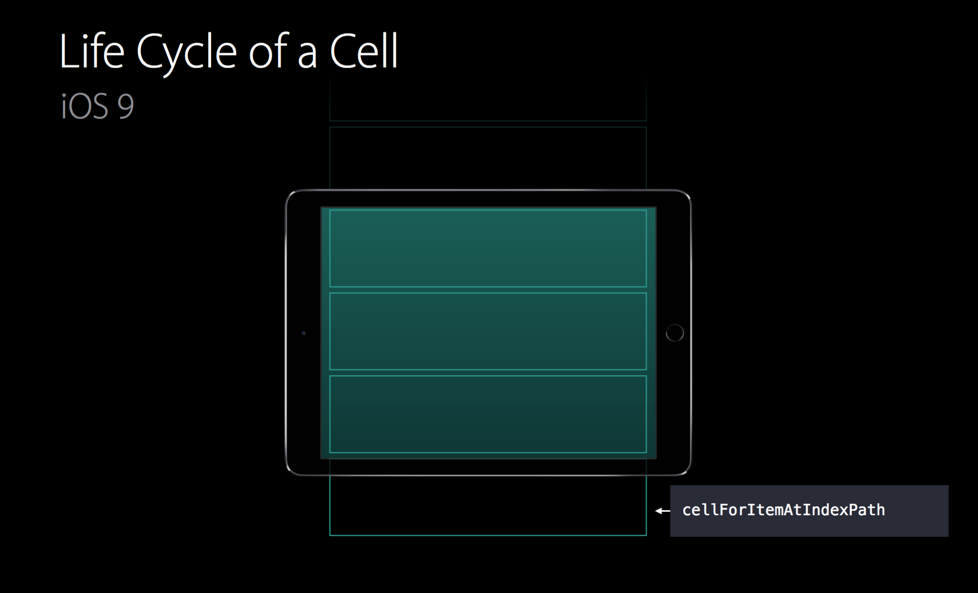
As scrolling continues, cellForItemAtIndexPath is called. This method contains the developer-defined logic for configuring the cell. Here, the data model is populated, assigned to the cell, and then the cell is returned to the iOS system.
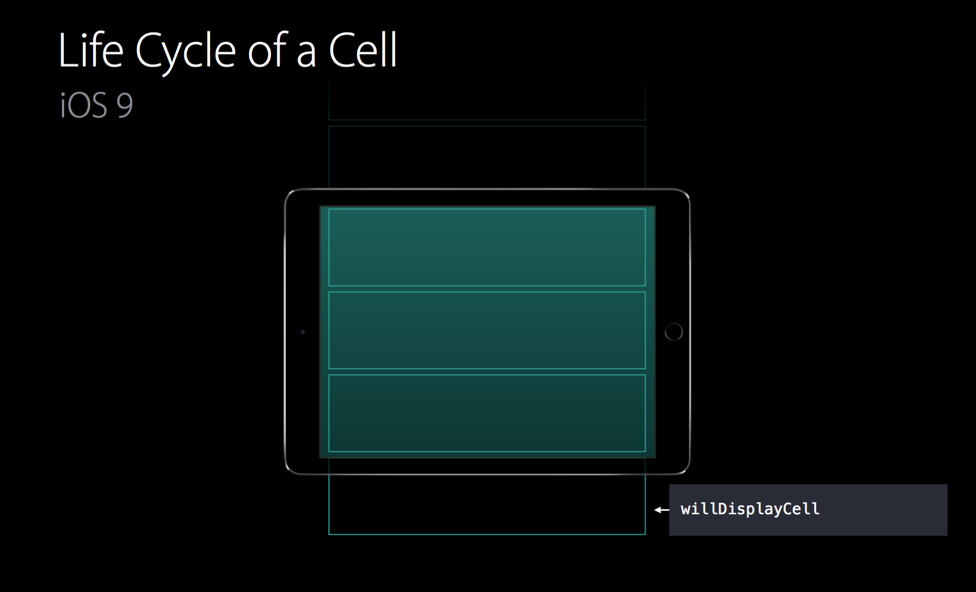
When the cell is just about to enter the screen, willDisplayCell is called. This method gives our app one last chance to do final preparation before the cell appears on screen. After willDisplayCell finishes executing, the cell enters the screen.
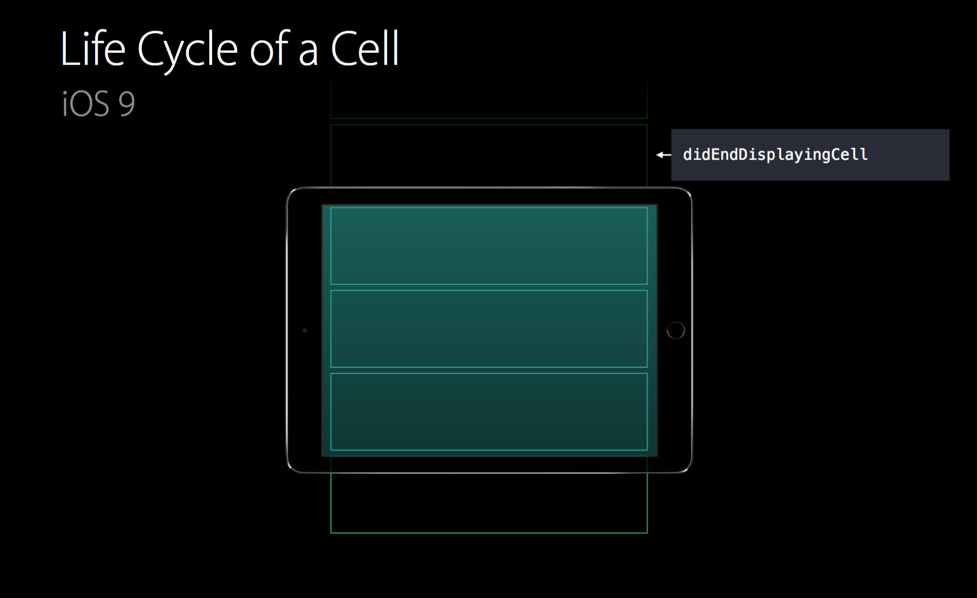
After the cell has completely left the screen, didEndDisplayingCell is called. The above is the entire UICollectionViewCell lifecycle before iOS 10.
Next, let’s look at what the UICollectionViewCell lifecycle is like in iOS 10.
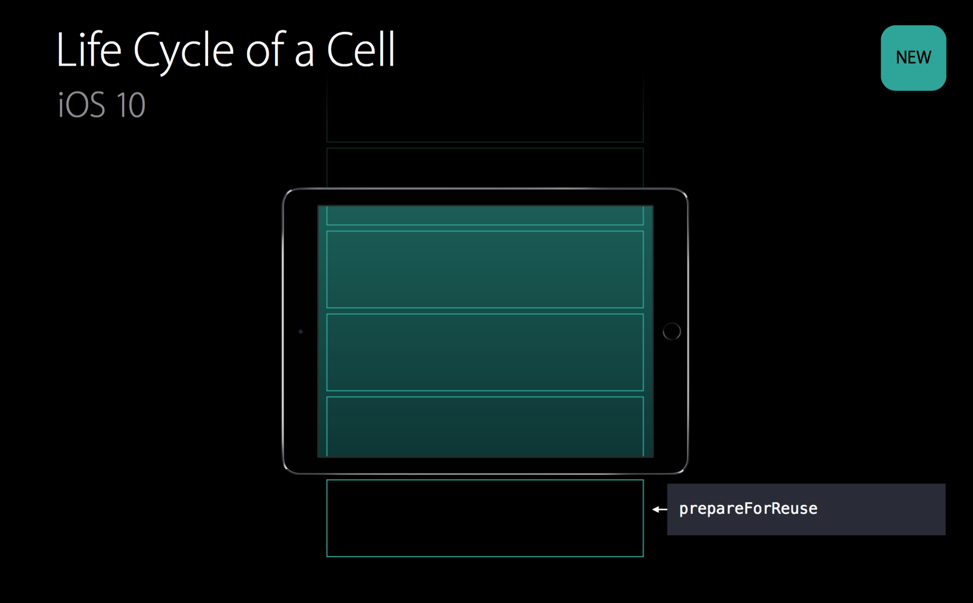
This part is still the same as in iOS 9. When the user scrolls the UICollectionView and a cell is needed, we take a cell from the reuse queue and call prepareForReuse. Pay attention to when this method is called: it is called in advance, before the cell has entered the screen. Compare this with iOS 9. In iOS 9, the method is called only when the cell’s upper edge is about to enter the screen. Here, the cell’s entire lifecycle has been moved earlier, to when the cell is still outside the device’s visible area.
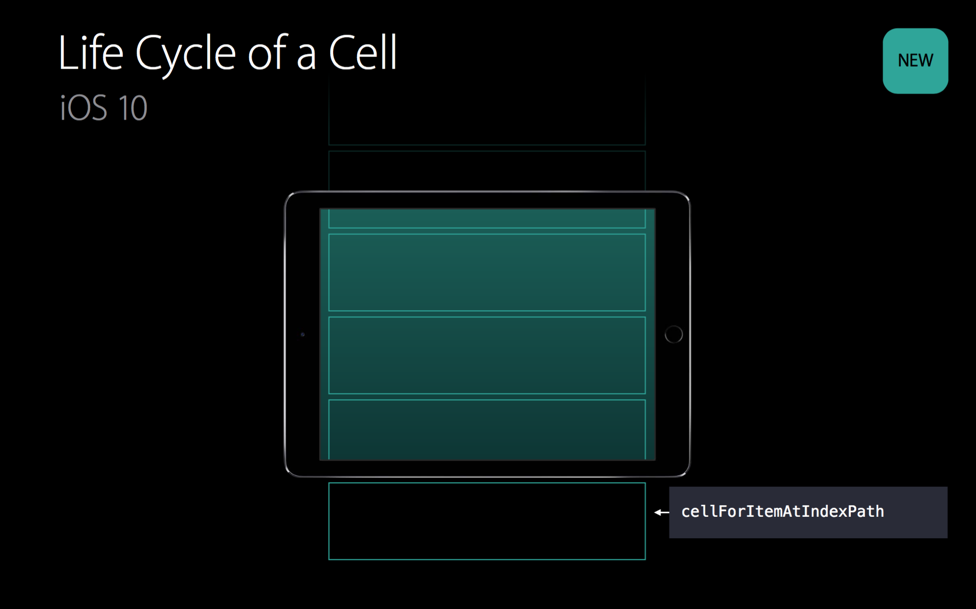
This is still the same as before: the cell is created in cellForItemAtIndexPath, data is populated, state is refreshed, and so on. Note that this part of the lifecycle also occurs earlier than it did in iOS 9.
The user continues scrolling, and now things become different!
At this point, we do not call willDisplayCell yet! The principle here is: call willDisplayCell only when it is actually time to display the cell.
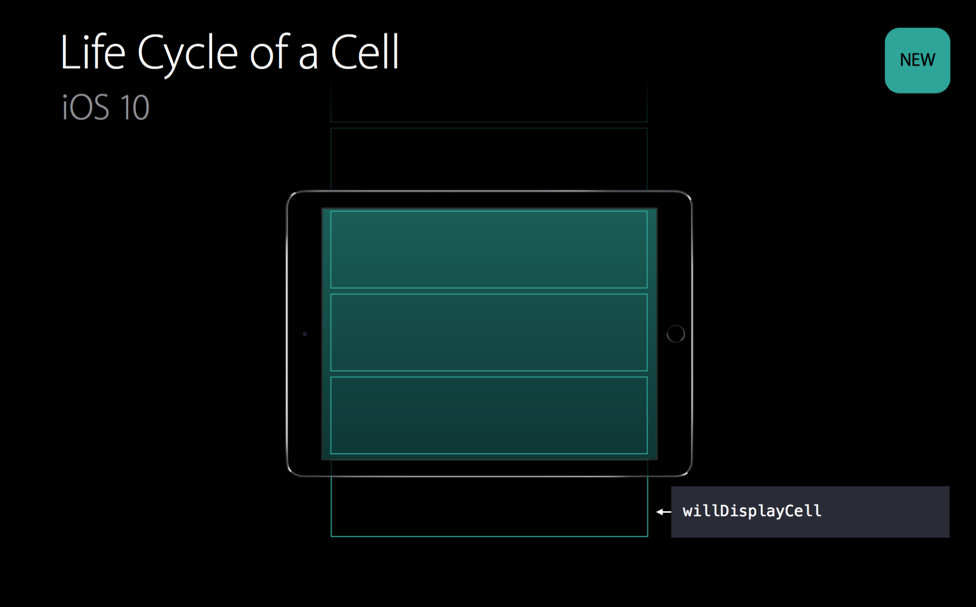
When the cell is just about to be displayed, we then call willDisplayCell.
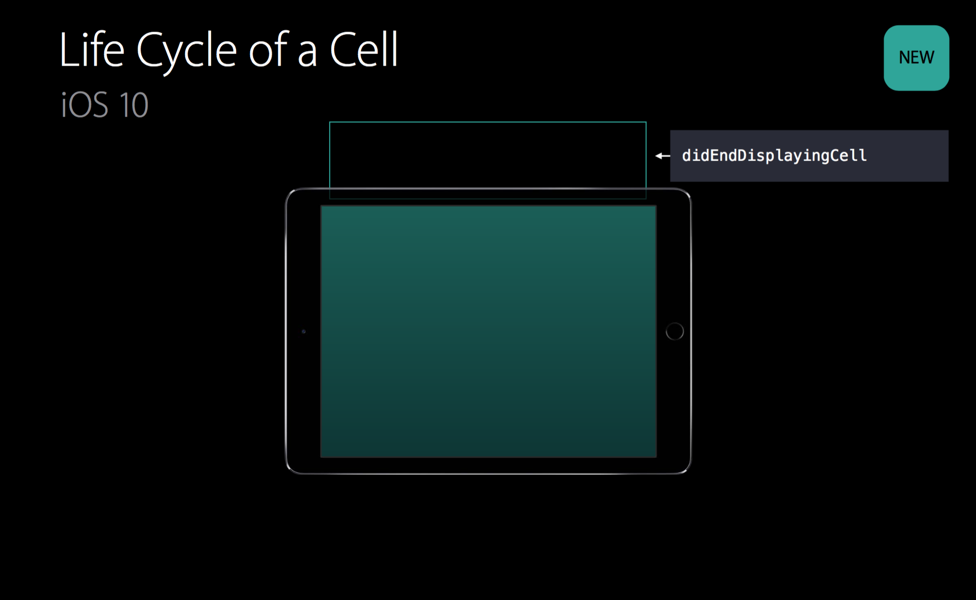
When the entire cell is about to disappear from the visible area of the UICollectionView, didEndDisplayingCell is called. What happens next is the same as in iOS 9: the cell enters the reuse queue.
If the user wants to display a certain cell again, in iOS 9 the cell can only be taken from the reuse queue, go through the lifecycle again, and call cellForItemAtIndexPath to create or generate a cell.
In iOS 10, the system keeps the cell around for a period of time. In iOS, if the user scrolls a cell off screen and then suddenly wants to go back to it, the cell does not need to go through another full lifecycle. It only needs to call willDisplayCell directly, and the cell will appear on screen again. This is the complete UICollectionView lifecycle in iOS 10.
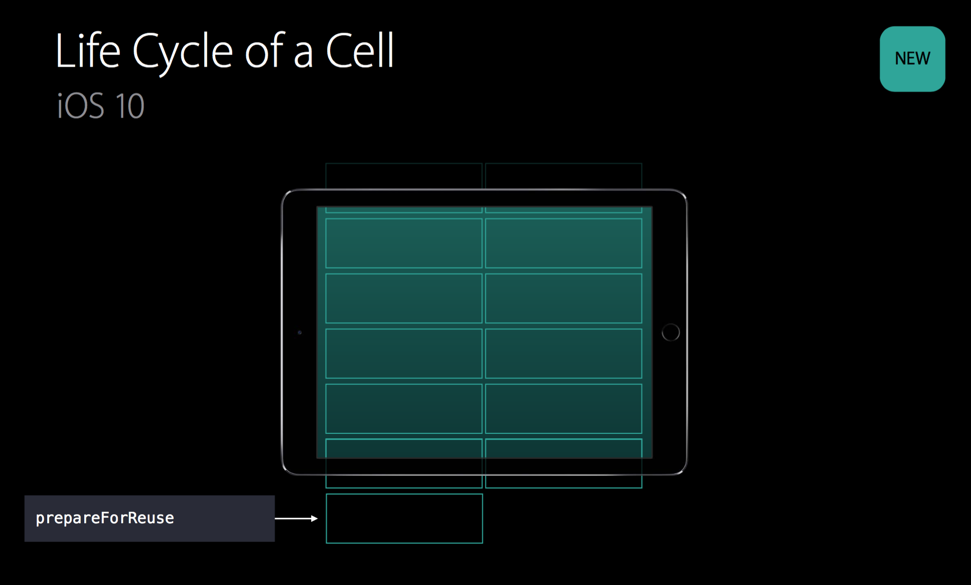
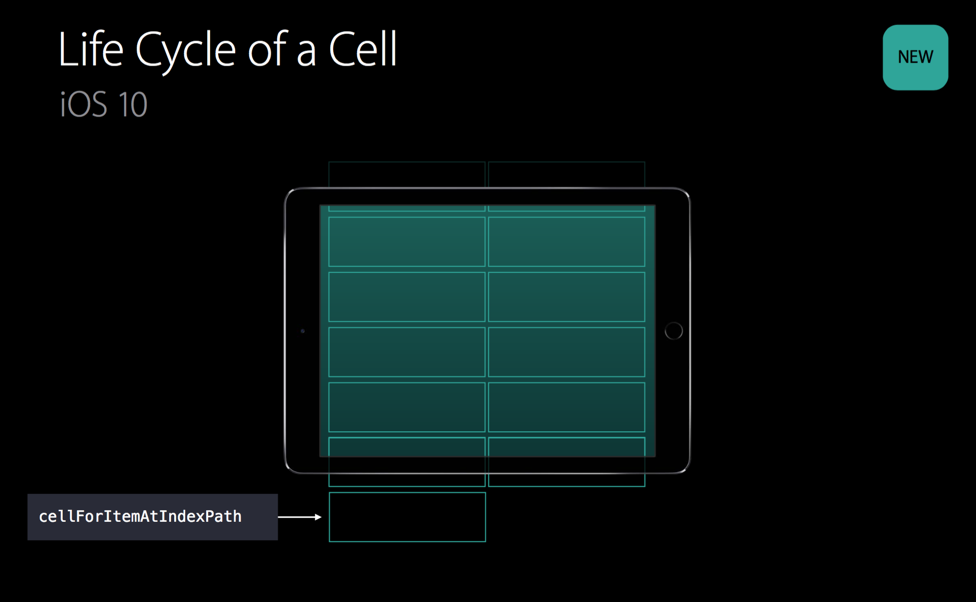
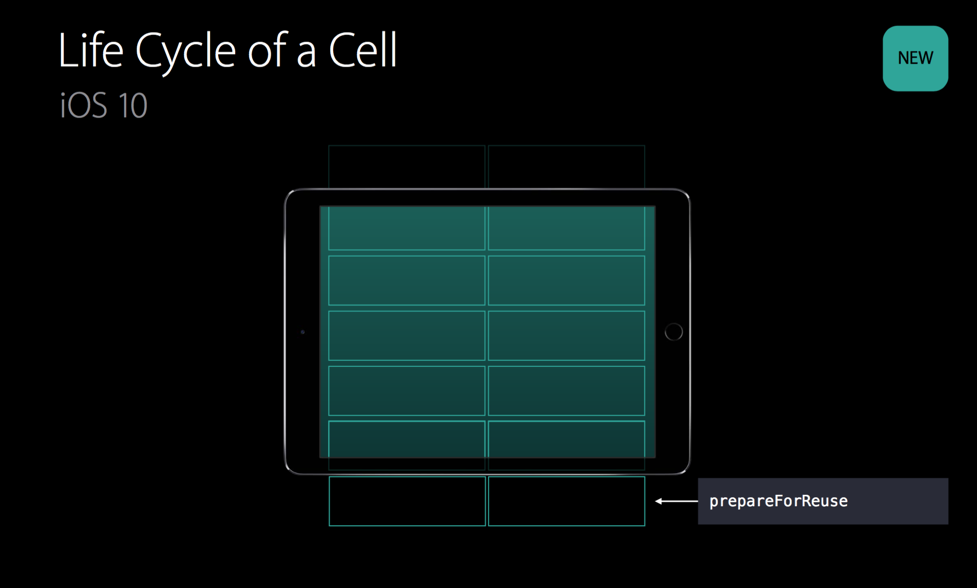
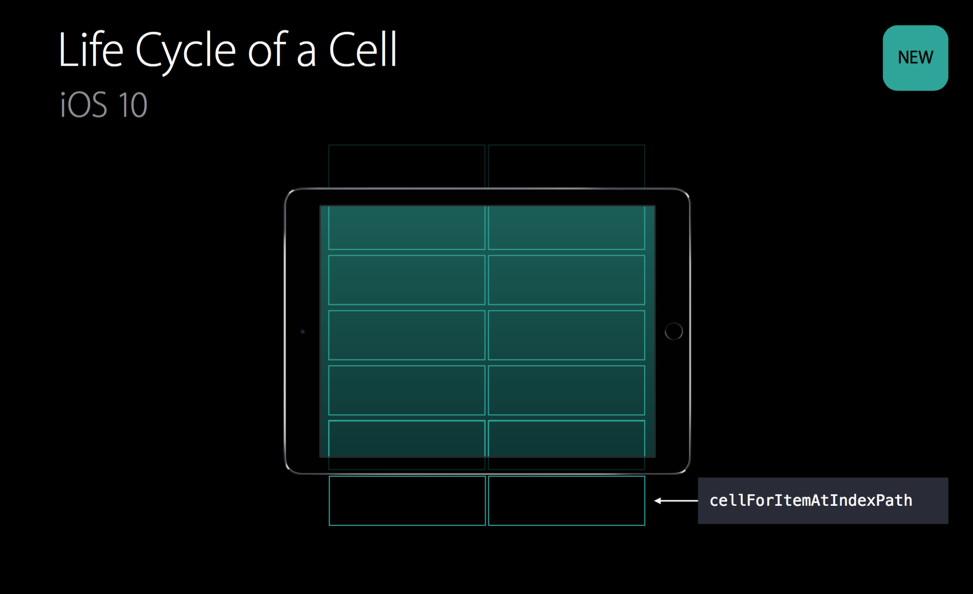
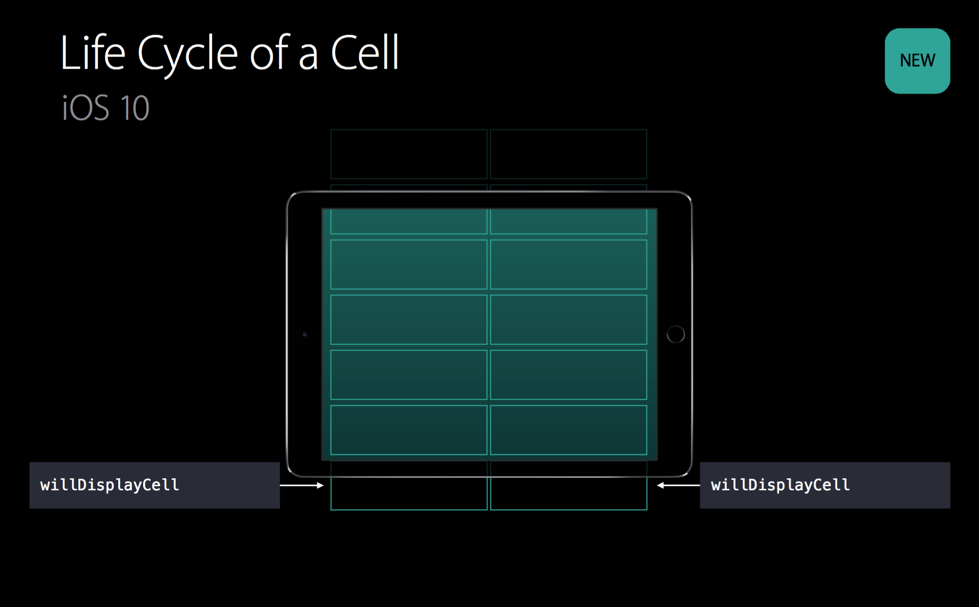
The iOS 10 scenario described above also applies to multi-column layouts. In this case, we load only one cell at a time instead of loading an entire row of cells each time. After the first cell is ready, we ask the second cell to prepare. Once both cells are ready, we then call willDisplayCell for each cell. After sending this message, the cells appear on the screen.
Although this looks like a very small change, this small change significantly improves the user experience!
Let’s look at how the changes above affect scrolling.
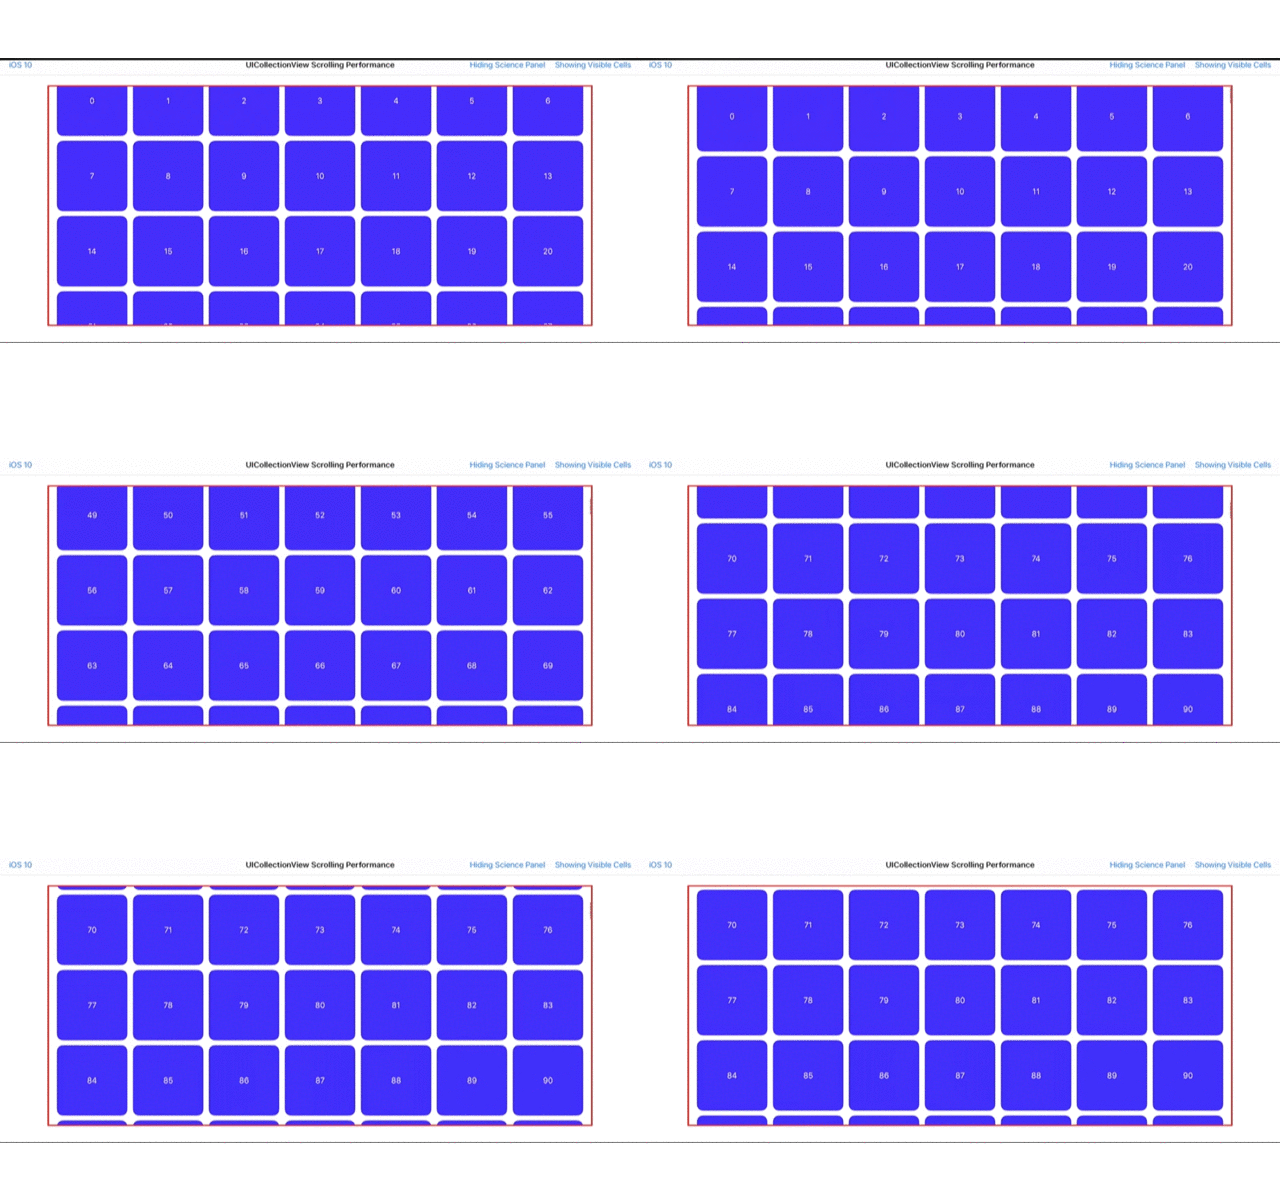
Scrolling is much smoother than in iOS 9. Here, you can see that the entire process is very even and does not stutter. Just like with iOS 9, let’s simulate how the system loads cells.

We can clearly see that the iOS system loads cells one by one: after one cell finishes loading, it moves on to load the next cell. This is very different from iOS 9, where an entire row of cells was loaded at once.
This is because we are using the new UICollectionViewCell lifecycle. The entire app does not add even a single line of code. The silky-smooth scrolling experience in iOS 10 is absolutely fantastic!!
II. UICollectionViewCell Pre-Fetching
When we compile an iOS 10 app, this Pre-Fetching feature is enabled by default. Of course, if for some reason you must use the old lifecycle from before iOS 10, you only need to add the new isPrefetchingEnabled property to collectionView. If you do not want to use Pre-Fetching, simply set this property to false.
@property (nonatomic, getter=isPrefetchingEnabled) BOOL prefetchingEnabled NS_AVAILABLE_IOS(10_0);

[collectionView setPrefetchingEnabled:NO];
To best put this new feature into practice, let’s first change the way we load cells. We’ll move the heavyweight data-reading operations, as well as the creation of all content, into the cellForItemAtIndexPath method. This ensures that we do essentially nothing else in the willDisplayCell and didEndDisplayCell methods. Finally, note that some cells generated by cellForItemAtIndexPath may never be displayed on screen. One such case is when a cell is about to be displayed, but the user suddenly scrolls away from this view.
If you compile your app with iOS 10 at this point, a very smooth user experience will be optimized automatically.
Once smooth scrolling in UICollectionView has been addressed, how do we solve the time spent loading UICollectionViewCell?
The time it takes to load a UICollectionViewCell depends on the DataModel. The DataModel may load images, either from the network or from a local database. Most of these operations are asynchronous. To make data loading faster, iOS 10 introduced a new API to address this problem.
UICollectionView has two “partners”: the data source and the delegate. In iOS 10, it gains a third “partner”. This “partner” is called prefetchDataSource.
protocol UICollectionViewDataSourcePrefetching {
    func collectionView(_ collectionView: UICollectionView,
                        prefetchItemsAt indexPaths: [NSIndexPath])
    optional func collectionView(_ collectionView: UICollectionView,
                                 cancelPrefetchingForItemsAt indexPaths: [NSIndexPath])
}
class UICollectionView : UIScrollView {
    weak var prefetchDataSource: UICollectionViewDataSourcePrefetching?
    var isPrefetchingEnabled: Bool
}
There is only one required method in this protocol: ColletionView prefetchItemsAt indexPaths. This method is called in prefetchDataSource and is used to let you asynchronously preload data. The indexPaths array is ordered; it represents the order in which the upcoming items will receive data, making it more convenient for our model to process data asynchronously.
There is also a second method in this protocol, CollectionView cancelPrefetcingForItemsAt indexPaths, but this method is optional. We can use this method to cancel preloading or lower the priority of preloading data while scrolling.
It is worth noting that this newly added “partner”, prefetchDataSource, cannot replace the original data loading method. This preloading mechanism only assists with loading data; it does not mean we can remove the original way we read data.
At this point, let’s see how much UICollectionView performance has improved from the beginning of the article until now. We will still use dropped frames to evaluate UICollectionView performance.
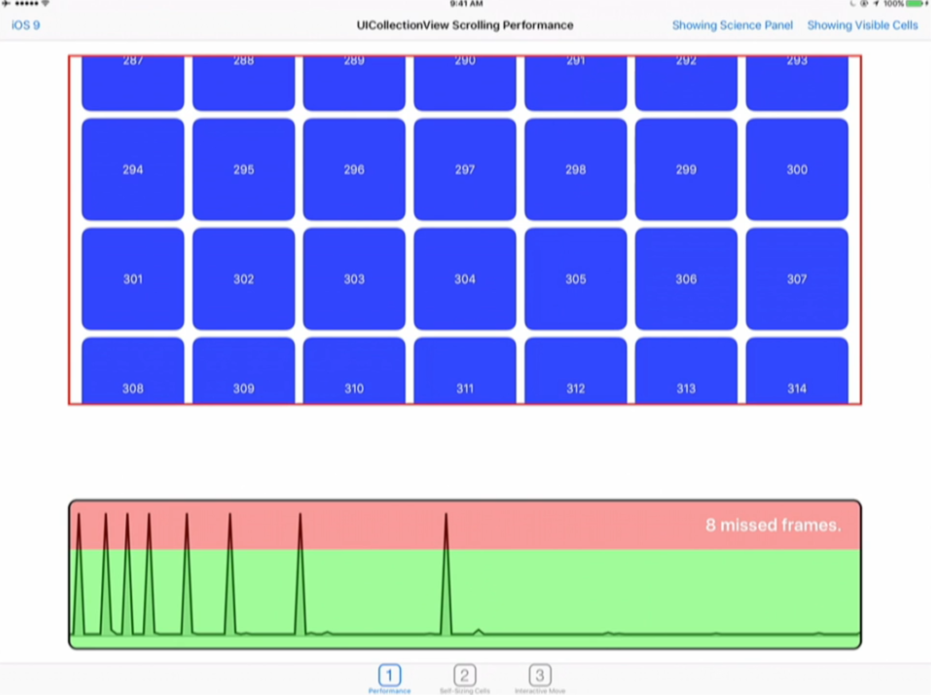
The image above shows the performance of UICollectionView on iOS 9. It is very clear that the peaks and valleys are pronounced, and 8 frames are dropped, resulting in obvious stuttering.
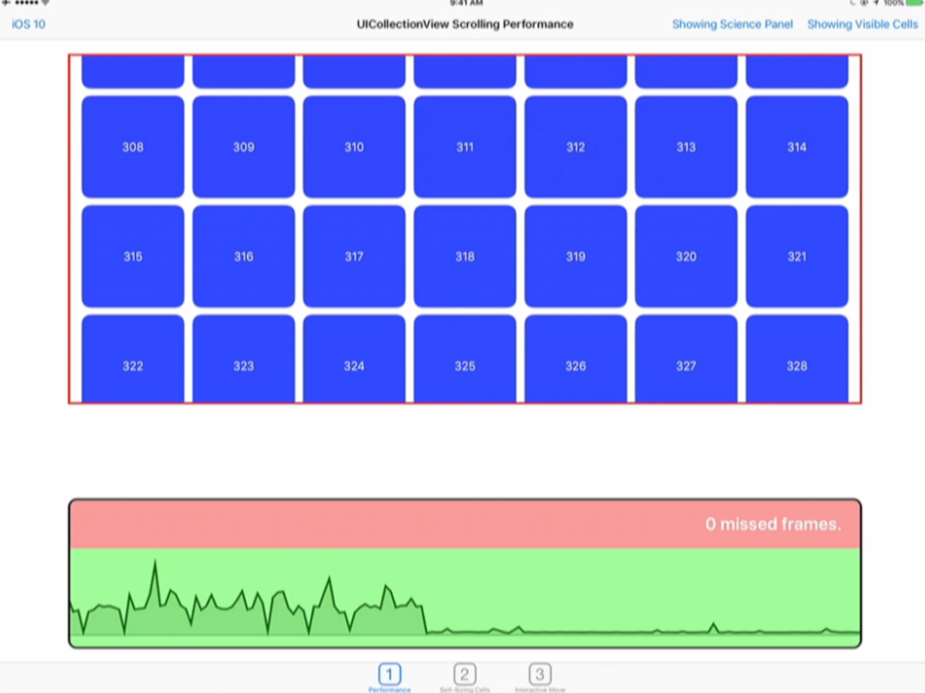
The image above shows the performance of UICollectionView on iOS 10. We can clearly see that, after the optimizations in iOS 10, the entire curve has become noticeably smoother, with no extreme peak-induced frame drops. However, there are still a few peaks that get close to the 16ms threshold.
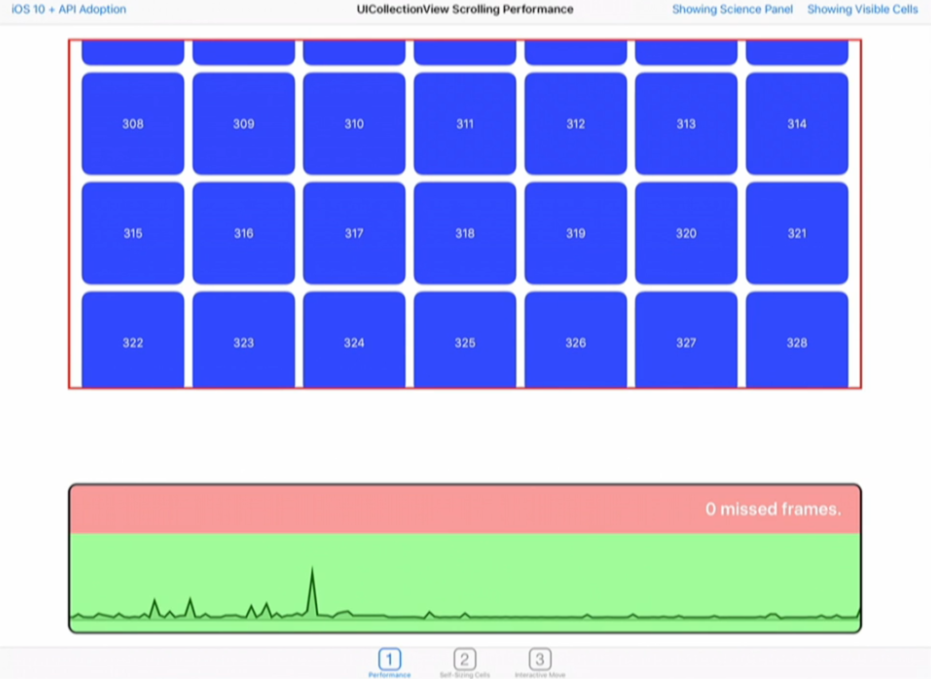
The image above shows the performance after iOS 10 + Pre-Fetching API. The optimization effect is already very obvious! The entire curve is basically flat—almost perfect. However, we can still find a few unusually high peaks. The points with very high peaks are where the cell has a heavy loading workload and takes longer to process. Next, we will continue optimizing!
First, let’s summarize the points to keep in mind when using the Pre-Fetching API.
When using the Pre-Fetching API, we must ensure that the entire preloading process runs on a background thread. Use GCD and NSOperationQueue properly to handle multithreading.
Remember that the Pre-Fetching API is an adaptive technology. What does adaptive technology mean? When we scroll slowly, during this relatively “quiet” period, the Pre-Fetching API will silently help us preload data in the background. But once we start scrolling quickly and need frequent refreshes, the Pre-Fetching API will not be executed.
Finally, use cancelPrefetchingAPI to respond to changes in the user’s scrolling behavior. For example, if the user is scrolling quickly and suddenly notices something interesting, stops scrolling, even quickly scrolls in the opposite direction, or taps an event to view details, we should enable cancelPrefetchingAPI at these moments.
In summary, the Pre-Fetching API is very helpful for improving UICollectionView performance, and it does not require adding much code. With only a small amount of code, you can achieve a significant performance improvement!
3. UITableViewCell Pre-Fetching
In iOS 10, UITableViewCell also received performance improvements along with UICollectionView, and likewise gained the Pre-Fetching API.
protocol UITableViewDataSourcePrefetching {
    func tableView(_ tableView: UITableView, prefetchRowsAt indexPaths: [NSIndexPath])
    optional func tableView(_ tableView: UITableView, cancelPrefetchingForRowsAt indexPaths:
                            [NSIndexPath])
}
class UITableView : UIScrollView {
    weak var prefetchDataSource: UITableViewDataSourcePrefetching?
}
As with UICollectionView above, this will call the TableView prefetchRowsAt indexPaths method. indexPaths is still an ordered sequence of numbers, and the order matches the visible order in the list. The second optional API is still TableView cancelPrefetchingForRowsAt indexPaths; as mentioned earlier, it is also used to cancel preloading. The performance improvement is the same as with UICollectionView, and it significantly improves UITableView performance!
4. Improvements for self-sizing
The self-sizing API was first introduced in iOS 8, and it has now received some improvements in iOS 10.
In UICollectionView, there is a fixed class called UICollectionViewFlowLayout, and iOS already fully supports self-sizing in this class. To enable this feature, developers need to set an estimated item size for cells whose CGSize cannot be 0.
layout.estimatedItemSize = CGSize(width:50,height:50)
This tells UICollectionView that we want to enable a layout that dynamically calculates its content.
So far, we have three ways to perform dynamic layout.
The first approach is to use Auto Layout.
When we add the constraints properly, the cell will lay itself out dynamically based on its content when it is loaded.The second approach, if you don’t want to use Auto Layout and want more manual control, is to override the
sizeThatFits()method.The third—and ultimate—approach is to override the
preferredLayoutAttributesFittingAttributes()method. In this method, you can provide not only size information, but also information such asalphaandtransform.
So, if you want to specify the size of a cell, you can use one of the three methods above.
In practice, however, we may find that sometimes it is difficult to set an appropriate estimated item size. It would be very useful if the flow layout could calculate the layout dynamically using a mathematical approach, rather than laying things out based on the size we provide.
iOS 10 introduced a new API to solve the problem described above.
layout.estimatedItemSize = UICollectionViewFlowLayoutAutomaticSize
For developers, all we need to do is configure the flow layout, then set estimatedItemSize to a new constant, and finally UICollectionViewFlowLayout will automatically calculate the height.
The system will automatically compute the entire layout, including cells whose size has already been determined, and it will also dynamically provide size estimates for upcoming cells.
The following two examples make the self-sizing improvements in iOS 10 very clear.
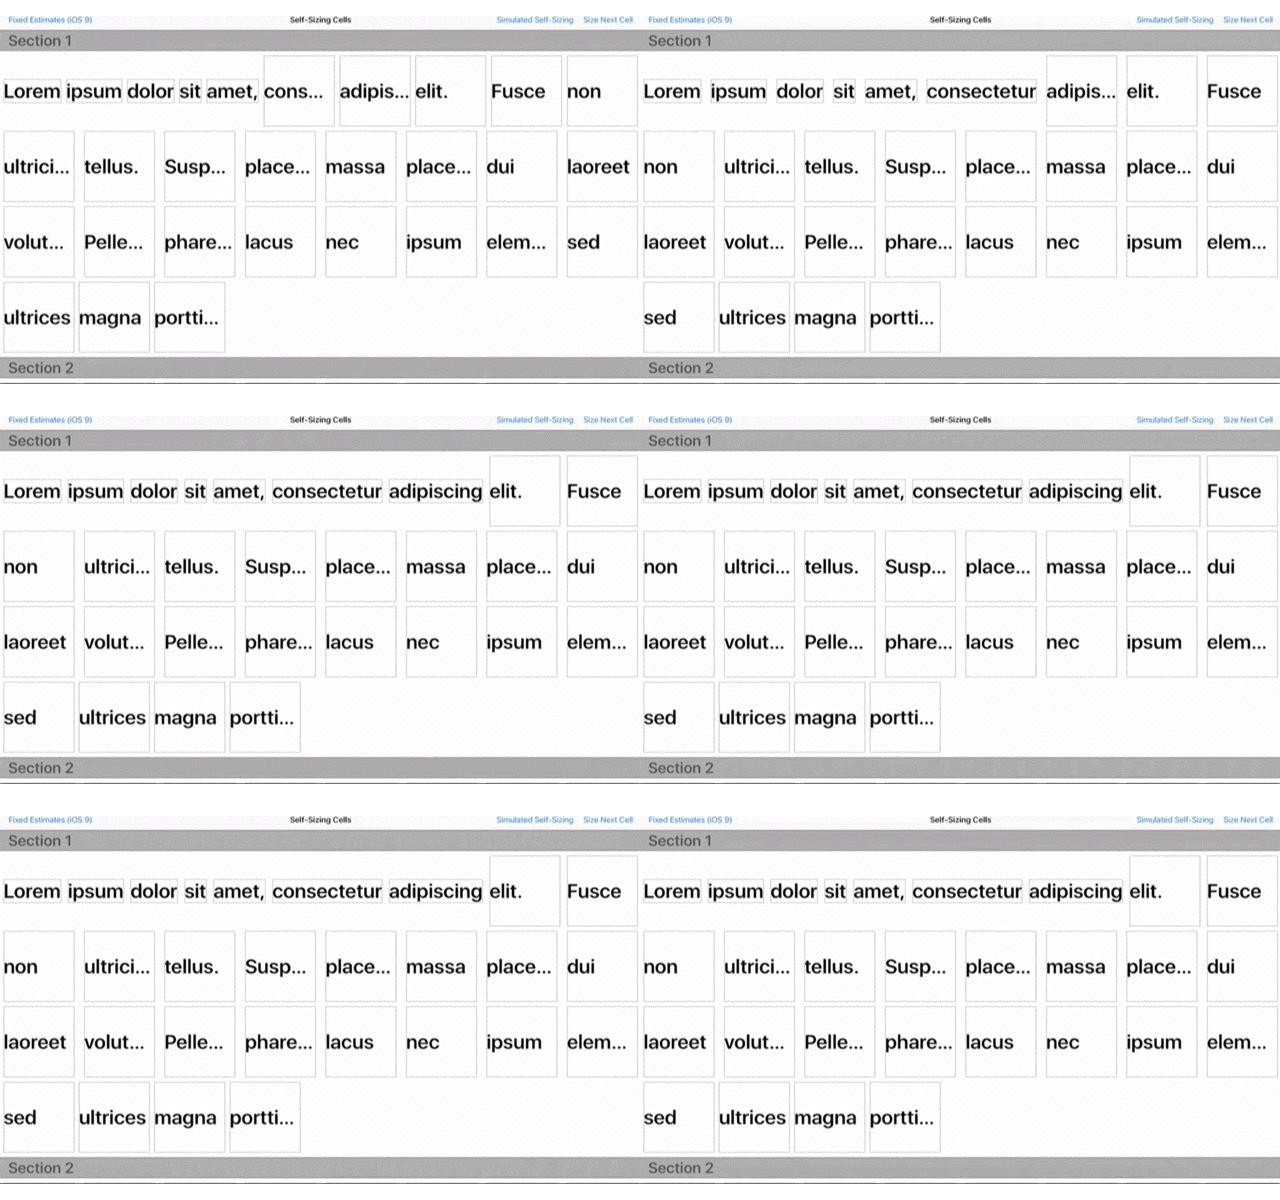
As shown above, in iOS 9 the layout is calculated on a per-cell basis. When a single cell changes, the other cells remain unchanged and still need to be recalculated.
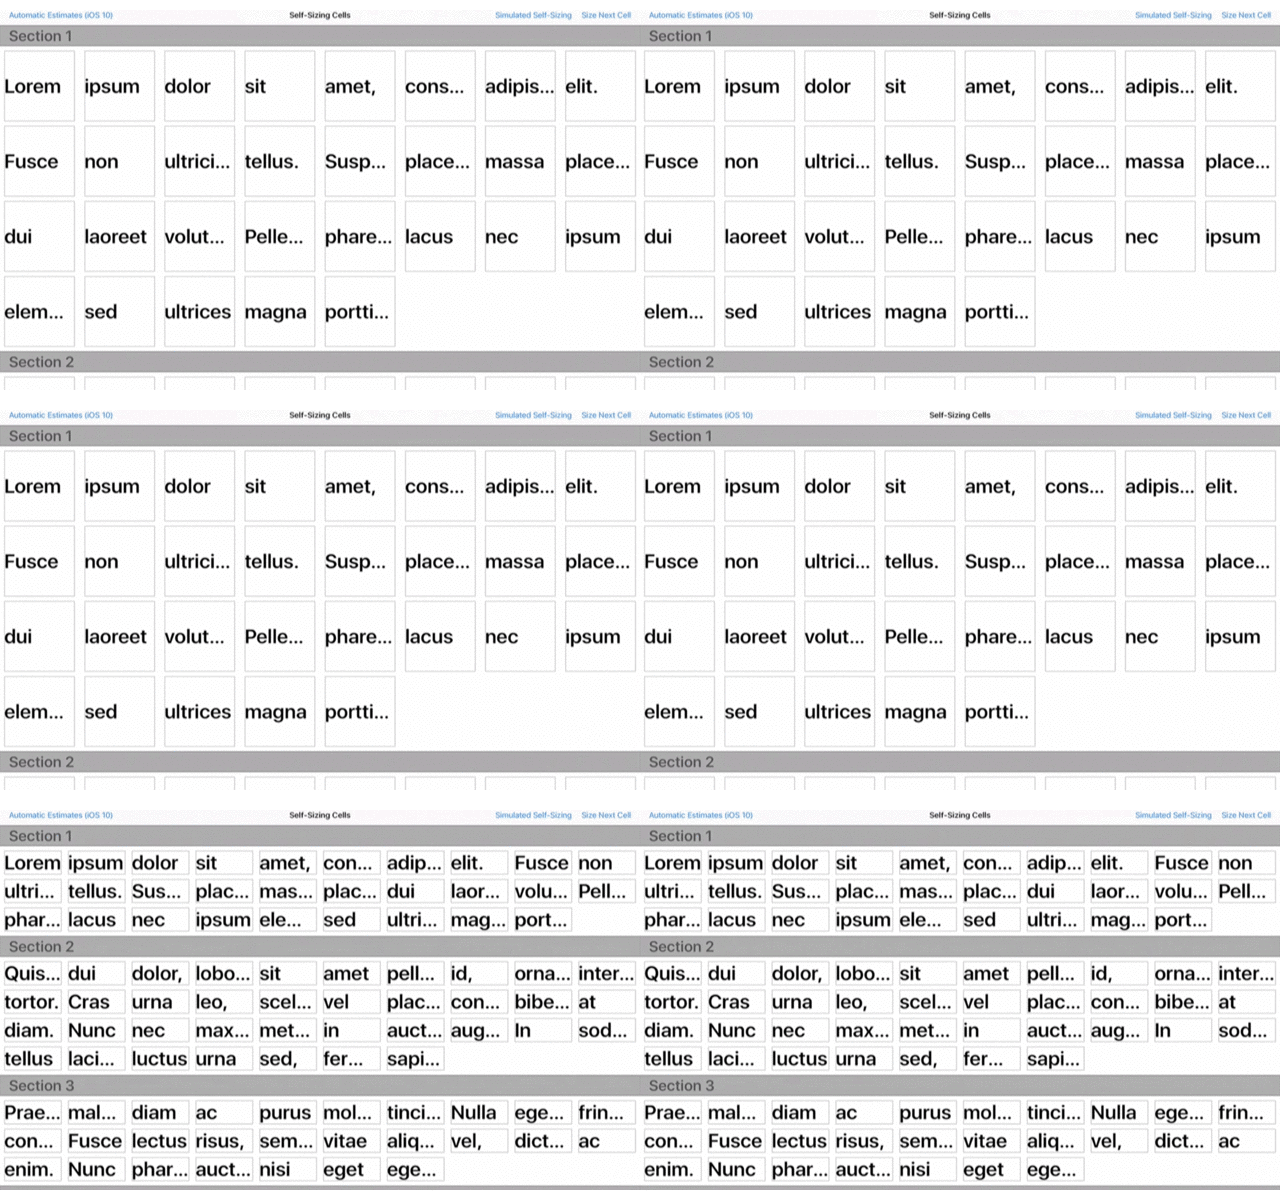
This example makes the difference very obvious. After we change the size of the first cell, the system automatically calculates the sizes of all cells, and the size of every row and every section is dynamically computed and the UI is refreshed!
That concludes the self-sizing improvements in iOS 10.
V. Interactive Reordering
When talking about reordering, we need to compare it with UITableView. Reordering in UICollectionView is similar to moving cells up and down in UITableView, except that UITableView reordering is vertical.
In iOS 9, UICollectionView introduced Interactive Reordering. In iOS 10 this year, some new APIs were added.

In the image above, we can see that even if we drag cells arbitrarily, the entire interface is reordered. And when we change the size of a cell, the entire UICollectionView is dynamically laid out again.
First, let’s look at the APIs in iOS 9.
class UICollectionView : UIScrollView {
    func beginInteractiveMovementForItem(at indexPath: NSIndexPath) -> Bool
    func updateInteractiveMovementTargetPosition(_ targetPosition: CGPoint)
    func endInteractiveMovement()
    func cancelInteractiveMovement()
}
To enable interactive movement, we need to call the beginInteractiveMovementForItem() method, where indexPath represents the cell we are about to move. Then, on each gesture update, we need to update the cell’s position so it responds to the movement of our finger. At this point, we need to call the updateInteractiveMovementTargetPosition() method. We pass the coordinate changes through the gesture. When the movement ends, we call the endInteractiveMovement() method. UICollectionView will drop the cell and finish processing the entire layout. At this point, you can also refresh the model or handle the data model. If the gesture is suddenly canceled midway, you should call the cancelInteractiveMovement() method. If we move the cell around and then put it back in its original position, that effectively means the movement was canceled, so in this case you should not refresh the data source inside the cancelInteractiveMovement() method.
In iOS 10, if you use UICollectionViewController, reordering becomes even simpler for you.
class UICollectionViewController : UIViewController {
    var installsStandardGestureForInteractiveMovement: Bool
}
You only need to set the installsStandardGestureForInteractiveMovement property to True. CollectionViewController will automatically add the gesture for you and automatically call the method above for you.
That’s the API iOS 9 added for us last year.
The new API added in iOS 10 this year builds on iOS 9 by adding page-turning functionality.
UICollectionView inherits from UIScrollView, so all you need to do is set the isPagingEnabled property to True to enable paging.
collectionView.isPagingEnabled = true
Before pagination is enabled:

After pagination is enabled, it looks like this:

Each move flips the content one page at a time.
VI. UIRefreshControl
UIRefreshControl can now be used directly inside a CollectionView; likewise, it can also be used directly inside a UITableView, independently of UITableViewController. This is because RefreshControl is now a property of ScrollView.
Using UIRefreshControl is straightforward—just three steps:
let refreshControl = UIRefreshControl()
refreshControl.addTarget(self, action: #selector(refreshControlDidFire(_:)),
                         for: .valueChanged)
collectionView.refreshControl = refreshControl
First, create a refreshControl, then associate it with an action event, and finally assign this new refreshControl to the corresponding property of the desired control.
Summary
Through the above, we covered the following topics:
- The UICollectionView cell pre-fetching mechanism
- The new UICollectionView and UITableView prefetchDataSource APIs
- Improvements for self-sizing cells
- Interactive reordering
Finally, let me share my thoughts after looking at the optimizations in iOS 10 UICollectionView. In places where AsyncDisplayKit was previously used to optimize UICollectionView performance, you can now consider not using a third-party library. The system-provided methods can solve common stuttering issues. I feel that UICollectionView in iOS 10 is finally like a complete version; the optimizations in previous systems were not sufficient. I’m still very optimistic about UICollectionView in iOS 10.
Feedback and suggestions are welcome.
