WWDC 2016 Session Notes - New Auto Layout Features in Xcode 8
####Table of Contents
- 1.Incrementally Adopting Auto Layout
- 2.Design and Runtime Constraints
- 3.NSGridView
- 4.Layout Feedback Loop Debugging
####I. Incrementally Adopting Auto Layout What does “Incrementally Adopting Auto Layout” mean? When laying out our views in IB, we don’t need to add all constraints in one shot. We can add constraints step by step, simplifying the process and making the setup more flexible.
Before discussing this new feature, let’s first introduce the background behind it.
Consider this scenario: suppose we place a view inside its superview without setting any constraints. After we run the app, it looks like the image below.
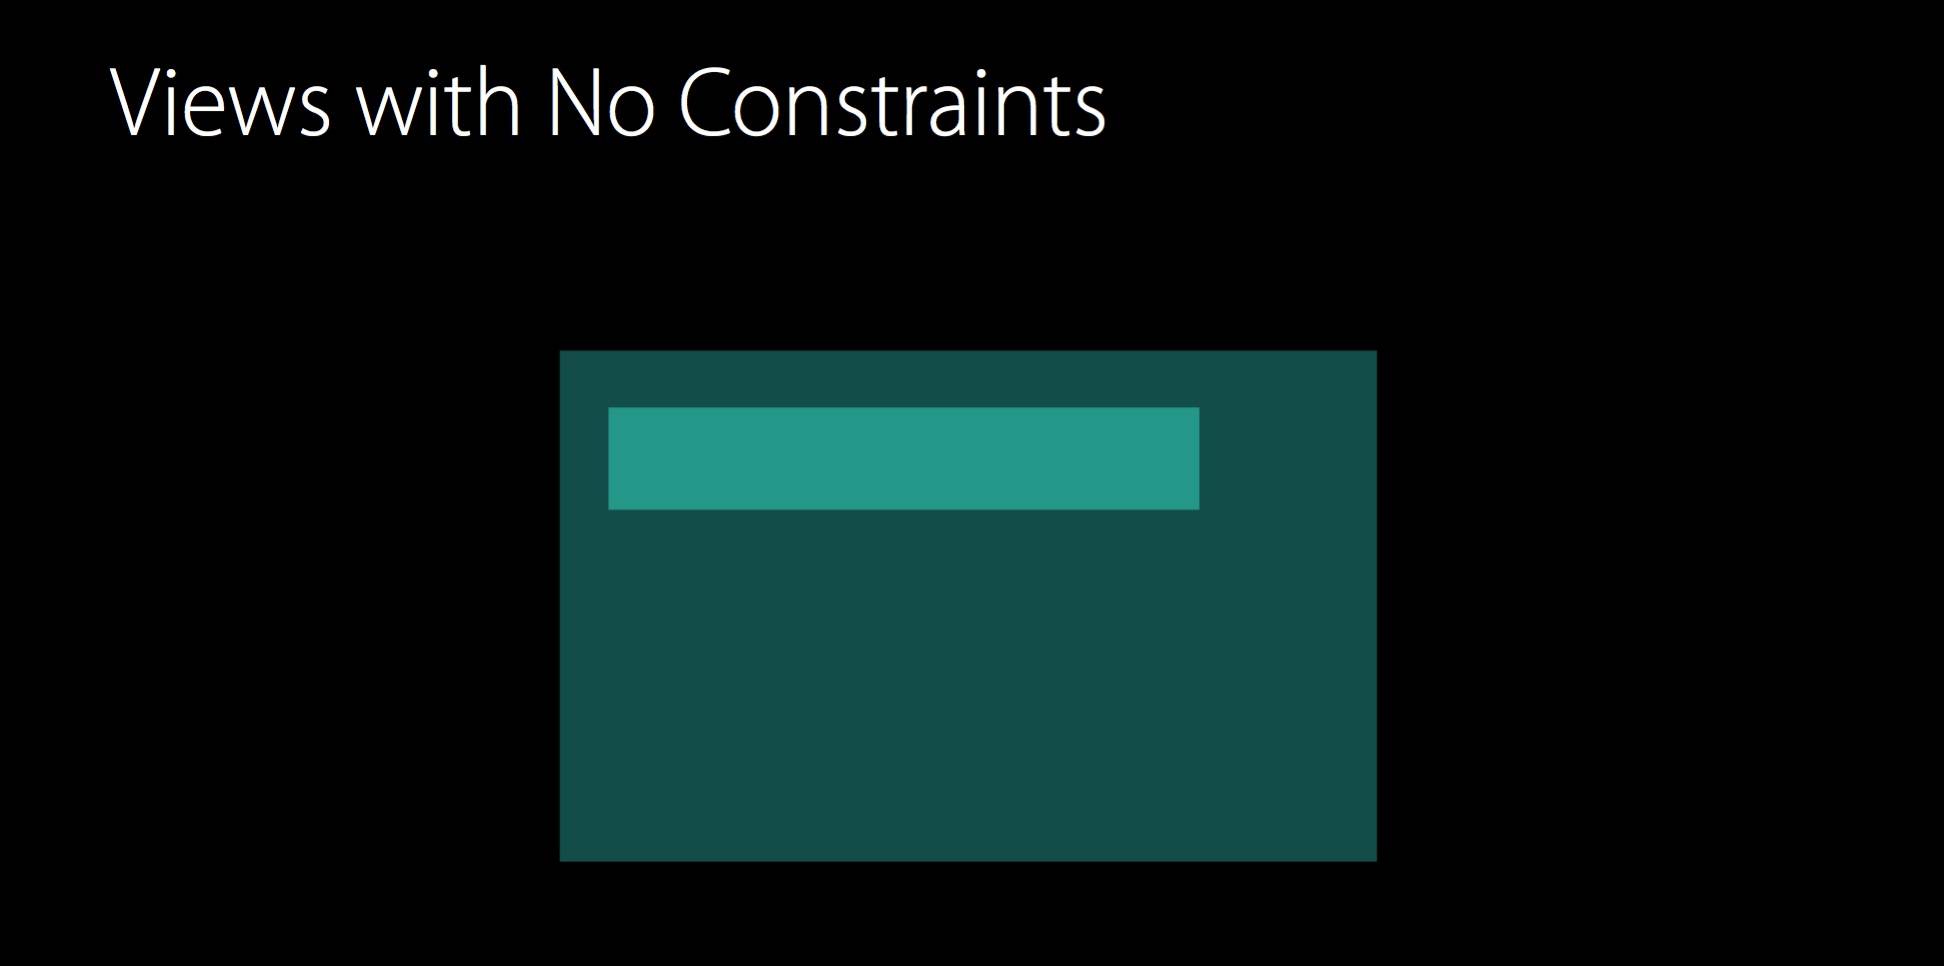
Everything appears normal. But once we rotate the device by 90°, it looks like this:
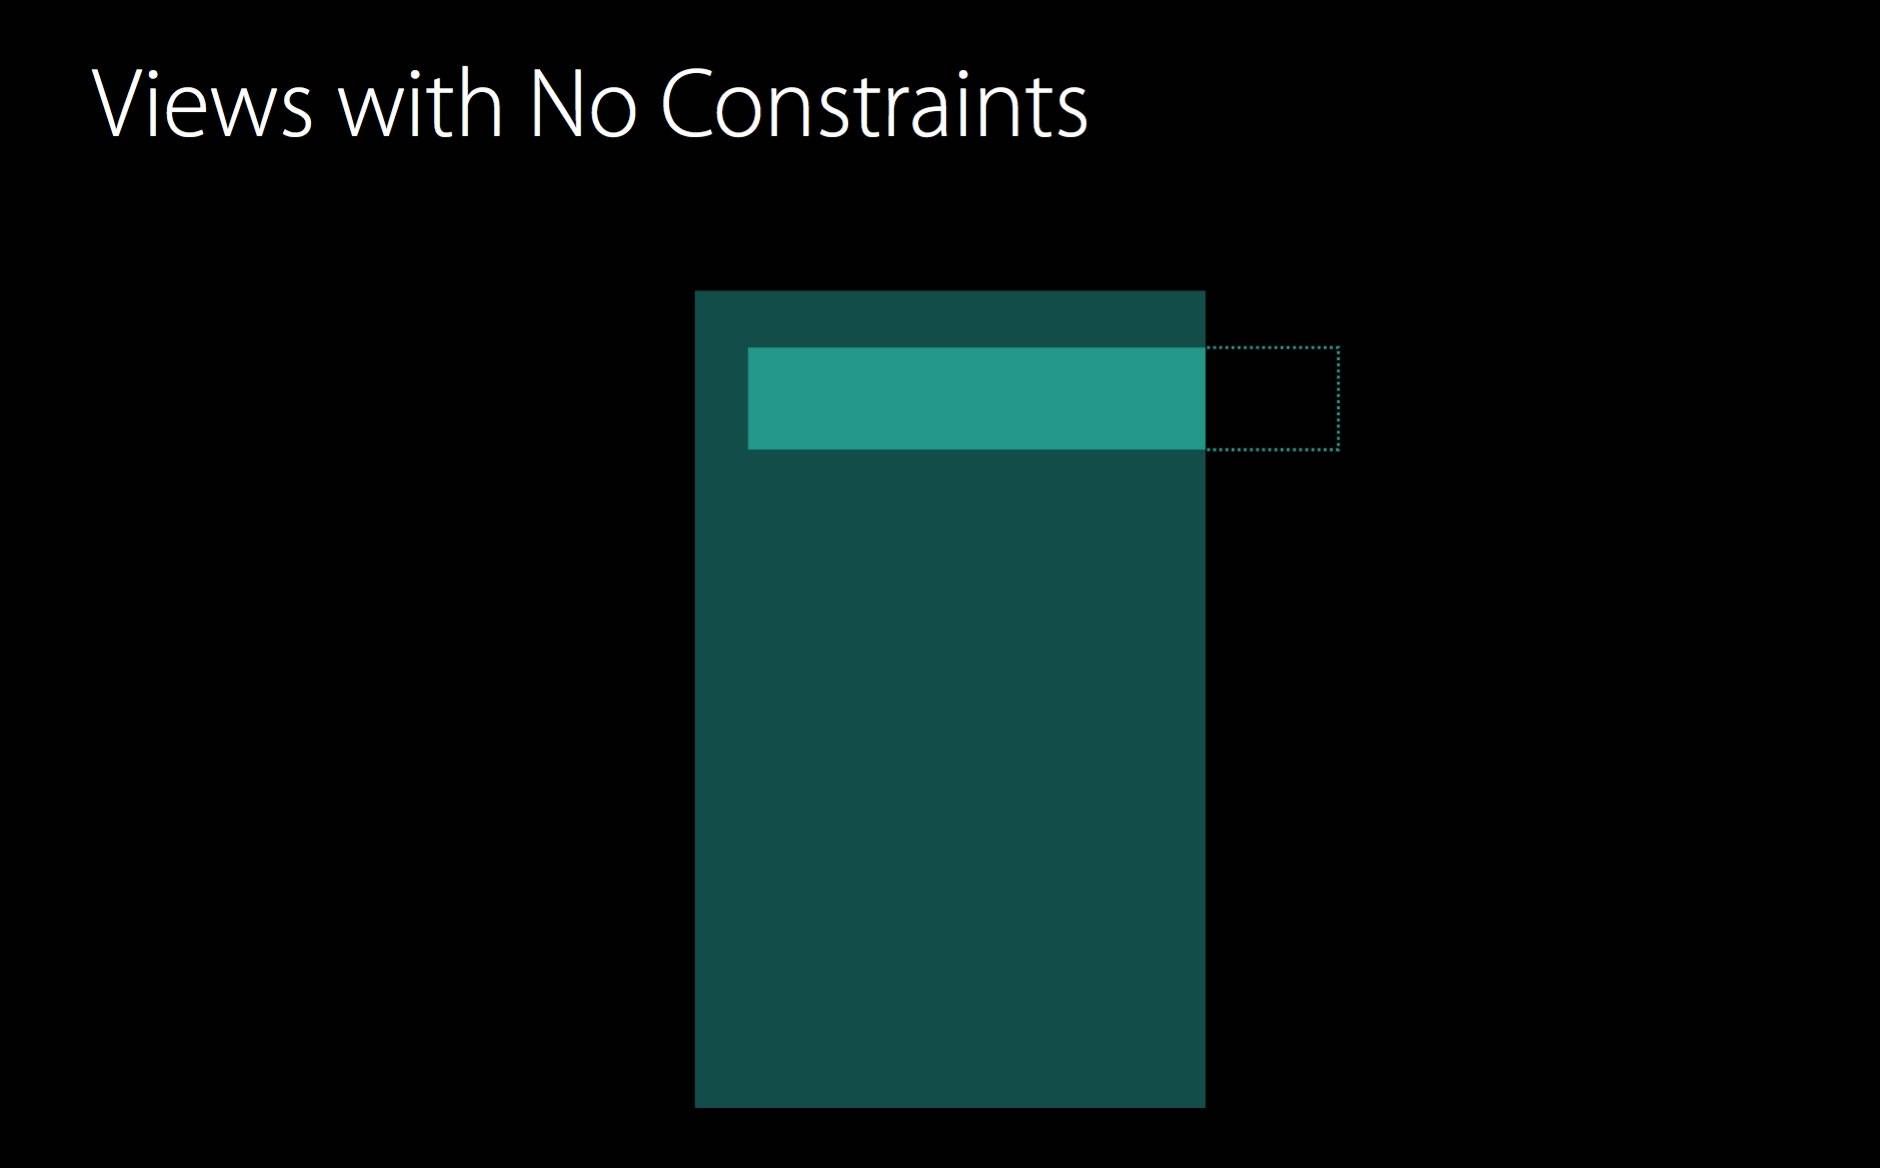
At this point, you can see that the view’s length, width, and top and left margins have not changed. We did not set any constraints, so how is this achieved?
At compile time, the Auto Layout engine automatically and implicitly adds some constraints to the view to ensure that its size does not change. In this example, the view is given four constraints: top, left, width, and height.
If we need more dynamic resizing behavior, we need to define constraints ourselves in IB. Now the question is: is there a better way to do this? Ideally, there would be a way to achieve simple resizing without using constraints.
This problem now has a solution. In Xcode 8, we can specify autoresizing masks for a view instead of setting constraints. This means we can achieve simple resizing behavior without constraints.
Before the Auto Layout era, some people may recognize this UI approach. It is a Springs & Struts UI. We can set edge constraints (note: the “constraints” here do not refer to constraints in Auto Layout, but to rules in autoresizing masks). No matter how the view’s width and height change, these views will change together with the view for which constraints have been set.
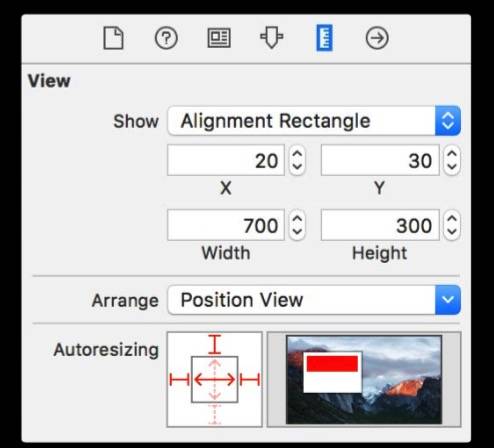
In the example above, Xcode 8 can preserve the view’s margins after rotating the screen without adding any constraints. How does it do that? In fact, Xcode 8 first retrieves the autoresizing masks and then converts them into the corresponding constraints. This conversion happens at runtime. The reason the corresponding constraints are generated at runtime rather than compile time is that it gives developers a more convenient way to add more fine-grained constraints to a view.
On a view, we can set the translatesAutoresizingMaskIntoConstraints property.
translatesAutoresizingMaskIntoConstraints == true
Suppose a View already has constraints added in Interface Builder. The “Show the Size inspector” panel will still look the same as before. Click the View and inspect all the constraints added to it. At this point, Autoresizing masks are ignored, and the translatesAutoresizingMask property will also become false. As shown below, at this point we can no longer see the AutoresizingMask settings panel in the “Show the Size inspector” panel.
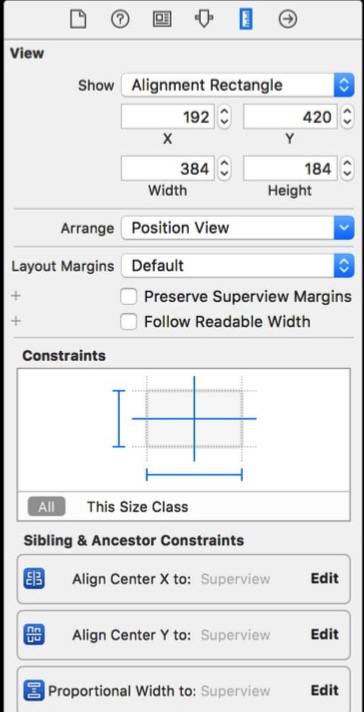
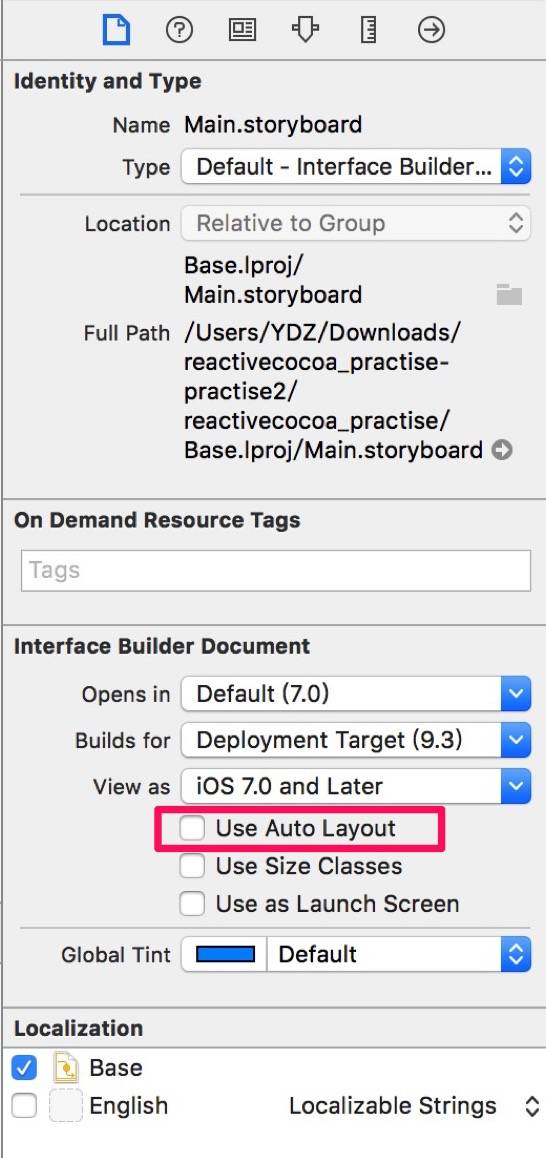
The images above show that before the Auto Layout era, we had always been using autoresizing masks. But once the Auto Layout era arrived, as soon as Auto Layout was enabled, the previous AutoresizingMask became invalid.
Back to our original question: Xcode 8 now supports incrementally adopting Auto Layout for Views. This means we can start with AutoresizingMask to handle simple resizing, and then, if there are more complex requirements, add appropriate constraints for adaptation. In short, Xcode 8 Auto Layout ≈ AutoresizingMask + Auto Layout.
Next, let’s use a demo to illustrate the new Auto Layout features in Xcode 8.
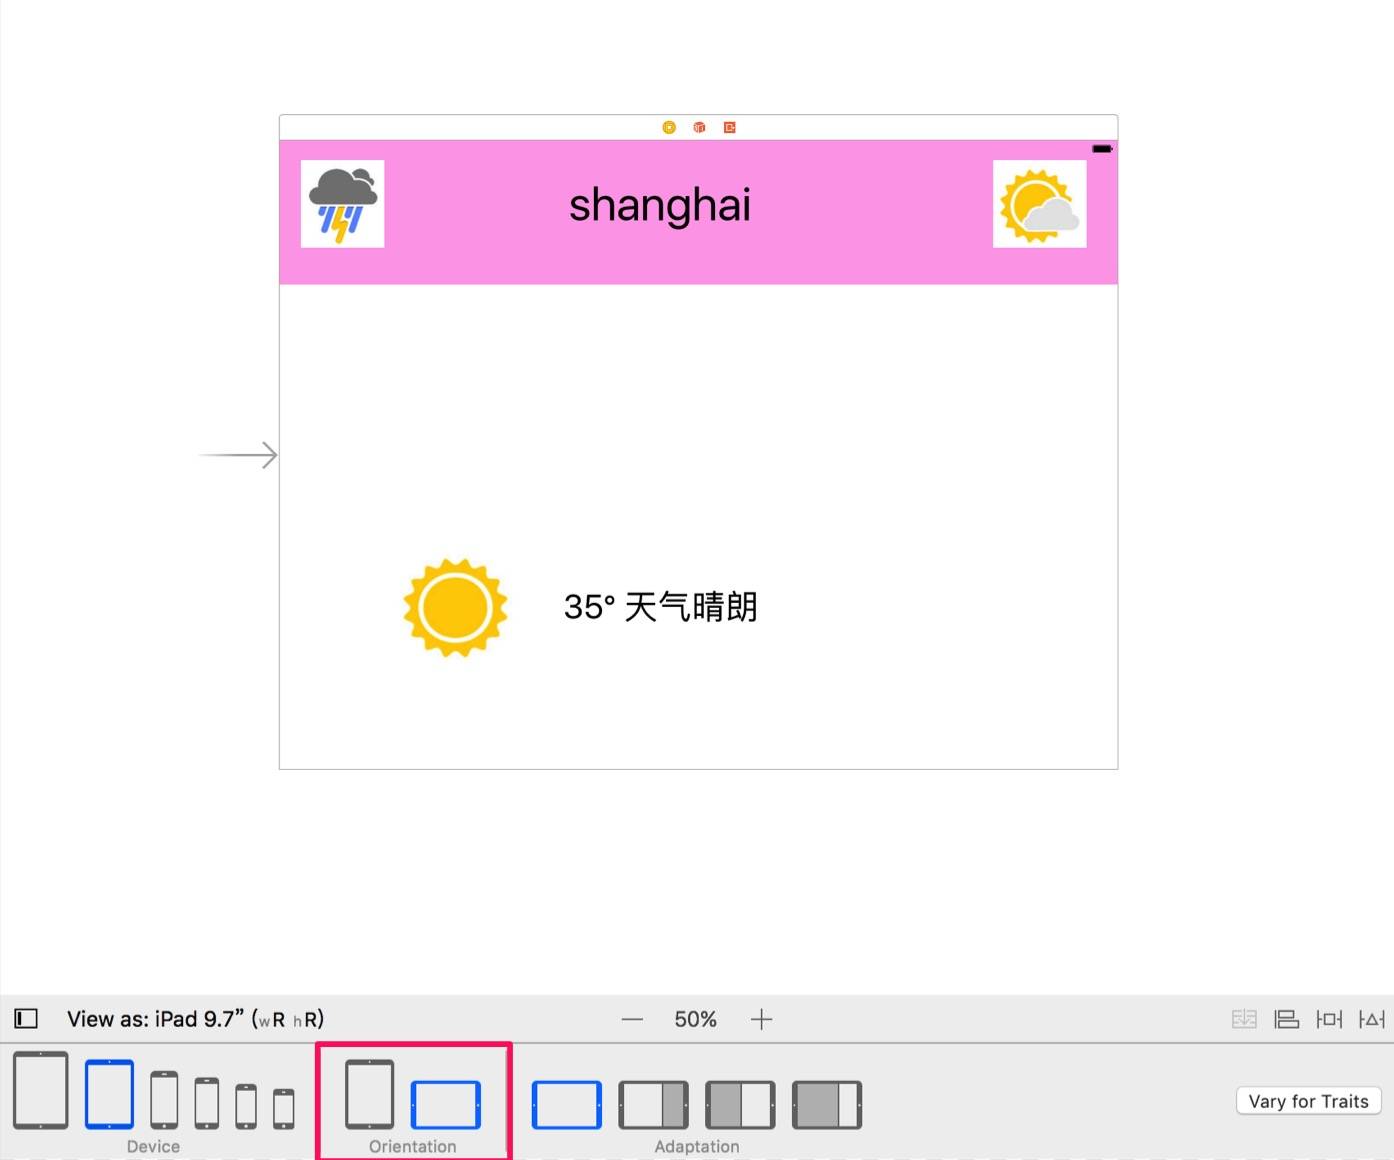
Before discussing the example, let’s first look at what new features Xcode 8 adds to storyboard. As shown below, we can see that a new bar has been added at the bottom, allowing us to switch between different screen sizes. We can see that the iPhone has now diverged into six screen sizes that we need to adapt to. From largest to smallest, they are: iPad Pro 12.9, iPad 9.7, iPhone 6s Plus/iPhone 6 Plus, iPhone 6s/iPhone 6, iPhone SE/iPhone5s/iPhone5, and iPhone4s/iPhone4. Below that, we can also choose portrait/landscape orientation and adaptability based on different screen percentages.
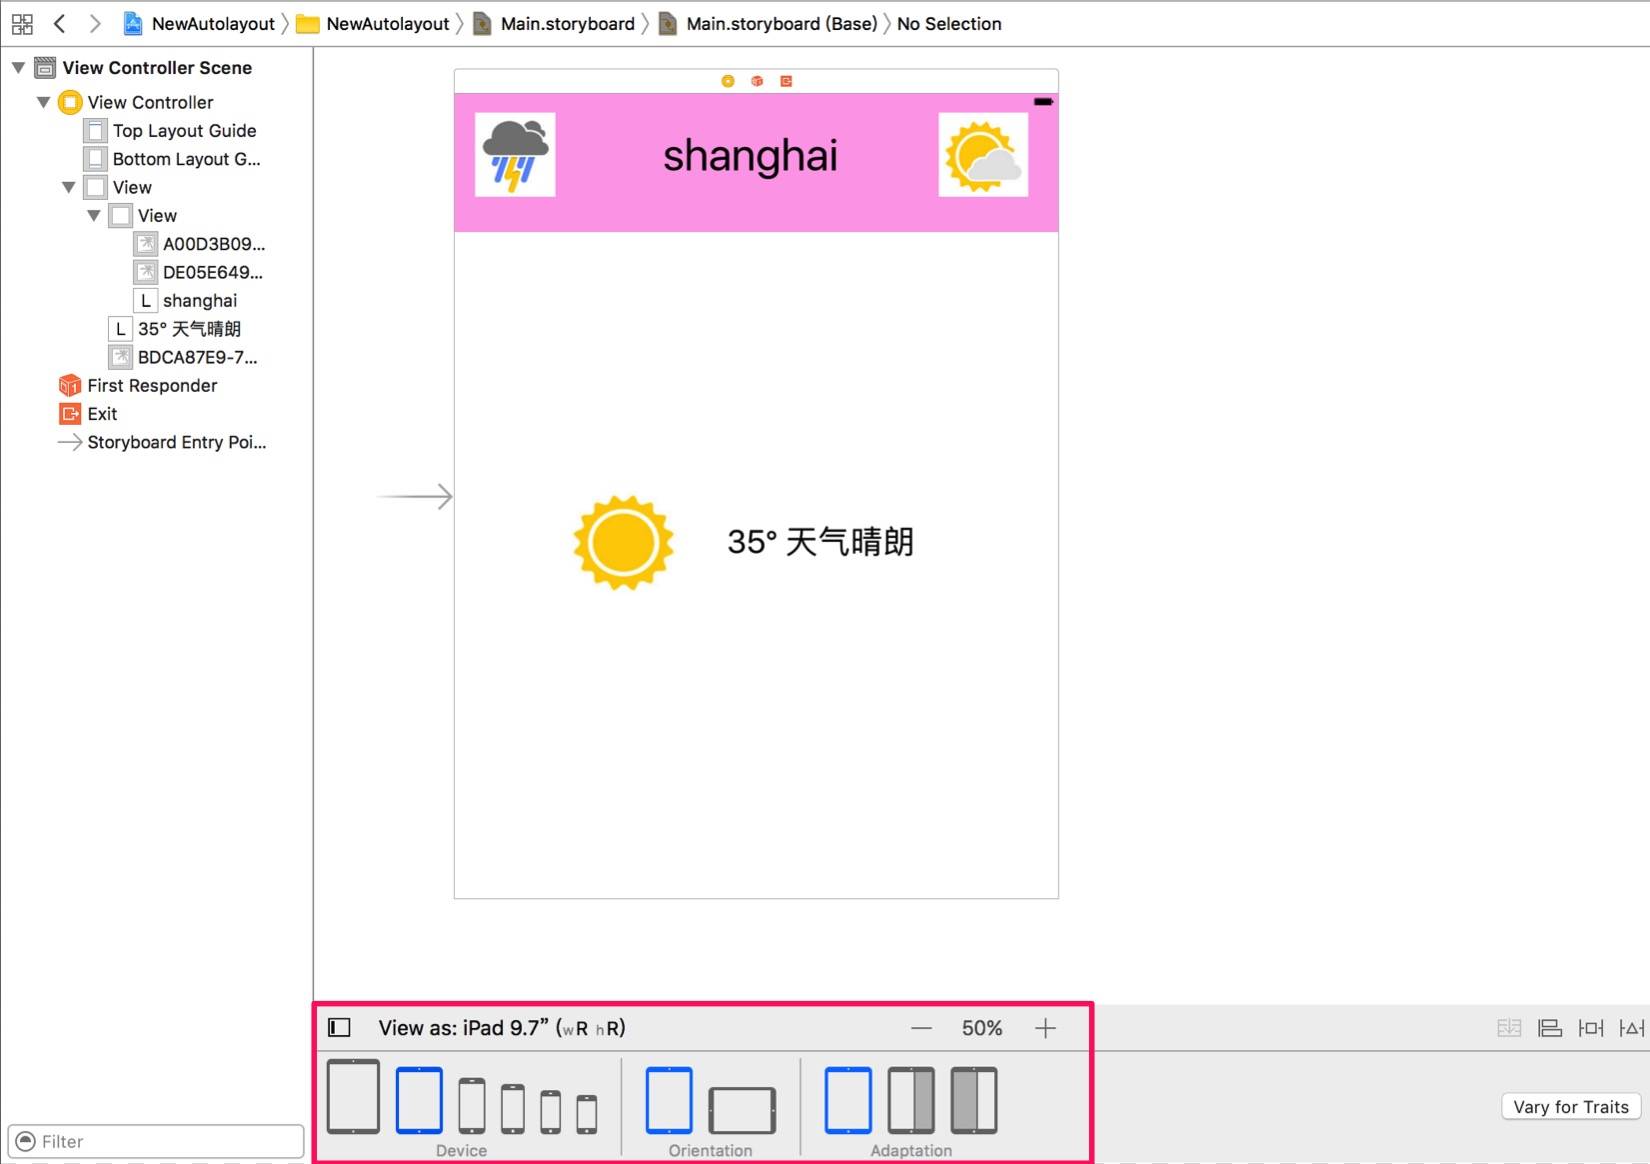
Back to the example. Now we’ll apply simple AutoresizingMask settings to these views on the page. In the preview area on the right, we can see the effect after adding these Masks.
First, for the pink parent View, we add the following AutoresizingMask.
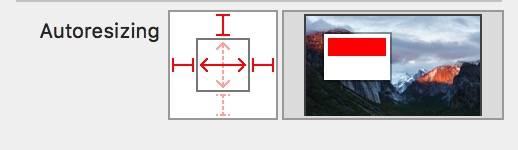
Add the following AutoresizingMask to the “rainy day” imageView.
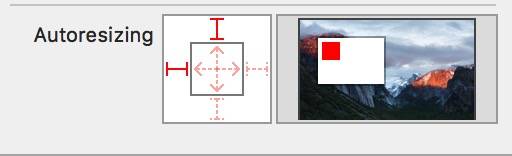
Add the following AutoresizingMask to the “cloudy day” imageView.
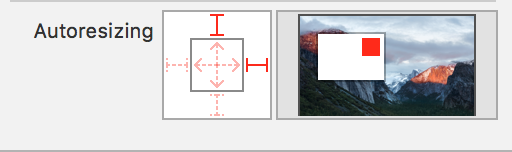
Finally, add AutoresizingMask to the Label in the middle.
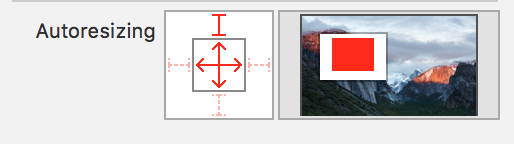
At this point, if we rotate the screen, everything works correctly, and the layout of the Views is exactly as expected.
Now let’s select 3:2 split view. At this point, something goes wrong: the Label’s Width gets compressed.
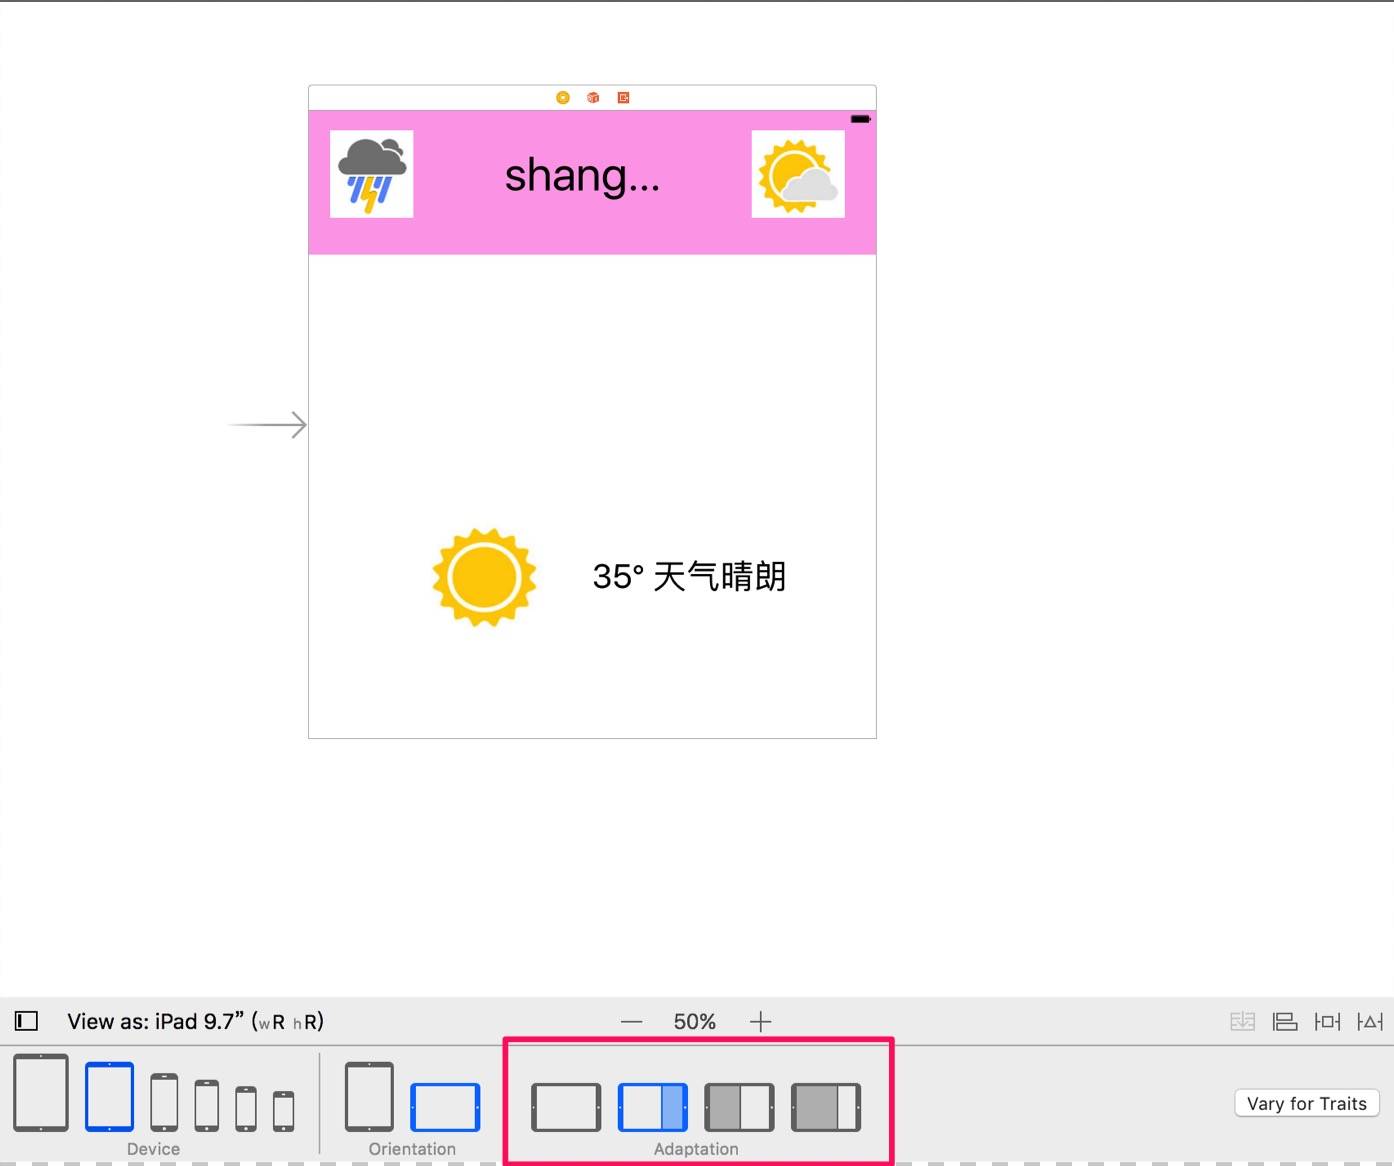
The reason is that Autoresizing masks do not consider a View’s content the way Auto Layout does, so it gets compressed here.
To fix this Label, we could easily add a constraint. But here, let’s discuss another approach.
Go to the Attributes Inspector panel, find the Autoshrink property, and switch “fixed font size” to “minimum font size”.
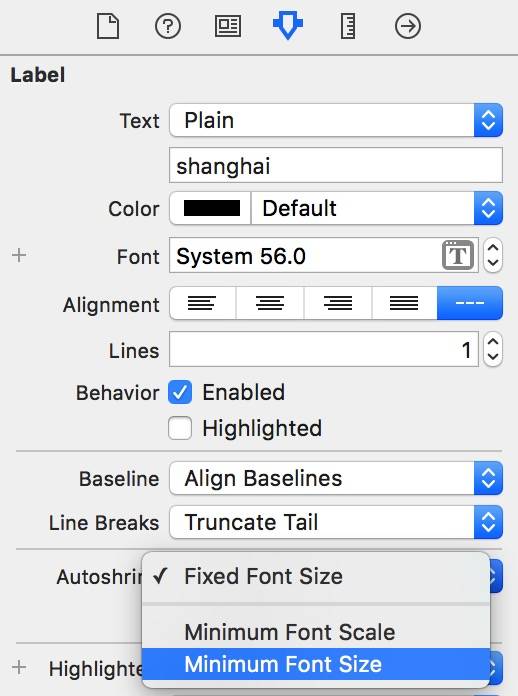
This fixes the issue above.
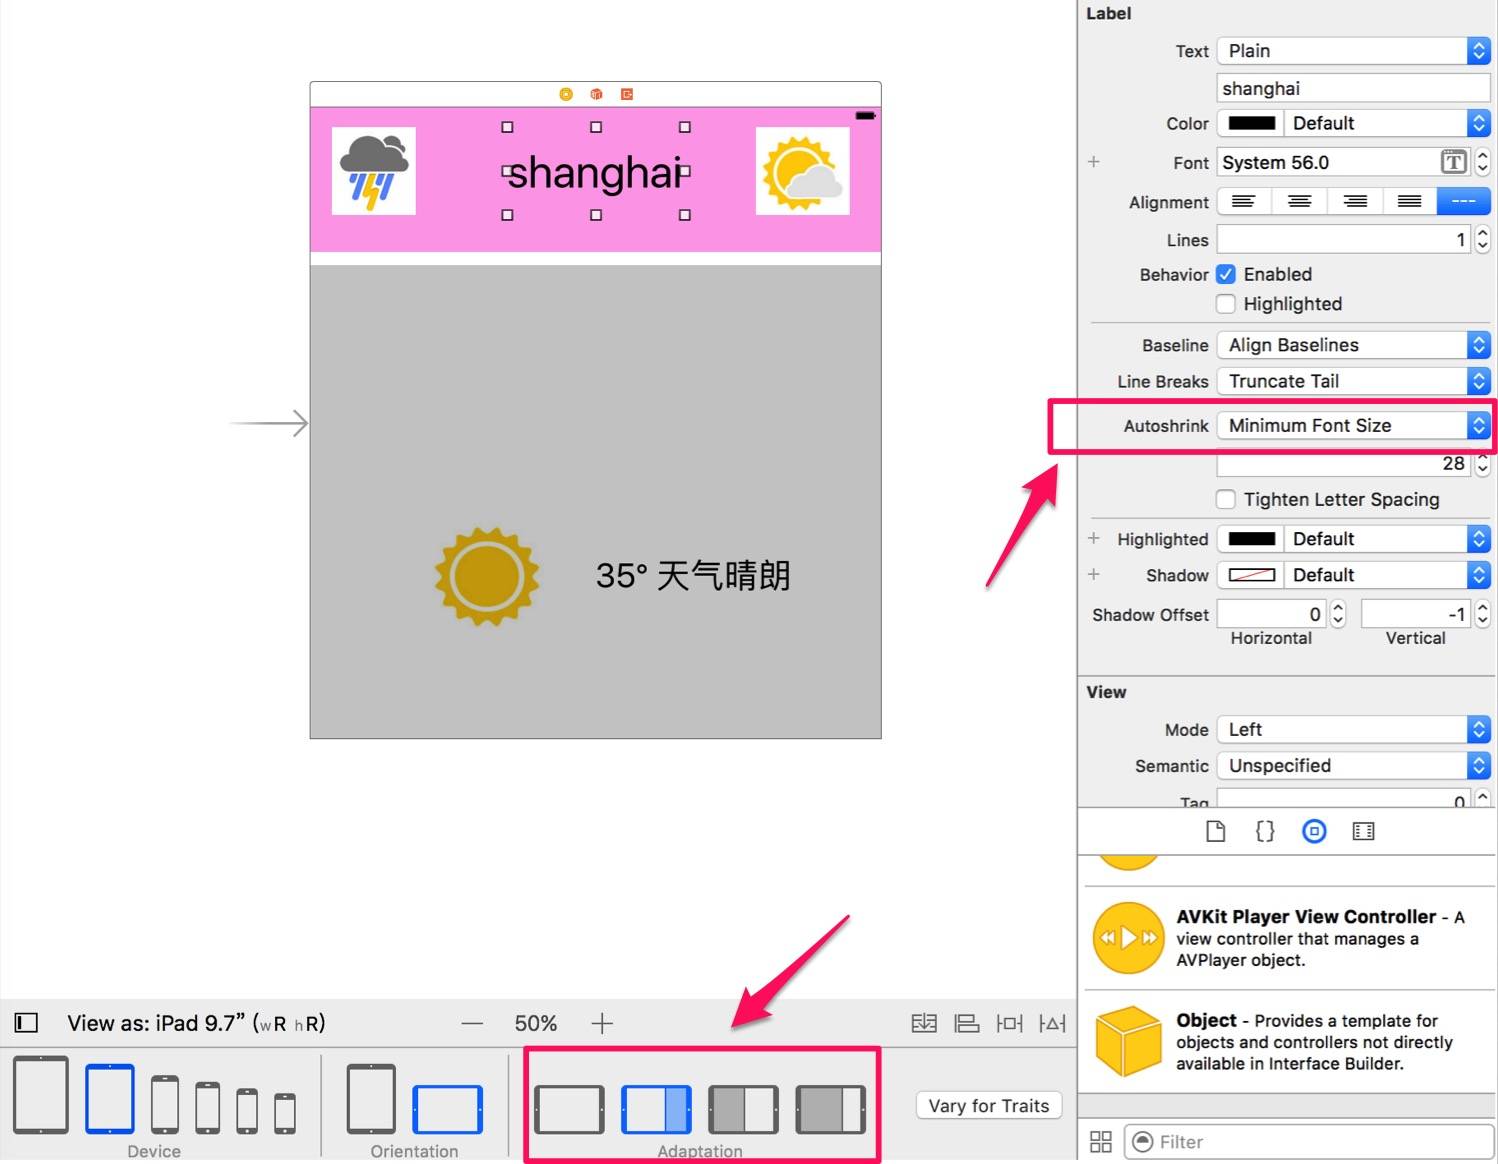
Now even when switching back to landscape in split view, it displays correctly.
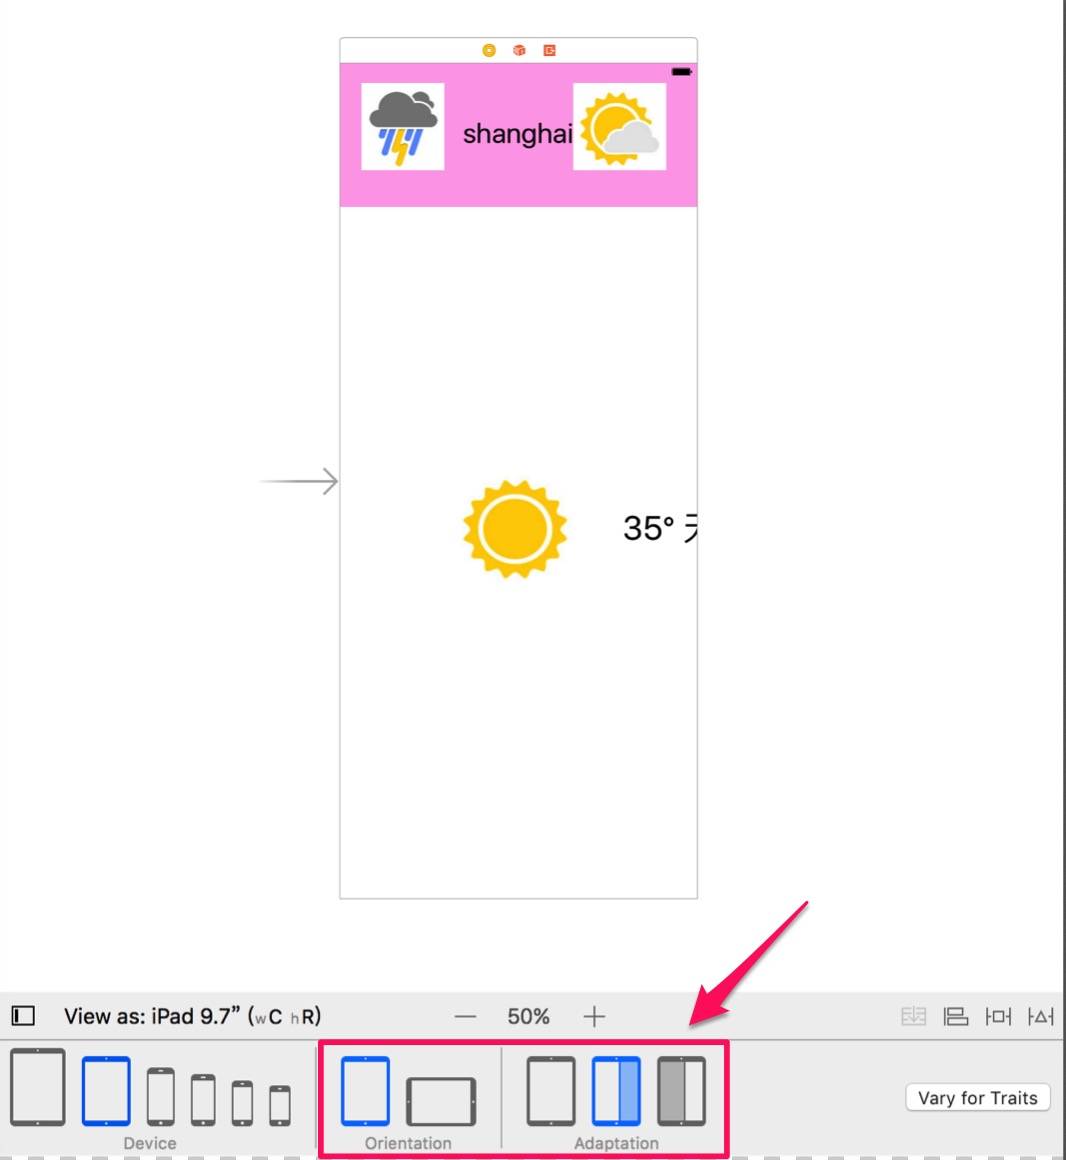
Next, let’s handle the temperature Label in the middle. This time we have a more complex requirement, so we need to use constraints.
At this point, hold down the control key, drag to the parent View, and release. A menu will pop up. Then hold down shift so we can select multiple constraints at once.
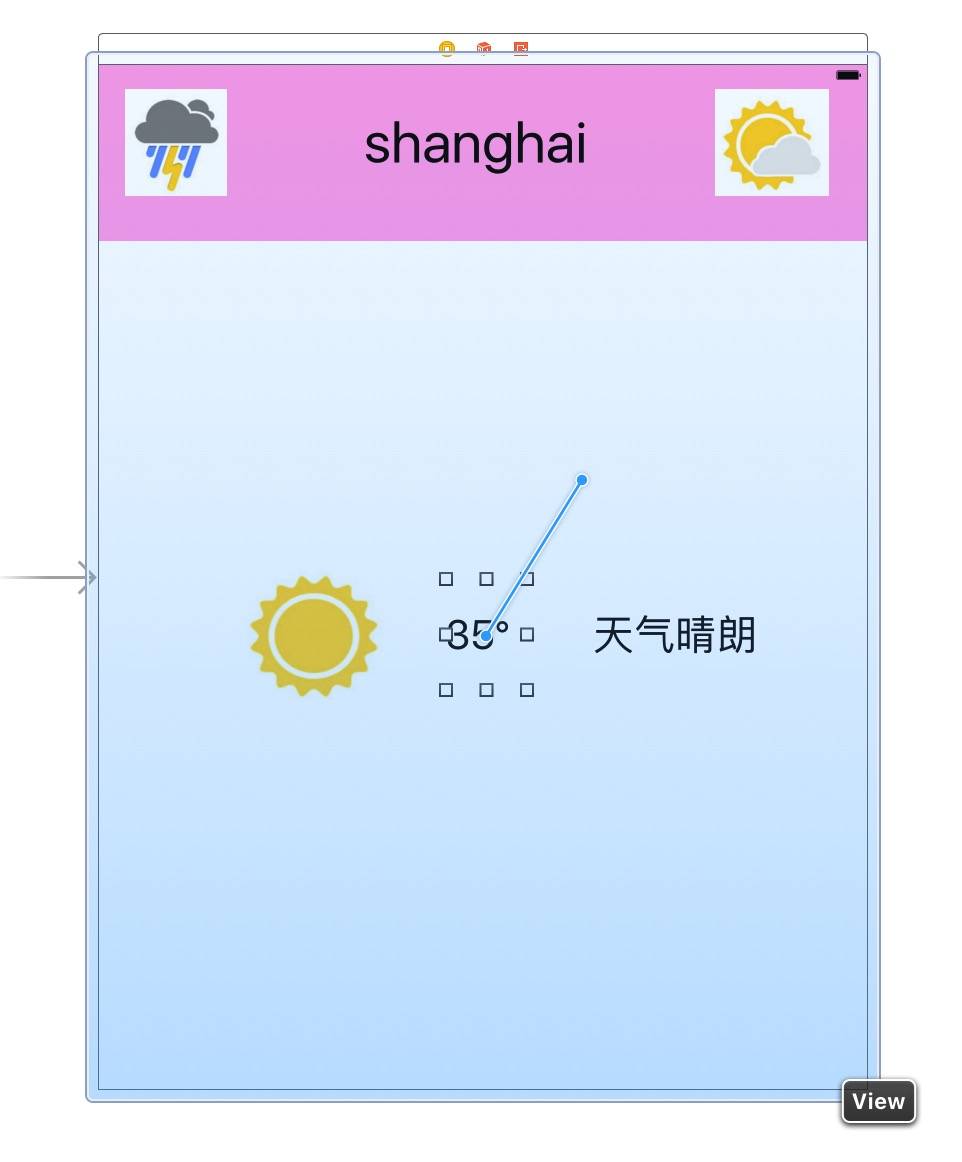
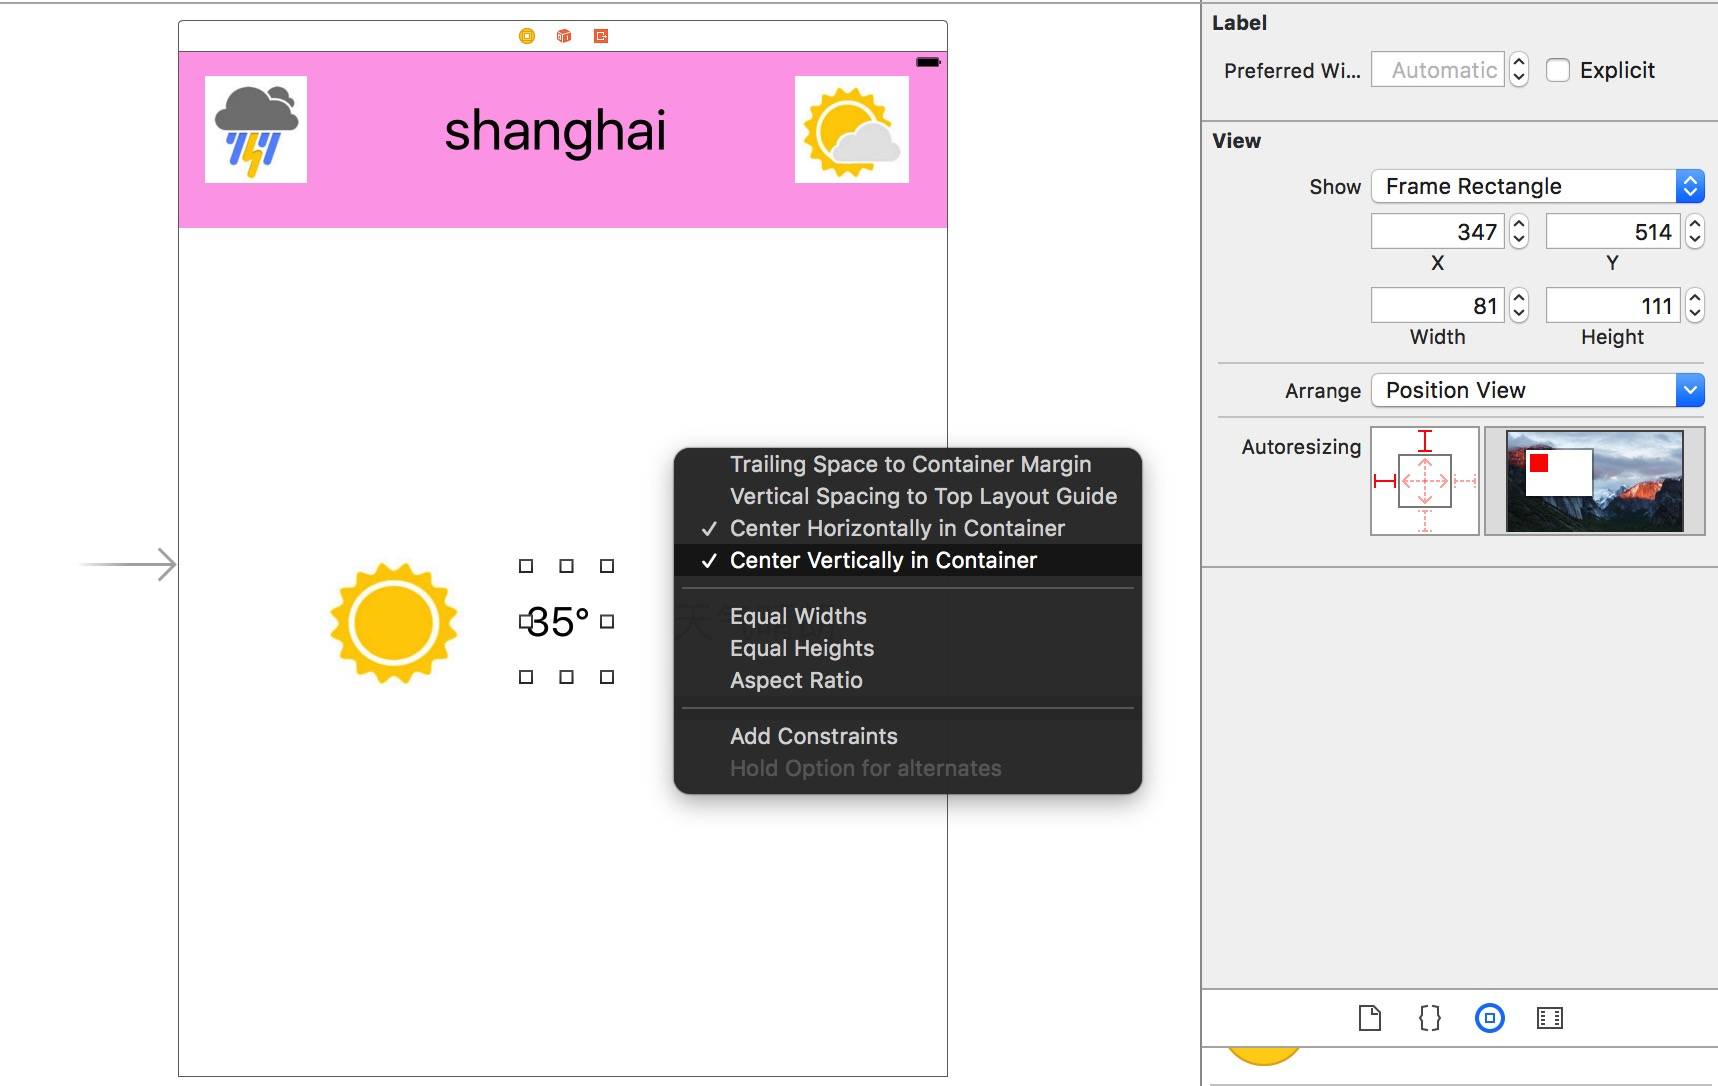
Select both “Center Horizontally in Container” and “Center Vertically in Container” at the same time. Note that the panel on the right is still the AutoresizingMask panel, because the Label does not have any constraints yet. When we click “Add Constraints”, constraints are added to the Label, and the panel on the right also becomes the constraints panel.
Then add two more constraints to this Label: “Horizontal Spacing” and “Baseline”.
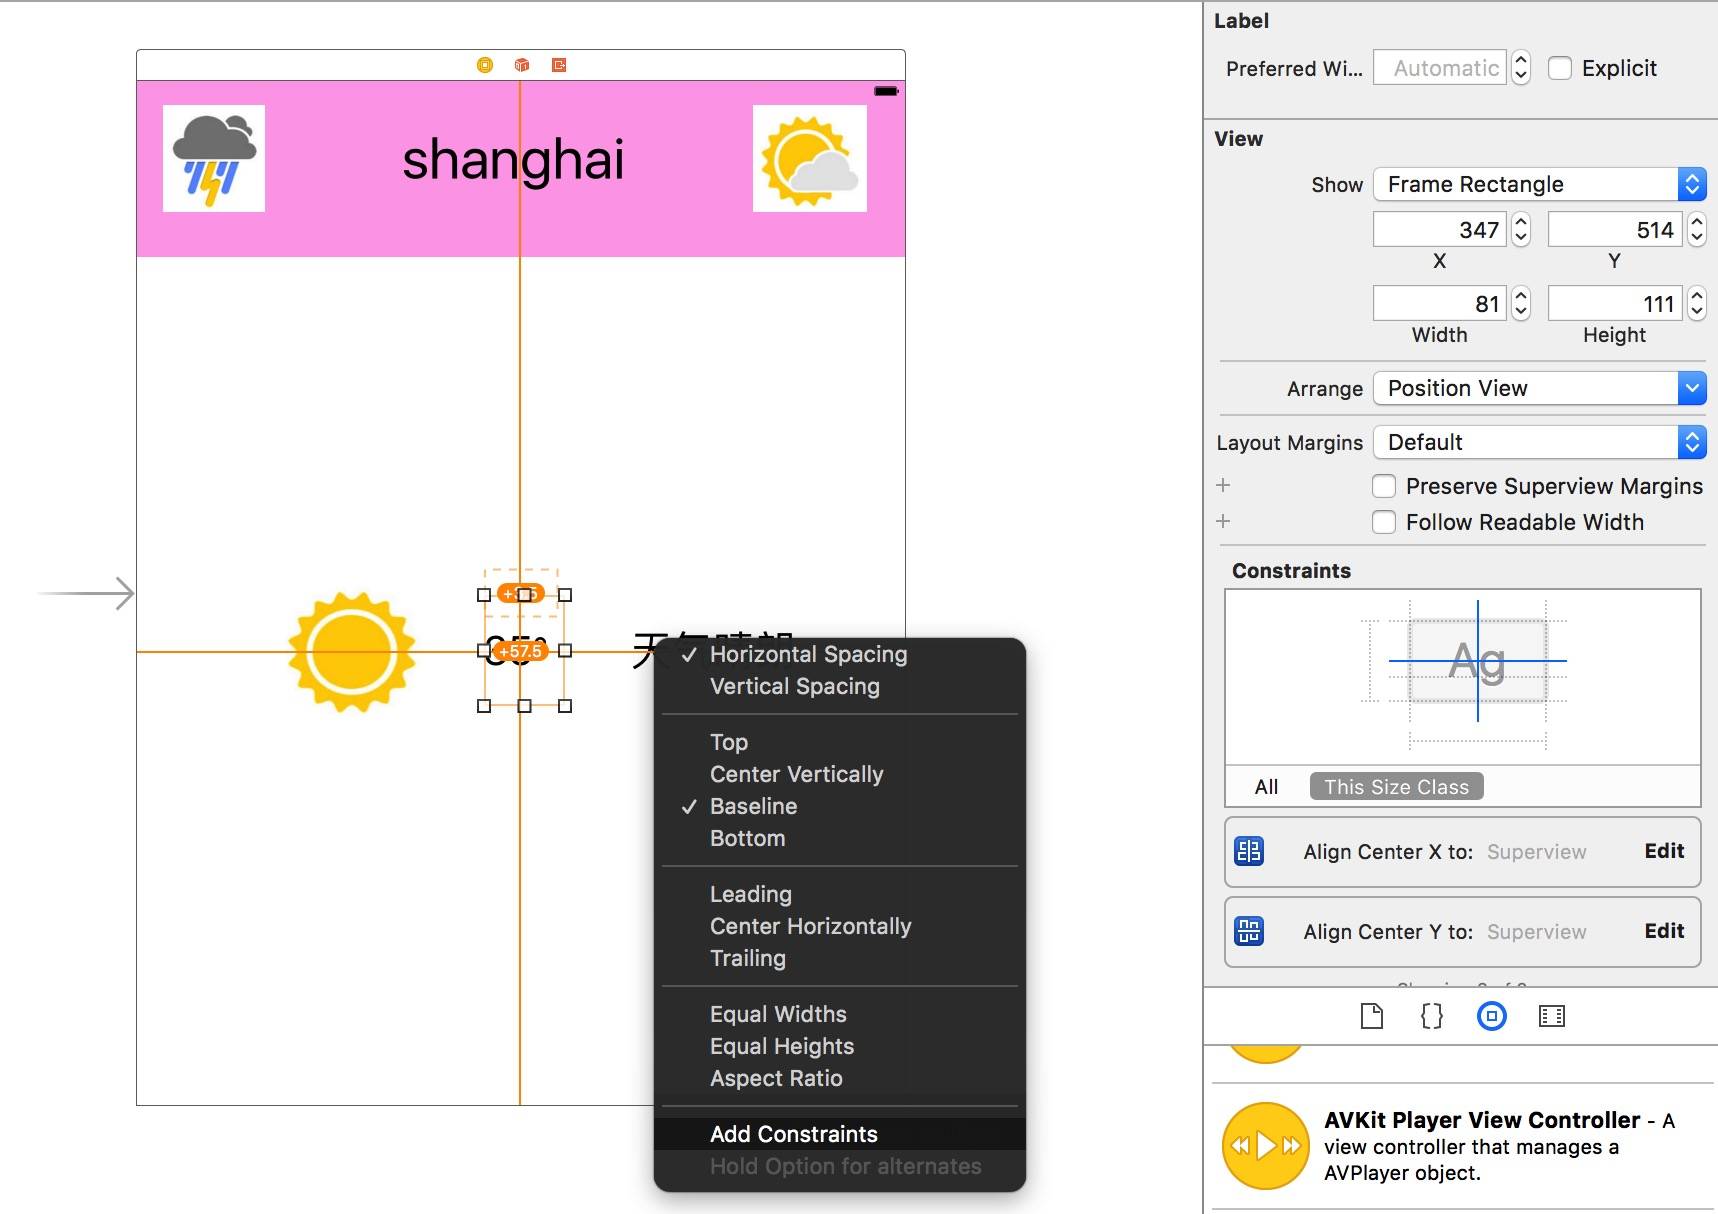
Similarly, drag from the Label to the “sun” imageView, and then add the “Horizontal Spacing” and “Baseline” constraints.
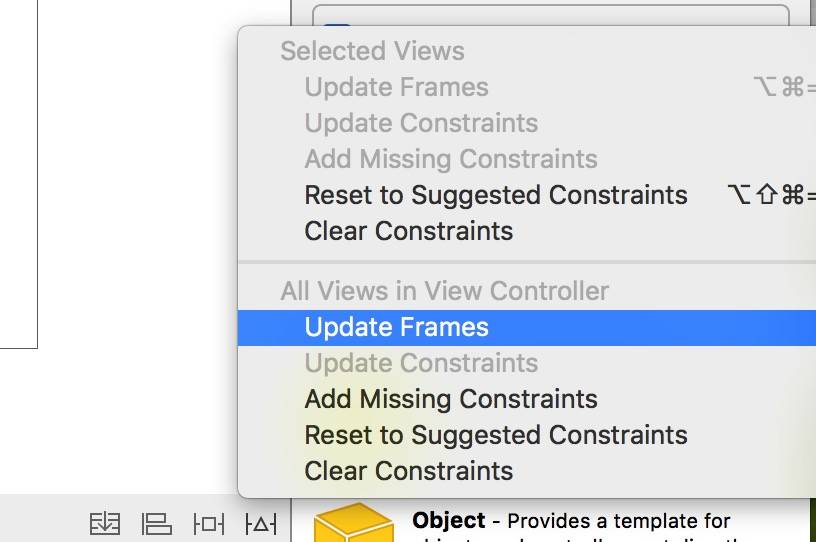
Now let’s update the frame. As shown below, select “Update Frames”; at this point, all the frames are completed.
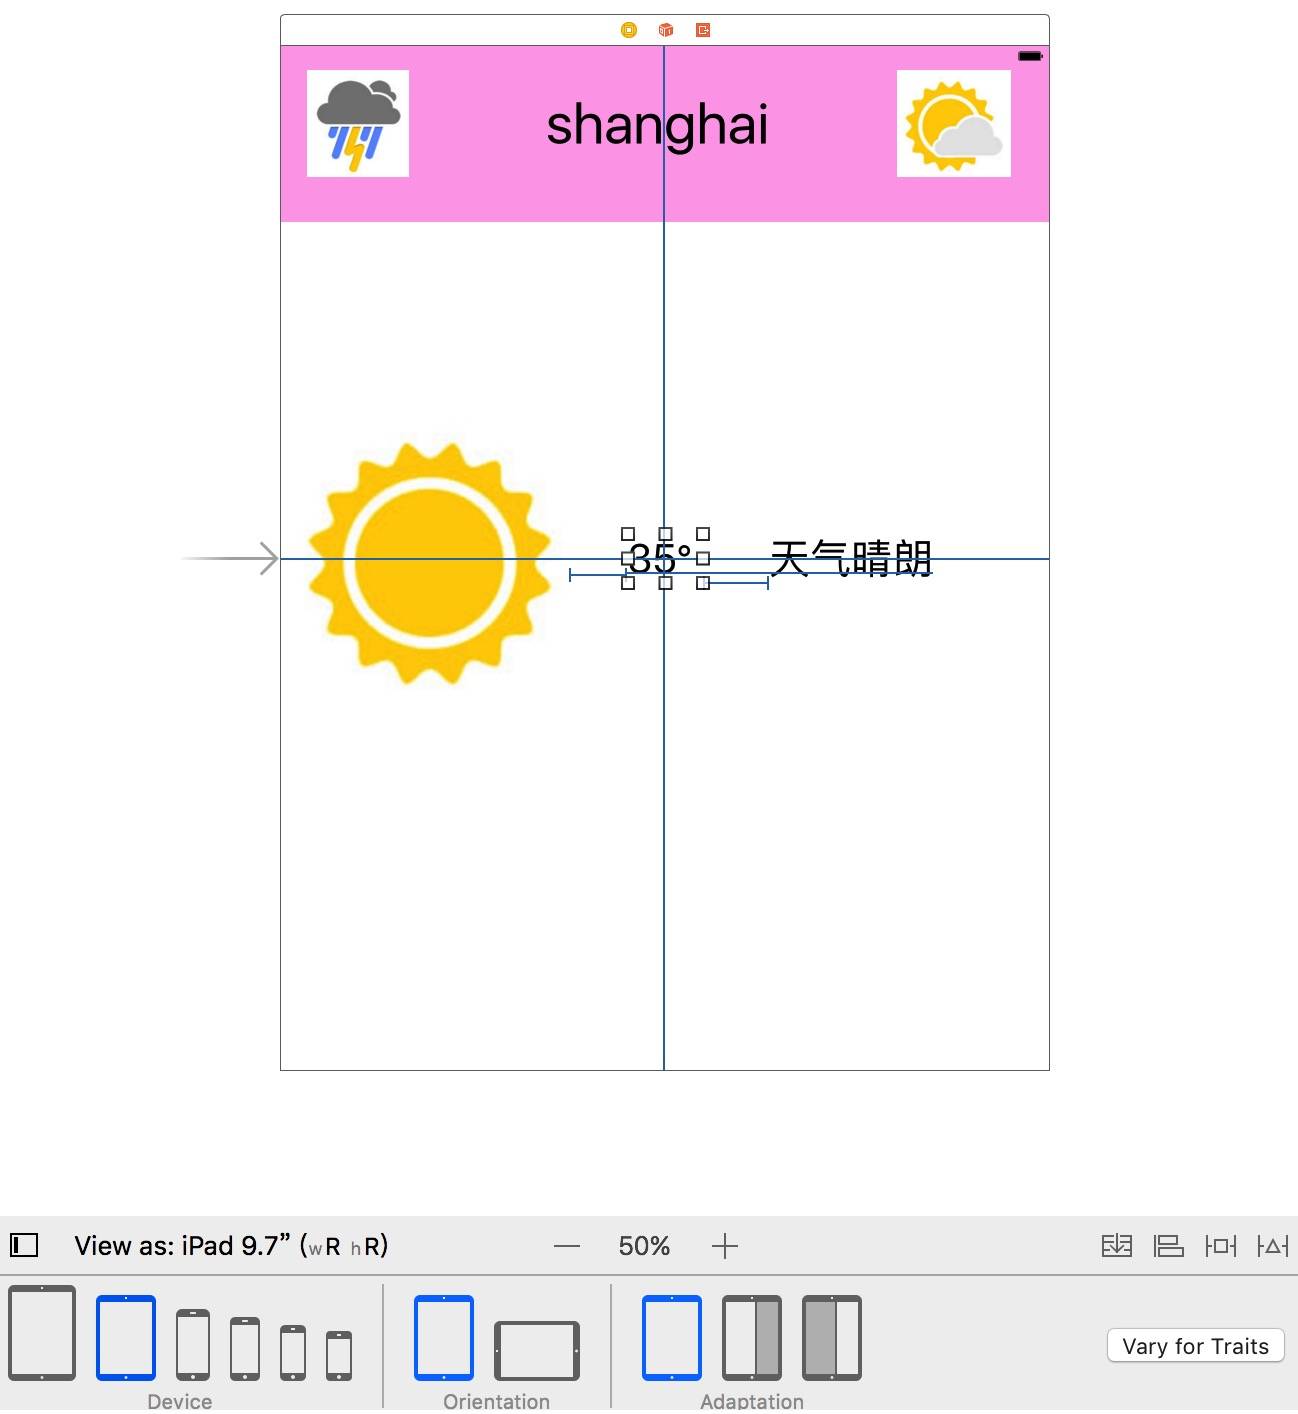
Now update the font size of the temperature Label in the middle. At this point, the calculated size becomes larger. Because our constraints are all correct, the Views on both sides will also grow as the Label’s font becomes larger.
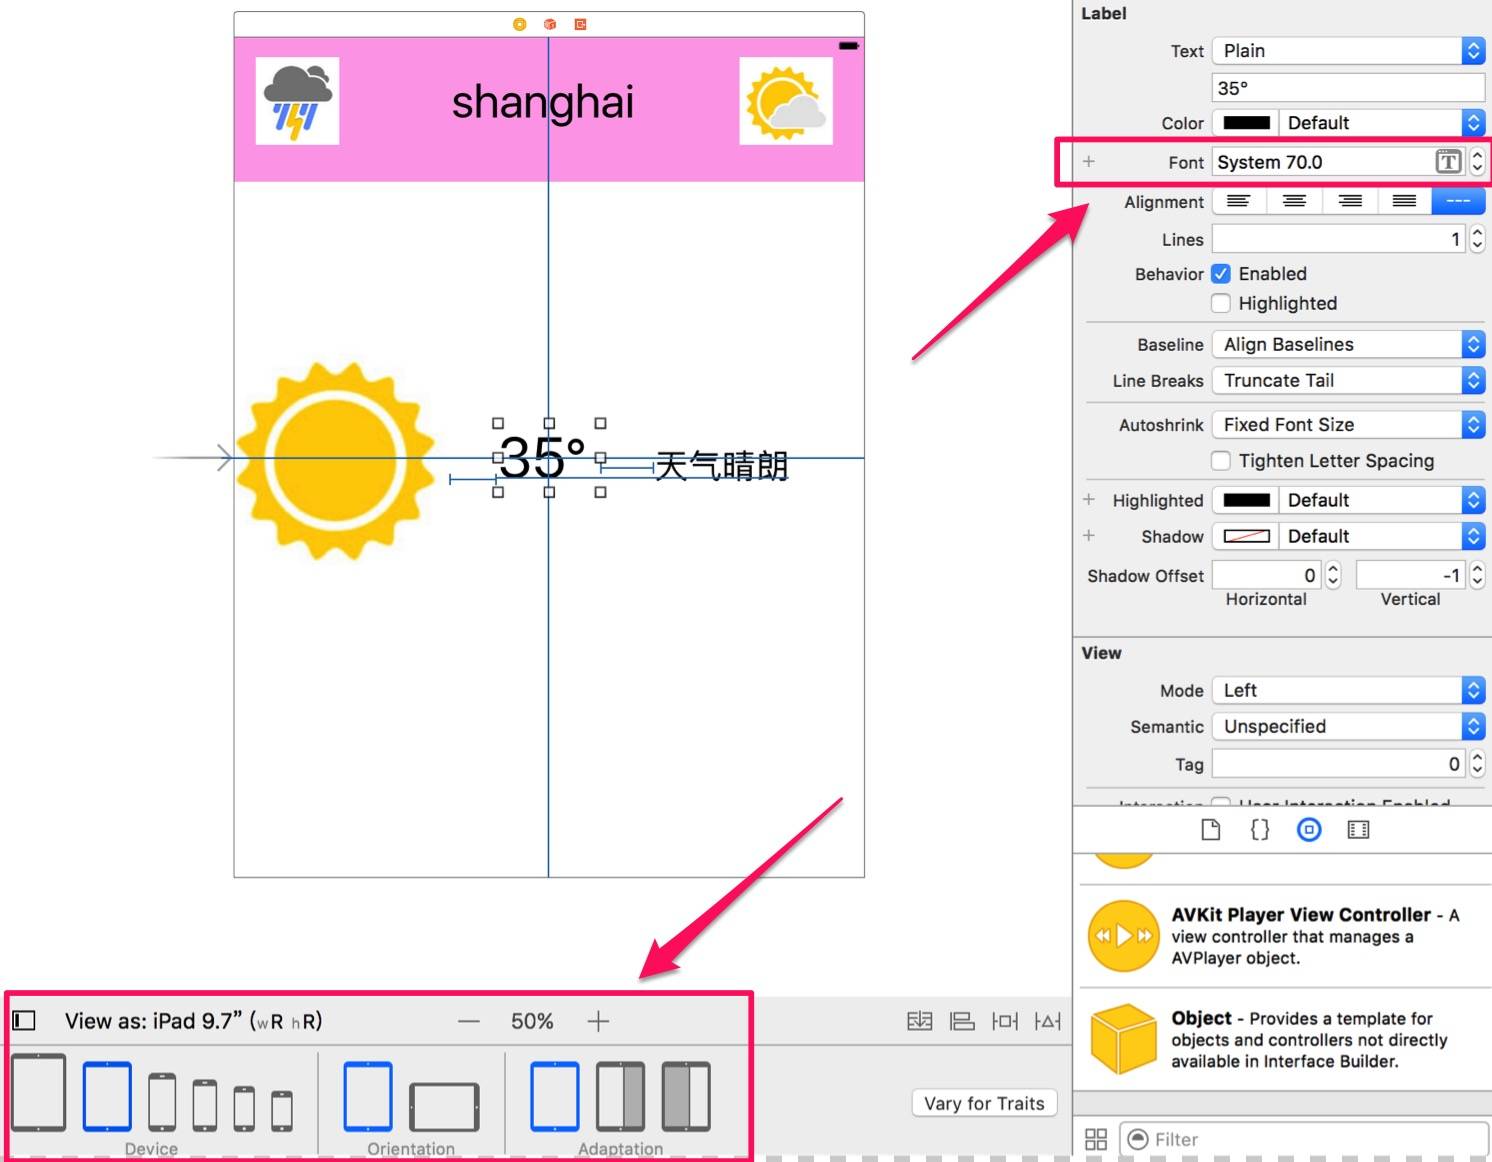
Xcode 8 becomes smarter here and immediately updates the frame automatically.
Next, let’s add a background image for sunny Shanghai. Add an imageView, make it fill the entire parent View, and set mode to “Aspect Fill”.
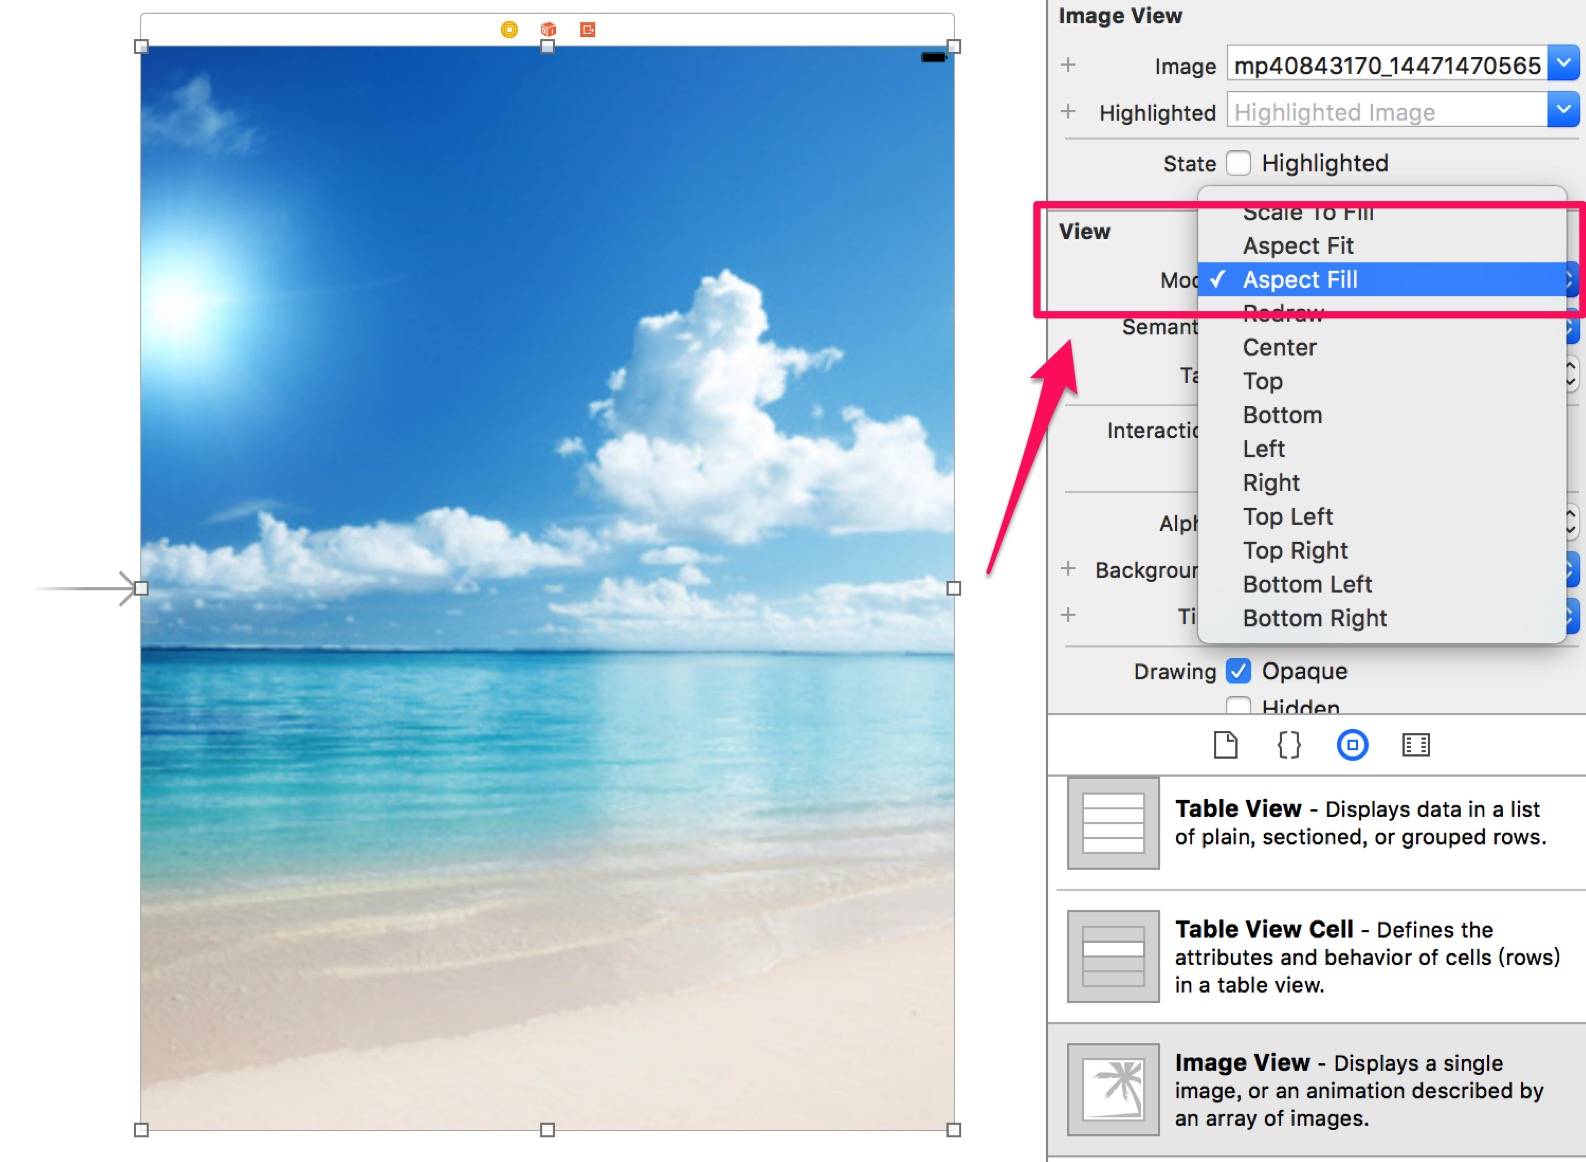
The usual approach next would be to add constraints to this imageView so that this View has the same size as the parent View. But for this kind of simple resizing behavior, we don’t need to add Constraints in Xcode 8. Here we’ll use Autoresizing masks instead. Add the following masks to the imageView.
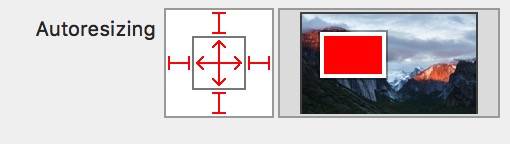
Move the imageView to the background. At this point, the layout for our entire UI is complete.
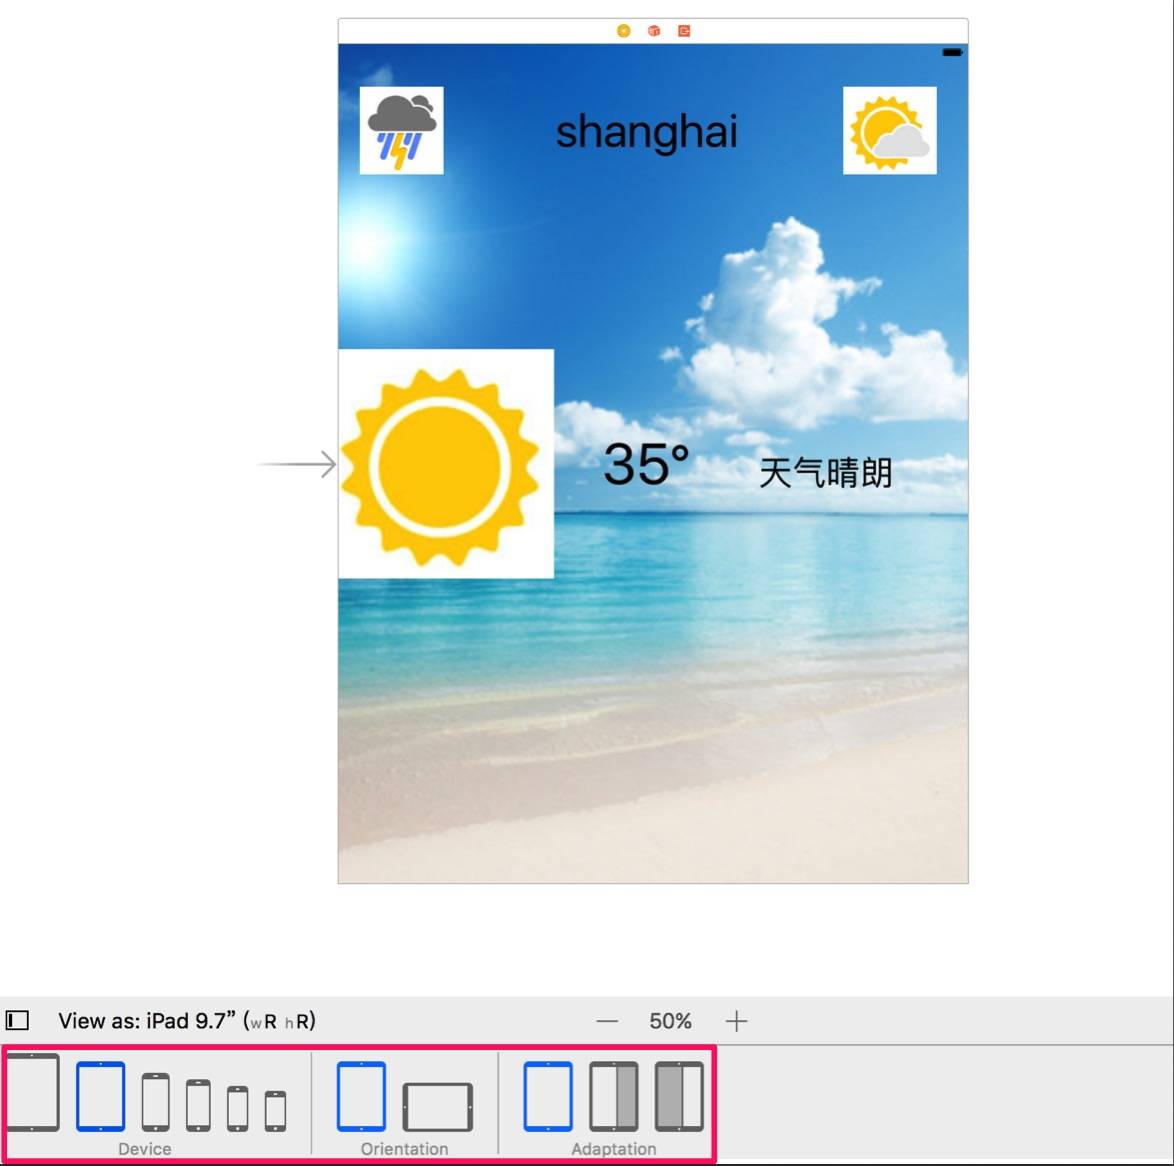
Test the landscape effect.
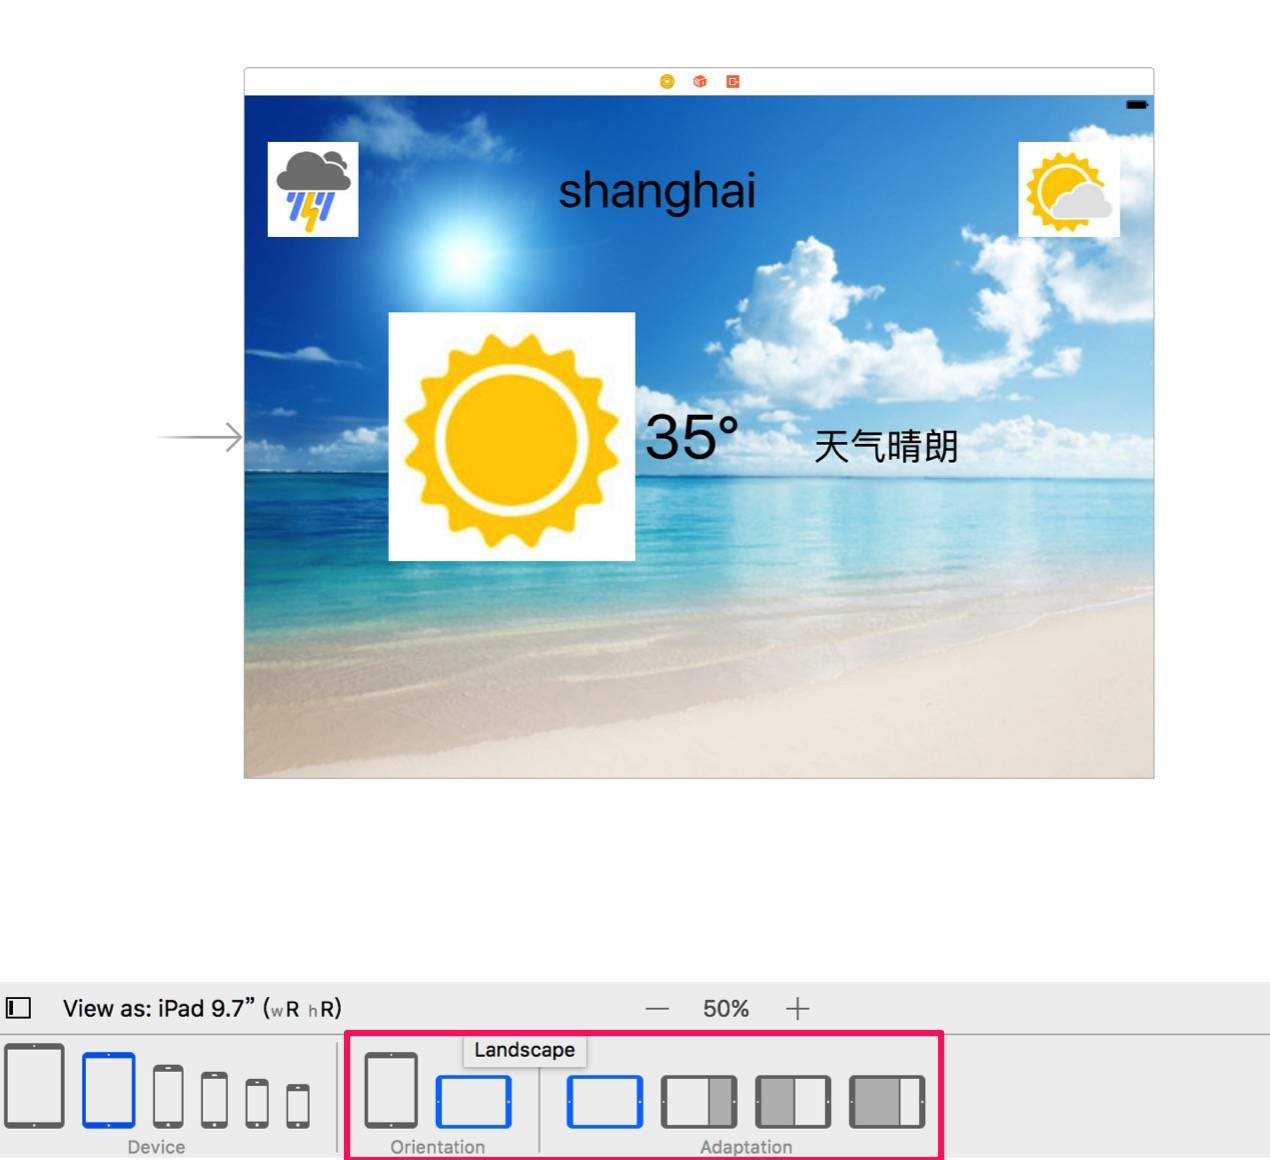
Even split view can complete the task just fine!
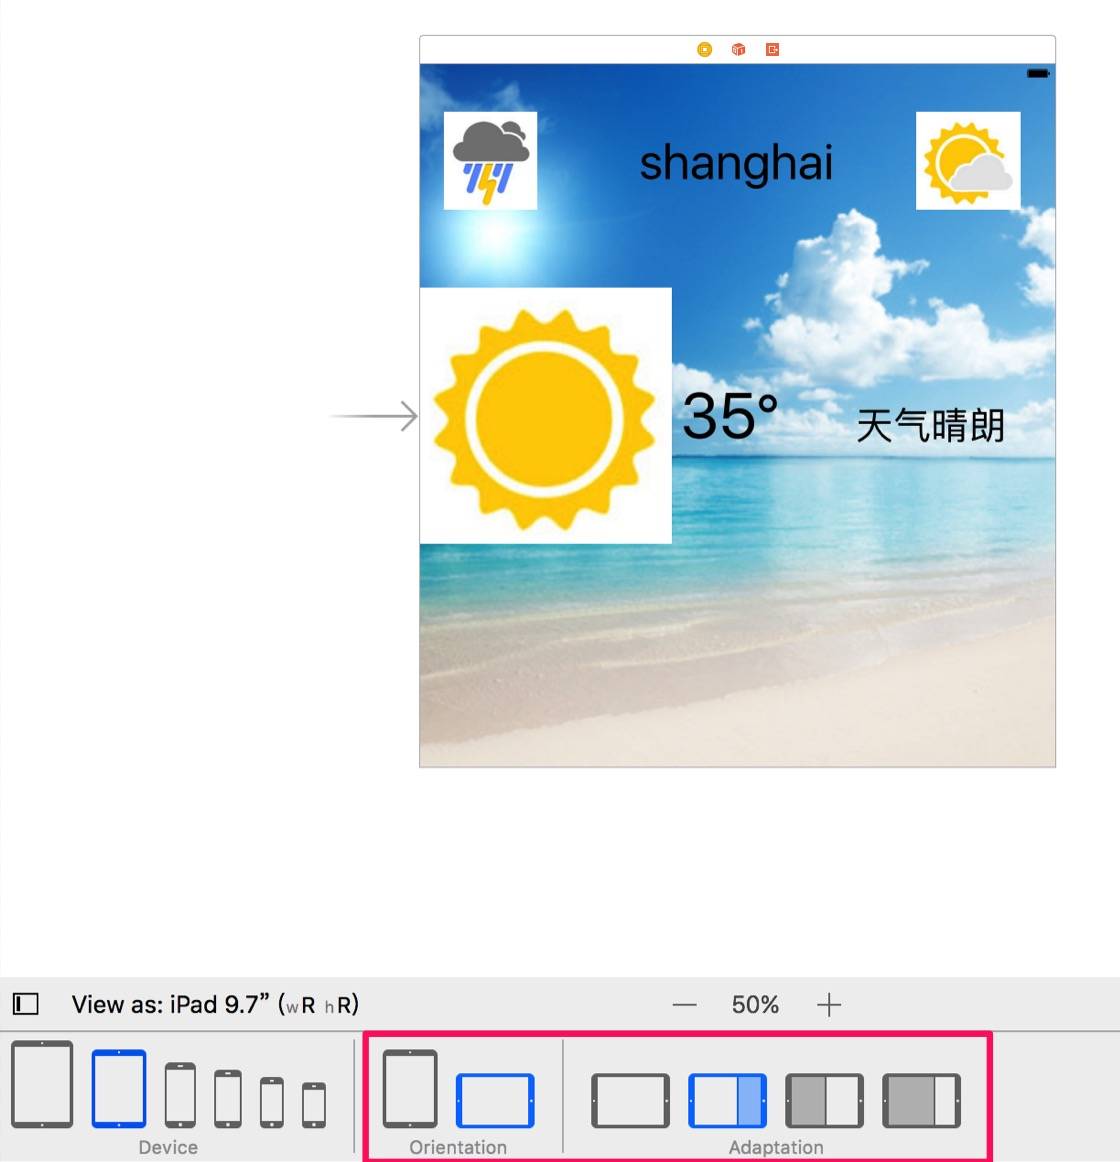
Demo GitHub address. There’s nothing difficult about this demo; it’s just for seeing the effect.
This is Xcode 8’s Incrementally Adopting Auto Layout: Autoresizing masks + Auto Layout Constraint working together!
II. Design and Runtime Constraints
During development, we may encounter a situation where a View’s constraints are added based on the data you load. So before the app runs, we cannot know all the constraints.
There are three ways to handle the above situation.
1. Placeholder Constraints
Suppose we now need to place an image in the vertical and horizontal center of a View, with a leading margin from the left edge. We also need to preserve its aspect ratio. But we do not know the final appearance of this image. Only at runtime can we know what this image looks like.
To be able to see our image in Interface Builder, we first estimate the image’s aspect ratio. Suppose we estimate it as 4:3. At this point, add constraints to the image, and check “place order constraint”; this constraint will be removed at build time.
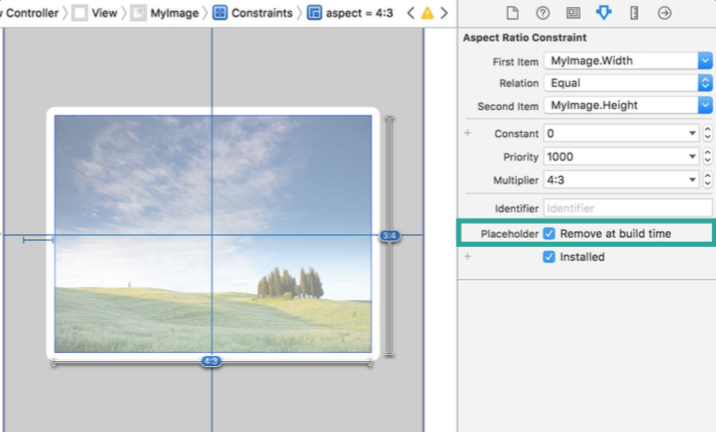
After we obtain the image at runtime, we can then add the appropriate constraints and aspect ratio to it.
2. Intrinsic Content Size
This is similar to the scenario above. Sometimes we customize UIView or NSView instances, and the content inside these Views is dynamic. Interface Builder does not run our code, so we do not know the internal size until the app runs. We can set an intrinsic content size for it.
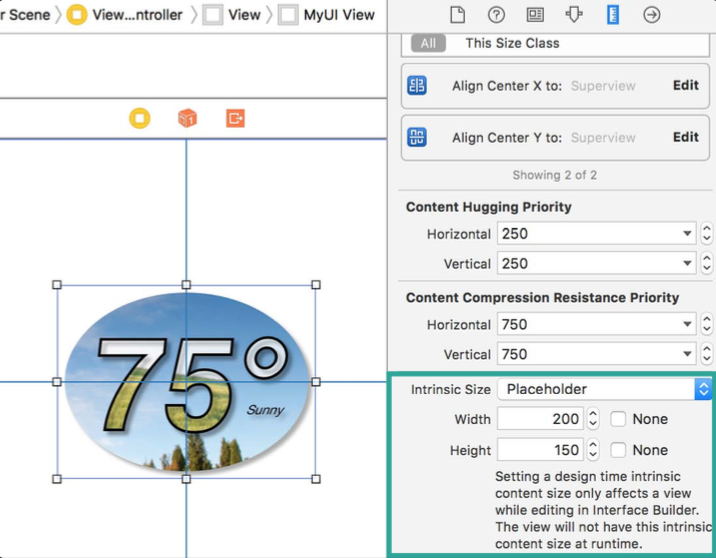
Setting a design time intrinsic content size only affects a view while editing in Interface Builder.The view will not have this intrinsic content size at runtime.
Pay attention to the note above: intrinsic content size is only equivalent to a placeholder during layout. At runtime, this size no longer exists. So if we really need to use this intrinsic content size during development, then we need to override the content size.
override var intrinsicContentSize: CGSize
3.Turn Off Ambiguity Per View
This is a new feature in Xcode 8. When neither of the two methods above can meet our needs, this is the approach to use. Xcode 8 gives us the ability to dynamically adjust the warning level when constraints introduce ambiguity.
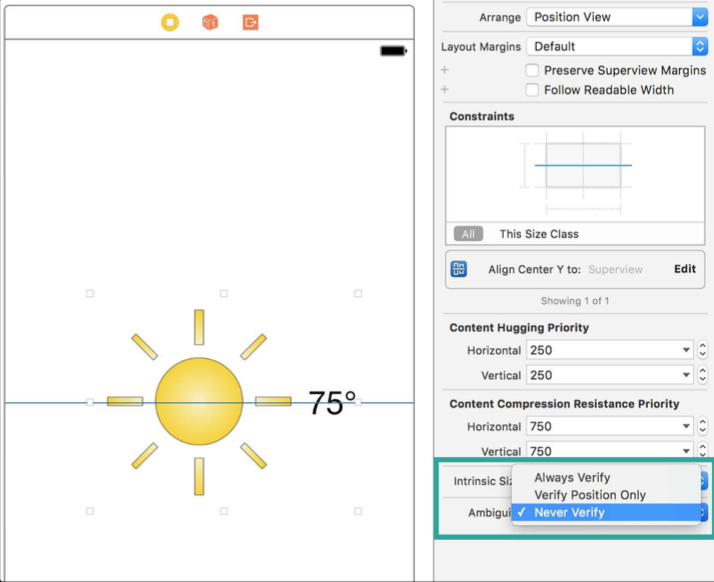
In this scenario, we only know that we need to place this imageView at the horizontal center, but we do not know the size of the imageView or its horizontal position. If we add only this single constraint, Interface Builder will show a red error, because based on the constraints we have provided, IB cannot uniquely determine the current view’s position.
If, later at runtime, after obtaining the full information for the image, we know how to add constraints ourselves, and we know how to lay things out so that the imageView’s position can be uniquely determined, then we can turn off IB’s red warning. Find “Ambiguous”; this is the warning level. Here we choose “Never Verify”, and then the red warning and error indicators will disappear. However, the prerequisite for choosing this option is that we can guarantee that at runtime we will add enough constraints to fully define the view’s positional information.
The three methods above are the solutions for adding constraints to a view at runtime.
III. NSGridView
This is a new layout container introduced for macOS.
Sometimes maintaining the correctness of constraints can be quite troublesome. For example, even with a simple group of checkboxes, maintaining constraints is not easy. In such cases, we tend to choose a stack view to make development easier.
The figure below shows a common group of checkboxes in a macOS app.
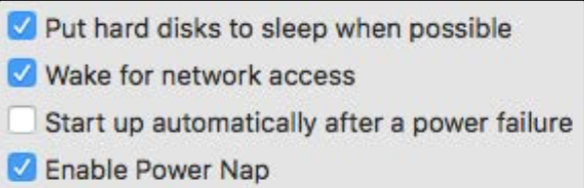
At this point, we choose NS/UIStackView to implement it, because it has the following advantages: it can arrange a group of items, and more importantly, it can properly handle content size and control the spacing between each item.
However, there are still some scenarios that stack view does not handle very conveniently. For example, the scenario shown below.
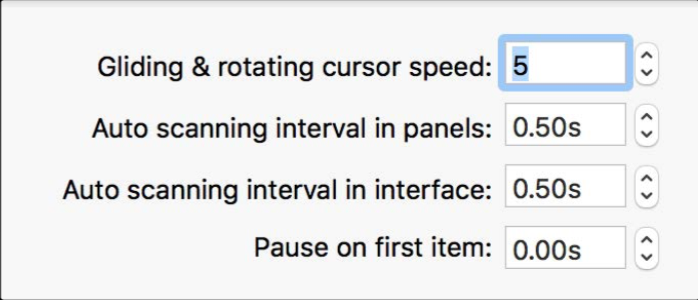
This can still be implemented with stack view, but it cannot help us align rows and columns based on the content.
This is why the new NSGridView was introduced.
With NSGridView, we can easily align content along both the X and Y axes. All we need to do is place the content into a predefined grid, and NSGridView will take care of everything related to alignment from there.
Let’s look at the following example.
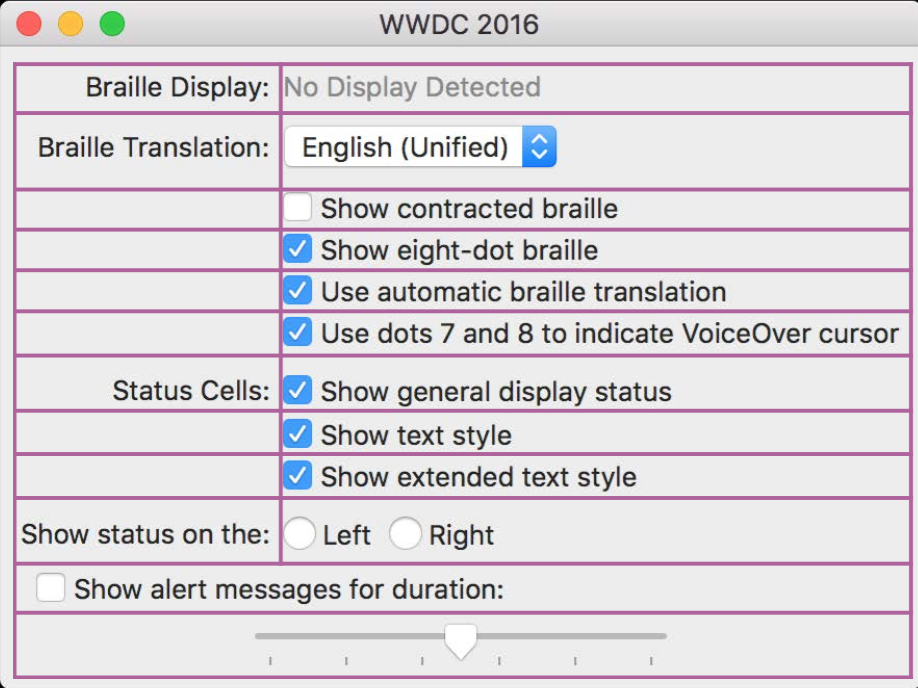
NSGridView has two related classes, NSGridRow and NSGridColumn, which automatically manage the size of the content. Of course, when needed, we can specify the size, padding, and spacing. We can also dynamically hide certain rows and columns.
The job of NSGridCell is to manage the layout of the content view inside each cell. If the content of a cell exceeds the cell’s bounds, the cells will be merged, just like in a regular spreadsheet app.
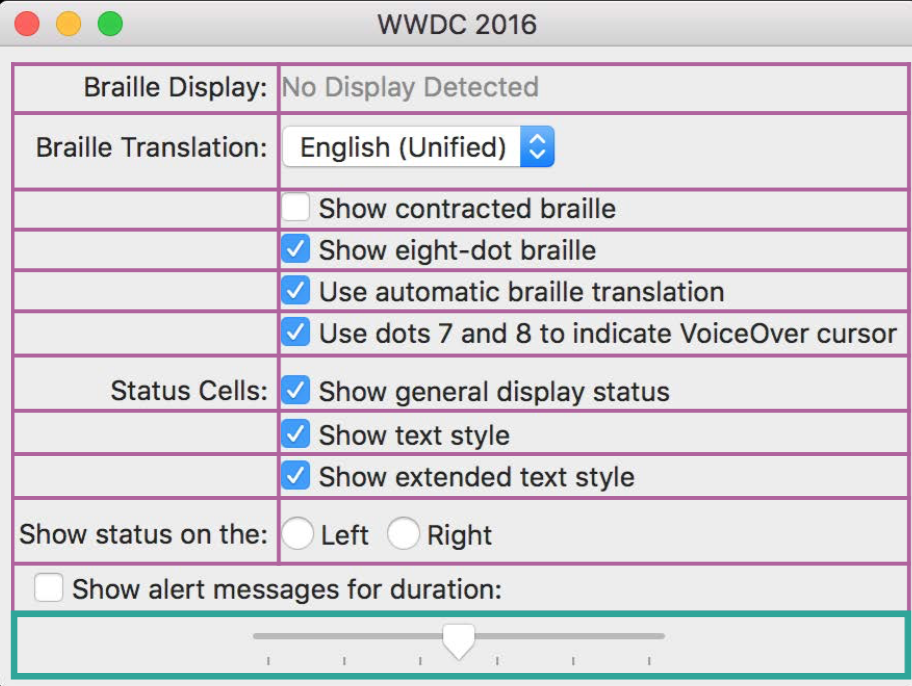
Let’s build a simple interface. The design is as follows:
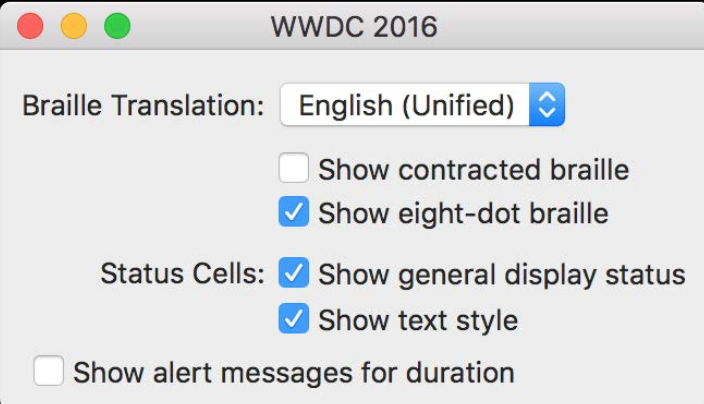
We do not need to worry about the sizing of the grid; we only need to care about how much content needs to be displayed in each row and each column.
let empty = NSGridCell.emptyContentView
let gridView = NSGridView(views: [
 [brailleTranslationLabel, brailleTranslationPopup],
 [empty, showContractedCheckbox],
 [empty, showEightDotCheckbox],
 [statusCellsLabel, showGeneralDisplayCB],
 [empty, textStyleCB],
 [showAlertCB]
])
The UI produced by running the code above looks like this:
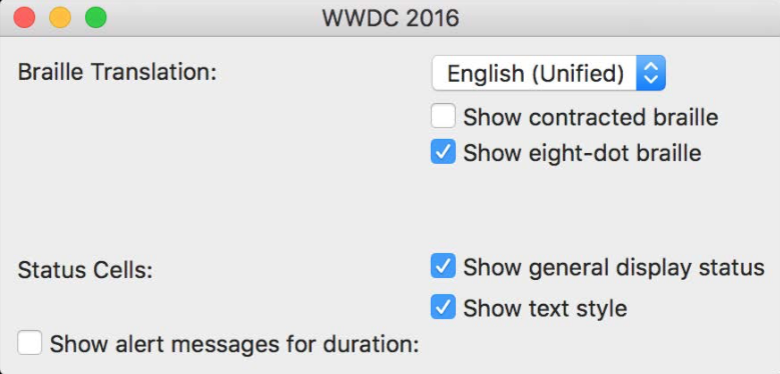
Although there is nothing wrong with how we call the initializer, the resulting UI clearly differs from the design in a few ways. The most obvious issue is that the UI has been stretched out, leaving a lot of empty space.
The reason for this problem is that the grid is constrained to the edges of the window. Our intent should be for the window to match the size of the grid, but what is happening instead is that the grid is being stretched to match the size of the window.
The way to solve this problem is to change the content hugging priority of the grid view. Even though the constraints on the page already have a high priority, we can still increase the priority further so that the constraints push the content away from the window’s edges. Let’s raise the priority a bit:
gridView.setContentHuggingPriority(600, for: .horizontal)
gridView.setContentHuggingPriority(600, for: .vertical)
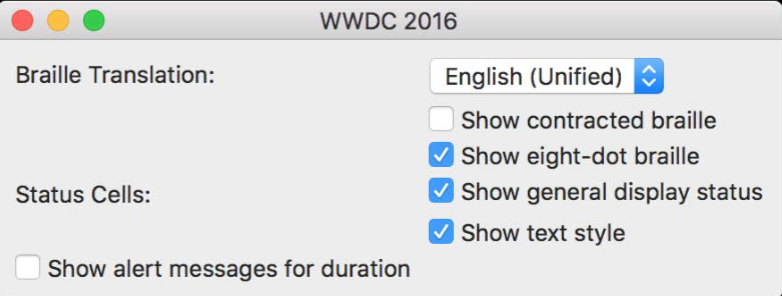
We can see that the content inside the window is now more compact, and the large blank area in the middle has disappeared.
Next, let’s fix the blank space in the middle of the window: the label on the left is too far from the content on the right. According to the design, the label should be right-aligned. This is easy to do; we only need to adjust the cell’s placement information. Placement information affects cells, rows, columns, and the grid view.
If the cell’s placement property value is not specified, the row and column will determine it based on the grid view’s placement property value. This rule allows us to set placement in one place and instantly change the layout of many cells.
//first column needs to be right-justified:
gridView.column(at: 0).xPlacement = .trailing
Find the first column of the gridView and change its xPlacement property value. This will make all cells in that column right-aligned.
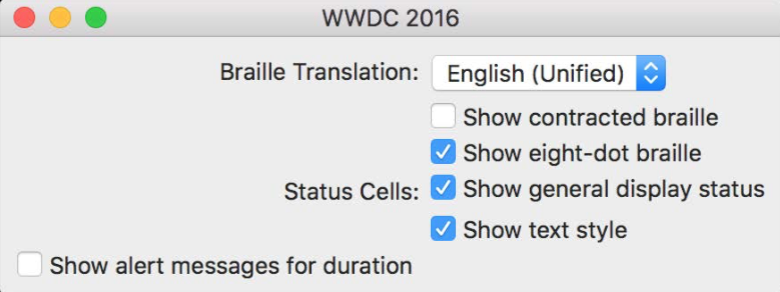
After right-aligning, we run into a new issue: the baselines are no longer aligned.
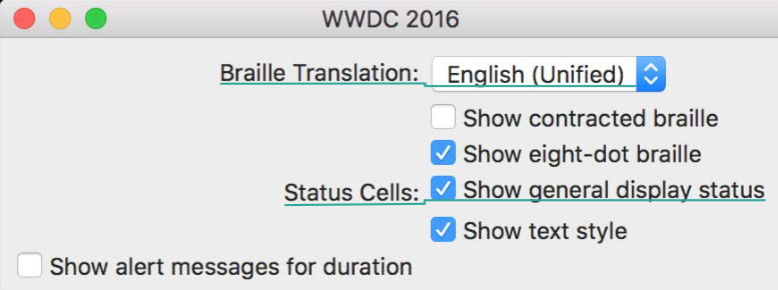
Row alignment works the same way as column alignment. Similarly, we only need to configure it in one place, and it will affect the entire grid view.
// all cells use firstBaseline alignment
gridView.rowAlignment = .firstBaseline
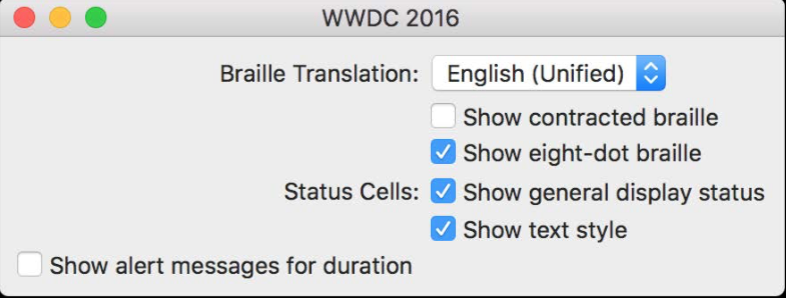
Once this is set, the entire grid view is aligned.
Next, let’s change the margins of the pop-up button.
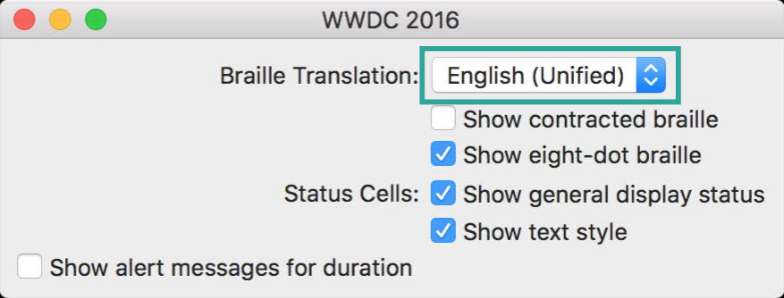
let row = gridView.cell(for: brailleTranslationPopup)!.row!
row.topPadding = 5
row.bottomPadding = 5
Here, taking the first row could also be done the same way as we previously took the first column: just take the row at index 0. Instead, we’ll use a better approach here. In gridView, find the cell that contains the pop-up button, and then find the corresponding row from that cell. This approach is better than directly using an index because if someone adds another row at index 0 in the future, the code would break. With our approach, however, the code will continue to work because it ensures that we’re retrieving the cell containing the pop-up button. So, in code, try not to hard-code fixed indexes; it makes future maintenance more difficult.
Similarly, let’s also add padding to the “status cells”.
ridView.cell(for:statusCellsLabel)!.row!.topPadding = 6
Here we need to compare the difference between padding and spacing.
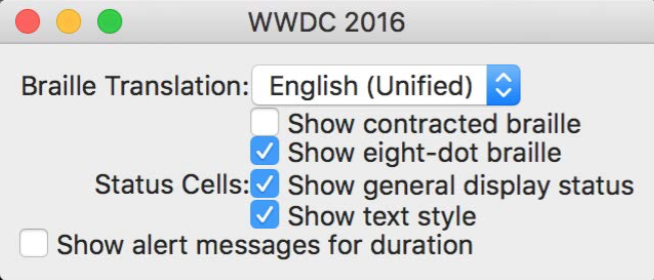
Padding refers to the space between each row or each column. We can increase padding to adjust the spacing between individual pairs. Spacing applies to the entire gridview. Changing it affects the layout of the entire grid view.
Now let’s look at our design:
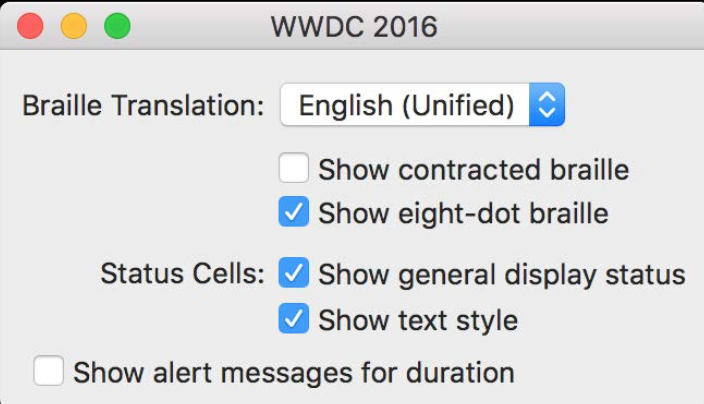
Without padding, it would look like this:
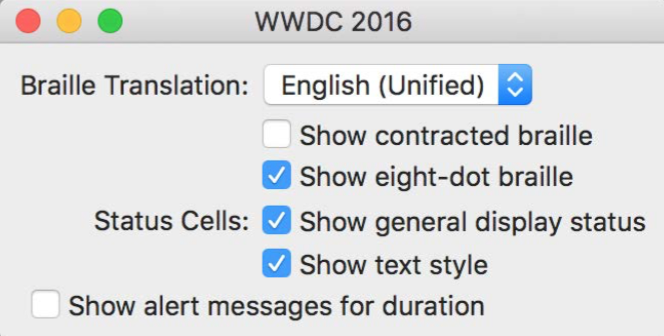
Without spacing, it would look like this:
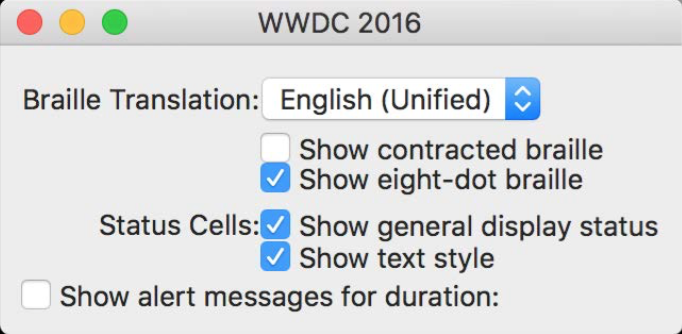
If neither spacing nor padding is set, everything will be packed together:
Finally, let’s handle the cell in the bottom row that contains the checkbox.
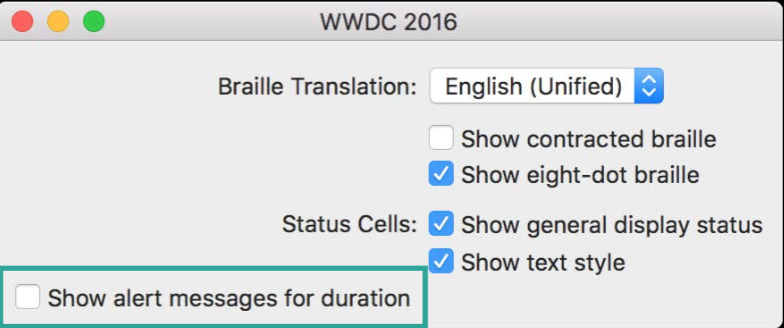
Here we need to use what was mentioned earlier: merging two cells.
// Special treatment for centered checkbox:
let cell = gridView.cell(for: showAlertCB)!
cell.row!.topPadding = 4
cell.row!.mergeCells(in: NSMakeRange(0, 2))
Here we explicitly specify merging the first 2 cells.
After the code is executed, it will look like this.
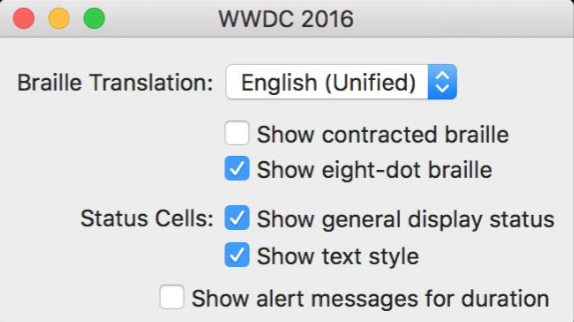
The cell in the last row will span the width of 2 cells. Although it occupies the space of 2 cells, it still inherits the right-alignment rule from the first column.
Now our requirement is that we don’t want it to be right-aligned, nor do we want it to be left-aligned. The checkbox actually supports being aligned between 2 columns, but because the widths of these 2 adjacent columns are not equal, the gridview doesn’t know how to lay it out. At this point, we need to manually change the layout.
Some people might think here: just directly take
cell.xPlacement = .none
Directly changing the cell’s xPlacement to none would immediately disrupt the entire GridView’s constraints-based layout, so we can’t do that. We need to continue adding extra constraints to the cell to preserve the overall balance of the GridView’s constraints.
cell.xPlacement = .none
let centering = showAlertCB.centerXAnchor.constraint(equalTo: textStyleCB.leadingAnchor)
cell.customPlacementConstraints = [centering]
We only need to provide the checkbox anchor on the x-axis. At that point, the checkboxes will be arranged the way we want.
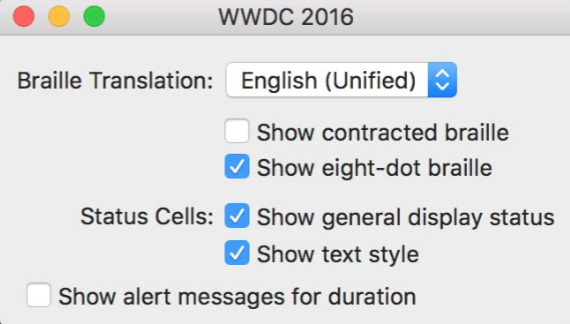
At this point, we have completed the requirement. To summarize: NSGridView is a new control that can help us implement grid-like layouts very effectively. It can quickly and conveniently arrange the content we need to display in an orderly way. After that, we only need to tweak information such as padding and spacing.
####IV. Layout Feedback Loop Debugging
Sometimes, after we set up constraints, no errors are reported, but in certain cases, when we run the app, a pile of constraint conflicts appears in the debug window. In severe cases, the app may even crash directly. This kind of crash occurs when we run into a layout feedback loop.
When this happens, it often occurs during a “transition period,” either at the beginning or at the end. For example, if you click a button and the button responds to your click, but afterward the button does not pop back up and remains in the pressed state.
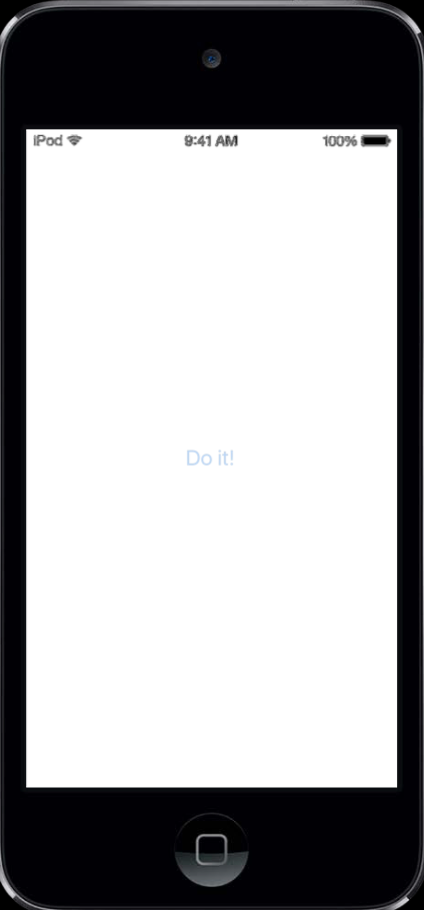
Then you will observe CPU usage maxing out, memory usage multiplying, and eventually the app crashes. At the same time, it returns a large amount of layout stack trace information.
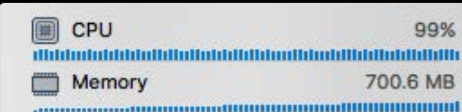
The reason this happens is that the layout of some view is being executed over and over again, falling into an infinite loop. The run loop will not stop, and CPU usage will remain at its peak. All messages will be collected into autoreleased objects; as messages keep being sent, they keep being collected. As a result, memory usage also multiplies.
One possible cause is the setNeedsLayout method.
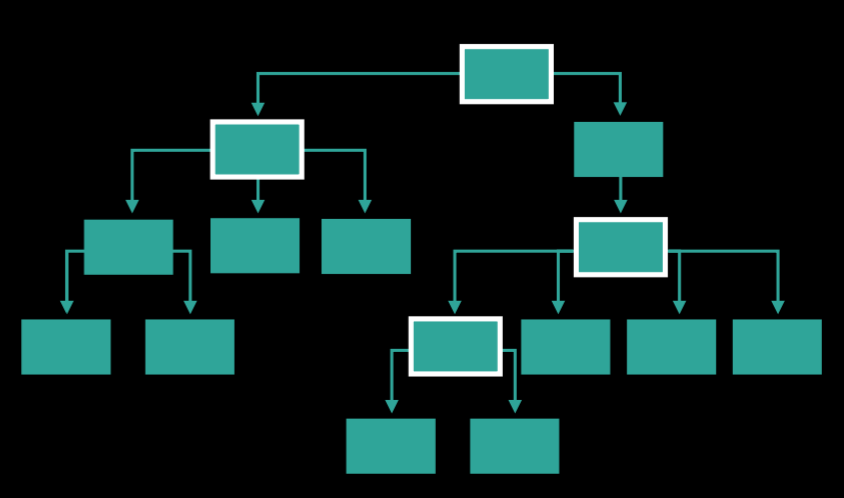
After one view calls setNeedsLayout, the call propagates to the parent view, which continues calling setNeedsLayout. The parent view’s setNeedsLayout may in turn trigger layout information for other views. If we can find the caller among these mutual calls—that is, identify which view called this method—then we can analyze clearly where these setNeedsLayout calls come from and where they go, and ultimately find the place where the infinite loop occurs.
This information is indeed difficult to collect. That is also why Apple specifically developed such a tool for us, making it easier to debug and identify the cause of the problem.
The switch for enabling this tool is in the “Arguments” tab, as shown below.
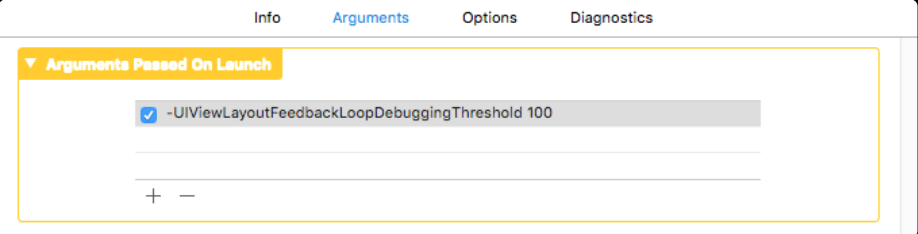
-UIViewLayoutFeedbackLoopDebuggingThreshold 100 // 50...1000
-NSViewLayoutFeedbackLoopDebuggingThreshold 100 // 50...1000
// Logs to com.apple.UIKit:LayoutLoop or com.apple.AppKit:LayoutLoop
UIView is used on iOS, and NSView is used on macOS. Once we enable this switch, the layout feedback loop debugger starts recording every call to setNeedsLayout.
Here I set its threshold to 100.
If, within a single Runloop, layout is invoked on a view more times than the threshold—100 in this case, meaning more than 100 times—the infinite loop will continue running for a short while, because the debugger needs some time to record information. Once recording is complete, it immediately throws an exception. The information is also shown in the logs. The log is recorded under com.apple.UIKit:LayoutLoop(iOS)/com.apple.AppKit:LayoutLoop(macOS).
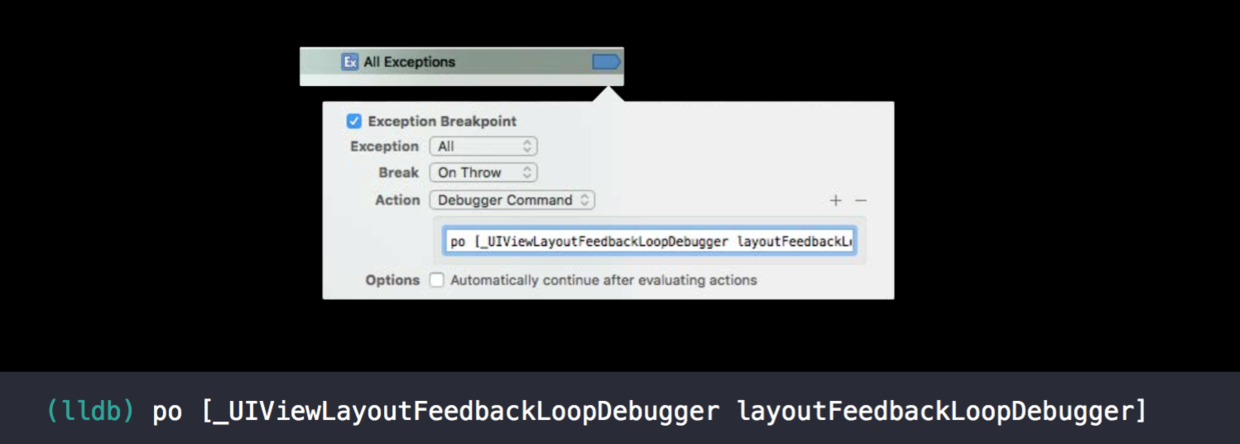
We can also set a global exception breakpoint. In the debugging window, we can also use the LLDB command po to print some debugging information.
Next, let’s look at two practical examples.
#####1.Upstream Geometry Change
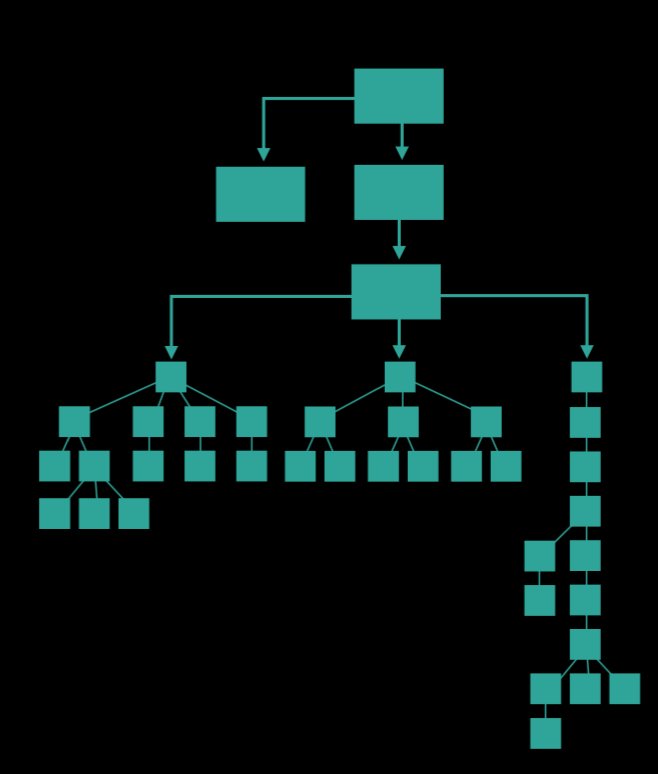
Here we have a number of views, with the hierarchy shown above.
Now, during one hierarchy change, 10 subviews on the right subtree are removed.
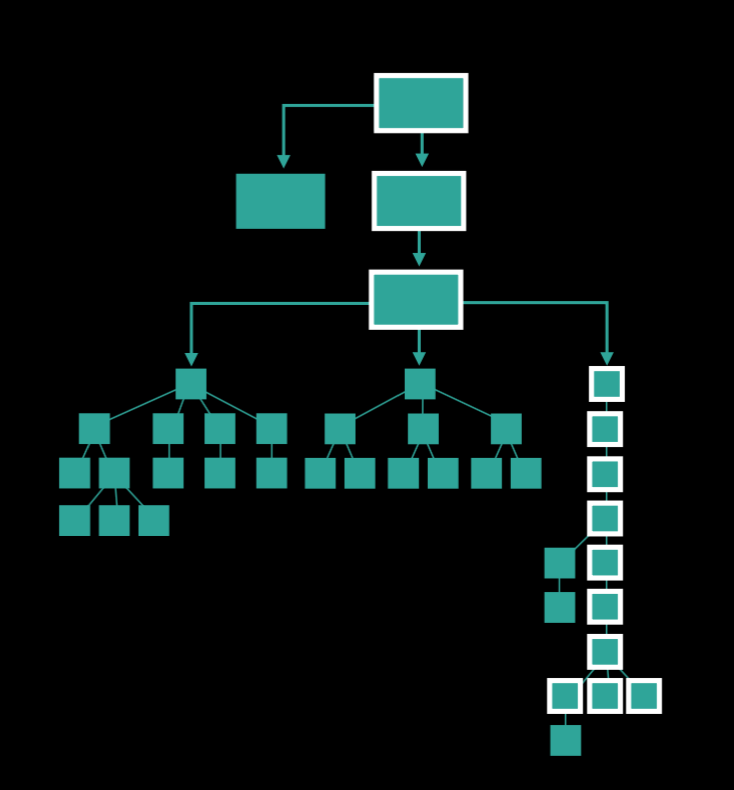
Then the 3 views circled at the top will all be affected. As a result, the bounds of these 3 views change, which implicitly calls setNeedsLayout to obtain the new bounds information.**(After experiments with @kuailejim, @冬瓜争做全栈瓜, and other experts, we found that setNeedsLayout must be called manually by developers; the system does not implicitly call setNeedsLayout when bounds changes.)** The current view’s bounds change, but if the parent view has not completed layout, the parent view will also continue receiving setNeedsLayout messages. This message keeps propagating upward until it reaches the topmost view. After the topmost view finishes layout, it resets the bounds of the associated views below and calls layoutSubview(). At this point, an infinite loop is created.
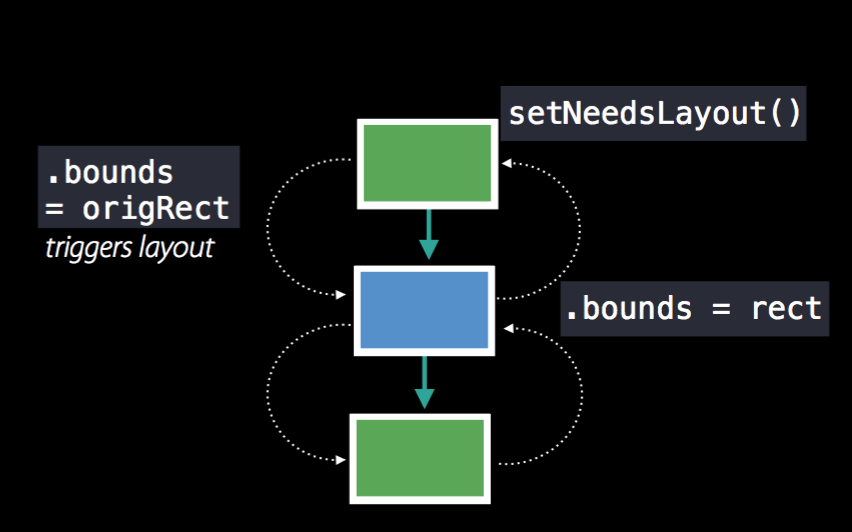
These 3 views are the 3 views above. The lower view needs setNeedsLayout and needs to obtain the latest bounds information; the blue view in the middle also needs setNeedsLayout, which in turn causes the upper view to call setNeedsLayout(). At this point, an infinite loop is created. There are 2 loops, one above and one below, and the shared view is the blue view in the middle. The views inside the loop keep requesting setNeedsLayout() from each other, and after completing their own layout they reset the bounds of the associated views. This forms triggers layout.
Many people were curious about how the 2 loops are produced here, and there was lively discussion about when loops can occur. The scenario we can currently imagine is as follows: in the 3 subtrees above, under certain circumstances, the right subtree is suddenly deleted. Suppose the user’s screen is currently full-screen. Because a large group of views is suddenly removed, the original area becomes blank. At this point, the developer wants to tile the other views across the screen. This requires changing the bounds of the parent view above. The bottommost view manually calls setNeedsLayout() on the blue view above in code and sets the blue view’s bounds to full-screen. Because the blue view’s bounds changes, the developer code then manually calls the parent view of the blue view and asks it to execute setNeedsLayout(). In the top view’s code, bounds = origRect is written again, which triggers layout for the blue view and updates its bounds. This creates a loop. By the same reasoning, a loop also forms below. Thus, 2 infinite loops are created. Thanks to @kuailejim and @冬瓜争做全栈瓜 for their guidance on these conclusions.
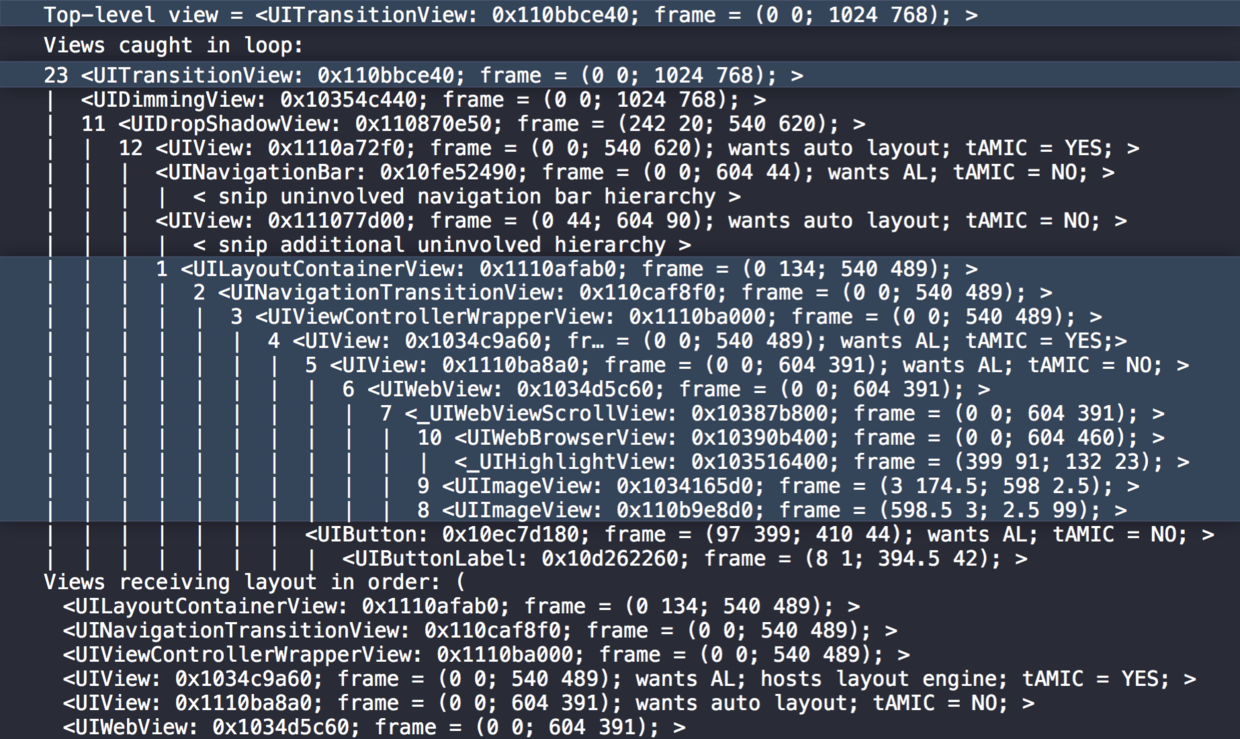
This is the log we collected with the tool. The first line is the top-level view, followed by the recursive process. Looking further down, we see some numbers. These numbers indicate how many times the view received layout, and the numbers are ordered. In one infinite loop, these numbers represent the order during the loop. Of course, within a loop, each view can be either the starting point or the ending point. Here we default to using the top view as the starting point. This lets us see how many views are involved in the infinite loop in total.
From the log, there are 3 views above and 10 views below, which do not add up to 23. Why is that? Let’s continue looking down the log and see what is recorded under “Views receiving layout in order”.
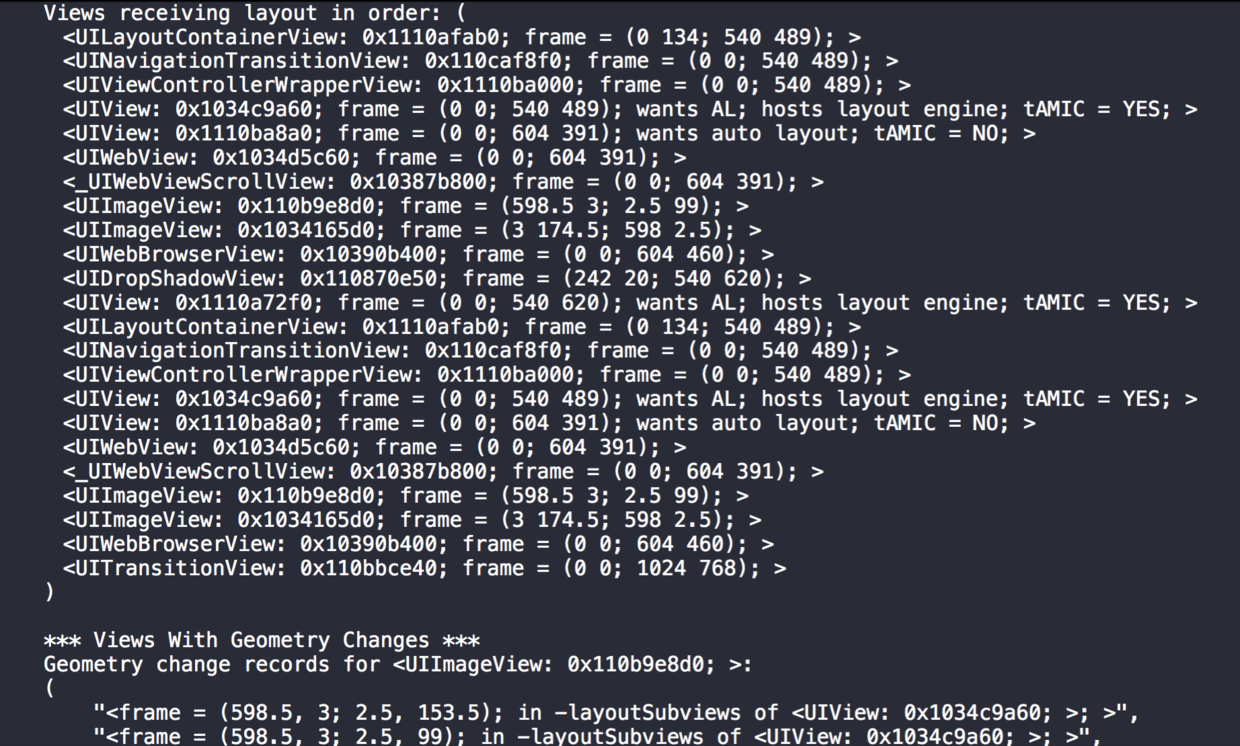
Here we can clearly see the order in which views receive layout: exactly 23 in total. We can also see that, in a single loop, a view may receive layout more than once.
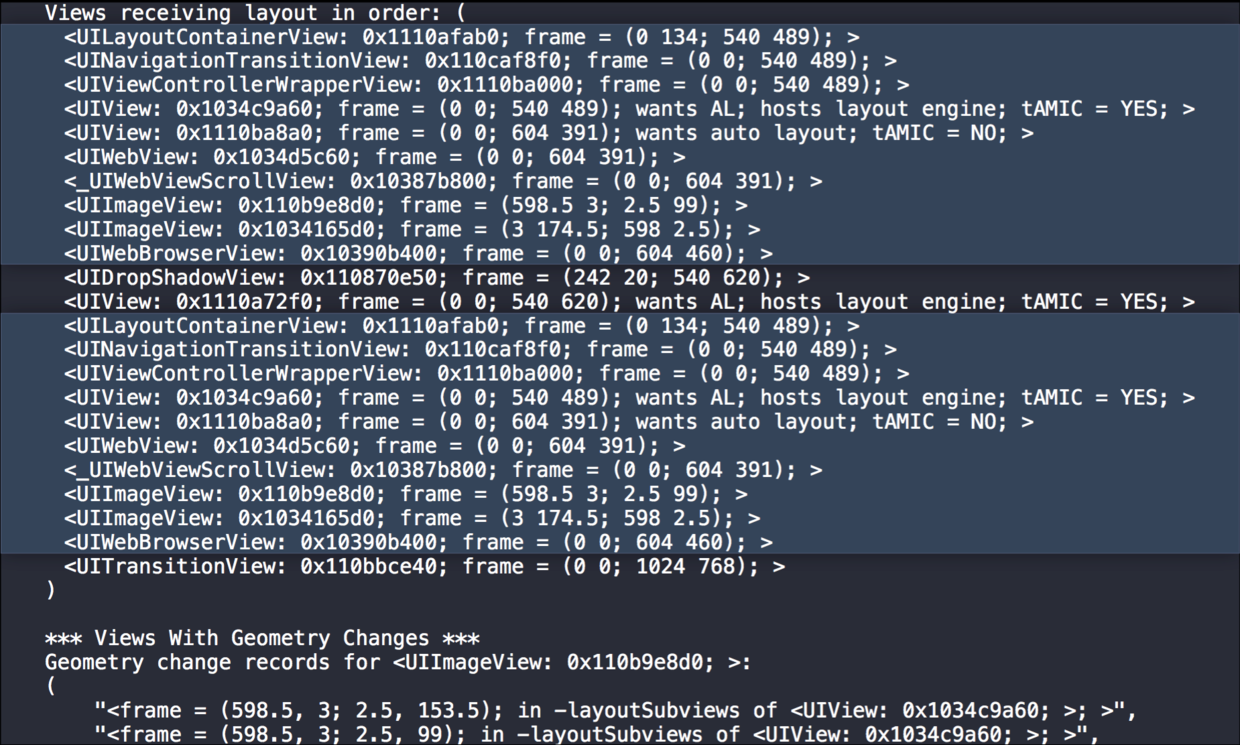
As marked in the figure above, there are 2 segments looping: after 10 views receive layout, there are 2 views, followed immediately by another 10 views, and then 1 view.
Returning to why we used this tool in the first place: initially, we used it to see where the setNeedsLayout message received by the top-level view came from. Continue searching downward until you find the call stack information.
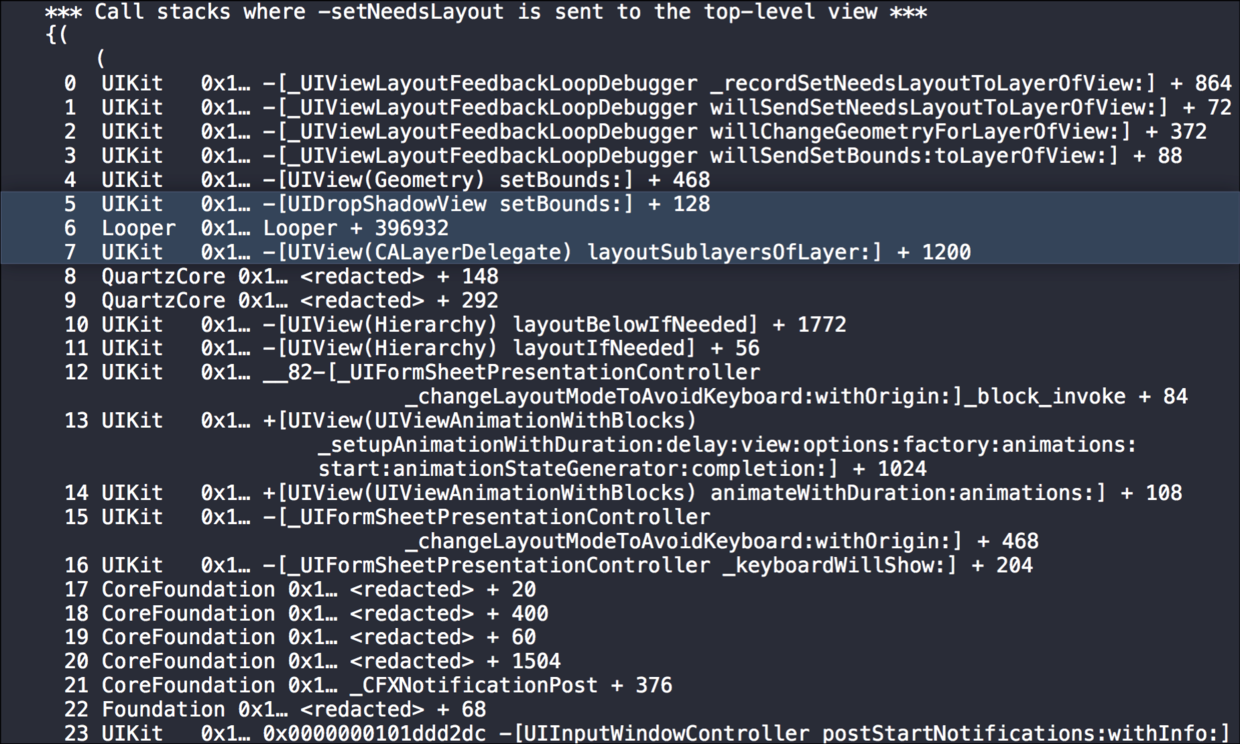
Reading from top to bottom, the first few lines are definitely UIViewLayoutFeedbackLoopDebugging information. Continue downward to line 6, where we can see that DropShadowView received the message and is about to setBounds. Looking back at the earlier hierarchy information, we can see that DropShadowView is a subview of TransitionView.
The only way to cause DropShadowView to trigger setBounds is for its parent view, TransitionView, to trigger setNeedsLayout(). Because at this point TransitionView has not yet laid out.

Returning to “geometry change records”, we can see that the 3 selected lines are repeating over and over. Looking at the 2nd and 3rd lines, we can see that they come from TransitionView’s layout. That is reasonable. Looking at the first line, we find that a subview of TransitionView is calling viewLayoutSubviews at this point.
Now we have located the root cause of the bug. As long as we find a way not to change the superview’s bounds during layout, we can eliminate this infinite loop.
#####2.Ambiguous Layout From Constraints
When we set constraints, we often create some ambiguous constraints. Ambiguous constraints are usually not scary; we only need to make some small adjustments and then update all frames.
However, the following scenario can lead to a loop:
When your view rotates, its constraints change accordingly, and some views’ constraints after rotation conflict with each other. As a result, some constraints form a loop.
Without this debugger tool, this problem is extremely hard to reason about and offers no obvious starting point. This is also why the log puts the top-level view on the first line: it gives us a hint to start looking for the cause of the bug from there.
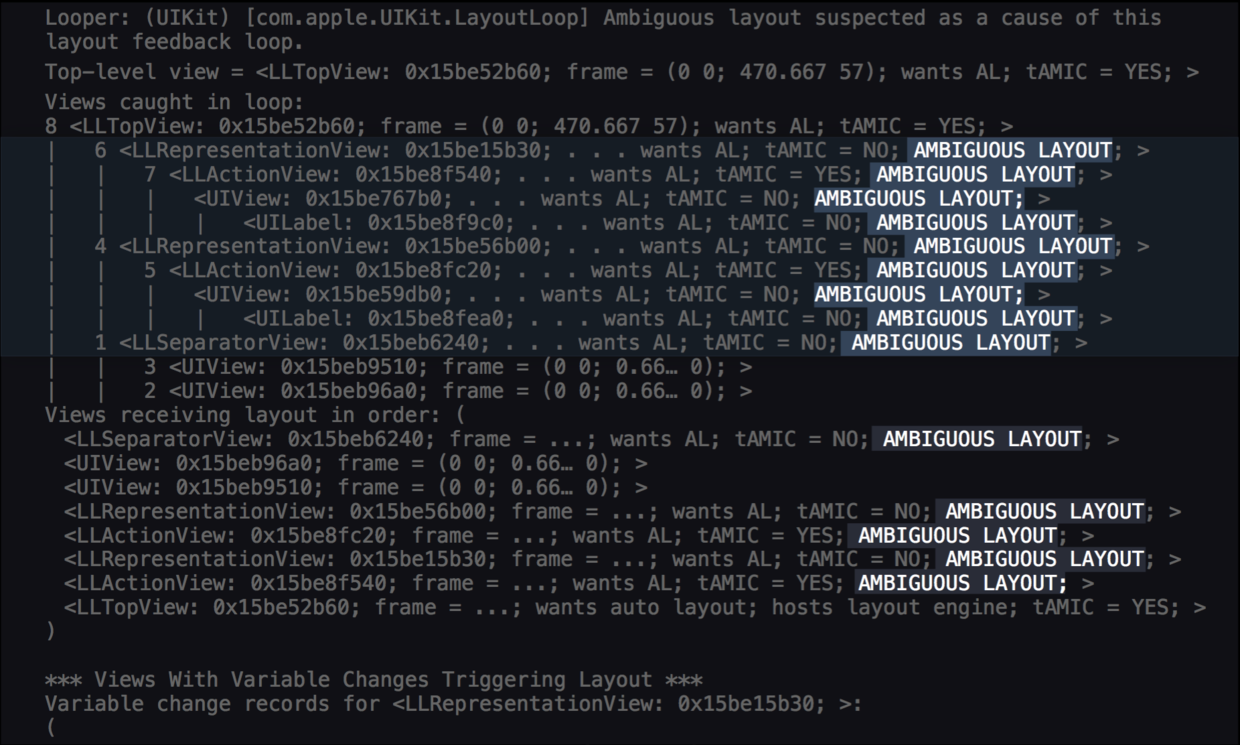
In the log, we will see many instances of “Ambiguous Layout”. Note: tAMIC is short for Translates Auto Resizing Mask into Constraints.
Let’s look at the detailed log. Before reading the log, we should know that although there may be many conflicting constraints, there may be only one constraint that actually causes the conflict. In other words, once we correct one of the constraints, it is very likely that all conflicts will be resolved.
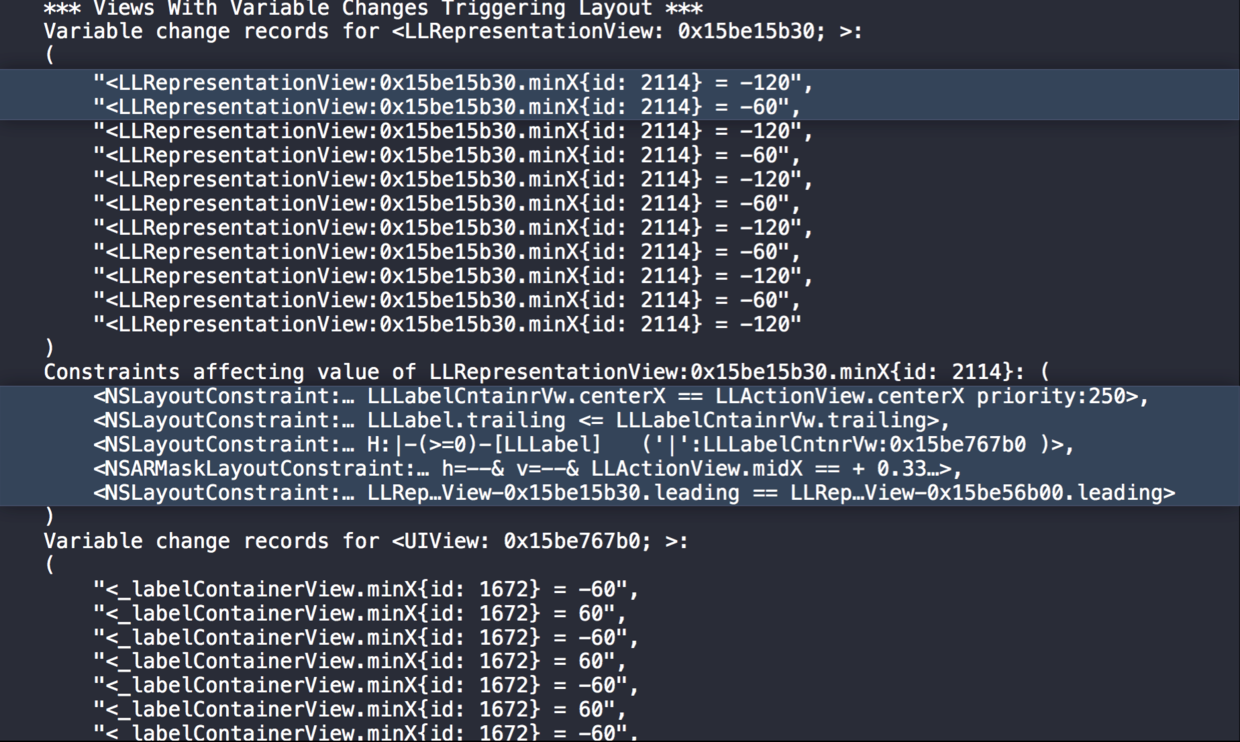
As shown in the log above, at minX we set 2 conflicting constraints: one is -60, and the other is -120. We can inspect the constraints one by one, but this list is very long, so checking it is rather cumbersome.
So let’s analyze this problem with a diagram.
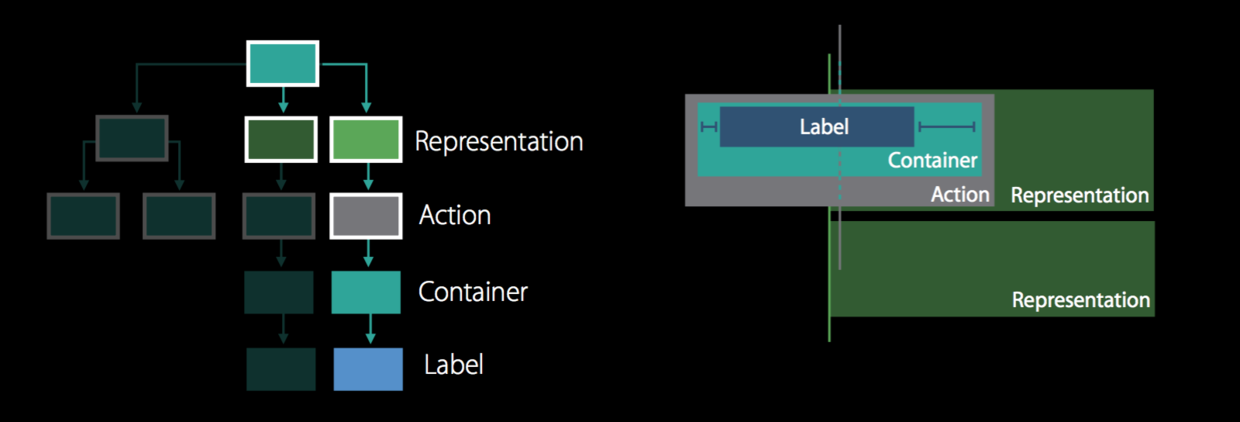
As shown, the label has leading and trailing padding. The label is a subview of container, container is a child of action, and action is a subview of representation. There is a centering constraint between container and action view. action view has autoresizing mask constraints on representation view.
Then each representation view is aligned with the others. From this, it appears that these views do not have enough constraints for all of them to determine their position information. For example, on the X-axis, this chain of views can exist at any position, so ambiguous constraints are produced.
To resolve the ambiguity above
-UIViewLayoutFeedbackLoopDebuggingThreshold 100 // 50...1000
-NSViewLayoutFeedbackLoopDebuggingThreshold 100 // 50...1000
 //Logs to com.apple.UIKit:LayoutLoop or com.apple.AppKit:LayoutLoop
Using the debugger can solve the issues described above.
Summary
Xcode 8’s Auto Layout integrates the previous Autoresizing Masks workflow, allowing the two to be used together. This gives us more options in different scenarios and lets us handle layout issues more flexibly. It also allows us to manually adjust the priority level of constraint warnings.
For layout issues on macOS, it also introduces a new control: NSGridView.
Finally, the new Layout Feedback Loop Debugging tool makes issues that are usually painful to debug much more tractable. With tooling support, we can investigate systematically, quickly locate the problem, and identify the root cause.
Lastly, I welcome your feedback and guidance.
